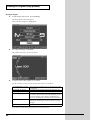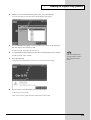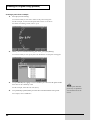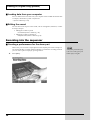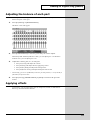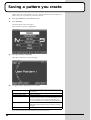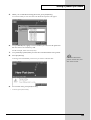
1
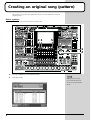
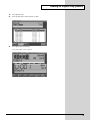
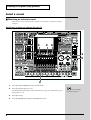
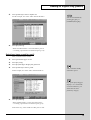
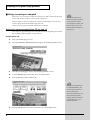
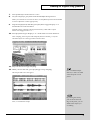
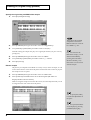
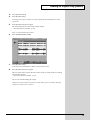
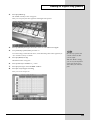
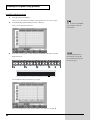
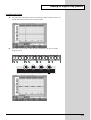
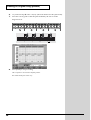
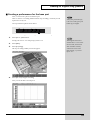
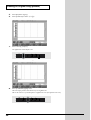
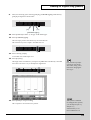
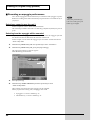
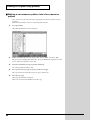
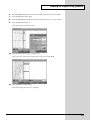
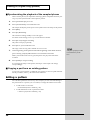
Thank you, and congratulations
on your choice of the Roland
MC-909 Sampling Groovebox.
The MC-909 comes with two
manuals: “Quick Start” and
“Owner’s Manual.” This “Quick
Start” manual will help you to
quickly learn basic operation of
the MC-909.
Quick Start
Completing an original song with the MC-909
Creating an original song (pattern).......................... 2
Select a sound ................................................................................................ 4
Selecting an internal sound.............................................................. 4
Using a sound you sampled ............................................................ 6
Loading data from your computer ............................................... 14
Editing the sound ............................................................................ 14
Recording into the sequencer.................................................................... 14
Creating a performance for the drum part .................................. 14
Creating a performance for the bass part..................................... 19
Recording an arpeggio performance ............................................ 22
Making a one-measure pattern into a four-measure pattern.... 24
Synchronizing the playback of the sampled phrase................... 26
Copying a part from an existing pattern...................................... 26
Editing a pattern ......................................................................................... 26
Adjusting the balance of each part........................................................... 27
Applying effects .......................................................................................... 27
Saving a pattern you create.................................... 28
Mastering.................................................................. 30
Before using this unit,
carefully read the sections
entitled: “IMPORTANT SAFETY
INSTRUCTIONS” (Owner’s
Manual p. 2), “USING THE
UNIT SAFELY” (Owner’s
Manual pp. 3–4), and
“IMPORTANT NOTES”
(Owner’s Manual p. 5). These
sections provide important
information concerning the
proper operation of the unit.
Additionally, in order to feel
assured that you have gained
a good grasp of every feature
provided by your new unit,
Quick Start and Owner’s
Manual should be read in its
entirety. The manual should be
saved and kept on hand as a
convenient reference.
Recording to MD......................................................................................... 31
Producing a CD on your computer.......................................................... 31
Profiles of the pattern creators .............................. 32
■ Convention Used in This Manual
• Words enclosed in square brackets indicate buttons or a dial or a knob or a slider on
the panel.
• (p. **) indicates a reference page.
985
* The explanations in this manual include illustrations that depict what should typically be shown
by the display. Note, however, that your unit may incorporate a newer, enhanced version of the
system (e.g., includes newer sounds), so what you actually see in the display may not always
match what appears in the manual.
202
Copyright © 2002 ROLAND CORPORATION
All rights reserved. No part of this publication may be reproduced in any form without the
written permission of ROLAND CORPORATION.
Creating an original song (pattern)
This section is a step-by-step explanation of how to use the MC-909 to create an
original pattern.
Select a pattern
Let's create an original pattern in user pattern 001.
fig.01
23
5
1
4
1.
Press [PATTERN] to enter Pattern mode.
2.
Press [F1 (List)].
fig.Q1-02
2
When you turn on the
power, the MC-909 will
always start up in Pattern
mode.
Creating an original song (pattern)
3.
Press [F2 (User)].
4.
Turn [VALUE] to select pattern “U:001.”
fig.Q1-02
5.
Press [F6 (Select Pattern)].
User pattern 001 is now selected.
fig.Q1-03
3
Creating an original song (pattern)
Select a sound
■ Selecting an internal sound
Here’s how to select a preset patch / rhythm set as the patch / rhythm set used by
each part.
Selecting a rhythm set (drums) for part 10
fig.02
3
4
6
1
5
2
1.
Press [PATCH/SAMPLE] to enter Patch mode.
2.
Press part button [10] so it’s lit.
If [PART] (SELECT/MUTE) is lit, press the button so it goes out, and then press part
button [10] so it’s lit.
4
3.
Press [F1 (List)].
4.
Press [F4 (Rhythm)] to display the Rhythm Set List.
A rhythm set is already
selected for part 10.
Creating an original song (pattern)
5.
Turn [VALUE] to select a rhythm set.
For this example, let’s select “PR-A: 001 909 TR-909 1.”
fig.Q1-05
6.
You can switch banks by
pressing [F1], [F2], or
[CURSOR (left/right)].
Press [F6 (Select)].
“PR-A: 001 909 TR-909 1” is now selected for part 10.
→ "Creating a performance for the drum part" (p. 14)
Selecting a bass sound for part 2
Next, we’ll select a bass sound.
1.
Press part button [2] so it’s lit.
2.
Press [F1 (List)].
3.
Press [F3 (Patch)] to display the patch list.
4.
Turn [VALUE] to select a patch.
In this example, let’s select “PR-C: 030 SH-101 Bs 2.”
A bass sound is already
selected for part 2.
fig.Q1-04
If you press [F5 (Categ)] to
display a “✔” mark in the
on-screen check box, you
will be able to select
patches by category.
5.
Press [F6 (Select)].
“PR-C: 030 SH-101 Bs 2” is now selected for part 2.
→ "Creating a performance for the bass part" (p. 19)
In the same way, select sounds for other parts as well.
5
Creating an original song (pattern)
■ Using a sound you sampled
Here’s how you can sample a sound (waveform) from a CD or other external audio
source, and use that sample to create a patch / rhythm set.
In this example we will use a CD player connected to the INPUT L/R jacks, and
sample a phrase from the included sample data CD.
Connect your CD player to the MC-909 before you continue.
Selecting a phrase sampled from CD for part 16
To prevent malfunction
and/or damage to speakers
or other devices, always
turn down the volume, and
turn off the power on all
devices before making any
connections.
Let’s sample an approximately four-second phrase from the beginning of track 24 on
the included “SAMPLE SHOW” sample data CD.
Sampling from CD
1.
Press part button [16] so it’s lit.
2.
Press [SAMPLING/RESAMPLING] to display the Sampling Menu screen.
fig.Q1-06
3.
Press [F1 (Sampling)] to display the Sampling Standby screen.
4.
Use [CURSOR (up)] to move the cursor to “Input Select.”
5.
Turn [VALUE] to select “LINE L/R.”
fig.Q1-07
When you set Input Select
to “MICROPHONE,” the
volume of the connected
device will become
extremely loud. Before you
change the Input Select
setting, make sure that the
connected device is not
producing sound.
6.
6
Press [CURSOR (down)] to move the cursor to “Pre Sample Time.”
Creating an original song (pattern)
7.
Turn [VALUE] to set the value to “0 ms.”
8.
On your CD player, play back track 24 and adjust the input level.
While you watch the on-screen level meter, use the [INPUT] knob in the VOLUME
section to adjust the volume appropriately.
9.
Stop the CD playback, and then press [F2 (Auto Trig)] to display a “✔”
mark in the on-screen check box.
With this setting, sampling will begin automatically when audio is input.
Set the Auto Trigger Level to “5.”
10. Press [F3 (Trim Sw)] to display a “✔” mark in the on-screen check box.
After sampling, the start point and end point (Owner’s Manual; p. 115) will
automatically be set to the region that contains sound.
fig.Q1-08
11. Play back the CD to begin sampling.
12. When you hear the click, press [F5 (Stop)] to stop sampling.
The Sample Edit screen will appear.
fig.Q1-09
Next, we will edit the sample.
On the included sample
data CD, a click is recorded
at the end point of each
phrase.
By pressing the velocity
pads located at the front
edge of the panel, you can
audition the sample you
are editing.
7
Creating an original song (pattern)
Specify the original key and BPM of the sample
1.
Press [F2 (Sample Param)].
fig.Q1-10
The jacket of the included
sample data CD lists the
BPM of each track. Track 24
2.
Press [CURSOR (down)] to move the cursor to “Original Key.”
3.
Use [VALUE] or [INC/DEC] to set the value to “60 (C4).”
With this setting, the sample will play at its original pitch when you press velocity
pad [2] (C4).
4.
Press [CURSOR (down)] to move the cursor to “BPM.”
5.
Use [VALUE] or [INC/DEC] to set the value to “ = 125.00.”
6.
Press [F6 (Close)].
Edit the sample
has a BPM of = 125.
If you do not know the
BPM of the sample, you can
determine the BPM by
pressing the TAP button
(Owner's Manual; p. 25)
three times or more in time
with the sample.
The phrase you sampled can be edited in a variety of ways. In this example, we will
remove the click noise at the end of the phrase and maximize the volume to prepare
the sample for use in a patch.
1.
Press [CURSOR (down)] to move the cursor to “End Point.”
2.
Turn [VALUE] toward the left to move the end point (the letter “E”
displayed above the waveform).
While viewing the sample waveform in the screen, move the end point until you can
no longer hear the click at the end of the phrase.
fig.Q1-11
You can press [INC/DEC]
to make fine adjustments to
the point.
You can expand/shrink the
screen display by pressing
[CURSOR (left/right)].
8
Creating an original song (pattern)
3.
Press [F4 (Truncate)].
4.
Press [F6 (Execute)].
A message will ask you whether it is OK to delete the unwanted portions of the
waveform.
5.
Press [F6 (Execute)] once again.
The unwanted portions of the sample will be deleted.
→ Truncate (Owner’s Manual; p. 117)
Next, we will maximize the volume.
6.
Press [NORMALIZE/AMP].
fig.Q1-12
7.
Press [F6 (Execute)].
A message will ask whether it is OK to maximize the volume.
8.
Press [F6 (Execute)] once again.
The level of the entire sample will be boosted as much as possible without exceeding
the maximum volume.
→ Normalize (Owner’s Manual; p. 121)
We are now finished editing the sample.
Samples you create will be lost when you turn off the power. In order to keep the
sample, you must save it as follows.
9
Creating an original song (pattern)
Saving a sample
1.
In the Sample Edit screen, press [WRITE].
The Write Menu screen will appear.
Make sure that “Sample” is highlighted.
fig.Q1-13
2.
Press [F6 (Sample)] or [ENTER].
The sample name entry screen will appear.
fig.Q1-14
3.
Assign a name to the sample you created.
For this example, we will save the sample with a name of “Gtr & Pf.”
[CURSOR (left/right)]
[CURSOR up/down]
[VALUE] [INC/DEC]
[F1 (Change Type)]
[F2 (Delete)]
[F3 (Insert)]
*
10
Moves the cursor (the location at which to enter/edit
a character).
Switches letters between uppercase and lowercase.
Selects characters.
Selects the type of character.
Each time you press this, you will alternately select
the first character of the uppercase alphabet (A),
lowercase alphabet (a), or numerals and symbols (0).
Deletes the character at the cursor location, while
shifting the following characters to the left, closing
the gap.
Inserts a space at the cursor location.
If you decide to cancel while entering the name, press [F5 (Cancel)].
Creating an original song (pattern)
4.
When you have finished entering the name, press [F6 (Write)].
A screen in which you can select the write destination will appear.
fig.Q1-15
5.
Use [CURSOR (left/right)] to select whether you will save the sample in
the user area or on a memory card.
For this example, select the user area (User).
6.
Use [VALUE] or [INC/DEC] to select the write-destination user sample.
For this example, select “U0001.”
7.
Press [F6 (Write)].
A message will ask whether you are sure you want to save the sample.
If the write-destination
sample already contains
data, that data will be
erased.
fig.Q1-16
8.
*
If you want to save the sample, press [F6 (Execute)].
To cancel, press [F5 (Cancel)].
Next we will create a patch from the sample that we just saved.
11
Creating an original song (pattern)
Creating a patch from a sample
1.
Press [F5 (Create Patch)].
A screen in which you can enter a name for the patch will appear.
For this example, we will save the patch with a name of “Gtr & Pf.”
For details on entering a name, refer to p. 10.
fig.Q1-17
2.
When you have finished entering the name, press [F6 (Write)].
A screen in which you can specify the write-destination for the patch will appear.
fig.Q1-18
3.
Use [CURSOR (left/right)] to select whether you will save the patch in the
user area or on a memory card.
For this example, select the user area (User).
4.
Use [VALUE] or [INC/DEC] to select the write-destination user patch.
For example, select “USER:001.”
12
The user patch data that
previously occupied that
write destination will be
erased.
Creating an original song (pattern)
5.
Press [F6 (Write)].
A message will ask you to confirm that it is OK to write the data.
fig.Q1-19
6.
Press [F6 (Execute)].
Now the sample can be used as user patch “U:001.”
The screen will ask you whether you want the newly created user patch 001 to be
assigned to the currently selected part (part 16).
7.
Press [F6 (Execute)].
User patch 001 is now selected for part 16.
The Patch Edit (Owner’s Manual; p. 54) screen will appear.
8.
Press [EXIT].
You will return to the top screen of Patch mode.
→ "Synchronizing the playback of the sampled phrase" (p. 26)
Selecting a rhythm set created by chopping a sample for part 10
You can use the Auto Chop operation to divide a sampled rhythm pattern into
multiple samples at divisions of the beat, and use these samples as the instruments
(rhythm tones) of a rhythm set.
→ Auto Chop (Owner’s Manual; p. 118)
→ Create Rhythm (Owner’s Manual; p. 119)
13
Creating an original song (pattern)
■ Loading data from your computer
WAV or AIFF format wave files from your computer can be loaded into the MC-909
as samples, and used in a patch or rhythm set.
→ (Owner’s Manual p. 132)
■ Editing the sound
You can edit various aspects of the sound, such as its brightness, thickness, volume
envelope, and pan.
• Editing the sound of a patch
→ Patch Edit (Owner’s Manual; p. 54)
• Editing the sound of a rhythm set
→ Rhythm Edit (Owner’s Manual; p. 70)
Recording into the sequencer
■ Creating a performance for the drum part
Here’s how you can create a simple phrase for the rhythm part. In this example we
will use the TR-REC recording method. TR-REC is a method of recording in which
you can create a phrase simply by pressing buttons.
1.
Press [REC].
fig.Q2-01
14
Verify that part button [10]
is lit. If it is unlit, press part
button [10] so it lights.
Creating an original song (pattern)
2.
Press [F2 (TR-Rec)].
The TR-REC standby screen will appear.
Here you can specify the time signature and length of the pattern.
fig.Q2-02
3.
Press [CURSOR (down)] to move the cursor to “Rec Measure Length.”
4.
Use [VALUE] or [INC/DEC] to select “1.”
Leave the settings at their default values, with a Rec Beat (pattern time signature) of
“4/4” and Rec Velocity of “REAL.”
5.
Press [F6 (BPM/Click)].
The BPM window will appear.
6.
Turn [VALUE] to set BPM to = 140.0.
7.
Press [F6 (Close)] to close the BPM window.
8.
Press [PLAY] to begin recording.
Rec Velocity specifies the
volume of the notes that
you will input.
With the “REAL” setting,
you can vary the dynamics
of the notes by the force
with which you strike the
pads.
Now you can record part 10.
fig.Q2-02a
15
Creating an original song (pattern)
Inputting the kick drum
1.
Press [F3 (Note Number)].
Now you can select the note number of the rhythm tone you want to input.
2.
Use [VALUE] or [INC/DEC] to select “60 (C4).”
Now you can input the kick drum.
fig.Q2-03
3.
Press the velocity pads so that the pads marked by the arrows in the
diagram are lit.
fig.TRrec1
The screen display will be as follows.
You should hear the kick drum that you input.
fig.Q2-04
Next, we will input the hi-hat. The procedure is the same as in steps 1–3.
16
You can also use [CURSOR
(up/down)] to select the
note number.
You can add dynamics to
the sound by varying the
force with which you press
the velocity pad.
Creating an original song (pattern)
Inputting the hi-hat
4.
Press [F3 (Note Number)], and use [VALUE] or [INC/DEC] to select “70
(A#4)” (the note number for the closed hi-hat).
fig.Q2-05
5.
Press the velocity pads so that the pads marked by the arrows in the
diagram are lit.
fig.TRrec2
fig.Q2-06
17
Creating an original song (pattern)
6.
As you did in step 4, select “72 (C5)” (the note number for the open hi-hat).
7.
Press the velocity pads so that the pads marked by the arrows in the
diagram are lit.
fig.TRrec3
fig.Q2-07
8.
Press [STOP] to stop recording.
This completes a one-measure rhythm pattern.
Record the drum part in this way.
18
Creating an original song (pattern)
■ Creating a performance for the bass part
Next, we will create a phrase for the bass part.
Here we will use a recording method called “step recording,” in which you will
input notes one by one.
Let’s input the bass phrase shown below.
Verify that part button [2]
is lit. If it is unlit, press part
button [2] so it lights.
fig.StepRec0
We will shift the range of the velocity pads down to the bass range.
1.
Press [OCT -] three times.
Pad [2] will now be “C1” and pad [11] will be “A1.”
2.
Press [REC].
3.
Press [F3 (Step)].
The step recording standby screen will appear.
fig.Q2-08
4.
Although the first note is
written here as “A2” on the
musical staff, electric bass
and contrabass actually
sound one octave lower
than written, so you will
input “A1.”
Press [PLAY] to begin recording.
Now you will be able to record part 2.
fig.Q2-09
19
Creating an original song (pattern)
5.
Press [F4 (Note Type)].
6.
Turn [VALUE] to select “1/8 ().”
fig.Q2-10
7.
Press velocity pad [11].
An eighth note will be input at A1.
fig.StepRec1
The screen will show the following.
fig.Q2-11
8.
Press [CURSOR (right)] twice.
The note input position will advance by two eighth notes.
This is the same as if you had input two eighth-note rests (one quarter-note rest).
fig.StepRec2
20
Creating an original song (pattern)
9.
Next, successively press velocity pad [11], [CURSOR (right)], and velocity
pad [11] to input two more notes.
fig.StepRec3.e
[11]
[11]
[CURSOR (right)]
10. Turn [VALUE] to select “1/16 ()” as the Note Type.
11. Press [CURSOR (right)].
The note input position will advance by one sixteenth note.
This means that you have input a sixteenth-note rest.
fig.StepRec4
12. Press velocity pad [6].
A sixteenth note will be input at E1.
13. Press [F3 (Tie)].
The length of the sixteenth note you input in step 12 will be extended by a sixteenth
note. This is the same as if you had input an eighth note.
fig.StepRec5
If you need to input just
one longer note among
short notes, using a tie is
faster than changing the
Note Type.
fig.Q2-12
14. Press [STOP] to stop recording.
This completes a one-measure bass pattern.
After you have finished
recording the bass pattern,
you should press [OCT -]
and [OCT +]
simultaneously to set
Octave Shift back to 0.
21
Creating an original song (pattern)
■ Recording an arpeggio performance
Let’s use the arpeggiator and chord memory to realtime-record arpeggios on part 3.
Realtime recording is the method in which your performance is recorded exactly as
you play it.
Selecting a sound to use for part 3
In this example let’s select “PR-A: 003 JP OctAttack.”
The selection procedure is the same as in "Selecting a rhythm set (drums) for part 10"
(p. 4).
Selecting how the arpeggio will be sounded
To specify how the arpeggio will be sounded, we will select the arpeggio style and
the chord form that will determine the structure of the chord.
In this example, we will select the arpeggio style “Preset071” and the chord form
“P038: G Maj add9.”
1.
Hold down [ARPEGGIO] and turn [VALUE] to select “Preset071.”
2.
Hold down [ARPEGGIO] and press [F6 (Arp Setting)].
The arpeggiator settings screen will appear.
Make the settings shown below.
fig.Q2-13
3.
Press [F5 (Close)].
4.
Hold down [CHORD MEMORY] and turn [VALUE] to select
“P038: G Maj add9.”
These settings will specify how the arpeggio will be sounded.
When you press the velocity pads, an arpeggio will sound.
• Arpeggiator → Owner’s Manual; p. 30
• Chord Memory → Owner’s Manual; p. 32
22
Verify that part button [3]
is lit. If it is unlit, press part
button [3] so it lights.
Creating an original song (pattern)
Recording
1.
Press [PATTERN] to enter Pattern mode.
2.
Press [REC].
3.
Press [F1 (Realtime)].
The realtime recording standby screen will appear.
For details on the settings, refer to p. 37 in the Owner’s Manual.
fig.Q2-14
4.
Press [PLAY] to begin recording.
The pattern will play back repeatedly.
5.
Press velocity pad [4] at the beginning of the pattern, and continue holding
it down until the pattern ends.
The arpeggio will play while you continue holding down the velocity pad, and will
be recorded.
6.
Press [STOP] to stop recording.
When you have finished
recording, press
[ARPEGGIO] and [CHORD
MEMORY] so the
indicators are extinguished.
About the key for Chord Memory
When you press velocity pad [2], Chord Memory will sound a chord at the registered
key (for preset 038, this will be “G Maj add9”).
Here we will press pad [4] to play an “A Maj add9” chord (arpeggio) to match the
key of the bass part.
Next, we will create a four-measure pattern based on this one-measure pattern.
23
Creating an original song (pattern)
■ Making a one-measure pattern into a four-measure
pattern
Let’s create a four-measure pattern by copying the one-measure pattern you just
recorded.
Make sure that pattern “U:001” is selected in Pattern mode.
1.
Press [F2 (Edit)].
The Pattern Edit Menu screen will appear.
fig.Q2-15
2.
Make sure that both “Source From” and “Source End” are set to “001.”
If they are set to anything other than “001”, press [CURSOR (left/right)] to move the
cursor, and turn [VALUE] to select “001.”
3.
Hold down [SHIFT] and press [PART ASSIGN].
All of the part buttons will go dark.
4.
Press part buttons [2], [3], and [10] to make them light.
The copy will be executed only for part 2, part 3, and part 10.
5.
Press [F2 (Copy)].
The Copy sub-window will appear.
Here you can specify the destination for the copy.
24
Creating an original song (pattern)
6.
Press [CURSOR (down)] several times to move the cursor to “Dest Meas.”
7.
Turn [VALUE] to select “002.”
8.
Press [CURSOR (down)] several times to move the cursor to “Copy Times.”
9.
Turn [VALUE] to select “3.”
The pattern will be copied three times.
fig.Q2-16
10. Press [F6 (Execute)] to carry out the copy.
The performance of the first measure will be copied to measures 2–4.
fig.Q2-17
11. Press [EXIT] to finish editing.
The four-measure pattern is now completed.
25
Creating an original song (pattern)
■ Synchronizing the playback of the sampled phrase
Here’s how the phrase you sampled in "Selecting a phrase sampled from CD for part
16" (p. 6) can be synchronized to the sequencer pattern.
1.
Press part button [16] so it’s lit.
2.
Press [AUTO SYNC] so its indicator is lit.
The sample used by the patch of part 16 will synchronize to the tempo of the pattern.
3.
Press [REC].
4.
Press [F1 (Realtime)].
The realtime-recording standby screen will appear.
For details on the settings, refer to p. 37 in the Owner’s Manual.
5.
Press [PLAY] to begin recording.
The pattern will play repeatedly.
6.
Press [OCT -] so its indicator is lit.
The range of the velocity pads is shifted one octave lower.
7.
At the beginning of the pattern and at the beginning of the third measure,
press velocity pad [10] and hold it for two measures each time.
While you hold down the velocity pad, the phrase will play back and will be
recorded.
8.
Press [STOP] to stop recording.
If you change the tempo of the pattern, the tempo of the sample will change
correspondingly.
■ Copying a part from an existing pattern
A part from a preset pattern or a different user pattern can also be copied and used.
For the procedure, refer to p. 44 in the Owner’s Manual.
Editing a pattern
You can edit a pattern in various ways. For example, you can correct the timing of
the performance in a pattern you’ve recorded, or change the number of measures.
• To edit in units of a measure
→ Pattern Edit (Owner’s Manual; p. 43)
• To edit individual events of performance data
→ Microscope (Owner’s Manual; p. 47)
26
You press pad [10] in order
to match the key of the
bass.
Creating an original song (pattern)
Adjusting the balance of each part
Use the part mixer (the eight sliders in the center of the panel) to adjust the volume
balance and pan of each part.
1.
Press [F3 (Mixer)] or [MIXER ASSIGN].
The Mixer screen will appear.
fig.Mixer
2.
Press [PART ASSIGN] to select the parts that you want to adjust.
When the [PART ASSIGN] indicator is dark, you can adjust parts 1–8. When the
indicator is lit, you can adjust parts 9–16.
3.
Adjust the volume, pan, etc., of each part.
•
•
•
•
*
4.
Press [F1 (Level)] and adjust the volume.
Press [F2 (Pan)] and adjust the left/right pan position.
Press [F3 (Key Shift)] and adjust the transposition.
Press [F4 (Reverb Level)] and adjust the depth of the reverb.
Alternatively, you can use [CURSOR] to select the part and parameter, or use [VALUE] or
[INC/DEC] to adjust the value.
Press [F6 (Close)], [MIXER ASSIGN] or [EXIT] to return to the previous
screen.
Applying effects
As necessary, you can apply effects such as compressor, reverb, or multi-effects.
Refer to p. 88 in the Owner’s Manual.
27
Saving a pattern you create
Pattern data you create will be lost if you re-select the pattern or turn off the power.
Here’s how to save your data if you want to keep it.
1.
Press [PATTERN] to enter Pattern mode.
2.
Press [WRITE].
The Write Menu screen will appear.
Make sure that “Pattern” is highlighted.
fig.Q3-01
3.
Press [F1 (PTN)] or [ENTER].
The pattern name entry screen will appear.
fig.Q3-02
4.
Assign a name to the pattern you created.
[CURSOR (left/right)]
[CURSOR up/down]
[VALUE] [INC/DEC]
[F1 (Change Type)]
[F2 (Delete)]
[F3 (Insert)]
*
28
Moves the cursor (the location at which to enter/edit
a character).
Switches letters between uppercase and lowercase.
Selects characters.
Selects the type of character.
Each time you press this, you will alternately select
the first character of the uppercase alphabet (A),
lowercase alphabet (a), or numerals and symbols (0).
Deletes the character at the cursor location, while
shifting the following characters to the left, closing
the gap.
Inserts a space at the cursor location.
If you decide to cancel while entering the name, press [F5 (Cancel)].
Saving a pattern you create
5.
When you are finished entering the name, press [F6 (Write)].
A screen in which you can select the write-destination pattern will appear.
fig.Q3-03
6.
Use [CURSOR (left/right)] to select whether you will save the pattern in
the user area or on a memory card.
For this example, select user area (User).
7.
Use [VALUE] or [INC/DEC] to select the write-destination user pattern.
8.
Press [F6 (Write)].
A message will ask whether you are sure you want to write the data.
fig.Q3-04
9.
*
If the write-destination
pattern contains data, that
data will be erased.
To write the data, press [F6 (Execute)].
To cancel, press [F5 (Cancel)].
29
Mastering
The MC-909 provides a compressor (mastering effect) that splits the sound into high,
mid, and low-frequency bands and makes the volume of each band more consistent.
When mixing down to MD or DAT, or when using a CD-R disc to produce your own
original audio CD, this lets you master at an optimized level.
Switching the mastering effect on/off
1.
In the MASTERING section, press [ON].
Each time you press this button, the mastering effect will be switched on (indicator
lit), or off (indicator extinguished).
Selecting a preset setting
The mastering effect provides three settings suitable for different styles.
1.
Press [F5 (Mastering)].
The mastering effect setting screen will appear.
fig.Q4-01
2.
One by one, press [F1 (Techno)] through [F3 (Break Beats)].
Settings appropriate for the selected style will be applied.
Listen to the differences between these settings.
• Mastering effect → Owner’s Manual; p. 108
Mastering can be done either by recording on a device that is connected to the MC909, or by converting the data to a WAV/AIFF file and sending it via USB to your
computer, where the file can be burned to CD-R.
You can vary the playback of the pattern you create by switching muting on/off or
using realtime modify to vary the playback during mastering, or you can create a
song for mastering.
30
Mastering
Recording to MD
Analog recording
Connect your MD recorder to the MIX OUTPUT jack, and perform the mixdown.
Digital recording
Connect your MD recorder to the digital out connector, and perform the mixdown.
Producing a CD on your computer
The original song you created can be resampled into a stereo sound file (WAV/
AIFF). This file can then be transferred to your computer via USB or by using a card
reader, and burned onto a CD-R disc to produce an audio CD.
• Resampling → Owner’s Manual; p. 112
• File utility → Owner’s Manual; p. 134
• USB → Owner’s Manual; p. 135
31
Profiles of the pattern creators
Nick Tidy
Nick is a free-lance electronic music composer. More specifically,
he's a dance music composer / producer / remixer commissioned
by clients to compose electronic music in the desired style and
genre.
Hans-Joerg Scheffler
Born and raised in the Ruhrvalley, one of the largest industrial
areas of europe, Hans interest in noise and rhythm came quite
naturally. Today he runs his own company Digital Audio Design
and creates patches and patterns for Roland Synthesizers and
Grooveboxes.
http://www.digitalaudiodesign.net/
Heigo Tani (wall5/Co-Fusion)
Active with the leading Japanese techno DJ “DJ WADA” as the
techno unit “Co-Fusion.” Has released albums from Sublime
Records.
Q'HEY
Heads the “MOON AGE RECORDINGS” label, and “REBOOT”
parties at Aoyama Maniac Love. Started DJ activities in 1989, and
continues to this day as a leader on the Tokyo techno scene. Active
on the cutting edge in Japan as well as in Asia and Europe.
Indispensable as a DJ for big parties and festivals, he continues to
win the support of numerous fans. Also created the internal presets
and patterns of the MC-505. Active as an equipment reviewer and
writer for music and instrument publications.
NEURON (Kouichi Ohkama)
Started his activities in ‘92 as a unit named “Electric Bodybeat/
Industrial,” and debuted in ‘97 with “Public House Record” from
the UK label NU-NRG. Active as a NU-NRG/Hard Trance artist in
Japan and abroad, producing tracks and performing live. Currently
pursuing unique sounds with a more heavily psychedelic flavor.
Masa
Japanese psychedelic trance originator with numerous releases
from trance labels around the world since the early ‘90s.
Has collaborated extensively with Japanese and foreign trance
artists, such as Mike Maguire and Xavier Morel, and has an
enormous influence particularly on the Japanese underground
scene. Since ‘98, has been broadening his activities as a member of
the psychedelic trance band Kinocosmo, and in ‘02 started the
HYPNODISK label. His current and future activities continue to be
a focus of attention.
B.U.S/aka/BeatPerLove
Influenced by NY GARAGE, UK Balearic of about ‘92, and early
trance.
Produced DJ YO*C’s solo album, and has produced numerous
remixes and originals for top Japanese DJs such as DJ Shinkawa
and DJ19. Another strength is garage-style vocal songs which he
provides to artists. Most recently, formed a unit named
BeatPerLove, and devotedly continues his underground activities.
Shinichiro Murayama
A leading creator/producer on the Japanese music scene.
Skilled at dance music, particularly groove-heavy R&B. Has
produced numerous hit songs in collaboration with many Japanese
top artists.
Handles not only composition, arranging, and programming, but
engineering as well.
Kazuhiko Maeda
Composer/Arranger/Producer
Active in CD production and as a song producer since the early
‘90s, with numerous releases and a solo album. Operates a music
production company named Kent in his own studio, and has
produced demo songs and patterns for Roland sound modules and
groove boxes. Possesses a wide-ranging musicality, and is admired
for the distinctive sonic world he systematically constructs from
harmonies and grooves.
Cappadocia Productions
Electronic sound aficionado residing in Japan. Also active as an art
performance unit named GIGAHERTZ. Has been involved in
product development for other models in Roland’s series of groove
gear.
Naoki Matsuura
Took up the bass while in middle school. Entered Berklee College
of Music. While studying there, he participated in “Tiger’s Baku,”
led by Tiger Okoshi. Has also played with numerous musicians
such as Tommy Campbell, Paquito de Rivera, and Toninho Horta
(and with Japanese musicians such as Masahiko Oosaka, Masaaki
Imaizumi, Carlos Kanno, and Yoshihiko Yoshitori).
After returning to Japan, he was employed by a musical instrument
manufacturer, but later left to establish his own music production
company, Presto (Ltd.). Composes and produces various types of
music for commercial purposes. Currently pursuing a dual path as
a creator and bassist.
Kunihiro Ueno
• GROOVE COMPETITION JAPAN 2000 grand prix
• GROOVE COMPETITION JAPAN 2001 grand prix runner-up
Composer who loves electronic music, ethnic music, and
traditional Japanese music. Also active in live and DJ performance
in the Tokyo area.
Devoted himself to techno in the early ‘90s, pursued drum’n’bass
in the mid-’90s, and currently continues his musical activities,
seeking points of contact between world music and ancient
Japanese music.
Has a diverse work portfolio that ranges from radio jingles and
games to anime sound tracks.
grogman (Junichi Oguro)
• GROOVE COMPETITION JAPAN 2000 grand prix runner-up
• GROOVE COMPETITION JAPAN 2001 grand prix
• Techno artist/Remixer/Producer
Heads the Sapporo-based techno label “aerostitch,” which has a
Total Techno concept. Active in a wide and open-ended range of
music, including club tracks and production, as well as live
performances both in Japan and abroad.
http://www.aerostitch.net
Daishiro Minami
• GROOVE COMPETITION JAPAN 2001 finalist
With the MC-505 as his main machine, produces tracks mainly in
techno/minimal styles. Also presents techno live events utilizing
groove gear. Says that he will never forget the chance he had to
perform at the groove competition. Wants to pass on the
excitement and possibilities of techno and groove gear to children
through these activities.
http://www.geocities.co.jp/MusicHall/4058/
Takatoshi Nishibu
• GROOVE COMPETITION JAPAN 2001 finalist
His initial music production efforts consisted of mechanically steprecording into a desktop music system, but then he met the MC505 and experienced the enjoyment of manipulating sounds and
phrases intuitively, in real time. Wants to continue producing
good-sounding electronic compositions that are not limited by
preconceptions of genre. Recently involved with background
music for exhibition videos.
http://sound.jp/tnsb/
03126701
’02-12-A3-21N