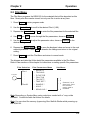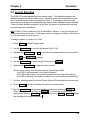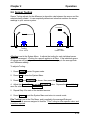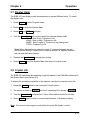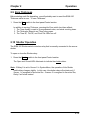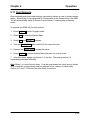
1
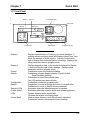
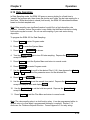
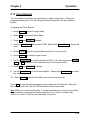
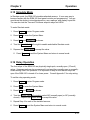
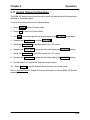
SQM-160 Rate/Thickness Monitor User’s Guide Version 4.09 Safety Information Read this manual before installing, operating, or servicing this equipment. Do not install substitute parts, or perform any unauthorized modification of the product. Return the product to Sigma Instruments…Now part of INFICON for service and repair to ensure that safety features are maintained. Safety Symbols W ARNING: Calls attention to a procedure, practice, or condition that could possibly cause bodily injury or death. CAUTION: Calls attention to a procedure, practice, or condition that could possibly cause damage to equipment or permanent loss of data. Refer to all manual Warning or Caution information before using this product to avoid personal injury or equipment damage. Hazardous voltages may be present. Earth ground symbol. Chassis ground symbol. Equipotential ground symbol. Warranty Information This INFICON product is warranted against defects in material and workmanship for a period of two (2) years from the date of shipment, when used in accordance with the instructions in this manual. During the warranty period, INFICON will, at its option, either repair or replace products that prove to be defective. Limitation of Warranty Defects from, or repairs necessitated by misuse or alteration of the product, or any cause other than defective materials or workmanship are not covered by this warranty. NO OTHER WARRANTIES ARE EXPRESSED OR IMPLIED, INCLUDING BUT NOT LIMITED TO THE IMPLIED WARRANTIES OF MERCHANTABILITY AND FITNESS FOR A PARTICULAR PURPOSE. UNDER NO CIRCUMSTANCES SHALL INFICON BE LIABLE FOR CONSEQUENTIAL OR OTHER DAMAGES RESULTING FROM A BREACH OF THIS LIMITED WARRANTY, OR OTHERWISE. Table of Contents Chapter 1 Quick Start Chapter 2 Operation Chapter 3 Options 1.0 1.1 1.2 1.3 1.4 1.5 1.6 Introduction .....................................................................................................1-1 Installation........................................................................................................1-1 Front Panel.......................................................................................................1-2 Rear Panel .......................................................................................................1-3 System Connections ........................................................................................1-4 Film Setup........................................................................................................1-5 Depositing a Film..............................................................................................1-6 2.0 Introduction ......................................................................................................2-1 2.1 Menu Selection ................................................................................................2-1 2.2 Film Menu ........................................................................................................2-2 2.3 System Menu ...................................................................................................2-4 2.4 Sensor Selection ..............................................................................................2-7 2.5 Sensor Frequency............................................................................................2-8 2.6 Sensor Tooling .................................................................................................2-9 2.7 Display Units ....................................................................................................2-10 2.8 Crystal Life .......................................................................................................2-10 2.9 Zero Thickness.................................................................................................2-11 2.10 Shutter Operation...........................................................................................2-11 2.11 Dual Sensors..................................................................................................2-12 2.12 Rate Sampling................................................................................................2-13 2.13 Time Setpoint .................................................................................................2-14 2.14 Thickness Setpoint.........................................................................................2-15 2.15 Simulate Mode ...............................................................................................2-16 2.16 Relay Operation .............................................................................................2-16 2.17 Analog Output Configuration ..........................................................................2-17 2.18 Troubleshooting…..........................................................................................2-18 3.0 Rack Installation...............................................................................................3-1 Chapter 4 Maintenance 4.0 Introduction ......................................................................................................4-1 4.1 Cleaning...........................................................................................................4-1 Appendix A. B. C. D. E. Material Parameters Specifications I/O Connections Communications Declaration of Conformity Chapter 1 Quick Start 1.0 Introduction Congratulations on your purchase of the SQM-160 Deposition Rate/Thickness Monitor. The SQM-160 is an easy-to-use instrument for measuring many types of thin-film coatings. This chapter will help to get you up and running quickly. Please review the entire manual for detailed operational, programming, and safety information. 1.1 Installation This section assumes you are familiar with thin-film monitors. Refer to Sections 1.3 and 1.4 for detailed system hookup information. WARNING: Maintain adequate insulation and physical separation of sensor, I/O, and wiring from hazardous voltages. Rack Installation The SQM-160 occupies a 3.5” high, half-rack space. Rack installation requires an optional half-rack adapter kit (900-014) or a full rack extender kit (900-008). Install the unit in a 19” rack with the appropriate hardware. See Chapter 3 for extender assembly instructions. Power Connection W ARNING: Verify that the power cable provided is connected to a properly grounded mains receptacle. Sensor Connections Connect the BNC cables and oscillator from your vacuum chamber feedthrough to the SQM-160 Sensor Input(s). See section 1.4. Digital I/O Connections Refer to Appendix C for details on wiring digital I/O to the SQM-160 Relay I/O connector. Computer Connection If you would like to use the supplied Windows™ Comm software with the SQM-160,see Appendix D. Option Connections If you have purchased the optional Four Sensor Card, connect the four additional sensors to these four inputs. Move the rear panel power switch to the On (|) position. The SQM-160 will briefly display its software and hardware versions, then go to normal operating mode. 1-1 Chapter 1 Quick Start 1.2 Front Panel Gary Display1 Was Display2 Crystal Status LEDs Here Control Knob Rate A/s Thickness kA Zero Open Time Closed Xtal Life 1 2 3 4 5 6 Crystal Status Time SP Thk SP Next Shutter Prev Clear Program Final Thk Control Configuration Control Section Setpoint LEDs Configuration Section Front Panel Controls Display 1 Display 2 Control Section Configuration Section Setpoint LEDs Crystal Status LEDs Control Knob Displays rate/thickness or frequency in normal operation. If multiple sensors are being used, and Display shows Time, then this is the average of those sensors. Turn the Control Knob right to display each individual sensor’s readings. Displays the setup parameter name in program mode. Displays deposition time, or the sensor # displayed on Display 1 when scrolling through sensor readings. Displays setup parameter values in program mode. Pushbutton to zero the thickness reading. Pushbutton to toggle display between Crystal Life and Rate/Thickness readings. Pushbutton to Open/Close shutter relay. Two LED shutter relay status display. Pushbutton to enter/exit program mode. Pushbutton to cancel a change and return to original value. Pushbuttons to move to Next/Previous parameter. Illuminates when the indicated setpoint is reached. Illuminates when the crystal is active and operating properly. Flashes when an active crystal fails. Off when that crystal is not being used. Used to adjust values or scroll though menu selections. Pushing the control knob stores the current setting. 1-2 Chapter 1 Quick Start 1.3 Rear Panel RS-232 USB/Ethernet 3 Sensor 1 Sensor 2 Rate Out Thick Out Option Card Sensor 4 5 Fuse T2.5A 250V 6 Relay I/O 100-120/200-240V~ 50/60 Hz 20 W Rear Panel Connections Sensor 1 & 2 Connection to quartz crystal sensors. See Section 1.4 for detailed hookup information. Rate and Thick Outputs Provides 0-5V analog outputs for Sensor 1 & 2 rate and thickness readings. For connection to strip chart recorders,etc. Relay I/O Connects 4 relays and 4 digital inputs to external devices. See Appendix C for connections. RS-232 Connection to computer for programming and data acquisition. See Appendix D. USB/Ethernet Optional connection to computer USB or Ethernet port for programming and data acquisition. See Appendix D. Provides four additional sensor measurement channels. Option Card Measurement ground terminal useful for common system and cable grounding. Power Connector W ARNING: Use removable power cords only of the specified type and rating, attached to a properly grounded receptacle. 1-3 Chapter 1 Quick Start 1.4 System Connections The diagram shows typical vacuum system wiring. The table identifies each component’s function. WARNING: Maintain adequate insulation and physical separation of sensor wiring from hazardous voltages. S ensor 9 3 2 -0 0 0 G ro u n d W ire O p tio n C a rd Sensor R S -2 3 2 In - V a c C a b le 9 0 2 -0 1 4 S o u rc e S h u tte r F e e d th ro u g h 9 3 0 -0 0 0 3 4 S e n s o r 1 S e n s o r 2 R a te O u T t h ic k O u t 5 6 F u s e T 2 .5 A 2 5 0 V R e la y I/O M anufac tured B y S ig m a ins trum ents 1 0 0 -1 2 0 /2 0 0 -2 4 0 V ~ 5 0 /6 0 H z 20 W S Q M -1 6 0 M o n ito r 6 " B N C C a b le 9 0 2 -0 1 1 O s cilla to r 9 0 0 -0 1 0 1 0 ' B N C C a b le 9 0 2 -0 1 2 System Components Sensor Holds the quartz crystal used to measure rate and thickness. Crystals must be replaced occasionally. In-Vac Cable Microdot cable that connects the sensor to the feedthrough. Feedthrough Provides isolation between vacuum and atmosphere for electrical and cooling lines. 6” BNC Cable Provides a flexible connection from the feedthrough to the oscillator. Keep this cable as short as possible. Oscillator Contains the electronics to operate the quartz crystal. Total cable length to the crystal should be under 40” (1 meter). 10’ BNC Cable Connects the oscillator to the SQM-160. Lengths up to 100’ (30 meters) are acceptable. Ground Wire A wire, preferably braided, that connects the vacuum system to the SQM-160 ground terminal. 1-4 Chapter 1 Quick Start 1.5 Film Setup This section will help you set up the SQM-160 to measure a film. Refer to Chapter 2 for detailed programming instructions. Note: User actions with front panel controls are indicated by a Box. Results shown on displays are indicated by a Dashed Box . Enter Program Mode Press Program to enter the film setup menu. If the Crystal Life display is shown, first press Xtal Life to return to Rate/Thickness mode then press Program. Select a Film Turn the Control Knob to select one of the 99 possible films, then press the Control Knob to enter that Film Menu. Set Film Parameters Turn the Control Knob to set the first film parameter (Density). The parameter value is shown in Display 2. Press the Control Knob to save the value and move to the next parameter. If you press Clear, the film parameter returns to its original value. Continue to set each parameter. Be sure to press the Control Knob to store each parameter. Press Program to exit Program mode and return to normal mode. To Enter the System Menu, press Program, then Prev. Set system parameters by turning, then pushing, the Control Knob as described above. Press Program to return to Normal mode. Set System Parameters If the sensor(s) you selected during Film setup are connected properly to the SQM-160, the Crystal Status LEDs should be lit. If not, return to the Film Menu and set the Sensor Average parameter to the desired sensor(s). See Section 2.4 for detailed information on assigning sensors to a film. If the Crystal Status LED is flashing, it is most likely that the sensor is not properly connected. A small test crystal, supplied with each oscillator module, can be used to test sensor connections external to the vacuum chamber. To use the test crystal, disconnect the oscillator from its 6” BNC cable. Attach the test crystal to the oscillator’s feedthrough connector. The Crystal Status LED will remain lit if the external sensor connections are correct. Refer to the Troubleshooting section of Chapter 2 for assistance in troubleshooting sensor problems. 1-5 Chapter 1 Quick Start 1.6 Depositing a Film If you have followed this Quick Start chapter, you are ready to deposit a film. Follow the procedure below to begin deposition. Verify Sensor Operation Verify that the Crystal Status LED for the measuring sensor(s) is lit, and not blinking. Display Rate/Thickness Display 1 should be displaying Rate on the left and Thickness on the right. If the Crystal Life display mode is active, press the Xtal Life switch to return to Rate/Thickness mode. If the Program Mode is active, press Program to return to normal mode. Zero Thickness If needed, press the Zero switch to zero the thickness reading. Start Deposition Apply power to your source evaporation supply. If the SQM160 shutter relay is connected, press the Shutter switch to open the source shutter and begin deposition. The Rate and Thickness displays should begin to move from zero. If the displays remain at zero, check your system setup to assure that you are actually evaporating. Also check that the deposited material is reaching the sensor. If the display is erratic or noisy, first check your sensor connections. Refer to the Troubleshooting section of Chapter 2 for information that can help in identifying the cause of noisy readings. If the rate and thickness readings do not match your expectations, refer to the Film Parameter (Density, Z-Factor, Tooling) and Sensor Tooling sections of Chapter 2. Please take time to review the remainder of this manual for detailed operational, programming, and safety information. 1-6 Chapter 1 Quick Start 1-7 Chapter 2 Operation 2.0 Introduction This section details the operation of the SQM-160 menus and front panel controls. It is arranged by common user tasks. Note: User actions with front panel controls are indicated by a Box. Results shown on displays are indicated by a Dashed Box . 2.1 Menu Selection Two menus provide control of the SQM-160 programming. The Film Menu allows you to customize each of the stored films. The System Menu sets values that remain constant for all films. The Configuration Section of the SQM-160 front panel contains four switches used to access the program menus. Within the program menus, the Control Knob is also used to adjust values and select menu choices. In program mode, Display 1 shows the parameter to be changed. Display 2 shows the selected parameter’s value. Note: If Crystal Life is shown on the SQM-160 displays, press the Xtal Life switch to return the displays to normal rate/thickness or frequency display. To enter the Film Menu, press the Program switch. The SQM-160 displays the currently selected film. If desired, turn the control knob to select a different film. Press Next to display the first parameter for the selected film. To enter the System Menu, press the Program switch. Then press Prev before any other switches. R a te A /s T hickne ss kA Z ero O pe n C lose d Xtal L ife T im e 1 2 3 4 5 6 C rystal S tatus Tim e S P Th k S P N ext S hu tter P rev C lear P r og r am Fina l Thk C o ntrol S Q M -16 0 R ate/T hickn ess M onitor P re ss N E X T to m o ve th ru th e F ilm m en u C on figu ra tion P re ss P R E V th e n N E X T to m ove thru the S yste m m en u P re ss PROGRAM to acce ss m e nu s 2-1 Chapter 2 Operation 2.2 Film Menu The Film Menu programs the SQM-160 for the materials that will be deposited as thin films. Ninety nine films can be stored, but only one film is active at any time. 1. Press Program to enter program mode. 2. Use the Control Knob to scroll to the desired Film # (1-99). 3. Depress the Control Knob or Next to enter the film parameters for the selected film. 4. Use Next and Prev to move through the film parameters, shown in Display 1. 5. Use the Control Knob to adjust the parameter value, shown in Display2, to the desired setting. 6. Depress the Control Knob or Next to save the displayed value and move to the next material parameter. Press Clear to abandon the change and return to the original setting. 7. Press Program to exit the Film Menu and return to normal mode. The diagram and table that follow detail the parameters available in the Film Menu. Refer to later sections of this chapter for instructions on setting specific film parameters. F ilm S electio n P rog ram F ilm 1 . . . . . . F ilm 99 F ilm P aram eters M en u - S u b -M en u D E N S IT Y T O O LIN G Z -F A C T O R F IN L T H K T H K S ET * T IM E S ET * S A M P LE * H O LD * - 1 - 2 - 3 . . - SENS AVG * - 6 S ensors 3 to 6 show only if the four-sensor option card is installed. Note: Depending on System Menu setup, selections marked with a * may not be available. Consult the table that follows for details. Note: You can clear film memory by pressing Zero-XtalLife-Shutter while powering up the SQM-160. 2-2 Chapter 2 Operation Film Menu Display Description Range Default Units DENSITY Density of the material being deposited. Consult the Appendix for common material densities. 0.5 – 99.99 1.00 gm/cc TOOLING Overall Tooling Factor for this film. See the Sensor Tooling section of this chapter. 10 – 399 100 % Z-FACTOR Z-Factor of the material being deposited. Consult the Appendix for common material Z-Factors. 0.10 – 10.00 1.0 FINL THK Desired Final Thickness of deposited material. Lights Final Thk LED when reached. 0.000 – 99.99 0.500 kÅ THK SET Thickness value that closes the Thickness Setpoint relay and lights Thk SP LED. *Not available when Sampling is ON in System Menu. 0.000 – 99.99 0 kÅ TIME SET Elapsed time that closes the Timer 0:00 – 99:59 Setpoint relay and lights Time SP LED. *Not available when Relay 2 is set to Dual or Sensor 2 in the System Menu. 0 Min: Sec SAMPLE The time for the sensor shutter to remain open when Rate Sampling is enabled in the System Menu. *Not available when Sampling is OFF in System Menu. 0 - 9999 0 Sec HOLD The time for the sensor shutter to remain closed when Rate Sampling is enabled in the System Menu. *Not available when Sampling is OFF in System Menu. 0 - 9999 0 Sec 2-3 Chapter 2 SENS AVG Operation Enable/disable crystals for this film. See the Sensor Selection section of this chapter. *Not available when Relay 2 is set to Dual in the System Menu. Enabled/ Disabled Ch1 Enabled 2-4 Chapter 2 Operation 2.3 System Menu The System Menu sets values that pertain to the overall functions of the SQM-160 and to your vacuum system’s setup. System Menu parameters apply to all films. 1. Press Program to enter program mode. 2. Press Prev to enter the System Menu. 3. Use Next and Prev to move through the system parameters. 4. Use the Control Knob to adjust the parameter value shown in Display2 to the desired setting. 5. Press Clear to abandon the change and return to the original setting. 6. Depress the Control Knob or Next to save the displayed value and move to the next material parameter. Press Clear to abandon the change and return to the original setting. 7. Press Program to exit the System Menu and return to normal mode. S ys te m P a ra m e te rs M e n u - T IM E B A S E - S IM M O D E - D IS P L A Y P ro gra m P re v - RATE RES R A T E F ILT RE LAY 2 S A M P L IN G BAUDRATE ETCH xT O O L IN G RELAYS F M IN /M A X R /T B N D S S u b -M e n u - T H C K (A ) T H C K (n M ) MASS FREQ - T IM E S P - DUAL - SENS 2 - F R E Q M IN - FREQ M AX - - xT L T O O L1 . - xT L T O O L6 - R ELA Y 1 . - R ELA Y 4 R A T E M IN RATE MAX T H IC K M IN T H IC K M A X 2-5 Chapter 2 Operation System Menu Display Description Range Default Units TIMEBASE Time required for a measurement. Longer times yield higher accuracy. 0.15 – 2.00 0.25 Sec. SIM MODE Simulates sensor inputs. On/Off Off DISPLAY Selects Rate/Thickness in Angstroms, Rate/Thickness in Nanometers, Frequency, or Mass (ugm/cc) display. THCK/nAnM/ FREQ/MASS Rate RATE RES Sets rate resolution to .01 or .1 Å/s. Hi/Low Low RATEFILT Number of rate readings averaged. 1 – 20 8 RELAY 2 Select Timer to cause relay to close when time setpoint is reached. Dual causes relay to close (to activate dual sensor) when sensor 1 fails. Sensor 2 causes relay to activate a sensor shutter when Sensor 2 is assigned to a film. On/Off Timer SAMPLING When Sampling is ON the sensor shutter periodically “samples” the rate. After a period, the shutter closes and the SQM-160 “holds” the same rate reading until the next sample period. Sample and Hold times are set in the Film Menu. On/Off Off BAUDRATE Serial baud rate to PC. 2.4 – 19.2 19.2 ETCH Sets rate negative for etching. On/Off Off xTOOLING Tooling value assigned to each sensor. See the Sensor Tooling section of this chapter. 10 – 399 100 RELAYS Assigns normally open or normally closed operation for each relay. Note: All relays are open with power off. NO/NC NO kbps % 2-6 Chapter 2 FMIN/MAX R/T BNDS RATE MIN Operation Sub-menu sets minimum and maximum crystal frequencies. Rate and Thickness Bounds submenu for analog outputs. Deposition Rate for zero output (zero Volts). RATE MAX Deposition Rate for full scale output (+5 Volts). THICKMIN Thickness for zero output (zero Volts). THICKMAX Thickness for full scale output (+5 Volts). 4.00 – 6.00 5.00 4.10-6.10 6.10 MHz 0 – 999 0 Å/s 9.9 – 999 100 Å/s 0 – 99.99 0.00 kÅ 0 – 99.99 1.00 kÅ 2-7 Chapter 2 Operation 2.4 Sensor Selection The SQM-160 comes standard with two sensor inputs. Four additional sensors are available by adding a Sensor Option Card. A specific sensor can be assigned to each film, or multiple sensors can be averaged for a film. The averaging option provides more uniform coverage of the deposition area, and provides a backup sensor capability. If one of multiple sensors assigned to a film fails, the sensor is automatically removed from rate/thickness calculations. Note: If Relay 2 Dual is selected in the System Menu, Sensors 1 and 2 are set up as a primary/secondary sensor pair. In that case, sensor averaging is disabled. See Section 2.11 for information on dual sensors. To assign a sensor, or sensors, to a film: 1. Press Program to enter Program mode. 2. Use the Control Knob to scroll to the desired Film # (1-9). 3. Depress the Control Knob or Next to enter the film parameters for the selected film. 4. Press Next until SENS AVG is shown. 5. Use the Control Knob to scroll through the sensors in Display2. 6. Depress the Control Knob to toggle the sensor on/off. Sensor status can be seen by observing the Crystal Status LEDs: If the LED is not illuminated, the crystal is disabled. If the LED is illuminated, the crystal is enabled and receiving valid readings. If the LED is blinking, the crystal is enabled, but is not receiving valid readings. 7. Continue selecting sensors until the Crystal Status LEDs indicate the desired setup. 8. Press Program to exit the Film Menu and return to normal mode. 9. Turn the Control Knob to sequence though each sensor’s reading on Display1. When a single number is shown in Display2 it is the sensor number whose readings are shown in Display1. When time is shown in Display2 , Display1 shows the average of all assigned sensors.. 2-8 Chapter 2 Operation 2.5 Sensor Frequency The Sensor Min/Max frequencies establish the operating range for the sensing quartz crystals. Both values are used to determine the % life that is displayed in Xtal Life mode. When the sensor frequency drops below the minimum (or reads above the maximum), the SQM-160 indicates a sensor failure by blinking the Crystal Status display. To set sensor minimum and maximum frequencies: 1. Press Program to enter Program mode. 2. Press Prev to enter the System Menu. 3. Press Next until FMIN/FMAX is shown. 4. Depress the Control Knob to display FREQ MIN. 5. Adjust the Control Knob to the desired minimum operating frequency on Display2. 6. Depress the Control Knob to accept the minimum value and display FREQ MAX. 7. Adjust the Control Knob to the desired maximum operating frequency on Display2. 8. Depress the Control Knob to accept the maximum value. 9. Press Program to exit the System Menu and return to normal mode. Crystals sometimes fail unexpectedly, or exhibit erratic frequency shifts (mode hopping) before total failure. Depending on the material, crystals may fail well before the typical 5 MHz minimum. If you find that crystals fail early consistently, set FREQ MIN to a value higher than 5 MHz to provide a Crystal Life warning consistent with actual failure. A sensor whose initial value exceeds the maximum will also cause a blinking Crystal status. You can set the maximum frequency slightly above the nominal values with no effect on accuracy. 2-9 Chapter 2 Operation 2.6 Sensor Tooling Sensor Tooling adjusts for the difference in deposition rate between the sensor and the substrate being coated. It is an empirically determined value that matches the sensor readings to your vacuum system. Substrate Substrate Tooling Over 100% Tooling Under 100% xTooling is set in the System Menu. It adjusts the tooling for each individual sensor before it is averaged. xTooling for a sensor applies to all films. If the individual sensor xToolings are set properly, a sensor failure will not cause a jump in the average Rate and Thickness reading. To adjust xTooling: 1. Press Program to enter Program mode. 2. Press Prev to enter the System Menu. 3. Press Next until xTOOLING is shown, then press the Control Knob. 4. Adjust the Control Knob to set the XTLTOOL 1 value. Depress the Control Knob to save the value and move to XTLTOOL 2. 5. Repeat Step 4 for each of the installed sensors. 6. Press Program to exit the System Menu and return to normal mode. Film Tooling is set in the Film Menu, and is applied to the averaged Rate and Thickness for all sensors assigned to that film. Film Tooling is a film-specific value, and is seldom required. 2-10 Chapter 2 Operation 2.7 Display Units The SQM-160 can display crystal measurements in several different units. To select the display units: 1. Press Program to enter Program mode. 2. Press Prev to enter the System Menu. 3. Press Next until DSP….. is shown. 4. Turn the Control Knob left or right to select the desired display mode: THCK - Rate in A/s, Thickness in kA nAnM - Rate in nM/s, Thickness in uM MASS - Rate in ng/cc/s, Thickness in ng (nanograms) FREQ – Frequency in Hz Note: When Nanometers is selected a small “n” appears between the rate and thickness displays When Mass is selected a small “m” appears between the rate and thickness displays. 5. Depress the Control Knob to accept your choice. 6. Press Program to exit the System Menu and return to normal mode. 2.8 Crystal Life The SQM-160 calculates the remaining crystal life based on the FMin/Max values set in the System Menu (see Section 2.5). To display the remaining crystal life for the sensors used by the currently active film: 1. Press the Xtal Life switch in the front panel Control section. 2. The sensor is shown in Display 1 and the % remaining life is shown in Display2. 3. Turn the Control Knob to display the % life of other sensors active for this film. 4. Press Xtal Life again to return to normal rate/thickness, or frequency display. Note: You cannot enter program mode while the crystal life display is active. 2-11 Chapter 2 Operation 2.9 Zero Thickness Before starting each film deposition, you will probably want to reset the SQM-160 Thickness value to zero. To zero Thickness: 1. Press the Zero switch in the front panel Control section. In addition to zeroing Thickness, pressing the Zero switch has these effects: 1. The Time display is reset to its programmed value, and starts counting down. 2. The Thickness Setpoint and Timer relays open. 3. The Time SP, Thk SP, and Final Thk LEDs turn off. 2.10 Shutter Operation The SQM-160 Shutter switch controls a relay that is normally connected to the source shutter. To open or close the Shutter relay: 1. Press the Shutter switch in the front panel Control section. The Open and Closed LEDs illuminate to indicate the shutter status. Note: If Relay 2 is set to Sensor 2 in System Menu, the operation of the Shutter switch/relay changes slightly. In this case, the shutter relay will activate only if Sensor 1 is assigned to the active film. If sensor 2 is assigned to the active film, Relay 2 will close instead. 2-12 Chapter 2 Operation 2.11 Dual Sensors Dual shuttered sensors provide a backup (secondary) sensor in case of primary sensor failure. When Relay 2 is programmed for Dual sensors in the System menu, the SQM160 will automatically switch to Sensor 2 when Sensor 1 readings stop or become erratic. To program the SQM-160 for dual sensors: 1. Press Program to enter Program mode. 2. Press Prev to enter the System Menu. 3. Press Next until RELAY 2 is shown. 4. Turn the Control Knob right to select DUAL sensor function. 5. Depress the Control Knob to accept the value. 6. Press Program to exit the System Menu and return to normal mode. 7. In the film menu, assign only Sensor 1 to the film. The backup sensor 2 is automatically assigned internally. Note: Relay 2 is a multi-function relay. It can be programmed as a dual sensor shutter, or to close when a programmed time has elapsed, or as a sensor 2 shutter relay. Section 2.10 and 2.13 discuss the other Relay 2 functions. 2-13 Chapter 2 Operation 2.12 Rate Sampling In Rate Sampling mode, the SQM-160 opens a sensor shutter for a fixed time to “sample” the process rate, then closes the shutter and “holds” the last rate reading for a fixed time. While the shutter is closed (hold mode), the SQM-160 calculates thickness based on the last sampled rate. Note: Rate sampling can significantly extend crystal life in a high deposition rate process. However, unless the process is very stable, the thickness calculation during hold mode may be incorrect. Do not use rate sampling if your rate varies during deposition. To program the SQM-160 for Rate Sampling: 1. Press Program to enter Program mode. 2. Press Prev to enter the System Menu. 3. Press Next until SAMPLING is shown. 4. Turn the Control Knob right to turn ON rate sampling. Depress the Control Knob to accept the value. 5. Press Program to exit the System Menu and return to normal mode. 6. Press Program to re-enter Program mode. 7. Use the Control Knob to scroll to the desired Film # (1-9), then depress the Control Knob or Next to enter the film parameter menu for the selected film. 8. Press Next until SAMPLE is shown. 9. Use the Control Knob to set the sample time period. Depress the Control Knob to accept the sample value and display HOLD. 10. Use the Control Knob to set the hold time period. Depress the Control Knob to accept the Hold value. 11. Press Program to exit the Film Menu and return to normal mode. Note: The rate sampling relay is a dual function relay. It can be programmed either to sample rate or to close when a programmed thickness is reached. Section 2.14 discusses the Thickness Setpoint function. Consult Appendix C for relay wiring. 2-14 Chapter 2 Operation 2.13 Time Setpoint The Time Setpoint provides a convenient way to signal a timed event. After a preprogrammed time period, the Time Setpoint closes a relay when the Zero switch is pushed. To program the Time Setpoint: 1. Press Program to enter Program mode. 2. Press Prev to enter the System Menu. 3. Press Next until RELAY 2 is shown. 4. Turn the Control Knob right to select TIME. Depress the Control Knob to accept the value. 5. Press Program to exit the System Menu and return to normal mode. 6. Press Program to re-enter Program mode. 7. Use the Control Knob to scroll to the desired Film # (1-9), then depress the Control Knob or Next to enter the Film Parameter menu for the selected film. 8. Press Next until TIME SET is shown. 9. Use the Control Knob to set the timer setpoint. Depress the Control Knob to accept the value. 10. Press Program to exit the Film Menu and return to normal mode. Press Zero to open the relay and begin counting down the Time Setpoint. When the time reaches zero, the Time SP LED illuminates and the relay closes. Note: Relay 2 is a multi-function relay. It can be programmed as a dual sensor shutter, or to close when a programmed time has elapsed, or as a sensor 2 shutter relay. Section 2.10 and 2.11 discuss the other Relay 2 functions. 2-15 Chapter 2 Operation 2.14 Thickness Setpoint The Thickness Setpoint closes a relay when a programmed thickness is reached. This setpoint is independent from Final Thickness, which always closes the source shutter. To program the Thickness Setpoint: 1. Press Program to enter Program mode. 2. Press Prev to enter the System Menu. 3. Press Next until SAMPLING is shown. 4. Turn the Control Knob right to turn OFF the Sampling function. Depress the Control Knob to accept the value. 5. Press Program to exit the System Menu and return to normal mode. 6. Press Program to re-enter Program mode. 7. Use the Control Knob to scroll to the desired Film # (1-9), then depress the Control Knob or Next to enter the Film Parameter menu for the selected film. 8. Press Next until THK SET is shown, not FINL THK. 9. Use the Control Knob to set the thickness setpoint. Depress the Control Knob to accept the value. 10. Press Program to exit the Film Menu and return to normal mode. When the Thickness Setpoint is reached, the Thk SP LED lights and the relay closes. You can use the Zero switch to open the relay and zero thickness at any time. Note: The Thickness Setpoint relay is a dual function relay. It can be programmed either to indicate a thickness, or to control a sensor shutter for rate sampling. Section 2.12 discusses the Rate Sampling function. Consult Appendix C for relay wiring. 2-16 Chapter 2 Operation 2.15 Simulate Mode In Simulate mode, the SQM-160 simulates attached sensors. It is an easy way to become familiar with the SQM-160 front panel controls and programming. You can open/close the shutter to simulate deposition, zero readings, and display crystal life. You can also test the Time and Thickness setpoint relays and LEDs. To enter Simulate mode: 1. Press Program to enter Program mode. 2. Press Prev to enter the System Menu. 3. Press Next until SIM MODE is shown. 4. Turn the Control Knob left or right to enable and disable Simulate mode. 5. Depress the Control Knob to accept the value. 6. Press Program to exit the System Menu and return to normal mode. 2.16 Relay Operation The four relays of the SQM-160 are physically single-pole, normally-open (1FormA) relays. However, each can be programmed to act as either normally-open or normallyclosed during SQM-160 operation. It is important to keep in mind that all relays will open if the SQM-160 is turned off or loses power. Consult Appendix C for relay wiring. To set the relay operating mode: 1. Press Program to enter Program mode. 2. Press Prev to enter the System Menu. 3. Press Next until RELAYS is shown. 4. Turn the Control Knob left or right to select NO (normally open) or NC (normally closed). Depress the Control Knob to accept the value. 5. Repeat Step 4 for each of the installed sensors. 6. Press Program to exit the System Menu and return to normal mode. 2-17 Chapter 2 Operation 2.17 Analog Output Configuration The SQM-160 analog outputs must be set to match the device that will be attached to the Rate or Thickness output. To set up the analog outputs in the System Menu: 1. Press Program to enter Program mode. 2. Press Prev to enter the System Menu. 3. Use Next to move through the system parameters until R/T BNDS is displayed. 4. Depress the Control Knob to display RATE MIN. 5. Adjust the Control Knob to the Rate desired for a 0V output. 6. Depress the Control Knob to save the value and display the RATE MAX setting. 7. Adjust the Control Knob to the Rate desired for a 5V output. 8. Depress the Control Knob to save the value and display the THICK MIN setting. 9. Repeat steps 5-8 to adjust the Thickness output values. 10. Press Program to exit the System Menu and return to normal mode. Refer to System Menu in Chapter 2 for more information on setting SQM-160 System parameters. 2-18 Chapter 2 Operation 2.18 Troubleshooting Most SQM-160 problems are caused by defective crystals or improper film setup. Follow the procedures below to identify and correct common problems. No Reading, or Erratic Readings from Sensors: First, replace the quartz crystal. Crystals sometimes fail unexpectedly, or exhibit erratic frequency shifts (mode hopping) before total failure. Depending on the material, crystals may fail well before the 5 MHz lower limit. If you find that crystals consistently fail early, you may want to set Freq Min to a value higher than 5 MHz. Verify that the sensors, oscillator and cabling are connected as shown in Section 1.4. Next, in the System Menu, assure that Sim Mode is OFF, Dsp Freq is ON, and F Min/Max are set properly (typically Freq Min=5.0 MHz, Freq Max=6.0 MHz). FMIN: FMAX: In the Film menu, assure that Sens Avg is set for the proper inputs as described in Section 2.4. When an input is selected, its LED will be on (crystal OK) or blinking (crystal defective). Record the LED state (on/off/blinking) below: INPUT 1: INPUT 2: While not depositing, observe the frequency display for each active sensor. The value should be stable within, say 1Hz.. FREQ 1: FREQ 2: If the sensor reading is outside the frequency limits: Replace the crystal, or reprogram the Freq Min/Max values. If the sensor reading is zero or unstable: Recheck the wiring from the sensor to the SQM-160, and verify that the SQM-160 is properly grounded. Especially check that the quartz crystal is properly seated in the sensor head. Try a different SQM-160 sensor input. If both SQM-160 inputs show zero or unstable readings, the problem is almost certainly a wiring or sensor problem. If the problem is not corrected: Referring to Section 1.4, disconnect the 6” BNC cable from the external oscillator module. A 5.5 MHz test crystal and BNC barrel adapter is supplied with each oscillator. Attach the test crystal to the oscillator Sensor connector. The display should read about 5.5 MHz, very stable. If not, contact Sigma Instruments’ technical support. Test all SQM-160 inputs. FREQ 1: FREQ 2: 2-19 Chapter 2 Operation When the frequency reading is stable, start the deposition process. As material is deposited on the crystal, the frequency reading should drop steadily. If not, check your source supply for erratic output. Also assure that the sensor is not too close to the source (particularly in sputtering). Incorrect Rate or Thickness Measurement: First complete the procedures in Section 2.14 to assure accurate frequency readings. Set the System Menu xTooling as described in Section 2.6. Incorrect xTooling values will cause consistently low or high rate/thickness values for every material. Once the System menu xTooling is set, set Tooling in the Film menu to 100 unless you are certain that another value is needed for a specific film. Verify that the Density and Z-Factor values match those in the Materials Parameters Appendix. If the material is not listed, check a materials handbook. Density has a significant effect on rate/thickness calculations. Z-Factor corrects for stresses as a crystal is coated. If accuracy deteriorates as crystals are used, verify the Z-Factor. The relationship between Z-Factor and Acoustic Impedance is discussed in the Materials Appendix. 2-20 Chapter 2 Operation 2-21 Chapter 3 Options 3.0 Rack Mounting The Full Rack Extender option (PN 900-008) mounts a single SQM-160 into a full-width 19” rack space. Follow these steps to assemble the extender and mount the SQM-160: Remove SQM-160 Mounting Ear Determine on which side of the SQM-160 you want to attach the rack extender. If a rack-mount ear is already attached to the SQM-160 on that side, remove the two 10-32 flat head screws that mount the ear and remove the rack-mount ear. Assemble the Extender Assemble the extender “box” using the eight 6-32 flat head screws, two end panels, and two main panels. Thread two socket head captive panel screws from the inside of one side of the extender. Continue to thread the captive screws until their threads are completely exposed on one side. Attach the Extender Place the extender next to the SQM-160, and thread the captive screws into the SQM-160 threaded holes that were previously used to mount the rack ear. Tighten the captive screws to secure the extender to the SQM-160. Attach the Mounting Ears Attach the mounting ear previously removed from the SQM160 to the extender using the same10-32 flat head screws. If a rack-mount ear is not already attached to the SQM-160, attach it also. Mount the SQM-160 Slide the entire assembly into an empty 3½” high 19” rackmount space. Secure the assembly with four rack screws (not supplied). The Half Rack Adapter kit (PN 900-014) mounts one SQM-160 to another 3½” high instrument. It consists of two rack-mount ears and a small adapter bracket. Mount one rack mount ear to the SQM-160, and the other to the second instrument. Attach the two instruments using the adapter bracket. If you want to connect two SQM-160s side-by-side, contact INFICON for the best method in your installation. 3-1 Chapter 3 Options 3-2 Chapter 4 Maintenance 4.0 Maintenance WARNING: There are no adjustments or user-serviceable parts inside the SQM-160. For maintenance or repair, contact: INFICON Two Technology Place East Syracuse, New York 13057 USA Tel +1.315.434.1100 Fax +1.315.437.3803 4.1 Cleaning Use a soft cloth, moistened with water or a mild cleaner, to clean the outer surfaces. 4-1 Chapter 4 Maintenance A. Material Parameters In the table below, an * is used to indicate that the material’s Z Factor is not known. A method of determining Z Factor empirically follows the materials table. Formula Ag AgBr AgCl Al Al2 O3 Al4 C3 AlF3 AlN AlSb As As2Se3 Au B B2O3 B4C BN Ba BaF2 BaN2O 6 BaO BaTiO3 BaTiO3 Be BeF2 BeO Bi Bi2 O3 Bi2 S3 Bi2 Se3 Bi2 Te3 BiF3 C C C8 H8 Density 10.500 6.470 5.560 2.700 3.970 2.360 3.070 3.260 4.360 5.730 4.750 19.300 2.370 1.820 2.370 1.860 3.500 4.886 3.244 5.720 5.999 6.035 1.850 1.990 3.010 9.800 8.900 7.390 6.820 7.700 5.320 2.250 3.520 1.100 Z-Ratio 0.529 1.180 1.320 1.080 0.336 *1.000 *1.000 *1.000 0.743 0.966 *1.000 0.381 0.389 *1.000 *1.000 *1.000 2.100 0.793 1.261 *1.000 0.464 0.412 0.543 *1.000 *1.000 0.790 *1.000 *1.000 *1.000 *1.000 *1.000 3.260 0.220 *1.000 Material Name Silver Silver Bromide Silver Chloride Aluminum Aluminum Oxide Aluminum Carbide Aluminum Fluoride Aluminum Nitride Aluminum Antimonide Arsenic Arsenic Selenide Gold Boron Boron Oxide Boron Carbide Boron Nitride Barium Barium Fluoride Barium Nitrate Barium Oxide Barium Titanate (Tetr) Barium Titanate (Cubic) Beryllium Beryllium Fluoride Beryllium Oxide Bismuth Bismuth Oxide Bismuth Trisuiphide Bismuth Selenide Bismuth Telluride Bismuth Fluoride Carbon (Graphite) Carbon (Diamond) Parlyene (Union Carbide) 4-2 Appendix Formula Ca CaF2 CaO CaO-SiO2 CaSO4 CaTiO3 CaWO4 Cd CdF2 CdO CdS CdSe CdTe Ce CeF3 CeO2 Co CoO Cr Cr2 O3 Cr3 C2 CrB Cs Cs2 SO4 CsBr CsCl CsI Cu Cu2O Cu2S Cu2S CuS Dy Dy2O 3 Er Er2O3 Eu EuF2 Density 1.550 3.180 3.350 2.900 2.962 4.100 6.060 8.640 6.640 8.150 4.830 5.810 6.200 6.780 6.160 7.130 8.900 6.440 7.200 5.210 6.680 6.170 1.870 4.243 4.456 3.988 4.516 8.930 6.000 5.600 5.800 4.600 8.550 7.810 9.050 8.640 5.260 6.500 Z-Ratio 2.620 0.775 *1.000 *1.000 0.955 *10~ *1.000 0.682 *1.000 *1.000 1.020 *1.000 0.980 *1.000 *1.000 *1.000 0.343 0.412 0.305 *1.000 *1.000 *1.000 *1.000 1.212 1.410 1.399 1.542 0.437 *1.000 0.690 0.670 0.820 0.600 *1.000 0.740 *1.000 *1.000 *1 .000 Material Name Calcium Calcium Fluoride Calcium Oxide Calcium Silicate (3) Calcium Sulfate Calcium Titanate Calcium Tungstate Cadmium Cadmium Fluoride Cadmium Oxide Cadmium Sulfide Cadmium Selenide, Cadmium Telluride Cerium Cerium (III) Fluoride Cerium (IV) Dioxide Cobalt Cobalt Oxide Chromium Chromium (III) Oxide Chromium Carbide Chromium Boride Cesium Cesium Sulfate Cesium Bromide Cesium Chloride Cesium Iodide Copper Copper Oxide Copper (I) Sulfide (Alpha) Copper (I) Sulfide (Beta) Copper (II) Sulfide Dysprosium Dysprosium Oxide Erbium Erbium Oxide Europium Europium Fluoride Appendix Formula Fe Fe2O3 FeO FeS Ga Ga2O3 GaAs GaN GaP GaSb Gd Gd2O3 Ge Ge3N2 GeO2 GeTe Hf HfB2 HfC HfN HfO2 HfSi2 Hg Ho Ho2O 3 In In2O3 In2Se3 In2Te3 InAs InP InSb Ir K KBr KCl KF KI Density 7.860 5.240 5.700 4.840 5.930 5.880 5.310 6.100 4.100 5.600 7.890 7.410 5.350 5.200 6.240 6.200 13.090 10.500 12.200 13.800 9.680 7.200 13.460 8.800 8.410 7.300 7.180 5.700 5.800 5.700 4.800 5.760 22.400 0.860 2.750 1.980 2.480 3.128 Z-Ratio 0.349 *1.000 *1.000 *1.000 0.593 *1.000 1.590 *1.000 *1.000 *1.000 0.670 *1.000 0.516 *1.000 *1.000 *1.000 0.360 *1.000 *1.000 *1.000 *1.000 *1.000 0.740 0.580 *1.000 0.841 *1.000 *1.000 *1.000 *1.000 *1.000 0.769 0.129 10.189 1.893 2.050 *1.000 2.077 Material Name Iron Iron Oxide Iron Oxide Iron Sulphide Gallium Gallium Oxide (B) Gallium Arsenide Gallium Nitride Gallium Phosphide Gallium Antimonide Gadolinium Gadolinium Oxide Germanium Germanium Nitride Germanium Oxide Germanium Telluride Hafnium Hafnium Boride, Hafnium Carbide Hafnium Nitride Hafnium Oxide Hafnium Silicide Mercury Holminum Holminum Oxide Indium Indium Sesquioxide Indium Selenide Indium Telluride Indium Arsenide Indium Phosphide Indium Antimonide Iridium Potassium Potassium Bromide Potassium Chloride Potassium Fluoride Potassium Iodide Appendix Formula La La2O 3 LaB6 LaF3 Li LiBr LiF LiNbO3 Lu Mg MgAl2O 4 MgAl2O 6 MgF2 MgO Mn MnO MnS Mo Mo2 C MoB2 MoO3 MoS2 Na Na3AlF6 Na5AL3 F14 NaBr NaCl NaClO3 NaF NaNO3 Nb Nb2O 3 Nb2O 5 NbB2 NbC NbN Nd Nd2O 3 NdF3 Density 6.170 6.510 2.610 5.940 0.530 3.470 2.638 4.700 9.840 1.740 3.600 8.000 3.180 3.580 7.200 5.390 3.990 10.200 9.180 7.120 4.700 4.800 0.970 2.900 2.900 3.200 2.170 2.164 2.558 2.270 8.578 7.500 4.470 6.970 7.820 8.400 7.000 7.240 6.506 Z-Ratio 0.920 *1.000 *1.000 *1.000 5.900 1.230 0.778 0.463 *1.000 1.610 *1.000 *1.000 0.637 0.411 0.377 0.467 0.940 0.257 *1.000 *1.000 *1.000 *1.000 4.800 *1.000 *1.000 *1.000 1.570 1.565 0.949 1.194 0.492 *1.000 *1.000 *1.000 *1.000 *1.000 *1.000 *1.000 *1.000 Material Name Lanthanum Lanthanum Oxide Lanthanum Boride Lanthanum Fluoride Lithium Lithium Bromide Lithium Fluoride Lithium Niobate Lutetium Magnesium Magnesium Aluminate Spinel Magnesium Fluoride Magnesium Oxide Manganese Manganese Oxide Manganese (II) Sulfide Molybdenum Molybdenum Carbide Molybdenum Boride Molybdenum Trioxdide Molybdenum Disulfide Sodium Cryolite Chiolite Sodium Bromide Sodium Chloride Sodium Chlorate Sodium Fluoride Sodium Nitrate Niobium (Columbium) Niobium Trioxide Niobium (V) Oxide Niobium Boride Niobium Carbide Niobium Nitride Neodynium Neodynium Oxide Neodynium Fluoride Appendix Formula Ni NiCr NiCrFe NiFe NiFeMo NiO P3N5 Pb PbCl2 PbF2 PbO PbS PbSe PbSnO3 PbTe Pd PdO Po Pr Pr2O3 Pt PtO2 Ra Rb Rbl Re Rh Ru S8 Sb Sb2 O3 Sb2 S3 Sc Sc2O3 Se Si Si3 N4 SiC SiO SiO2 Density 8910 8.500 8.500 8.700 8.900 7.450 2.510 11.300 5.850 8.240 9.530 7.500 8.100 8.100 8.160 12.038 8.310 9.400 6.780 6.880 21.400 10.200 5.000 1.530 3.550 21.040 12.410 12.362 2.070 6.620 5.200 4.640 3.000 3.860 4.810 2.320 3.440 3.220 2.130 2.648 Z-Ratio 0.331 *1.000 *10~ *1.000 *10~ *1.000 *1.000 1.130 *1.000 0.661 *1.000 0.566 *1.000 *1.000 0.651 0.357 *1.000 *1.000 *1.000 *1.000 0.245 *1.000 *1.000 2.540 *1.000 0.150 0.210 0.182 2.290 0.768 *1.000 *1.000 0.910 *1.000 0.864 0.712 *1000 *1.000 0.870 1.000 Material Name Nickel Nichrome Inconel Permalloy Supermalloy Nickel Oxide Phosphorus Nitride Lead Lead Chloride Lead Fluoride Lead Oxide Lead Sulfide Lead Selenide Lead Stannate Lead Telluride Palladium Palladium Oxide Polonium Praseodymium Praseodymium Oxide Platinum Platinum Oxide Radium Rubidium Rubidium Iodide Rhenium Rhodium Ruthenium Sulphur Antimony Antimony Trioxide Antimony Trisulfide Scandium Scandium Oxide Selenium Silicon Silicon Nitride Silicon Carbide Silicon (II) Oxide Silicon Dioxide Appendix Formula Sm Sm2O3 Sn SnO2 SnS SnSe SnTe Sr SrF2 SrO Ta Ta2O5 TaB2 TaC TaN Tb Tc Te TeO2 Th ThF4 ThO2 ThOF2 Ti Ti2O3 TiB2 TiC TiN TiO TiO2 Tl TlBr TlCl TlI U U3 O8 U4 O9 UO2 V V2O5 VB2 VC VN Density 7.540 7.430 7.300 6.950 5.080 6.180 6.440 2.600 4.277 4.990 16.600 8.200 11.150 13.900 16.300 8.270 11.500 6.250 5.990 11.694 6.320 9.860 9.100 4.500 4.600 4.500 4.930 5.430 4.900 4.260 11.850 7.560 7.000 7.090 19.050 8.300 10.969 10.970 5.960 3.360 5.100 5.770 6.130 Z-Ratio 0.890 *1.000 0.724 *1.000 *1.000 *1.000 *1.000 *1.000 0.727 0.517 0.262 0.300 *1.000 *1.000 *1.000 0.660 *1.000 0.900 0.862 0.484 *1.000 0.284 *1.000 0.628 *1.000 *1.000 *1.000 *1.000 *1.000 0.400 1.550 *1.000 *1.000 *1.000 0.238 *1 .000 0.348 0.286 0.530 *1.000 *1.000 *1.000 *1.000 Material Name Samarium Samarium Oxide Tin Tin Oxide Tin Sulfide Tin Selenide Tin Telluride Strontium Strontium Fluroide Strontium Oxide Tantalum Tantalum (V) Oxide Tantalum Boride Tantalum Carbide Tantalum Nitride Terbium Technetium Tellurium Tellurium Oxide Thorium Thorium.(IV) Fluoride Thorium Dioxide Thorium Oxyfluoride Titanium Titanium Sesquioxide Titanium Boride Titanium Carbide Titanium Nitride Titanium Oxide Titanium (IV) Oxide Thallium Thallium Bromide Thallium Chloride Thallium Iodide (B) Uranium Tri Uranium Octoxide Uranium Oxide Uranium Dioxide Vanadium Vanadium Pentoxide Vanadium Boride Vanadium Carbide Vanadium Nitride Appendix Formula VO2 W WB2 WC WO3 WS2 WSi2 Y Y2 O3 Yb Yb2 O3 Zn Zn3Sb2 ZnF2 ZnO ZnS ZnSe ZnTe Zr ZrB2 ZrC ZrN ZrO2 Density 4.340 19.300 10.770 15.600 7.160 7.500 9.400 4.340 5.010 6.980 9.170 7.040 6.300 4.950 5.610 4.090 5.260 6.340 6.490 6.080 6.730 7.090 5.600 Z-Ratio *1.000 0.163 *1.000 0.151 *1.000 *1.000 *1.000 0.835 *1.000 1.130 *1.000 0.514 *1.000 *1.000 0.556 0.775 0.722 0.770 0.600 *1.000 0.264 *1.000 *1.000 Material Name Vanadium Dioxide Tungsten Tungsten Boride Tungsten Carbide Tungsten Trioxide Tungsten Disulphide Tungsten Suicide Yttrium Yttrium Oxide Ytterbium Ytterbium Oxide Zinc Zinc Antimonide Zinc Fluoride Zinc Oxide Zinc Sulfide Zinc Selenide Zinc Telluride Zirconium Zirconium Boride Zirconium Carbide Zirconium Nitride Zirconium Oxide Z-Factor is used to match the acoustic properties of the material being deposited to the acoustic properties of the base quartz material of the sensor crystal. Z-Factor = Zq / Zm For example, the acoustic impedance of gold is Z=23.18, so: Gold Z-Factor = 8.83 / 23.18 = .381 Unfortunately, Z Factor is not readily available for many materials. Z Factor can be calculated empirically using this method: 1. Deposit the material until Crystal Life is near 50%, or near the end of life, whichever is sooner. 2. Place a new substrate adjacent to the used quartz sensor. 3. Set QCM Density to the calibrated value; Tooling to 100%. Zero thickness. 4. Deposit approximately 1000 to 5000 Å of material on the substrate. 5. Use a profilometer or iterferometer to measure the actual substrate film thickness. 6. Adjust the Z Factor of the instrument until the correct thickness reading is shown. Appendix Another alternative is to change crystals frequently. For a crystal with 90% life, the error is negligible for even large errors in the programmed versus actual Z Factor. Appendix B. Specifications Measurement Number of Sensors Sensor Frequency Range Reference Frequency Accuracy Reference Frequency Stability Thickness Display Resolution Frequency Resolution* Rate Resolution* Thickness Resolution* 2 standard, 4 additional optional 4.0 MHz to 6.0 MHz .002% +/- 2ppm (total, 0 to 50 C) 1Å +/- 0.12 Hz (Std.), +/- 0.03 Hz (HiRes) 0.60 Å/s (Std.), 0.037 Å/s (HiRes) 0.15 Å (Std.), 0.037 Å (HiRes) *Density = 1, Period = 4 rdgs/sec (Std.) 10 rdgs/sec. (HiRes) Film Parameters Stored Films Density Tooling Z-Factor Final Thickness Thickness Setpoint Time Setpoint Sample/Hold Sensor Average 99 0.5 – 99.99 gm./cc 10 – 399 % 0.10 – 10.00 0.000 – 99.99 kÅ 0.000 – 99.99 kÅ 0:00 – 99:59 mm:ss 0-9999 sec. Any combination of installed sensors System Parameters Measurement Period Simulate Mode Frequency Mode Rate Resolution Measurement Filter Dual Crystal 1/2 Rate Sampling RS-232 Baud Rate Etch Mode Crystal Tooling 1-6 Crystal Fail Min/Max .15 to 2 sec. On/Off On/Off .01/.1 Å/s 1 to 20 readings On/Off On/Off 2.4/4.8/9.6/19.2 kb/s On/Off 10-399 % 4.0 to 6.0 MHz / 4.1 to 6.1 MHz Appendix Digital I/O Digital Inputs Functions Input Rating Relay Outputs Functions Relay Rating General Specifications Mains Power Supply Power Consumption Operating Environment Storage Environment Rack Dimensions (HxWxD) Weight 4 Open Shutter Close Shutter Zero Thickness Zero Time 5VDC, non-isolated 4 Shutter Sample/Hold or Thickness Setpoint Dual Sensor Shutter or Time Setpoint Crystal Fail 30Vrms or 30VDC, 2A maximum 100-120/200-240~, ±10% nominal 50/60 Hz 20W 0 C to 50 C 0 to 80% RH non-condensing 0 to 2,000 meters Indoor Use Only Class 1 Equipment (Grounded Type) Suitable for Continuous Operation Ordinary Protection (not protected against harmful ingress of moisture) Pollution Degree 2 Installation (Overvoltage) Category II for transient overvoltages -40 C to 70 C 88.5mm x 212.7mm x 196.9mm 2.7 kg (6 pounds) Appendix C. I/O Connections A 15-pin female D-sub connector is included with the instrument to connect digital I/O to the SQM-160 Relay I/O connector. The figure below shows the solder-side pin assignments for the supplied connector. 1 8 9 15 Relay I/O Connector Rear View Pins 1,2 Relay 1 3,4 Relay 2 Function Crystal Fail Relay Time Setpoint, Dual Sensor, or Sensor 2 Relay 5,6 Relay 3 Shutter Relay 7,8 Relay 4 Sampling or Thickness Setpoint Zero Timer Input Zero Thick Input Close Shutter Input Open Shutter Input Ground 9 10 11 12 13,14,15 Description Contacts close when all enabled sensors have failed. If Relay 2 is set to TIME in the System menu, contacts close when timer counts down to zero from its programmed Timer Setpoint value. If DUAL is selected, contacts close when Sensor 1 fails. If SENS2 is selected, contacts close when shutter is pushed if Sensor 2 is programmed for the active film. Controlled by front panel shutter switch. Contacts close when Shutter Open is selected. If SENS2 is selected for Relay 2 in the System menu, the shutter relay contacts close only if Sensor 1 is programmed for the active film. If Sampling is ON in System Menu, contacts close during Sample, open during Hold. If Sampling is OFF contacts close when Thickness Setpoint is reached. Grounding this pin zeroes the setpoint timer. Grounding this pin zeroes the thickness display.. Grounding this pin opens the shutter relay. Grounding this pin closes the shutter relay. WARNING: The inputs are not isolated! The voltage level applied must be limited to between 0 and +5 volts with respect to Ground. WARNING: Output relays are rated for 30Vrms or 30VDC, at 2A maximum. Proper fusing and adequate wiring insulation and separation should be provided to assure these limits are not exceeded. Appendix C. Communications Communications with a computer is by RS-232, or optional USB or Ethernet. RS-232 requires a standard 9-pin straight through cable. For USB communications, first install the SQM-160 Comm program supplied on the CD-ROM. When the SQM-160 is connected to a USB port, it will be found and installed automatically by Windows. For Ethernet communications, the SQM-160 is supplied with a fixed TC/IP address of 192.168.1.200. That address can be changed using the Dgdiscvr program on the CDROM. To change the IP address: Run dgdiscvr.exe and find the unit (it may take a minute, click Refresh) Double click on unit (should be highlighted) Enter User Name: root and Password: dbps Click Login Click Configuration, Network and set 1 – Change IP=192.168.1.200 to your new IP address. Click Apply, then Log Out SQM-160 Comm This Windows program allows you to set film parameters and names, download them to the SQM-160, and collect data from the instrument. The data can be graphed, and also saved in a spreadsheet format. Appendix SQM-160 Communications Protocol The SQM-160 communicates with a host computer via an ASCII based protocol. The instrument defaults to 19200 baud, 8 data bits, and no parity. The baud rate can be changed in the System Menu of the SQM-160, but is always 8 data bits with no parity. The basic protocol is: <sync character> <length character> <1 to n data characters> <CRC1><CRC2> Once a valid command has been transmitted to the SQM-160, a response is returned. The structure of the packet is identical in both the command and response. In the response, the first character is a Response Status. These are summarized in the following table. Response Letter A B C D E Meaning Command understood, normal response Command understood, but instrument reset Invalid command Problem with data in command Instrument in wrong mode for this command The sync character is an exclamation point ‘!’. Anytime this character is received, the communications for that packet is reset. Following the sync character is the length character. This is the number of characters in the packet starting with the length and counting the 2 CRC characters. This character has a decimal 34 added to it so there cannot accidentally be a sync character embedded in the packet. The two character CRC is computed using the following algorithm: 1. The CRC is initialized to 3FFF hex. 2. Each character in the message is examined, bit by bit, and added to the CRC in the following manner: a) The character is exclusive or’d with the CRC. b) The CRC is shifted right one bit position. c) If the character’s least significant bit is a 0 then the CRC is exclusive or’d with 2001 hex. d) Steps b and c are repeated for each of the 8 bits in the character. The CRC contains 14 significant bits. This is split into two characters of 7 bits each, and then a decimal 34 is added to offset the character outside the range of the Sync Character. See the code example in the SQM-TERM.C file for an example of managing the CRC. Appendix Command: @ Parameters: None Description: Returns the model number and software version number. Example: @ Command: A AMON Ver 2.01 Parameters: [1..99], Values | ? Description: Film parameters. The parameters available for change or inspection are Label, Density, Tooling, Z-Factor, Final Thickness, Thickness Setpoint, Time Setpoint, Sensor Average The parameters are sent/retrieved in that order. The label is a maximum of 8 characters, and is terminated by a space character. If you want to send a space embedded in a Label, use an underscore character ‘_’. Each parameter is separated by a space. Each film’s parameters are accessed by using the ASCII character associated with film number directly after the Command. For example Film 1-9 are ASCII characters “1” (ASC 49) to “9” (ASC 57). Film 10 is a “:” character (ASC 58), etc. The parameters are edited by adding a value after the command film number. The parameters are inspected by issuing a command, film number, then a question mark. An example of the Set/Get command for Film 4 is: Example: A4LENS_1 A4? Command: B 6.23 125 1.05 1.525 0.450 30 1 ALENS 1 6.23 125 1.05 1.525 0.450 30 1 Description: System 1 parameters. The parameters available for change or inspection are Time Base, Simulation Mode, Frequency Mode, Rate Resolution, Rate Filter, Crystal Tooling and the parameters are sent/retrieved in that order. Example: B? A0.25 0 0 0 8 100 100 100 100 100 100 Appendix Appendix Command: C Description: System 2 parameters. The parameters available for change or inspection are Minimum Frequency, Maximum Frequency, Minimum Rate, Maximum Rate, Minimum Thickness, Maximum Thickness, Etch Mode and the parameters are sent/retrieved in that order. Example: C? Command: D 5.000 6.000 0.000 100.00 0.000 1.000 0 Parameters: 1 to 9 Description: Sets the active film. Example: D1 Command: J Set the active film to Film #1 Parameters: None. Description: Read the number of channels installed. The number of channels will be either an ASCII two or six. Example: J Command: L A2 The unit has two channels available. Parameters: [1..6] Description: Read the current Rate for a channel. Example: L1 Command: M A9.32 Channel one’s rate is 9.32 Angstroms/S Parameters: None. Description: Read the current Average Rate. Appendix Example: M Command: N A10.42 Average Rate is 10.42 Angstroms/S Parameters: [1..6] Description: Read the curent thickness for a channel. Example: N4 A1.187 Angstroms. Command: O Channel four’s Thickness is 1.187 Kilo Parameters: None. Description: Read the current Average Thickness Example: O A2.376 Angstroms. Command: P The current Average Thickness is 2.376 kilo Parameters: [1..6] Description: Read the current Frequency for a channel. Example: P2 Command: R A5701563.2 Channel two’s current Frequency 5701563.2Hz Parameters: [1..6] Description: Read the Crystal Life for a channel. Example: R3 A57.82 57.82%. Command: S Parameters: None. Channel three’s remaining life is Appendix Description: Zero Average Thickness and Rate. Example: S Command: T A Parameters: None. Description: Zero Time Example: T Command: U A Zeroes time display on unit. Parameters: 0,1, or ? Description: Toggles shutter open/closed or reads shutter state. Example: U1 U? U0 Command: Y A A1 A Shutter is opened Shutter Status is open Shutter is closed. Parameters: None. Description: Read the Power-Up Reset flag. The Power-Up Reset flag is set during boot-up of the unit and stays set until read through the RS232 interface. After the flag is read, it is reset and will not be set again until the unit is power cycled. Example: Y Y Command: Z A1 A0 Power-Up Reset flag is set. Power-Up Reset flag is reset. Parameters: None. Description: Set all Film and System menu parameters to defaults. Note that this command can take over 1 second to complete Appendix Example: Z to defaults. A All Film and System parameters are set Appendix SIGMACOM.DLL Function Descriptions This dll acts as an interpreter between an application and the SQM160. The dll transforms function calls to specific command sequences that the unit understands. Transfer of data to the unit, in general, requires two function calls. The first function call is to transfer the data to the unit. The data to be sent is usually contained in the function’s parameter(s). The second function call is to ChkCommDone. This function call ensures that the data was sent properly to the unit. Data retrieval requires three function calls. The first function call is used to tell the unit what data is being requested. The second function call is to ChkCommDone. This function call is used to determine when all of the data has been transferred from the unit to the dll or if an error occurred in the communications. The third function call is used to retrieve the data from the dll. InitComm Parameters: 16 Bit Integer, 32 Bit Integer Return : 16 Bit Integer. InitComm is used to initialize the dll com port. The function’s first parameter is the com port number to initialize (1 - 99 are valid). The second parameter is the baud rate for the port. The function returns zero if initialization was successful or a bit flag to indicate the failure of the initialization : bit 0 : Communications Port handle is invalid. bit 1 : Communications Port Set parameters invalid (Baud Rate) bit 2 : Communications Port Set timeouts invalid. bit 3 : Communications Port Set mask invalid. bit 4 : Communications Port Error – Already exists. bit 5 : Communications Port Set Read Thread fail. bit 6 : Communications Port Set Read Thread priority fail. Example: ReturnVal =InitComm(1,19200) initialize Com1 to 19200 baud if (ReturnVal != 0) if port did not initialize correctly CloseComm() close the port ClearComm Parameters: None. Return : 16 Bit Integer, always returns a 1. Appendix ClearComm is used to clear the communications buffers in the dll. Example: ReturnVal =ClearComm() the dll Clear the comm buffers in CloseComm Parameters: None. Return : 16 Bit Integer, always returns a 1. CloseComm is used to close the currently opened communications port. CloseComm should always be used before attempting to open another port or before exiting the dll’s calling application. The dll can have only one port open at a time. Example: ReturnVal =CloseComm() port Close the currently open comm ChkCommDone Parameters: None. Return : 16 Bit Integer. ChkCommDone is used to check the status of a single communications iteration. The function returns one of five different types of values: -1: Positive integer : communications not complete communications complete, value is byte count of returned message. -99 : communications complete, but return message incomplete due to timeout with unit. -98 : communications complete, but return message not valid due to a CRC error. -97 : communications complete, but message not understood by unit. Example: ReturnVal =ChkCommDone() check communications status SendGetVers Parameters: None. Return : 16 Bit Integer, always returns a 1. Appendix SendGetVers is used to retrieve the software version of the unit from the unit. This function must precede the use of the GetVers function Appendix GetVers Parameters: Pointer to Null-Terminated string. Return : 16 Bit Integer, always returns a 1. GetVers is used to retrieve the software version of the unit from the dll. This function must be preceded by the SendGetVers. The Null-terminated string is used to return the version from the dll. Example: ReturnVal = SendGetVers() tell unit to transfer version to dll do while(ChkCommDone == -1) wait for comm to finish ReturnVal = GetVers(&VersionString[0]) VersionString contains version info Set160Film Parameters: Pointer to a Film Structure. Return : 16 Bit Integer, always returns a 1. SetFilm is used to set a Film’s parameters in the unit. All of the parameters are passed to the function through the Film Structure. Example: ReturnVal = SetFilm(&FilmStruct) do while(ChkCommDone == -1) set film parameters to FilmStruct values wait for comm to finish SendGetFilm Parameters: 16 Bit Integer. Return : 16 Bit Integer, always returns a 1. SendGetFilm is used to get a Film’s parameters from the unit. The Film’s number (1 - 9) is passed to the function. This function must precede the use of GetFilm. Get160Film Parameters: Pointer to a Film Structure. Return : 16 Bit Integer, always returns a 1. GetFilm is used to retrieve a Film’s parameters, the film requested by SendGetFilm, from the dll. The parameters are passed through the Film Structure. Example: ReturnVal = SendGetFilm(FilmNum)tell unit to transfer Film # FilmNum to dll Appendix do while(ChkCommDone == -1) ReturnVal = GetFilm(&FilmStruct) wait for comm to finish FilmStruct contains Film info SetSys1 Parameters: Pointer to a System1 Structure. Return : 16 Bit Integer, always returns a 1. SetSys1 is used to set the System1 Parameters. The parameters are passed to the function through the System1 Structure. Example: ReturnVal = SetSys1(&Sys1Struct) do while(ChkCommDone == -1) set System1 parameters to Sys1Struct values wait for comm to finish SendGetSys1 Parameters: None. Return : 16 Bit Integer, always returns a 1. SendGetSys1 is used to get the System1 Parameters from the unit. This function must precede the use of the GetSys1 function. GetSys1 Parameters: Pointer to a System1 Structure. Return : 16 Bit Integer, always returns a 1. GetSys1 is used to retrieve the System1 Parameters from the dll. The parameters are passed through the System1 Structure. Example: ReturnVal = SendGetSys1() tell unit to transfer System1 parameters do while(ChkCommDone == -1) wait for comm sequence to finish ReturnVal = GetSys1(&Sys1Struct) Sys1Struct contains System1 info SetSys2 Parameters: Pointer to a System2 Structure. Return : 16 Bit Integer, always returns a 1. SetSys2 is used to set the System2 Parameters. The parameters are passed to the function through the System2 Structure. Example: ReturnVal = SetSys2(&Sys2Struct) set System2 parameters to Sys2Struct values Appendix do while(ChkCommDone == -1) wait for comm to finish Appendix SendGetSys2 Parameters: None. Return : 16 Bit Integer, always returns a 1. SendGetSys2 is used to get the System2 Parameters from the unit. This function must precede the use of the GetSys2 function. GetSys2 Parameters: Pointer to a System2 Structure. Return : 16 Bit Integer, always returns a 1. GetSys2 is used to retrieve the System2 Parameters from the dll. The parameters are passed through the System2 Structure. Example: ReturnVal = SendGetSys2() tell unit to transfer System2 parameters do while(ChkCommDone == -1) wait for comm sequence to finish ReturnVal = GetSys2(&Sys2Struct) Sys2Struct contains System2 info SendGetNumCh Parameters: None. Return : 16 Bit Integer, always returns a 1. SendGetNumCh is used to get the number of channels installed from the unit. This function must precede the use of the GetNumCh function. GetNumCh Parameters: None. Return : 16 Bit Integer, Number of channels installed. GetNumCh is used to retrieve the number of channels installed from the dll. The number of channels is returned by the function. Example: ReturnVal = SendGetNumCh() tell unit to transfer Number of channels do while(ChkCommDone == -1) wait for comm sequence to finish ReturnVal = GetNumCh() ReturnVal contains Number of channels ZeroStartTime Parameters: None. Return : 16 Bit Integer, always returns a 1. Appendix ZeroStartTime is used to zero the beginning time before acquiring data with GetAllData. Appendix SendGetAllData Parameters: None. Return : 16 Bit Integer, always returns a 1. SendGetAllData is used to get the data from the unit. This function must precede the use of the GetAllData function. GetAllData Parameters: Pointer to an AllData Structure. Return : 16 Bit Integer, always returns a 1. GetAllData is used to retrieve the data from the dll. The parameters are passed through the AllData Structure. If the TimeStamp parameter of the AllData structure returned is equal to -1 then the unit does not have new data available. Example: ReturnVal = ZeroStartTime() time do ReturnVal = SendGetAllData() zero the run tell unit to transfer AllData do while(ChkCommDone == -1) wait for comm to finish ReturnVal = GetAllData(&AllDataStruct) AllDataStruct contains run info if (AllData.TimeStamp != -1) then if new data available ProcessData() then graph or save data while(Running) SendCrystalLife Parameters:16 Bit Integer Return : 16 Bit Integer, always returns a 1. SendCrystalLife is used to get the crystal life for a channel from the unit. The parameter is the channel number to retrieve.This function must precede the use of the CrystalLife function. CrystalLife Parameters: None. Return : Double. CrystalLife is used to retrieve the Crystal life remaining for the channel requested by SendCrystalLife from the dll. The Crystal life is returned by the function. Appendix Example: ReturnVal = SendCrystalLife(XtalNum) tell unit to transfer Life for XtalNum do while(ChkCommDone == -1) wait for comm to finish ReturnVal = CrystalLife() ReturnVal contains Life for XtalNum ZeroReadings Parameters: None. Return : 16 Bit Integer, always returns a 1. ZeroReadings is used to command the unit to zero the rate and thickness values for all channels and the average rate and thickness. Example: ReturnVal =ZeroReadings() tell unit to reset Rate and Thickness do while(ChkCommDone == -1) wait for comm sequence to finish ZeroTime Parameters: None. Return : 16 Bit Integer, always returns a 1. ZeroTime is used to command the unit to zero the system time. Example: ReturnVal =ZeroTime() display do while(ChkCommDone == -1) tell unit to reset time wait for comm to finish ShutterState Parameters: 16 Bit Integer Return : 16 Bit Integer, always returns a 1. ShutterState is used to command the unit to set the shutter open or closed. Example: ReturnVal =Shutter(0) tell unit to toggle open the shutter do while(ChkCommDone == -1) wait for comm sequence to finish SendGetShutter Parameters: None. Return : 16 Bit Integer. Appendix SendGetShutter is used to retrieve the condition of the shutter, open or closed, from the unit. Appendix GetShutter Parameters: None. Return : 16 Bit Integer, Shutter value (0 = Closed, 1 = Open). GetShutter is used to retrieve the value of the shutter from the dll. The returned value from the function is the value of the shutter : Example: ReturnVal = SendGetShutter() tell unit to transfer Shutter value do while(ChkCommDone == -1) wait for comm sequence to finish ReturnVal = GetShutter() ReturnVal contains Shutter value SendGetReset Parameters: None. Return : 16 Bit Integer, always returns a 1. SendGetReset is used to get the value of the power up reset flag from the unit. GetReset Parameters: None. Return : 16 Bit Integer, Flag value (0 = flag not set, 1 = flag set). GetReset is used to get the value of the power up reset flag from the dll. The value of the flag is the return value of the function : Example: ReturnVal = SendCrystalLife(XtalNum) tell unit to transfer Life left for XtalNum do while(ChkCommDone == -1) wait for comm to finish ReturnVal = CrystalLife() ReturnVal contains Life left for XtalNum LoadDefaults Parameters: None. Return : 16 Bit Integer, always returns a 1. LoadDefaults is used to cause the unit to load the default values into every film and system parameter. Example: ReturnVal =LoadDefaults() tell unit to load default values do while(ChkCommDone == -1) wait for comm sequence to finish Appendix Data Structures: unit. The size of each data type in the structures is : double : 8 bytes, the LSB is thrown out before transmission to the int : 2 bytes. char : 1 byte. Film Data double double double double double double double char int Density Tooling ZFactor FinThk ThkSet TimeSet SnsAvg Name[8] FilmNum film density film tooling film zfactor film End Thickness film Thickness Setpoint film Time Setpoint Sensors to average film Name film Number System1 Data double TimeBase double SimMode double FreqDisp double RateRes double RateFilt double XTool[6] simulation mode (1 = on, 0 = off) frequency display (1 = on, 0 = off) rate resolution (1 = hi, 0 = low) rate filter depth (1 - 20) six individual crystal tooling System2 Data double FMin double FMax double RMin double RMax double TMin double TMax double EtchMode minimum frequency maximum frequency minimum rate maximum rate minimum thickness maximum thickness Etch mode on/off AllData double double double double double double time relative to start time data was acquired average rate average thickness up to six individual channels of rate up to six individual channels of thickness up to six individual channels of frequency TimeStamp AvgRate AvgThick ChRate[6] ChThick[6] ChFreq[6] Appendix Appendix E. EC Declaration of Conformity This is to certify that this equipment, designed and manufactured by: INFICON Inc. Two Technology Place East Syracuse, NY 13057 USA meets the essential safety requirements of the European Union and is placed on the market accordingly. It has been constructed in accordance with good engineering practice in safety matters in force in the Community and does not endanger the safety of persons, domestic animals or property when properly installed and maintained and used in applications for which it was made. In addition, this is to certify that this equipment has also been designed and manufactured, having regard to the state of the art, to ensure complies with the Protection Requirements of EMC directive 2004/108/EC. A Technical Documentation File is also available for review by competent authorities and will be maintained for a period of ten years after the date on which the equipment was last manufactured. In additional to this file, technical, installation, maintenance and application information concerning this equipment can also be found in the Operating Manual(s) for this product or product family. Equipment Description: SQM-160 Rate / Thickness Monitor (including all options). Applicable Directives: 2006/95/EC (LVD) 2004/108/EC (General EMC) 2002/95/EC (RoHS) Applicable Standards: Safety: EN 61010-1:2001 Emissions: EN 61326-1:1997/A1: 1998/A2: 2001 (Radiated & Conducted Emissions) Class A: Emissions per Table 3 (EMC – Measurement, Control & Laboratory Equipment) Appendix Immunity: EN 61326-1:1997/A1: 1998/A2: 2001 (General EMC) Class A: Immunity per Table A1 (EMC – Measurement, Control & Laboratory Equipment) RoHS: Fully compliant CE Implementation Date: January 2003 (Updated December 2008) Authorized Representative: Duane H. Wright Operations Quality Manager, ISS INFICON Inc. ANY QUESTIONS RELATIVE TO THIS DECLARATION OR TO THE SAFETY OF INFICON'S PRODUCTS SHOULD BE DIRECTED, IN WRITING, TO THE VICE-PRESIDENT OF OPERATIONS AT THE ABOVE ADDRESS. Revised 12/24/08 (Rev B)