1
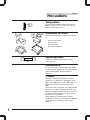
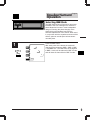
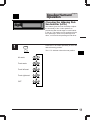
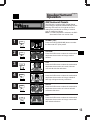
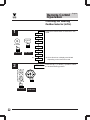
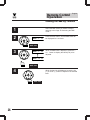
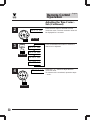
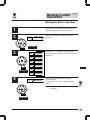
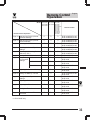
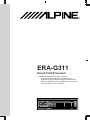
R
ERA-G311
Sound Field Processor
• OWNER'S MANUAL (page 2- page 35)
Please read this manual to maximize your
enjoyment of the outstanding performance and
feature capabilities of the equipment, then retain
the manual for future reference.
LISTENING POSITION SELECTOR
SOUND FIELD PROCESSOR
EQ SEL
L.P.S.
SUR
NORMAL
STADIUM
LIVE
CHURCH
DANCE
BBE
F
7 BAND EQUALIZER / SURROUND
14 BAND EQUALIZER
FRONT 7 BAND / REAR 7 BAND EQUALIZER
BBE
SUR
EQ
OFF
EQ
FLAT
MALE
FEMALE
POPS
500
1.2K
ROCK
NEWS
DUAL EQ
HALL
1
2
3
SUB.W
PHASE
R
180°
DISP
50
1
80
2
140
200
3
315
800
4
2K
5
3.2K
5K
8K
6
11K
16K
English
Precautions
Warning
This label is intended to alert the user to the presence of important
operating instructions.
Failure to heed the instructions will result severe injury or death.
DO NOT DISASSEMBLE OR ALTER. Doing so may lead to accident, fire or electric
shock.
KEEP SMALL ARTICLES OUT OF THE REACH OF CHILDREN. If swallowed,
consult a physician immediately.
USE THE CORRECT AMPERE RATING WHEN REPLACING FUSES. Failure to do
so may result in fire or electric shock.
HALT USE IMMEDIATELY IF A PROBLEM APPEARS. When problems occur such
as a lack of sound or video, foreign objects inside the unit, smoke coming out, or
noxious odors, stop use immediately and contact the dealer where you bought the
equipment. Failure to do so may result in an accident or injury.
DO NOT OPERATE THE EQUIPMENT OR LOOK AT THE SCREEN WHILE
DRIVING THE VEHICLE. Operating the equipment may distract the driver from
looking ahead of the vehicle and cause accident. Always stop the vehicle in a safe
location before operating this equipment.
DO NOT RAISE THE VOLUME EXCESSIVELY. Keep the volume at a level where
you can still hear outside noises while driving. Driving while unable to hear outside
noises could be the cause of accident.
DO NOT USE THIS EQUIPMENT FOR PURPOSES OTHER THAN STATED FOR
THE VEHICLE. Failure to do so may result in electric shock or injury.
2
Contents
English
Page
4 ....................................................................... Precautions
Basic Operation
5 ................................................................... Power ON/OFF
5 ..................... Adjusting Volume/Balance/Fader/Subwoofer
Equalizer/Surround Operation
6 .................................................... Band Quantity Switching
6 ..................................................................... Dual Function
7 ............................................................... Equalizer Presets
8 ........................................ Adjusting the Equalizer Settings
9 .......................................................... Selecting BBE Mode
10 ......................................... Creating a Custom BBE Curve
11 ........... Choosing the Listening Position Selector (L.P.S.)
12 ................................................................ Adjusting L.P.S.
13 ..................................................... DSP Surround Presets
14 ....................................... Adjusting the Surround Settings
15 ................................... Memorizing the Equalizer Settings
16 ............................................................. Switching Display
Remote Control Operation
18 .............. Selecting the Factory Preset Equalizer Settings
19 ................ Selecting the Factory Preset Surround Modes
20 .................................................. Selecting the BBE Mode
21 ........................... Recalling the Stored Equalizer Settings
22 ........... Choosing the Listening Position Selector (L.P.S.)
23 .................................. Turning the Defeat Mode On or Off
(RUE-4160/RUE-4162 only)
24 .................................. Customizing the Equalizer Settings
25 ....................................... Adjusting the Surround Settings
26 ............................................. Making the BBE by Yourself
27 ................................... Storing Custom Equalizer Settings
28 ................................................................ Adjusting L.P.S.
29 .......................................... Adjusting the Time Correction
31 ............................................. Storing the Time Correction
32 .............................. Recalling the Stored Time Correction
34 ........................................................ In Case of Difficulty
35 ................................................................. Specifications
3
Precautions
English
Temperature
+60°C
–10°C
Be sure the temperature inside the vehicle is
between +60°C (+140°F) and –10°C (+14°F)
before turning your unit on.
Installation Location
Make sure the ERA-G311 will not be exposed
to:
•
•
•
•
Direct sun and heat
High humidity
Excessive dust
Excessive vibrations
Replacing Fuses
3A
Replace the fuse with one with the same
amperage (3A).
Maintenance
If you have problems, do not attempt to repair
the unit yourself. Return it to your Alpine dealer
or the nearest Alpine Service Station for
servicing.
Caution
ERA-G311 allows three different modes of
system as "1) 7 Band EQ + Surround + LPS +
BBE", "2) 14 Band EQ + LPS + BBE" and "3) 7
Band EQ + 7 Band EQ (Dual EQ) + LPS +
BBE".
When the mode is changed, all systems should
be reset to change the program for DSP. This
resetting is made automatically when you push
the key of switching mode and cause to clear
stored memory of presets.
Not to delete your stored presets, please
determine the mode you use and have attention
not to switch the mode after making your
presets.
4
English
Basic Operation
Power ON/OFF
The unit is turned OFF/ON from the head unit's
Power switch.
Operating procedures for use with
non-Ai-NET Head Units
Adjusting Volume/Balance/
Fader/Subwoofer
Make each adjustment on the Head Unit.
For PHASE switching, press and hold the Audio
Control button on the Head Unit at least 2
seconds.
Note: Some functions or displays are limited
depending on the product used.
If you have any question, consult with the
authorized Alpine dealer.
5
Equalizer/Surround English
Operation
Band Quantity Switching
1
1
7 Band
EQ SEL
14 Band
Press and hold the EQ SEL button for at least 4
seconds to switch the equalizer band from 7 to
14 bands.
Note: In the 14 band equalizer mode, the
surround cannot be used.
Front 7 Band
Rear 7 Band
Dual Function
1
7 Band
EQ SEL
14 Band
Front 7 Band
Rear 7 Band
Press and hold the EQ SEL button for at least 4
seconds in the 14 band mode to activate the
dual mode.
(Front output: 80, 200, 500, 1.2k, 3.2k, 8k,
16 kHz
Rear output: 50, 140, 315, 800, 2k, 5k,
11 kHz)
Note: In the dual equalizer mode, the surround
cannot be used.
6
Equalizer/Surround English
Operation
Equalizer Presets
Six typical equalizer settings are preset at the
factory for a variety of musical source material.
↓
EQ
Level
1
Setting 1: FLAT
Press the EQ (EQUALIZER) button to select
the flat frequency response.
Frequency
↓
EQ
Setting 2: MALE (VOCAL)
Level
2
Press the EQ button to select the MALE setting.
Frequency
↓
EQ
Setting 3: FEMALE (VOCAL)
Level
3
Frequency
↓
EQ
Setting 4: POPS
Level
4
Press the EQ button to select the FEMALE
setting.
Press the EQ button to select the POPS setting.
Frequency
↓
EQ
Setting 5: ROCK
Level
5
Frequency
↓
EQ
Setting 6: NEWS
Level
6
Press the EQ button to select the ROCK
setting.
Frequency
Press the EQ button to select the NEWS
setting.
7
Equalizer/Surround English
Operation
Adjusting the Equalizer
Settings
You can modify the Equalizer settings to create
a response curve more appealing to your
personal taste.
1
EQ
EQ
FLAT
Press the EQ (EQUALIZER) button repeatedly
to select the Equalizer setting preset which you
wish to adjust. The EQ indicator blinks for 5
seconds.
The example shows FLAT mode.
Dual mode
DISP
F
R
2
3
8
------
While the EQ indicator is blinking, press the
DISP button. The EQ mode will toggle between
front or rear.
While the EQ indicator is blinking, press the EQ
BAND DN (l ) or UP (r ) button to select the
frequency band to adjust. The BAND indicator
of the selected frequency will blink.
Press the LEVEL DN (> ) or LEVEL UP (< )
button while the frequency range is blinking to
decrease or increase the level respectively.
Repeat Steps 2 and 3 to adjust other
frequency ranges.
To adjust other Equalizer settings, repeat Steps
1 to 3 .
Equalizer/Surround English
Operation
Selecting BBE Mode
The BBE (Barcus Berry Electronics) processor
installed in this unit is designed to correct the
phase distortion inherent in most loudspeaker
designs. Ensuring the phase integrity of the
signal driving the speakers improves the
accurate reproduction of the sound. When used
in conjunction with the equalizer and sound field
effects, optimum sound space enhancement
can take place.
1
BBE
BBE
1
BBE
2
BBE
BBE
Press the BBE button.
With each press of the button the mode will
changed in the sequence: BBE 1, BBE 2, BBE
3, and BBE OFF. The BBE effect is the highest
in BBE 1 mode, will be reduced in BBE 2 mode
and will have the least effect in BBE 3 mode.
3
OFF
9
Equalizer/Surround English
Operation
Creating a Custom BBE
Curve
1
BBE
1
Press the BBE button to select a BBE mode to
be adjusted. The BBE indicator will blink for 5
seconds.
BBE
2
3
10
Example: BBE 1
While the BBE indicator is blinking, press the
EQ Band up/down (r /l ) buttons to select
either the high or low frequency bands to be
adjusted.
Adjust for desired levels by pressing the level
UP/DN (< / > ) adjusting buttons while the
indicator is blinking.
Adjustments can be made to the other BBE
modes by repeating the above procedures for
each one you wish to customize.
Equalizer/Surround English
Operation
Choosing the Listening Position Selector (L.P.S.)
This feature gives the user the ability to adjust
the time delay of the 4 main speakers to
provide the ideal sound stage for each listener
in the car. The staging can be optimized for the
front passenger, driver, front passenger and
driver, or front and rear passengers and driver.
1
L.P.S.
Press the L.P.S. button repeatedly to select the
desired listening position.
The L.P.S. indicator shows the seat position.
All seats
Front seats
Front left seat
Front right seat
OFF
11
Equalizer/Surround English
Operation
Adjusting L.P.S.
1
2
12
L.P.S.
Press the L.P.S. button repeatedly to select
the L.P.S. mode you want to adjust.
The L.P.S. indicator will blink for 5 seconds.
While the L.P.S. indicator is blinking, press
the up/down (< , > ) and left/right (l , r )
buttons, to fine tune the time correction for
the selected position.
Equalizer/Surround English
Operation
DSP Surround Presets
The ERA-G311 employs DSP (Digital Signal
Processing) to duplicate mathematically various
listening environments. Six typical surround
settings are provided for a variety of musical
source material as follows.
Note: If 14-band equalizer is selected, the DSP
Surround function can not be used.
1
NORMAL (Flat)
SUR
Press the SUR (SURROUND) button to select
the Surround OFF (Flat) mode.
NORMAL
2
3
4
SUR
A D I U M
ST
STADIUM
Press the SUR button to select the mode which
duplicates the acoustics of a large outdoor
stadium.
LIVE
SUR
LIVE
Press the SUR button to select the mode which
duplicates the acoustics of a small, intimate
concert hall with few reflections.
CHURCH
SUR
Press the SUR button to select the mode which
duplicates the acoustics of a large cathedral
with high ceilings and many reflections.
CHURCH
5
DANCE
SUR
Press the SUR button to select the mode which
duplicates the acoustics of a dance hall with
moderate reflections.
DANCE
6
HALL
SUR
HALL
Press the SUR button to select the mode which
duplicates the acoustics of a large concert hall
with limited reflections.
13
Equalizer/Surround English
Operation
Adjusting the Surround
Settings
You can adjust the Surround settings for your
preference.
1
SUR
STADIUM
SUR
2
4
Press the SUR button repeatedly to select the
desired surround mode (except NORMAL). The
selected surround mode indicator blinks for 5
seconds.
While the surround mode indicator is blinking,
press the > or < button to decrease or
increase the reverberation level. Adjustments
can be made within a range of +4 to
–4 steps.
Press the l or r button to adjust the initial
reverberation time. Adjustments can be made
within a range of +4 to –4 steps.
14
Equalizer/Surround English
Operation
@.#
1
1
Memorizing the
Equalizer Settings
Press the EQ button to select the desired
equalizer setting (factory preset or your own)
you wish to store in memory.
EQ
2
Press and hold any one of the Memory buttons
for at least 2 seconds. The Preset indicators
blink for 5 seconds showing the unit is ready for
storing.
PE
1
2
3
4
3
5
6
P1
1
2
3
4
5
6
Press the Memory button into which you wish to
store the selected equalization setting while the
Preset indicators are blinking. Repeat Steps 1
to 3 to store other settings.
The example shows the setting has been stored
at the Preset 1.
Notes:
• If the band quantity is switched, the
memory contents will be cleared.
• You can store the BBE and Surround
settings as well as the Equalizer settings in
the Presets.
• To recall the curve memorized, press one of
the memory buttons you memorized.
15
Equalizer/Surround English
Operation
Switching Display
1
DISP
2
DISP
Example
Normal mode
Reverse mode
16
Press the DISP button to switch the display.
Select one of the display patterns you like.
Press and hold the DISP button for more
than 2 seconds. The display will toggle
between normal or inverted mode.
Equalizer/Surround English
Operation
Pattern
Display
Description
1
EQ Pattern
2
Spectrum Analizer Pattern
3
Peak Hold Pattern
4
Peak Value Increasing Pattern
5
"i" Character Pattern
6
Block Pattern
7
Mirror Pattern
8
Spectrum Dual Stack Pattern
9
Scan Display
(Repeats endlessly for 5 seconds from
Pattern 2 to Pattern 8.)
17
Remote Control
Operation
PWR
VOL
REMOTE
CONTROL
UNIT
DN
PWR
UP
RUE - 4180
ENT
VOL
English
If an Alpine, Ai-Net compatible head unit is
connected to the ERA-G311, some or all of
the EQs functions can be controlled from the
head unit's remote control.
CD/3D/6D
BAND
PROG
AUDIO
SEL
A.PROC
DEFEAT
VISUAL
SEL
MUTE
SELECT
A V
BAND
PROG
SOURCE A. PROC
CD/3D/6D
REMOTE CONTROL UNIT
RUE-4160
RUE-4180
Notes:
• The following display examples appear in
the Alpine Ai-compatible head unit
displays.
• These displays will differ depending upon
the Alpine head unit connected.
RUE-4160
Selecting the Factory Preset
Equalizer Settings
1
Head Unit
Press the A.PROC button and select the EQ
mode. Each press changes the modes as
follows:
EQ
A.PROC
SUR
A. PROC
BBE
Private
RUE-4180
RUE-4160
LPS
★
T-CORR
2
Press the Up (8 ) or Down (9 ) button to
select the desired Equalizer mode, "MALE"
for example.
ENT
MALE
RUE-4180
18
RUE-4160
★: Some functions or displays are limited
depending on the Head Unit used.
Remote Control
Operation
English
Selecting the Factory Preset
Surround Modes
Note: If 14-band equalizer is selected, the
DSP Surround function can not be used.
1
Head Unit
Press the A.PROC button and select the
surround mode.
EQ
A.PROC
SUR
A. PROC
BBE
Private
RUE-4180
RUE-4160
LPS
★
2
T-CORR
STADIUM
★: Some functions or displays are limited
depending on the Head Unit used.
Press the Up (8 ) or Down (9 ) button to select
the desired surround mode.
"STADIUM" for example.
ENT
RUE-4180
RUE-4160
19
Remote Control
Operation
English
Selecting the BBE Mode
1
Head Unit
Press the A.PROC (Audio Processor) button to
select the BBE mode.
EQ
A.PROC
SUR
A. PROC
BBE
Private
RUE-4180
RUE-4160
LPS
★
2
ENT
RUE-4180
20
RUE-4160
T-CORR
★: Some functions or displays are limited
depending on the Head Unit used.
BBE-1
Press the Up (8 ) or Down (9 ) button to select
the desired BBE mode.
Remote Control
Operation
English
Recalling the Stored
Equalizer Settings
1
Head Unit
Press the A. PROC button and select the
Private mode.
EQ
A.PROC
SUR
A. PROC
BBE
Private
RUE-4180
RUE-4160
★
2
LPS
T-CORR
1 P-MEMO
★: Some functions or displays are limited
depending on the Head Unit used.
Press the Up (8 ) or Down (9 ) button to
select the stored setting from PRESET 1 to
PRESET 6.
ENT
RUE-4180
RUE-4160
21
Remote Control
Operation
English
Choosing the Listening
Position Selector (L.P.S.)
1
Head Unit
Press the A.PROC button to select the L.P.S.
mode.
EQ
A.PROC
SUR
A. PROC
BBE
Private
RUE-4180
RUE-4160
LPS
★
2
LPS ALL
ENT
RUE-4180
22
T-CORR
RUE-4160
★: Some functions or displays are limited
depending on the Head Unit used.
Press the Up (8 ) or Down (9 ) button to select
the desired listening position.
Remote Control
Operation
English
Turning the Defeat Mode On
or Off
(RUE-4160/RUE-4162 only)
1
2
DEFEAT
DEFEAT
Press the DEFEAT button to skip the BBE/
Surround circuit and get flat equalizer setting.
The display DEFEAT is shown on the Head Unit
side.
To cancel the DEFEAT mode, press the
DEFEAT button a second time.
23
Remote Control
Operation
English
The remote control operations (RUE-4185/
RUE-4160/RUE-4162) described in the
following sections are applicable to full Ai-NET
compatible units only (TDA-7558, etc.).
Notes:
• The following display examples appear in
the Alpine Ai-compatible head unit displays.
• These displays will differ depending upon
the Alpine head unit connected.
Customizing the Equalizer
Settings
1
Select the equalizer characteristic to be
adjusted. Refer to page 18 "Selecting the
Factory Preset Equalizer Settings".
2
50
0
Press the ENT button to enter the frequency
adjustment mode. The first frequency band will
be displayed for 5 seconds.
ENT
RUE-4160
3
2.0K 0
ENT
While in the frequency adjustment mode, press
the c or f button to display the frequency to
be adjusted.
Changes to the frequency band selected must
be made within 5 seconds, otherwise the unit
will return to normal mode.
RUE-4160
4
2.0K +6
ENT
While the frequency is still displayed, press the
8 or 9 button to adjust for the desired level.
If you want to adjust more, repeat the steps
above.
Note: In the dual mode, press the BAND/PROG
button to switch Front/Rear.
RUE-4160
24
Remote Control
Operation
English
Adjusting the Surround
Settings
1
Select the surround mode to be adjusted. Refer
to page 19 "Selecting the Factory Preset
Surround Modes".
2
SR LEVEL ±0
Press the ENT button to activate (for 5
seconds) the adjustment mode.
ENT
RUE-4160
3
SR LEVEL +3
During the adjustment mode, press the 8 or 9
button to adjust for the desired level.
ENT
RUE-4160
SR TIME –1
Press the c or f button to adjust the reverberation time.
ENT
RUE-4160
25
Remote Control
Operation
English
Making the BBE by Yourself
1
Select the BBE mode you desire to adjust
referring to the Page 20 "Selecting the BBE
mode".
2
BBE - L +2
Press the ENT button, and the BBE band will
be displayed for 5 seconds.
ENT
RUE-4160
3
BBE - L +2
ENT
While the BBE band is displayed, press the c
or f button to display the band (L/H) to be
adjusted.
BBE - H +2
RUE-4160
4
While the band is still displayed, press the Up
(8 ) or Down (9 ) button to adjust for the desired
level.
ENT
RUE-4160
26
Remote Control
Operation
English
Storing Custom Equalizer
Settings
1
Customize the equalizer settings as described
on page 24 "Customizing the Equalizer
Settings".
2
P
MEMORY
Press and hold the ENT button at least 2
seconds.
ENT
RUE-4160
3
P 1 MEMORY
Press the 8 or 9 button to select the curve to
be stored from PRESET 1 to PRESET 6.
P 2 MEMORY
P 3 MEMORY
ENT
P 4 MEMORY
P 5 MEMORY
RUE-4160
P 6 MEMORY
4
P 1 MEMORY
Press the ENT button to store the curve. If you
want to store more, repeat the steps above.
Note: Each operation should be made within 5
seconds.
ENT
RUE-4160
27
Remote Control
Operation
English
Adjusting L.P.S.
1
Select the L.P.S. mode to be adjusted. Refer to
page 22 "Choosing the Listening Position
Selector (L.P.S.)".
2
LPS F
Press the ENT button to activate (for 5
seconds) the L.P.S. adjustment mode.
ENT
RUE-4160
3
Press the 8 , 9 , c or f button to adjust for the
desired position.
ENT
RUE-4160
28
Remote Control
Operation
English
Adjusting the Time Correction
Example 2
Front Right
Rear Right
Front Left
Rear Left
Example 1
1
A.PROC
Head Unit
Time Correction:
The distance between the listener and the
speakers in a car vary widely due to the special
conditions of the mobile environment. This
difference in the distances from the speakers to
the listener creates a shift in the sounds image
and frequency characteristics. This is caused
by the time delay between the sound reaching
the listener's right versus the left ear.
To correct this, the ERA-G311 is able to delay
the audio signal to the speakers closest to the
listener. This effectively creates a perception of
increased distance for those speakers. The
listener can be placed at an equal distance
between the left and right speakers for optimum
staging.
The adjustment will be made for each speaker
in a step of 0.1mS.
Example 1. Listening Position: Front Left
Seat
Adjust the time correction level of the front left
speaker to a high value and the rear right to
zero or a low value. (See the Illustration.)
Example 2. Listening Position: All Seats
Adjust the time correction level of each speaker
to almost the same level. (See the Illustration.)
Press the A. PROC to activate the mode
T-CORR.
EQ
SUR
RUE-4160
BBE
Private
LPS
★
T-CORR
★: Some functions or displays are limited
depending on the Head Unit used.
29
Remote Control
Operation
English
Adjusting the Time Correction (Continued)
2
TC F L 0.0
Press the ENT button to activate the time
correction mode. The time correction value will
be displayed for 5 seconds.
ENT
RUE-4160
3
BAND
PROG
TC F L 0.0
Press the BAND/PROG button to select the
channel to be adjusted.
TC F R 0.0
RUE-4160
TC R L 0.0
TC R R 0.0
4
TC F R 5.0
ENT
RUE-4160
30
Press the 8 or 9 button to adjust the time
correction value.
To advance to the next band, repeat the steps
3 and 4 .
Remote Control
Operation
English
Storing the Time Correction
1
Adjust the time correction value referring to
page 29 "Adjusting the Time Correction".
2
TC
MEMORY
Press and hold the ENT button at least 2
seconds.
ENT
RUE-4160
3
TC 1 MEMORY
Press the 8 or 9 button to select the time
correction value to be stored from PRESET 1 to
PRESET 6.
TC 2 MEMORY
ENT
TC 3 MEMORY
TC 4 MEMORY
TC 5 MEMORY
RUE-4160
TC 6 MEMORY
4
TC 1 MEMORY
ENT
Press the ENT button to store the time
correction value.
If you want to store more, repeat the steps
above.
Note: Each operation should be made within
5 seconds.
RUE-4160
31
Remote Control
Operation
English
Recalling the Stored Time
Correction
1
Head Unit
Press the A. PROC button to select the time
correction mode.
EQ
A.PROC
SUR
BBE
RUE-4160
Private
LPS
★
2
TC 1 MEMORY
ENT
RUE-4160
32
T-CORR
★: Some functions or displays are limited
depending on the Head Unit used.
Press the 8 or 9 button to select the stored
time correction from PRESET 1 to PRESET
6.
Remote Control
Operation
English
Model TDA-7638E CDA-7949E TDA-7664E
TDA-7537E TDA-7558E TDA-7562E
TDA-7536E CVA-1000E TDA-7553E
CDA-7939E
TDA-7551E
TDA-7556E/EG
TDA-7554E
TDA-7552E
TDA-7548E
TDA-7547E
CDA-7846E
CDA-7843E
3DA-7987E
Remote Control Operation
Page 18 Selecting the Factory Preset
Equalizer Settings
Page 19 Selecting the Factory Preset
Surround Modes
Page 20 Selecting the BBE Mode
○
○
○
○
○
○
○
○
○
Page 21 Recalling the Stored Equalizer
Settings
Page 22 Choosing the Listening Position
Selector (L.P.S.)
Page 23 Turning the Defeat Mode On or Off
7 Band Mode
Page 24 Customizing
the Equalizer
Settings
14 Band Mode
○
○
○
○
○
○
○
○
○
○
○
Dual Mode
Page 25 Adjusting the Surround Settings
○
Page 26 Making the BBE by Yourself
○
Page 27 Storing Custom Equalizer
Settings
Page 28 Adjusting L.P.S.
Page 29 Adjusting the Time Correction
Page 31 Storing the Time Correction
Page 32 Recalling the Stored Time
Correction
○*1
○
○
○
○
○*1
○
○
○
Remote Control
RUE-4180/RUE-4185
RUE-4160/RUE-4162
RUE-4180/RUE-4185
RUE-4160/RUE-4162
RUE-4180/RUE-4185
RUE-4160/RUE-4162
RUE-4180/RUE-4185
RUE-4160/RUE-4162
RUE-4180/RUE-4185
RUE-4160/RUE-4162
RUE-4160/RUE-4162
RUE-4185/RUE-4160
RUE-4162
RUE-4185/RUE-4160
RUE-4162
RUE-4185/RUE-4160
RUE-4162
RUE-4185/RUE-4160
RUE-4162
RUE-4185/RUE-4160
RUE-4162
RUE-4185/RUE-4160
RUE-4162
RUE-4185/RUE-4160
RUE-4162
RUE-4185/RUE-4160
RUE-4162
RUE-4185/RUE-4160
RUE-4162
RUE-4185/RUE-4160
RUE-4162
*1: CDA-7939E only
33
In Case of
Remote
Control
Operation
Difficulty
English
If you encounter a problem, please review the
items in the following checklist. This guide will
help you isolate the problem if the unit is at
fault. Otherwise, make sure the rest of your
system is properly connected or consult your
authorized Alpine dealer.
Initial Turn-On After Installation
34
Symptom
Cause and Solution
No function or display.
•
Car's ignition is off.
– If connected following instructions, the
unit will not operate with the car's ignition
off.
•
Improper power lead connections.
– Check power lead connections.
•
Blown fuse.
– Check the fuses on the battery leads;
replace with the proper value if necessary.
Remote
Control
Specifications
Operation
English
Number of Bands .......................................................................................................................... 14
Equalizer Center Frequency Range ..................................................... 50/80/140/200/315/500/800/
1.2k/2k/3.2k/5k/8k/11k/16kHz
Frequency Response (+1, –1 dB) ............................................................................ 20 Hz – 20 kHz
Signal-to-Noise Ratio .......................................................................................................... 100 dBA
Boost/Cut Range ................................................................................................................... ±10 dB
Subwoofer Level Control ................................................................................................ 0 to +15 dB
Input Impedance ...................................................................................................... 10k ohms MIN.
Output Impedance ...................................................................................................... 1k ohm MAX.
Power Requirement ........................................................................ 11 – 16 V DC Negative Ground
Dimensions (W x H x D) ................................................ 178mm (7") x 50mm (2") x 120mm (4-3/4")
Weight ................................................................................................................... 925g (2 lbs. 1 oz)
Note: Due to product improvement, specifications and design are subject to change
without notice.
35