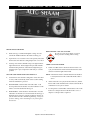
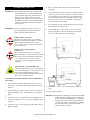
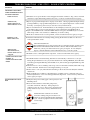
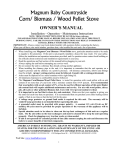
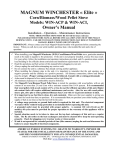
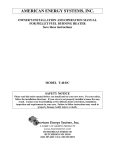
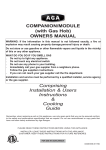
1
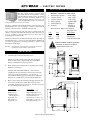
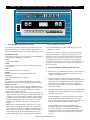
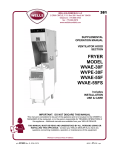
®
OPERATION & CAR E MAN UAL
FAE-55FS
Solid State
Control
FAE-55F
Manual
Control
ELECTRIC FRYERS
FAE-55F • FAE-55FS
COOK/HOLD SERVE SYSTEMS by
W164 N9221 Water Street
PHONE: 262.251.3800
800.558.8744
PRINTED IN U.S.A.
U . S . A ./ CANADA
●
P.O. Box 450
●
®
Menomonee Falls, Wisconsin 53052-0450
FAX: 262.251.7067 - 800.329.8744 U . S . A ./ CANADA
262.251.1907 INTERNATIONAL
U.S.A.
WEBSITE:
www.alto-shaam.com
#8451• 3/00
®
— E L E C T R I C F RYE R S
S P E C I F I C AT I O N I N F O R M AT I O N
DELIVERY
The Alto-Shaam electric fryer has been
thoroughly tested and inspected to insure
only the highest quality unit is provided.
When you receive your fryer, check for any
possible shipping damage and report it at
once to the delivering carrier. See Transportation
MODEL FAE-55F or FAE-55FS
1. Shortening Capacity: . . .55 lb (25kg)
2. Chicken (fresh) . . . . . . . . .30 lb (13kg)
3. Chicken (frozen) . . . . . . . .25 lb (11kg)
4. Phase Options: . . . . . . . . .3 phase only
5. Line Frequency: . . . . . . . .50/60 Hz
6. Controls: . . . . . . . . . . . . . . .Manual or
Solid State
Electrical Specifications
Amps per Line
VAC
kW
Three Phase
208V
17.0
47.8 per line
240V
17.0
41.0 per line
380-415
17.4
L1-26.0, L2&L3-24.0
Damage and Claims section located in this manual.
The fryer, complete with unattached items and accessories, may
be delivered in one or more packages. Check to ensure that all
items have been received as standard with each unit.
Save all the information and instructions packed inside the
cabinet. Complete and return the warranty card to the factory as
soon as possible to assure prompt service in the event of a
warranty parts and labor claim.
This manual must be read and understood by all people using or
installing this fryer. Contact your local Alto-Shaam distributor if
you have any questions concerning installation, operation and
maintenance of this fryer.
NOTE:
ENSURE POWER SOURCE MATCHES
VOLTAGE STAMPED ON UNIT
IDENTIFICATION TAG
All claims for warranty must include the full model
number and serial number of the cabinet.
15-11/16"
(398mm)
U N PAC K I N G
1.
Carefully remove the fryer from the carton.
®
KNOCK OUT: 1-3/8"
NOTE: Do not discard the carton and other packaging
material until you have inspected the fryer for hidden
damage and tested it for proper operation.
1-3/8"
(35mm)
37-3/8"—(948mm)
13"
(330mm)
DIMENSIONS
23-3/8"
(594mm)
Operation and Care Manual #8451 • 1
3-11/16"
(93mm)
48-15/16" (1241mm)
FRYER BASKET IN UP POSITION
45-11/16" (1160mm)
Accessories:
Filter powder, 1 box
High temp.brushes, 2 ea.
Stainless steel shovel, 1 ea.
Cleanout dowel, 1 ea.
Street elbow, 1-1/4NPT, 1 ea.
Drain pipe, 1-1/4NPT X12", 1 ea.
Literature package, 1 ea.
LIFT MECHANISM IN UP POSITION
Components:
Filter reservoir, 1 ea.
Filter leaf, 1 ea.
Oil filter suction
tube O-ring, 4 ea.
Fry basket, 1 ea.
Lift cradle, 1 ea.
Fry pot lid, 1 ea.
37-11/16" (957mm)
Remove all protective plastic film, packaging materials and
accessories from the fryer and the filter reservoir before
connecting electrical power to the fryer. Store the accessories
in a convenient place for future use.
36"—(914mm)
3.
6"
DO NOT DISCARD THIS MANUAL. This manual is
considered to be part of the fryer and is to be given to the
owner or manager of the business, or to the person
responsible for training operators of the fryer. Additional
manuals are available from your Alto-Shaam distributor.
(152mm)
Read all instructions in this manual carefully before starting
installation of this fryer.
18"
(456mm)
(22mm)
20-1/4"
(514mm)
2.
(35mm)
KNOCK OUT: 7/8"
EQUIPMENT SET-UP PROCEDURES
SAFETY PROCEDURES
Knowledge of proper procedures is essential to the safe operation
of electrically energized equipment. In accordance with generally
accepted product safety labeling guidelines for potential hazards,
the following signal words and symbols are used throughout this
manual.
Used to indicate the presence of a hazard which
will cause severe personal injury, death, or
substantial property damage in the event the
statement is ignored.
Warning used to indicate the presence of a hazard
which can cause personal injury and possibly
death, or major property damage, in the event the
statement is ignored.
Caution is used to indicate the presence of a hazard
which will or can cause minor personal injury or
property damage in the event the statement is
ignored.
Used to indicate the presence of an electrical
hazard which will or can cause personal injury or
property damage in the event the statement is
ignored.
NOTE
Used to notify personnel of installation, operation
or maintenance information which is important,
but not hazard related.
1.
Set up the fryer on a firm, level, non-combustible surface
ONLY. Verify local codes for requirements. Concrete, tile,
terrazzo, or metal surfaces are recommended. Metal over
combustible material may not meet code for non-combustible
surfaces.
2.
Leveling: Verify that the fryer sits firmly on both casters and
on both legs. With a spirit level, check that the fryer is level
front-to-back and side-to-side. With the adjustable legs,
adjust as required to level the fryer.
INSTALLATION & ELECTRICAL INFO
1.
Installation and start up should be referred to the local AltoShaam distributor. Installer must complete the warranty
registration/fryer checkout form, and record fryer
installation particulars on the back of this manual.
2.
Verify that this fryer installation is in compliance with the
specifications listed in this manual and with local code
requirements. This is the responsibility of the installer.
3.
Certain codes require fryers to be restrained with a cable or
other restraint device. It is the responsibility of the installer
to check with the authority having jurisdiction in order to
ascertain the applicability of this requirement to this specific
fryer installation.
4.
Refer to the nameplate on the front the the fryer. Verify the
electrical service power. Voltage and phase must match the
nameplate specifications, and available electrical service
amperage must meet or exceed the specifications listed.
PRECAUTIONS & GENERAL INFORMATION
1.
This fryer is intended to deep fry food products for human
consumption. No other use is authorized or recommended.
2.
This fryer is intended for use in commercial establishments,
where all operators are familiar with the appliance use,
limitations, and associated hazards. Operating instructions
and warnings must be read and understood by all operators
and users.
3.
This fryer is equipped with an oil filtration system which is
designed to filter hot liquid shortening ONLY. Water,
cleaning agents, or other liquids will damage the filter pump.
4.
This piece of equipment is made in the USA and has
American size hardware.
5.
Any trouble shooting guides, component views, or parts lists
included in this manual are for general reference only, and
are intended for use by qualified technical personnel.
6.
This manual should be considered a permanent part of this
appliance. This manual and all supplied instructions,
diagrams, schematics, parts breakdowns, notices and labels
must remain with the appliance if it is sold or moved to
another location.
ELECTRICAL SHOCK HAZARD
Electrical connections must be made by a licensed
electrician. Electrical shock will cause death or
serious injury.
NOTE: Wire gauge, insulation type and temperature rating, as
well as type, size and construction of conduit, must meet
or exceed applicable specifications of local codes and of
the National Electrical Code.
5.
The fryer is shipped from the factory wired for 3Ph electrical
service. This fryer is not approved for conversion to single
phase. Converting to single phase will void the warranty
and invalidate the UL certification.
IMPORTANT: Field wiring must be routed and secured away
from the fry pot, tubing, and
filter pump and motor. Field
wiring must allow access to
the rear of the fryer for
cleaning and for access to the
oil filter pump motor reset
button and to the lift motor
lubrication point.
See illustration.
Operation and Care Manual #8451 • 2
M A N U A L C O N T R O L • FA E - 5 5 F
F E AT U R E S & O P E R AT I N G C O N T R O L S
1.
2.
3.
4.
5.
6.
7.
8.
9.
POWER SWITCH (FRYER-OFF-FILTER)
FRYER position turns ON the fryer and power light and turns
OFF the filter pump. Heating elements are energized and
regulate to the temperature set on the control thermostat
(#10). OFF position turns OFF the fryer and de-energizes the
lower panel filter pump switch (#8). FILTER position
energizes the lower filter pump switch (#8) and turns OFF the
fryer.
POWER LIGHT (AMBER)
When lit, indicates fryer is energized.
HEAT LIGHT (AMBER)
When lit, indicates heating element is energized. Light turns
OFF when oil has reached temp preset on control thermostat.
COOK LIGHT (AMBER)
When lit, indicates the timer (#5) is ON and the basket (#15) is
lowered.
TIMER
Controls the lift cradle and the buzzer. Timer is started by
pressing the red button in the center of the knob. When the
red button is pressed, the lift cradle lowers. The red pointer
on the dial shows time remaining. When timer reaches "0",
buzzer sounds and lift cradle raises.
BUZZER LIGHT (AMBER)
When lit, indicates buzzer switch (#7) is turned ON and
buzzer circuit is active.
BUZZER SWITCH
Activates the buzzer circuit. When turned ON and timer has
reached "0", buzzer will sound until buzzer switch is turned
OFF or timer is activated.
FILTER PUMP SWITCH (ON-OFF)
Causes the oil to be filtered and pumped back into the fry pot.
The power switch (#1) must be in the FILTER position for the
filter pump switch to operate.
HI-LIMIT THERMOSTAT
Provides over temperature protection by de-energizing the
heating elements if the oil temperature exceeds the factory-set
limit. Reset must be performed manually. Allow the oil to
cool below 300°F (149°C), then firmly press the red button on
the lower control panel.
FIRE HAZARD
The hi-limit thermostat is a fire protection device.
If tripping persists, clean debris from the space
between the hi-limit bulb and the element to
enhance oil flow and facilitate reset. Otherwise,
contact your authorized service agency for repair.
DO NOT attempt to bypass or hold in the button of
the hi-limit thermostat, or a fire may occur.
10. TEMPERATURE CONTROL THERMOSTAT
Controls the oil temperature from 250°F (121°C) turned fully
counter-clockwise to 375°F (191°C) when turned fully clockwise.
11. DRAIN VALVE HANDLE
Opens and closes the drain valve. To open, rotate the handle
until it points down. To close, rotate the handle to the
horizontal position.
12. POWER OUTLET BOX
Contains the electrical service connection terminal block.
13. OIL FILTER RESERVOIR
Holds the filter screen.
14. FILTER PUMP MOTOR RESET BUTTON (located at the rear
of the motor)
The filter pump motor is equipped with an overheating protection device. Reset must be performed manually. Allow the
motor to cool for approx. 15 minutes, then press the red button.
15. LIFT CRADLE
Raises and lowers fry basket.
16. FRY BASKET
Sits on the lift cradle and holds product to be cooked. Raised
and lowered by the lift cradle.
17. LIFT MOTOR
Raises/lowers lift cradle. Accessible for lubrication thru the
access plate in back panel.
18. DRIP PAN
Gathers fluids that accumulate on the top of the fryer section
of ventilator hood model VAE-55F.
22. ELECTRICAL DIAGRAM
Installation and troubleshooting (for qualified technicians).
23. IDENTIFICATION TAG
Identifies manufacturer, model, serial number, electrical.
Operation and Care Manual #8451 • 3
SOLID STATE CONTROL • FAE-55FS • FEATURES & OPERATING CONTROLS
1.
2.
3.
4.
5.
6.
7.
8.
9.
POWER SWITCH (FRYER-OFF-FILTER)
FRYER position turns ON the fryer and power light and
turns OFF the filter pump. Heating elements are energized
and regulate to the temperature set on the selected MENU
key (#7). OFF position turns OFF the fryer and de-energizes
the lower panel filter pump switch (#8). FILTER position
energizes the lower filter pump switch (#8) and turns OFF
the fryer.
TIME KEY
Used to check and set menu times.
TEMP KEY
Used to check and set menu temperatures.
READOUT
LED display of various data and functions.
UP ARROW KEY
Used to raise fry basket and raise program settings.
DOWN ARROW KEY
Used to lower fry basket and lower program settings.
MENU KEYS
Used to begin a menu time/temperature cycle. Keys 1-6 are
programmable for time and temp. Key 7 is available for
individually set time/temp cook cycles.
FUNCTION KEYS
Used to perform the functions of Pause, Clean, Standby,
Basket (raise/lower), and Filter (warning/acknowledge).
HI-LIMIT THERMOSTAT
Provides over temperature protection by de-energizing the
heating elements if the oil temperature exceeds the factoryset limit. Reset must be performed manually. Allow the oil
to cool below 300°F (149°C), then firmly press the red button
on the lower control panel.
FIRE HAZARD • The Hi-Limit Thermostat is a fire
protection device. If tripping persists, clean debris from the
space between the hi-limit bulb and the element to enhance
oil flow and facilitate reset. Otherwise, contact your
authorized service agency for repair. DO NOT attempt to
bypass or hold in the button of the hi-limit thermostat, or a
fire could occur.
10. SONALERT
Audible alarm to signal end of a cook cycle and other
programmed functions.
11. DRAIN VALVE HANDLE
Opens and closes the drain valve. To open, rotate the handle
until it points down. To close, rotate the handle to the
horizontal position.
12. POWER OUTLET BOX
Contains the electrical service connection terminal block.
13. OIL FILTER RESERVOIR
Holds the filter screen.
14. FILTER PUMP MOTOR RESET BUTTON (located at the
15.
16.
17.
18.
22.
23.
rear of the motor)
The filter pump motor is equipped with an overheating
protection device. Reset must be performed manually.
Allow the motor to cool for approx. 15 minutes, then press
the red button.
LIFT CRADLE
Raises and lowers fry basket.
FRY BASKET
Sits on the lift cradle and holds product to be cooked. Raised
and lowered by the lift cradle.
LIFT MOTOR
Raises/lowers lift cradle. Accessible for lubrication thru the
access plate in back panel.
DRIP PAN
Gathers fluids that accumulate on the top of the fryer section
of ventilator hood model VAE-55FS.
ELECTRICAL DIAGRAM
Installation and troubleshooting (for qualified technicians).
IDENTIFICATION TAG
Identifies the appliance manufacturer, model and serial
number, and electrical rating.
Operation and Care Manual #8451 • 4
PREPARATION PRIOR TO OPERATION
1.
CLEANING:
Prior to leaving the factory, the fryer is tested for proper
operation with peanut oil. After testing is complete, the oil is
removed but oil residue remains. Therefore, it is necessary to
clean the fry pot before filling it with fresh oil. See Cleaning
the Fryer section in this manual.
2.
Examine the cradle rollers. Adjust or tighten as required.
Lubricate the rollers with vegetable oil. DO NOT operate the
fryer unless the cradle rollers are in place and rotating freely.
Serious damage to the fry pot will result if the rollers are
missing or do not rotate freely.
3.
Install the lift cradle onto the cradle pivot. Set the fry basket
on the lift cradle.
4.
Install the filter leaf into the filter reservoir. Suction tube
O-rings are shipped from the factory installed on the suction
tube. Examine to verify one O-ring is in the groove closest to
the end of the tube. Install the assembled filter reservoir into
the fryer.
Operation and Care Manual #8451 • 5
PREPARATION PRIOR TO OPERATION
5.
For Ventilator Hood models • VAE-55
Install the drip pan into the mounting bracket behind the
fryer door at the lower right front of the fryer.
7.
If drip pan is not installed, oil will drip onto the floor which
could cause slipping or falling.
Fill the fry pot to the COLD OIL LINE in the fry pot with
room temperature commercial quality shortening. This
requires 55 lbs. of liquid shortening.
Damage caused by attempts to pump anything other than
shortening in the liquid state is not covered by warranty.
IMPORTANT: This fryer is designed for liquid shortening ONLY.
Remember to fill the fryer to the COLD OIL LINE
with fresh shortening prior to turning the power
switch to the FRYER position.
Energizing the fryer without oil covering the elements will cause serious
damage, and this damage will not be covered by warranty.
SLIPPING & FALLING HAZARD • SPILLED
OIL
Do not operate unless the drip pan is installed.
Oil will drip onto the floor and falls will result.
Death or serious injury may result from slipping
and falling in spilled oil.
6.
Close the drain valve lever by turning the lever up to the
horizontal (closed) position.
8.
Check operation of fryer and all controls. See Operating
Instructions section in this manual.
9.
DETERMINE MAXIMUM LOAD WEIGHT: For
operational safety, it is very important to determine the
maximum load weight for the specific operation. This can be
accomplished by starting out with small loads and gradually
increasing to the largest load size which allows a complete
cook cycle without oil foaming out of the fry pot.
POTENTIAL FOR OIL OVERFLOW
➔The weight of product which can be safely
cooked in this fryer will vary with oil level,
product moisture content, oil temperature, and
other various conditions. See Determine
Maximum Load Weight above.
➔Failure to observe this warning will result in hot
oil release from the fryer. Hot oil causes severe
burns on contact.
SLIPPING & FALLING HAZARD • SPILLED
OIL
Close the drain valve before filling with oil. If the
drain valve is open, oil poured into the kettle will
drain into the filter reservoir or onto the floor. Oil
spills will occur, and death or serious injury could
result by slipping in oil.
Operation and Care Manual #8451 • 6
OPERATI NG I N STR UCTION S • FAE-55F • MAN UAL CONTROL
PRE-HEATING THE FRYER
1.
Make sure fry pot is filled with liquid cooking oil to the
COLD OIL LINE inscribed on the inside of the fry pot.
2.
Open the door to access the lower control panel, and set the
thermostat to the desired cooking temperature. Close door.
3.
Set the power switch to FRYER. The power light and heat
light will turn ON. The heat light will cycle ON and OFF
with the heating elements. When the heat light first goes
OFF, the fryer is up to temperature and ready to cook the
product.
SET THE COOK TIMER AND LOAD PRODUCT
1.
2.
3.
Set the timer to the desired cooking time. Unless the timer
is reset, it will automatically return to the last time setting
when the red button is pressed.
Frozen Product: Set the basket on the lift cradle. Load
frozen product into the basket. Press the red button on the
timer to lower the basket into the fry pot.
Fresh Product: Set the basket on the lift cradle. Press the
red button on the timer to lower the basket into the fry pot.
Manually drop each piece of fresh product into the hot oil,
just above the oil level to minimize splattering. Always use
protective clothing, such as insulated gloves, to protect against
hot oil burns.
BURN HAZARD • HOT OIL SPLATTER
Hot oil can cause serious burns on contact.
Wear protective clothing when cooking.
COOK CYCLE AND BUZZER
1.
When an audible alarm is desired at the end of the cook
cycle, turn the buzzer switch ON after the timer has been
started. The buzzer light will turn ON.
NOTE: If the buzzer switch is turned ON before the basket is
lowered, the buzzer will sound until the lift cradle is
down.
2.
At the end of the cook cycle, the basket will raise, and the
buzzer will sound until the buzzer switch is turned OFF or
until the next cook cycle is started.
3.
Use the plastic-coated handles of the basket to remove the
basket of cooked product from the lift cradle. Serve or
dispense cooked product as required.
Operation and Care Manual #8451 • 7
F A E - 5 5 F S • S O L I D S TAT E C O N T R O L • O P E R AT I N G I N S T R U C T I O N S
®
FRYER
OFF
TIME
TEMP
HEAT
READY MANUAL
FILTER
1
2
3
4
5
6
7
A. PROGRAMMING THE KEY FUNCTIONS
PAUSE
CLEAN
STANDBY
BASKET
FILTER
fashion to MENU keys 1 thru 6.
As each control panel key is pressed, a "beep" will sound. The
illuminated indicator for each key will light whenever the key is
pressed, and while the function associated with that key is active.
FRYER-OFF-FILTER
Allows the fryer to be placed in a normal cook mode (FRYER), an
oil-filtering mode (FILTER), or turned OFF.
TIME
Controls time functions.
TEMP
Controls temperature functions. Data can be read on the solid
state readout.
HEAT
Is lit whenever the burners are energized.
READY
Is lit when the oil is at the programmed temperature.
MANUAL
Is lit whenever MENU key 7 is selected.
ARROW
Up and down keys control the basket lift (after pressing the
BASKET key), and are used to scroll through program settings.
MENU keys 1 thru 7
Allow a choice of six (or seven) pre-programmed time/temp
settings. The solid state control is shipped from the factory with
all seven MENU keys programmed to ZERO time and 325°F
(165°C on units shipped to Europe).
➵MENU keys 1 and 2 incorporate a feature that will inform the
operator when to "drop" the wings and drumsticks during the
cooking cycle. The "drop" feature will allow cooking breasts
and thighs longer than the wings and drumsticks by audibly
beeping, and displaying "drop" on the readout. Your fryer
installer can program this feature into your control upon
request.
➵MENU key 7 is unprogrammed so that special or a one-of-akind product may be programmed any time. Any time the
fryer is ON, press and hold the TIME key and MENU key 7 at
the same time. Press the UP or DOWN arrow key until the
desired time is displayed. If this MANUAL feature is not
desired, MENU key 7 may be programmed in the identical
➵Any selected MENU key can be cancelled by pressing and
holding for 3 seconds.
To program the control for cooking your product, first determine the
cooking time and temperature required to cook that product. Each
MENU key may be programmed for a different time and temperature,
depending upon the requirements of each menu item. It is the sole
responsibility of the end user to determine the time and temperature
requirements of each menu item, and to program each MENU key to the
determined time and temperature in order to insure completely and
safely cooked product.
B. TO PROGRAM MENU TIMES & TEMPERATURES
1.
Make sure fry pot is filled with shortening to the COLD OIL
LEVEL line inscribed on the inside of the fry pot. Do not
overfill or underfill the fryer.
2.
Set the power switch to FRYER. After 10 seconds, the
readout will display "preheat" followed by the number of the
menu currently selected (the indicator of the selected menu
key will be lit). Press TEMP to verify the programmed
temperature setting of that menu. Press any MENU key to
change to that menu.
3.
Enter the programming mode by pressing and holding TIME
and TEMP for 3 seconds, until the beep sounds and "prog" is
displayed on the readout.
Program MENU key 1 for the pre-determined cook time by
pressing and holding TIME and Menu key 1 at the same
time. Scroll to desired time by pressing UP or DOWN arrow
until the desired time is displayed on the readout.
Program MENU key 1 for the pre-determined cook
temperature by pressing and holding TEMP and MENU
key 1 at the same time. Scroll to the desired temp by
pressing UP or DOWN arrow until the desired temperature
is displayed on the readout. Range is 200°F to 375°F (93°C
to 191°C).
Operation and Care Manual #8451 • 8
SOLID STATE CONTROL OPERATING INSTRUCTIONS
CONTINUED......
4.
Program MENU keys 2 thru 6 in the same manner. MENU
key 7 can be programmed, or left as a "manual" menu key.
NOTE: Only MENU key 7 can be programmed while another
MENU is cooking.
5.
Exit the programming mode by pressing and holding TIME
and TEMP keys for 1 second. The readout will display
"00:00" or "Preheat".
6.
Be sure to record which MENU key corresponds to which
menu item or product to be cooked.
C. USING THE FUNCTION KEYS
PAUSE
Halts the time countdown while any menu is running and time
remaining is displayed on the readout. Allows user to raise the
basket to inspect the product in the middle of a cook cycle. Time
remaining is frozen until the PAUSE key is pressed again.
TO USE:
➵While a menu is running, press and hold the PAUSE key for 5
seconds until a beep sounds and the red indicator illuminates.
➵Raise the basket to inspect the product by pressing the BASKET
key and UP arrow key.
➵Resume cooking the product by pressing the BASKET key and
the DOWN arrow.
➵Resume the time countdown by pressing the PAUSE key.
TO CHANGE TIME REMAINING WHILE IN PAUSE:
➵This option uses the near-instant programming feature of the
MENU 7 "manual" key. Press and hold the TIME key plus
MENU 7 key at the same time.
➵Scroll in a new time remaining with the UP or DOWN arrow
keys. Release all keys. Press and hold the lit MENU key for 3
seconds. Display will read "00:00". Lower the basket by
pressing the BASKET key followed by the DOWN arrow key.
Press the "manual" MENU 7 key. The basket will rise when the
display reads "00:00".
➵If the original menu time or temperature must be adjusted, see
Programming Procedure section on preceding page.
CLEAN
Puts the fryer into the cleaning mode by setting the temperature
to approximately 200°F (94°C), which is just below the boiling
point of water.
TO USE: See Cleaning instructions in this manual.
STANDBY
Puts the fryer into a "standby" mode for off-peak periods when
the fryer is not needed, but when it is not desirable to perform a
complete oil cool down. This economy function allows the oil
temperature to cool to 275°F (135°C) when the fryer is not in use,
but it is not desirable to turn the fryer off.
TO USE:
➵While no menu is running and the display reads "00:00", press
and hold the STANDBY key until a "beep" sounds and the red
indicator illuminates.
➵To resume cooking after being in standby mode, press and hold
the STANDBY key until a "beep" sounds. The heating elements
will be energized. Fryer is ready for use when the READY light
illuminates.
BASKET
Allows the UP and DOWN arrow keys to raise or lower the basket.
TO USE:
➵Press and release the BASKET key. The red indicators over the
BASKET key and UP and DOWN arrow keys will light. Press
and release either arrow key. The indicator for the selected
arrow key will light.
➵All keys will be inactive for the 10 seconds of the raise/lower
cycle. This key is only active in the PREHEAT and PAUSE
MODES, or when "00:00" is displayed.
FILTER
Acknowledges a filter alarm. The filter alarm is programmed to
sound after a preset number of cook cycles. This is factory set to
ZERO cycles. Your fryer installer can alter the number of cycles
upon request.
TO USE:
➵When the cycle count reaches the preset number, a "beep" will
sound. Press and release the FILTER key to cancel the alarm
and reset the filter load counter to "0". See Filtering Oil section
in this manual.
D. PREHEAT THE FRYER
Press a MENU key. If the oil temperature has not reached the
programmed temperature, the readout will display "preheat"
followed by the menu key number, and the HEAT indicator will
light. When the oil has reached the programmed temperature,
the READY indicator will light, a "beep" will sound 5 times, and
the readout will display "00:00". The readout will normally
display the time remaining. To display the oil temperature of the
lit menu item press TEMP key.
E. TO COOK PRODUCT
1.
Press MENU key 1 thru 6 for the desired menu item. When
the oil reaches the programmed temperature for that MENU
key, the READY light will go ON, the HEAT light will to
OFF, and five "beeps" will sound.
2.
FROZEN PRODUCT: Set the BASKET on the lift cradle in
the raised position. Load frozen product into the basket.
Lower the basket by pressing BASKET key, then DOWN
arrow. When the basket is fully down, start the time cycle by
pressing the appropriate MENU key. The basket will raise
automatically (and the 10 second buzzer will sound) at the
end of the timed cycle.
3.
FRESH PRODUCT: Set the empty basket on the lift cradle
in the raised position. Lower the basket by pressing
BASKET, then DOWN arrow. Manually drop each piece of
fresh product into the hot oil just above the oil level to
minimize splattering. Always use protective equipment, such as
insulated gloves, to protect against hot oil burns. For chicken,
drop thighs and breasts first, followed by drumsticks, then
wings. Start a timed cycle by pressing the MENU key you
have programmed with the desired settings.
4.
Use the plastic-coated handles of the basket to remove the
basket of cooked product from the lift cradle.
NOTE: MENU keys 1 and 2 can incorporate a feature that
"beeps" and displays "drop" on the readout to inform
when to "drop" the wings and drumsticks. The installer
can program this feature into your control upon request.
Operation and Care Manual #8451 • 9
MAI NTE NAN C E
A. CRADLE LIFT ASSEMBLY LUBRICATION
Failure to keep the cradle lift screw properly
lubricated will result in premature wear of the
brass lift nut. Wear caused by lack of proper
lubrication is NOT covered by warranty.
Disconnect the fryer from electrical power
before lubricating the cradle lift drive
screw. The lift motor could start
unexpectedly, causing serious injury if
power is not disconnected.
C.
FILTER LEAF ASSEMBLY
Clean the filter leaf after each day's filtration, or as needed to
return oil promptly to the kettle. Make sure all oil is pumped into
the fry pot before proceeding.
1.
Disconnect the fryer from electrical power.
2.
Open the rear access panel. Coat the exposed threads of the
cradle lift screw with moly (molybdenum disulfide) grease.
3.
Close the access panel and restore electrical power.
4.
Recommended frequency is "as required" or at a minimum of
every six months. Lubricate the cradle lift screw
immediately if a grinding or rubbing noise is heard when the
basket is raising.
B.
CRADLE ROLLER ASSEMBLIES
SLIPPING & FALLING HAZARD • SPILLED
OIL
Do not use cradle if the rollers do not spin freely.
Replace rollers immediately if they are frozen. Oil
spill may occur, and serious injury may result by
slipping in oil.
1.
DAILY: Rinse the cradle with cold water and use a mild,
abrasive pad to clean off any debris.
2.
Thoroughly flush the bearings
in the rollers with hot water
(under the faucet or with a
spray nozzle). Rinse and dry.
3.
Check the rollers to be sure they
roll freely. Check the bearing
nuts. KEEP THEM TIGHT!
NOTE: If rollers are frozen or found to
not spin freely after being thoroughly cleaned, replace them
immediately. Smooth operation of the rollers is essential to the
life of the fry kettle. Worn rollers can wear grooves thru the
frypot. Damage by frozen rollers is not covered by warranty.
1.
Open the fryer door and slide the filter reservoir forward to
remove it. Remove the filter leaf from the reservoir.
2.
Daily cleaning of filter leaf assembly: Scrape off any debris and
clean with a hot water rinse. Drain, and air dry overnite.
3.
Weekly cleaning (or as needed) of filter leaf assembly:
Disassemble the filter leaf by separating the two side rails at
the joint with the straight pin. Scrape any debris off, clean
with a hot water rinse, and air dry overnite.
4.
Assemble the screen with the separator installed between the
two screens. Verify that the O-ring is in place on the suction
tube on the bottom screen. See diagram in Preparation Prior to
Operation section in this manual.
5.
Slide the screens into side rail B (L-shaped pin). Note that
the handle will point away from the suction tube on the
bottom screen. Hook side rail A over the pin on side rail B
and work the screens into side rail A until the straight pin on
side rail A is held by the bump on side rail B.
6.
Inspect the filter leaf in the filter reservoir with the suction
tube firmly into the filter reservoir drain hole.
7.
Install the O-ring on the filter suction tube for damage.
Using one of the spare O rings in the suction tube groove,
replace the O ring if it is cut, cracked or scuffed.
8.
Install the filter reservoir into the fryer. Make sure the O-ring
closest to the end of the suction tube is firmly seated in the
suction line receptacle.
BURN HAZARD • HOT OIL SPLATTER
➔Do not remove filter reservoir when it contains
hot oil. Always remember to wear insulated
gloves – or allow the oil and the reservoir time
to cool.
➔Hot oil quickly heats the reservoir. Serious
burns could result.
Operation and Care Manual #8451 • 10
F I LT E R I N G O I L
IMPORTANT: Filtering the cooking oil helps to ensure the
quality of the food product. Careful observation
of the finished food product will help you
determine your optimal filtering frequency.
Example: Filter the oil after each six loads of fresh
breaded product.
BURN HAZARD • HOT OIL SPLATTER
➔Protective clothing and gloves must be worn
during the filtering process. Hot oil may
splatter resulting in serious injury.
➔The fryer filtration system is designed to filter
hot liquid shortening ONLY. Water, cleaning
agents, or other liquids will damage the filter
pump.
➔DO NOT attempt to filter cold oil (less than
300°F or 149°C).
➔DO NOT store oil in the filter reservoir
overnight, or other extended periods.
➔DO NOT attempt to pump cold oil. The filter
pump will not pump cold oil through the filter
leaf. Pumping cold oil will result in premature
failure of the filter pump.
1.
Press the power switch to the OFF position.
2.
Remove and examine the filter reservoir. Make absolutely
certain that no water exists in the bottom of the pan. Verify that
the filter leaf is properly installed, and that the suction tube
O-ring is in place and in good condition. Install the filter
reservoir assembly into the fryer, making sure the suction
tube is properly seated in the suction receptacle.
BURN HAZARD
The filter reservoir may be hot. Wear insulated
gloves or allow the filter reservoir to cool before
touching it.
IMPORTANT: Do not leave the fryer unattended during the
filtering process. Continuously monitor the oil
level in the reservoir to avoid overflowing the
reservoir and spilling oil on the floor.
3.
Filter powder absorbs acids and other contaminants in the
cooking oil, allowing the cooking oil to be used for a longer
period of time before it must be replaced. Carefully and
slowly add the contents of one package of filter powder to
the oil in the fry pot. Stir in the powder with the "l" shaped
brush.
4.
Slowly rotate the drain valve lever to the OPEN position.
The oil will drain from the kettle. If the kettle does not drain,
unplug the drain by using the wood cleanout dowel
provided with the fryer. Unplug the drain by pushing the
dowel down through the drain hole in the bottom front
center of the kettle.
BURN HAZARD
➔Protective clothing and insulated gloves
must be worn when cleaning the kettle with
the hi-temp brush and when unclogging
the drain with the wood cleanout dowel.
The kettle will be hot, hot oil may splatter,
and serious injuries may result.
➔Never attempt to remove the filter reservoir
when it is full of hot oil. Serious burns
could result from any hot oil spill.
5.
Press the power switch to the FILTER position. The filter
pump will circulate the oil through the filter leaf, returning it
to the kettle.
6.
Using the high temperature brush supplied with the fryer,
brush and scrape down the fry pot sides and bottom to
loosen crumbs and flush them from the fryer.
7.
Be aware that filter powder and crumbs will accumulate on
the filter leaf. If the oil is slow to return to the fry pot
because of a plugged filter leaf, use the stainless steel shovel
supplied with the fryer to scoop the debris from the filter leaf
top surface. See Cleaning Instructions in this manual.
8.
When filtering is complete (5 to 7 minutes of pump running
with the drain valve open), rotate the oval drain valve handle
to the CLOSED position.
9.
When bubbles begin to appear in the oil being pumped into
the fry pot, wait approximately 15 seconds. Then press the
power switch to the OFF position.
10. Service the filter leaf after each day's filtration, or as needed
to return oil promptly to the kettle.
IMPORTANT: Verify that all oil has been returned to the kettle
at the end of the filtering cycle.
Operation and Care Manual #8451 • 11
DI SCAR DI NG U S ED OI L
5.
Place a suitable metal oil disposal container under the
drain pipe.
IMPORTANT: The following instructions for discarding old
oil from this fryer are to be disregarded if you
possess a Mobile Oil Caddy. This manual oil
pump/removal system allows you to hand
pump the used oil directly from the fry pot into
the Mobile Oil Caddy. You may then pump the
oil into the oil disposal drum by reversing the
pump rotation.
6.
Slowly turn the drain valve lever down toward the OPEN
(vertical) position. Fill the container no more than 1/2 full.
Close the drain valve and allow the oil to finish draining
from the drain pipe before removing the container. Dump
the used oil into your waste oil container. Continue this
process until the kettle is empty.
7.
Close the drain valve by rotating the drain valve lever up to
the CLOSED (horizontal) position.
8.
Using suitable gloves, unscrew the 1-1/4 NPT x 12" drain
pipe from the elbow. Unscrew the elbow from the drain
valve. Store these items in a convenient place.
9.
Reinstall the 1-1/4 NPT x 5-7/8" drain pipe into the drain
valve.
REMEMBER - Always and without fail, allow the oil to cool,
prior to pumping the oil into the Mobile Oil
Caddy. HOT OIL WILL BURN YOU.
BURN HAZARD • HOT OIL
Oil must cool to 120°F (49°C) or cooler before
draining oil from the fryer for disposal. Normal
operation temperature of the fryer is 375°F
(191°C). Death or serious injury will result from
contact with hot oil.
SLIPPING & FALLING HAZARD •
SPILLED OIL
➔Do not use the filter reservoir to discard oil.
➔Do not fill disposal container more than 1/2 full.
➔Do not leave fryer unattended when draining
oil. Oil spills may occur. Death or serious
injury can occur from slipping and falling in
spilled oil.
BURN HAZARD • FILTER RESERVOIR
When removing the filter reservoir after filtering
oil, wear insulated gloves, or allow it time to cool.
The hot oil will quickly heat the reservoir.
Serious burns could result from touching the hot
filter reservoir with bare hands.
DISCARDING USED OIL WITHOUT USING THE MOBILE
OIL CADDY
1.
2.
Press the power switch to OFF and allow the oil to cool to
120°F (49°C) or less, before attempting to drain the oil from
the fryer.
Using suitable gloves, remove the 1-1/4 NPT x 5-7/8" drain
pipe from the drain valve. Store this item in a convenient
place.
3.
Screw the 1-1/4 NPT x street elbow that was supplied with
the fryer into the drain valve. Loosen it just enough to point
forward.
4.
Screw the 1-1/4 NPT x 12" drain pipe into the elbow. Hand
tight is sufficient.
10. Clean up any spilled oil.
IMPORTANT: Remember to fill the fryer to the COLD OIL LINE
with fresh liquid shortening prior to turning the
power switch to the FRYER position. Energizing
the fryer without oil covering the elements will
cause serious damage. Damage due to operating
the fryer without oil covering the elements is
NOT covered by warranty.
Operation and Care Manual #8451 • 12
CLEANING THE FRYER
6.
KETTLE CLEANING INSTRUCTIONS
(After discarding old oil)
NOTE: For safe handling if using a metal container, allow
the solution to cool to 120°F or below. Always safely
dispose of used cleaning solution as required by
local ordinances.
HOT BOIL OUT METHOD
(Use low foaming commercial fryer cleaner only.)
SLIPPING AND FALLING HAZARD • SPILLED OIL
Do not store oil in the filter reservoir while
cleaning the kettle. If cleaning solution is
accidentally drained into the filter reservoir oil will
spill on the floor. Death or serious injury may
result from slipping and falling in spilled oil.
1.
Press the power switch to the OFF position.
2.
Discard old oil. Refer to Discarding Used Oil instructions
in this manual.
3.
Fill the fry pot to the COLD OIL FILL LINE with cold water.
BURN HAZARD • HOT WATER SPLATTER
➔Turn thermostat to lowest temperature setting
(fully counter-clockwise ).
➔Only use low foaming commercial fryer cleaner.
Follow container instructions and warnings.
➔ Do not leave fryer unattended while boiling out
kettle.
➔ If water foaming occurs, be prepared to press
power switch to OFF. Boiling water may
splatter resulting in serious injuries.
4.
For FAE-55F Model, press the power switch to the FRYER
position. Allow the water to come to a full boil, then press
the power switch to OFF. When the boiling ceases, slowly
add and stir in the low foaming commercial fryer cleanser.
Stir until the cleanser is completely mixed with the water
using the high temperature brush supplied with the fryer.
Press the power switch to FRYER. When the water begins to
boil, press to OFF. When the boiling subsides, again press
the power switch to FRYER. Repeat this procedure (i.e.,
FRYER-boil-OFF) continuously for at least 15 minutes.
For FAE-55FS Model, press the power switch to the FRYER
position. Wait 10 seconds, then press and hold CLEAN
button for six seconds until a "beep" sounds and "BOIL" is
displayed. Slowly add the low foaming commercial fryer
cleanser to the water. Stir until the cleanser is completely
mixed with the water using the high temperature brush
supplied with the fryer.
5.
For FAE-55F, allow the cleaning solution to set for 30 minutes
with the power switch in the OFF position.
For FAE-55FS, time displayed is elapsed time. When the
display reads "1:30", press the power switch to the OFF
position. Allow the solution to cool to a safe temperature.
To exit Clean mode, turn power switch OFF. With the power
switch in the OFF position, drain the cleaning solution.
7.
Rinse the kettle thoroughly with clean, warm water. Drain
into the same container as used to dispose of the cleaning
solution.
IMPORTANT: NEVER turn the filter pump ON with
anything other than commercial quality
liquid shortening in the filter reservoir.
Water will cause severe oil splatter, damage
the pump, and contaminate the cooking oil.
CLEANING THE RESERVOIR
Clean the reservoir only when empty. The filter reservoir and
filter leaf should be cleaned after each day's filtration, or as
needed to return oil promptly to the kettle.
1.
Remove the empty filter reservoir from the fryer. Clean the
filter reservoir and the filter leaf components using a hot
water rinse. Let dry overnite, or dry with a non-abrasive
cloth.
BURN HAZARD • FILTER RESERVOIR
When removing the filter reservoir after filtering
oil, wear insulated gloves, or allow it time to cool.
The hot oil will quickly heat the reservoir.
Serious burns could result from touching the hot
filter reservoir with bare hands.
2.
Rinse the reservoir thoroughly with clean, warm water to
remove all residue. Be sure to flush out the filter reservoir
suction tube. Tip the filter reservoir upside down and allow
all water to drain from the reservoir and suction tube.
3.
Dry all parts thoroughly with a non-abrasive cloth.
4.
Assemble and reinstall the filter leaf and filter reservoir.
Refer to Preparation Prior to Operation section in this manual.
DAILY CLEANING OF FRYER
As required, wash the exterior of the fryer with warm water, mild
soap or detergent, and a clean, non-abrasive cloth. Dry with a
clean, non-abrasive cloth.
WARNING • SOAP USE
Any components of the fryer that come in contact with the liquid
shortening should NOT be cleansed with soap or detergent. If
this does happen, rectify the situation by rinsing these parts with
a mild vinegar/water solution (2 teas. vinegar per 1 gal. water).
Then, rinse again thoroughly with clear water, and dry with a
clean, non-abrasive cloth.
Operation and Care Manual #8451 • 13
T R O U B L E S H O O T I N G • F A E - 5 5 F S • S O L I D S TAT E C O N T R O L
PROBLEM
REMEDY
FRYER WILL NOT HEAT
WHEN POWER SWITCH IS
IN FRYER POSITION
DISPLAY not lit.
➔Check the service power breaker. Reset if tripped. If breaker continues to trip, contact a licensed
electrician to repair field wiring (if that is the cause), or contact an authorized service agency.
DISPLAY LIT,
READY indicator lit,
HEAT indicator not lit.
➔Fryer is at programmed temperature. Display reads "00:00". Check programmed temperature by
pressing TEMP key. If programmed temperature is too low, adjust temperature or select another
menu key. (See Operating Instructions for Solid State Control, in this manual).
➔Fryer is in CLEAN mode. If CLEAN indicator is lit and display reads "boil", press power switch
to the OFF position, wait 10 seconds, then press power switch back to the FRYER position.
➔Fryer is in STANDBY mode. If the STANDBY indicator is lit, press STANDBY key for 3 seconds
until a beep sounds. Press and release a MENU key to resume cooking.
➔If the above instructions do not solve problem, contact an authorized service agency for repair.
DISPLAY not lit,
HEAT indicator lit.
DISPLAY LIT,
HEAT indicator lit,
hi-limit thermostat not
"tripped"
CRADLE LIFT WILL NOT
LOWER - or CRADLE LIFT WILL NOT
RAISE
FILTER PUMP WILL NOT
RUN
➔Check the hi-limit thermostat. Reset by firmly pressing the hi-limit reset button on the lower
control panel until it "clicks".
FIRE HAZARD/HOT OIL
The hi-limit thermostat is a fire protection device. If tripping persists, clean the space
between the hi-limit bulb and the element to enhance oil flow and facilitate reset.
Otherwise, contact your authorized service agency for repairs. Do not attempt to
bypass or hold in the button of the hi-limit thermostat, or a fire may result.
➔Probable cause is a damaged internal component. Contact an authorized service agency.
➔Cradle lift must be lowered manually, but will raise automatically at the end of a cook cycle.
During the period between cook cycle, in the PAUSE mode or during PREHEAT, the cradle lift is
lowered by pressing BASKET key, then DOWN arrow, and raised by pressing BASKET key, then
UP arrow.
➔The lift motor has a 10 second delay (after an up or down command is entered) until it will accept
another command. The lift motor is de-energized during a cook cycle.
➔At the end of a cook cycle, when the time remaining on the readout reaches 00:00, the cradle lift
should raise.
➔If the cradle lift does not behave as described above, probable cause is a damaged control, an
internal adjustment or one or more damaged internal components. Contact a factory authorized
service agency for repair.
➔Verify that the power switch (upper control panel) is in the
FILTER position.
➔Press the red reset button on the filter pump motor,
accessible on the back of the fryer. If the pump motor
continues to trip out, or if no other cause is apparent for the
pump's failure to run, contact a factory authorized service
agency.
BURN HAZARD • HOT OIL SPLATTER
Protective clothing and gloves must be worn
whenever servicing the filter during the filtering
cycle. Hot oil may splatter which could result in
serious injury.
continued.......
NOTE: Any servicing or adjustment which requires the removal of any cover or other protective panel
must be performed by a factory authorized service agency.
Operation and Care Manual #8451 • 14
TR O U B LE S H O OTI N G • FAE-55F • MAN UAL CO NTR O L
PROBLEM
REMEDY
FRYER WILL NOT HEAT
Power light NOT ON.
➔Check the service power breaker. Reset if tripped. If breaker continues to trip, contact a licensed
electrician to repair field wiring (if that is the cause) or contact an authorized service agency.
➔Check the hi-limit thermostat. Reset by pressing the hi-limit reset button on the lower control
panel until it "clicks".
FIRE HAZARD/HOT OIL
The hi-limit thermostat is a fire protection device. If tripping persists, clean debris from
the space between the hi-limit bulb and the element to enhance oil flow and facilitate
reset. Otherwise, contact your authorized service agency for repairs. Do not attempt to
bypass or hold in the button of the hi-limit thermostat, or a fire may result.
Power light ON;
Heat light NOT ON.
➔Check setting of temperature control thermostat. If turning the thermostat fully clockwise
(i.e., to a higher temp) does not turn the heat light ON, and also cause the oil to heat, or if the
control thermostat calibration is significantly incorrect, contact an authorized service agency.
Power Light ON;
Heat Light ON.
➔Probable cause is a damaged internal component. Contact an authorized service agency.
CRADLE LIFT WILL NOT
LOWER - or - CRADLE
LIFT WILL NOT RAISE
FILTER PUMP WILL NOT
RUN
OIL NOT RETURNING
TO FRY POT DURING
FILTER CYCLE
➔Verify that the timer is set to time other than 0. When the red button in the center of the timer is
pressed, the cradle lift should lower.
➔When the timer reaches 0, the cradle lift should raise.
➔If the cradle lift does not behave as described above, probable cause is an internal adjustment, or
one or more damaged internal components. Contact an authorized service agency.
➔Verify that the power switch (upper control panel) is in the FILTER
position. On FAE-55F,. also verify that the filter pump switch
(lower control panel) is in the ON position.
➔Press the red reset button on the filter pump motor, accessible on
the back of the fryer. If the pump motor continues to trip out, or if
no other cause is apparent for the pump's failure to run, contact a
factory authorized service agency.
The surface of the filter leaf may become clogged with crumbs or other debris.
If this happens:
➔Turn OFF the drain valve handle and press the power switch OFF.
➔Using appropriate gloves, carefully and very slowly slide the filter reservoir out approximately
6". Gently run the stainless steel shovel across the surface of the filter leaf and scrape the crumbs
toward the rear. Carefully and very slowly slide the filter reservoir back into place, making sure
the suction tube is properly seated in the receptacle.
BURN HAZARD/HOT OIL SPLATTER
Protective clothing and gloves must be worn whenever servicing the filter during the
filtering cycle. Hot oil may splatter which could result in serious injury.
FILTER PUMP WILL NOT
PUMP - or -PUMPS AIR
DURING FILTERING.
Bubbles in the oil while filtering and/or a failure of the pump to achieve or maintain prime indicate that air is
entering the suction side of the pump.
➔Examine the suction tube O-ring. A damaged or improperly seated O-ring can cause the filter
pump to lose suction. This will result in a failure to filter the oil, and in a failure of the oil to be
returned to the fry pot. Replace suction tube O-ring if it is missing, cracked, distorted, or scuffed.
➔Verify that the suction tube is fully seated in the suction line receptacle.
NOTE: Any servicing or adjustment which requires the removal of any cover or other protective panel
must be performed by a factory authorized service agency.
Operation and Care Manual #8451 • 15
T R O U B L E S H O O T I N G • F A E - 5 5 F S • S O L I D S TAT E C O N T R O L
PROBLEM
REMEDY
OIL NOT RETURNING TO
FRY POT DURING FILTER
CYCLE
The surface of the filter leaf may become clogged with crumbs or other debris. If this happens:
➔Turn OFF the drain valve handle and press the power switch OFF.
➔Using appropriate gloves, carefully and very slowly slide the filter reservoir out approximately
6". Gently run the stainless steel shovel across the surface of the filter leaf and scrape the crumbs
toward the rear. Carefully and very slowly slide the filter reservoir back into place, making sure
the suction tube is properly seated in the receptacle.
FILTER PUMP WON'T PUMP
- or - PUMPS AIR DURING
FILTERING
Bubbles in the oil while filtering, and/or a failure of the pump to achieve or maintain prime indicate that air
is entering the suction side of the pump.
➔Examine the suction tube O-ring. A damaged or improperly
seated O-ring will cause the filter pump to lose suction. This
will result in a failure to filter the oil, and in a failure of the oil
to be returned to the fry pot. Replace suction tube O-ring if it
is missing, cracked, distorted, or scuffed.
➔Verify that the suction tube is fully seated in the suction line
receptacle.
BURN HAZARD • HOT OIL SPLATTER
Protective clothing and gloves must be worn
whenever servicing the filter during the filtering
cycle. Hot oil may splatter which could result in
serious injury.
NOTE: Any servicing or adjustment which requires the removal of any cover or other protective panel
must be performed by a factory authorized service agency.
SERVICE PARTS LIST
Use only factory authorized service parts and replacement filters.
Contact the Alto-Shaam factory for advice.
Fryer Accessories
Basket
Lift Cradle
Brush, heating element cleaning
Flavor Saver oil filter powder (45pk)
Mobile Oil Disposal Caddy
Paddle, stirring chicken
Brush, fry pot cleaning
Drip pan
Filter leaf assembly
Stainless steel shovel
Kettle cover
Maintenance Items
Lube, molybdenum disulfide
O-ring, suction tube
Dowel, cleaning
O-ring, filter leaf
Operation and Care Manual #8451 • 16
Operation and Care Manual #8451 • 17
Operation and Care Manual #8451 • 18
Operation and Care Manual #8451 • 19
Operation and Care Manual #8451 • 20
Operation and Care Manual #8451 • 21
Tr a n s p o r t a t i o n
Damage and Claims
All Alto-Shaam equipment is
sold F.O.B. shipping point,
and when accepted by the
carrier, such shipments
become the property of
the consignee.
Should damage occur in shipment, it is a matter between the carrier
and the consignee. In such cases, the carrier is assumed to be
responsible for the safe delivery of the merchandise, unless
negligence can be established on the part of the shipper.
1. Make an immediate inspection while the equipment is still in
the truck or immediately after it is moved to the receiving area.
Do not wait until after the material is moved to a storage area.
2. Do not sign a delivery receipt or a freight bill until you have
made a proper count and inspection of all merchandise received.
3. Note all damage to packages directly on the carrier’s delivery
receipt.
4. Make certain the driver signs this receipt. If he refuses to sign,
make a notation of this refusal on the receipt.
5. If the driver refuses to allow inspection, write the following on
the delivery receipt:
Driver refuses to allow inspection of
containers for visible damage.
6. Telephone the carrier’s office immediately upon finding
damage, and request an inspection. Mail a written confirmation
of the time, date, and the person called.
7. Save any packages and packing material for further inspection
by the carrier.
8. Promptly file a written claim with the carrier and attach copies
of all supporting paperwork.
We will continue our policy of assisting our customers in collecting
claims which have been properly filed and actively pursued. We
cannot, however, file any damage claims for you, assume the
responsibility of any claims, or accept deductions in payment for
such claims.
Record the model and serial numbers of the unit for easy reference. Always refer
to both model and serial numbers in your correspondence regarding the unit.
Model: _______________________________________________________
Serial Number: _________________________________________________
Purchased From: ________________________________________________
Date Installed: _______________
Voltage: ___________________
Fryer • Original Equipment Limited Warranty
Alto-Shaam, Inc. warrants to the original purchaser that any original part that
is found to be defective in material or workmanship will, at our option, subject
to provisions hereinafter stated, be replaced with a new or rebuilt part.
The labor warranty remains in effect one (1) year from installation or fifteen
(15) months from the shipping date, whichever occurs first. Alto-Shaam will
bear normal labor charges performed during standard business hours not
subject to overtime, holiday rates, or any additional fees.
The parts warranty remains in effect one (1) year from installation or fifteen
(15) months from the shipping date, whichever occurs first.
This warranty does not apply to:
1.
Safety thermostat, circuit breaker and overload protector reset or fuse
replacement unless specifically warranted.
2.
Any and all malfunction due to operation at voltages other than specified
on the equipment. Conversion to correct voltage and phase are the
responsibility of the purchaser.
3.
Any and all problems due to electrical connections not in accordance with
electrical code requirements and the wiring diagrams supplied with the
equipment.
4.
Calibration of heat controls on original components after the first sixty
(60) days.
5.
Replacement of items subject to normal wear. Such items include but are
not limited to knobs, light bulbs, baskets, grids, mechanical timers,
thermocouples, fuses and indicating lights.
6.
Normal maintenance functions including lubrication, adjustments of airflow, thermostats, door mechanisms, micro-switches, burners and pilot
burners.
7.
Installation labor, inspection, and start-up are not considered warranty
items.
8.
Charges incurred by delays or operational restrictions which hinder the
ability of a service technician to perform service are not covered by
warranty.
9.
Equipment damage caused by accident, shipping, improper installation or
alteration.
10. Equipment used under conditions of abuse, misuse, carelessness or
abnormal conditions including equipment subjected to harsh or
inappropriate chemicals, poor water quality or equipment with missing or
altered serial numbers.
11. Any losses or damages resulting from malfunction, including loss of
product or consequential or incidental damages of any kind.
12. Equipment modified in any manner from original model, substitution of
parts other than factory authorized parts, removal of any parts or addition
of any parts.
Alto-Shaam factory authorized replacement parts are warranted for ninety (90)
days from date of purchase on non-warranty equipment. Replacement parts
warranty is limited to the defective part only. The use of parts other than
factory authorized Alto-Shaam replacement parts completely voids warranty
coverage.
This warranty is exclusive and is in lieu of all other warranties, expressed or
implied, including the implied warranties of merchantability and fitness for
purpose. In no event shall the Company be liable for loss of use, loss of
revenue, or loss of product or profit, or for indirect or consequential damages.
This warranty is in lieu of all other warranties expressed or implied and AltoShaam, Inc. neither assumes or authorizes any persons to assume for it any
other obligation or liability in connection with Alto-Shaam equipment.
COOK/HOLD/SERVE SYSTEMS BY
®
W164 N9221 Water Street ● P.O. Box 450 ● Menomonee Falls, Wisconsin 53052-0450 ● U.S.A.
PHONE:
262.251.3800
FAX:
262.251.7067 ● 800.329.8744 U.S.A./CANADA
WEBSITE:
800.558.8744 U.S.A./CANADA
262.251.1907 INTERNATIONAL
WWW.alto-shaam.com
PRINTED IN U.S.A.
Business Name_______________________ Location________________
Installation Date_____________________Technician_________________
Service Co.__________________________________________________
Address__________________________State_________Zip_____
Telephone No. (
)_________________________
Equipment Model No.____________________
Equipment Serial No._____________________
Voltage ✔ one
❑ 208V
❑ 240V
❑ 380-415V
Please have this information available if calling for service.
Operation and Care Manual #8451 • 23