1
SEK-1000
Samsung Evolution Kit
Thank you for purchasing this Samsung product.
To receive more complete service, please register your product at www.samsung.com/register
Model _____________ Serial No. _____________
✎
I f you have any questions, please call us at 1-800-SAMSUNG (1-800-726-7864) for assistance.
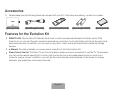
Accessories
✎ Please make sure the following items are included with your Kit. If any items are missing, contact your dealer.
Evolution Kit
LAN Cable Adapter
Smart Touch Control
Batteries (AAA x 2)
User Manual
Features for the Evolution Kit
Ř SMART HUB: The Evolution Kit features Smart Hub, a multi-purpose entertainment and family center. With
Smart Hub, you can surf the web, download applications, and stay in touch with family and friends through social
networking services. In addition, you can view or play photo, video, and music files stored on external storage
devices.
Ř e-Manual: Provides a detailed, on-screen user’s manual built into the Evolution Kit.
Ř Smart Touch Control: The Smart Touch Control makes it easier and more convenient to use the TV. For example,
you can use the remote panel’s built-in touch pad to move the focus and make selections as you would on a
computer using a mouse. In addition, you can use the virtual remote panel displayed on the screen to change
channels, play media files, and access favorites.
English-2
Limitations
Upgrading to a 2013 TV using the evolution kit results in the following limitations:
Ř The Evolution Kit provides many functions that are available on the 2013 Samsung TVs, except some functions, such
as Screen Mirroring.
Ř The Evolution Kit may not support some apps and functions that are available on the 2012 Samsung TV, such as
Software Update > By Channel, printing a photo.
Ř A wireless network connection via Plug & Access is not supported. Use a different method such as entering a
password or WPS to establish a wireless network connection.
Ř Soft APs are not supported. Use Wi-Fi Direct to connect mobile devices to the TV directly.
Ř Installing the evolution kit may reset some of the existing TV settings.
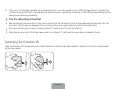
Attaching the Evolution Kit to a TV
✎ First, check the network status and ensure there is an Internet connection. Internet access is required to use the
evolution kit.
✎ Remove the USB device from the TV before installing the Evolution Kit. If the USB device is connected to the TV, the
Evolution Kit may not be installed properly.
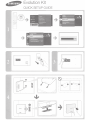
By mounting the evolution kit onto your existing Samsung TV, you can upgrade the TV’s software without purchasing a new
TV. Use the evolution kit to unlock the new features and services offered by Samsung Electronics.
1.
The TV must first be updated to the latest software version. Navigate to Software Update (Support > Software Update)
and update the software using Online.
English-3
2.
Turn off the TV and then insert the evolution kit into the two slots as shown in the diagram below. Press the PUSH button
on the right side of the kit and click the kit into place. Unplug the TV’s power cable before mounting the evolution kit.
2
1
3.
To make sure the Evolution Kit attached securely, press it again, as shown by the figure below.
4.
Turn on the TV using the Smart Touch Remote unit accompanying the evolution kit and wait for the TV to recognize the
kit. The recognition takes about 1 minute.
5.
Follow the on-screen instructions to upgrade the TV to the 2013 version.
6.
Once the upgrade is complete, the TV will turn off and then back on automatically.
✎ The LAN cable adapter and Smart Touch Remote unit can only be used after installing the evolution kit on the TV.
English-4
✎ Once your TV has been updated using the evolution kit, you will be able to use a USB storage device to update the
software. Ensure that the TV update file and the evolution kit update file contained on the USB storage device are the
same version before proceeding.
[ The Pre-Mounting Checklist
Ř Before snapping the evolution kit into place, ensure that the other end of the kit has been inserted securely into the
two slots. The kit may be damaged if you continue without securely positioning the kit inside the slots.
Ř If you are mounting the kit onto a wall-mounted TV, remove the TV from the wall first.
Ř Mounting an evolution kit that has been used on a different TV will reset the user data contained in the kit.
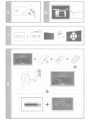
Detaching the Evolution Kit
Grab the Evolution Kit’s edges and pull out the Evolution kit with the right side pushed to detach it from the TV, as illustrated
by the figure below.
1
2
English-5
Correcting if Improperly Attached
Push one of the corners in the direction of arrow ˾ and press the PUSH button
indicated by arrow ˿.
2
1
Recovering a Previous State
1.
Turn off the TV and detach the evolution kit from the TV. Unplug the TV’s power cable before detaching the kit.
2.
Turn on the TV, navigate to Software Update (Support > Software Update), and then update the software.
✎ Update the software via the Internet. Otherwise, you will not be able to update via USB or play DRM-protected
videos.
Connecting to a wired network
1
To use a wired network on a TV that has an Evolution
Kit attached, disconnect the LAN cable from the TV, and
then connect it to the Kit using the LAN Cable Adapter.
2
English-6
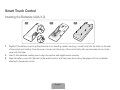
Smart Touch Control
Inserting the Batteries (AAA X 2)
1
2
3
or
1.
Slightly lift the battery cover by pulling the strap or by inserting a plastic card (e.g. a credit card) into the notch on the side
of the control and twisting. Once the cover is loose, hold the body of the control firmly with one hand and pull up on the
cover with the other.
2.
Insert 2 AAA batteries, making sure to align the positive and negative ends correctly.
3.
Align the battery cover with the back of the remote control, and then press down along the edges until it is completely
attached to the remote control.
English-7
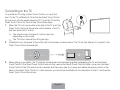
Connecting to the TV
To operate the TV using a Smart Touch Control, you must first
pair it to the TV via Bluetooth. Note that the Smart Touch Control
will only work with the paired Samsung TV. To pair the TV and the
Smart Touch Control for the first time, follow these steps:
1.
When the TV is off, move within a few feet of the TV, point the
Smart Touch Control at the remote control receiver of the TV,
and then press the TV button.
✎ The remote control receiver’s location may vary
depending on the model.
✎ The TV button transmits an IR signal only.
2.
A Bluetooth icon will appear at the bottom left of the screen as shown below. The TV will then attempt to connect to the
Smart Touch Control automatically.
3.
When pairing is successful, the TV displays a small green circle between graphics representing the TV and the Smart
Touch Control. If the Smart Touch Control does not pair, remove the Smart Touch Control’s battery cover, aim the Smart
Touch Control at the TV’s remote control receiver, and then use a pen tip to press and release the pairing button on the
back of the Smart Touch Control. In a few seconds, you should see the Bluetooth icon described in Step 2, and then the
Smart Touch Control should pair.
English-8
Reconnecting the Smart Touch Control
If you need to re-establish the connection between the TV and the Smart
Touch Control, remove the Smart Touch Control’s battery cover, aim the Smart
Touch Control at the TV’s remote control receiver, and then press and release
the pairing button on the back of the Smart Touch Control. The Smart Touch
Control will perform the pairing process described on page 8.
<The Smart Touch Control’s pairing button>
Battery Low Alarm
When the Smart Touch Control’s batteries become low, an alarm window
appears at the bottom left of the TV screen. When the alarm window pops up,
replace the batteries in the Smart Touch Control with fresh alkaline batteries.
<Low battery alarm window>
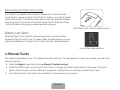
e-Manual Guide
The e-Manual embedded in your TV contains information about your TV’s key features. To view the e-manual, use one of the
following methods:
Ř Open the Support menu and choose e-Manual (Troubleshooting).
Ř Press the MORE button on the Smart Touch Control to display the virtual remote panel on the screen. Flick left or
right on the touch pad until the e-Manual icon appears. Highlight the icon, and then press the touch pad.
✎ A printable version of this guide is also available at www.samsung.com/support.
English-9
Using the Smart Touch Control
Use Voice Recognition function with the microphone
embedded in remote control.
✎ The Voice Recognition function can be affected by
Turn on and off the satellite or cable set-top box connected
to the TV. For this, the Smart Touch Control must be
configured as a universal remote control. See the e-Manual
chapter, Controlling the TV > Universal Remote Setup.
unclear pronunciation, voice level, or surrounding
noise.
✎ This function is not available for PDP 7000 series.
Turns the TV on and off.
TV
Displays and selects the available video sources.
STB
MIC
SOURCE
VOICE: Take your voice command and enter a text using
your voice.
Adjusts the volume.
VOICE
CH
VOL
Changes channels.
MUTE
MUTE: Cuts off the
sound temporarily.
MORE
Displays a virtual remote panel on the screen. See the
e-Manual chapter, Controlling the TV > Using the Virtual
Remote Control.
Touch Pad
LIGHT: Turn on the backlight for the buttons. The backlight
lasts for only a few seconds. Turns the remote control light
on or off. When on, the buttons become illuminated for a
moment when pressed. (Using the remote control with this
button set to On will reduce the battery usage time.)
DVR: This button is only available when the Smart Touch
Control is configured to function as a universal remote
control to control a set-top box. Run DVR (Digital Video
Recording) in set-top box.
MENU: Opens the OSD.
✎ This function is not available for PDP 7000 series.
Ř Drag on the touch pad to move the focus on the
screen.
Ř Press the touch pad to run, activate, or select the
highlighted item.
Ř Press and hold the touch pad to display the Channel
List.
LIGHT
DVR
MENU
3D
Displays the EPG (Electronic Program Guide).
RETURN
EXIT
SMART HUB
GUIDE
Brings up Smart Hub applications. See the e-Manual
chapter, SMART TV Features > Smart Hub.
3D: Turns the 3D function on or off. See the e-Manual
chapter, TV Viewing > 3D TV.
✎ To exit an application that is running easily, press
Returns to the previous menu.
the ™ button.
English-10
Using the touch pad
Use the touch pad to implement various commands. Navigate to Tutorial (System > Device Manager > Smart Touch
Control Settings > Tutorial) to view an on-screen guide to using the Smart Touch Control.
Dragging
Pressing
Drag on the touch pad to move the focus, pointer, or
highlight in the direction the finger is dragging.
Press the touch pad to select the item highlighted or in
focus. When watching TV, press and hold the touch pad for
2 seconds displays the channel list. On some apps, press
and hold the touch pad for 2 seconds displays a list of
functions available for the app.
English-11
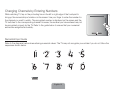
Changing Channels by Entering Numbers
While watching TV, tap on the protruding line on the left or right edge of the touchpad to
bring up the numerical input window on the screen. Use your finger to enter the number for
the channel you want to watch. The recognized number is displayed on the screen and the
TV switches to the corresponding channel. However, the number you have entered may not
be recognized properly by the TV. Refer to the guide below to ensure that your numerical
entries are recognized accurately.
Numerical Input Guide
Refer to the diagrams below when entering numerical values. The TV may not recognize your entries if you do not follow the
sequences shown below.
English-12
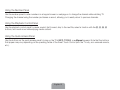
Show Status and Notification Banner
Press the MORE button on the Smart Touch Control and then select STATUS on the virtual remote panel that appears on the
screen. The status and notification banner appears at the top of the screen. For more information about using the status and
notification banner, refer to e-Manual > SMART TV Features > Status and Notification.
Recommended
Press the RECOMM. / SEARCH button and then select the Recommended from the list on bottom of the screen. This
shows the current/scheduled program and application recommendations.
Select a program that is currently airing to jump to the corresponding channel or a program that is scheduled to air to set up a
Schedule Viewing setting. Refer to e-Manual > SMART TV Features > On TV for more information.
Select an application to launch. Samsung Apps will launch if the selected application is not installed on the TV. Refer to
e-Manual > SMART TV Features > Apps > Samsung Apps for more information.
History
Press the RECOMM. / SEARCH button and then select History from the list displayed at the bottom of the screen. This
displays an interactive list of recently accessed channels, media content and applications.
Searching
Press the RECOMM. / SEARCH button on the Smart Touch Control. The list appears at the bottom of the screen. Press the
RECOMM. / SEARCH button again. The keypad will appear on the screen. Enter search criteria to search not only many
apps and their contents on the TV but also the Web.
Refer to e-Manual > SMART TV Features > Searching for more information.
English-13
Using the Virtual Remote Control
Press the MORE button to display the virtual remote panel on the TV screen. The virtual remote panel consists of the number
panel, a playback control panel, and the quick access panel. Use the touch pad to highlight and select icons, numbers, and
buttons on the panels.
✎ The displayed virtual remote panel on the TV screen may differ depending on the country.
Changing the Virtual Remote Panel
You can change which virtual remote panel is displayed on the TV screen. To shift between panels, move the focus highlight
beyond the left or right edge of the displayed panel.
Use left/right scroll function on the touch pad to change the panel easily.
Change a position of the Virtual Remote Panel
Press the MORE button on the Smart Touch Control. The virtual remote panel appears on the screen. Press and hold the
touch pad for one second. Users can change a position of the virtual remote panel of the screen.
English-14
Using the Number Panel
Use the number panel to enter numbers on a keypad screen or webpage or to change the channel while watching TV.
Changing the channel using the number pad leaves a record, allowing you to easily return to previous channels.
Using the Playback Control Panel
Use the playback control panel to pause, rewind, fast forward, skip to the next file, select a function with the a, b, {, }
buttons, and much more while enjoying media content.
Using the Quick Access Panel
Use the buttons on the quick access panel to bring up the TV’s INFO, TOOLS, or e-Manual screens. Note that the buttons
that appear may vary depending on the operating mode of the Smart Touch Control (with the TV only, as a universal remote,
etc.).
English-15
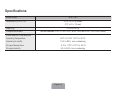
Specifications
Model Name
SEK-1000
Dimensions (W x H x D)
5.0 x 3.5 x 0.6 inches
(127 x 91 x 16 mm)
Weight (g)
Compatible models
0.5 lbs (250 g)
Models released in 2012: LED 7500, 8000, 9000 and PDP 7000, 8000 series
Environmental Considerations
Operating Temperature
50°F to 104°F (10°C to 40°C)
Operating Humidity
10% to 80%, non-condensing
Storage Temperature
-4°F to 113°F (-20°C to 45°C)
Storage Humidity
5% to 95%, non-condensing
English-16
WARRANTY
This Samsung product is warranted for the period of twelve (12) months from the original date
of purchase, against defective materials and workmanship. In the event that warranty service is
required, you should first return the product to the retailer from whom it was purchased. However,
Samsung Authorized Service Centers will comply with this warranty during the Warranty Period. To
obtain details, please contact your nearest Authorized Service Center.
PROCEDURE FOR MAKING A WARRANTY CLAIM
To make a claim under the warranty, you must contact the Samsung Contact Center during the
Warranty Period to discuss the problems you are having with the product. If a repair or replacement
is required, you will be provided with a Warranty Claim Number and address of an Authorized
Service Center.
If you are provided with a Warranty Claim Number, to obtain a repair or replacement of the product,
you must send the product to the Authorized Service Center advised together with:
(i) a copy of your completed warranty card or, if you have already provided this to Samsung, your
name, address and contact telephone number;
(ii) your original receipt, invoice or sales slip for the purchase of the product as new;
(iii) your Warranty Claim Number.
Samsung will then repair or replace the product and return it to you using the contact details
provided.
WARRANTY CONDITIONS
1. The warranty is only valid if the above procedure for making a warranty claim is followed.
2. Samsung’s obligations are limited to the repair or, at its discretion, replacement of the product or
the defective part.
3. Warranty repairs must be carried out by Samsung Authorized Service centers. No reimbursement will be made for repairs carried out by service centers or dealers that are not
authorized by Samsung and any such repair work and damage to the products caused by such
repair work will not be covered by this warranty.
4. This product is not considered to be defective in materials nor workmanship by reason that
it requires adaptation in order to conform to national or local technical or safety standards
in force in any country other than the one for which the product was originally designed and
manufactured. This warranty will not cover, and no re-imbursement will be made for such
adaptation, nor any damage which may result.
5. The warranty does not apply to any product that has been damaged or rendered defective as a
result of any of the following excluded reasons, namely:
a. as a result of accident, misuse, or abuse;
b. through the failure to use this product for its normal purposes;
c. by the use of parts not manufactured or sold by Samsung;
d. by modification without the written permission of Samsung;
e. by damage resulting from transit, neglect, power surge or failure;
f. by damage resulting from lightning, water, fire, or acts of God;
g. as a result of normal wear and tear; or
h. difference in broadcasting methods or product standards between countries.
6. This warranty is valid for any person who legally acquired possession of the product during the
warranty period.
7. NOTHING IN THESE WARRANTY CONDITIONS SHALL EXCLUDE OR LIMIT SAMSUNG’S
LIABILITY FOR DEATH OR PERSONAL INJURY CAUSED BY THE PROVEN NEGLIGENCE OF
SAMSUNG, UNLESS SUCH LIMITATION OR EXCLUSION IS PERMITTED BY APPLICABLE
LAW.
8. WITH THE EXCEPTION OF SAMSUNG’S LIABILITY WHICH CANNOT BE EXCLUDED OR
LIMITED BY LAW, SAMSUNG SHALL NOT BE LIABLE FOR: ANY INDIRECT, INCIDENTAL,
SPECIAL OR CONSEQUENTIAL DAMAGES LOSSES OR EXPENSES; OR LOST PROFITS;
OR LOSS OF USE OR LOSS OF DATA; OR DAMAGE TO GOODWILL, REPUTATION OR LOST
BUSINESS, ARISING DIRECTLY OR INDIRECTLY, FROM THE PURCHASE, USE OR SALE
OF THE PRODUCT, WHETHER OR NOT SAMSUNG WAS ADVISED OR AWARE OF THE
POSSIBILITY OF SUCH DAMAGES, LOSSES OR EXPENSES.
9. WITH THE EXCEPTION OF SAMSUNG’S LIABILITY WHICH CANNOT BE EXCLUDED
OR LIMITED BY LAW, SAMSUNG’S LIABILITY UNDER OR IN CONNECTION WITH THIS
WARRANTY OR THE PURCHASE, USE OR SALE OF THE PRODUCT SHALL NOT EXCEED
THE PRICE PAID FOR THE PRODUCT AS NEW.
10. UNLESS PROVIDED FOR IN THIS WARRANTY, ALL CONDITIONS, WARRANTIES AND TERMS
IMPLIED BY STATUTE OR OTHERWISE ARE HEREBY EXCLUDED TO THE MAXIMUM EXTENT
PERMISSIBLE BY LAW.
11. The above warranty conditions do not affect your statutory rights as a consumer or otherwise.
English-17
Notice
IMPORTANT NOTE:
FCC Statement
This equipment has been tested and found to comply with the limits for a Class B digital device,
pursuant to Part 15 of the FCC Rules. These limits are designed to provide reasonable protection
against harmful interference in a residential installation. This equipment generates, uses and can
radiate radio frequency energy and, if not installed and used in accordance with the instructions,
may cause harmful interference to radio communications. However, there is no guarantee
that interference will not occur in a particular installation. If this equipment does cause harmful
interference to radio or television reception, which can be determined by turning the equipment off
and on, the user is encouraged to try to correct the interference by one of the following measures:
FCC Radiation Exposure Statement:
Ř Reorient or relocate the receiving antenna.
Ř Increase the separation between the equipment and receiver.
Ř Connect the equipment into an outlet on a circuit different from that to which the receiver is
connected.
Ř Consult the dealer or an experienced radio/TV technician for help.
FCC Caution:
Any changes or modifications not expressly approved by the party responsible for compliance could
void the user’s authority to operate this equipment.
This device complies with Part 15 of the FCC Rules. Operation is subject to the following two
conditions:
(1) This device may not cause harmful interference, and
(2) this device must accept any interference received, including interference that may cause
undesired operation.
This equipment complies with FCC radiation exposure limits set forth for an uncontrolled
environment.
IC Statement
This Class B digital apparatus complies with Canadian ICES-003.
Cet appareil numérique de la classe B est conforme á la norme NMB-003 du Canada.
This device complies with Industry Canada license-exempt RSS standard(s). Operation is subject
to the following two conditions: (1) this device may not cause interference, and (2) this device must
accept any interference, including interference that may cause undesired operation of the device.
Le présent appareil est conforme aux CNR d'Industrie Canada applicables aux appareils radio
exempts de licence. L'exploitation est autorisée aux deux conditions suivantes: (1) l'appareil ne doit
pas produire de brouillage, et (2) l'utilisateur de l'appareil doit accepter tout brouillage radioélectrique
subi, même si le brouillage est susceptible d'en compromettre le fonctionnement.
IC Radiation Exposure Statement:
This equipment complies with IC RSS-102 radiation exposure limits set forth for an uncontrolled
environment.
English-18
BN68-05240A-01
Evolution Kit
QUICK SETUP GUIDE
0
i)
I
I
: 8· 6 8
_,,0
I
f)
E-n~l
IAIIU6
I
0
i
:
I:
'---------------'
I
I
·~
~ .. ~
I
··················>
,
:
I
\
\
'].·.~+
+. · . ·
~"
ll
·.
-
'
I;
. '
\t
I
I
.
I
~.
··•·•
• •
'
j
\
)
I' ----
,"
,