1
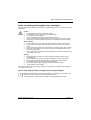
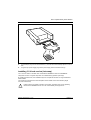
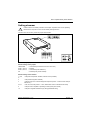
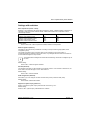
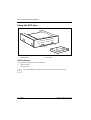
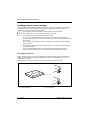
Operating Manual DAT 72 (DDS Gen5) 36/72 GBYTE English Are there ... ... any technical problems or other questions you need clarified? Please contact our Help Desk (see warranty card). The latest information on our products, tips, updates, etc., can be found on the Internet under: www.fujitsu-siemens.com Dieses Handbuch wurde auf Recycling-Papier gedruckt. This manual has been printed on recycled paper. Ce manuel est imprimé sur du papier recyclé. Este manual ha sido impreso sobre papel reciclado. Questo manuale è stato stampato su carta da riciclaggio. Denna handbok är tryckt på recyclingpapper. Dit handboek werd op recycling-papier gedrukt. Herausgegeben von/Published by Fujitsu Siemens Computers GmbH Bestell-Nr./Order No.: A26361-H939-Z100-1-7419 Printed in the Federal Republic of Germany AG 0206 02/06 A26361-H939-Z100-1-7419 DAT 72 (DDS Gen5) 36/72 GBYTE OPERATING MANUAL DAT 72 (DDS Gen5) 36/72 GBYTE Operating Manual February 2006 edition Microsoft, MS, MS-DOS and Windows are registered trademarks of Microsoft Corporation. Other software and hardware names referred to in the manual are generally also registered trademarks whose use is also subject to legal conditions. Copyright 2006 All rights, including rights of translation, reproduction by printing, copying, or similar methods, in part or in whole, are reserved. Offenders will be liable for damages. All rights, including rights created by patent grant or registration of a utility model or design, are reserved. Delivery subject to availability. The right to technical modification is reserved. This manual was produced by cognitas Gesellschaft für Technik-Dokumentation mbH www.cognitas.de Contents Introduction........................................................................................................................................... 1 Functions ...................................................................................................................................... 1 Notational conventions ................................................................................................................. 2 Important notes..................................................................................................................................... 3 Safety ........................................................................................................................................... 3 Manufacturer’s notes .................................................................................................................... 3 Environmental protection.............................................................................................................. 3 Cleaning notes ............................................................................................................................. 5 Notes on working with magnetic tape cartridges .......................................................................... 7 How to order magnetic tape cartridges and cleaning cartridges .......................................... 7 Installing a DAT drive ........................................................................................................................... 8 Installing 5 1/4 inch version .......................................................................................................... 8 Integrating DAT drive (5 1/4 inch version)............................................................................ 8 Connecting DAT drive (5 1/4 inch version)........................................................................... 8 Installing 3 1/4 inch version (hot-swap) ........................................................................................ 9 Features of hot-swap drive................................................................................................. 10 Backup software for hot-swap drives ................................................................................. 10 Hot-swap installation in a PRIMERGY server (under Windows) ........................................ 11 Hot-swap replacement in a PRIMERGY server (under Windows) ..................................... 12 Installing or eplacing a drive in a PRIMERGY server (under LINUX)................................. 14 Setting streamer ................................................................................................................................. 15 Jumper settings .......................................................................................................................... 16 Settings with switches ................................................................................................................ 17 Using the DAT drive ........................................................................................................................... 18 LED indicators ............................................................................................................................ 18 Meaning of the LED indicators ........................................................................................... 19 Handling magnetic tape cartridges............................................................................................. 20 Using Write-protection........................................................................................................ 20 Loading a cartridge............................................................................................................. 21 Unloading a cartridge ......................................................................................................... 21 Emergency unload of magnetic tape cartridge................................................................... 21 Troubleshooting.................................................................................................................................. 22 Technical data .................................................................................................................................... 23 A26361-H939-Z100-1-7419 English Introduction The DAT drive (Digital Audio Tape) DAT 72 is a magnetic tape drive for DAT 72 cartridges and DDS3 and DDS4 cartidges (Digital Data Storage). A cartridge is an inexpensive mass storage which is particularly suitable for creating backup copies and archiving data. Depending on the tape length, cartridges are automatically written in the following formats: 125 m tape length 150 m tape length 170 m tape length DDS-3 DDS-4 DAT 72 The DAT drive is compatible with older drives and drives from other manufacturers which write to the cartridges in standard DDS formats. The data compression of the DAT drive is carried out in DCLZ mode (Data Compression Lempel Ziv). Functions Therefore, in order to operate the DAT drive the computer must have a SCSI host adapter and the appropriate SCSI and device drivers must be installed. i The DAT drive is available in two models, as a 5 1/4 inch (Streamer H938) and as a 3 1/2 inch version (Streamer H939). The 3 1/2 inch version is delivered mounted in a carrier and can be installed during operation (hot-swap). Both drives are technically identical. DDS cartridges with a 60 m, 90 m and 120 m tape length are not supported. The DAT drive is equipped with the following properties/functions: ● ● ● ● ● a SCSI interface of the type Ultra2 Wide LVD/SE (Low Voltage Differential or Single-Ended). a memory capacity of 36.0 Gbyte (without compression) or 72.0 Gbyte (with 2:1-compression). a 68-pin Wide SCSI port a maximum continuous data transfer rate of up to 3.5 MB per second without compression an internal buffer of 16 MB This manual contains all the information you require to install and operate the streamer. To install the drive, you need some knowledge of hardware. Make sure you observe the instructions in the "Important notes" chapter of your computer's operating manual. In the event of any problems occurring, please contact your sales outlet or your customer service center. Further information • How to mount a drive in the computer is described in the following manuals: − − • Information about the SCSI interface can be found in the following manuals: − − − • Operating manual for your computer Technical Manual for your computer Technical Manual for the SCSI board Operating manual for your computer Technical Manual for your computer For information on the required SCSI drivers and the backup software, refer to the software documentation. A26361-H939-Z100-1-7419 English - 1 DAT 72 (DDS Gen5) 36/72 GBYTE Notational conventions In this manual the following notational conventions can be found: ! i Indicates information which is important for your health or for preventing physical damage. Failure to follow the instructions may lead to loss of data, invalidate your warranty, destroy the notebook, or endanger your life. Indicates important information, which is required to use the system properly. ► Text which follows this symbol describes activities that must be performed in the order shown. This font represents outputs on the screen. This font indicates names of programs, commands or menu items. "Quotation marks" indicate names of chapters, hard disks, CD, DVD and terms that are being emphasized. 2 - English A26361-H939-Z100-1-7419 DAT 72 (DDS Gen5) 36/72 GBYTE Important notes In this chapter you will find information regarding safety which is essential to take note of with your DAT drive. ! Safety This device complies with the relevant safety regulations for data processing equipment, including electronic office machines for use in an office environment. If you have any questions, contact your sales outlet or your customer service center. • This device has been developed for use in approved systems with a fire-proof casing (in accordance with IEC 950 / EN 60950). • Please observe the notes on power loss and environmental conditions in the "Important notes" chapter of the computer's operating manual. • Please observe the safety information provided in the "Important notes" chapter in the computer’s operating manual. Manufacturer’s notes CE certificate The shipped version of this device complies with the requirements of the EC Guideline 89/336/EEC "Electromagnetic compatibility". Compliance was tested in a typical system configuration. When installing the drive, observe the specific installation notes in the Operating Manual or Technical Manual for the receiving device. Environmental protection Environmentally friendly product design and development This product has been designed in accordance with the Fujitsu-Siemens Computers standard ”environmentally friendly product design and development". This means that the designers have taken into account decisive criteria such as durability, selection of materials and coding, emissions, packaging, the ease with which the product can be dismantled, and the extent to which it can be recycled. This saves resources and thus reduces the harm done to the environment. Notes on saving energy Devices that do not have to be switched on permanently should not be switched on until they are used and should be switched off during long breaks and upon completion of work. Notes on packaging Please do not throw away the packaging. We recommend that you do not throw away the original packaging in case you need it later for transporting your system unit. If possible, the system unit and the devices should only be transported in their original packaging. A26361-H939-Z100-1-7419 English - 3 DAT 72 (DDS Gen5) 36/72 GBYTE Notes on dealing with consumables Please dispose of printer consumables and batteries in accordance with local government regulations. Lithium batteries may not be disposed of with household rubbish according to the EU directive They must be disposed of in accordance with local regulations concerning special waste. All batteries containing pollutants are marked with a symbol (a crossed-out garbage can). In addition, the marking is provided with the chemical symbol of the heavy metal decisive for the classification as a pollutant: Cd Cadmium Hg Mercury Pb Lead The following applies for Germany: – Private consumers can return batteries free of charge after use at the point of sale or in its immediate vicinity. Notes on labeling plastic casing parts Please avoid sticking your own labels on plastic casing parts wherever possible, since this makes it difficult to recycle them. Restriction on the use of dangerous materials in electrical and electronic devices (ROHS) In accordance with EC directive 2002/95/EC, the internal magnetic tape drive is subject to restrictions on the use of certain dangerous substances in electrical and electronic devices. Take-back, recycling and disposal The device may not be disposed of with household rubbish. This appliance is labelled in accordance with European Directive 2002/96/EC concerning used electrical and electronic appliances (waste electrical and electronic equipment - WEEE). The guideline determines the framework for the return and recycling of used appliances as applicable throughout the EU. To return your used device, please use the return and collection systems available to you. You will find further information on this at www.fujitsu-siemens.com/recycling For details on take-back and reuse of devices and consumables within Europe, see the manual „Returning used devices“, contact your Fujitsu Siemens Computers branch office/subsidiary or our recycling center in Paderborn: Fujitsu Siemens Computers Recycling Center D-33106 Paderborn Tel.: ++49 5251 8 18010 Fax: +49 5251 818015 4 - English A26361-H939-Z100-1-7419 DAT 72 (DDS Gen5) 36/72 GBYTE Cleaning notes The read/write heads of the DAT drive must be cleaned regularly to ensure that no errors occur during data processing. ! ● Do not carry out preventative cleaning. ● Wait until the drive requests cleaning: ● The drive should be cleaned immediately following the request. ● Never use an audio cleaning cartridge. Use only cleaning cartridges designed for a DAT 72 drive. ● Do not carry out wet cleaning! Cleaning must be carried out immediately when a TapeAlert message appears on the screen or the CLEAN indicator on the DAT drive flashes slowly. The cleaning intervals are primarily dependent on how many cartridges you read/write in the DAT drive. Please note the following basic rule: Cartridges Cleaning DDS-3, DDS-4, DAT 72 every 50 hours Or Number of cartridges per day Cleaning 1 cartridge Once a week 2 cartridges Twice a week 3 cartridges Three times a week 4 or more cartridges Every day i Never rewind a cleaning cartridge! One cleaning cartridge lasts for up to 50 cleaning operations, depending on size. After that the cleaning cartridge cannot be reused! ► Insert the cleaning cartridge into the drive. The drive automatically cleans the read/write heads when the cartridge is pulled in. The cleaning cartridge is then automatically ejected. 1 1= drive bay ► Make a note of the cleaning date on the cleaning cartridge label so that you know how many times the cartridge has been used. A26361-H939-Z100-1-7419 English - 5 DAT 72 (DDS Gen5) 36/72 GBYTE i If, after cleaning, the CLEAN indicator and/or MEDIA indicator begin flashing again immediately, then the data cartridge used is probably defective. In this case, you should copy the data to a new cartridge and stop using the old cartridge. Cleaning cartridges with a length of 60 m may not be used or are not supported. i Cleaning cartridges may be subject to variations in quality. This can lead to restrictions in maximum use. ► Please read the leaflet included with the cleaning cartridge your have selected for information on maximum use. The drive will automatically eject an expired cartridge. 6 - English A26361-H939-Z100-1-7419 DAT 72 (DDS Gen5) 36/72 GBYTE Notes on working with magnetic tape cartridges Although magnetic tape cartridges do not require any special maintenance, some basic rules should be followed: ! General • • • • • The cartridges must be kept out of direct sunlight. The cartridges are not to be placed near magnetic fields. Avoid heavy mechanical loading. Do not insert damaged magnetic tape cartridges in the drive. Failure to observe this warning may lead to the warranty for the drive being voided. Avoid major, short-term temperature fluctuations. Condensation must be avoided! When operating • • • • ● The cartridges are not to be operated in high-humidity and in dusty environments. Do not remove the magnetic tape cartridge from the drive while it is being read or written. Do not switch off the system while a magnetic tape cartridge is being read or written. Always leave the protective cover over the opening for the write/read head. Never touch the magnetic tape. New magnetic tape cartridges should be acclimatized to the ambient temperature up to four hours prior to use. Storage • • • • • ● Always observe the conditions for storing archiving cartridges (see the chapter "Technical data"). The cartridges are not to be stored in high-humidity and in dusty environments. Always keep the magnetic tape cartridges in the protective covers provided. The cartridges must never be stored in high temperatures. Do not store magnetic tape cartridges in stacks of more than six high. Condensation must be avoided! The maximum capacity of 36/72 Gbyte is reached, for example, when a magnetic tape cartridge of the type "DAT 72" is used. How to order magnetic tape cartridges and cleaning cartridges i Magnetic tape cartridges and cleaning cartridges (for dry cleaning) can be ordered with the Fujitsu Siemens Computers price list (SysARC, PC-ARC). The offered types of magnetic tapes complies with the requirements of the drive. A26361-H939-Z100-1-7419 English - 7 DAT 72 (DDS Gen5) 36/72 GBYTE Installing a DAT drive The following steps must be performed to install the DAT drive: • • • Mounting the DAT drive Connecting the DAT drive Installing the software required (e. g. SCSI drivers and backup software) i Current drivers, Firmware and Tools are on ● the TapeSupport CD ● on the Internet www.fujitsu-siemens.com. ● on the Internet ftp://ftp.fujitsu-siemens.com/fsc/supportcds/ Installing 5 1/4 inch version ! i Please note the information provided in the chapter "Important notes" in the Operating Manual of the computer or in the manual "Safety and Ergonomics". The drivers to operate SCSI devices are supplied with the SCSI host adapter. For information on the drivers which need to be entered in the CONFIG.SYS file, please refer to the documentation accompanying the software. In addition to these SCSI drivers you also require device drivers for the DAT drive. These drivers are part of the package supplied with your operating system or your backup software. Integrating DAT drive (5 1/4 inch version) If the DAT drive is not installed at the factory, it is supplied in a frame and requires a 5 1/4-inch bay. It can be installed horizontally or vertically. ► Install the DAT drive as described in "Installing a disk drive" in the Technical Manual or in the Operating Manual for the computer. Connecting DAT drive (5 1/4 inch version) i The SCSI bus must be equipped with terminators on the first and last device. With an LVD/SE-SCSI cable (Low Voltage Differential/Single-Ended), the terminator is already mounted on the end of the cable. With an SE-SCSI cable you require an additional terminator when the DAT drive is connected as the last device. Use an LVD/SE-SCSI cable if possible to achieve the high throughput rates in the LVD mode. Use only drives that can be operated in the LVD mode on the LVD/SE-SCSI cable if possible. If a drive is connected in the SE mode, then all drives connected to the LVD/SESCSI cable will automatically be operated in the SE mode and the high throughput rates will not be reached in the LVD mode. 8 - English A26361-H939-Z100-1-7419 DAT 72 (DDS Gen5) 36/72 GBYTE 2 1 ► Plug the 68-pin plug into the SCSI interface (1). The DAT drive automatically adjusts to LVD or SE. ► Plug the 4-pin power supply plug into the power supply socket of the DAT drive (2). Installing 3 1/4 inch version (hot-swap) The 3 1/2 inch version of the DAT drive is intended for PRIMERGY servers and PRIMERGY subsystems in which a magnetic tape drive is to installed during operation (hot-swap). By installing the DAT drive, two installation bays are occupied that are then no longer available for HDD modules. The module is connected to the SCSI backplane without cables via the SCA interface (Single Connector Attachment). ! Please note the information provided in the chapter "Important notes" in the Operating Manual of the PRIMERGY server or in the manual "Safety and Ergonomics". A26361-H939-Z100-1-7419 English - 9 DAT 72 (DDS Gen5) 36/72 GBYTE 1 ► Release the locking mechanism by pressing the locking button (1). ► Swing the drive handle completely in the direction of the arrow. ► Install the DAT drive as described in "Hot-plug/hot-swap components" in the operating manual of the PRIMERGY server. ► Swing the drive handle down again. Features of hot-swap drive The advantages of hot-swap drives for PRIMERGY systems that they do not require a separate controller for the drive, and that the drives can be easily replaced in the case of a failure. i The drive can be installed during operation. When removing the drive, you must deactivate the software and drivers beforehand. Other features: • • • • Compatibility to the latest version of NT-Backup and CA ARCserve 2000/BrightStore 9 Support under Windows 2000, Windows Server 2003; LINUX SLES 8.X Can be combined with hard disk drives and hot-swap drives on the same SCSI bus LVD interface with SCA II plug for easy installation Backup software for hot-swap drives Hot-swap drives are compatible to the backup software NT-Backup and CA ARCserve 2000/BrightStore 9. Installation recommendations • The performance of hard disk drives can be impaired by operating more than three DAT drives on the same bus. • • With rack mounting, install the first DAT drive in the right-hand outer slide-in module. With tower mounting, install the first DAT drive in the top slide-in module. Installing in a new PRIMERGY server Apply the following procedure to install the hot-swap drive in a new server with 10 - English A26361-H939-Z100-1-7419 DAT 72 (DDS Gen5) 36/72 GBYTE Windows Server 2003, Windows 2000 or LINUX SLES 8.x: ► Install the operating system. ► Check the firmware and drivers for the SCSI/RAID controller. ► Install the DAT drive. ► Select Scan for Hardware Changes in the Device Manager (Windows 2000, Windows Server 2003) to detect the DAT drive. With LINUX, proceed as described in the section "Installing or replacing a drive in a LINUX server". ► Install the necessary tape drivers. ► Install the backup software after the drive has been detected. Using NT-Backup ► Restart your server. ► Start NT-Backup. The tape is now ready for operation. Using CA ARCserve 2000/BrightStore 9 ► Run ARCserve. The new DAT drive is automatically detected when ARCserve/Bright Store is started. ► Check whether the DAT drive appears under ARCserve/Bright Store Device. The tape is now ready for operation. Hot-swap installation in a PRIMERGY server (under Windows) Proceed as follows to install a new drive under Windows 2000 or Windows Server 2003. Backup software is already installed i The following procedure requires you to have administrator rights. ► Make sure that no backup activity is running. ► Close all open applications. ► Check the firmware and drivers of the SCSI/RAID controller. ► Install the DAT drive. ► Wait at least 30 seconds. ► Select Scan for Hardware Changes in the Device Manager (Windows 2000, Windows Server 2003) to detect the DAT drive. ► Install the required driver. A26361-H939-Z100-1-7419 English - 11 DAT 72 (DDS Gen5) 36/72 GBYTE Using NT-Backup ► Check whether the tape is installed in the Device Manager. ► Check whether the removable storage-medium service is operating. ► Reboot your server (only under Windows 2000). The tape is now ready for operation. Using CA ARCserve 2000/BrightStore 9 ► Stop and then restart all ARCserve/BrightStore job engines. This enables the application to add a new drive to its device configuration. ► Restart ARCserve and check whether the new drive is detected in the device configuration. The tape is now ready for operation. Backup software is not yet installed i The following procedure requires you to have administrator rights. ► Make sure that no backup activity is running. ► Close all open applications. ► Check the firmware and drivers of the SCSI/RAID controller. ► Install the DAT drive. ► Wait at least 30 seconds. ► Select Scan for Hardware Changes in the Device Manager (Windows 2000, Windows Server 2003) to detect the DAT drive. ► Install the required driver. ► Install the backup software when the operating system has detected the drive. Using NT-Backup ► Check whether the removable storage-medium service is operating. ► Reboot your server (only under Windows 2000). The tape is now ready for operation. Using CA ARCserve 2000/BrightStore 9 ► Run ARCserve. The new DAT drive is automatically detected when ARCserve/Bright Store 9 is started. ► Check whether the new drive is detected in the device configuration. The tape is now ready for operation.Hot-swap replacement in a PRIMERGY server (under Windows) Proceed as follows to replace a drive under Windows 2000 or Windows Server 2003. 12 - English A26361-H939-Z100-1-7419 DAT 72 (DDS Gen5) 36/72 GBYTE ! Never remove a drive during tape operation or data transfer. ► Make sure that the drive to be replaced is inactive and remove any storage medium from the drive. ► Deactivate the device in the Device Manager (Windows 2000, Server 2003). ► Pull out the DAT drive by the handle. ► Install the new tape device in the same slide-in module! i Use the same slide-in module, as otherwise you must reinstall the device (see the section "Hot-swap installation in a PRIMERGY server (under Windows) "). ► Insert the storage medium in the new drive. ► Wait at least 30 seconds. ► Start the backup software and check whether the drive you have just mounted still has the same device configuration. The tape is now ready for operation. A26361-H939-Z100-1-7419 English - 13 DAT 72 (DDS Gen5) 36/72 GBYTE Installing or eplacing a drive in a PRIMERGY server (under LINUX) Proceed as follows to install or replace a drive in a LINUX server. i The following procedure requires you to have root privileges. Installing a hot-swap drive ► Mount the DAT drive and lock it with the handle. ► Wait at least 30 seconds. ► Add the device to the configuration with the following command: >> echo scsi add-single-device a b c d > /prog/scsi/scsi [ENTER] The parameters have the following meaning: a = Host adapter ID b = SCSI channel on host adapter c = SCSI-ID d = LUN (Logical Unit Number) ► Check the installation with the following command: >> cat scsi /prog/scsi/scsi [ENTER] Removing a hot-swap drive ► Remove the device from the configuration with the following command: >> echo scsi remove-single-device a b c d > /prog/scsi/scsi [ENTER] The parameters have the following meaning: a = Host adapter ID b = SCSI channel on host adapter c = SCSI-ID d = LUN (Logical Unit Number) ► Check the deinstallation with the following command: >> cat scsi ► /prog/scsi/scsi [ENTER] Pull out the DAT drive by the handle. 14 - English A26361-H939-Z100-1-7419 DAT 72 (DDS Gen5) 36/72 GBYTE Setting streamer ! Please note the information provided in the chapter "Important notes" in the Operating Manual of the computer or in the manual "Safety and Ergonomics". The DAT drive can be set by means of jumpers and switches. 10 9 8 7 6 5 4 3 2 1 ON TERM PWR PE SCSI 3 SCSI 2 SCSI 1 SCSI 0 Position of plug-in jumpers and switches on the back and bottom of the drive Default settings of the jumpers TERM PWR = not inserted (Termination Power from SCSI bus) SCSI 1, SCSI 2 SCSI 0, SCSI 3 = inserted = not inserted (SCSI address 6) PE = inserted (Parity check enabled) Default settings of the switches 1° and 2° = ON (Data compression enabled, software control possible) 3 = ON (media recognition enabled) 4 = ON (the drive runs a self-test diagnostic sequence (POST = Power-On Self Test) for about 5 sec.) 5 to 8 = ON, ON, OFF, ON (switch 7 = OFF, default block size 0 for Windows and UNIX) 9 = ON (the drive is capable of operating in Wide (16-bit) SCSI mode) 10 = ON (drive supplies Standard Inquiry String (SEAGATE DAT)) A26361-H939-Z100-1-7419 English - 15 DAT 72 (DDS Gen5) 36/72 GBYTE i Configuration for other operating systems Switch 5 to 8 = OFF, ON, ON, OFF (Novell) Switch 5 to 8 = ON, OFF, OFF, OFF (DEC UNIX) Jumper settings SCSI address (SCSI 0, SCSI 1, SCSI 2 and SCSI 3 jumpers) SCSI address SCSI 1 SCSI 2 SCSI 4 SCSI 8 address 15 address 14 address 13 address 12 address 11 address 10 address 9 address 8 address 6 address 5 address 4 address 3 address 2 address 1 address 0 + = installed – = not installed + – + – + – + – – + – + – + – + + – – + + – – + – – + + – – + + + + – – – – + + + – – – – + + + + + + + + – – – – – – – Default setting: Jumpers SCSI 1 and SCSI 2 inserted, jumpers SCSI 0 and SCSI 3 not inserted = address 6 i SCSI address 7 is always reserved for the SCSI controller. Termination power (TERM PWR jumper) The TERM PWR jumper sets the power supply for the terminating resistors on the SCSI bus. The terminating resistors can be provided with power by the drive or the SCSI bus. Termination power via SCSI bus = TERM PWR not inserted Termination power via drive = TERM PWR inserted Default setting: TERM PWR jumper not inserted = power supply from SCSI bus Parity checking (jumper PE) The jumper PE is preset to "Parity Checking Enabled". Parity check enabled = PE inserted Parity check disabled = PE not inserted Default setting: PE inserted = Parity check enabled 16 - English A26361-H939-Z100-1-7419 DAT 72 (DDS Gen5) 36/72 GBYTE Settings with switches Data compression (switch 1 and 2) Switches 1 and 2 determine the type of data compression. Switch 1 decides whether compression is switched on when the system is started. Switch 2 determines whether the compression can be controlled by software. Data compression switch 1 switch 2 enabled, with software control enabled, without software control disabled, with software control disabled, without software control ON ON OFF OFF ON OFF ON OFF Default setting: Switch 1 and 2 ON = data compression enabled, software control possible Media recognition (switch 3) Cartridges for DAT drives are provided with a marking on the pre-tensioning tape (MRS, media recognition system). The media recognition system of the DAT drive can be switched on and off with switch 3. If media recognition is switched on at the DAT drive, only cartridges with the mark can be written to. All other DDS cartridges can only be read. i The suitable DDS cartridges are marked with the DDS logo. Audio DAT cartridges may not be used. Default setting: Switch 3 ON = media recognition enabled Self-test (Switch 4) The self-test of the drive can be switched on and off with switch 4. If the self-test is switched on, the drive carries out a self-test approx. 5 sec. after switch-on. Default setting: Switch 4 ON = self-test enabled SCSI configuration (Switch 9) With switch 9 you can configure the drive for Wide SCSI (16-bit) or Narrow SCSI (8-bit). Default setting: Switch 9 ON = Wide SCSI enabled Support for system inquiry (switch 10) Switch 10 is used for system inquiry with the SCSI command INQUIRY. Default setting: Switch 10 ON = system inquiry "SEAGATE DAT" enabled A26361-H939-Z100-1-7419 English - 17 DAT 72 (DDS Gen5) 36/72 GBYTE Using the DAT drive 4 3 1 2 1 = CLEAN indicator 2 = MEDIA indicator 3 = DRIVE indicator 4 = Eject button LED indicators On the LED the following Information are displayed: ● Status information ● Error conditions i If you require additional information, please contact your customer service center. 18 - English A26361-H939-Z100-1-7419 DAT 72 (DDS Gen5) 36/72 GBYTE Meaning of the LED indicators Three indicators on the front of the DAT drive show the status of the drive and/or of the inserted cartridge. The indicators can be constantly bright or flash in various ways. Indicators Cleaning Cartridge Drive Drive state Clean LED Media LED Drive LED on - - The drive needs to be cleaned as it has already been operated for 50 hours. flashes slowly - - The drive should be cleaned, as it detects an excessively high error rate. i - on - A cartridge is inserted and the drive operates normally. - flashing - It was not possible to write to the inserted cartridge properly (a write error has occurred). The drive must be cleaned. - - on A cartridge is being read or written. ! - i If, after cleaning, the indicator flashes again, then the data cartridge used must be replaced with a new one. - flashes quickly Do not press the eject button while the indicator is lit up. This could result in data loss. There is a hardware error in the drive. If a cartridge is inserted in the drive, proceed as described in the section "Emergency unload of magnetic tape cartridge". If the drive needs to be cleaned, follow the instructions given in the "Cleaning" section. If there is a fault in the drive, please contact your sales outlet or customer service center. A26361-H939-Z100-1-7419 English - 19 DAT 72 (DDS Gen5) 36/72 GBYTE Handling magnetic tape cartridges Use only magnetic tape cartridges indicated with "DAT 72". The logo guarantees that the cartridges are suitable for recording data. Although magnetic tape cartridges do not require any special maintenance, some basic rules should be followed: i Avoid subjecting the tape cartridges to high temperatures or direct sunlight. The cartridges are not to be stored or operated in high-humidity. The cartridges are not to be placed near magnetic fields. As a rule, new cartridges should be wound forward once to the end of the tape and rewound to the beginning, and clean the drive then with a cleaning cartridge designed for a DAT 72 drive. Do not switch off the computer or remove a cartridge from the drive while the cartridge is being accessed. Never touch the magnetic tape. The contact protection must always cover the opening for the read/write heads. Use only standard labels and stick only one label onto the part intended for labels. Failure to observe these basic rules can endanger the operability of your DAT drive. Using Write-protection Write protection enables you to protect a magnetic tape cartridge against inadvertent overwriting or deletion. When the tape cartridge is write-protected, the system can read data, but can neither overwrite nor delete data. Write protection is provided by a plastic slide which can be moved to the left or right. 1 2 1 = not write-protected 20 - English 2 = write-protected A26361-H939-Z100-1-7419 DAT 72 (DDS Gen5) 36/72 GBYTE Loading a cartridge ! When inserting the magnetic tape cartridge, ensure that the label side is facing up. The side on which the tape is visible must be on the right. ► Open the drive bay. ► Push the magnetic cartridge into the drive until it is pulled in automatically. Unloading a cartridge ! ► Do not remove the cartridge as long as the DRIVE indicator is lit. This could result in data loss. Push the eject button. It may take a few seconds until the cartridge is ejected. ► Remove the tape cartridge from the drive. Emergency unload of magnetic tape cartridge ! ► Emergency removal can cause data loss on the cartridge. Only use this procedure if the cartridge cannot be ejected any other way! Press the Eject button for at least five seconds. The cartridge will be ejected after approx. 40 seconds regardless of its status. Emergency removal is still possible if the eject button has been disabled with the SCSI command PREVENT MEDIA REMOVAL. A26361-H939-Z100-1-7419 English - 21 DAT 72 (DDS Gen5) 36/72 GBYTE Troubleshooting For PRIMERGY servers: Device will not be recognised during BIOS interrogation ► Check whether the SCSI BIOS is activated. You can set this entry in the system BIOS. ► Check that the SCSI cable is properly connected to the SCSI controller and drive, and that none of the pins in the connector are bent. ► Check that the cable for the power supply is correctly connected. ► Check whether the setting of the SCSI ID is correct. The SCSI ID of the drive must not be egal with the SCSI ID of the SCSI controller or other SCSI devices. ► Check whether the system BIOS of the PRIMERGY server and the SCSI BIOS of the SCSI controller is up to date. ► If possible, carry out a self-test of the drive. ► Remove the tape from the drive. ► Restart your PRIMERGY server and ensure that the drive will be recognised during BIOS interrogation. The drive should now be ready for operation. Device does not accept a medium ► Check whether the drive must be cleaned. ► Use a new medium and check whether it is accepted. The medium cannot be written ► Check whether the write protection of the medium is activated. ► Check whether the drive must be cleaned. ► Use a new medium and check if it is accepted and if a write process is possible. For PRIMERGY servers under Microsoft Windows Server 2003 or Microsoft Windows 2000: Device not recognized by Device Manager (Windows 2000, Windows Server 2003) ► Make sure that the drive is detected during the BIOS interrogation. ► Check that you are using the correct approved Windows drivers for the SCSI controller and drive. ► Check whether a yellow exclamation mark or a red cross is shown in the Device Manager next to an SCSI controller or a tape device. If so, uninstall and reinstall the drivers. Device not detected by backup software ► Check whether the drive is recognised by the device manager. ► Shut down the backup software ► Check that you are using the newest drivers for the drive ► Check that you are using the newest version of the backup software For CA ARCserve 2000/BrightStore 9: ► Stop all job engines. ► Restart all job engines. 22 - English A26361-H939-Z100-1-7419 DAT 72 (DDS Gen5) 36/72 GBYTE Technical data Dimensions and weight (5 ¼ inch version) Height: 41.3 mm Width: 146 mm Length: 160 mm Weight: approx. 1,000 g Dimensions and weight (3 ½ inch version, without additional casing) Height: 41.3 mm Width: approx. 101 mm Length: approx. 150 mm Weight: approx. 1,000 g Electrical data Voltage: +5V ±5% + 12V ±10% Output: 9W Current (typical): • +5 V 1.35 A 0.25 A • +12 V Ripple • +5 V • 100 mVpp max.. 100 mVpp max.. +12 V Environmental conditions of the system unit Environment class 3K2/2K2, IEC 721 Temperature: • When operating • during transport 15 °C .... 35 °C -25 °C .... 60 °C Condensation during operation must be avoided. Maximum temperature variation during operation may not exceed 10°C per hour! Performance Data transfer rate: • • • uncompressed 2:1 compressed Burst Transfer Access time: (tape length 170 m): A26361-H939-Z100-1-7419 ca. 3.5 Mbyte/s ca. 7.0 Mbyte/s max. 80 Mbyte/s < 40 s English - 23 DAT 72 (DDS Gen5) 36/72 GBYTE Data buffer: 16 Mbyte Data interface: SCSI Ultra2 Wide LVD or SE Regulations complied with: UL 1950 CSA C22.2 No. 950 IEC -950 (EN 60950) CE, FCC Manufacturer's designation: Quantum 5 ¼ inch version: CD72LWH / TD6100-61x 3 ½ inch version: CD72LWH / TD6100-60x System inquiry: Seagate DAT72-000 Tape Alert support: yes The function must be supported by the application/software. Conditions for storing Short-term storage: • Temperature • Humidity -5 °C .... 45 °C 20% ... 80% rel. humidity Long-term storage (archiving): Temperature Humidity 20 °C ± 5 °C 30% ... 70% rel. humidity • • To prevent the cartridge tapes from sticking, we advise you to rewind the cartridges once a year. i Recommended magnetic tape cartridges Size: 73 mm x 54 mm x 10.5 mm (W x H x D) Tape length: 125 m, 150 m, 170 m Recording format: DDS-3, DDS-4, DAT 72 Capacity 125 m tape length (DDS-3) compressed *): uncompressed: 150 m tape length (DDS-4) compressed *): uncompressed: 170 m tape length (DDS72) compressed *): uncompressed: 24.0 Gbyte typical 12.0 Gbyte 40.0 Gbyte typical 20.0 Gbyte 72.0 Gbyte typical 36.0 Gbyte DDS cartridges with a 60 m, 90 m and 120 m tape length are not supported. *) The specifications on the capacity for a data compression of 2:1 are only approximate values. i Magnetic tapes may be subject to variations in quality. This can lead to restrictions in usability. Use only tapes matched to the hardware. Additional and more current information on the magnetic tapes qualified by Fujitsu 24 - English A26361-H939-Z100-1-7419 DAT 72 (DDS Gen5) 36/72 GBYTE Siemens Computers is available from the hotline of Fujitsu Siemens Computers. A26361-H939-Z100-1-7419 English - 25 Information on this document On April 1, 2009, Fujitsu became the sole owner of Fujitsu Siemens Computers. This new subsidiary of Fujitsu has been renamed Fujitsu Technology Solutions. This document from the document archive refers to a product version which was released a considerable time ago or which is no longer marketed. Please note that all company references and copyrights in this document have been legally transferred to Fujitsu Technology Solutions. Contact and support addresses will now be offered by Fujitsu Technology Solutions and have the format …@ts.fujitsu.com. The Internet pages of Fujitsu Technology Solutions are available at http://ts.fujitsu.com/... and the user documentation at http://manuals.ts.fujitsu.com. Copyright Fujitsu Technology Solutions, 2009 Hinweise zum vorliegenden Dokument Zum 1. April 2009 ist Fujitsu Siemens Computers in den alleinigen Besitz von Fujitsu übergegangen. Diese neue Tochtergesellschaft von Fujitsu trägt seitdem den Namen Fujitsu Technology Solutions. Das vorliegende Dokument aus dem Dokumentenarchiv bezieht sich auf eine bereits vor längerer Zeit freigegebene oder nicht mehr im Vertrieb befindliche Produktversion. Bitte beachten Sie, dass alle Firmenbezüge und Copyrights im vorliegenden Dokument rechtlich auf Fujitsu Technology Solutions übergegangen sind. Kontakt- und Supportadressen werden nun von Fujitsu Technology Solutions angeboten und haben die Form …@ts.fujitsu.com. Die Internetseiten von Fujitsu Technology Solutions finden Sie unter http://de.ts.fujitsu.com/..., und unter http://manuals.ts.fujitsu.com finden Sie die Benutzerdokumentation. Copyright Fujitsu Technology Solutions, 2009