1
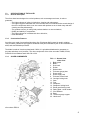
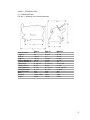
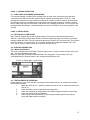
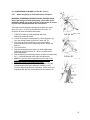
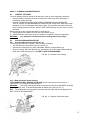
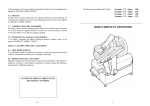
C
E
C
I
L
W
A
R
E
Service Manual
43-05 20th Avenue Long Island City, NY 11105
Tel: 718-932-1414 Fax: 718-932-7860
Visit us on the web: www.cecilware.com
E-mail: [email protected]
This manual is meant to provide users with information on the slicer and its specifications and the necessary
operating and maintenance instructions in order to guarantee the best possible use of the machine and
preserve its efficiency in the long term.
This manual is to be used by qualified and skilled people well informed about the use of the slicer
and its periodic maintenance.
TABLE OF CONTENTS
CHAP. 1
1.1
1.2
1.2.1
1.2.2
1.3
1.3.1
1.3.2
1.3.3
CHAP. 2
2.1
CHAP. 3
3.1
CHAP. 4
4.1
4.2
4.2.1
4.3
CHAP. 5
5.1
5.2
5.3
5.3.2
CHAP. 6
6.1
6.2
6.2.1
6.2.2
6.2.3
6.2.4
6.3
CHAP. 7
7.1
7.2
7.3
7.4
7.5
7.6
CHAP. 8 -
INFORMATION ON THE SLICER
GENERAL USE, MAINTENANCE AND SAFETY INSTRUCTION
SAFETY SYSTEMS INSTALLED IN THE SLICER
MECHANICAL SAFETY SYSTEM
ELECTRICAL SAFETY SYSTEM
SPECIFICATIONS OF THE SLICER
GENERAL DESCRIPTION
CONSTRUCTION FEATURES
SLICER COMPONENTS
TECHNICAL DATA
SPECIFICATIONS
PACKAGING INSPECTION
CHECK ON THE PACKAGE UPON ARRIVAL
INSTALLATION
SETTING UP OF THE SLICER
ELECTRIC CONNECTION
MOTOR SPECIFICATIONS
TESTING PRIOR TO OPERATION
OPERATING OF THE SLICER
CONTROLS
LOADING AND SLICING OF PRODUCTS
BLADE SHARPENING
BLADE SHARPENING OF SLICER WITH BUILT-IN SHARPENER
CLEANING AND MAINTENANCE
GENERAL FEATURES
SLICER CLEANING PROCEDURE
PRODUCT TABLE CLEANING
BLADE AND BLADE GUARD CLEANING
SHARPENER CLEANING
DEFLECTOR CLEANING
LUBRICATION OF SLIDING GUIDES
SERVICE
GENERAL FEATURES
BELT
FEET
POWER SUPPLY CORD
BLADE
SHARPENING STONES
TROUBLESHOOTING
page 3
page 5
page 6
page 6
page 7
page 9
page 10
page 11
2
PLEASE READ THE FOLLOWING INSTRUCTION CAREFULLY
1.1
•
•
•
•
•
•
•
•
•
•
•
•
•
- GENERAL USE, MAINTENANCE AND SAFETY INSTRUCTION
The slicer must be operated only by highly qualified people who are fully aware of the safety
measures described in this manual. It is the responsibility of the owner to ensure that the slicer
is properly and safely used.
Although the slicer is equipped with safety devices in the dangerous points, KEEP HANDS
CLEAR OF THE BLADE AND ALL MOVING PARTS.
Before starting cleaning and maintenance, ALWAYS UNPLUG THE SLICER.
Be particularly alert when protection devices are removed to carry out cleaning and
maintenance.
Cleaning and maintenance requires great concentration.
A regular check of the power supply cords is absolutely necessary; a worn-out or damaged
cord can expose users to electric shock hazard.
If the slicer doesn't work properly, don't use it and don't attempt to service it yourself.
Do not use the slicer to cut frozen products, meat and fish with bones or any other product other
than food.
Use the slicer only with the help of the pusher.
Do not place yourself in a dangerous position; the blade may cause serious injuries.
Do not expose slicer to water or moisture. Do not keep it in places where electrical parts may
enter in contact with water.
Retain this instruction manual for future reference.
The manufacturer is not liable for slicer malfunction in the following cases:
If the slicer has been tampered with by non-authorized personnel
If some parts have been substituted with non original spare parts
If the instructions contained in this manual are not followed accurately
If the slicer is not cleaned and oiled with the right products
1.2
- SAFETY SYSTEMS INSTALLED IN THE SLICER
1.2.1 Mechanical Safety System
The mechanical safety system of the slicer described in this manual includes:
•
blade guard
•
cover
•
meat pusher
•
hand cover on product table
•
product table + finger protection
1.2.2 Electrical safety Systems
The safety system installed to protect users against electrical risks includes a micro-switch which stops
the slicer in case the tie rod for blade guard is removed (see Fig. No.1);
The micro-switch prevents restarting the slicer if the guard has not been set to the off position.
The blade and other parts of the machine can cause serious cuts and injuries. Do not touch
them without taking the proper measures shown in this manual.
3
1.3
1.3.1
SPECIFICATIONS OF THE SLICER
General Description
The slicers have been designed to cut food products, such as sausages and meat, in order to
guarantee:
• The highest degree of safety in functioning, cleaning and maintenance;
• The highest hygienic standards due to an accurate choice of materials and a smooth design of
the slicer components which come into contact with products so as to obtain easy and total
cleaning and easy disassembly;
• The greatest accuracy in cutting food products thanks to a cam mechanism;
• Solidity and stability of components;
• The highest degree of noiselessness due to belt drive;
• Great handiness;
1.3.2
Construction Features
Our slicers are made of an anodized aluminum alloy (Peraluman Mg5) treated by anodic oxidation.
This procedure guarantees high hygienic standards of the parts interested by the cut and resistance to
acids, salts and oxidation processes.
The blade is made of chromium plated steel 100Cr6; it is grinded and hardened to guarantee an
accurate and sharp cut of products. The other components of the slicer are made of ABS, LEXAN,
PLEXIGLAS and stainless steel AISI 430 or 304.
1.3.3
SLICER COMPONENTS
FIG. n 1 - General view
of the slicer
1. Blade guard
2. Blade
3. Push knob
4. Pusher
5. Product table
6. Thickness gauge plate
7. Power switch
8. Power supply cord
9. Thickness control knob
10. Carriage locking knob
11. Stem
12. Foot
13. Sharpener
14. Sharpener locking knob
15. Blade guard locking knob
16. Rating plate - serial number
17. Slice deflector
18. Base
19. Thickness gauge support
20. Hand cover
slicer shown EPS-10
4
CHAP. 2 - TECHNICAL DATA
2.1 - SPECIFICATIONS
FIG. No. 2 - Drawings of the overall dimensions
Blade Diameter
Length A
Width B
Height C
Distance Between D
Distance Between E
Hopper Size
Carriage Travel
Cutting Capacity
Cutting Thickness
Blade Resolution
Motor
Electrical
Weight
EPS-9
9”
20”
15 3/4”
12 1/2”
15 1/2”
9 1/2”
9” x 9 1/4”
8 3/4”
6” x 8”
0 - 1/2”
300
125
120V - 60Hz.
39 lbs.
EPS-10
10”
21 1/4”
17”
13 3/4”
15 1/2”
9 1/2”
9” x 9 1/4”
8 3/4”
6 1/4” x 8
0 - 1/2”
300
125
same
39 lbs.
HDPS-12
12”
26 1/4”
23 1/2”
23 1/2”
18 7/8”
13”
12” x 9 1/2”
11 1/4”
8 1/2” x 9 5/8”
0 - 9/16”
300
210
same
69 lbs.
5
CHAP. 3 - PACKING INSPECTION
3.1 - CHECK ON THE PACKAGE UPON ARRIVAL
If no external damage is evident on the package upon its arrival, open it and make sure that all the
components are inside and that the machine has not suffered any damage (see FIG. No. 3). If the
package has suffered from rough handling, has bumps or crashes, the carrier must be informed about
any damage; moreover a detailed report on the extent of the damage caused to the machine must be
filled in within three days from the delivery date shown in the shipping documents. Do not overturn the
package!! When the package is transported make sure the box is lifted by the 4 corners (parallel to the
ground).
CHAP. 4 - INSTALLATION
4.1 - SETTING UP OF THE SLICER
Slicer must be installed upon a working table suitable for the slicers overall dimensions shown in
Table No. 2 (according to the model); therefore it must be adequately large, well levelled, dry, smooth,
resistant, stable and well lit. The slicer should be placed at a height of 30” from the ground. The machine
o
must be installed in a room with max. 75% not saline humidity at a temperature between 40 F and
o
95 F; that is to stay in a place that does not provoke the slicer failure.
4.2 - ELECTRIC CONNECTION
4.2.1 -Motor Specifications
The slicer is equipped with a SJT AWG 14 power supply cord 4.3 ft long. Connect the slicer with a 120
Volt - 60 Hertz grounded electric outlet.
Moreover check that the technical data described in the rating plate - serial number (FIG. no4)
corresponds with the features shown in the consignment and delivery note.
FIG. No. 4 - Rating plate - serial number
4.3 - TESTING PRIOR TO OPERATION
Before testing the slicer check that the meat hopper is blocked and then try the functions according to
the following procedure:
1.
Adjust the switch to the "I" switch-on position and then to the "O" switch-off position (see
FIG. No. 5);
2.
Check the sliding of the product table and meat pusher;
3.
Check the functioning and adjustment of the plate through the thickness control knob;
4.
Check the functioning of the sharpener;
5.
Check that the slicer switches off by unscrewing the blade tightener knob (only for
slicers with blade guard microswitch).
6
CHAP. 5 - OPERATING OF THE SLICER
5.1 -CONTROLS
Controls are placed on the left hand side of the base as shown in the picture below.
HDPS-12 Slicers have a rotary switch.
1. Thickness control knob adjusts the cutting thickness.
2. The switch can be adjusted to two settings:
a) switch-on setting (|), b) switch-off setting (0).
FIG. No. 5 - Position of controls
5.2 - LOADING AND SLICING OF PRODUCTS
WARNING:
Products to be cut must be loaded on the
product table only when the thickness control knob is set
to the “O" position. Pay attention to blade and sharp edges.
The procedure is as follows:
1. Once the product has been placed onto the product
table and placed against the plate, lock in place with the pusher;
2. Adjust the thickness control knob to obtain the desired
cutting thickness;
To avoid accidents, the person who is cutting has to face the
machine and stand correctly: put the right hand on the pusher,
and then the left one beside the deflector (do not touch the blade);
the body must be perpendicular to the working surface(see FIG. No. 6a),
3. WARNING: Pay maximum attention: no parts of your body should
enter in contact with the blade (see FIG. No.7b) because of the risk of
serious injuries. KEEP HAIR AND LOOSE CLOTHING CLEAR OF
ALL MOVING PARTS.
4. Push the switch-on button "I";
5. Smoothly push the carriage (product table + pusher + stem) back
and forth, without exerting pressure on food with the pusher
since the same pusher will feed the product toward the knife due to
gravity force. The blade will easily cut food and slices will be
guided by the deflector onto the collecting plate (see FIG. No. 7);
6. Do not operate the slicer without product;
7. Once product has been cut, set the thickness control knob to
the "O" position and switch off the machine by setting the
switch to the "O" position;
8. Resharpen the blade as soon as slices show a rough or frayed
surface and the cutting becomes difficult (see 5.3).
FIG. No. 6a - Correct Position
FIG. No. 6b - Wrong Position
FIG. No. 7 - Meat Cut
7
5.3 - SHARPENING OF BLADE (see FIG. No. 9 a-b-c)
5.3.1
Blade sharpening of slicer with built-in sharpener
WARNING: SHARPENING OPERATION WILL EXPOSE KNIFE.
Before preceding with blade sharpening, remain alert to the
RESIDUAL RISKS (see §1.2.2) that refer to the hazard of serious
injuries if the instructions below are not followed.
The blade must be sharpened periodically (at least once a day
when you use it). As soon as the blade becomes blunt, it is
necessary to follow the detailed instructions:
1. TURN OFF, UNPLUG THE MACHINE and clean
blade with denatured alcohol.
2. Loosen the sharpener locking knob (1), lift the sharpener (2)
o
up to the locking position (a) and let it rotate 180 (b).
3. Let it move up to the travel end (c) so that the blade is
positioned between the two sharpening stones. Relock the
knob (1).
4. Turn on the slicer.
5. Push the sharpening stone button (3), let the blade rotate
against the grinding mole for 30 - 40 sec. to produce burr
on the blade edge.
6. Push sharpening and deburring buttons (3 and 4) simultaneously
for 3 - 4 seconds and then leave them simultaneously.
7. NOTE: Do not carry out this operation for more than a few
seconds, as mentioned above, in order to prevent the
dangerous twisting of the blade cutting edge.
8. It is recommended to clean the sharpening stones after the
sharpening procedure (see sharpener cleaning § 6.2.3).
Once the sharpening has been completed, set the slicer to its
original position with the reverse procedure and switch it off.
FIG No. 9a
FIG No. 9b
FIG No. 9c
8
CHAP. 6 - CLEANING AND MAINTENANCE
6.1 GENERAL FEATURES
The slicer cleaning must be carried out at least once a day or more frequently,if necessary.
• Cleaning must be extremely accurate for those parts of the slicer which are directly or
indirectly in contact with food.
• DO NOT CLEAN THE SLICER WITH WATER-CLEANSER AND HIGH PRESSURE
JETS OF WATER, IN DISHWASHERS OR SINKS but with a damp cloth, water and neutral
detergent. Do not use detergents other than neutrals. Tools, brushes and other devices are
likely to damage the slicer surface. DO NOT USE THEM. Machine must not enter in contact
with water.
Before carrying out any cleaning operation it is necessary to:
1) Unplug the slicer to isolate it from the rest of the electric circuit;
2) Set the thickness control knob to the "O" position to completely close the gauge plate;
Pay attention to residual risks due to cutting and/or sharp edges.
WARNING:
6.2
SLICER CLEANING PROCEDURE
6.2.1 Product Table Cleaning (see FIG. No. 10)
The carriage (product table + pusher + stem) is easily removable:
• Turn the thickness control knob to the "O" position (1);
• Unscrew the locking knob (2), place underneath, slide the carriage laterally (a);
• Once the carriage has been removed, the meat hopper can be accurately cleaned with hot
water and neutral detergent (PH 7). DO NOT CLEAN IN DISHWASHER.
FIG. No. 10 - Release of the carriage
6.2.2 - Blade and Blade Guard Cleaning
THIS OPERATION WILL EXPOSE THE BLADE. Unscrew the knob of the tie screw (1)
(see FIG. No. 11) to release the blade guard (2).
The blade cleaning procedure must always be carried out with METAL GLOVES
WARNING:
(3) using a damp cloth. To do that disassemble the blade cover (see FIG. No. 11).
N.B.: The blade guard must be cleaned accurately with hot water and neutral detergent. DO
NOT CLEAN IT IN DISHWASHER
FIG. No. 11 - Release of the blade guard
9
6.2.3 - Sharpener Cleaning
After using the sharpener, check if the stones are clean. If not, clean them. Cleaning the
sharpener is carried out by rubbing the sharpening stones with a soft brush dampened in alcohol.
NEVER WASH THE SHARPENER IN THE DISHWASHER.
If the slicer has a built-in sharpener, the stones must be placed in the safety position to be
cleaned, which means that they must be turned towards the side opposite to the blade.
PAY PARTICULAR ATTENTION DURING THIS OPERATION AS THE BLADE IS EXPOSED.
6.2.4 - Deflector Cleaning
The two screws (a) locking the deflector must be unscrewed to remove it (see FIG. No. I2).
FIG. No. 12 - View of the deflector
Now clean the deflector with hot water and neutral detergent.
6.3 - LUBRICATION OF SLIDING GUIDES
From time to time pour some drops of oil (from the oil bottle provided with the slicer) onto the
round bar along which the carriage slides back and forth. This operation can be carried out
through the hole (OIL) next to the thickness control knob. If your machine is not provided with the
hole (OIL), just pour a few drops of oil onto the sliding guides.
CHAP. 7 - SERVICE
7.1
- GENERAL FEATURES
IMPORTANT: DO NOT ATTEMPT TO SERVICE THE SLICER YOURSELF. ALWAYS REFER
ALL SERVICING TO QUALIFIED PERSONNEL ONLY.
7.2 - BELT
The belt is not to be adjusted. Generally it must be replaced after 3-4 years;
7.3 - FEET
Feet may deteriorate and lose elasticity thus reducing the stability of the slicer. In this case they
must be replaced.
7.4 - POWER SUPPLY CORD
Periodically check whether the power supply cord is worn-out. If this is the case, have it
changed. NEVER USE THE SLICER IF THE CORD IS WORN-OUT BECAUSE OF THE
DANGER OF ELECTRICAL SHOCKS
7.5 - BLADE
Have the blade replaced when it is 10 mm or 1/3” shorter than its original diameter.
7.6 - SHARPENING STONES
Check that the grinding moles retain their abrasive property during sharpening operations. On the
contrary, they must be replaced not to damage the blade.
10
CHAP. 8 - TROUBLESHOOTING
These are the normal problems that may occur when using a slicer. If your slicer is not working
properly, check out the following suggestions. Should the problem not be solved, contact a
qualified servicing center. IMPORTANT: DO NOT ATTEMPT TO SERVICE THE SLICER
YOURSELF. ALWAYS REFER ALL SERVICING TO QUALIFIED PERSONNEL ONLY
PROBLEM
SOLUTION
The slicer does not switch on:
1. Make sure your getting electrical power
from the outlet, that the power supply cord is
plugged in and that the switch is in the ON
position.
2 Check if the blade guard locking knob is
completely fastened.
The slicer does not cut
properly:
1. The product is not positioned correctly or
held securely to the product table.
2. Your pushing the product too much
toward the blade.
3. The knife is not sharp. Remember to
sharpen it at least once a day when you use
it.
4. Some slicer component could be loose,
Tighten it.
5. Slicer components are dirty or greasy.
Clean the slicer following the instructions
enclosed in this manual.
6. The blade is not perfectly round due to
hits or has shortened too much and needs
to be replaced.
The carriage does not slide
properly:
1. Pour a few drops of oil onto the sliding
guides or in the OIL hole.
The slicer is noisy:
1. Make sure that all the components of the
machines are securely tightened.
The sharpening stones do not
sharpen properly:
1. Check out for dirt on the sharpening
stones.
2. Grinding stones are worn, cracked or
chipped. Have them replaced.
For all other problems or should you not be sure how to carry out an operation, contact
Cecilware or qualified service personnel.
11