Transcript
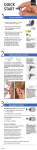
QUICK
START
1
Battery and ON/OFF
• Open the battery door — located
on the bottom of the device.
• Remove yellow tab from battery.
Note: The battery has a flat side
and a round side.
Battery Door
ON = Closed
OFF = Open
• Place battery in the door and close.
Note: Door will not close if the
battery is inserted incorrectly.
Turn ON by closing battery door.
A working battery must be in place.
Turn OFF by opening battery door.
Note: Battery does not need to
be removed if the door is open
far enough to turn off the device.
2
Tip:
Always carry spare
batteries.
Low-battery warning:
When you hear a
low rumbling sound,
change the battery
(refer to manual).
Eartips and Proper Insertion
3-Flange
Foam
The eartip that is most comfortable
and seals the ear is the best choice.
When changing
eartips make sure
the eartip fits
securely on the
stem of the device.
Note: Eartips are reusable. Replace
3-flange eartips every 60-90 days
and foam eartips regularly.
correct
To properly insert: Pull ear up and out.
Using a twisting motion, position the
device horizontally in the ear with the
switch toward the back of the ear.
incorrect
Note: Feedback (whistling) may be
heard while inserting the device until
it is fully sealed in the ear.
Tip:
Deeply-sealed eartips
reduce the “hollow”
sound in your voice.
If this happens, try
to achieve a deeper
seal. You may want
to try an eartip with
a long stem.
3
Operating the Switch
Normal setting — flip the switch
toward the front of the device.
High setting — flip the switch
toward the back of the device
for more sound.
Tip:
Some people can flip
the switch when the
device is in the ear,
but it is not unusual
that you will have to
take it out of your ear
to change the switch
position.
Refer to the user manual for complete instructions
and troubleshooting information.
ER098595