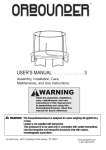
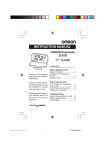
1
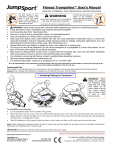
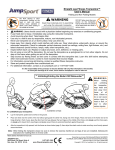
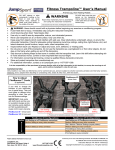
R 40in Model 830i-PRO Rebounder with Infinitune Technology User’s Manual Assembly, Installation, Care, Maintenance, and Use Instructions WARNING Read these materials prior to assembling and using this Rebounder trampoline DO NOT attempt or allow somersaults. Landing on the head or neck can cause serious injury, paralysis or death, even when landing in the middle of the bed. DO NOT allow more than one person on the trampoline. Use by more than one person at the same time can result in serious injury. Use trampoline only with mature, knowledgeable supervision. The maximum user weight is 350 pounds. This Rebounder is not recommended for use by children under six years of age. Retain address information for future use. JumpSport, Inc. 2055 South 7th Street, Suite A San Jose, CA 95112 U.S.A. 408-213-2551 www.jumpsport.com 1 P/N: INS-P-10739B Copyright Notice This material is protected by United States copyright laws and is proprietary to JumpSport, Inc. Disclosure, reproduction, translation, modification, or use of this document by anyone other than authorized employees, authorized users, or licensees of JumpSport without the prior written consent of JumpSport, Inc. is prohibited. The information in this document is subject to change without notice. JumpSport, Inc. shall not be liable for any damages resulting from technical errors or omissions, which may be present in this document, or from use of this document. Copyright © 2003-2006, by JumpSport, Inc. All rights reserved. Printed: 2006 Version 1.0 Instruction Manual P/N: INS-P-10739B AlleyOop 40in Model 830i-PRO Rebounder with Infinitune Technology P/N: RBA-S-10437A Trademarks JumpSport®, AlleyOop Sports®, and Infinitune™ are trademarks of JumpSport, Inc. All other brand or product names are trademarks or registered trademarks of their respective companies or organizations. How to Contact Customer Support Should you require customer service or technical support for your AlleyOop 40in Model 830i-PRO Rebounder with Infinitune Technology, please contact AlleyOop Sports’ Customer Service department at: 408-213-2551 8:00am—5:00pm Monday through Friday, Pacific Time 2 Contents Chapter 1 Assembly and Installation Instructions Preparation Rebounder Placement Assembly Chapter 2 5 5 7 Care and Maintenance Instructions Inspection Replacement Parts Care Chapter 3 13 13 13 13 Warning Information Points of Safety Bouncing off the Rebounder Landing Incorrectly on the Mat Chapter 4 5 Use Instructions 14 14 14 14 15 Safety Rules 15 Warranty Information 3 Last Page (This page left intentionally blank.) 4 Assembly and Installation Instructions 1 Congratulations on purchasing an AlleyOop 40in Model 830i-PRO Rebounder with Infinitune Technology! We sincerely believe that you have purchased one of the finest Rebounders on the market. It has been engineered with safety, durability, and performance in mind. This product features our Infinitune Technology. Preparation Before you begin using your AlleyOop 40in Model 830i-PRO Rebounder, make sure your Rebounder is in a proper location. Rebounder Placement Caution: When deciding on where to place your Rebounder, consider the following: WARNING Overhead Clearance Adequate overhead clearance is essential. A minimum of 8 feet from ground level is recommended for indoor trampolines. Provide clearance for lights, ceiling fans, and other possible hazards. Lateral Clearance Lateral clearance is essential. Place the Rebounder trampoline away from walls, structures, furniture, and other play areas. Maintain a clear space on all sides of the Rebounder trampoline. Level Surface Place the Rebounder trampoline on a level surface before use. Lighting Use the Rebounder trampoline in a well-lit area. Artificial illumination may be required for indoor use. Security Secure the Rebounder trampoline against unauthorized and unsupervised use. Ground Clearance Remove any obstructions from beneath the Rebounder trampoline. Note: The owner and supervisors of the Rebounder trampoline are responsible to make all users aware of practices specified in the Use Instructions. It is the responsibility of the purchaser to become familiar with all of the information in this booklet, to convey the warnings to all users, and to enforce AlleyOop Sports’ rules for safe use. This unit is not intended for commercial or public use and is therefore strictly prohibited. The maximum user weight is 350 pounds. This Rebounder trampoline is not recommended for use by children under six years of age. 5 Assembly and Installation Instructions Your 830i-PRO Rebounder comes with a stabilizer bar (disassembled), 16 pins and Tuning Springs (not attached to the Rebounder), and a spring tool (for installing the springs). The following pages explain how to install each separate component of the Rebounder. Note: For all installation Steps, safety glasses and gloves are recommended for safety. Familiarize yourself with the Assembly and Installation Instructions before beginning installation. If you are missing any pieces, call AlleyOop Sports’ Customer Service immediately at 408-213-2551. CAUTION Pinch Point. Pay careful attention to hand position when attaching legs, and when handling springs. CAUTION Avoid Injury. Stabilizer bar (when attached to the Rebounder) is not designed to support your entire weight. It is to aid with balance only. 6 Spring Tool Assembly and Installation Instructions Firmer = with Tuner Spring = without Tuner Spring Note: Infinitune Technology allows the user to adjust the feel of this Rebounder. The softest configuration uses no Tuning Springs, and the firmest configuration uses all 16 Tuning Springs. Above are some sample configurations. For more details, refer to Step 14. 1) Lay Rebounder frame upside down. Install only three legs, one 2) Flip Rebounder over so the rubber feet rest on the ground. at every other location on frame. The remaining legs will be installed in a later step. 7 Assembly and Installation Instructions 3) Install a spring pin as shown. 4) Connect a Tuning Spring to the pin. Spring hook will point toward ground when installed correctly. Bridge Tuning Link (entire piece) Tool access hole Tuning Spring Infinitune parts list 8 Assembly and Installation Instructions Pointed end facing up (Twist) Pointed end facing down 5) Perform the following procedure in one continuous motion: Hand 1: Rotate end of Tuning Link downward (away from mat). Hand 2: Insert spring tool through Tuning Link and past bridge (with spring tool hook pointing up). Twist tool so hook points down. Pull tool back until the hook catches on the bridge for leverage. Rotate Tuning Link so that the spring tool is almost vertical. Hand 1: Connect the Tuning Spring to the Tuning Link as shown. You now have one “Tuning Spring assembly” installed. >> Repeat Steps 3—5 at every 4th pair of springs on the Rebounder (see picture in Step 14). Then repeat at every middle pair of springs (see picture in Step 14). Then repeat at all remaining pairs of springs. When finished, you will have a total of 16 Tuning Spring assemblies installed. 9 Assembly and Installation Instructions Stabilizer bar 6) Install spring cover over the 3 legs. Then pull edges of spring 7) If you plan on using the Stabilizer Bar, continue to the next cover over outer edge of frame so that it fully covers all springs step. If not, skip to Step 14. and PowerArms. C D A B E E D A D Stabilizer bar parts list 8) Place a leg through each A piece as shown. 10 Assembly and Installation Instructions C B B D 9) Screw three remaining legs onto frame. 10) Connect both B pieces to piece C as shown. Secure all pieces together using two D pieces (small thumb-screws). (Do not over- IMPORTANT: Keep spring cover and bungee away from threads tighten.) You now have a “handle assembly”. while tightening legs. E 11) Lower handle assembly into each A piece. Holes on each A 12) Lower the handle assembly until there are only two holes piece must align with holes on handle assembly. Rotate each A showing. Screw each E piece (large thumb-screw) into place to piece as needed to get the holes aligned. keep the handle assembly from moving. (Do not over-tighten.) 11 Assembly and Installation Instructions Note: To change height of stabilizer bar, remove each E piece, move handle assembly up or down to desired height, then screw each E piece back into place. There are 4 different height adjustments for the stabilizer bar. D 13) Screw the remaining four D pieces (small thumb-screws) into each A piece. (Do not over-tighten.) Tuning Spring assemblies installed at every 4th pair of springs. Tuning Spring assemblies installed at every other pair of springs. Your 830i-PRO Rebounder is now completely assembled! 14) If the Rebounder feels too firm, you can adjust how the Rebounder feels by removing some of the Tuning Spring assemblies. Instead of installing all 16, try only installing 4 or 8. 12 To remove any component of the Rebounder, follow the Installation Instructions in reverse order. Care and Maintenance Instructions 2 Your AlleyOop 40in Model 830i-PRO Rebounder is made using quality materials and is finely-crafted to provide you with many years of enjoyment and exercise. Proper maintenance and care will help to prolong the life of the Rebounder trampoline and reduce the possibility of injury. All Rebounder trampolines require maintenance at some point. The following maintenance guidelines should always be observed. Inspection Inspect the Rebounder trampoline before each use and replace any worn, defective, or missing parts. The following conditions could represent potential hazards: Missing, improperly positioned, or insecurely attached frame padding (spring cover) Puncture, frays, tears, or holes worn in the bed or frame padding (spring cover) Deterioration in the stitching or fabric of the bed or frame padding (spring cover) Ruptured springs A bent or broken frame A sagging bed Sharp protrusions on the frame or suspension system Note: The “bed” mentioned above and elsewhere in this manual, refers to the jumping surface (generally referred to as the “mat”). If any of the above conditions exist, your Model 830i-PRO Rebounder must be protected against use until the condition is remedied. Replacement Parts All replacement parts should be ordered through AlleyOop Sports. Stores that repair shoes, awnings, or tents, as well as upholstery shops, do not have the proper materials, equipment, or methods for the proper/safe repair of Rebounder trampoline mats and frame pads (spring covers). Call AlleyOop Sports at 408-213-2551 if you need replacement parts, or have any questions. If any warning labels or signs become unreadable or missing, call AlleyOop Sports for free replacements. Rebounder trampoline mats should be completely replaced if any tear or hole is greater than one inch in length. Patches over larger holes will eventually fail, creating a potential for hazardous injury. Caution: Do not repair Rebounder trampoline mats with holes greater than one inch. Care Do not allow family pets on the Rebounder trampoline, as claws may snag and pull the trampoline mat material or damage the frame pad (spring cover). The Model 830i-PRO Rebounder Trampoline is intended to be used by one person at a time, weighing less than 350 pounds. The user should either be barefoot or wearing gymnastic slippers or non-cleated athletic shoes. The user should remove all sharp objects from their person that may cause injury or damage to the trampoline mat. Heavy, sharp, or hard pointed objects should not contact the mat surface. 13 Warning Information 3 WARNING DO NOT attempt or allow somersaults. Landing on the head or neck can cause serious injury, paralysis or death, even when landing in the middle of the bed. DO NOT allow more than one person on the trampoline. Use by more than one person at the same time can result in serious injury. Use trampoline only with mature, knowledgeable supervision. Points of Safety It is essential that Rebounder trampoline users follow a carefully planned safety program so that the trampoline can be fully enjoyed. Most accidents can be classified into the following: Bouncing off the Rebounder trampoline Landing incorrectly on the mat These are covered in detail in the following sections. Bouncing off the Rebounder Trampoline Bouncing off of the Rebounder trampoline can be controlled, if not completely eliminated, through: Strictly forbidding any “flying dismounts” (i.e. jumping off of the trampoline onto another object or the ground) Using the trampoline only with mature, knowledgeable supervision Keep objects away from the Rebounder trampoline. It is dangerous to jump from the trampoline to the floor or ground. Do not jump from the trampoline onto a piece of furniture or any other object. Landing Incorrectly on the Mat Landing incorrectly on the mat creates great risk of a serious injury, with most injuries resulting from attempted somersaults/flips. It is strongly recommended that somersaults/flips are not performed. 14 Use Instructions 4 Safety Rules It is the responsibility of the owner to become familiar with the safety rules and to convey these rules to all users. WARNING You should consult with a physician before beginning any exercise or conditioning program. If you feel faint or dizzy, immediately stop using the Rebounder trampoline. DO NOT attempt or allow somersaults. Landing on your head or neck can cause serious injury, paralysis, or death, even when landing in the middle of the bed. DO NOT allow more than one person on the trampoline. Use by more than one person at the same time can result in serious injuries. Use trampoline only with mature, knowledgeable supervision. Rebounder trampolines are not recommended for use by children under 6 years of age. Inspect the trampoline before each use. Make sure the frame padding (spring cover) is correctly and securely positioned. Replace any worn, defective, or missing parts. Step on and off the trampoline. It is a dangerous practice to jump from the trampoline to the floor or ground when dismounting, or to jump onto the trampoline when mounting. Do not use the trampoline as a springboard to other objects. Stop bounce by flexing knees as feet come in contact with the trampoline bed. Learn this skill before attempting others. Learn fundamental bounces and body positions thoroughly before trying more advanced skills. A variety of trampoline activities can be carried out by performing the basic fundamentals in various series and combinations, performing one fundamental after another, with or without feet bounces between them. Avoid bouncing too high. While keeping the head erect, focus eyes on the trampoline toward the perimeter. This will help control bounce. Avoid bouncing when tired. Keep turns short. Properly secure the trampoline when not in use. Protect it against unauthorized use. Keep objects away which could interfere with the performer. Maintain a clear area around the trampoline. Do not use the trampoline while under the influence of alcohol or drugs. For additional information concerning the trampoline equipment, contact the manufacturer. For information concerning skill training, contact a certified trampoline instructor. Bounce only when the surface of the bed is dry. Read all instructions before using the trampoline. Warnings and instructions for the care, maintenance, and use of this trampoline are included to promote safe, enjoyable use of this equipment. Note: The “bed” mentioned above and elsewhere in this manual, refers to the jumping surface (generally referred to as the “mat”). 15 Use Instructions (This page left intentionally blank.) 16 Use Instructions (This page left intentionally blank.) 17 Use Instructions (This page left intentionally blank.) 18 R Limited Lifetime Warranty What is covered by this warranty? This warranty covers any defects in materials or workmanship on all of the components of the AlleyOop 40in Model 830i-PRO Rebounder with Infinitune Technology. The warranty also covers a one-time replacement for each individual component of the trampoline, should a failure occur as a result of normal wear and tear. The warranty is extended exclusively to the original retail purchaser. How long does this coverage last? Warranty coverage for defects and one-time replacements begins from the original date of purchase and is valid for as long as the original retail purchaser owns the product. What will AlleyOop Sports do? If you return the defective part to AlleyOop Sports, as instructed below, AlleyOop Sports will either repair or replace such part, at AlleyOop Sports’ discretion, and return it to you. What is not covered by this warranty? This warranty does not cover expenses of on-site labor, travel, assembly or disassembly, or other charges associated with the repair or replacement of covered components. This warranty also does not cover any problem that is caused by abuse, misuse, commercial or public use, ordinary wear and tear (beyond the one-time replacement as described above), weathering, acts of God (such as wind and lightning), failure to follow directions, improper installation, or improper maintenance. Rust is a natural occurrence with any steel product and is likewise not covered by this warranty, to the extent that it does not affect the structural integrity of the part. ALLEYOOP SPORTS IS NOT RESPONSIBLE OR LIABLE FOR INDIRECT, SPECIAL, OR CONSEQUENTIAL DAMAGES ARISING OUT OF OR IN CONNECTION WITH THE USE OR PERFORMANCE OF THE PRODUCT OR OTHER DAMAGES WITH RESPECT TO ANY LOSS, INCLUDING BUT NOT LIMITED TO ECONOMIC LOSS, LOSS OF PROPERTY, LOSS OF REVENUE OR PROFITS, LOSS OF ENJOYMENT OR USE, COST OF REMOVAL, INSTALLATION OR OTHER CONSEQUENTIAL DAMAGES. SOME STATES DO NOT ALLOW THE EXCLUSION OR LIMITATION OF INCIDENTAL OR CONSEQUENTIAL DAMAGES. ACCORDINGLY, THE ABOVE LIMITATION MAY NOT APPLY TO YOU. THE WARRANTY EXTENDED HEREUNDER IS IN LIEU OF ALL OTHER WARRANTIES AND ANY IMPLIED WARRANTY OF MERCHANTABILITY OR FITNESS FOR A PARTICULAR PURPOSE IS LIMITED IN ITS SCOPE AND DURATION TO THE TERMS SET FORTH HEREIN. SOME STATES DO NOT ALLOW LIMITATIONS ON HOW LONG AN IMPLIED WARRANTY LASTS. ACCORDINGLY, THE ABOVE LIMITATION MAY NOT APPLY TO YOU. How to get a defective part replaced: 1) 2) 3) Call the AlleyOop Sports Customer Service department at 408-213-2551 to obtain a Return Authorization number. All returns must be pre-authorized. Send the part(s) to the designated Service Center, along with a copy of your original sales receipt and a brief written description of the problem, including how it occurred. You must pay freight and insurance to return the part to AlleyOop Sports. At AlleyOop Sports’ sole discretion, we may ask you to send photographs in addition to or in lieu of returning the part. After inspecting the returned part(s), AlleyOop Sports will make a final determination whether the part is covered by this warranty. We reserve the right to examine photographs or physical evidence concerning parts claimed to be defective prior to making a final determination concerning the claim. A repaired or replacement part will be returned to you. Please allow 3 to 4 weeks for delivery. This warranty gives you specific legal rights. You may also have other rights which vary from state to state. 19 JumpSport, Inc. 2055 South 7th Street, Suite A San Jose, CA 95112 408-213-2551 http://www.jumpsport.com 20