1
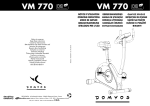
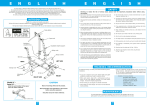
VM 770
VM 770
Notice à conserver
Keep these instructions
Conservar instrucciones
Bitte bewahren Sie diese Hinweise auf
Istruzioni da conservare
Bewaar deze handleiding
Instruções a conservar
Zachowaj instrukcję
Őrizze meg a használati útmutatót
Сохранить инструкцию
Οδηγίες χρήσης για φύλαξη
Păstraţi instrucţiunile
Návod je potrebné uchovať
Návod je třeba uchovat
GEBRUIKSHANDLEIDING
MANUAL DE UTILIZAÇÃO
INSTRUKCJA UŻYTKOWANIA
HASZNÁLATI ÚTMUTATÓ
ИНСТРУКЦИЯ ПО ИСПОЛЬЗОВАНИЮ
Réalisation : EVOLUTION + 32 / 69 250 500
NOTICE D’UTILISATION
OPERATING INSTRUCTIONS
MODO DE EMPLEO
GEBRAUCHSANWEISUNG
ISTRUZIONI PER L’USO
DECATHLON - 4, Boulevard de Mons - 59665 Villeneuve d’Ascq - France
Made in China - Hecho en China - 中国 制造 - Произведено в Китае
Réf. pack : 1023.951 - CNPJ : 02.314.041/0001-88
1
Ο∆ΗΓΙΕΣ ΧΡΗΣΗΣ
INSTRUCŢIUNI DE UTILIZARE
NÁVOD NA POUŽITIE
NÁVOD K POUŽITÍ
MONTAGE • ASSEMBLY •MONTAJE • MONTAGE • MONTAGGIO • AFWERKING
• MONTAGEM • MONTAŻ • SZERELÉS • СБОРКА • ΣΥΝΑΡΜΟΛΟΓΗΣΗ
• MONTARE • MONTÁŽ • MONTÁŽ •
3
MONTAGE • ASSEMBLY •MONTAJE • MONTAGE • MONTAGGIO • AFWERKING
• MONTAGEM • MONTAŻ • SZERELÉS • СБОРКА • ΣΥΝΑΡΜΟΛΟΓΗΣΗ
• MONTARE • MONTÁŽ • MONTÁŽ •
A
[
18
M8xP1.25x75L
C
16 8*19*2T
15 M8
[
37
54
[
23 M8
8*2t
22 M8xP1.25x60L
[
[
6
5 7*2t 4 7*12*1T
M7*P1.0*30mmL
[
8 7*12*40mmL
[
[
9 T-shape knob
3 Hbar Clamp
4
[
[
[
30 M8xP1.25x90L
[
15 M8
16 8*19*2T
B
D
[
5
MONTAGE • ASSEMBLY •MONTAJE • MONTAGE • MONTAGGIO • AFWERKING
• MONTAGEM • MONTAŻ • SZERELÉS • СБОРКА • ΣΥΝΑΡΜΟΛΟΓΗΣΗ
• MONTARE • MONTÁŽ • MONTÁŽ •
MONTAGE • ASSEMBLY •MONTAJE • MONTAGE • MONTAGGIO • AFWERKING
• MONTAGEM • MONTAŻ • SZERELÉS • СБОРКА • ΣΥΝΑΡΜΟΛΟΓΗΣΗ
• MONTARE • MONTÁŽ • MONTÁŽ •
1
2
6
7
MONTAGE • ASSEMBLY •MONTAJE • MONTAGE • MONTAGGIO • AFWERKING
• MONTAGEM • MONTAŻ • SZERELÉS • СБОРКА • ΣΥΝΑΡΜΟΛΟΓΗΣΗ
• MONTARE • MONTÁŽ • MONTÁŽ •
5
Siège - Seat
Sillín - Sitz
Sella - Zadel
Assente - Siodełko
Nyereg - Сиденье
Θέση - Şezut
Sedadlo - Sedadlo
Guidon - Handlebars
Manillar - Lenker
Manubrio - Stuur
Guiador - Kierownica
Kormány - Руль
Τιµόνι - Ghidon
Riadidlá - Řidítka
Tube porte-selle
Seat post
Tubo portasillín
Sattelstütze
Tubo reggisella
Zadelbuis
Tubo do assento
Wspornik siodełka
Nyeregtartó cső
Подседельная труба Σωλήνας στήριξης σέλας
Tub suport pentru şa
Nosná sedlová trubka
Trubka nesoucí sedlo
Console - Console
Consola - Konsole
Braccio - Terminal
Contador - Licznik
Konsole - Панель управления
Κονσόλα - Consolă
Konzola - Konzole
Tube support-guidon
Handlebar post
Tubo soporte-manillar
Steuerkopfrohr
Tubo supporto manubrio
Stuurbuis
Tubo suporte de guiador
Wspornik kierownicy
Kormánytartó cső
Опорная труба для руля
Σωλήνας στήριξης-τιµόνι
Tub suport-ghidon
Trubka nosníka riadidiel
Trubka podpírající řidítka
Bouton de réglage
du tube porte-selle
Seat post knob
Botón de reglaje del
tubo portasillín
Feststellknopf der
Sattelstütze
Leva di regolazione del
tubo reggisella
Bevestigingsknop
van de
zadelbuis
Botão de
regulação
do tubo do assento
Pokrętło wspornika siodełka
A nyeregtartó állítóbütyke
Колесико регулировки подседельной трубы
Πλήκτρο ρύθµισης του σωλήνα στήριξης σέλας
Buton de reglare al tubului suport pentru şa
Nastavovací gombík nosnej sedlovej trubky
Páka na seřízení sedla
6
VM770
Pédale - Pedal
Pedal - Pedal
Pedale - Pedaal
Pedal - Pedał
Pedál - Педаль
Πεντάλ - Pedală
Pedál - Šlapka
33,25 kg
73 lbs
132 x 102 x 54 cm
52 x 40 x 21 inch
8
9
E
N
G
L
I
S
H
E
N
G
L
I
S
H
This product is DIS (Domyos Interactive System) compatible
You have chosen a piece of fitness equipment by DOMYOS. We thank you for your confidence in us.
We have created the DOMYOS brand to provide a way for all athletes to stay in shape.
This product has been designed by athletes for athletes. We would be pleased to receive your comments and suggestions
concerning DOMYOS products. Therefore, your store team is ready to listen, as is the DOMYOS products design department.
You can also find us at www.domyos.com
We wish you successful training and hope that you will enjoy using this DOMYOS product.
Product in accordance with
EN 957-1&5 class HA, ASTM F 1250 & 2276,
GB17498, not suitable for therapeutic purposes.
MAXI
110 kg / 242 lbs
PRESENTATION
The VM770 is a new generation stationary fitness bicycle.
This bike allows you to measure your pedaling power in watts.
This product is equipped with magnetic transmission for greater pedaling comfort without jerks.
To reduce the risk of serious injury and damage to the product, read the following important instructions for safe usage
before using the product.
1. Only use this product in the manner described in this manual. Keep this
manual for the entire life of the product.
12. Never allow more than one person to use the product at any one
time.
2. The owner is responsible for ensuring that all users of this product are
properly informed as to how to use this product safely.
13. Keep your hands and feet away from moving parts.
DECATHLON - 4 bd de Mons 59665 Villeneuve d'Ascq - France
F : (+).33.3.20.50.00
EN 957-1,5/ASTM F1250 - F2276 / 16CFR1303 / GB17498
DPP: DP Shangaï
Model: xxxxxxxxx
Made in CHINA
STT: xxx
Order : xxxxxx - xxxxxx
xxxxx
SETTINGS
14. Keep your back straight while exercising.
3. DOMYOS cannot be held liable for claims of injury or damage sustained by any person or property originating from the use or misuse of this
product by the purchaser or by any other person.
4. This device complies with European standards (standard CE, standards
EN-957-1 and EN 957-6 category HA) concerning fitness equipment
in domestic, non-therapeutic use (equivalent to GB17498). Do not use
this product in a commercial, rental or institutional setting.
15. Put your hair up so that it does not get in the way during exercise.
16. Do not wear baggy clothing likely to get in your way during exercise.
Warning: It is necessary to get off the bike to proceed to the settings (saddle, handlebar)
1
3
27
17. Always hold the fixed handlebar when getting on or off the machine.
24
5. Use the product indoors on a flat surface, in an uncluttered place free
from moisture and dust. Ensure that you have enough space to safely
access and move around the device. Do not store or use the product
outside.
18. Keep children and pets away from the product at all times.
6. It is the user’s responsibility to inspect and if necessary tighten all parts
before using the product. Immediately replace any worn or defective
parts.
20. There are many factors that may affect the precision of the readout
from the heart rate monitor; it is not a medical device. It is designed
merely to help you determine your approximate heart rate.
7. Any assembly or disassembly of the product should be carried out with
care.
WARNING:
21. People who use a pacemaker or any other implanted electronic device are warned that they use the heart rate monitor at their own risk.
Before the first use, a test exercise under the supervision of a doctor
is thus recommended.
8. Do not modify your product.
19. Use a soft cloth to remove dust. Persistent stains (like sweat) can be
removed with a slightly damp cloth.
4
21
29-1
9. Should your product deteriorate, stop using it until it has been fully
repaired and return it to your Décathlon store.
10. Do not store this product in a damp place (e.g. edge of a pool,
bathroom, etc).
11. For its protection, cover the floor under the product with a suitable
floor mat, available in Decathlon stores.
22. Pregnant women are advised not to use the heart rate monitor. Before
any use consult your doctor
23. As you finish your workout, gradually reduce your pedalling speed
until the pedals come to a complete stop.
38
5
2
HOW TO ADJUST THE SEAT
POSITION
To ensure effective exercise, the seat
must be at the correct height.
When you pedal, your knees should
be slightly bent when the pedals are at
their lowest position.
To adjust the seat (27), hold the seat
and turn the knob (38) on the seat
tube. Align one of the holes on the seat
post (21) with a hole on the seat tube.
Replace the knob (38) and retighten.
It is also possible to adjust the horizontal
position of the seat. Whilst holding the
seat (27), loosen the fastening knob
(24), adjust the position of the seat and
fully retighten the fastening knob (24).
1
WARNING :
• Ensure that the knob is replaced
correctly in the seat tube and that it is
fully retightened.
• Never extend the seat above its
maximum height.
• Do not sit on the seat unless the
fastening knob is correctly tightened.
HOW TO ADJUST THE
HANDLEBARS
TTo adjust the handlbars (2), loosen
the knob (9), adjust the position of the
handlebars and retighten the knob.
2
WARNING: If you experience vertigo, nausea, chest pains or any other abnormal symptom, stop exercising immediately and consult your doctor before continuing.
9
WARNING
Consult your doctor before starting an exercise program.
This is particularly important for people over 35 or having had health problems before.
Read all the instructions before use.
20
0/000.000
WARNING
WARNING
• Misuse of this product may result
in serious injury.
• Read user’s manual and follow all
warnings and operating instructions prior to use.
• Do not allow children on or
around machine.
• Replace label if damaged, illegible, or removed.
• Keep hands, feet and hairs away
from moving parts.
2
21
HOW TO ADJUST THE PEDAL
STRAPS
To adjust the pedal straps, loosen the
brake system, adjust the strap to your
desired position and then retighten the
brake system.
3
4 LEVELLING ADJUSTMENT
If the bike should become instable
during use, turn one or both of the
plastic end fittings (29-2) of the rear
support (29-1) until the bike becomes
stable.
5 SETTING THE RESISTANCE
According to EN definition, this
product is a «speed independent
product». You can adjust the
braking torque not only through
the pedalling frequency, but also
by choosing the resistance level
manually (by turning
the torque controller button on nonmotorized products, by pressing the
up/down buttons on motorized products). Nevertheless, if you keep the
same resistance level, the braking
torque will increase/decrease as
your pedalling frequency increases/
decreases.
6 MOVING YOUR PRODUCT
Stand facing the front of the bike,
hold the handlebar and pull the
bike towards you. Your bike now
rests on the castors and you can
move it. When you have finished
moving it, hold on to it until the
back feet are back on the ground.
E
N
G
L
I
S
H
FC 700 CONSOLE
E
N
G
L
I
S
H
HEART RATE MONITOR BELT
1. Parts and components
DISPLAY
Emitter
Flexible belt
Lithium battery CR2032, 3V
2. Inserting the battery
• Insert the supplied CR2032 battery as illustrated below.
Waterproof seal
Battery compartment lid
3. Using the belt
• Before placing the emitter on your chest, moisten the two electrodes with water or a water-based gel to ensure optimal
transmission of the signal
• First, insert the battery with the + pole towards the top.
• Center the heart rate monitor belt on your chest
or pectoral muscles, directly above your sternum,
with the battery compartment lid facing inwards.
• Place the seal and then the lid, with the two small dots aligned.
Tighten with a coin.
• Adjust the belt so that the emitter always stays in close contact
with your skin. Do not overtighten, to avoid breathing difficulties.
• If the heart-rate monitor belt is loose or positioned incorrectly, you
may get an erroneous or irregular reading.
Important !
Make sure that the lid is tightly closed (around 1/2 turn) to prevent
perspiration or water from entering.
FUNCTIONS
1. Programme display zone – MAIN SCREEN
2. Programme selection indicator
3. Display of SPEED (Km/h - Mi/h), DISTANCE (Km - Mi), or HEART RATE
(BPM), according to the display choice made by the user.*
4. HEIGHT selection indicator (cm – inch)
5. WEIGHT selection indicator (kg or llbs)
6. SEX selection indicator (Male or Female)
7. Target heart rate setting indicator:
HIGH (100% of max. value)
LOW /(70% of max. value)
8. Indicates that you are exiting your target heart rate zone.
9. Exiting target heart rate zone indicator alarm.
10. Alternating display (changing every 10 seconds) of DISTANCE covered
and pedalling rate per minute.
Average HEART RATE during exercise, displayed at the end of the programme.
11. Display of CALORIES expended
12. Display of DISTANCE or HEART RATE, according to the display choice
made by the user on the main screen.
13. Countdown display; default setting is 20 minutes (duration can be set at
between 10 and 180 minutes, in intervals of 5 minutes).
a. If the remaining time is more than 1 hour Display in hours and
minutes (HH:MM)
b. If the remaining time is less than 1 hour Display in minutes and
seconds (MM:SS)
If you do not pedal for more than 5 seconds, the countdown and the CALORIE
counter both stop.
The countdown and the CALORIE counter restart as soon as you start pedalling
again.
14. Display of SPEED or HEART RATE, according to the display choice made
by the user on the main screen.
15. Indicator of selection of user’s AGE.
Speed: This function indicates estimated speed, either in km/h or mph,
depending on the position of the switch at the rear of the product (see
diagram)
RPM (Rhythm per minute): Number of pedal rotations per minute
Distance: This function indicates estimated distance since the beginning
of the exercise session.
This can be in km (kilometres) or M (miles) depending on the position of the
switch on the rear of the product.
Heart Rate*: Your heart rate is measured by the heart strap. It is displayed
in beats per minute.
Body fat percentage: Measurement of body fat percentage
*Warning: il s’agit d’une estimation, qui ne doit en aucun cas être prise
comme caution médicale.
Time: This function indicates the length of time since the start of the exercise
session in minutes and seconds (MM:SS) for the first hour, and then in hours
and minutes (HH:MM)
*Warning: For a period of around 30-40 seconds, or when there is a
change in heart rate, the value displayed may not correspond to your actual
heart rate. This is due to the mechanism starting up.
Calories : This function displays an estimation of calories expended since
the beginning of the exercise session.
*Caution: When the product encounters a strong electromagnetic
field, the pulse value maybe displayed or changed.
* The user can change the display during exercise by pressing the B or D
buttons
Resetting the product:
The product goes into standby mode after about 10 minutes of inactivity.
The indicators are reset to 0 when the product goes into standby mode (the
data is not saved)
The counter is activated as soon as the pedals start turning or if one of the
buttons is pressed
CONTROLS AT THE BACK OF THE CONSOLE
Switch 1: Selection of type of apparatus that you are using
with the console: VM (magnetic bike) ---- VE (elliptical bike)
Switch 2: Selection of unit of DISTANCE measurement.
MI (Miles) ---- KM (Kilometres)
BUTTON FUNCTIONS
Switch 3: Selection of geographical region where apparatus
will be used: EU (Europe) ---- AS (Asia)
DIS connections
SWITCH 2
A
The navigation system for your FC700 console consists of:
SWITCH 1
SWITCH 3
E
- a central adjustment and confirmation button, E,
- 2 buttons for navigating through the screens, B and D, and
- 2 buttons for changing values, A and C
RESET
D
B
C
22
23
E
N
G
L
I
S
H
E
N
SETTING
G
L
I
S
H
CALCULATION OF BODY FAT PERCENTAGE
To go into setting mode, hold down E when the screen displays the word
SEL.
100% of the recommended heart rate and a minimum 70% of this maximal
value. You can alter these 2 values using buttons A and C.
If you haven’t started exercising, holding down E will take you directly into
setting mode.
If you were in the middle of an exercise session, holding down E will stop
the current programme. The word STOP is displayed on the main screen for
15 seconds. During this time the data from your previous exercise session
will be displayed. The word SEL will then be displayed on the screen. Hold
down E again to return to setting mode.
You can increase or decrease these values by pressing buttons A and C.
Holding down the buttons allows you to scroll through the values more
quickly.
You can increase or decrease these values by pressing buttons A and C. Holding down the buttons allows you to scroll through the values more quickly.
Button B confirms your selection and moves on to the next setting. If you make a mistake, you can use button D to take you back to the previous screens.
Button B confirms your selection and moves on to the next setting. If you
make a mistake, you can use button D to take you back to the previous
screens.
Setting your sex (Male/Female)
To return to “Body fat calculation” mode, hold down button C when the screen displays the word SEL.
In setting mode, you can enter your SEX, AGE and WEIGHT. The device
then offers you a target heart rate zone, which, by default, is a maximum of
Setting your sex (Male/Female)
A/C
Max. target heart rate.
B
E
Setting your age
A/C
Place your hands on the heart rate sensors for as long as you see
‘HOLD’ displayed.
A/C
A/C
B
A/C
B
Setting your age
Min. target heart rate.
B
Setting your height
Your body fat percentage appears on the screen after being calculated.
A/C
A/C
A/C
A/C
B
B
Activating/deactivating
the alarm warning you
that you are exiting the
target heart zone.
Setting your weight
A/C
B
Setting your weight
Press button E to move on to programme selection
A/C
A/C
ATHLETIC
GOOD
AVERAGE
HIGH
MAN
< 13%
13-25,9%
26-30%
> 30%
WOMAN
< 23%
23-35,8%
36-40%
> 40%
B
B
USE
Once you have finished entering your settings, press button E to confirm your settings and exit settings mode.
To set your personal objectives, refer to the table and the guidelines CARDIO-TRAINING.
24
The console is mains and / or battery operated
The console switches off after 10 minutes of inactivity.
We advise you to remove the batteries if you are not going to use your console for a long time or if you regularly use it connected to the mains.
25
E
N
G
L
I
S
H
E
N
G
L
I
S
H
CARDIO-TRAINING
PROGRAMME
Reminder: Holding down button E stops the current programme.
You can scroll through the programmes by pressing buttons B and D, and select by pressing button E.
CARDIO TRAINING
Cardio training is aerobic exercise (muscle development in the presence of oxygen); it enables you to improve your cardiovascular capacity.
More specifically, you improve the tone of your heart muscle and blood vessels. Cardio training provides oxygen from the air you breathe to your
muscles. The heart pumps this oxygen throughout the entire body, and especially to the muscles that are doing the work.
Programmes 1 to 9
Select your exercise time with buttons
A and C, and confirm with button E.
Once the programme has started,
you can increase the intensity of the
exercise with buttons A and C.
CHECKING YOUR PULSE
It is essential that you check your pulse regularly during exercise in order
to monitor your training.
If you have no electronic measuring device, proceed as follows:
To check your pulse, place two fingers:
- on your neck, below your ear or under your wrist next to your thumb
Do not press too hard:
excessive pressure reduces your blood flow and may slow down your
heart rate.
After counting the beats for 30 seconds, multiply by two to give the number of beats per minute.
For example: 75 beats counted equals 150 beats per minute.
P H A S E S O F P H Y S I C A L A C T I VI TY
Programme 10: WATT
Start pedalling and then set the resistance using buttons A and C until you
have obtained the desired power, given in WATTS on the main screen.
Confirm by pressing button E.
The bike will vary resistance according to your pedalling speed in order to
maintain the power chosen at the beginning of your exercise session.
The higher the pedalling speed, the lower the resistance, and vice versa.
You have the option to change the WATT value while exercising by pressing
button E quickly. Then pedal and set the resistance (buttons A and C) until
you reach your chosen power, which is indicated as WATT on the main
screen.
Confirm by pressing E.
Programme 11: Fat burn.
Allows you to work at between 60 and 70% of your maximum heart rate
Select your exercise time with buttons A and C, and confirm with button E.
Once the programme has started, you can increase the intensity of the
exercise with buttons A and C
If your measured heart rate is below 60% of your maximum HR, the bike will
increase its resistance to return your HR to the target heart zone.
If your measured heart rate is above 70% of your maximum HR, the bike will
reduce its resistance to return your HR to the target heart zone.
For greater comfort of use, we recommend that you pedal at a stable
speed.
Programme 12: PERF
Allows you to work at between 70 and 80% of your maximum heart rate
Select your exercise time with buttons A and C, and confirm with button E.
Once the programme has started, you can increase the intensity of the
exercise with buttons A and C
If your measured heart rate is below 70% of your maximum HR, the bike will
increase its resistance to return your HR to the target heart zone.
If your measured heart rate is above 80% of your maximum HR, the bike will
reduce its resistance to return your HR to the target heart zone.
Resistence
Level
For greater comfort of use, we recommend that you pedal at a stable
speed.
Pedaling speed
(turns per minute)
30
40
50
60
70
80
90
1
8
13
20
26
35
46
53
2
14
21
35
47
59
78
91
3
20
31
49
66
87
109
128
4
25
40
64
87
112
142
166
5
32
51
81
108
140
174
205
6
37
62
96
128
165
207
243
7
44
72
114
148
190
234
278
8
50
82
126
170
218
269
318
9
56
94
141
190
256
301
358
10
62
104
156
210
274
336
395
11
67
114
172
231
297
362
429
12
77
130
195
250
340
410
485
B - Training
The workout is the main phase of your physical activity.
By working out on a REGULAR basis, you can improve your physical fitness.
• Anaerobic work, for improving endurance.
• Aerobic work for improving cardio-pulmonary strength.
1) You wake up your muscles with a SERIES OF SPECIFIC STRETCHES that
PREPARE YOU FOR EXERCISE: every muscle group is used, and the
joints are stimulated.
2) The overall warm-up makes it possible to put the cardio-vascular and respiratory system into action progressively, for a better
blood supply to the muscles and better preparation for the effort.
It should be long enough: 10 minutes for a recreational sport, and 20
minutes for a competitive sport.
Note that you should warm up for longer: in the morning and if you are
over 55.
C - Warming down
This corresponds to low-level activity; it is the progressive “resting” phase.
WARMING DOWN brings your cardiovascular, respiratory and circulatory
systems and your muscles back to normal functioning (thereby preventing
undesirable side effects such as the build-up of lactic acid, which is one of
the major causes of muscle pain namely, cramps and stiffness).
For greater comfort of use, we recommend that you pedal at a stable
speed.
INFORMATION :
In accordance with EN957 class HA standard, this Domyos Ergometer
product has been calibrated according to the following chart.
Developped
Power
in Watts
A - Warm-up phase
LThe warm-up is the preparatory phase for exercise and gets your body
FULLY READY to start working out. It is a way to PREVENT INJURIES TO
TENDONS AND MUSCLES. It involves two steps: WAKING UP THE MUSCULAR SYSTEM, AND OVERALL WARM-UP.
D - Stretching
You should stretch after warming down.
Stretching after exertion: Minimises MUSCULAR STIFFNESS caused by the
build-up of LACTIC ACIDS and “stimulates» BLOOD CIRCULATION
CARDIO-TRAINING : EXERCISE ZONE
• Training at 80 to 90% and above of maximum heart rate: Anaerobic zone and red zone reserved for high-performance
athletes and specialists.
• Training at 70-80% of maximum heart rate: Endurance training
• Training at 60% to 70% of maximum heart rate: Getting into shape/burning off fat.
• Training at 50 to 60% of maximum heart rate.
Heartbeats per minute
Heartbeats per minute
Men
Age
Women
Age
If your age is different to those given in the table, you can use the following formulae to calculate your maximum heart rate at 100%.
For men: 220- age - For women: 227- age
If you note a disparity from the resistive torque (of more than 10%) during the two-year warranty period, stop using your bike and contact
your nearest store.
26
NOTICE AND WARNING TO USERS
Getting into shape must be done in a CONTROLLED manner. Before beginning physical activity, do not hesitate to CONSULT
a PHYSICIAN, especially if: you have not done any sport in recent years, you are over the age of 35, you are unsure of your health
or if you are on medication. IT IS ESSENTIAL TO CONSULT A DOCTOR BEFORE PRACTISING A SPORT.
27
E
N
G
L
I
S
H
PARTS OF THE BODY WORKED
The exercise bike provides an excellent kind of cardio-training activity. Training on this equipment is designed to increase your cardio-vascular
capacity. On this principle, you improve your physical condition, your endurance and you burn calories (an indispensable activity for weight
loss in association with dieting).
Finally, the exercise bike allows you to tone the muscles in the legs and buttocks.
The muscles in the calves and the lower abdominals are also worked.
USE
If you are just starting out, begin by exercising for several days at a low resistance and speed, without forcing it, taking breaks if necessary.
Gradually increase the number or duration of the sessions.
Maintenance/Warm-up: Gradual effort
starting with 10 minutes.
For maintenance work designed to keep you
in shape or get back into shape, you can train
every day for about ten minutes. This type of
exercise will wake up your muscles and joints,
or it can be used as a warm-up before another type of physical activity. To develop muscle
tone in the legs, choose a greater resistance
and increase the duration of the exercise.
Obviously, you can vary the pedalling resistance over the course of your workout.
Aerobic exercise for getting into shape:
Moderate effort for a relatively long
time (30 minutes to 1 hour).
If you wish to lose weight, this type of exercise, combined with a diet, is the only way
to increase the amount of energy your body
consumes.
To do this, it is useless pushing yourself beyond
your limits.
Training on a regular basis is what will produce
the best results.
Choose a relatively low pedalling resistance
and exercise for at least 30 minutes.
This exercise should cause you to build up a
mild sweat, but it certainly should not leave you
out of breath.
It is the duration of the exercise at a slow pace
that will cause your body to dip into your fat
reserves to get its energy, as long as you pedal
for more than about thirty minutes at least three
times a week.
Aerobic training for endurance:
Sustained effort for 20 to 40 minutes.
This type of training aims to strengthen the
heart muscles significantly and improve respiratory functioning.
Pedalling resistance and/or speed is increased
to accelerate respiration during exercise.
This type of exercise is more sustained than
when you are working out to get into shape.
Little by little, as you train, you will be able to
work out for longer, at a faster pace or with a
higher resistance.
Aerobic endurance training requires at least
three training sessions per week.
More intense workouts (anaerobic work and
red-zone work) are reserved for athletes and
require specific preparation.
After each session, spend several minutes pedalling, gradually reducing speed and resistance to warm down and gradually return the
body to rest.
E
N
G
L
I
S
H
TROUBLESHOOTING
- *If you note abnormal distances or speeds, check that the switch
behind the console is in the VM position for magnetic bikes and VE
for elliptical bikes. Press the RESET button for the change to take
effect.
- * If you note that the counter does not display the correct units of
distance, check that the switch behind the console is in the Mi position to display in miles, or in the Km position to display in kilometres. Press the RESET button for the change to take effect.
- On magnetic bikes each turn of the pedals corresponds to a
distance of 4 metres, and on elliptical bikes one pedal rotation corresponds to a distance of 1.6 metres. (These values correspond to
average distances on a bike or walking.)
If the counter does not turn on:
- If you are using batteries : check that the polarity (+/-) of the batteries is correct.
- If the problem recurs, try new batteries
- If you are using mains power: check that the adaptor is correctly
connected to the bike.
- In both cases, check that the cables are correctly connected
behind the console and at the handlebar mounting on the main
frame of the bike.
If the problem persists, take the product back to your nearest
DECATHLON shop.
- If the heart rate indicator (3, 12 or 14) is not flashing or is
flashing erratically, check that the heart strap is correctly fitted (refer
to the heart strap instructions).
- If the following screen appears during calculation of body fat percentage, check that your hands are positioned properly on the heart
rate sensors and that the sensors are not too moist.
If there is a noise coming from inside the crankcase or if you cannot
set your level of intensity in manual mode, do not try to repair the
fault yourself. Return the product to your nearest DECATHLON store.
Only use the product with the adaptor supplied.
BATTERY INSTALLATION
1. Lift the console out of its support, remove the battery cover located at the
back of the product, and place four LR14 (1.5 V) batteries in the battery
compartment behind the screen.
2. Ensure that the batteries are inserted correctly and that they are in full contact
with the springs.
3. Replace the battery cover and the console, ensuring that they are correctly
attached.
4. If the display is unreadable or incomplete, remove the batteries, wait for 15
seconds and then replace them.
5. When you remove the batteries, the console memory is erased.
RECYCLING:
The “crossed-out bin” symbol indicates that this product and the
batteries it contains cannot be thrown away with household waste.
They are subject to specific sorting. Dispose of batteries and, at the
end of its life, your product at an authorised collection point for
recycling. Recycling your electronic waste will protect the environment
and your health.
TRADE WARRANTY
DECATHLON guarantees this product for parts and labor, under normal conditions of use, for 5 years for the structure and 2 years for wear
parts
and labor starting on the date of purchase, confirmed by the date on the sales ticket.
DECATHLON’S obligation in compliance with this warranty is limited to the product’s replacement or repair, at DECATHLON’S convenience.
All the products for which the warranty is applicable, shall be accepted by DECATHLON in one of its authorized service centers, sent postage
paid together with the proof of the purchase.
This warranty cannot be applied in the following cases:
• Damage caused during transport
• Misuse or abnormal use
• Repairs done by people not authorized by DECATHLON
• The commercial use of the product concerned
This trade warranty does not exclude the legal guarantee(s) applicable according to countries and / or provinces.
DECATHLON
- 4 BOULEVARD DE MONS – BP299 –
- 59665 VILLENEUVE D’ASCQ – France -
28
29