1
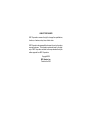
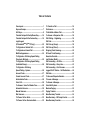
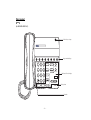
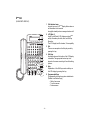
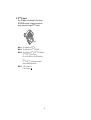
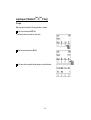
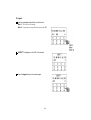
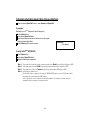
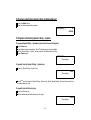
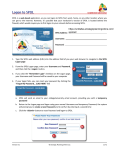
ND-91712(E)
ISSUE 1
Dterm Series i / Dterm IP USER’S GUIDE
SEPTEMBER, 2002
LIABILITY DISCLAIMER
NEC Corporation reserves the right to change the specifications,
functions, or features, at any time, without notice.
NEC Corporation has prepared this document for use by its employees and customers. The information contained herein is the property of NEC Corporation and shall not be reproduced without prior
written approval from NEC Corporation.
Copyright 2002
NEC America, Inc.
Printed in the USA
Table of Contents
Face Layout......................................................... 1
Keys and Lamps ................................................. 7
Soft Keys ............................................................. 9
Terminal Setup with the Up/Down Key........... 16
Terminal Setup with the Feature Key ............. 18
Login/Logout
(IP Enabled Dterm/Dterm IP Only) ...................... 22
To Originate an Outside Call ........................... 24
To Originate an Internal Call............................ 24
Multiline Appearance ....................................... 24
To Originate a Call Using Speed Calling
(One-touch Buttons)......................................... 25
To Originate a Call Using Speed Calling
(Individual/Group)............................................. 26
To Originate a Call Using
Speed Calling – System ................................... 26
Account Code ................................................... 27
Forced Account Code ...................................... 27
Authorization Code .......................................... 28
Voice Call .......................................................... 28
To Answer a Voice Call Hands Free ............... 29
Automatic Intercom.......................................... 30
Manual Intercom ............................................... 31
Dial Intercom..................................................... 32
To Place a Call on Hold.................................... 33
To Place a Call on Exclusive Hold .................. 33
To Transfer a Call............................................. 34
Conference ....................................................... 35
To Establish a Broker Call............................... 35
To Answer a Camped-on Call ......................... 36
Call Waiting – Originating ............................... 36
Call Park............................................................ 38
Call Pick-up (Group) ........................................ 39
Call Pick-up (Direct)......................................... 39
Outgoing Trunk Queuing................................. 40
Off-hook Trunk Queuing.................................. 40
Executive Override........................................... 41
Last Number Redial ......................................... 41
Call Forwarding – All Calls.............................. 42
Call Forwarding – Busy Line........................... 43
Call Forwarding – Don’t Answer..................... 45
Logged Out IP Station – Call Destination ...... 46
Call Back ........................................................... 48
To Save and Repeat a Number ....................... 49
To Leave a Message ........................................ 50
To Answer a Message...................................... 50
Voice Mail System............................................ 51
Meet-me Paging................................................ 52
Paging Transfer................................................ 53
Boss/Secretary Transfer.................................. 54
Boss/Secretary – MW Lamp Control .............. 55
Boss/Secretary Override ................................. 56
Table of Contents
Do Not Disturb .................................................. 57
Privacy............................................................... 58
Privacy Release ................................................ 59
Index .................................................................. 60
LCD Displays .................................................... 62
Face Layout
Dterm8
(8-LINE NON DISPLAY)
Call Indicator Lamp
Programmable Keys
2
ABC
DEF
3
Recall
Feature
4
6
Conf
Mic
GHI
5
JKL
MNO
7
8
1
Directory
Message
PQRS
Hold
TUV
9
Redial
WXYZ
0
#
Answer
Transfer
Speaker
Dedicated Function Keys
Microphone
Speaker
–1–
Dterm8D
(8-LINE WITH DISPLAY)
Call Indicator Lamp
LCD Display
Help
Exit
Soft Keys
Programmable Keys
2
3
DEF
Recall
Feature
ABC
4
5
JKL
6
Conf
Mic
7
PQRS
8
9
WXYZ
Redial
0
#
Answer
Transfer
Speaker
1
Directory
GHI
MNO
Message
TUV
OPER
Hold
Dedicated Function Keys
Microphone
Speaker
–2–
Dterm16D
(16-LINE WITH DISPLAY)
Call Indicator Lamp
LCD Display
Help
Exit
Soft Keys
Programmable Keys
2
3
DEF
Recall
Feature
ABC
4
5
JKL
6
Conf
Mic
7
PQRS
8
9
WXYZ
Redial
0
#
Answer
Transfer
Speaker
1
Directory
GHI
MNO
Message
TUV
OPER
Hold
Dedicated Function Keys
Microphone
Speaker
–3–
Dterm32D
(32-LINE WITH DISPLAY)
1
1
Call Indicator Lamp
Lamp at top corner of Dterm Display flashes when a
call terminates to the terminal.
Lamp lights steadily when a message has been left.
2
LCD (Note 1)
Liquid Crystal Diode (LCD) display provides Dterm
activity information plus date, time, and Soft Key
Operation.
The LCD display has 24-character, 3-line capability.
3
Exit
The user can escape from the Help key mode by
pressing this key.
4
Soft Keys
Any feature shown at the bottom of the LCD display
is available. The appropriate feature key is displayed on the screen according to the call handling
process.
5
Help
Explanations of the Soft Keys can be called up on
the LCD display by pressing this key.
6
Programmable Keys
[Programmable by telephone system administrator
(Flexible Line/Feature Keys)]
• Station line access
• Trunk line access
• Feature access
2
3
Help
Exit
4
5
6
7
8
1
2
DEF
Recall
Feature
ABC
3
5
JKL
6
Conf
Mic
9
Directory
4
GHI
10
MNO
Message
8
9
Redial
#
Answer
Hold
Transfer
Speaker
19
18
17
7
PQRS
TUV
0
OPER
WXYZ
11
12
13
14
15
16
–4–
[Programmable by user (Flexible Line/One-Touch
Speed Dial)]
<Flexible Line>
• Station line access
• Trunk line access
• Feature access
<One-Touch Speed Dial> (Note 2)
• Any feature can be assigned.
• Direct station selection
• Station speed dial
7
Recall
Press key to terminate established call and returns
to the internal dial tone.
8
Feature
Used to activate terminal setup functions and to
program One-Touch Speed Dial/Feature Keys.
9
Directory (Note 3)
Press key to activate speed calling - system feature.
10 Message (Note 3)
Press key to access the voice mail system.
11 Mic
Press key to respond hands free. LED on this key
lights during speakerphone operation.
12 Conf
Press key to establish a three-way conversation.
LED on key lights when key is active.
14 Microphone
Built-in microphone is used for hands free operation
with speakerphone.
15 Up/Down
( DOWN UP)
Used to adjust LCD contrast, speaker/receiver volume, and ringer volume.
• LCD Contrast:
Press ( ) or ( ) key while idle.
• Speaker/Receiver Volume:
Press ( ) or ( ) key during conversation.
• Ringer Volume:
Press ( ) or ( ) key during ringing.
16 Answer
When LED on this key is lighted, press key to
answer a waiting call.
17 Speaker
Controls the built-in speaker which can be used for
Hands Free dialing/monitoring.
LED on key lights when key is active.
18 Transfer
Allows the station user to transfer established calls
to another station, without attendant assistance.
19 Hold
Press key to place an internal or external call on
hold.
13 LNR/SPD (Last Number Call/Speed Calling)
Press key to activate redial feature. Press redial
and scroll back through numbers that have been
dialed.
Until the desired number is displayed.
Press the or # (Note 4) key to activate dialing.
–5–
20 Dterm IP Adapter
Dterm IP adapter can be attached to Dterm Series i
8D/16D/32D terminals. It supports the same telephony service as the original Dterm terminal.
20
Note 1: Not applicable for Dterm 8.
Note 2: Not applicable for Dterm 8/8D/16D.
Note 3: Not available for Dterm 65/Dterm Series III and
Dterm 75/Dterm Series E mode.
Dterm Series III/Dterm Series E: North America
Dterm 65/Dterm 75: Australia, Asia, Latin
America, Middle East, Russia
Note 4: A-law Countries: #
µ-law Countries:
–6–
Keys and Lamps
Programmable Keys
These are examples of Dterm! features available by pressing the programmable keys. Some features may be programmed by the user. Others must be programmed by the telephone system administrator.
AICM
Press key to activate “Automatic Intercom”.
DICM
Press key to activate “Dial Intercom”.
DND (Do Not Disturb)
Press key to activate or cancel “Privacy” feature.
FWD
Press key to activate or cancel “Call Forwarding – All Calls” feature.
FWD-BY
Press key to activate, verify, or cancel “Call Forwarding – Busy Line” feature.
FWD-NA
Press key to activate, verify, or cancel “Call Forwarding – Don’t Answer” feature.
MICM
Press key to activate “Manual Intercom”.
MSG (Message)
Press key to leave message indication at station in no answer or busy condition.
MULTILINE APPEARANCE
A programmable extra extension key. Press this key to see status of extra extension.
MW-SET
Press key to leave message waiting indication on boss’ station from secretary’s station.
MW-CANCEL
Press key to cancel message waiting indication on boss’ station from secretary’s station.
P-RLS
Press key to release “Privacy” feature.
–7–
S&R (Save and Repeat)
Press key to store a number or redial a stored number.
SIG
Press key to cause chime at predetermined station.
Lamps
Call Indicator Lamp
Lamp at top of Dterm Display flashes when a call terminates to the terminal.
Lamp lights steadily when a message has been left.
LCD
Liquid Crystal Diode (LCD) display provides Dterm activity information plus date, time and Soft Key operation.
LED
Some Feature keys have a built-in Light Emitting Diode (LED) that lights or flashes according to the activity of that
Feature key.
Function Key Activities
Feature + 1 =
Feature + 2 =
Feature + 3 =
Feature + 4 =
Feature + 5 =
Feature + 6 =
Feature + 7 =
Turns microphone on or off.
Adjusts handset receiver volume
Selects ringer tone
Adjusts transmission/receiving volume
Activates hands-free operation
Deactivates hands-free operation
Turns call indicator lamp on or off for incoming call notification. (If turned off, this lamp will still
light to indicate message waiting.)
Feature + 8 = Turns Dynamic Dial Pad on or off.
–8–
Soft Keys
4051
7:35 AM MON 18 JUL 2002
MIC DND
>>>
Exit
Help
Note: Soft Key functionality is optional and may not be available on your Dterm Series i/Dterm IP telephone.
The Soft Keys on the Dterm Series i/Dterm IP provide a set of functions on the LCD that adapts to the changing state
of the telephone. While default Soft Key settings are provided, desired functions can be assigned to individual stations as required. The Soft Keys, at the bottom of the LCD, can display the blinking names of available functions,
names of user-assigned functions and names of functions assigned by a specific Soft Key pattern. The Soft Keys
displayed can vary, depending on the state of the phone and/or when the Next/Previous button is pressed.
Exit Key
Press the Exit Key to exit the Help program.
Help Key
Press the Help Key. Press desired Soft Key for helpful information about that key.
MIC (Microphone)
Press the Soft Key below “MIC” to activate or deactivate the Microphone. LED on Mic key will illuminate when Mic is
on.
DND (Do Not Disturb)
Press the Soft Key to allow denying access to the station line for incoming calls.
–9–
Default Function Displays for Each Status
Default Soft Key settings are provided corresponding to particular functions. Different Soft Key settings are displayed at the bottom of the LCD depending on the state of the call, as shown below.
Different patterns of Soft Key settings can be registered for individual call states and assigned to individual terminals
as required.
IDLE
MIC
(Time display)
DND
>>>
DIAL TONE/DIALING
(1)
(Time display)
MIC PICK
FDA
Push >>>
(2)
>>>
FDN
(Time display)
FDB
>>>
MIC
(Time display)
VOICE
>>>
RINGING
– 10 –
BUSY
BUSY
2000
(1)
MIC
Push >>>
(Time display)
CW
CB
BUSY
(2)
2000
(Time display)
S&R
>>>
CONNECTION
2000
MIC
CONSULTATION HOLD
>>>
(Time display)
DND
TRANSFER
(Time display)
MIC CONF
– 11 –
>>>
2000
>>>
Soft Key Features
When the Soft Key corresponding to a desired function name is operated, the selected function name starts to blink
on the LCD. The blinking display of available functions takes precedence over the display of functions specified by
the Soft Key pattern.
FDB (Call Forwarding – Busy)
Permits a call to a busy station to be immediately forwarded to a predesignated station.
FDA (Call Forwarding – All Calls)
Permits all calls destined for a particular station to be routed to another station regardless of the busy or idle status
of the called station.
FDL (Logged Out IP Station – Call Destination)
Enables a system to transfer the call to appropriate station when Dterm whose LOGGED OUT IP STATION – CALL
DESTINATION has already been registered is in logout status.
E-OVR (Executive Override)
Enables selected station users, upon encountering a busy condition at an internal station, to bridge into the busy
connection.
CW (Call Waiting)
Enables a busy station to receive a second incoming call. A camp-on indication tone is sent to the busy station, and
the user can use a switchhook flash to answer the second call.
CB (Call Back)
Provides the ability for a calling station to set a CALL BACK. The calling station will be rung as soon as the busy station becomes available.
S&R (Save and Repeat)
Allows a station to save a specific dialed number and then redial that number later.
MWSET (Message Waiting – Set)
Allows a station to set a Message Waiting indication or lamp.
HOLD (Call Hold)
Permits a station user to hold a call in progress and to return to the previously held call.
MWOFF (Message Waiting – Cancel)
Allows a station to cancel a Message Waiting indication or lamp.
– 12 –
PICK (Call Pickup – Group)
Permits a station user to answer any calls directed to other lines in the user’s preset Call Pickup Group.
CONF (Three-way Calling)
Enables a station user to establish a three-way conference by connecting an additional party to an already existing
conversation.
VOICE (Voice Call)
Enables the user to make a call to the called party’s built-in speaker. If the called party’s MIC is on, the called party
can converse hands-free.
S-SPD (Speed Calling – System)
Allows a station user to call certain frequently dialed numbers using fewer digits (abbreviated call codes) than would
normally be required.
CAS (CAS-Switch Hook Flash)
Allows the user to send a switchhook flash while on an outside trunk.
UCDBO (UCD Busy Out)
Allows a station user to block UCD calls and to cancel Busy Out.
FLASH (Flash)
Provides the station with a switchhook flash.
FDN (Call Forward – No Answer)
Permits a call to an unanswered station to be forwarded to a predesignated station if the called station does not
answer within a predetermined period of time.
C-RPT (ISDN Malicious Call Trace)
Allows the user to initiate a Call Trace on ISDN calls only.
G-SPD (Speed Calling – Group)
Allows a station user to share a set of common Speed Calling numbers with other station users in the group.
P-RLS (Privacy Release)
Allows another station to depress a busy line button and enter the conversation of a station already engaged in communication.
DND (Do Not Disturb)
Allows a station user to deny access to the station line for incoming calls.
– 13 –
MIC (Microphone On/Off)
Allows the user to turn the microphone on and off for use with the speakerphone.
BPAGE (Button Page)
Allows the user to assign two functions to each feature or speed key and to toggle between pages.
HSET (Headset)
Allows the user to go off- and on-hook when using the headset.
RLS (Release Key)
Allows the user to release the current call when using the headset, without waiting for the party to hang up.
SIG (Manual Signaling)
Permits station users to send a one-second ring to a predetermined station. If the signaled station is ringing from
another call, the manual intercom signal will interrupt that ringing.
CKEEP (Eight-Party Conference Retrain)
Allows all outside parties to stay on a conference when all internal parties hang up.
SCALL (Serial Call)
Allows the user to set Serial Call for the caller before extending the call, allowing the caller to receive an announcement at the end of the call guiding the caller to dial the next number and subsequent numbers.
IZP (Internal Zone Paging)
Allows a user to make a voice call through the speakers of the designated group.
IDCHG (Call ID Change Display)
Allows the user to toggle between standard display and an alternate display.
GPICK (Call Pickup – Group Enhancement)
Allows the user to answer any ringing station within the user’s expanded call pickup group.
CHCNF (Call Hold – Conference)
Allows a station user to establish a conference connection by adding a third party, who is held on another line, to the
existing two-party connection.
– 14 –
RMUTE (Ringer Mute)
Allows a station user to mute or recover station ringing.
>>> (Display Function Next Page)
Allows the user to scroll to the next display screen.
<<< (Display Function Previous Page)
Allows the user to scroll to the previous display screen.
– 15 –
Terminal Setup with the Up/Down Key
Note: Not Displayed for Dterm 65/Dterm Series III and Dterm 75/Dterm Series E mode.
Dterm Series III/Dterm Series E : North America
Dterm 65/Dterm 75 : Australia, Asia, Latin America, Middle East, Russia
To adjust the handset receiver volume
Press the Up/Down key in the off-hook status or engaged in a call.
LCD display for North America, Latin America, Asia, Middle East and Russia.
HANDSET
LCD display for Australia.
HANDSET
To adjust the speaker volume
Press the Up/Down key during speakerphone operation or engaged in a call.
SPEAKER
To adjust ringer tone
Press the Up/Down key during ringing.
RING
– 16 –
To adjust LCD contrast
Press the Up/Down key in the on-hook status.
LCD
– 17 –
Terminal Setup with the Feature Key
Microphone On/Off
LED on Mic key shows the status of the built-in microphone.
To change microphone status
Press Soft Key associated with the MIC Display or press Feature and 1.
To adjust initial receiving volume
Handset receiver volume can be changed.
To change the handset receiver volume
Press Feature and 2. The LCD displays the current volume status.
Press Feature and 2 to alternate between Large and Small volume.
– 18 –
RCV VOL.
SMALL
(Time display)
RCV VOL.
LARGE
(Time display)
To select ringer tone
The Dterm Series i/Dterm IP has 9 kinds of ringer tones that you can select.
Press Feature and 3. The LCD displays the selected tone number (n=1 ~ 9).
Tone No.
Frequency (Hz)
Modulation (Hz)
1
520/660
16
2
520/660
8
3
1100/1400
16
4
660/760
16
5
Melody 1
6
Melody 2
7
Melody 3
8
Melody 4
9
Melody 5
Note: Tone number 5~9 may not be available in all feature packages.
– 19 –
RINGER TONE
(Time display)
n
To adjust transmission/receiving volume
Handset volume can be changed.
Press Feature and 4. The LCD displays the current volume.
Press Feature and 4 again to alternate between Small and Large volume.
T/R VOL.
SMALL
(Time display)
T/R VOL.
LARGE
(Time display)
To activate hands-free
To set hands-free on:
Press Feature and 5. The LCD displays:
To set hands-free off:
Press Feature and 6. The LCD displays:
HANDS FREE
(Time display)
ON
HANDS FREE
(Time display)
OFF
Direct Dial Pad
(Time display)
ON
INDICATOR
(Time display)
OFF
Call Indicator lamp on/off
The user can choose to turn the call indicator lamp either on or off during ringing.
Press Feature and 7. The LCD displays:
Note: The call indicator lamp lights when used as a Message Waiting Lamp, even when it is turned off by the above operation.
– 20 –
Dynamic Dial Pad on/off
The user can originate a call at first hand without lifting handset or pressing Speaker key.
Press Feature and 8. The LCD displays:
Direct Dial Pad ON
(Time display)
Direct Dial Pad OFF
(Time display)
Note: When this feature is ON, the user may initiate a call by immediately dialing the number and the station will go
hands-free off-hook automatically.
– 21 –
Login/Logout (IP Enabled Dterm/Dterm IP Only)
To Login
When login mode is activated, following procedure is required.
Enter login code and press SET key.
(The station number is used as the Login code.)
Enter the password and press OK key.
If the login code is accepted, display changes to normal idle status.
– 22 –
To Logout
Press the preassigned logout button on the terminal.
Note 1: This location is an example.
Note 2: Logout button is assigned by data setting at the PBX.
“LOGOUT?” is displayed on the LCD of the terminal.
Press the logout button on the terminal again.
– 23 –
To Originate an Outside Call
Lift handset or press Speaker key, receive dial tone.
Dial the Central Office access code, e.g.
Dial desired telephone number.
Use handset or MIC to converse.
Display indicates:
Elapsed
time
Trunk
type
15:39
DDD
(Time display)
Trunk
number
To Originate an Internal Call
Lift handset or press Speaker key.
Receive dial tone.
Dial desired station number. Display indicates digits dialed.
Use handset or MIC to converse.
Multiline Appearance
To originate
Press the MULTILINE APPEARANCE feature key.
Lift handset or press Speaker, receive Central Office or distant PBX dial tone.
Dial the destination.
To answer
Press the MULTILINE APPEARANCE feature key (ringing and flashing LED alert user to incoming call).
Lift handset or press Speaker.
Speak with incoming party.
– 24 –
3
To Originate a Call Using Speed Calling (One-touch Buttons)
Press the desired Speed Call button, or press Speaker and Speed Call.
To program
(Available only on Dterm stations with speed calling keys.)
Press Feature button.
Press desired Speed Call button.
Enter desired telephone number or feature code on the keypad.
Display indicates digits dialed.
Press Feature again to save the number.
SPEED SET
(Time display)
To verify (with Dterm 8D/16D/32D)
Press Feature button.
Press desired Speed Dial button.
Display indicates digits programmed.
Note 1:
Note 2:
Note 3:
Note 4:
To program a hook switch for transfer or feature activation, press Recall key as first digit. (! displays on LCD.)
To program a pause, press the Recall key as any digit other than the first digit. (– displays on LCD.)
To program a Voice Call, press Transfer key after dialing station number. (V displays on LCD.)
Speed calling for feature access:
Speed call keys may use a feature key by storing the NEAX2400 IPX feature access code. The features may be
programmed on a system basis by the PBX engineer.
Access codes may be stored in conjunction with telephone numbers. For example, one button can be programmed by the user to transfer to a certain extension.
– 25 –
To Originate a Call Using Speed Calling (Individual/Group)
Press the Redial button.
Press the desired speed calling number.
LNR[*]/SPD[_ _]
–X
XXXXXX
To Originate a Call Using Speed Calling – System
To program Speed Calling – System key (on one-touch seed calling key)
Press Feature key.
Press desired one-touch speed key. The LCD displays previously stored digits.
Dial the “Speed Calling – System” access code and .the abbreviated call code.
Press Feature again.
SPEED SET
(Time display)
To operate from the Speed Calling – System key
Press the “Speed Calling – System” key.
XXXX
(Time display)
If the Dterm does not have the “Speed Calling – System” key, dial the “Speed Calling – System” access code, then
the abbreviated call code.
To operate from the Directory key
Press the Directory key.
Dial the abbreviated call code (maximum of 4 digits).
XXXX
(Time display)
– 26 –
Account Code
To enter
Lift handset or press Speaker, receive dial tone.
Enter feature access code, receive service set tone.
Enter “Account Code” (up to 10 digits).
Receive dial tone and dial desired number.
To enter account code after authorization code
Lift handset or press Speaker, receive dial tone.
Enter feature access code for “Authorization Code”, receive service set tone.
Enter “Authorization Code”, receive second service set tone.
Enter “Account Code”, receive dial tone, and dial desired number.
Note: Authorization and Account Codes may be up to 20 digits combined.
Forced Account Code
Lift handset or press Speaker, receive dial tone.
Enter feature access code, receive service set tone.
Enter “Forced Account Code” (up to 10 digits), receive dial tone.
– 27 –
Authorization Code
To enter without account code
Lift handset or press Speaker, receive dial tone.
Enter feature access code, receive service set tone.
Enter “Authorization Code” (up to 10 digits).
Receive dial tone, dial desired number.
- Or Lift handset, receive dial tone.
Dial desired number.
If an “Authorization Code” is required, caller hears special dial tone.
Enter “Authorization Code”, or call will be denied.
Note: This option is available only if system is programmed with Least Cost Routing.
To enter with account code (see above)
Service set tone is optional depending upon system programming.
Note: If a 16- or 32-button display terminal is used, the display indicates all of the digits dialed.
Voice Call
Lift handset
Dial desired station number.
Press Voice.
VOICE
2000
(Time display)
Speak to called party.
– 28 –
Using the Soft key
Lift handset
Dial desired station number; VOICE Soft Key appears while station is
ringing.
2000
MIC
(Time display)
VOICE
>>>
Press VOICE Soft Key. Speak to called party.
Note 1: A Voice Call may be programmed on a one-touch speed key by pressing Speed Dial button, dialing the extension, and pressing the Transfer key. (V displays if programming on an LCD Display Dterm. Save by pressing
Speed Dial again.)
Note 2: If called party is on their line when a Voice Call is attempted, calling station’s display indicates:
VOICE BUSY
(Time display)
Note 3: A voice call is restricted if called party’s station is not a Dterm.
Display indicates:
VOICE REST
(Time display)
To Answer a Voice Call Hands Free
Receive incoming Voice Call.
Press the MIC Soft Key or Mic. LED lights.
Respond hands-free.
Calling station
VOICE
2001
(Time display)
Note: If privacy is required, lift handset.
– 29 –
Automatic Intercom
To initiate
Lift handset or press Speaker key.
Press the AICM key.
Hear ringback tone.
Called party
ICM
2
(Time display)
To answer
Calling party
AICM key flashes red indicating an incoming intercom call.
ICM
1
(Time display)
Press AICM, lift handset or press Speaker. LED lights solid green.
If called station is engaged in a non-intercom call, the station may press AICM after placing original caller on hold
(with HOLD key).
To bridge into an automatic intercom call
Note: Bridging is an optional feature.
Overriding party
Press the AICM key, lift handset or press Speaker.
OVERRIDE
(Time display)
A three-party conference is established.
CONF
(Time display)
– 30 –
1
Manual Intercom
To initiate
Press MICM, lift handset or press Speaker, ringback tone is heard.
Press the SIG key if it is desired for the called station to hear ringing.
Called party
ICM
2
(Time display)
To answer
Calling party
MICM key flashes, indicating an incoming call. Ring tone may also be heard.
ICM
Press MICM.
Lift handset or press Speaker, LED lights solid green.
If called station is engaged in a non-intercom call, the station may press
MICM after placing original caller on hold (with Hold key).
1
(Time display)
To bridge into a manual intercom call
Note: Bridging is an optional feature.
Overriding party
Press MICM, lift handset or press Speaker.
OVERRIDE
(Time display)
A three-party conference is established.
1
CONF
(Time display)
Note 1: The SIG key signals the corresponding station when speaking over the intercom path is unnecessary.
Note 2: Two-button Manual Intercom provides one button for signalling and one for talking. A separate signalling button
can be used in many ways for the secretary to alert a boss, or vice versa.
– 31 –
Dial Intercom
To initiate
Lift handset or press the Speaker key.
Press DICM key.
Dial desired intercom station number. Receive ringback tone.
Called party
ICM
2
(Time display)
To answer
DICM LED flashes, indicating an incoming intercom call.
Press DICM.
Lift handset or press Speaker. LCD shows solid green.
If called station is engaged in a non-intercom call, the station may press
DICM after placing the original call on hold (with the Hold key.)
Calling party
ICM
2
(Time display)
To bridge into a dial intercom call
Note: Bridging is an optional feature.
Overriding party
Press the DICM key, lift handset or press Speaker.
OVERRIDE
(Time display)
A three-party conference is established.
3
CONF
(Time display)
Note: Dial intercom provides a Dial Intercom group where each member of the group may be called by a 1- or 2-digit
number without using their prime lines.
– 32 –
To Place a Call on Hold
Held station
number
Press Hold. Held line wink flashes.
Note: If held line appears on other Dterm stations, the associated LED flashes
red slowly.
HOLD
2001
(Time display)
To retrieve
Lift handset or press Speaker.
Press held line. Use handset to converse.
Note: Any station with this line appearance can retrieve the call.
If unanswered
After preprogrammed time, Automatic Recall is initiated.
Visual and audible signal (rapid flash and ring burst) is sent to station that placed call on hold.
Note 1: A transfer or conference call may be placed on hold depending on software level of the NEAX2400 IPX.
Note 2: Hold shows as a flashing green LED on your phone. The same line on other phones shows as a flashing red
LED.
Recall shows as a flashing green LED on your phone and flashing red LED on other phones with the same line.
To Place a Call on Exclusive Hold
Press Hold twice. Line appearance indicates interrupted wink.
Note: If held line appears on other Dterm stations, LED remains steadily lit red.
To retrieve
Lift handset or press Speaker.
Press held line. Use handset to converse.
Note: Only the Dterm that set Exclusive Hold option can retrieve the call.
– 33 –
Held station
number
E_HOLD
(Time display)
2001
If unanswered
After preprogrammed time, Automatic Recall is initiated.
Visual and audible signal (rapid flash and ring burst) is sent to station which placed call on Exclusive Hold. Recall
shows as a flashing green LED on your phone, and solid red on other phones with same line.
Note: Exclusive Hold excludes any other phone from picking up your held call. Exclusive Hold shows as a flashing green
LED on your phone. The same line on other phones appears as a solid red LED.
To Transfer a Call
After conversing, ask party to hold.
Press Transfer. Receive interrupted dial tone.
TRANSFER
(Time display)
Transferred station
or trunk number
Dial destination station’s extension, hand up or wait for answer.
TRANSFER
(Time display)
2001
Transferring station
If transferring party hangs up, that station’s number appears in the center of
recipient’s display.
– 34 –
TRANSFER 2000
DDD 3
(Time display)
Conference
With call in progress, ask party to hold.
Press Transfer, receive interrupted dial tone.
Dial desired number.
After call is answered, press Conf. Conf LED lights.
Three-way conference is established.
CONF
(Time display)
Using the Soft Key
With a call in progress, press Transfer and dial desired number.
After call is answered, press CONF Soft Key.
Three-way conference is established.
If one party hangs up, other two remain connected. Conf LED goes out.
CONF
(Time display)
MIC
>>>
To Establish a Broker Call
While engaged in a call and wishing to consult a third party, press Transfer. Caller is automatically placed on
hold.
Dial desired party to consult.
Press Transfer to return to original caller. Third party is automatically placed on hold.
By repeating these steps, it is possible to alternate between calls.
Note: The display indicates connected station or trunk at any given time.
– 35 –
To Answer a Camped-on Call
(from the attendant)
While engaged in a call, receive the camp-on indication (one short tone burst). Answer LED flashes.
Press Answer. Call in progress is placed on hold.
Trunk
Trunk
Connection to camped-on call is established.
type
number
Press Answer to return to original call. Camped-on call is placed on hold.
CAMP ON DDD
3
By repeating these steps, it is possible to alternate between calls. Display
(Time display)
indicates connected station or trunk at any given time.
Call Waiting – Originating
To program call waiting key (on one-touch speed calling key)
Press Feature.
Press desired one-touch speed key.
Press Recall. ! appears on LCD. (See Note.)
Dial “Call Waiting” feature access code.
Press Feature.
Note: To program a hook switch for transfer or feature activation, press Recall as first digit. ! displays on LCD.
To activate call waiting – originating
Called station
number
Dial desired station number, receive busy tone.
Press CALL WAITING.
Receive special ringback tone.
Call waiting tone is sent to busy station.
C WAIT
2000
(Time display)
– 36 –
– Or –
Lift handset or press Speaker.
Dial “Call Waiting” access code, receive dial tone.
C WAIT
(Time display)
Dial busy station.
C WAIT SET
(Time display)
Using the Soft Key
Dial desired station and receive busy tone.
Press CW Soft Key receive call waiting ringback tone.
2000
Called station
number
C WAIT SET
(Time display)
MIC
2000
>>>
To answer a waiting call
Call Waiting Tone is heard.
Press Answer.
Waiting call is automatically connected. Original party is placed on hold.
By repeatedly pressing Answer, it is possible to alternate between calls.
Display indicates connected station or trunk at any given time.
Calling station
number
C WAIT
2001
(Time display)
Calling station
number
Using the Soft Key
Hear burst of tone Display indicates “C WAIT” and Answer button flashes.
Press Answer receive call waiting tone.
C WAIT
MIC
To disconnect
Press Recall. Station user is automatically connected to original party.
– 37 –
2001
(Time display)
>>>
Call Park
To program call park key (on one-touch speed calling key)
Press Feature.
Press one-touch speed key.
Press Recall. ! displays on LCD.
Dial “Call Park” access code.
Press Feature again.
Parked station
or trunk
To park a call
While connected to a station or trunk CALL PARK.
CALLPARK SET
DDD 3
(Time display)
To retrieve a parked call from originating station
Dial “Call Park” local retrieval code.
Station user is connected to parked call.
Elapsed time
10:01
DDD 2
(Time display)
To retrieve a parked call from a remote station
Dial “Call Park” remote retrieval code and the station number from which
the call was parked.
Station user is connected to remotely parked call.
Station that
parked the call
2000
DDD 2
(Time display)
– 38 –
Call Pick-up (Group)
When a station within pick-up group rings
Lift handset.
Press CALL PICK-UP or dial “Call Pick-up” access code (may be stored on one-touch speed calling key).
Connection to calling party is established.
Called
Calling
If currently on a call, press Transfer and dial “Call Pick-up” access code.
station
party
The original party is placed on hold.
PICK UP 2000 DDD
3
(Time display)
Using the Soft Key
Called
station
Lift handset and press PICK Soft Key.
Connection to calling party is established.
PICK UP 2000
(Time display)
MIC
Call Pick-up (Direct)
To program pick-up direct key (one-touch speed key)
Press Feature.
Press one-touch speed key.
Dial “Direct Call Pick-up” access code.
Press Feature again.
When a station within the system rings
Lift handset, receive dial tone.
Press PICK-DIRECT and dial the station number to be picked up.
– 39 –
Calling
party
2001
>>>
– Or –
Dial “Direct Call Pick-up” access code and the station number to be picked up.
Called
Calling
Connection to calling party is established.
station
party
If busy, original call must be placed on hold before new call can be picked
PICK UP 2000 DDD
3
up.
(Time display)
Outgoing Trunk Queuing
If trunk busy
Receive Trunk Busy indication. Press CALL BACK. Call is placed in queue
OG-Q SET
for next available trunk.
(Time display)
When trunk is available, setting station is alerted by ringing and flashing red
LED.
Press Speaker or lift handset. Dial tone is heard or number is automatically dialed if NEAX2400 IPX is programmed with Least Cost Routing.
Off-hook Trunk Queuing
Press Speaker, receive dial tone.
Dial “Off-hook Queuing” access code.
Dial desired telephone number. Encounter a trunk busy condition.
Station user receives service set tone and leaves speaker on.
The desired number is automatically dialed when a trunk becomes available.
– 40 –
Executive Override
If called station is busy
Overridden station
Press OVERRIDE.
Interrupted parties receive warning tone.
OVERRIDE
(Time display)
Three-way conference is initiated.
Conf LED lights.
2001
CONF
(Time display)
Using the Soft Key
Press E-OVR Soft Key.
Interrupted parties receive warning tone and three-way conference is initiated.
OVERRIDE
(Time display)
MIC
2001
>>>
Note: Override may be programmed by the NEAX2400 IPX engineer for one of the Programmable Line/Feature keys, or
may be programmed by the user on a one-touch speed calling key by storing the Recall and Override access code.
Last Number Redial
To Recall the Last Number Dialed
Press Redial. Last number dialed is displayed.
Press Redial key until desired number is displayed. Up to 5 previously
dialed numbers.
Press # or (Note). The number on the display is automatically redialed.
When party has answered, lift handset or speak handsfree.
Note: A-law Countries: #
µ-law Countries:
– 41 –
LNR[# or
]/SPD[_ _]
–X
XXXXXX
Call Forwarding – All Calls
To set
Press Speaker. Receive dial tone.
If setting for another station, press MULTILINE APPEARANCE.
Press FWD or dial “Call Forwarding – All Calls” access code. Receive special dial tone.
Dial destination station or external telephone number. Receive service set tone.
FWD LED lights (at your station or at the Dterm of the multiline station you
Forwarding
are setting).
station
Press Speaker. Call Forwarding – All Calls is set.
FORWARD SET
2000
(Time display)
Using the Soft Key
Press FDA Soft Key. Receive special tone.
Dial destination; wait for service set tone.
“FORWARD SET” is displayed, call forwarding for all calls is set.
To verify (with Dterm 8D/16D/32D)
Press FWD.
Display indicates the station number calls are forwarded to.
If recipient station is a Dterm 8D/16D/32D, LCD displays:
Note 1:
Note 2: With Soft Key operation, FDB flashes on the display.
– 42 –
FORWARD SET
(Time display)
MIC
>>>
Forwarding
station
FORWARD
(Time display)
2000
To cancel
Press Speaker. Receive dial tone. If cancelling for another station, press
MULTILINE APPEARANCE.
Press FWD or dial “Call Forwarding – All Calls” cancel code. Receive service set tone. LED goes out at your station (or the Dterm of the multiline station).
Press Speaker. Call Forwarding – All Calls is cancelled.
FORWARD CANCEL
(Time display)
Using the Soft Key
Press FDA Soft Key.
Receive service set tone and “FORWARD CANCEL” is displayed.
FORWARD CANCEL
(Time display)
MIC
Call Forwarding – Busy Line
To set
Press Speaker. Receive dial tone.
If setting for another station, press MULTILINE APPEARANCE.
Press FWD-BY or dial “Call Forwarding – Busy Line” access code. Receive special dial tone.
Dial destination station or external telephone number. Receive service set tone.
FWD LED lights (at your station or at the Dterm of the multiline station you are setting).
Press Speaker. Call Forwarding – Busy Line is set.
FORWARD SET
(Time display)
– 43 –
>>>
Using the Soft Key
Press FDB Soft Key. Receive special dial tone.
Dial destination; wait for service set tone.
“FORWARD SET” is displayed; Call Forwarding – Busy Line is set.
FORWARD SET
(Time display)
MIC
>>>
To verify (with Dterm 8D/16D/32D)
Press FWD-BY.
Display indicates the station number calls are forwarded to.
term
Note 1: If recipient station is a D 8D/16D/32D, LCD displays:
Note 2: With Soft Key operation, FDB flashes on the display.
Forwarding station
FORWARD
(Time display)
2000
To cancel
Press Speaker. Receive dial tone. If cancelling for another station, press
MULTILINE APPEARANCE.
Press FWD-BY or dial “Call Forwarding – Busy Line” cancel code. Receive
service set tone. LED goes out at your station (or the Dterm of the multiline
station).
Press Speaker. Call Forwarding – Busy Line is cancelled.
FORWARD CANCEL
(Time display)
Using the Soft Key
Press FDB Soft Key.
Receive service set tone and “FORWARD CANCEL” is displayed.
– 44 –
FORWARD CANCEL
(Time display)
MIC
>>>
Call Forwarding – Don’t Answer
To set
Press Speaker. Receive dial tone.
If setting for another station, press MULTILINE APPEARANCE.
Press FWD-NA or dial “Call Forwarding – Don’t Answer” access code. Receive special dial tone.
Dial destination station or external telephone number. Receive service set tone.
FWD LED lights (at your station or at the Dterm of the multiline station you are setting).
Press Speaker. Call Forwarding – Don’t Answer is set.
Forwarding
station
FORWARD SET
(Time display)
2000
Using the Soft Key
Press FDN Soft Key. Receive special dial tone.
Dial destination; wait for service set tone.
“FORWARD SET” is displayed; Call Forwarding – Don’t Answer is set.
FORWARD SET
(Time display)
MIC
>>>
To verify (with Dterm 8D/16D/32D)
If verifying for another station, press MULTILINE APPEARANCE while idle.
Press FWD-NA.
Display indicates the station number calls are forwarded to.
Note 1: If recipient station is a Dterm 8D/16D/32D, LCD displays:
Forwarding
station
FORWARD
(Time display)
2000
Note 2: Call Forwarding for Busy Line and Don’t Answer may be combined depending upon system programming.
Note 3: With Soft Key operation, FDB flashes on the display.
– 45 –
To cancel
Press Speaker. Receive dial tone. If cancelling for another station, press
MULTILINE APPEARANCE.
Press FWD-NA or dial “Call Forwarding – Don’t Answer” cancel code.
Receive service set tone. LED goes out at your station (or the Dterm of the
multiline station).
Press Speaker. Call Forwarding – Don’t Answer is cancelled.
FORWARD CANCEL
(Time display)
Logged Out IP Station – Call Destination
To set
Lift handset or press Speaker key.
Dial “Logged Out IP Station – Call Destination” access code.
Dial destination station number; receive service set tone.
Replace handset or press Speaker key. Logged Out IP Station – Call Destination is set.
FORWARD SET
(Time display)
XXXX
FORWARD SET
(Time display)
MIC
XXXX
Using the Soft Key
Press FDL Soft Key; receive special Dial Tone.
Dial destination station number.
Receive service set tone; “FORWARD SET” is displayed.
To verify (with Dterm
>>>
8D/16D/32D)
Press “Logged Out IP Station – Call Destination” feature key lighting red or press FDL.
Display indicates the station number calls are forwarded.
FORWARD
(Time display)
Note: With Soft Key Operation, FDL flashes on the display.
– 46 –
XXXX
To cancel
Lift handset or press Speaker key; receive Dial Tone.
Dial “Logged Out IP Station – Call Destination” cancel code; receive service set tone.
Replace handset or press Speaker key. Logged Out IP Station – Call DestiFORWARD CANCEL
nation is canceled.
(Time display)
Using the Soft Key
Lift handset or press Speaker key; receive Dial Tone.
Press FDL Soft Key; receive service set tone.
Dial destination station number; receive service set tone.
“Logged Out IP Station – Call Destination” lamp goes off and FDL indication disappears on the LCD.
FORWARD CANCEL
(Time display)
MIC
– 47 –
>>>
Call Back
If called station is busy
Called party
Press CALL BACK. Receive service set tone.
CALLBACK SET
(Time display)
2000
– Or –
Press the FLASH key and enter “Call Back” access code.
When both parties become idle, calling party’s phone rings. Calling party
would go off hook and hear ring back tone.
The called station would then be ringing.
Connection is established when the called party answers.
Called party
CALLBACK
(Time display)
2000
Called party
Note: Call Back may be programmed by the PBX Engineer on a Programmable
Line/Feature Key or by the user on a one-touch speed calling key.
CALLBACK
(Time display)
2001
Using the Soft Key
Press CB Soft Key and receive service set tone.
“CALLBACK SET” is displayed and the CB Soft Key flashes on the display.
– 48 –
CALLBACK SET
(Time display)
MIC
>>>
To Save and Repeat a Number
To save
Press Speaker.
Dial desired telephone number.
Press S&R. Dialed number is now stored. S&R LED lights.
– Or –
Receive internal call.
Press S&R. Number is stored in memory.
S&R LED lights.
Using the Soft Key
Press S&R. Number is stored in memory.
S&R LED lights.
To verify (with Dterm 8D/16D/32D)
While idle, press S&R.
Display indicates digits sorted.
To repeat
Press Speaker.
Press S&R. Dterm automatically redials the programmed number.
S&R automatically cancelled. LED goes out.
Note: If saved number is busy or no answer is received, to save it again, press S&R again before hanging up.
Using the Soft Key
Press flashing S&R Soft Key. Stored number is automatically redialed. “S&R” disappears from display.
– 49 –
To Leave a Message
Press Speaker. Receive dial tone.
Dial desired station number. Encounter no answer or busy condition.
Press MSG. Message is sent to called Dterm.
Called station MSG LED lights.
Note 1: Up to four messages can be stored in Dterm memory.
Note 2: If a fifth message is attempted, reorder tone is heard and display indicates:
Note 3: If station is not equipped to receive messages, reorder tone is heard and
display indicates:
Called station
MESSAGE SET
(Time display)
2001
MESSAGE BUSY
(Time display)
MESSAGE REST
(Time display)
To Answer a Message
To display
MSG LED is lit. Station is idle.
Press MSG.
Re-press MSG to display additional messages in order received.
To respond
While displaying desired message, press Speaker.
Press MSG. Station which left message is automatically redialed.
Message is erased.
– 50 –
Calling
station
MSG 2001
12:28PM
(Time display)
To erase
To erase a message without returning the call, press MSG to display
desired message.
Dial # or while message displays. Message is erased.
Note: If station that left message is busy, callback or MSG may be set. If station
that left message does not answer, MSG may be set, notifying originating
party that a message return was attempted.
MESSAGE CANCEL
(Time display)
Voice Mail System
To set
Press Feature key.
Press Message key.
Dial desired “Voice Mail System” access code.
Press Feature again.
SPEED SET
(Time display)
To originate
Press Message key.
Hear ringback tone.
– 51 –
Meet-me Paging
Example: Station A can page Station B. When Station B dials answer code, they are connected.
To page (station A)
Dial “Paging” access code, receive continuous ringback for one second.
Page station B.
Remain off hook or hang up.
PAGING
Trunk number
3
(Time display)
To answer (station B)
If station A remains off hook
Station B dials “Paging” answer code, and they are immediately connected.
PAGING
3
(Time display)
If station A hungs up
Station B dial “Paging” answer code, and Station A Dterm rings.
When station A goes off-hook, they are connected.
Note: Paging function can not be supported with Dterm IP adapter and Dterm IP.
– 52 –
Paging Transfer
Calling trunk
Example: Station A receives an important call for Station B who is not at a desk.
number
Station A can page Station B. When Station B dials the Paging
TRANSFER
DDD 3
answer code, Station A can announce the call and transfer it to Sta(Time display)
tion B.
Station A paging
Ask calling party to hold.
Press Transfer. Receive interrupted dial tone.
Dial “Paging” access code. Receive continuous ringback for one second.
Page Station B.
Remain off-hook or hang up.
To answer (Station B)
If Station A remained off hook
Station B dials “Paging” answer code, and is connected with Station A. Station A announces call.
Stations A and B each display
the other’s number
TRANSFER
(Time display)
Station A hangs up. Station B and the calling party are connected.
XXXX
DDD 3
(Time display)
If Station A hungs up
Station B dials “Paging” answer code. Station A Dterm rings.
Stations A and B each display
the other’s number, flashing
TRANSFER
DDD 3
(Time display)
Station A picks up and announces call.
Station A hangs up. Station B and the calling party are connected.
Calling trunk number
DDD 3
(Time display)
– 53 –
– Or –
(Dependent on System Programming)
Station B dials “Paging” answer code, and is immediately connected to the
calling party.
PAGING
DDD 3
(Time display)
Boss/Secretary Transfer
Secretary
Calling party
Lift handset, press boss’ ringing line. Ask calling party to hold.
DDD 3
(Time display)
Press boss’ line again. “Voice Call” is automatically established.
Announce the call to the boss.
Boss and secretary station each
display the other’s number
ICM
XXXX
(Time display)
If boss accepts call
Secretary replaces handset.
Boss lifts handset, presses flashing line.
If boss refuses call
Secretary presses boss’ line to return to calling party.
– 54 –
Boss/Secretary – MW Lamp Control
To set MW at boss’ station
With caller on the line
Lift handset or press Speaker.
Press boss’ ringing line. Ask calling party to hold.
Press the MW-SET line/feature key. No service set tone is heard.
MW SET
(Time display)
Boss sees MW on display and can call secretary to receive message.
Without caller on the line
After taking message, press Recall and receive dial tone.
Press the MW-SET line/feature key. Receive service set tone.
MW SET
(Time display)
Note: The secretary can hang up after taking a message, and set a message lamp at any time by going off-hook on the
boss’ multiline and pressing the MW-SET key.
To cancel at boss’ station
Without caller on the line
Lift handset or press Speaker. Receive dial tone.
Press Boss’ line appearance.
Press MW-CANCEL line/feature key. Receive service set tone.
With caller on line
While engaged in conversation on boss’ multiline, press MW-CANCEL key.
No service set tone is heard.
– 55 –
MW
CANCEL
(Time display)
MW
CANCEL
(Time display)
Boss/Secretary Override
Example: Station 2000 is boss, Station 2001 is secretary.
Boss is connected to Trunk A.
Incoming call on Trunk B connects to secretary, but is intended for boss.
To program boss/secretary override key
Press Feature.
Press a Speed Calling key.
Dial “Boss/Secretary Override” access code.
Press Recall. – displays on LCD.
Dial boss’ station number.
Press Feature again.
Secretary
Lift handset to answer Trunk B, ask caller to hold.
Press CALL HOLD feature key or Transfer and dial call hold access code.
Receive dial tone.
Press BOSS/SEC OVERRIDE.
Receive ringback tone.
Boss’ station
number
C WAIT
2000
(Time display)
Boss
Secretary’s station
number
Hear 3 bursts of tone. LCD display indicates:
C WAIT
2001
(Time display)
Option 1
Boss presses Answer and converses with secretary. Trunk A is placed on hold.
Secretary hangs up. Boss is connected to Trunk B.
Boss can alternate between the two parties by pressing Answer.
– 56 –
Option 2
Boss presses Answer and converses with secretary. Trunk A is placed on hold.
Boss presses station 2001 key and converses with Trunk B. Boss presses Answer to reconnect to Trunk A.
Secretary hears reorder tone, hangs up.
Boss can alternate between the two parties by pressing Answer.
Option 3
If boss does not respond to 3 bursts of tone, secretary presses Recall.
Secretary is connected to Trunk B.
Option 4
Boss presses Answer and converses with Secretary. Trunk A is placed on hold.
Boss denies call, presses Transfer to return to Trunk A.
Secretary is returned to Trunk B.
Note: If boss has 8/16/32 button display terminal, display always indicates the connected station or trunk at any given
time.
Do Not Disturb
While idle (on hook)
Press DND. LED lights.
Note: With Soft Key operation, “DND” flashes when set.
DND SET
(Time display)
To cancel
Press DND. LED goes out.
DND CANCEL
(Time display)
Using the Soft Key
Press flashing DND Soft Key.
DND CANCEL
Note: DND must be programmed by the PBX engineer on a programmable feature key.
– 57 –
MIC DND
>>>
Privacy
While off-hook
Press DND. LED lights.
Privacy feature prevents interruptions for the duration of the call.
PRIVACY SET
(Time display)
Using the Soft Key
Press flashing DND Soft Key. “DND” flashes when set.
Privacy feature prevents interruptions for the duration of the call.
PRIVACY SET
(Time display)
MIC
>>>
To cancel
Press DND. LED goes out.
PRIVACY CANCEL
(Time display)
– Or –
Replace handset. Privacy feature is automatically cancelled.
Note: DND must be programmed by the PBX engineer on a programmable feature key.
Using the Soft Key
Press flashing DND Soft Key.
PRIVACY CANCEL
(Time display)
MIC DND
– 58 –
>>>
Privacy Release
Example: Dterm Station B is engaged in a conversation, and allows Dterm Station A to enter the call in progress.
Station A lifts handset or presses Speaker.
Station A presses the line appearance of Station B.
Warning tone is sent to the interrupted parties (optional).
A three-way conference is established.
CONF
(Time display)
Note: Station A may also be a single-line station as long as it appears on the Station B Dterm.
– Or –
Example: Dterm Station A requests entrance into Station B’s call in progress.
Station A lifts handset or presses Speaker.
Station A presses the line appearance of Station B.
WAIT P-RLS?
(Time display)
Station B LCD indicates:
Station B may allow Station A to enter the conversation by pressing P-RLS.
Warning tone is sent to the interrupted parties (optional).
A three-way conference is established.
P-RLS?
(Time display)
CONF
(Time display)
Note 1: Station A can be a single-line station if it appears on the Station B Dterm.
Note 2: Up to six parties can break into a two-party conversation (additional hardware required).
– 59 –
Index
E
Establishing a Broker Call ...................................... 35
Exclusive Hold ....................................................... 33
Executive Override ................................................ 41
Exit ........................................................................... 4
A
Account Code ......................................................... 27
Answering a Camped-on Call ................................ 36
Answering a Message ............................................ 50
Answering a Voice Call Hands Free ...................... 29
Authorization Code ................................................. 28
Automatic Intercom ................................................ 30
F
Forced Account Code ............................................ 27
Function Keys and Lamps ....................................... 7
B
Boss/Secretary – MW Lamp Control ...................... 55
Boss/Secretary Override ........................................ 56
Boss/Secretary Transfer ........................................ 54
Broker Call, Establishing ........................................ 35
H
Headset Key .......................................................... 14
Help ......................................................................... 4
Hold ......................................................................... 5
C
Call Back ................................................................ 48
Call Forwarding – All Calls ..................................... 42
Call Forwarding – Busy Line .................................. 43
Call Forwarding – Don’t Answer ............................. 45
Call Park ................................................................. 38
Call Pick-up (Direct) ............................................... 39
Call Pick-up (Group) ............................................... 39
Call Transfer ........................................................... 34
Call Waiting – Originating ....................................... 36
Camped-on Call, Answering .................................. 36
Conference ............................................................. 35
I
Internal Call Origination ......................................... 24
L
Last Number Redial ............................................... 41
Leave a Message .................................................. 50
Logged Out IP Station – Call Destination .............. 12
Login/Logout (IP Enabled Dterm Only) ................... 22
M
Manual Intercom .................................................... 31
Meet-me Paging .................................................... 52
Message, Answering ............................................. 50
Message, Leaving .................................................. 50
Microphone Key ....................................................... 9
Multiline Appearance ............................................. 24
D
Dial Intercom .......................................................... 32
Do Not Disturb ........................................................ 57
– 60 –
Privacy Release ..................................................... 59
N
Number Save and Repeat ...................................... 49
S
Saving and Repeating a Number ........................... 49
Speed Calling – System ........................................ 13
Speed Calling Call Origination
(Individual/Group) .................................................. 26
Speed Calling Call Origination
(One-touch Buttons) .............................................. 25
O
Off-hook Trunk Queuing ......................................... 40
Originating a Call Using Speed Calling
(Individual/Group) ................................................... 26
Originating a Call Using Speed Calling
(One-touch Buttons) ............................................... 25
Originating an Internal Call ..................................... 24
Originating an Outside Call .................................... 24
Outgoing Trunk Queuing ........................................ 40
Outside Call Origination ......................................... 24
T
Terminal Setup with the Feature Key .................... 18
Terminal Setup with the Up/Down Key .................. 16
Transfer a Call ....................................................... 34
P
Paging Transfer ...................................................... 53
Placing a Call on Exclusive Hold ............................ 33
Placing a Call on Hold ............................................ 33
Privacy ................................................................... 58
V
Voice Call ............................................................... 28
Voice Call Hands Free, Answering ........................ 29
Voice Mail System ................................................. 51
– 61 –
LCD Displays
D
15:39
DDD
X
Time elapsed, trunk type and number for outside call
Time elapsed for parked call
DND SET/CANCEL
Do Not Disturb set or cancelled
XXX
DDD
X
Parked call retrieved from a remote station, showing
the number of the station that parked the call
Direct Dial Pad ON/OFF
Dynamic Dial Pad status
E
C
E-HOLD
XXXX
Station placed on Exclusive Hold
CALLBACK
XXXX
Call Back is activated, showing called or calling number
F
CALLBACK SET
XXXX
Call Back set for busy called station
CALLPARK SET
Incoming call is parked
FORWARD
XXXX
Station displays forwarding destination
Call Forwarding – All Calls
Call Forwarding – Busy Line
Call Forwarding – Don’t Answer
Logged Out IP Station – Call Destination
X
CAMP ON
DDD
X
Camped on call placed on hold
CONF
Three-party conference established
Conference for Executive Override
Conference for Privacy Release
FORWARD SET/CANCEL
Call Forwarding set or cancelled
Call Forwarding – All Calls
Call Forwarding – Busy Line
Call Forwarding – Don’t Answer
Logged Out IP Station – Call Destination
C WAIT
XXXX or
C WAIT SET
XXXX
Call Waiting tone sent to or received at busy station
show in called or calling number
Call received on boss’ station from secretary’s station
H
HANDS FREE
Hands free status
– 62 –
ON/OFF
LCD Displays (continued)
HOLD
Station placed on hold
M
XXXX
MSG XXXX HH:MMPM
Message waiting (calling station and time of message)
I
ICM
X
Intercom call with called or calling party number
Automatic Intercom
Manual Intercom
Dial Intercom
Boss Secretary Transfer
MESSAGE BUSY
Called station message memory Busy – cannot store
addition messages
INDICATOR O/OFF
Indicator Lamp status
MESSAGE REST
Called Station message receipt restricted – not
equipped to receive messages
L
MESSAGE SET
XXXX
Message indication left and busy called station
MESSAGE CANCEL
Message erased
LNR[*]/SPD[_]-n
Prompt for last number called or
Speed Calling number
Stack Dial
MW SET/CANCEL
Message Waiting set or cancelled on boss’ station
from secretary’s station
Login
The IP Enabled Dterm becomes operational when the
user enters “Login Code” and “Password”.
O
OG-Q SET
Outgoing Trunk Queue – call placed in queue for next
available outgoing trunk
Logout
Press preassigned Logout button to logout.
– 63 –
LCD Displays (continued)
RINGER TONE
X
Ready for Ringer tone selection
OVERRIDE
X
Overriding intercom call through bridging
Automatic Intercom
Dial Intercom
Manual Intercom
OVERRIDE
Executive Override
S
SPEED SET
Speed Calling number saved in memory
XXXX
P
T
PICK UP
XXXX
X
Call Pickup of station within group showing called and
calling stations
TRANSFER
Ready to transfer a call
TRANSFER
XXXX
Transferred station or trunk number
Page Call Transfer
PAGING
X or
PAGING
DDD
X
Ready to page station, page waiting or page call connection
TRANSFER XXXX
X
Transferring station number
P-RLS SET
Privacy Release set
TRANSFER
3
Transferring page call to another station
P-RLS ?
Prompt requesting privacy release for incoming call
T/R VOL. SMALL/LARGE
Transmission Receiving Volume status
PRIVACY SET/CANCEL
Privacy set or cancelled
V
R
VOICE
XXXX
Voice Call showing called or calling station number
RCV VOL. SMALL/LARGE
Receiver Volume status
VOICE BUSY/REST
Voice Call station called is busy or restricted
– 64 –
W
WAIT P-RLS?
Prompt when requesting privacy release at another
station
– 65 –