1
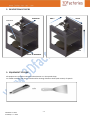
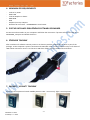
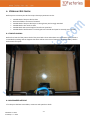
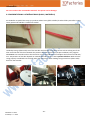
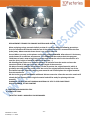
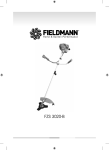
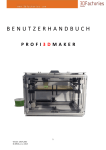
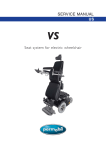
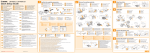
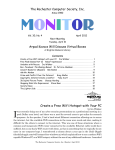
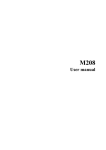
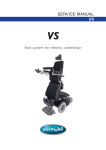
Thank you for chooding our 3D printer
Before any manipulation with the printer carefully read this user
guide
USER‘S GUIDE
TYPE: EASY3DMAKER
-1VERSION: 1.9.2012
© AROJA, s.r.o. 2012
IMPORTANT SAFETY NOTICE:
1. CAUSING DAMAGE A 3D PRINTER DUE TO FAILURE OF FOLLOWING INSTRUCTION IN THIS USER MANUAL,
EXPIRING THE WARRANTY VOID.
2. SECOND MATERIAL FOR DAMAGES AND PERSONAL INJURY CAUSED BY THE PRINTER MISAPPLICATION IN
VIOLATION OF THIS USER'S MANUALS OR FAILURE TO SAFETY REGULATIONS IS FULLY RESPONSIBLE USER
OF THIS DEVICE.
3. RISK OF A POSSIBLE BURNS CAUSED BY THE ACCIDENT! BE CAREFUL!
4. THIS DEVICE IS NOT TOY! KEEP AWAY FROM CHILDREN!
5. NEVER LEAVE EQUIPMENT WORK WITHOUT SUPERVISION!
6. CAUTION HOT ITEMS ABOVE 70 ° C! RISK OF BURNS!
7. PERSONS WHO ARE NOT ABLE TO MENTALLY OR MOTORIZED EQUIPMENT FULLY OPERATE, MAY OPERATE
THIS DEVICE ONLY UNDER THE SUPERVISION OF A COMPETENT PERSON.
8. BEFORE USING MAKE SURE THAT THE PRODUCT IS COMPLETE.
9. RISK OF ELECTRIC SHOCK.
10. DEVICE MAY OPERATE AT LEAST 18 YEARS OF AGE, OTHERWISE UNDER ADULT SUPERVISION.
11. DEVICE MAY NOT be disposed of via standard WASTE.
PRINTER CAN BE ONLY IN A PLACE THAT IS:
• DRY WITHOUT DUST
• STABLE
• GOOD VENTILATION
• NEAR AN EASILY ACCESSIBLE POWER OUTLET
• AWAY FROM OBJECTS THAT MIGHT BLOCK THE VENTILATION HOLE OF THE PRINTER AT A SAFE DISTANCE FROM
FLAMMABLE OBJECTS (EG CURTAINS) AWAY FROM SPLASHING LIQUIDS, AWAY FROM ORGANIC GASES (SUCH AS
AMMONIA)
• AWAY FROM DIRECT SUNLIGHT
• SEVERE TEMPERATURE FLUCTUATIONS
• AWAY FROM OUTLETS HEATING, VENTILATION AND AIR CONDITIONING SYSTEMS
-2VERSION: 1.9.2012
© AROJA, s.r.o. 2012
CONTENT
1.
2.
3.
4.
5.
6.
7.
8.
9.
10.
11.
12.
13.
14.
PAGE
PACKAGE CONTENTS
3
DESCRIPTION OF PARTS
EQUIPMENT TO PRINT
MINIMUM PC REQUIREMENTS
5
INSTALL SOFTWARE – G3DMAKER
5
PRINTER CONNECTION
TURN ON - OFF MACHINE
5
BEFORE PRINT
6
8.1 PRINT BED
6
8.2 REMOVING OF DEBRIS
6
8.3 PRINT BAD CALIBRATION
7
8.4 CONTROL OF PRINT BED FLATNESS
9
8.5 NOZZLE CLEARING
9
PRINT
11
9.1 PRINT MATERIALS
11
9.2 NEW FILAMENT, CHANGE OF FILAMENT
11
9.3 PREPARE FILE FOR PRINT
MANUÁL K G3DMAKER
9.4 START PRINT
MANUÁL K G3DMAKER
9.5 REMOVE OBJECT FROM PRINTER
CLEANING AND MAINTENANCE
HOW TO SOLVE TROUBLE CASE
PRINT IS NOT GOOD
CRUNCH THE X OR Y
TECHNICAL SUPPORT
4
4
5
WARRANTY AND SPARE PARTS
HOW TO ORDER SPARE PARTS
DECLARATION OF CONFORMITY
1. PACKAGE CONTENTS
1x POWER SOURCE 24 V
1x 3D PRINTER
1x USB CABLE
1x CD
-3VERSION: 1.9.2012
© AROJA, s.r.o. 2012
2. DESCRIPTION OF PATRS
EXTRUDER
AXIS Y
AXIS X
PRINT BED
AXIS Z
SPOOL OF MATERIAL
3. EQUIPMENT TO PRINT
All equipments is possible order via our distributost or in the special shops.
For model removing from the print bed and for cleaning of bed use knife (with caution) of spatula.
-4VERSION: 1.9.2012
© AROJA, s.r.o. 2012
4. MINIMUM PC REQUIREMENTS
-
Intel Cel. 2,8 GHz
RAM 1 GB
Intel HD Graphics or better
HDD 50GB
DVD
Keyboard, mause, USB port
Windows XP and newer + FRAMEWORK 3.5 and newer
5. POSTUP INSTALACE OBSLUŽNÉHO SOFTWARU G3DMAKER
Put CD into and CD reader on your compiuter and follow the instruction. If process will not start find on CD
G3DMAKER_setup.exe and double click on it.
6. PŘIPOJENÍ TISKÁRNY
After instalation of software connect printer to an eletricity with the adapter 24V 5A which is part of the
package. To the compiuter i sprinter connectet with USB cable. After connect compiuter asky ou for driver of
USB. Follow instruction. Driver is on the CD in USB driver folder, map this folder and install driver.
7. ZAPNUTÍ – VYPNUTÍ TISKÁRNY
Printer has three positional switch. Middle position is OFF. I turn on only light. II turn on printer.
-5VERSION: 1.9.2012
© AROJA, s.r.o. 2012
8. PŘÍPRAVA PŘED TISKEM
Before print is necessary do this few steps. Please pay attention to this.
•
•
•
•
•
•
Doublecheck if the print bed is clean
Remove all debris and rests of material
Doublecheck if the print bed is put in the right way and strongly attached
Doublecheck it the nozzle is clean
Doublecheck and correct height of nozzle over print bed
Doublecheck if the filament is correctly put into extruder and spool is correctly put in printer
8.1 TISKOVÁ PLOCHA
Before first launch of the printer check if the print bed is clear and without rest of material. Each printer is
tested before packing and can happen that there will be some rests of material. By the same way check it
before each next print.
8.2 ODSTRANĚNÍ NEČISTOT
If on the print bed are some debris, remove it with spatula or knife.
-6VERSION: 1.9.2012
© AROJA, s.r.o. 2012
Remove material carefully avoid to damage of print bed
Scratching the surface, which occurs during the operation is not reason for impossibility to print.
Print quality is affected and the risk of damage to your printer comes with deeper grooves, pits and uneven
print surface. See flatness control the print area
8.3 KALIBRACE TISKOVÉ PLOCHY
Due to transportation, changes in temperature and humidity or wear of mechanical components operating is
shifting print area and must be reset. This setting has a direct impact on the quality of printing, but also the
safe operation of the printer. Nozzle height above the floor must be always the same control points.
Need to calibrate a standard sheet of paper 80 g/m2 to insert between the nozzle and the surface of the table.
First Turn on the printer and run the software G3DMAKER. Go to MANUAL CONTROL menu and here at the
bottom click on HOME Z. printer moves to the reference position to the Z axis, then turn off the printer.
-7VERSION: 1.9.2012
© AROJA, s.r.o. 2012
TURN OFF THE MACHINE CALIBRATION PROCEDURE IS PERFORMED IN PRINTER disconnected from electricity!
First put the paper on the print bed. Set screws so that the paper is just touching the nozzle. ATTENTION PAPER must move a little freely! Do this for 3 position and be used to check again. Crossing the nozzle into the
appropriate positions perform manually.
8.4 KONTROLA TISKOVÉ PLOCHY
Check the flatness of the print area and visually using a ruler or other flat surface.
If the print surface deflection, make sure that no point no higher than the lowest set point of nozzle. If
necessary, readjust the height of the nozzle or replace the print area.
-8VERSION: 1.9.2012
© AROJA, s.r.o. 2012
8.5 TRYSKA A ČIŠTĚNÍ TRYSKY
SAFETY WARNING!
o
o
o
o
the nozzle flowing molten material coating layers. Nozzle temperature can reach up to 280 ° C, please
observe caution.
To print ran correctly, it is necessary to keep the nozzle clean.
Do not touch the print head when the machine Danger of burns!
Clean the print nozzles always turned off the machine and when the print nozzle has cooled down for
about 30 minutes after the last press and switched off.
Make sure the nozzle is clean, residue-free material. If necessary, remove waste material.
If the material even after warming up and running extruder still leaking, check that it is properly implemented
filament or carefully clean with the drill bit diameter of 0.5 mm nozzle. Cleaning should be done very carefully
and always perpendicular to the hole. Never hold drill in hand, but only on the horns. This cleaning takes place
when the material is A hot! Danger of burns!
9. TISK
For fixing the printed object to the base use paper labels or using a special adhesive. Here is also described a
procedure of operations.
9.1 TISKOVÉ MATERIÁLY
Supported is PLA as a basic material. The melting point is 190 ° C. The diameter of the filament is 1.75 mm and
it is possible to order the material in several colors (natural, red, black, blue … see www.3dfactories.com) The
coil weight is 1 kg or 2Kg.
-9VERSION: 1.9.2012
© AROJA, s.r.o. 2012
UPOROZNĚNÍ !
Do not use other then recomendet materials. The printer can be damage.
9.2 ZAVEDENÍ STRUNY A VÝMĚNA STRUNY (BARVY, MATERIÁLU)
Ze zásobníku ve spodní části stroje je vyvedeno vedení struny (bílá trubička) do tiskové hlavy extrudéru. Konec
struny upravte dle obrázku a nasuňte do vedení.
Leadership strings (white tube) out of the extruder and pull the string about 10 cm so that sticking out of the
tube. Push the end of the line between the pressure and the drive wheel (see picture below). The program
G3DMAKER start extruder and set the interval to run the extruder 30 mm and adjust the feed rate of 100 mm /
min. Temperature of extruder depend on material ABS 230°C and PLA 190°C preheat it before. Make sure the
string properly introduced into the hole under the drive wheel. After loading strings insert lines (white tube)
back into the extruder.
- 10 VERSION: 1.9.2012
© AROJA, s.r.o. 2012
REPLACEMENT STRINGS FOR CHANGE MATERIAL AND COLOR
When replacing strings proceed similarly as that of a new line with the following procedure:
First Cut off above the extruder and the rest of the original material is removed from the line
(tube) away. Above extruder leave about 2 cm original material.
Second When you turn on the printer and heating using G3DMAKER. After about 1.5-2 minutes,
nozzle heated to a sufficient temperature - this G3DMAKER be used to check the program.
Third Boot to head a new string to the extruder and follow the rules for the introduction of a
new line (trim, height of material pulled from the tube ...).
4th Printing plate reduce to a minimum distance of 100 mm from the nozzle and start the
extrusion speed of 100 mm / min and 100 mm length of the extrusion.
5th Must manually hold the new material, so that it touches the original material, which is
gradually extruded from the nozzle. Once the end of the original material already out of the
feed wheel extruder, extruder sobering new material and it will displace the original material
from the nozzle out.
6th Set in the program G3DMAKER additional 100 mm extrusion. After the extrusion nozzle will
already be fully cleansed from original material and will be ready for printing with new
material.
WARNING - DO NOT DO NOT ORIGINAL MATERIAL OF JETS TO FEED DIRECTION!!
RISK OF DAMAGE TO THE PRINTER!!
9.3 PŘÍPRAVA SOUBORU PRO TISK
9.4 ZAHÁJENÍ TISKU
TATO ČÁST BUDE V MANUÁLU PRO G3DMAKER.
- 11 VERSION: 1.9.2012
© AROJA, s.r.o. 2012
9.5 VYJMUTÍ MODELU Z TISKÁRNY
For better access to print flat scroll to the bottom position. Using a knife or spatula peel first corner base layer
of the model, and then gradually podeberte and remove the entire model.
If there is to fuse the model to the motherboard and it is difficult to peel off the model it is possible to remove
the entire board for better access to the model. (after removal of the plates must be re-calibrate its height)
Loosen the screws plates, then loosen the set screw and pull together to release the ezámečků, then lift and
pull the plate side facing out from the machine.
- 12 VERSION: 1.9.2012
© AROJA, s.r.o. 2012
9TH CLEANING AND MAINTENANCE
OUTER SHEATH PRINTER WITH A DRY CLOTH.
XYZ AXES KEEP CLEAN AND FREE FROM DUST. XY AXIS PERIODICALLY LUBRICATE WITH SILICONE OIL. BEFORE DELETING WIPE
WITH A DRY CLOTH OR TOWEL SO THAT YOU GET RID OF DUST AND DIRT. SCREWS AND GUIDE RODS Z TREAT THE SAME WAY.
IN THE CASE OF IMPURITIES ON THE Z AXIS IN THE SAME WAY AS THE PREVIOUS PERSON OR A VACUUM CLEANER TO REMOVE
DUST.
PRESS GENTLY CLEAN THE SURFACE MECHANICALLY. VACUUM OR WIPE DUST CLOTH. DO NOT USE THINNERS, SOLVENTS OR
OTHER CHEMICALS.
MAKE SURE THAT ALL AXES ARE FREE OF SCRATCHES AND SCRAPES.
ALL MAINTENANCE PERFORMED ONLY WITH THE MACHINE TURNED OFF AND DISCONNECTED NETWORK ADAPTER
10.1 THE PRINTER DOES NOT PRINT
INVOLVED PRINTER MOVES BUT NONE COMES OUT OF THE NOZZLE MATERIAL.
CHECK OR PERFORM THE CLEANING NOZZLE CHAPTER 7 FIGURE 7.1.2
ENSURE PROPER IMPLEMENTATION OF STRINGS.
IF STRING STUCK ON THE DRIVING WHEEL, IT COULD CAUSE IT TO STOP LABORED AND FIGURE 10.1.1. PULL OR PULL LINE FROM
THE EXTRUDER. RUBBED PART OF THE THREAD AND INSERT THE STRING AGAIN. ALTERNATIVELY, REMOVE AND CLEAN THE DRIVE
WHEEL.
10.2 THE PRINTOUT QUALITY IS NOT
- 13 VERSION: 1.9.2012
© AROJA, s.r.o. 2012
CHECK THE NOZZLE HEIGHT ADJUSTMENT. IF THE NOZZLE IS TOO LOW, THE MATERIAL IS APPLIED INCORRECTLY, IT BREAKS UP INTO
THE NOZZLE AND IT BREAKS.
THE NOZZLE IS TOO HIGH. MATERIAL FORM ROLLER, COMES OUT OF THE NOZZLE AND FORMS A WAVE.
IDEALLY NESTLED NOZZLE ZANACHÁVÁ UNIFORM LAYER OF MATERIAL SPREAD IT INTO A THIN FLAT SHAPE.
CRUNCH 10.3 X AXIS OR Y
WHEN PRINTING, THE X OR Y AXIS STUCK AND SUBSEQUENT LAYERS ARE SHIFTED.
- STOP PRINTING, AND THEN CLEANING AND LUBRICATION XY. THE JAM MAY OCCUR THAT THE AXIS OF THE DIRT NENBO LONG
TIME WAS NOT LUBRICATED AND OIL DRIED UP.
11TH TECHNICAL SUPPORT
THE SITE WWW.3DFACTORIES.COM CAN EASILY QUERY, JOIN THE FORUM OR COMMUNITY. YOU WILL ALSO FIND MANY HELPFUL
TIPS, TUTORIALS AND USER EXPERIENCE.
DOWNLOADS ARE ALSO MANY 3D MODELS.
- 14 VERSION: 1.9.2012
© AROJA, s.r.o. 2012