1
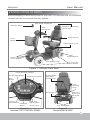
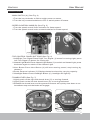
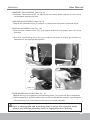
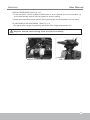
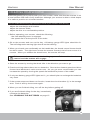
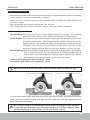
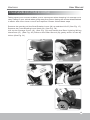
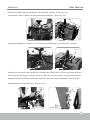
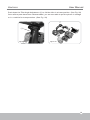
Horizon Scooter
Horizon
User Manual
Horizon
User Manual
TABLE OF CONTENTS
Introduction --------------------------------------------------------------1
Important Precautions -------------------------------------------------2
Electromagnetic Interference and Warnings ----------------------3
Identification of Parts --------------------------------------------------6
Operating Your Scooter
---------------------------------------------10
Disassembling Your Scooter ---------------------------------------12
Re-assembling Your Scooter ---------------------------------------15
Charging the Batteries
----------------------------------------------16
Care and Maintenance ----------------------------------------------18
Troubleshooting -------------------------------------------------------19
Technical Specifications
--------------------------------------------21
Horizon
User Manual
INTRODUCTION
Thank you and congratulations on purchasing your new Invacare Mobility Scooter.
It is designed to provide you with transportation indoors and outdoors.
We pride ourselves on providing safe and comfortable products. Our goal is to ensure
your complete satisfaction with our product. We are certain that you will enjoy your Invacare
mobility scooter.
Please read and observe all warnings and instructions given in the owner's manual
before operating this scooter. Also, retain this booklet for future reference.
If you have any questions, please contact your local dealer or:
For your local distributor
Phone: 0800 770 220
www.invacare.co.nz
Invacare® New Zealand
4 Westfield Place, PO Box 62 124,
Mt Wellington, Auckland
New Zealand
Freephone: 0508 468 222 FreeFax: 0508 807 788
Email: [email protected]
1
Horizon
User Manual
IMPORTANT PRECAUTIONS
•Only one person at a time can ride a Invacare Mobility Scooter.
•Maximum load is 135 kg / 300 lbs.
•Turn the key off before getting on or off your scooter.
•Always drive carefully with your feet on the floorboard and be aware of others in
your area.
•Always use pedestrian crossings where possible. Take extreme care crossing roads.
•Do not drive on slopes exceeding 12 degrees, and take extreme care when turning
on slopes.
•Do not use full power when turning sharp corners.
•Do not drive the scooter unless the seat and the tiller are locked and secured in the
driving position.
•Do not use the scooter if the rear anti-tip wheels are damaged or removed.
•Take great care and use low speeds for backing up, riding downhill, over uneven
surfaces and kerb climbing.
•The scooter may not operate well in high humidity.
•Never put your scooter in neutral when stopping on slopes.
•Follow all traffic laws when you ride in the vicinity of public roads.
•It is NOT recommended to use your scooter in wet environments as it may cause
damage. Electronic equipment damaged by any liquid form is not covered under
the warranty.
2
Horizon
User Manual
ELECTROMAGNETIC INTERFERENCE
AND WARNINGS
CAUTION: It is very important that you read this information regarding the possible
effects of Electromagnetic Interference on your motorized scooter.
Powered wheelchairs and motorized scooters may be susceptible to electromagnetic
interference (EMI), which is interfering electromagnetic energy (EM) emitted from sources
such as radio stations, TV stations, amateur radio (HAM) transmitters, two-way radios,
and cellular phones. The interference (from radio wave sources) can cause the motorized
scooter to release its brakes, move by itself, or move in unintended directions. It can also
permanently damage the motorized scooter control system. The intensity of the interfering
EM energy can be measured in volts per meter (V/m). Each motorized scooter can resist
EMI up to a certain intensity. This is called its "immunity level." The higher the immunity
level, the greater the protection will be. At this time, current technology is capable of
achieving at least a 20 V/m immunity level, which would provide useful protection from the
more common sources of radiated EMI. The immunity level of this motorized scooter model
is 10 v/m.
There are a number of sources of relatively intense electromagnetic fields in the everyday
environment. Some of these sources are obvious and easy to avoid. Others are not
apparent and exposure is unavoidable. However, we believe that by following the warnings
listed below, your risk to EMI will be minimized.
The sources of radiated EMI can be broadly classified into three types:
1.Hand-held portable transceivers (transmitters-receivers) with the antenna mounted
directly on the transmitting unit. Examples include: citizens band (CB) radios,
"walkie talkie," security, fire, and police transceivers, cellular telephones, and other
personal communication devices.
Some cellular telephones and similar devices transmit signals while
they are ON, even when not being used.
2.Medium-range mobile transceivers, such as those used in police cars, fire trucks,
ambulances, and taxis. These usually have the antenna mounted on the outside
of the vehicle.
3
Horizon
User Manual
3.Long-range transmitters and transceivers such as commercial broadcast transmitters
(radio and TV broadcast antenna towers) and amateur (HAM) radios.
Other types of hand-held devices, such as cordless phones, laptop
computers, AM/FM radios, TV sets, CD players, and cassette players,
and small appliances, such as electric shavers and hair dryers, so far
as we know, are not likely to cause EMI problems to your motorized
scooter.
Motorized Scooter Electromagnetic Interference:
Because EM energy rapidly becomes more intense as one moves closer to the transmitting
antenna (source), the EM fields from hand-held radio wave sources (transceivers) are
of special concern.
It is possible to unintentionally bring high levels of EM energy very
close to the motorized scooter control system while using these devices. This can affect
motorized scooter movement and braking. Therefore, the warnings listed below are
recommended to prevent possible interference with the control system of the motorized
scooter.
Warnings:
Electromagnetic interference (EMI) from sources such as radio and TV stations, amateur
radio (HAM) transmitters, two-way radios, and cellular phones can affect motorized
scooters. Following the warnings listed below should reduce the chance of unintended
brake release or motorized scooter movement, which could result in serious injury.
1.Do not operate hand-held transceivers (transmitters-receivers), such as citizens band
(CB) radios, or turn ON personal communication devices, such as cellular phones, while
the motorized scooter is turned ON;
2.Be aware of nearby transmitters, such as radio or TV stations, and try to avoid coming
close to them;
3.If unintended movement or brake release occurs, turn the motorized scooter OFF as
soon as it is safe;
4
Horizon
User Manual
4.Be aware that adding accessories or components, or modifying the motorized scooter,
may make it more susceptible to EMI; and.
There is no easy way to evaluate their effect on the overall immunity
of the motorized scooter.
5.Report all incidents of unintended movement or brake release to the distributor listed
on the inside front cover of this manual. Note whether there is a source of EMI nearby.
Important Information:
1.20 volts per meter (V/m) is a generally achievable and useful immunity level against
EMI (as of May 1994). The higher the level, the greater the protection.
2.The immunity level of this product is at least 20/Vm.
5
Horizon
User Manual
IDENTIFICATION OF PARTS
Before attempting to drive this scooter on your own, it is important that you familiarize
yourself with the controls and how they operate.
Tiller Angle Adjustment
Rearview Mirror
Mid-Back W/Headrest
Swivel Seat
Delta
Handle Bar
Tilting Armrest
Front
Basket
Seat Rotation Lever
Side Reflectors
Optical Headlights
& Turn Signals
Seat Sliding Lever
11" Front and
Rear Wheels
Figure 1 - Horizon Front View
Power Reserve Indicator
Hazard Light Button
Speed Control Knob
Horn
Button
Armrest Width
Adjustment
Thumbscrews
Freewheeling
Lever
Storage Cover
Left Turn
Signal Button
Headlight
Button
Rear Turn
Signal and
Tail Lights
Right Turn
Signal Button
Thumb Lever
Figure 2 Horizon TOP CONTROL PANEL
Anti-Tip Wheels
Figure 3
Horizon BACK VIEW
6
Horizon
User Manual
Function Of Parts:
•MAIN SWITCH (A) (See Fig. 4)
1.Turn the key clockwise to ON to switch power on status.
2.Turn the key counterclockwise to OFF to switch power off status.
•SPEED CONTROL KNOB (B) (See Fig. 5)
1.Turn the speed control knob clockwise for faster speed.
2.Turn the speed control knob counterclockwise for slower speed.
(A)
(B)
Figure 4
Figure 5
•TOP CONTROL PANEL BUTTONS (See Fig. 6)
1.Left/Right Turn Signal-Press Right Turn Signal (1) button for turning right, press
Left Turn Signal (2) button for turning left.
2.Hazard Light Button-Press Hazard Light Button (3) to switch on Hazard Light, press
the button again to switch off the Hazard Light.
3.Horn Button-Press Horn Button (4) will buzz warning sound, stop horning by
release it.
4.Power Reserve Indicator (5)-Displays batteries electricity carrying capacity.
5.Headlight Button-Press Headlight Button (6), headlight will light up.
•THUMB LEVER (See Fig. 7)
1.Lightly push on the right side thumb lever (C) to moving forward.
2.Lightly push on the left side thumb lever (D) to moving backward.
3.Release the thumb lever and the powered scooter will quickly slow down to an
immediate stop and the brake will engage.
(5)
(3)
(4)
(1)
(2)
Figure 6
(6)
(D)
Figure 7
(C)
7
Horizon
User Manual
•ARMREST ADJUSTMENT (See Fig. 8)
1.Release Thumbscrew (E), to adjust the armrest's width; tighten to lock in the
comfortable desired position.
•ARM PAD ADJUSTMENT (See Fig. 9)
1.Adjust the handrail bolt's (F) height, to control the armrest's horizontal angle.
•SEAT ADJUSTMENT (See Fig. 10)
1.Pull the seat rotation lever (G) up to adjust seat's turning angle, also can lift up
the seat .
2.Pull the seat sliding lever (H) up to adjust the seat to either go forward or
backward to an appropriate position.
(F)
(E)
Figure 9
Figure 8
(I)
(H)
(G)
Figure 10
Figure 11
•FREE-WHEELING LEVER (See Fig. 11)
1.Before driving, to engage the free-wheeling lever (I) by push the lever downward.
2.While stopping or system malfunction could not operate the scooter, by pulling the
free-wheeling lever then the scooter can be moved manually.
Its extremely dangerous to drive on the scooter when the free-wheeling
lever is disengaged and travelling down a slope. The operator must
ensure that the free-wheeling lever is engaged prior to driving.
8
Horizon
User Manual
•CIRCUIT BREAKER (See Fig. 12)
1.If the scooter's circuit system malfunction or over loaded, the circuit breaker (J)
will automatically switch off the power to ensure safety.
2.After automatically power switch off by press the circuit breaker can be reset.
•TILLER ANGLE ADJUSTMENT (See Fig. 13)
1.To adjust tiller angle by pushing down the tiller angle adjustment (K).
Objects should not be hung from the tiller assembly.
(J)
(K)
Figure 12
Figure 13
9
Horizon
User Manual
OPERATING YOUR SCOOTER
Before beginning your journey with your new scooter, make sure that the scooter is on
a level surface and clear of any obstacles. Although your scooter is able to climb slopes
it is safer to practice on a leveled surface.
You can make the following adjustments to increase your comfort when driving:
•adjust the seat height and location.
•adjust the armrest width.
•adjust the tiller to a comfortable position.
1.Before operating your scooter, check the following:
•the free-wheeling lever is engaged.
•the speed dial is at the picture of the turtle.
2.Sit on the scooter and turn on the key. All battery gauge LED lights should be lit.
The self-diagnostic warning light should not be blinking.
3.When your hands rest comfortably on the handle bar, the thumb control levers should
be within reach. The right lever moves the scooter forward; the left one moves it in
reverse. When you release the thumb lever, the scooter will stop.
This scooter has an automatic braking system. Release the thumb
control and the brakes will engage.
4.Steer the scooter by turning the whole tiller in the direction you want to go.
5.Practice driving where there are no obstacles. Start at the slowest speed and drive
forward and backward; make some turns. As you get more comfortable you can
increase the speed by turning the speed dial toward the picture of the rabbit.
6.If only two-battery gauge LED lights are lit, you should plan to recharge the batteries
very soon.
7.If the scooter stops and does not function, locate the circuit breaker (L) in the storage
area. Push it and try the scooter again.
8.When you are finished riding, turn off the key before getting off.
9.If you are finished riding for the day, immediately
recharge the batteries.
See CHARGING THE BATTERIES on page 15.
Figure 14
(L)
10
Horizon
User Manual
Keep in mind these rules:
•Release the thumb levers and allow the scooter to stop completely before changing
from forward to reverse, or reverse to forward.
•When turning a corner, swing the front wheels wide, because the back wheels will
turn more tightly.
•Use the scooter only where it would be safe to walk.
•Use low speeds for reverse, downhill, ramps, kerbs, or uneven surfaces.
Other Operating Information:
Hill Climbing:You may need to use a higher speed going up on slopes. For a higher
speed, set the speed control knob in the proximity of the rabbit.
Down Slopes:To proceed down steep slopes slowly, set the speed control in the
proximity of the turtle. This enables driver control, as the closer the
speed control is set toward the turtle, the slower the scooter will travel.
However, this scooter will not self accelerate down hills due to the
automatic braking taking effect should you attempt to drive too fast.
Kerb Climbing:Approach slowly at right angles to the kerb. A slight angle is permissible
with a 4-wheel scooter. Do not attempt kerb climbing greater than a
50mm kerb. If the Self-Diagnostic Warning Lights start to blink, identify
the problem from the chart on page 18 and take action.
Vertical limit approach approximately : 5cm
Acceptable gap width approximately : 22cm
When driving, proceed straight forward slowly pass through the gap.
Figure 15
Figure 16
If the scooter breaks down and must be moved, get off the scooter, pull the free-wheeling
lever, move the scooter slowly to a safe location, and push the free-wheeling lever
back downward to engage.
As a safety feature, an automatic speed reducer engages if the scooter
is pushed quickly when the Free-wheeling lever is disengaged. This
standard feature is specifically created for down slopes.
11
Horizon
User Manual
DISASSEMBLING YOUR SCOOTER
Taking apart your scooter enables you to save space when keeping it in storage or to
carry it along in your vehicle when going away from home. Having the scooter disassembled
is easier than ever since no tools are required. Please follow these steps
Remove the seat by pull the Seat Rotation Lever (M) up and then lift off. (See Fig. 17)
Remove the Free-wheeling Lever Knob (N). (See Fig. 18)
Life up the Storage Cover (O). (See Fig. 19) and detach the Rear Lighting Wiring
Harnesses (P). (See Fig. 20) Remove the Rear Shroud (Q) gently which is held by
Velcro.(See Fig. 21)
(N)
(M)
Figure 17
Figure 18
(O)
(P)
Figure 19
Figure 20
(Q)
Figure 21
12
Horizon
User Manual
Detach the Main Wiring Harnesse (R) from the scooter. (See Fig. 22)
Unstrap the Velcro Band (S) that holds the batteries. (See Fig. 23)
(S)
(R)
Figure 22
Figure 23
Unplug both Battery Cables (T) and remove the Batteries (U).(See Fig. 24 & 25)
(U)
(T)
Figure 24
Figure 25
Detach the front and rear sections by holding the Seat Post (V) with one hand and the
other hand pushing the release lever to the rear of the scooter. Lift the seat post to
separate the Front Frame Assembly (W) from the rear frame assembly. (See Fig. 26)
Disassemble Front Basket (X). (See Fig. 27)
(V)
Figure 26
(W)
(X)
Figure 27
13
Horizon
User Manual
Push down the Tiller Angle Adjustment (Y) to fold the tiller in a lower position. (See Fig. 28)
Once all the parts have been disassembled, you are now able to put the pieces in storage
or in a vehicle for transportation. (See Fig. 29)
(Y)
Figure 28
Figure 29
14
Horizon
User Manual
RE-ASSEMBLING YOUR SCOOTER
To assemble the scooter, you can repeat the disassembly directions in reverse.
Abbreviated directions are given below. Refer to the figures on pages 12-13 to
locate the parts.
1.Using the tiller angle adjustment, unfold the tiller in an upright position. Place the front
basket on the tiller.
2.Hold the seat post and align the Curved Locking Brackets (Z) on the front frame
assembly with the bar on the rear frame assembly.
(Z)
Figure 30
3.While holding the seat post, slowly pivot the rear frame assemby forward until the release
lever locks.
4.Attach the main wire harness.
5.Place the two batteries and use the Velcro strap to secure them in place.
6.Attach the battery cable plugs.
7.Place the rear shroud on.
8.Attach all rear lighting harnesses.
9.Place the storage cover on.
10.Place the free-wheeling lever knob.
11.Install the seat by pulling the seat rotation lever up to allow the seat to drop into the
locked position.
15
Horizon
User Manual
CHARGING THE BATTERIES
Your Invacare scooter uses two 12V/50Ah rechargeable batteries and one 24V/5A
charger. Batteries must be charged before using the scooter for the first time
and should be recharged after each day's use. Be sure the power switch is in the
OFF position and the free-wheeling lever is in the engaged position.
1.Insert the Battery Charger Output Terminal (A) into the Scooter Charger Port (B).
(B)
(A)
Figure 31
2.Plug the other end of the power cable into a standard electrical wall outlet. Ensure
voltage switch on battery charger is correct in 115V or 230V.
Do not place the battery charger near areas that there may be a risk
of fire.
3.The Battery Charger Light (C) will normally be amber at this point.
(C)
Figure 32
4.Allow to charge until the battery charger light turns green.
5.After the light turns green, turn off the switch. Then unplug the battery charger from
the scooter and wall outlet.
16
Horizon
User Manual
6.If at any time the battery charger light flashes green over 40 minutes, this indicates
an abnormal charging has occurred. You should check that:
•charger plugs are correctly positioned
•fuse is not burned out
•the scooter is turned off
•if none of these is a problem, contact your authorized dealer.
The time needed to recharge will vary depending on the depletion of
the batteries. Charging for longer than necessary will not harm the
batteries. They cannot be overcharged.
Keep in mind these rules:
•Fully charge batteries at least once a month, more if you use the scooter regularly.
Charge after each trip exceeding 3 kilometers / 1.86 miles.
•If storing your scooter for some time (one month or more) make sure that the batteries
are fully charged, and on returning, charge them again before using the scooter.
Batteries will only give the maximum performance after the scooter has been used, and
the batteries have been recharged up to 10 times.
For safety, please follow the guidelines below.
1.DO NOT use the charger if the power cord is damaged.
2.DO NOT use an extension cord when charging your batteries. A risk of fire and/or
electric shock could be encountered.
3.DO NOT take apart the charger, as this will void the warranty.
17
Horizon
User Manual
CARE AND MAINTENANCE
Taking care of your scooter will keep it in top-notch condition. It is recommended that
you have your dealer to provide preventative maintenance service of your scooter on a
regularly basis. Here are a few maintenance guidelines:
BODY COVER: If your scooter is dirty, use a damp or lightly soapy cloth to wipe it down.
Do not use running water to wash or rinse the scooter in order to protect
the electrical parts. Polish with an automotive liquid polish.
SEAT AND ARMREST: Using a damp cloth helps clean the upholstery. Please note that
using the scooter outdoors can lead to sun damage of the
upholstery material. Since this is a normal wear and tear condition,
it is not covered under the warranty.
An authorized dealer should do all maintenance and repair of your scooter that relates
to electronics, batteries, motor parts, and tires.
Also between uses, your scooter is best stored in a dry location at room temperature.
18
Horizon
User Manual
TROUBLESHOOTING
To check the Self-Diagnostic Warning Light, turn on the key and count the number of flashes.
Flash Code/Fault
Impact
on Scooter
Notes
1. Battery needs
recharging
Will drive
Battery charge is running Iow.
Recharge the batteries as soon as possible.
2. Battery voltage
too Iow
Drive
inhibited
Battery charge is empty. Recharge the batteries.
If the scooter is left off for a few minutes, battery
charge might recover enough to allow driving
for a short time.
Drive
inhibited
Battery charge is too high. If a charger is
plugged in, unplug it or turn the Charge/Run
switch to Run. Scooters powered by RHINO
charge the batteries when travelling down
slopes or decelerating. Excessive charging
in this manner can cause this fault. Turn the
scooter power off then on again. If necessary,
reduce speed when descending the slope.
Drive
inhibited
The scooter has drawn too much current for
too long, possibly because the motor has been
over-worked, jammed or stalled. Turn the scooter
power off, leave for a few minutes, and then
turn the power back on again. The controller
has detected a shorted motor. Check the loom
for shorts and check the motor. Contact your
service agent.
Drive
inhibited
Check that the park-brake release lever is in
the engaged position. Check that the motor/
park-brake connector is plugged in firmly. The
park-brake coil or wiring is fauly. Check the
park brake and wiring for open or short circuits
If necessary, unplug the motor/park-brake
connector and check that all four pins are in the
correct position. If this flash code does not
appear until the throttle has been moved out of
neutral, check for a short in the park-brake
circuit. If this flash code appears at power-up,
check for an open circuit in the park-brake
circuit. Contact your service agent.
6. Out of neutral at
power-up
Drive
inhibited
Thumb lever not in neutral position when turning
key switch on. Return Thumb lever to neutral, turn
power off, and back on again. Throttle may need
to be re-calibrated (see Section 4.2.3). Check
throttle wiring.
7. Speed VR error
Drive
inhibited
Thumb lever or its wiring is faulty. Check for open
or short circuits. Thumb lever may not be correctly
set up. Contact your service agent.
8. Motor volts error
Drive
inhibited
The motor or its wiring is faulty. Check for
open or shot circuits. Contact your service
agent.
9. Other internal
errors
Drive
inhibited
Contact your service agent.
3. Battery voltage
too high
4. Current limit
time-out
5. Brake fault
19
Horizon
User Manual
Other Problems:
•Scooter will not move when the key is turned on:
1.Check the power reserve indicator on the control panel. All the LED lights should
be on.
2.Check the Self-Diagnostic Warning Light. It should be steady. If it is flashing, see
chart on page 18 for problem identification.
3.Check all electrical connections to be sure they are tight.
4.If none of these correct the problem, contact your authorized dealer.
•If you have charged your scooter for over 10 hours and the light on the charger does
not change to green, then please contact your authorized dealer.
Please note that your scooter is equipped with a controller that constantly checks the
drive system for a safe and enjoyable ride. If an error occurs, the control panel will
provide you an indication of the problem by way of blinking lights.
20
Horizon
User Manual
TECHNICAL SPECIFICATIONS
SPECIFICATIONS
Horizon
Challenger
Overall Length
1290 mm / 51"
1290 mm / 51"
Overall Width
620 mm / 24"
625 mm / 25"
Overall Height
1140 mm / 45"
1150 mm / 45"
Wheels: Front
290 mm / 11" Solid
290 mm / 11" Solid
Wheels: Rear
290 mm / 11" Solid
290 mm / 11" Solid
Weight without Batteries
65 kg / 143 Ibs.
65 kg / 143 Ibs.
Max. Speed
8 kmph / 5 mph
12 kmph / 8 mph
Weight Capacity
135 kg / 300 Ibs.
135 kg / 300 Ibs.
Ground Clearance
75 mm / 3"
87 mm / 3.4"
Grade Climbable
12 degree
12 degree
Kerb Climbing
50 mm / 2"
50 mm / 2"
Turning Radius
1565 mm / 62"
1565 mm / 62"
Front & Rear
Front & Rear
Electro-Mechanical
Electro-Mechanical
Suspension
Brake
Seat Type
Premium Upholstery Mid-back with Headrest Swivel
Seat Width
455 mm / 18"
455 mm / 18"
Motor Size
500W, 3200 r.p.m.
700W, 5900 r.p.m.
(2) 12V. 50Ah
(2) 12V. 50Ah
Battery Weight
31.26kg / 69 Ibs. total
31.26kg / 69 Ibs. total
Travel Range
Up to 40 km / 25 Miles
Up to 40 km / 25 Miles
DC 24V / 5 Amp
DC 24V / 5 Amp
Battery Size
Battery Charger
Electronics
On/Off Key Switch, Battery Level Indicator,
Speed Control Knob
*Subject to change without notice.
21