1
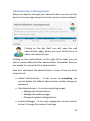
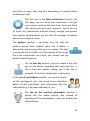
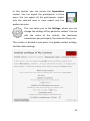
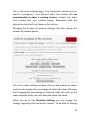
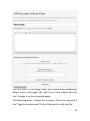
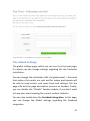
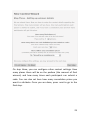
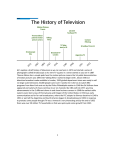
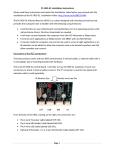
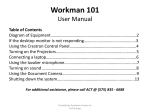
The Contester User Manual Updated version! 1.2 This manual is supported on version 1.2 of the Contester. Henrique Mouta Mouta.org In case of questions or bugs regarding this particular software, please send me a email to [email protected] with details of your bug and/or with your question. Summary Summary of this manual The Contester User Manual ......................................................... 1 Summary...................................................................................... 2 What is Contester? ...................................................................... 3 Installation ................................................................................... 4 The Basic Usage of Contester ...................................................... 5 The Basics ................................................................................ 5 What’s a Key? ...................................................................... 5 The Front-End .......................................................................... 6 The Back-End ........................................................................... 9 Administrators Management ............................................. 10 Contest management (CCPanel) ........................................ 11 Contest Archive .................................................................. 16 Pages management – CMS ................................................ 18 Custom Fields..................................................................... 20 The Global Settings ............................................................ 21 How To… .................................................................................... 23 … Make a new Contest .......................................................... 23 ... Draw a Contest .................................................................. 26 … Configure the Facebook ..................................................... 27 2 What is Contester? This software is a simple yet powerful contest manager. The basic usage of this software consists in two parts: the first part, where are thousands of codes (user can tell the Contester how many codes he/she wants) and the participant will generate one of the codes. He will be able to submit from one to three codes, depending on what the administrator configured. Once the code is submitted, it can be selected for the next phase, and if so, the participant will receive an email informing that he is one of the selected participants to the next phase. But if the code is not selected, the user may submit another code (again: it depends of the settings), or may be able to win a consolation prize. Regarding the consolation prizes, it is one single prize that will be offered to 1 to 10 participants or just to everybody. One example is, I want to offer every single participant, an exclusive discount coupon to my online store, so I can activate the consolation prize and give the Contester this information. The first phase is now explained. The second phase starts when the administrator close the submissions on the control panel, as you can see later on this manual. Since then, no one is able to submit any more code, and the administrator is now able to do the final draw of the contest. When the draw is being done, the system will select from 1 to 10 winners, depending on what administrator defined when created the contest, using a random algorithm, and also will select who gets the consolation prize. That’s it, the basic usage of this software. If you have any doubt regarding the usage or some more technically issue, contact me to [email protected] and I’ll reply to you as soon as possible. 3 Installation The installation of this software is very easy and understandable. Instead of writing boring and long text, we have provided a short video that will describe all the steps for install this software. You can watch it on YouTube on http://youtu.be/ugVqH4qMAf8. If you have any problem installing your Contester software, contact me to [email protected] and I’ll reply to you as soon as possible. 4 The Basic Usage of Contester In this section we will describe the basic usage of Contester software, explaining all its features. First, we will start with the front-end and then we will go to the back-end, following the menu order. But first, let’s explain some basics! The Basics What’s a Key? A key consists on an md5 hash, generated using a secret random algorithm. The keys are store on Database, and have two statuses: If they are already reclaimed and if they are selected. Using you backend, you can check every detail of a particular key on the Contest Control Panel. 5 The Front-End The front-end have a very simple design, which tries to offer the best intuitive interface to the participant. This is how the public main page of the Contester looks like. You can easily edit this page, by going to your FTP client and edit the start.php file. The entire file is well documented and you will quickly understand how to edit this file. 6 Creating and managing your online contest was never been so cool and easy. With contest manager you can do a draw and configure every detail of your contest. The contest consists in two phases: the first phase where the user submits a code and can be selected to the next phase, and the draw phase, where all the selected codes are draw. This is the menu. You have four items: The Home, that is your front page; The Enter in Contest, where the user can press to enter the contest (it goes exactly to the same place as when you click in the “Join the contest!” bottom on the front page (See image above); The Rules, where the rules of the contest are. To edit this page is very simple. You have to login in the backend and go to the Pages Manager. From there, you are able to edit this page. The Prizes, where you can check the current prizes, a picture, and a description of it. Regarding the prizes configuration, we will talk about that later. When the draw is done, there is also another menu item: The Podium, where you can check who won and in which place each person stayed. The rest of the frontend is very intuitive, and don’t need any explanation. If you want to change the text of the “Enter in 7 Contest” you should edit play.php but be careful, the code is well documented but it is a little bit complex. If you have Facebook Integration activated, user may need to connect with his Facebook account before submit a code. You decide if it’s mandatory or not. You can read about this later on this document. 8 The Back-End We are now going to review the Back-end functions. The following image is the main dashboard, and it’s what you see when you login in /admin backend. In this page you have some shortcuts, statistics and a fast tip. On the left side you have the navigation menu, and you can manage everything using this functions. We will see about each one of that functions later on this manual. 9 Administrators Management When you need to manage your administrators you can use this panel to easy manage everyone that has access to your backend. Clicking on the big ‘Add’ icon will open the add administrator page, where you must fill the form to add a new administrator. Clicking on the small buttons on the right of the table, you can edit or remove that particular administrator. Remember that you are unable to remove the first administrator. Now let’s talk about the administrators’ access. There are three access levels: Global Administrator – It has access to everything, yet cannot delete the default administrator neither change its password. Sub-Administrator – It can do everything except: o Manage the administrators o Manage the website pages o Change the global configurations. Contest Manager – It can only manage the current contest, but can’t change the contest’s settings. 10 Currently (at version 1.0) these access conditions are not fully implemented, but the version 1.1 will be released as soon as possible with this fix. Contest management (CCPanel) This is the main function of the whole Contester. The CCPanel – Contest Control Panel, also known as Contest management, it where you can manage every detail of your contest. It has a bold, colored and big text line that will resume the status of your contest. If the contest is active it will be green, if it’s been finished, the text will be red. 11 You have six icons, that may vary depending on contest status (activated or not). The first icon is the finish submission function. On this page you can finish the submissions, and get your contest ready to the final draw. Once you finish the submissions you can’t reopen it. And if you try to finish the submissions without having enough participants (the number of participants are less than the number of podium places) you will get an error. The podium module is obviously. You can edit the podium places. Each podium place has a Name, a description and a picture that you can upload. This data is accessible by the public on the frontend of the script. Once the submissions are finish, you cannot edit the podium places anymore. On the test key section, you can submit a key and get all the details regarding that particular key. A key’s chart will appear, telling you if the key is selected, if has been claimed yet, and by who. In the see all participants module, you have access to all the participants list, and check every individual detail of each participant, with information like the submitted key, if has been selected, IP, etc… The see all the selected participants section is almost like the above section, but instead of displaying all the participants, it will just display the selected ones. 12 In this section you can access the Exportation section. You can export the participants in three ways: You can export all the participants, export only the selected ones or even export only the podium winners. This icon takes you to the Settings, where you can change the settings of this particular contest. You can edit the name of the contest, the maximum submissions per participant, the amount of keys, etc. This section is divided in two parts: the global contest settings, and the codes settings. 13 This is the main settings page. The red button should only be used in “emergency” case and will abort the contest. It’s not recommended to abort a running contest, instead, just abort that contest that you created wrong. Remember that the aborted contests will not show on the archive. Changing the number of winners settings, will also change the number of podium places. This is the codes settings window. You can add a batch of codes, and you can change the percentage of selected codes. Attention that changing the percentage of selected codes will reset all the codes selected status, but will keep the codes the same. When you go to the Facebook Settings you can change the settings regarding that particular contest. To be able to change 14 those settings, you must activate the Facebook Integration. You will learn how to do this later on this manual. When a user submits a code, Contester will publish this on Wall: 15 When you close your contest, your control panel will change to this: Later on, we will see how to draw the contest. Contest Archive In this section, you can check the old contests you generated. 16 You will have a list of contests, and once you press View, you can get an interface where you can check some basic details regarding that contest and some statistics. Each of these functions doesn’t need any more explanation. 17 Pages management – CMS This is a section where you can manage the pages of the frontend. In this section, you can edit the rules page, and make it fit as you like. You can see on the image below the basic interface of this module. In the coming version, a menu manager will be included to an even easier management. The first 5 pages are protected against deletion and some crucial editions, like the page URL, and the php file that should be included. Above, you can see the edition/add interface with a brief explanation. 18 The first field it’s the page name, you should write something. Below there is the page URL, and it has to be unique and you can’t change it on the protected pages. The following space is where the text goes. This area is ignored if the “Page file replacement” field is filled with a valid php file. 19 On the keywords and meta description you can write some SEO details, like the keywords of this page and it’s description. Finally, in the Page file replacement, you can write a file name of a php file (that must be on the installation directory of the Contester), that will be the page content (title and text will be replaced by this). Custom Fields In the version 1.2+ you can now create custom fields that you want to user’s to fill. Click on the Custom Fields link on the menu to get on the custom fields manager. By default, there is not any custom field created. Those fields are just for testing purposes. To add a new field you can create on Add new Field icon, on the top right corner, and fill the form. When the participant submits a code, he will see the custom fields as you can see in the image below. 20 The Global Settings The global settings page, which you can see it on the next page, it’s where you can change settings regarding ALL the Contester installation. You can change the installation URL, the global email – the email from where the emails are sent and for where participants will be able to send emails, and some front-end settings, like the page title and the page description (as seen on header). Finally, you can disable the “Details” header module, if you don’t want to have your users knowing the current contest statistics. You can also enable here the Facebook Integration. In this page, you can change the Global settings regarding the facebook integration. 21 22 Clicking on the Email Settings on the top, you are able to edit all the emails that the Contester Software will send to each participant. This also applies to the Facebook Settings. Clicking on it, you can change settings regarding the Facebook. How To… In this section of the manual, I will teach you how to do some things with this software. … Make a new Contest To create a new contest, you can’t be running any other contest. If you want to force close your contest, check above how to abort a contest. Once you have any contest enabled, go to the contest control panel, and you will see the following options: 23 To create a new contest, press on the big green button. You will be taken to a wizard to create your contest. On first step you have to choose a contest name. Once you do that, press Next. On the step two, you will configure the code generator settings. You can choose how many codes you want to generate (we recommend from 2.000 to 99.000 depending on audience size), and the selected winner percentage. This percentage is the amount of codes that will select the users to the next phase, the Draw phase. This will be the odd of getting selected. Once you are ready, press Next. 24 On step three, you can configure other contest settings. How many places there will be on the podium (the amount of final winners) and how many times each participant can submit a code. You can also set here how many consolation prizes you want to attribute. Once you are done, press next to go to the final step. 25 This is the final step. Check if everything is like you want, and press the big green button. Once you press it, the contest generation can take a while to generate (50.000 codes can take about 30 seconds or more to generate). Please stand by, and do not stop the loading. That’s it! Your fresh brand new contest is now created! ... Draw a Contest To draw a contest you must finish it. To finish your contest, go to the Contest management section, and press the finish icon. 26 As I said earlier, to finish the contest you must have at least as many participants as podium places. Once you finish the contest, get back to the Contest management and press the big green button. Once you do that, you will start the draw wizard. Just keep following the wizard and the system will automatically draw the winners and the consolations prizes for you. Once you got a winners list, you can press the button to start the mailing. First, we will mail the winners, and then, we will mail the consolation prize winners and the rest of the participants. Remember you can change these emails on the settings. Check above for more details. Once the draw is done, the contest is officially over. You may now create a new contest… or do nothing else. … Configure the Facebook I’ve made a very simply and understandable video guide, where you can see how can you easily configure the Facebook Integration. Keep in mind that this is an easy procedure, but may be a little complex. You can see the video on YouTube here: http://www.youtube.com/watch?v=nhPPps9F1LY. 27 If you have any problems with this configuration, feel free to contact me. 28