1
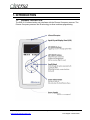
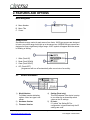
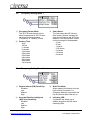
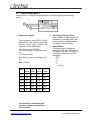
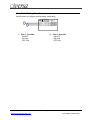
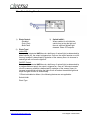
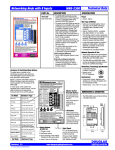
WIR-3110
Infrared Setting Unit
User Manual for
Diversa Dual Technology Sensors
Douglas Lighting Controls
www.douglaslightingcontrols.com
Page 1
July 20, 2015
R1.0
1. INTRODUCTION
1.1.
GENERAL DESCRIPTION
The WIR-3110 Infrared setting unit interfaces with the Diversa Occupancy sensors. The
Diversa Occupancy sensors use IR technology to allow touchless programming.
Douglas Lighting Controls
www.DouglasLightingControls.com
Page 2
August 25, 2015
Tech Support: 1-877-873-2797
2. FEATURES AND OPTIONS
Menu Navigation
A. Menu Number
B. Menu Title
C. Cursor
Send/Receive
Send/Receive range varies for each sensor form factor. WOS type sensors are designed
to have a very short range; hold right up to the sensor lens. WOR/WOW type sensors are
designed to have a significantly longer range. A WiFi symbol will appear while the sensor
is Reading or Writing.
1. Write (Push UP)
2. Read (Push DOWN)
3. Clear (Push RIGHT)
4. Off* (Push LEFT)
*programmer will turn off automatically after one minute of no activity.
2.1.
Sensor Information
1)
Model Number:
Full Model number indicating
options. Note, lens type is not
shown.
4)
Setting (Read only):
This field indicates if the device is setup
to use either the on-board dip switch
values or the IR settings.
2)
Hardware Version
5)
3)
Firmware Version
IR Lock:
If “Locked” the Setting DIP for
configuration is ignored and only the IR
settings are used.
Douglas Lighting Controls
www.DouglasLightingControls.com
Page 3
August 25, 2015
Tech Support: 1-877-873-2797
2.2.
Occupancy Setting Menu 1
1)
Occupancy Sensor Mode:
The “WO” Diversa sensors can be
setup to operate like a “WV” Diversa
sensors by selecting between
“Occupancy” or “Vacancy” modes.
2)
Vacancy Time:
- Auto
- 30 Sec
- 1 minutes
- 5 minutes
- 10 minutes
- 20 minutes
- 30 minutes
- 40 minutes
- 60 minutes
- 90 minutes
- 120 minutes
2.3.
3)
Smart Sense:
The timer keeps the ADI-Voice on
after vacancy timeout, allowing the
lights to be turned on with ADI-Voice
detection. The selected time is used
as the mid range for the adaptable.
- 15 sec
- 30 sec
- 1 minute
- 1:30 minute
- 2 minutes
- 3 minutes
- 4 minutes
Occupancy Setting Menu 2
1)
Passive Infrared (PIR) Sensitivity:
Disabled
Low
Medium
High
3)
Walk-Thru Mode:
When enabled, this feature turns the
lights off after 3 minutes if no
occupancy detection occurs after the
first 30 seconds after initial turn on.
2)
Accurate Detection Intelligence
(ADI) Voice Sensitivity:
Disabled
Low
Medium
High
4)
Indicating LED:
If preferred, this allows you to
disable the motion and ADI-Voice
indicating LEDs.
Douglas Lighting Controls
www.DouglasLightingControls.com
Page 4
August 25, 2015
Tech Support: 1-877-873-2797
2.4.
Feature Enabling Menu
1)
Switching Feature:
Enable or Disable on-board
switch.
3)
0-10V Dimming:
If equipped, enable or disable the 010V dimming output.
2)
Photo ON/OFF Feature:
If equipped, enable or disable
the photocell feature. This
feature enables/disables lights if
adequate natural light is
present.
4)
Photo Controlled Dimming:
If equipped, allow the 0-10V dimming &
photo options, enabling it’s function will
allow the 0-10V output to be controlled
by the photocell or at the fixed dim
level; see menu 9.
Douglas Lighting Controls
www.DouglasLightingControls.com
Page 5
August 25, 2015
Tech Support: 1-877-873-2797
2.5.
Switch Setting Menu 1
Use this menu to configure dual pole sensors as multi-level lighting (sequencing)
sensors.
1) Sequences (2-Pole):
Once configured using WIR-3110 with
each press of the override button the
Diversa sensor steps through the
sequence, as per table below:
00 = Both poles off (START)
10 = Primary pole off, secondary pole
on
11 = Both poles on
01 = Primary pole on, secondary pole
off
RPT = Repeat
Start
1st
Press
2nd
Press
3rd
Press
4th
Press
00
01
10
11
00
00
10
11
00
10
00
01
11
00
01
00
11
00
11
00
00
01
00
01
00
00
00
00
00
00
2)
Alternating Primary (2-Pole):
When enabled, the primary pole will
alternate for even lamp wear, every
time occupancy is detected (does
not apply to override button).
3)
Disable Mode
The sensor can be disabled by
applying 24VAC from the source on
the Sensor Link wire. This option is
to determine what action is to be
performed.
- OFF
- 10
- 01
- 11
- – – (As-is)
The first level is activated by the
occupancy signal or switch if it is
set to vacancy.
Douglas Lighting Controls
www.DouglasLightingControls.com
Page 6
August 25, 2015
Tech Support: 1-877-873-2797
2.6.
Switch Setting Menu 2
Use this menu to configure override button functionality.
1)
Pole 1 - Override:
- ON/OFF
- ON Only
- OFF Only
Douglas Lighting Controls
www.DouglasLightingControls.com
2)
Page 7
Pole 2 - Override:
- ON/OFF
- ON Only
- OFF Only
August 25, 2015
Tech Support: 1-877-873-2797
2.7.
1)
2)
Photo Setting Menu 1
Ranges:
Ceiling Mount 0-800 Lux
Wall Mount
0-800 Lux
Wall Switch 0-800 Lux
Photo Setpoint High
For switching: When the light level is
lower than this setting it will turn the
lights ON when in ON/OFF photo
mode.
3)
Photo Setpoint Low
For switching: When the light level is
higher than this setting it will inhibit the
lights from turning ON or turn them off
depending on the “Photo Mode”.
Douglas Lighting Controls
www.DouglasLightingControls.com
Page 8
Photo Capture & Temporary Dim
These two functions are used to set
the photo set points automatically.
Use the temporary (30 Sec) dim to
set the desired maintained light
level. Then send a “Photo Capture”
to read the light level.
August 25, 2015
Tech Support: 1-877-873-2797
2.8.
Photo Setting Menu 2
1)
Photo Control:
- Disabled
- Pole 2 Only
- Both Poles
3)
Switch Inhibit*:
When enabled, it will inhibit the
switch from turning the light on if
there is sufficient ambient light
detected. Photo OFF setpoint.
2)
Photo Type*:
Inhibit Only:
If occupancy is detected AND there is a deficiency of natural light (as determined by
photo setpoint off), the output is triggered on. Once on, the output remains on until a
vacancy condition is determined by expiration of the vacancy timer. An increase in
natural light will not force the lights off.
ON/OFF Control:
If occupancy is detected AND there is a deficiency of natural light (as determined by
a programmable set point), the output is triggered on. Once on, the output remains
on until a vacancy condition is determined by expiration of the vacancy timer. An
increase in natural light will allow the lights to turn off and as the ambient light level
drops the lights will turn on automatically.
*If Photo is disabled on Menu 4, the following features are not applicable:
Switch Inhibit
Photo Type
Douglas Lighting Controls
www.DouglasLightingControls.com
Page 9
August 25, 2015
Tech Support: 1-877-873-2797
2.9.
Dimming Setting Menu
1)
Dimming Maximum Limit (%) &
Fixed Dimming Output
2)
Dimming Minimum Limit (%)
3)
Unoccupied Function:
- Minimum Dim Only
- Relay OFF
3)
Test Mode:
When activated, the sensor options
are temporarily changed for quick
reaction times (Timeout: 5 sec,
Smart-Sense: 5 sec) and ADI-Voice
enabled. This will drop out to normal
mode after 30 minutes
2.10. Miscellaneous Setting Menu
1)
Auxiliary Contact Mode (-R option):
Indicate Occupancy
Indicate Output Signal
2)
RESET:
All Settings
Photo Settings
Audio Settings
None
Douglas Lighting Controls
www.DouglasLightingControls.com
Page 10
August 25, 2015
Tech Support: 1-877-873-2797