1
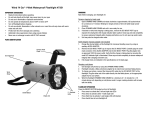
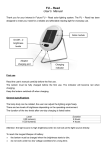
SolaDyne® Mini Solar Lantern #7470
IMPORTANT SAFEGUARDS
•
Read all instructions before operating
•
Do not look directly at the light; may cause injury to your eyes
•
Do not use in flammable or explosive environments
•
Do not operate at temperatures above 120°F or below 32°F
•
To reduce the risk of electric shock, do not submerge the unit or its accessories in any liquid. Unit is
water resistant but not waterproof.
•
This unit is not intended for use in explosive atmospheres or locations
•
Turn off all lights before charging
•
Store in a clean dry place when not in use
•
Do not use alcohol, flammable or other solvents on or near this unit. Only clean with warm water and
soft cloth.
•
Protect LED lens and solar panel from damage and scratching
•
Administer close supervision when using around children
PARTS IDENTIFICATION
Handle
(Carabiner clip not shown)
Solar Panel
ON/OFF Button
DC In/Out Port
& Charging
Indicator
Solar Charging:
1. Place the lantern on a flat surface with the solar panel in direct sunlight.
2. Allow 5-6 hours for a full charge. Solar charging will be most effective on a bright sunny day. It will
take longer to charge on a cloudy day.
3. Repositioning the lantern throughout the day will be required to make sure sunlight is effectively
charging the battery. This may require tilting the lantern to directly face the sun in the morning and
afternoon.
Dynamo Charging:
1. Open the Hand Crank and rotate clockwise at approximately 120 cycles/minute for a minimum of one
minute. Winding for a longer period of time will yield longer power durations.
2. The red charging indicator on the lantern will illuminate during charging.
3. Close the Hand Crank.
120V OR 12V Charging (adapter not included):
1. Purchase a 5V USB 120V AC or 12V DC vehicle charging cable from your local electronics retailer.
2. Connect the female USB adapter tip into the DC IN/OUT port and then connect the USB cable to charge the
unit.
Lantern Operation
Press the ON/OFF button:
•
1 time for 3-LED
•
2 times for 6-LEDs
•
3 times for off
6 LED Bulbs
Hand Crank
CHARGING THE RECHARGEABLE BATTERY
Before charging, turn off the lantern.
Cell Phone Charging
The lantern is equipped to charge a variety of cell phones for emergency calls by hand cranking. Some smart
phones may not properly charge due to their specific requirements.
1. Plug the female USB adapter tip into the DC IN/OUT port and plug your cell phone’s USB charging
cable into the female USB.
2. Wind the HAND CRANK as described under Dynamo Charging for 1-3 minutes to generate power to
your cell phone. Longer winding times will increase cell phone talk time.
TECHNICAL INFORMATION
SPECIFICATIONS
INTERNAL RECHARGEABLE BATTERY
Lithium Ion LIR14250/300 mAh 3.6V
DC INPUT
6V 300 mA
DC OUTPUT
6V 350-500 mA
AUXILIARY CHARGING METHOD
(not included)
120V AC Power Adapter
Input: 120V AC 50/60 Hz
Output: 5V 0.5A DC
12V DC Power Adapter
Input: 12V DC
Output: 5V 0.5A DC
Center positive polarity
WEIGHT
10 oz.
DIMENSIONS
3 3/8” L x 3 3/8” W x 6 11/16” H
Patent
Pending
Mini Solar Lantern
POWER DURATION
LANTERN
After 5-6 hours of solar charging on a bright sunny day
(fully charging the battery). If not adjusted, charging time
will increase.
After winding for 1-3 minute
CELL PHONE
CHARGING
After winding for 1 -3
minutes
5 hours with 3-LEDs
2½ hours with 6-LEDs
60 minutes with 3-LEDs
30 minutes with 6-LEDs
Using either a 12V or 120V power adapter to fully charge approx. 5-7 hours. (not included)
5 hours with 3-LEDs
2½ hours with 6-LEDs
This feature may not work with smart phones.
1-2 minutes of emergency talk time. Longer talk times may be achieved with
additional winding.
AERVOE INDUSTRIES, INC.
Gardnerville, NV 89410 • 1-800-227-0196
www.aervoe.com • [email protected]
7470inst; rb5/13
OPERATING INSTRUCTIONS