1
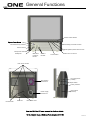
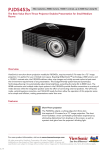
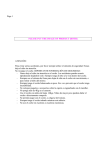
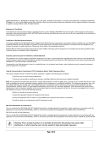
Quick Start Guide
+23T.977+!
1 Check Contents
Rear Cable Cover
Microsoft Manual
Please keep the packaging for future
storage or transport
RM One system
Keyboard & Mouse
AC power lead
RM Recovery CDs
You may also have purchased
optional accessories such as a
desk bolt and padlock.
2 Setting Up
Please Note: The RM One can weigh up to 14kgs. Please ensure you use normal manual handling precautions when lifting and positioning
the system. The integrated handle should be used with due care.
Position the RM One in your desired location
Connect your keyboard, mouse and Ethernet cable to the connectors in the rear of the RM One. The mains connects to the power supply on the right of the cave. If you wish to use the
cable clamp you will need to unscrew the cable clamp screws on the base of the RM One. Remove the cable clamp, position the cables in the rubber grip and screw the cable clamp back
into position. You may find it easier to lay the RM One down, taking care not to rest the RM One on any sharp objects. Switch the RM One on using the Power Switch on the silver panel
as shown above.
3 Using your RM One PC
RM One User manual:
A manual can be found by clicking: Start—Run then typing c:\rm\manuals
Troubleshooting:
My RM One will not power up?
Useful Features:
LCD Power Button
Ensure you have the mains cable connected. Some RM One systems are shipped with a
mains switch on the power supply next to the AC cable inlet. Ensure this is set to the on
position. Ensure you use the correct power button on the silver panel.
Front Panel I/O
Press the LCD Power button on the front of the monitor.
This switches off the sound and display without powering down the system fully.
The front panel houses a volume control, which affects both the speakers and headphone
volume. Rotate to the right to increase volume, and left to reduce the volume. In addition,
there is a stereo headphone socket, microphone socket, a IEEE1394 (Firewire) socket and
two USB2.0 sockets.
Variable Speed Fans
The RM One will change the speed of the fans depending on the applications being run. You
may hear the fans speed up and slow down occasionally. This is completely normal and helps
to reduce the noise produced from the RM One when the system is not being utilized.
My RM One powers up but there is no display on the screen?
My RM One shows a shimmering or corrupt display.
Press the button marked ‘AUTO’ on the front of the monitor. The screen will flicker and
change colour for a few seconds before settling on the correct size, brightness and
contrast.
I cannot unscrew the rear cover of the RM One.
The RM One is fitted with security screws. Please contact your sales representative to
obtain a matching security key.
4 Safety Notice
The mains cable provided has a sealed moulded plug and fuse. Always use the supplied cable, plugged into a standard 3-pin power socket. Always replace a blown fuse with one of the
same rating, and ensure the fuse cover is refitted. Check the condition of cables regularly. If any are damaged, replace them immediately. Place the RM One near to outlet sockets to
avoid the trip hazard of trailing cables.
Do not use the RM One in conditions of extreme temperature, humidity, dust, vibration, or electromagnetic radiation. They may damage your RM One or make it unsafe to use.
To avoid over-heating ensure the ventilation slots on the rear are not obstructed. Leave a gap of at least 10cm (4 inches). When the RM One is switched on avoid sudden movement of
the unit. Hard disks are easily damaged if moved whilst operating. Failure to comply with these guidelines may cause damage to the RM one and are not covered by any warranty. The RM
One User Manual contains more information and may be found pre-installed on your RM One system.
RM plc, New Mill House, 183 Milton Park, Abingdon, OX14 4SE
Support Telephone Number: 08709 202202
General Functions
Monitor Power Button
System Power Button
Auto Setup/Increase Function
Hard Disk Activity Indicator
Volume Control
Mute Speakers/Decrease Function
Microphone Socket
Headphone
IEEE1394
(Firewire)
Socket
USB2.0
Sockets
Access Menu
Menu Item Increment
Rear Cover Screws
Rear System
Exhaust Fan
3½” Floppy Drive
(if fitted)
Eject Button
Activity Indicator
Power Supply
Exhaust Fan
Panel Screws
Cable Run
Optical Drive
(if fitted)
Rear Cable Cover
See the RM One PC user manual for further details.
RM plc, New Mill House, 183 Milton Park, Abingdon, OX14 4SE
Support Telephone Number: 08709 202202
Version 2