1
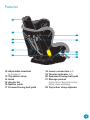
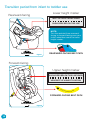
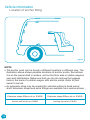
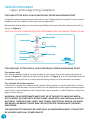
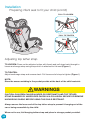
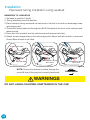
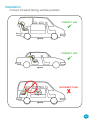
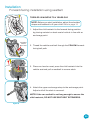
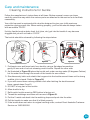
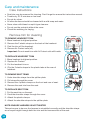
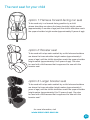
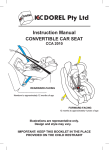
Euro & Hera
Convertible Car Seat
To be used only in a rearward facing position until
the infant’s shoulders reach the lower shoulder
height marker (approx. 12 months of age).
Then to be used in a forward-facing position until
the child’s shoulders reach the upper shoulder
height marker (approx. 4 years of age).
IMPORTANT: KEEP THIS BOOKLET IN THE PLACE
PROVIDED ON THE CHILD RESTRAINT.
Table of Contents
Welcome letter .............................................................................................................. 3
Warnings .......................................................................................................................... 4
Parts list ............................................................................................................................. 8
Transition period from infant to toddler use ................................................... 10
Vehicle information ................................................................................................... 12
Upper anchorage fitting installation ......................................................................... 12
Anchorage fitting installation ................................................................................... 13
Location of anchor fitting .......................................................................................... 14
Upper anchorage fitting installation (for sedans only) .......................................... 15
Correct rearward-facing vehicle position ............................................................. 16
Installation ................................................................................................................... 17
Angle adjustment ...................................................................................................... 17
Preparing infant seat to fit your child ....................................................................... 18
Shoulder height marker (rearward-facing) ........................................................ 21
Rearward-facing installation using seatbelt ........................................................... 22
Correct forward-facing vehicle position ............................................................... 23
Shoulder height marker (forward-facing) .............................................................. 24
Forward-facing installation using seatbelt ............................................................. 25
Lower connectors installation ............................................................................... 26
Rearward-facing .......................................................................................................... 27
Forward-facing ............................................................................................................ 27
Installation .................................................................................................................... 28
Installing locking clip (optional) ............................................................................... 28
Care and maintenance ............................................................................................ 29
Cleaning instructions for buckle .............................................................................. 29
Care instructions ........................................................................................................ 30
Removing trim for cleaning ...................................................................................... 30
Removing insert for cleaning .................................................................................... 31
Accessories (if supplied) ......................................................................................... 32
Belt mates ................................................................................................................... 32
The next seat for your child ................................................................................... 33
Notes ............................................................................................................................... 34
Guarantee ..................................................................................................................... 35
2
Dear customer,
Congratulations on
the purchase of your
brand new Maxi-Cosi car seat,
we hope you and your little one
will have plenty of hours of fun together!
Our car seats are produced with the greatest care and craftmanship
backed by a 6 year warranty on the seat and 3 year warranty on the trimming.
In the event of a car accident, your Maxi-Cosi child restraint may have unseen
damage from crash forces. The Maxi-Cosi Accident Exchange Service offers
new for old Maxi-Cosi child restraint replacement in the event of an accident,
giving you peace of mind knowing your child is corectly protected.
So there is nothing for you to worry about, just sit back and enjoy the ride
where ever it may take you.
We would love to hear from you!
Nothing makes us happier and encourages us to continue developing
the very best products available than hearing how it helped you
enjoy your time together, on the go.
Feel free to share you story on our Facebook page or our website.
Enjoy your ride,
The Maxi-Cosi Team
Need assistance?
Call our Customer Service Centre: 1300 809 526
Monday to Friday (8:30am-5:00pm AEST) or send
an email: [email protected]
www.maxi-cosi.com.au
maxicosi.australia
3
WARNINGS
Read and follow all of the installation instructions for maximum
protection. If you have any questions regarding the installation or use
of this restraint, please contact Dorel Australia or agent, or a child
restraint fitting station authorised by the relevant transport authority,
or in New Zealand, to consult the agent for the vehicle.
•To be used only in a rearward-facing position until the infant’s shoulders
reach the lower shoulder height marker (approximately 12 months of age).
Then to be used in a forward-facing position until the child’s shoulders
reach the upper shoulder height marker (approximately 4 years of age).
•Continue to use this child restraint until the child reaches this limit.
•Do not use forward facing until child’s shoulders are above the lower
shoulder height marker.
•Infants are at risk of serious injury if they face forward too early.
•Children are at risk of serious injury if they move to booster seats too
early.
•Children who have outgrown this restraint are safest in a larger child
restraint with an in-built harness or a booster seat until their shoulders
reach the upper shoulder height marker of the restraint.
GENERAL
•Use the restraint exactly as shown in the instructions.
•Supervision of children is needed because they may be able to undo the
buckles.
•DO NOT LEAVE CHILDREN UNATTENDED IN THE CAR.
•Do not alter or modify this restraint.
•Repairs must only be done by the manufacturers or agent.
•Do not allow the restraint to come into contact with polishes, oils, bleach
and other chemicals.
•Destroy the restraint if it has been in a severe crash, even if no damage is
visible
•DO NOT USE THIS RESTRAINT WITHOUT THE COVER.
•To ensure infant’s back is evenly supported, do not put more than one
nappy on the baby and make sure the nappy is not thickly folded at the
back.
•DO NOT USE A REAR- FACING CHILD RESTRAINT WHERE AN AIRBAG
IS FITTED IN FRONT OF THE SEATING POSITION.
4
WARNINGS
•Fit the restraint firmly to the car seat.
•Fit the harness firmly to the child.
•A loose restraint or harness is dangerous.
•Do not harness an infant wrapped in a blanket or swaddled. Any blanket
or wrap must only be placed over the harness and infant.
•Seatbelt extenders are not recommended to be used if the seatbelt is
not long enough to secure the child restraint. If seatbelts are too short
then advice should be sought from a child restraint fitter and their
recommendation be considered before using a seatbelt extender.
•Always secure the loose end of the top tether strap. Do not use the child
restraint where this strap may fall into a split in the seat back or off the
side of the seat.
•Always secure the loose end of the top tether strap to prevent it hanging
out of the car or being accessible by the child.
•ALWAYS ATTACH HOOK AND REMOVE SLACK.
•THIS RESTRAINT IS NOT SUITABLE FOR USE WHERE THE TOP TETHER
STRAP MAY FALL INTO A SPLIT IN THE SEAT BACK OR OFF THE SIDE
OF THE SEAT.
•THIS RESTRAINT MUST BE ATTACHED TO A CHILD RESTRAINT
UPPER ANCHORAGE POINT IN THE CAR. REFER TO CAR OWNER’S
HANDBOOK FOR LOCATION OF UPPER ANCHORAGE POINTS. REFER
TO A CHILD RESTRAINT FITTING STATION IF NO UPPER ANCHORAGE
POINTS ARE IN THE MOTOR CAR.
•Always check the measurements between the front of the seat back of
the rear seat and all front seats in the car in which the child restraint is
intended to be used, to ensure that the space is sufficient.
•Care and attention be given to ventilation and shading of the occupant.
•TO BE USED WITH A LAP-SASH/LAP-ONLY SEATBELT OR ISOFIX LOW
ANCHORAGES IN THE FRONT/BACK OF MOST CARS WITH FORWARD
FACING SEATS.
5
WARNINGS
•The use of child restraints in the front seat may be restricted for children
of specific ages by local legislation. Please check with your local
legislation regarding any restriction for child restraint. If a car has two or
more rows of seats, children under four must not travel in the front seat.
If all seats, other than the front seats, are being used by children under
seven years, children aged between four and six years (inclusive) may
travel in the front seat, provided they use an approved child restraint or
booster seat.
•Use of aftermarket accessories (i.e. items not provided in the box with the
child restraint), can reduce the safety provided by child restraint and may
cause injury or death. For approved aftermarket accessories please refer
to page 12.
•Please contact Dorel Australia Customer Service with any questions or
concerns.
6
7
Parts list
1
2
3
11
10
9
4
8
5
6
7
1
2
3
4
Air protect cell (x2)
Height marker
Stabilising arm
Harness release lever
(under flap)
5 Harness tightening strap
6 Base adjustment button
(two positions)
8
7Base
8 Mesh pocket for lower connector (x2)
9Buckle
10Belt mates (x2)
11 Infant insert
Parts list
12
13
14
15
16
17
12 Adjustable headrest
(5 positions)
13Top tether strap
14Hook
15Anchor kit
16 Splitter plate
17 Forward facing belt path
22
21
20
19
18
18Lower connectors (x2)
19 Tension indicator (x2)
20Rearward facing belt path
21Storage pocket
(instruction manual & excess
tether strap webbing)
22Top tether strap adjuster
9
Transition period from infant to toddler use
Lower height marker
Rearward-facing
MUST BE REAR FACING WHEN
SHOULDERS BELOW THIS LINE
NOTE:
Turn the restraint from rearwardfacing to forward-facing once your
child’s shoulders reach the lower
height marker.
ID
2. M
IGH
3. H
Front of vehicle
Figure 1
A
RE
OW
1. L
R
B WA
EL R
T D
PA FA
TH CIN
G
REARWARD-FACING BELT PATH
Forward-facing
Upper height marker
SHOULDERS BELOW THIS LINE WHEN
HEADREST AT HIGHEST POSITION
FO
RW
ARD
NLY
-FAC
ING BELT PATH O
FORWARD-FACING BELT PATH
Front of vehicle
10
Figure 2
Transition period from infant to toddler use
(cont’d)
WARNINGS
•To be used only in a rearward-facing position until the infant’s shoulders
reach the lower shoulder height marker (approximately 12 months of age).
Then to be used in a forward-facing position until the child’s shoulders
reach the upper shoulder height marker (approximately 4 years of age.
•Continue to use this child restraint until the child reaches this limit.
•Do not use forward facing until child’s shoulders are above the lower
shoulder height marker.
•Infants are at risk of serious injury if they face forward too early.
•Children are at risk of serious injury if they move to booster seats too
early.
•Children who have outgrown this restraint are safest in a larger child
restraint with an in-built harness or a booster seat until their shoulders
reach the upper shoulder height marker of the restraint.
•The child restraint is unsuitable for the occupant when the shoulders are
below the lower marker or above the upper marker. The child needs to be
moved into the next form of child restraint (booster seat) when they reach
the top shoulder height marker.
NOTE :
• If the baby’s neck muscles are unable to support their head, then
the child should remain rear facing.
11
Vehicle information
Location of anchor fitting
Figure 3
NOTE:
•The anchor point can be found in different locations in different cars. The
illustration above shows possible locations of anchor points. Sometimes
it is on the parcel shelf in sedans, and on the floor area in station wagons,
vans and hatchbacks. Make sure that you do not confuse the luggage
hook in the back of a station wagon with anchor points. Refer to your
owner’s manual.
•An extension strap may be needed for vehicles without a fixed parcel
shelf. Extension straps and extra fittings are available from various stores.
12
Extension straps 300mm ref no. 014398
Extension straps 600mm ref no. 014399
Anchor bolt kit ref no. 014400
Locking clip ref no. 014401
Vehicle information
Anchorage fitting installation
Child restraints must be used correctly to provide proper protection for your
child. The anchorage system on child restraint must be used in the correct
way.
CORRECT
Make sure there is no slack in the top strap and the attachment clip is
upright in the anchorage fitting.
INCORRECT
The clip must not lie flat on the anchorage fitting.
INSTALLATION
CORRECT
INCORRECT
Make sure there is no
slack in the top strap
and the attachment
clip is upright in the
anchorage fitting.
The clip must not
lie flat on the
anchorage fitting.
Figure 1.
Anchorages in
vertical panel at
rear of vehicle
Figure 2.
Floor mounted
anchorages
13
Vehicle information
Upper anchorage fitting installation
FOR CARS FITTED WITH A CHILD RESTRAINT UPPER ANCHORAGE POINT
Locate the upper anchorage point behind the rear seating position (consult the car owner’s
handbook for the location of the upper anchorage point).
Remove the thread plug from the parcel shelf/floor/roof and install the attachment bolt as
shown in Figure 3.
CAUTION: DO NOT OVERTIGHTEN THE ATTACHMENT BOLT. MAXIMUM TORQUE 20 Nm.
Attachment bolt
Lock washer
Anchor fitting
Spacer(s)
(if required)
Vehicle metal
structure
Vehicle trim
Front of vehicle
Figure 4
FOR CARS NOT FITTED WITH A CHILD RESTRAINT UPPER ANCHORAGE POINT
For sedans only
Drill a 9mm diameter hole in the parcel shelf on the centre-line of the seating position as
shown in Figure 4. Install the anchor bolt as shown in Figure 5. It is recommended that this
installation be carried out by a child restraint fitting station or licenced motor mechanic.
For vehicles other than sedans
In Australia, consult your nearest child restraint fitting station or traffic authority for vehicle
inspection to find the best, correct position for the placement of the upper anchorage point,
and for the correct attachment bolt length and use of spacers. In New Zealand, consult the
agent for the vehicle.
WARNING: CHILD RESTRAINTS MUST NOT BE ATTACHED TO UNSOUND METAL
OR TO WOOD, OR SYNTHETIC STRUCTURES. WHEN DRILLING THE 9mm HOLE DO
NOT DRILL THROUGH FUEL LINES, FUEL TANKS, ELECTRICAL WIRING, OR RADIO
SPEAKERS. WEBBING STRAPS MUST BE PROTECTED FROM SHARP CORNERS
AND EDGES.
THE ANCHOR FITTING MUST BE USED ONLY AS DESCRIBED ABOVE. IT MUST NOT
BE HOOKED ONTO ANY OTHER OBJECT.
14
Vehicle information
Upper anchorage fitting installation (for sedans only)
Centre line of
seating position
Figure 5
Attachment bolt
Anchor fitting
Spacer(s)
(if required)
Vehicle trim
Vehicle metal
structure
Reinforcing
washer
Lock washer
Nut
Front of vehicle
Figure 6
15
Vehicle information
Correct rearward-facing vehicle position
Some seating positions in your vehicle may NOT be safe for this safety seat. Some vehicles
do not have any seating positions that can be used safely with the seat.
If you are not sure where to place the infant seat in your vehicle, consult your vehicle’s
owner’s handbook.
Vehicle Seat Location Requirements
Children are safer when properly restrained in rear vehicle seating positions. Whenever
possible, secure the infant seat in the centre position of the seat directly behind the front
seats.
CORRECT USE
Figure 7
CORRECT USE
Figure 8
390mm
640mm
Figure 9
WARNINGS
IMPROPER PLACEMENT OF THE SAFETY SEAT INCREASES THE RISK OF SERIOUS
INJURY OR DEATH.
16
Installation
Angle adjustment
Position seat ensuring that the angle is no
greater than 40˚ from horizontal plane.
Angular adjustment is achieved by adjusting
the base. Refer to page 19 for base adjustment.
40˚
Front of vehicle
Figure 10
WARNINGS
• DO NOT install convertible child restraints excessively reclined, ensure the angle is
no greater than 40°.
• DO NOT adjust harness or tether strap hardware such that it sits too close to the
occupant.
• Ensure that correct seatbelt path is used and that the restraint is installed in the
correct direction for rearward facing application. Refer to page 22
• DO NOT wrap baby in a blanket or swaddled as infant can be ejected and killed in
an accident.
• Ensure the harness fits the baby firmly.
• Ensure that any blanket or other covering may only be placed over the harness
after the harness is adjusted firmly.
• The infant’s legs are not be bound or wrapped together and the arms are not
bound or wrapped together.
17
Installation
Preparing infant seat to fit your child
You MUST make these adjustments with your child before you install the child
restraint in the vehicle. Please adjust harness according to the infants shoulder
height prior to installation.
(air)
Configuring the harness
belt for shoulder height
(air)
3
Adjuster clamp
(Lift lever)
1.Lift the harness release lever at the front of seat.
2.Pull one side of the shoulder strap to loosen
3.Press red button to release buckle assembly
for ease of child fitment. Pull harness straps
over sides of infant seat. Place child in seat.
5
Figure 11
Adjuster belt
4
Adjust headrest height
4. Rotate harness height adjustment levers inward. Move headrest to the proper height and lock into place.
5. Fasten buckle assembly (See Page 19). Pull the adjuster belt at the front of the seat until the harness belt lies firmly against the child.
Figure 12
WARNINGS
•
•
18
Always adjust the height of the shoulder straps as the child grows.
Failure to fasten and tighten the harness system correctly can result in serious
injury or death.
Installation
Preparing infant seat to fit your child (cont’d)
Click!
STEP 1
STEP 4
STEP 3
STEP 2
Figure 13
To fasten buckle assembly
Release: Press the red button to release the buckle.
1: Insert one buckle tongue as shown above (you will not hear a click).
2: Insert the second buckle tongue as illustrated above. Now listen for a ‘CLICK’.
3: Remember to always pull up on the harness straps to make sure buckle is locked tightly.
Base adjustment
* PUSH base adjuster in
red under front seat and
rock seat to adjust the
base. (3 positions)
PUSH
OW
1. L
2. M
AR
RE
Red base adjuster
under front of seat
ID
3. H
IGH
B WA
EL R
T D
PA FA
TH CIN
G
Figure 14
WARNINGS
DO NOT LEAVE CHILDREN UNATTENDED IN THE CAR
19
Installation
Preparing infant seat to fit your child (cont’d)
PULL TO LOOSEN
PULL
BUTTON
Figure 15
PULL TO TIGHTEN
PULL
BUTTON
Figure 16
Adjusting top tether strap
TO LOOSEN: Press on the adjuster button with thumb and pull strap back through to
loosen anchorage strap using strap which is attached to the seat (Figure /).
TO TIGHTEN:
Adjust anchorage strap and remove slack. Pull loose end of strap to tighten (Figure /).
NOTE:
Store the excess webbing in the pocket provide at the back of the child restraint.
WARNINGS
CAUTION: CHILDREN CAN BE INJURED OR RESTRAINTS AND TOP TETHER
STRAP DAMAGED BY UNSECURED CARGO IN A COLLISION. SECURE OR REMOVE
HAZARDOUS CARGO BEFORE USING THIS CHILD RESTRAINT.
Always secure the loose end of the top tether strap to prevent it hanging out of the
car or being accessible by the child.
When not in use, fold hanging tether strap and place in storage pocket provided.
20
Installation
Shoulder height marker (rearward-facing)
REARWARD FACING
(Newborn to 12 months)
Shoulder
strap
The shoulder straps must be in the
slots which are nearest to the child’s
shoulders, but not lower than the
child’s shoulders.
Figure 17
MUST BE REAR FACING WHEN
SHOULDERS BELOW THIS LINE
Front of vehicle
Figure 18
21
Installation
Rearward-facing installation using seatbelt
NEWBORN TO 12 MONTHS
1.Set base in position 3 (High)
2. Swing stabilising arm into position.
3.Place restraint facing rearwards on back seat of vehicle in line with an anchorage strap
anchorage point.
4.Thread the vehicle seat belt through the BLUE belt path at the front of the restraint and
fasten buckle.
5.Press the child restraint into the vehicle seat and remove belt slack.
6.Attach the anchorage strap to the anchorage point. Adjust until all the slack is removed.
Ensure Base of seat is not lifted.
STABILISING ARM
RECLINE ARM
PRESS HERE
REARWARD-FACING
BELT PATH
REARWARD-FACING
BELT PATH
Figure 19
NOTE: Ensure the harness is pulled through the
mould & trim all the way and correctly tensioned.
Front of vehicle
WARNINGS
DO NOT LEAVE CHILDREN UNATTENDED IN THE CAR
22
Installation
Correct forward-facing vehicle position
CORRECT USE
Figure 20
CORRECT USE
Figure 21
INCORRECT USE
Figure 22
23
Installation
Shoulder height marker (forward-facing)
Strap can
be next
slot above
FORWARD FACING
(12 months to 4 years)
Child
Shoulders
Strap cannot
be more than
25mm below
The shoulder straps must be in the slots which
are nearest to the child’s shoulders, but not
more than 25 mm below the child’s shoulders
Figure 23
SHOULDERS BELOW THIS LINE WHEN
HEADREST AT HIGHEST POSITION
Front
of of
vehicle
Front
vehicle
Figure 24
The child restraint is unsuitable for the occupant when the shoulders are below the lower
marker or above the upper marker. The child needs to be moved into the next form of child
restraint (booster seat) when they reach the top shoulder height marker’.
WARNINGS
DO NOT LEAVE CHILDREN UNATTENDED IN THE CAR
24
Installation
Forward-facing installation using seatbelt
TODDLER 12 MONTHS TO 4 YEARS OLD
NOTE: Before you start installation, adjust the shoulder
straps and headrest to fit your child. Refer to page 14.
1. Adjust the child restraint to the forward facing position
by placing restraint on back seat of vehicle in line with an
anchorage point.
FORWARD
FACING
BELT PATH
PULL
SEATBELT
PRESS DOWN
2. Thread the vehicle seat belt through the YELLOW forwardfacing belt path.
3. Place one hand on seat, press the child restraint into the
vehicle seat and pull on seatbelt to remove slack.
4. Attach the upper anchorage strap to the anchorage point.
Adjust until all the slack is removed.
NOTE: If the car seatbelt is not long enough to secure the
child restraint, DO NOT USE SEAT BELT EXTENDERS.
Figure 25
25
Lower connectors installation
LOOK FOR THESE SYMBOLS FOR
ATTACHMENT IN VEHICLE
ISOFIX
Figure 26
WARNINGS
IMPORTANT
Do not attach the lower attachment connectors of two separate child restraints to
the same ISOFIX low anchorages in your car.
Always attach the top tether strap to the child restraint upper anchorage in your car.
Child restraint lower attachment connectors and the ISOFIX low anchorages in your car are
designed to withstand only those loads imposed by a correctly fitted child restraint.
• Never place a child rear-facing in a seating position with an active frontal airbag. This
can result in serious injury or death.
• Do not use the lower connectors along with the vehicle lap or lap/shoulder belt.
• Check lower connector strap before each use. Use only if the strap can be tightened
properly and securely.
• Do not use both the lower connectors and vehicle belt at the same time.
• Failure to follow these warnings can result in serious injury or death.
• Failure to securely attach child restraint to base can result in serious injury or death.
26
Lower connectors installation
Rearward-facing
LOWER ATTACHMENT
CONNECTORS
Figure 27
1. Set base in position 3 (High)
2. Swing stabilising arm into position.
3. Place restraint facing rearwards on back
seat of vehicle in line with an anchorage
strap anchorage point.
4. Fasten the lower attachment connectors to
the anchor in the vehicle seat located in the
vehicle seat bight. Repeat for other side of
base.
5. Pull on the adjuster strap next to the lower
connectors and remove slack. Repeat for
other side of base.
6. Check for the green indicator on the lower connectors adjuster. If indicator is red then
take out slack on the belt. If indicator is green, then your restraint is secure.
7. Attach the anchorage strap to the anchorage point. Adjust until all the slack is removed.
Ensure Base of seat is not lifted.
Forward-facing
Figure 27
1. Adjust the child restraint to the forward facing
position. Fold the Stabilizer Arm if the restraint has been used for rear facing.
2. Adjust the base to suit your child as fitment in
some vehicles can be impacted due to the location
of anchorage points, or the shape of rear seats,
(3 positions base adjustment). Place restraint
facing forwards on back seat of vehicle in line with
an anchorage strap anchorage point.
3.Adjust the shoulder straps and headrest to fit your
child. Refer to page 18.
4.Place restraint facing forwards on back seat of vehicle inline with an anchorage strap anchorage point.
5.Fasten the lower attachment connectors to the anchor in the vehicle seat located in the
vehicle seat bight. Repeat for other side of base.
6.Pull on the adjuster strap next to the lower connectors and remove slack. Repeat for
other side of base.
7.Check for the green indicator on the lower connectors adjuster. If indicator is red then
take out slack on the belt. If indicator is green, then your restraint is secure.
8.Attach the anchorage strap to the anchorage point. Adjust until all the slack is removed.
Ensure Base of seat is not lifted.
27
Installation
Installing locking clip (optional)
A
B
C
D
E
F
Using the seat belt locking clip to convert a lap-sash belt to a lap only belt.
NOTE:
Locking clip can be fitted on either side depending on the vehicle seatbelt and child
restraint configuration.
1. Using a locking clip (Figure A) to convert a lap-sash belt to a lap only belt.
2. Hold the lap and sash straps (Figure B) together. Thread webbing (still pinched) into the locking clip, one side at a time (Figure C & D)
3. Repeat step 2 for the other slot in the locking clip. (Figure E & F )
4. Feed the straps through the locking clip to remove any slack.
5. If the locking clip is on correctly, it will hold the lap belt securely, if the lap belt slips repeat the previous steps.
6. Locking clips are available from most speciality outlets or from Dorel Australia Customer Service (1300 809 526)
NOTE:
The locking clip must be removed when the child restraint is not installed to allow
other users to use the seatbelt as a lap-sash seatbelt.
The locking clip shall not create unacceptable slack in the seatbelt.
28
Care and maintenance
Cleaning instructions for buckle
Follow the manufacturer’s instructions at all times. Before removal, ensure you have
carefully noted the way which the various parts are attached to the seat so as to facilitate
reassembly.
Your child car seat is equipped with a buckle designed to give your child maximum
protection during proper use. When working properly, your buckle should always fasten
with an audible ‘CLICK’.
If sticky liquids (such as baby food, fruit juice, etc.) get into the buckle it may become
sluggish and you will not hear a ‘CLICK’.
The buckle should be cleaned by following the steps below.
push metal rod
into slot
Figure 29
Figure 30
Figure 31
1. Fold seat cover and foam back from buckle, using a flat edged screwdriver
gently lift one end of rod out releasing crotch buckle. Repeat for other side.
2. As illustrated in Figure 29 place the buckle unit under running water (40 degrees Celsius)
Let the water flow through the mouth of the buckle for one minute
3. Simultaneously latch and unlatch the tongues into the buckle several times until a strong
audible click is heard. Refer to Figure 30.
4. If you still cannot hear a strong audible click after latching the buckle several
times. repeat steps 2 and 3.
5. DO NOT oil any part of the buckle.
6. Allow buckle to dry.
7. Refit crotch buckle ensuring RED button is facing out.
8. Thread the webbings as shown with arrows in Figure 31.
9. Put the 2 metal rods back into the webbing loops and push into the slots.
10.Pull the buckle to make sure that it is fitted properly. 11.If the buckle does not return to original working order, contact Dorel Australia Customer
Service on 1300 809 526
29
Care and maintenance
Care instructions
•
•
•
•
•
•
•
Seat trim may be removed for cleaning. Don’t forget to remove the instruction manual.
Tumble dry 10-15 minutes on low heat.
Do not dry clean.
All other surfaces should be cleaned with a mild soap and water.
Never clean with bleach or spirit-type cleaners.
Do not use the restraint without the cover.
Check the webbing for fraying.
Remove trim for cleaning
TO REMOVE HEADREST TRIM
1. Move headrest to highest position.
2. Remove the 2 elastic straps on the back of the headrest.
3. Peel the trim off the headrest.
4. Remove Air Protect cells (x2).
Important: Do not wash trim with Air Protect cells still inside.
TO REPLACE HEADREST TRIM
1. Move headrest to highest position.
2. Replace Air Protect.
3. Put the headrest trim on.
4. Clip the 2 elastic straps to the plastic tabs at the rear of
headrest.
TO REMOVE SEAT TRIMS
1. Undo shoulder straps from the splitter plate.
2. Pull straps through the cover.
3. Remove the 4 plastic clamps on the front and rear of seat.
4. Remove the seat trim from the seat.
TO REPLACE SEAT TRIM
1. Put the seat trim on the seat.
2. Feed the shoulder straps through the cover.
3. Attach the plastic clamps.
3. Attach the shoulder straps to the splitter plate.
Elastic
Figure 32
Figure 33
SPLITTER PLATE
Figure 34
NOTE: ENSURE HARNESS IS NOT TWISTED
Take extra care to be sure the harness is reinstalled correctly and the shoulder straps
are of equal height through both the trim and the harness slots of the seat.
30
Care and maintenance
Remove insert for cleaning
To remove insert
To remove the insert, separate the snaps in 2 places.
Refer to illustrations. Undo the buckle and pull the insert
out.
To replace insert
Feed the crotch part of the buckle through the opening
slot in the insert. Place the shoulder straps as illustrated
and attach the snaps in 2 places. Fasten buckle assembly.
SNAPS
Figure 35
Figure 36
Figure 37
WARNINGS
VERY IMPORTANT:
Only replace the cover with a manufacturer’s supplied
replacement cover with identical shoulder height markers
or a replacement cover meeting AS/NZS 8005.
31
Accessories (if supplied)
Belt mates
NOTE: Before fitting covers, remove harness from splitter plate
(see page 19).
• Fit belt mates to harness strap by threading the strap through
the belt mate.
Figure 38
• Repeat for both sides.
• Thread harness straps back through harness slots.
NOTE: Refit splitter plate before continuing.
(see page 19).
Figure 39
32
The next seat for your child
option 1: Harness forward-facing car seat
To be used only in a forward-facing position by a child
whose shoulders are above the lower shoulder height marker
(approximately 6 months of age) until the child’s shoulders reach
the upper shoulder height marker (approximately 8 years of age).
option 2: Booster seat
To be used with a lap-sash seatbelt by a child whose shoulders
are above the lower shoulder height marker (approximately 4
years of age) until the child’s shoulders reach the upper shoulder
height marker (approximately 6 to 8 years of age). Can also
be used with child harness that is approved for use with this
booster seat.
option 3: Larger booster seat
To be used with a lap-sash seatbelt by a child whose shoulders
are above the lower shoulder height marker (approximately 4
years of age) until the child’s shoulders reach the upper shoulder
height marker (approximately 8 to 10 years of age). Can also
be used with child harness that is approved for use with this
booster seat.*
for more information, visit
www.maxi-cosi.com.au
33
Notes
34
Guarantee
Dorel Australia Pty Ltd warrants your new product to be free from defects in
materials and workmanship for 6 years on the seat & 3 years on the trim, from
the date of purchase, provided that the product is used in accordance with
accompanying recommendations or instructions where provided. The benefit of
this warranty is in addition to your rights under the Australian Consumer Law and
to other rights and remedies of the consumer under a law in relation to the goods
or services to which the warranty relates.
Dorel Australia Pty Ltd will provide you with your choice of a refund, repair, or
exchange (where possible) for this product if it becomes defective within the
warranty period. Dorel Australia Pty Ltd will bear the reasonable expense of
claiming the warranty. This warranty will no longer apply where the defect is a
result of alteration, accident, misuse, abuse, or neglect.
Please retain your receipt as proof of purchase and contact our Customer Service
team on Ph: 1300 809 526 or alternatively, via our website at www.dorel.com.au
for any difficulties with your product. Warranty claims and claims for expense
incurred in returning this product can be addressed to our Consumer Service team
at 655-685 Somerville Road, Sunshine West, VIC, 3020. Hours: 8:30 am to 5:00
pm, Monday to Friday.
For New Zealand please contact Customer Service Centre, 14 Sir William
Avenue, East Tamaki, Auckland, 2013. Auckland: (09) 2741040 NZ wide: 0800
628 000 (Toll Free). Hours: 8:00 am - 5:00 pm, Monday to Friday.
Our goods come with guarantees that cannot be excluded under the Australian
Consumer Law. You are entitled to a replacement or refund for a major failure and
compensation for any other reasonably foreseeable loss or damage. You are also
entitled to have the goods repaired or replaced if the goods fail to be of acceptable
quality and the failure does not amount to a major failure.
IMPORTANT: KEEP THIS INSTRUCTION MANUAL
IN THE POCKET PROVIDED ON THE HEADREST.
Australian
Standard
AS/NZS 1754 Lic 1491
SAI Global
35
Europe’s most popular and trusted car seat brand.
Australia
© 2014 Dorel Australia, Pty Ltd. All Rights Reserved.
CCA 2013 L
#015459
08/14