1
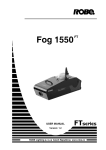
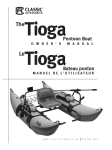
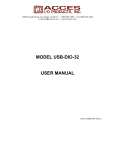
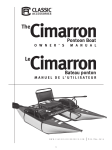
The
Colorado
Pontoon Boat
O W N E R ' S
M A N U A L
Le
Colorado
Bateau ponton
MANUEL DE L'UTILISATEUR
1
CO LO R A D O P O N T O O N B O AT O W N E R ’ S M A N U A L
TABLE OF CONTENTS
INTRODUCTION3
PRODUCT SPECIFICATIONS & CAPACITY
4
SAFETY INFORMATION AND SYMBOLS
5
RESPONSIBILITIES OF THE OPERATOR(S)
6
CERTIFICATE OF ORIGIN AND HIN NUMBERS
7
INFLATION8
ELECTRIC MOTOR AND BATTERY USE
9
ASSEMBLY10
PARTS LIST
11
ASSEMBLY AND USE
12-16
REPAIR AND TROUBLESHOOTING
17-18
CARE AND STORAGE
19
WARRANTY20
2
CO LO R A D O P O N T O O N B O AT O W N E R ’ S M A N U A L
INTRODUCTION
Congratulations on your purchase of a Classic Accessories pontoon boat.
This manual has been compiled to help you assemble your boat correctly and
operate it safely. It contains specific details of the boat, including its parts and
equipment, and information on its safe operation, proper care, maintenance and
repair. Please read it carefully, and familiarize yourself with your boat before
using it.
If this is your first pontoon boat, or if you are changing to this type of boat for
the first time, for your own comfort and safety, please ensure that you obtain
handling and operating experience before serious use. Doing so will assure
many years of trouble free use and enjoyment.
PLEASE KEEP THESE INSTRUCTIONS IN A SECURE PLACE, AND TRANSFER THEM
TO THE NEW OWNER IF YOU SELL THE CRAFT.
MODIFICATIONS
Because of possible interference with the factory design and integrity of the
boat, owner modifications to the boat, any of its parts, equipment or systems
are not recommended.
Classic does not recommend that owners modify the boat or any of its parts,
equipment or systems. Such modifications could compromise the design and
integrity of the boat, prevent safe operation, and void warranty coverage.
3
CO LO R A D O P O N T O O N B O AT O W N E R ’ S M A N U A L
P R O D U C T S P EC I F I C AT I O N S & C A PA C I TY
BOAT SPECIFICATIONS
Product Name: COLORADO Pontoon Boat
Dimensions: 108 inch L x 56 inch W x 26 inch H
274 cm L x 142 cm W x 66 cm H (top of the seat)
Dry Weight: 71.5 lbs (32 kg)
Maximum Persons Capacity: 1 person or up to 275 lbs (125 kg)
Maximum Persons & Gear Capacity: 400 lbs (181 kg)
Recommended Inflation Pressure: 2.5 psi (0.17 BAR)
Maximum Motor Thrust: 30 lbs (14 kg)
Maximum Motor Shaft Length: 36 inch (91 cm)
BOAT CAPACITY
The person/load capacity is partly
dependent on proper seating and load
distribution. Make sure that your load
is distributed evenly and the seating
position is such that, when afloat, the
boat rides level in the water.
U.S. COAST GUARD
MAXIMUM CAPACITIES
1PERSON OR 275 LBS
400 LBS PERSONS, GEAR
PRESSURE = 2.5 psi (main chambers)
MAX 30 LB THRUST MOTOR
WARNING - DO NOT EXCEED THE
MAXIMUM CAPACITY OF THIS BOAT
UNDER ANY CIRCUMSTANCES.
MANUFACTURER: CLASSIC ACCESSORIES, INC.
KENT, WA, USA 98032
181 kg
0.17 bar (main chambers)
4
5.25 inch
CO LO R A D O P O N T O O N B O AT O W N E R ’ S M A N U A L
SA F E TY I N F O R M AT I O N A N D S Y M B O L S
The symbol to the left is the Safety Alert symbol. It is used to alert you
to potential personal injury hazards. Obey all safety messages that follow this
symbol to avoid possible injury or death.
DANGER
Indicates a potentially hazardous situation which, if not avoided, will result in
death or serious injury.
WARNING
Indicates a potentially hazardous situation which, if not avoided, could result in
death or serious injury.
CAUTION
Indicates a potentially hazardous situation which, if not avoided, may result in
minor or moderate injury.
CAUTION
Indicates a potentially hazardous situation which, if not avoided, may result in
property damage.
This manual lists certain recommended practices and provides some basic
precautions. However, this list of precautions is not all-inclusive. Users
must follow all applicable laws, rules, and regulations and should exercise
appropriate caution in the safe operation of this pontoon boat.
REMEMBER - always use common sense when using your pontoon boat.
5
CO LO R A D O P O N T O O N B O AT O W N E R ’ S M A N U A L
R E S P O N S I B I L I T I E S O F T H E O P E R AT O R
IMPORTANT SAFETY AND CARE INFORMATION
• Read this owner’s manual carefully before using
your pontoon boat.
• This product is not to be used by children under
the age of 16 years of age or by any child
without adult supervision. Check the laws in
your state.
• This product is not a toy.
• This is not a life saving device.
• You MUST wear an approved personal flotation
device (PFD).
• All safety equipment & PFDs must properly fit
the user, be in good condition, and suitable
for your body weight.
• Know and follow all local water safety rules and
boating regulations.
• Do not exceed 400 lbs (181 kg) total cargo
weight. (The weight of you and all of your gear
should not exceed 400 lbs (181 kg).
• Inspect your pontoon boat for wear or damage
before and after each use.
• Class 1 river rating: not for use in rough water,
white water, rapids or open ocean.
• Always use a Coast Guard approved personal
flotation device.
• Never float alone.
• Never use this boat in bad weather.
• Keep sharp objects (knives, fish hooks, etc.)
away from the pontoons.
• Do not use under the influence of drugs or
alcohol.
• Do not tow this pontoon boat.
• Use only in water free from debris and
obstructions.
• Do not use in high wind, rapid currents, open
water or dangerous tides.
• Seek shelter from water if there is threat of
lightning.
• Do not stand on this product while in use.
• Never jump into or dive from this boat.
• Inflate with cold air only.
• Do not over inflate or use CO2 or a high pressure
6.43 inch
air compressor to inflate.
• Follow the inflation sequence listed in this
instruction manual.
• Recommended working pressure is 2.5 psi (0.17
bar). DO NOT EXCEED 2.5 PSI.
• Check for leaks before using.
• Partially deflate if leaving boat in direct sunlight
or within a vehicle in sunlight.
• Remember that air pressure changes with
temperature and elevation so always check
your air pressure before use.
• Maximum anchor weight capacity 6-8 lbs (2.73
to 3.64 kgs)
• Check all screws and wingnuts before each use.
CARE
• Clean with warm water and a mild detergent.
• To avoid mildew be sure your boat is dry before
storing it.
• Deflate pontoons slightly between uses to
extend the life of your boat.
WARNING
DO NOT stand on
your boat while
on the water
WARNING
• Not a life saving device
• Not a toy
• Not to be used by children
under age 16
• Do not overload
• Always wear an approved
personal flotation device
(life preserver)
• Check for leaks before
using
• Use only in water
away from debris
and obstructions
• Do not over inflate
• Never dive into or from
this boat
• Never leave boat in water
when not in use
• Do not use in high wind,
rapid currents, open water
or dangerous tides
• Know and follow local
water safety rules and
boating regulations
• Follow the inflation
sequence listed in the
instruction manual
• Partially deflate if leaving in
the sun
AVERTISSEMENT
6
• Ceci n’est pas un appareil
de sauvetage
• N’est pas jouet
• Ne doit pas être utilisé par
• Ne jamais plonger sur ni
depuis ce bateau
• Ne pas utiliser lors de vents
forts, de courants rapides,
CO LO R A D O P O N T O O N B O AT O W N E R ’ S M A N U A L
C E R T I F I C AT E O F O R I G I N A N D H I N N U M B E R S
CERTIFICATE OF ORIGIN
A separate Certificate of Origin form has been included with this pontoon boat. If your state requires
registration of your pontoon boat, you will need to include the HIN number on the form. Check your state's
boating regulations to see if your pontoon boat requires registration.
PRODUCT SPECIFICATIONS
LOCATING THE HIN (HULL IDENTIFICATION NUMBER)
Code: PB-200
The HIN Number
or "Hull Identification
is required
for every pontoon boat. Each pontoon boat has
ame: FRAME
FOR 9-FOOT
PONTOON Number"
BOAT, WITH
WHEEL
a unique number assigned to it, specific to that pontoon boat only. The assigned number appears on three
locations of the pontoon boat (two locations on the pontoon boat and one location on the frame).
The HIN is located on both pontoon boat skins. they are located to the rear, towards the inside of the boat.
MPORTANT!! The numbers on the frame pieces and retail package must all match!!
cturers Serial Number (reset
HIN is located on
on January 1st every year)
the bottom PVC
panel, aligned with
the warning label,
USCG MIC Code
towards
the inside
se letters do not
change)
of the boat
Month & Year of Certification or
Manufacture *
MODEL YEAR (This number changes for
each Model Year. Indicates the year
delivered to Classic.)
Left Pontoon Shown
XXQ00001L708
USCG Mandatory
12 digit HIN
* A - January
B - February
C - March
D - April
E - May
F - June
G - July
H - August
I - September
J - October
K - November
L - December
HIN are located on
the plates that are
Stamp HIN on both motor
on
the plates
rear frame.
mount
that are
welded to the rear frame.
XXQ00001L708
Example of HIN number
7
Page 53 of 56
CO LO R A D O P O N T O O N B O AT O W N E R ’ S M A N U A L
I N F L AT I O N
PROPER INFLATION
During final inflation, inflate until most of the wrinkles in the fabric are gone and
it feels firm to the touch, but DO NOT exceed 2.5 psi (0.17 bar) in the main air
chambers.
CAUTION - DO NOT OVER INFLATE YOUR PONTOON BOAT
Water temperature and weather affect the air pressure in the boat. In cold
weather your pontoon boat will lose some pressure because the air will
contract. If this occurs, you may want to add more air.
In hot weather, the air will expand. You must let out some air to prevent the
pontoons from failing from over pressure. Avoid exposing your pontoon boat to
extreme temperatures (hot or cold).
CAUTION
On warm sunny days, keep the pontoon boat either in water or in shade (if kept
inflated on land). This will decrease the risk of overexpansion of the pontoon
chambers posed by rising temperatures, which can result in seam tears,
delamination and pinholes.
Avoid asphalt, sand, pebbles or concrete in direct sunlight as they radiate high
ground heat.
Also understand that changes in altitude will cause the air in the bladders
to expand or contract. If traveling to higher elevation with the pontoon boat
inflated, frequently check the pressure in the pontoons to avoid over pressure.
If traveling to lower elevation you may have to add more air to maintain proper
pressure in the pontoons.
WARNING - ALWAYS CHECK THE AIR PRESSURE IN THE PONTOONS BEFORE
AND DURING EACH USE.
8
CO LO R A D O P O N T O O N B O AT O W N E R ’ S M A N U A L
E L EC T R I C M OT O R A N D B AT T E R Y U S E
USING A MOTOR WITH YOUR PONTOON BOAT
Clamp your motor to the motor mount provided on the rear of your boat and
carefully follow the setup and safety instructions provided with your motor.
Using a motor and battery will affect the weight distribution on your boat.
Before using your boat for the first time with a motor check and adjust your seat
position and cargo so your boat rides level in the water.
WARNING - THIS PONTOON BOAT IS NOT RATED FOR USE WITH GASOLINE
OR DIESEL OUTBOARD MOTORS.
WARNING - MAKE SURE TO FOLLOW ALL SAFETY INSTRUCTIONS AND
PROCEDURES THAT CAME WITH YOUR ELECTRIC MOTOR.
IMPORTANT - A MAXIMUM ELECTRIC MOTOR SHAFT LENGTH OF 36 INCH (91 cm)
WITH A MAXIMUM THRUST OF 30 LBS (14 kg) IS RECOMMENDED.
USING A BATTERY WITH YOUR PONTOON BOAT
Be sure to secure your battery to the rear wire platform so that it will not move
or tip during operation. For the best weight distribution we recommend placing
the battery as close to the seat back (center of the boat) as possible.
WARNING - BATTERIES CAN LEAK POISONOUS GASES OR LIQUIDS OR
EXPLODE. USE EXTREME CARE AND FOLLOW ALL SAFETY INSTRUCTIONS AND
PROCEDURES THAT CAME WITH YOUR BATTERY.
WARNING - MAKE SURE THAT YOUR ENGINE AND BATTERY ARE SECURELY
FASTENED TO YOUR PONTOON BOAT BEFORE AND DURING EACH USE.
WARNING - ONLY USE AN APPROVED MARINE BATTERY. USE PROPER
SHIELDING TO PREVENT SHORT CIRCUITS.
9
CO LO R A D O P O N T O O N B O AT O W N E R ’ S M A N U A L
A S S E M B LY A N D U S E
It is important to follow these instructions to successfully and safely assemble
your Classic Accessories Pontoon Boat.
Please pay particular attention to the bold faced instructions and any
information which has this
symbol next to it.
10
CO LO R A D O P O N T O O N B O AT PA RT S L I S T
Before you begin please unpack the carton and
check that you have all your parts.
IMPORTANT: All small parts are located inside
the center pocket of one of the pontoon storage
bags marked by a tag for easy identification.
Tools Needed:
Rubber Mallet, 2 Adjustable Wrenches, Phillips
Screw Driver #2
Metal Frame Parts
2 Pontoon Frames
(left and right)
1 Seat Frame
Small Parts (Small parts bag located in pontoon pocket)
2 Pontoon Bladder Patches
(Two self-adhesive patches)
1Seat
(folding seat with screws, washers, locknuts and wingnuts installed)
1 Inflation Adapter
2 Foot Pegs, right and left
1 Inflation Valve
Wrench
1 Rear Platform Frame
1 Rod Holder
with Clevis Pin
1 Rear Cargo Platform
2 Oar Locks
2 Oar Lock Cotter Pins
Soft Parts
2Pontoons
8 Frame Clevis Pins
1 Stripping Apron
Oar Parts
2Oars
(4 pieces or 2 per oar)
1 Anchor Bag with 25 ft. Cord
11
CO LO R A D O P O N T O O N B O AT O W N E R ’ S M A N U A L
A S S E M B LY A N D U S E
1. Confirm that all the parts are present.
(See the parts list on page 10).
2. Identify the right and left pontoons.
You can identify the right and left pontoons by the “R” (right) and “L” (left) labels sewn on the inside
of the rear pocket on top of each.
3. Partially inflate the air bladders.
The valve is located on the top and toward the front half of the pontoon.
Press and
turn on
center
button
The valve has a center button that opens and closes the valve by simply
pushing down, and turning a quarter turn. THE VALVE IS OPEN WHEN THE
CENTER BUTTON IS DOWN, AND CLOSED WHEN IT IS UP. BEFORE INFLATING,
MAKE SURE THE VALVE IS IN THE CLOSED POSITION.
Unscrew the valve cap, make sure the valve is closed and insert the inflation
adapter into the valve and twist to secure. Inflate using a foot pump or air
compressor with a cone-type nozzle fitting.
Inflation Valve
Inflate the pontoon to about 3/4 full. Do not inflate beyond 3/4 full because it will make the
next step very difficult—attaching the pontoons to the frame.
Repeat this step with the other pontoon.
Insert
into
valve
and
twist to
inflate
Inflation
adapter
Right hand
pontoon and
frame
4. Attach the pontoons to the frames.
Each pontoon attaches to a metal pontoon frame with four
webbing attachment straps.
Locate the left and right pontoon frames.
On the front of each pontoon frame (where the front of the
boat will be) there is a “L” (left) or “R” (right) label indicating
left or right.
Place a right pontoon frame on top of the right pontoon as
shown. There is a “L” (left) or “R” (right) label inside the
pocket of each pontoon). The longest straight tube of each
frame should be on the same side of the pontoon as the
pontoon zipper.
FRONT
12
CO LO R A D O P O N T O O N B O AT O W N E R ’ S M A N U A L
Now attach the two inside and two outside webbing straps
on the pontoon to the pontoon frame. Thread the straps as follows:
5.
1. Through the metal rectangle on the frame…
2. Back to the buckle…
3. Through the buckle threading path…
2.
4. Match the rip-and-grip to each other.
5. Fold the remaining webbing. Back it through the metal rectangle
and trap it between the pontoon and webbing. Repeat for the remaining three straps.
Repeat the procedure with the left pontoon.
4.
1.
5. Inflate the pontoon completely.
Finish inflating the pontoons using both valves in each
pontoon as outlined in Step 3.
3.
Inflate to approximately 2.5 psi (0.17 BAR).
Inflate until firm but not hard. DO NOT over inflate.
6. Determine the seat placement.
The seat placement determines the center of gravity of the boat. Where you attach the seat to the frame depends on your
size and whether you will be using a motor and battery or carry cargo on the boat.
Use the following information about seat placement as guide to help you setup your boat for optimum balance in the
water. After setup, load your boat with the gear you would use fishing, and try your boat in shallow water to determine if
further seat position adjustment is necessary for optimum weight distribution.
• If you are up to 5 ft 6 inch (168 cm) in height, place the forward seat screws (underside of seat) into the front
1/3 of the seat frame bars.
• If you are up to 6 ft (183 cm) in height, place the forward seat
screws (underside of seat) into the middle section of the seat
frame bars.
Seat Frame
• If you are over 6 ft (+183 cm) in height, place the forward seat
screws (underside of seat) into the rear 1/3 of the seat frame bars.
• If you use a motor and battery or load the cargo basket with any
heavy items, you will need to adjust the seat forward to offset the
load and keep your boat balanced. The amount you will need to
move the seat forward depends on the weight of the cargo and
will necessitate that you try out the new position in shallow water
before setting out.
• Try making adjustments for cargo weight by moving seat forward
in 1 inch (3 cm) increments.
7. Attach the seat to the seat frame.
Locate the four 2 inch (5 cm) screws coming out of
the bottom of the seat. Unscrew the wing nuts and
remove the washers. Place the seat with screws facing
downwards into the two bars on the seat frame and
position the seat in the place that is best for your height
and weight (see above). Once the seat placement has
been determined, attach the washers and wing nuts
onto the screws and tighten to hold the seat into place.
13
CO LO R A D O P O N T O O N B O AT O W N E R ’ S M A N U A L
8. Attach the seat frame
to the pontoon frames.
Insert the seat platform tubes onto the pontoon
frame posts with the seat facing the front. The front
of the pontoon frames are the ends labeled “L”
(left) and “R” (right). (You may need to LIGHTLY tap
the frames with a rubber mallet to fit).
Align the holes and secure with four clevis pins.
You MUST lock the security retainers on all four
clevis pins to insure that the frame stays together.
9. Thread the anchor
bag cord.
Start by feeding the cord into the front
anchor cord pulley located on the side
of either pontoon frame. Continue by
threading the cord through the cord
guides and under all frame tubes.
Next, insert the cord through
the rear cord tube guide [1] on the rear
platform frame. Finish by threading the
cord through the pulley mounted on the
rear platform frame and attaching the
cord to the anchor bag.
Note: Seat and p0ntoons
removed for clarity
1
Attach this
end of anchor
line to the
anchor bag
Note: The anchor bracket can be placed
on either side of the rear platform frame.
Insert the included ball-end wrench into
the bottom of the anchor stud while
holding the nut on top of the stud with
an adjustable wrench
to loosen.
Front anchor
cord pulley
10. Attach the rear platform frame.
In order to attach the rear platform frame you
must first partially attach the wire cargo deck.
Start by sliding the bent wire tabs into the slots
welded on to the rear of each pontoon frame.
Next, push the rear platform frame tubes into the
open tubes on the rear of each pontoon frame.
Make sure to insert the wire guides on the rear of
the wire cargo deck into the corresponding holes
on the rear platform frame as you push the tubes
together. Also make sure not to pinch the threaded anchor cord.
Attach the rear corners with two clevis pins. These secure the wire cargo deck and the
rear platform frame to the pontoon frames. Be sure to insert each pin through the rear
platform frame and through the pontoon frames. Lock both clevis pins.
11. Insert the oar locks.
Insert an oar lock into the top of both oar lock brackets on the pontoon frames.
There are three oar lock positions; we suggest starting with the forward most
position. If you have the seat set back you may prefer the middle or back
position. Secure each oar lock with an oar lock cotter pin.
14
Motor mount can
be mounted to
either side
CO LO R A D O P O N T O O N B O AT O W N E R ’ S M A N U A L
12. Insert the foot pegs.
Insert the foot pegs into the pontoon frame as shown. Starting with
a position in the middle of the adjustment range, align the holes and
secure with two clevis pins.
13. Attach the stripping apron.
Pull apart the back of the apron behind the circular
seat hole and, working from the front, fit the apron
seat hole around the bottom of the seat. Reattach the
hook and loop tabs at the back of the apron.
14. Set up the oars and oar stops.
oar stop
First, assemble the two piece oars. Align the holes so that the
button pops through the oar handle.
To set an oar in an oar lock drop the thinnest section of the oar into
the oar lock. Slide the oar until the oar stop rests against the oar
lock. The oar stops are adjustable if desired.
*Helpful Hint : Oars do not need to be taken apart in order to place
in the oar locks.
15. Attach the anchor system.
The anchor system consists of a mesh weight bag and a length of
cord threaded through the frame as in step 9.
The bag is filled with rocks or metal weights (not included).
Usually 6 to 8 lbs (2.7 to 3.6 kg) will keep you anchored in a light
breeze but the weight needed will vary depending on your weight,
your cargo weight, currents and wind.
Thread the cord that is attached to the anchor bag through the
pulley mounted to the rear platform frame. Attach the free end to
the rear platform frame.
15
CO LO R A D O P O N T O O N B O AT O W N E R ’ S M A N U A L
16. Attach the rod holder.
The rod holder may be placed in three
different positions on either the left or right
oar lock frame. You can hold your rod to the
back (1), out to the side (2) or to the front (3).
The rod holder attaches with the clevis frame
pins as in step 8.
To use the rod holder first unwrap the
rip-and-grip strap on the end. Put your rod in
the holder butt end first then turn it to drop
the reel handle into the cutout on the side
of the rod holder. Keeping one hand on your
rod use your other hand to wrap the strap
around the front of the reel to secure your
rod in place in the holder.
17. The bladder repair kit.
Included with your boat are self-adhesive tube patches to repair any tears or holes in the pontoon bladders.
We recommend storing these in one of the pockets to keep them available for repairs.
18. Do the final fitting and adjustments.
Sit in the boat on dry land and adjust the foot pegs and oar lock placement to your leg length and preference.
Float your pontoon boat in shallow water. Push off, get seated comfortably, place your feet on the foot pegs and check to
see if you are level in the water. (This is easier with a another person on shore).
WARNING - The goal is to find your balance point. When you are floating in the boat it should be level in the water.
WARNING - Using a motor and battery or placing heavy cargo in the wire cargo deck may necessitate moving the
seat forward.
WARNING - If you need to adjust the seat or foot pegs bring the boat back to shore and make the
needed adjustments.
WARNING - DO NOT STAND UP IN YOUR BOAT WHILE ON THE WATER.
YOU COULD LOOSE YOUR BALANCE AND FALL OVERBOARD.
WARNING - THIS BOAT IS NOT RECOMMENDED FOR USE IN SALTWATER.
Practice going forward and backward a bit to get comfortable. Then catch some fish and enjoy your boat!
16
CO LO R A D O P O N T O O N B O AT O W N E R ’ S M A N U A L
REPAIR & TROUBLESHOOTING
Repairing Tears and Holes in Pontoon Bladders
If your pontoon bladder becomes torn or punctured, use the enclosed patches to fix it.
It may be necessary to take the pontoon bladder out of the pontoon skin. Look in the
Troubleshooting section on the next page for this
procedure. To fix a hole or tear, follow the steps
listed below.
1. For best results, it is important to apply patch
to a clean, dry surface and that the surface
temperature is 50° F (10° C) or warmer.
2.Use an alcohol prep pad to clean the surface to
be repaired. If you do not have an alcohol prep
pad, use a 50/50 mixture of isopropyl alcohol
and water. After cleaning, allow the surface to
dry completely.
Extend patch
one inch (2.5 cm)
beyond tear
3.Cut a patch to the correct size with scissors.
Allow for the patch size to extend 1 inch (2.5 cm) beyond all edges of the tear. Cut
the patch with rounded corners. This will make it difficult for the corners to peel up
after it is attached.
4.Peel back 1/8 inch - 1/4 inch (0.3 cm - 0.6 cm) of paper backing and position and
anchor the exposed patch edge, allowing the patch to extend 1 inch (2.5cm) beyond
all edges of the tear.
5.Slowly peel the paper backing while carefully applying the patch over the tear. Take
care to avoid air bubbles.
6.Rub the patch firmly for proper adhesion and allow to cure for 4 hours before use.
17
CO LO R A D O P O N T O O N B O AT O W N E R ’ S M A N U A L
REPAIR & TROUBLESHOOTING
If your boat appears to be losing air, it might not be because of a leak. Changes in air temperature,
elevation and use on cold water (which can cool the air inside the pontoon bladders) can all have an
effect on the air inside the bladders. If none of these factors have changed, you may need to look for
a leak. Follow the steps listed below.
1. Start by giving the pontoon skins a visual inspection.
Is the pontoon skin ripped or torn? Are there any major scuff marks?
If so, it might be an indication of a bladder tear or leak.
2. Check if you can hear air escaping the bladder in any suspected areas. You can apply soapy water
to any suspected areas as well. A leak will produce bubbles. If you find a hole, fix it using the
methods listed earlier in these instructions.
If you don't find a leak using these methods, check the inflation valves:
Check valve edge
for leaks
3. Give them a visual inspection, making sure the valve is closing properly
and the valve cap closes securely.
4. Check if you can hear air escaping. You may also use soapy water around
the valve. If you find that a valve is leaking air around its edge, the valve
may be loose.
Checking For A Leaking Valve
Inflation Valve Cage
(bonded to pontoon bladder)
twist the valve. Be careful not to tear or rip the
bladder skin.
If the valve is difficult to turn, remove the valve completely
and add a
small amount
Turn counter-clockwise to loosen
of silicon
Inflation
grease to
Valve Wrench
the valve
O-ring and
reassemble.
Inflation Valve
If the valve is
not leaking
around its
edge, you
may have a
defective valve.
Valve O-ring
The inflation valve consists of a two-part assembly. There
is the inflation valve itself and the inflation valve cage. The
inflation valve cage protects
the inflation valve from
damage and is bonded into
the pontoon bladder.
Inflation
To tighten a loose valve
insert the Inflation Valve
Wrench into the valve and
twist clockwise. It may be
necessary to grasp the
inflation valve cage (which is
inside the pontoon bladder)
to get enough purchase to
Turn
clockwise
to tighten
Please visit our website at the web address listed on the
last page of these instructions to order a new valve.
If you must remove the pontoon bladder from the pontoon
skin to make a repair, you must completely unscrew the
inflation valve from the inflation valve cage. Make sure to
align the valves in the bladder with the valve openings in
the skin. Since the pontoon skin is captive in between the
inflation valve cage and the inflation valve, care must be
taken not to tear, rip or stress either the bladder or the
skin by over-tightening the valve.
Valve
Wrench
18
CO LO R A D O P O N T O O N B O AT O W N E R ’ S M A N U A L
CARE & STORAGE
TRANSPORTING YOUR PONTOON BOAT
The pontoon boat can be transported partially or fully assembled and or inflated.
Due to size constraints, many customers will keep their frame fully intact and simply
inflate and attach their pontoons once they reach their destination. Various methods
such as a pickup truck bed, trailer, or roof rack can be used to transport your boat.
If you are carrying a partially or fully assembled and or inflated boat, please consult
with your vehicle, trailer, or roof rack Manufacturer.
CARE FOR YOUR BOAT
The pontoon boat can be cleaned with soap and water then rinsed.
Use a soft rag for hard to clean areas.
SEASONAL STORAGE OF YOUR BOAT
Remove pontoons from the frame, empty pockets of any sharp objects that may
puncture the skin. Deflate completely and fold for storage. Store pontoons away from
sharp objects, heat or abrasive wear. Dismantle frame and boat parts and store in box.
19
M A N U E L D ’ U T I L I SAT I O N D U B AT E A U P O N T O N CO LO R A D O
TA B L E D E S M AT I È R E S
INTRODUCTION22
CARACTÉRISTIQUES ET CAPACITÉ DU BATEAU
23
CONSIGNES DE SÉCURITÉ ET SYMBOLES
24
RESPONSABILITÉS DE L'UTILISATEUR
25
CERTIFICATE OF ORIGIN AND HIN NUMBERS
26
GONFLAGE
27
UTILISATION D'UN MOTEUR ÉLECTRIQUE ET DE LA BATTERIE
28
LISTE DES PIÈCES
29
ASSEMBLAGE ET UTILISATION
30-36
RÉPARATION ET GUIDE DE DÉPANNAGE
37-38
ENTRETIEN ET REMISAGE
39
20
M A N U E L D ’ U T I L I SAT I O N D U B AT E A U P O N T O N CO LO R A D O
INTRODUCTION
Félicitations, vous venez de faire l’acquisition d’un bateau ponton de Classic
Accessories.
Ce manuel a été préparé afin de vous aider à assembler correctement le bateau et
à l’utiliser en toute sécurité. Il contient des informations importantes concernant
le bateau, ses pièces, son utilisation, son entretien et sa réparation. Veuillez lire
attentivement ce manuel et vous familiariser avec le bateau avant toute utilisation.
Si ce bateau est votre premier bateau ponton ou si vous comptez utiliser ce type de
bateau pour la première fois et afin d’assurer votre confort et votre sécurité, veuillez
vous exercer auparavant avec un autre bateau ponton et acquérir une certaine
expérience avant d’utiliser ce bateau. En effet, vous pourrez ainsi profiter de votre
bateau pendant des années sans avoir de problèmes.
VEUILLEZ CONSERVER CES INSTRUCTIONS EN LIEU SÛR ET LES REMETTRE
AU NOUVEAU PROPRIÉTAIRE SI VOUS VENDEZ CETTE EMBARCATION.
MODIFICATIONS
Il vous est déconseillé de modifier les pièces, l’équipement et autres dispositifs car
ceci risque de causer des problèmes avec la conception du bateau et son intégrité.
Classic déconseille à tout propriétaire de modifier le bateau ou ses pièces, son
équipement ou ses dispositifs. Toute modification risque de nuire à la conception, à
l'intégrité et à l’utilisation du bateau et de rendre nulle et non
avenue la garantie.
Vous avez des questions, des problèmes ou des pièces s’avèrent manquantes ?
Avant de retourner au magasin, appelez le service à la clientèle de Classic Accessories
au 1-800-854-2315, de 8 h à 16 h, heure normale du Pacifique, du lundi au vendredi.
Courriel: [email protected]
21
M A N U E L D ’ U T I L I SAT I O N D U B AT E A U P O N T O N CO LO R A D O
CARACTÉRISTIQUES TECHNIQUES ET
C A PA C I T É D U B AT E A U
CARACTÉRISTIQUES DU BATEAU
Nom du produit: Bateau ponton COLORADO XT
Dimensions: 108 po. de long x 56 po. de large x 26 po. de haut (haut du siège)
274 cm de long x 142 cm de large x 66 cm de haut (haut du siège)
Poids à sec: 77 lb (35 kg)
Capacité maximale de personnes: 1 personne ou jusqu’à 275 lb (125 kg)
Capacité maximale de personnes et d’équipement: 400 lb (181 kg)
Pression de gonflage recommandée: 2,5 psi (0,17 BAR)
Poussée maximum du moteur: 30 lbs (14 kg)
Longueur maximum de l'arbre moteur: 36 po. ( 91 cm)
CAPACITÉ DU BATEAU
La capacité du bateau dépend
partiellement d’une assise correcte et de
la répartition du chargement (personnes
et matériel). Assurez-vous que votre
chargement est réparti de façon équilibrée
et que la position assise est telle, que,
quand à flot, le bateau est de niveau dans
l’eau.
AVERTISSEMENT – NE JAMAIS
EXCÉDER LA CAPACITÉ MAXIMALE DU
BATEAU QUELLES QUE SOIENT LES
CIRCONSTANCES.
U.S. COAST GUARD
MAXIMUM CAPACITIES
1PERSON OR 275 LBS
400 LBS PERSONS, GEAR
PRESSURE = 2.5 psi (main chambers)
MAX 30 LB THRUST MOTOR
MANUFACTURER: CLASSIC ACCESSORIES, INC.
KENT, WA, USA 98032
181 kg
0.17 bar (main chambers)
22
4.5 inch
5.25 inch
M A N U E L D ’ U T I L I SAT I O N D U B AT E A U P O N T O N CO LO R A D O
CONSIGNES DE SÉCURITÉ ET SYMBOLES
Le symbole à gauche est le symbole de l’alerte sécurité. Il est utilisé pour
vous alerter de possibles accidents corporels. Obéissez à tous les messages de
sécurité accompagnant ce symbole afin d’éviter toute blessure voire la mort.
DANGER
Indique une situation potentiellement dangereuse, qui, si elle n’est pas évitée,
entraînera certainement des blessures graves ou la mort.
AVERTISSEMENT
Indique une situation potentiellement dangereuse, qui, si elle n’est pas évitée,
risque d’entraîner des blessures graves ou la mort.
ATTENTION
Indique une situation potentiellement dangereuse, qui, si elle n’est pas évitée,
peut entraîner des blessures légères.
ATTENTION
Indique une situation potentiellement dangereuse, qui, si elle n’est pas évitée,
peut entraîner des dégâts matériels.
Ce manuel comporte une liste des pratiques recommandées et fournit des
précautions de base. Cependant, cette liste de précautions ne couvre pas
tous les risques. Les utilisateurs doivent respecter toutes les lois, règles et la
réglementation et sont tenus de faire preuve de prudence dans l’utilisation de
ce bateau ponton.
SOUVENEZ-VOUS – faites toujours preuve de bon sens lorsque vous utilisez
votre bateau ponton.
23
M A N U E L D ’ U T I L I SAT I O N D U B AT E A U P O N T O N CO LO R A D O
RESPONSABILITÉS DE L’UTILISATEUR
INFORMATION DE SÉCURITÉ IMPORTANTE
SÉCURITÉ
•Lisez ce manuel de l’utilisateur avec attention avant
d’utiliser votre bateau ponton.
•Ce bateau n’est pas destiné à être utilisé par des
enfants de moins de 16 ans ou par des enfants sans la
surveillance d’un adulte. Consultez la réglementation
de votre état ou province.
•Cet objet n'est pas destiné aux enfants, et n'est pas un
jouet de piscine. CECI N'EST PAS UN JOUET.
•Ceci n’est pas un équipement de sauvetage.
•Vous DEVEZ porter un gilet de sauvetage homologué.
•Tout équipement de sécurité et gilet de sauvetage doit
être adapté à l’utilisateur, en bonne état de marche et
approprié à votre poids.
•Veuillez connaître les règles de sécurité de navigation
locale.
•Ne dépassez pas un poids total de 350 lb (159 kg).
(Votre poids et celui de votre équipement ne doit pas
dépasser 350 lb /159 kg)
•Examinez votre bateau ponton pour usure et dommage
avant et après chaque utilisation.
•Classement rivière 1: ne pas utiliser en eaux agitées,
eaux vives, sur rapides ou en pleine mer.
•Veillez à toujours porter un gilet de sauvetage
approuvé par la Garde Côtière.
•Ne jamais flotter tout seul.
•Ne jamais utiliser ce bateau par mauvais temps.
•Gardez les objets pointus (couteaux, hameçons, etc.)
loin des pontons.
•Cet article n'est pas destiné à être utilisé par des
enfants ou en tant que jouet de piscine.
6.43 inch
•Ne pas utiliser si sous l’influence de drogues ou
d’alcool.
•Ne pas remorquer ce bateau ponton.
•Utilisez uniquement cette embarcation dans des eaux
claires et sans obstacles.
•Ne pas utiliser lors de vent fort, dans des courants
rapides, en pleine mer ou dans des marées
dangereuses.
•Trouvez refuge hors de l’eau en cas d’orage et risque de
foudre.
•Ne pas se tenir debout sur cet article lorsqu’il est
utilisé.
•Ne jamais plonger à partir de ce bateau, ni sauter
dedans.
•Gonflez seulement avec de l’air froid.
•Ne gonflez pas excessivement et n’utilisez pas de CO2
ou de compresseur à haute pression pour gonfler.
•Suivez les étapes de gonflage indiquées dans
ce manuel.
•La pression recommandée est de 2,5 psi (0,17 bar). NE
PAS EXCÉDER 2,5 PSI.
•Vérifiez qu’il n’y a pas de fuite avant utilisation.
•Rappelez-vous que la pression atmosphérique change
en fonction de la température et de l’altitude ; donc
vérifiez toujours la pression de l’air avant utilisation.
•Dégonflez légèrement le bateau si vous le laissez en
plein soleil ou dans un véhicule ensoleillé.
•Vérifiez toutes les fixations, la visserie et les écrous à
oreilles avant usage.
ENTRETIEN
• Nettoyez le bateau avec de l'eau tiède et un détergent
doux.
• Pour éviter toute apparition de moisissure, assurezvous que votre bateau est sec avant de le remiser.
• Dégonflez légèrement les pontons entre chaque
utilisation afin de prolonger la durée de vie du bateau.
WARNING
• Not a life saving device
• AVERTISSEMENT
Not a toy
• Not to be used by children
under
16
NE PAS age
se tenir
sur le
bateau
•debout
Do not
overload
lorsqu’il
est
sur
l’eau
• Always wear an approved
personal flotation device
(life preserver)
• Check for leaks before
using
• Use only in water
away from debris
and obstructions
• Do not over inflate
• Never dive into or from
this boat
• Never leave boat in water
when not in use
• Do not use in high wind,
rapid currents, open water
or dangerous tides
• Know and follow local
water safety rules and
boating regulations
• Follow the inflation
sequence listed in the
instruction manual
• Partially deflate if leaving in
the sun
AVERTISSEMENT
• Ceci n’est pas un appareil
de sauvetage
• N’est pas jouet
• Ne doit pas être utilisé par
des enfants de moins de 16
ans
• Ne pas surcharger
• Veiller à toujour porter un
gilet de sauvetage
approuvé
• Vérifier qu’il n’y a pas de
fuites avant toute utilisation
• Utiliser uniquement cette
embarcation dans des eaux
sans débris ni obstacles
• Veiller à bien connaître
l’endroit de navigation
• Ne jamais plonger sur ni
depuis ce bateau
• Ne pas utiliser lors de vents
forts, de courants rapides,
en haute mer ou lors de
marées dangereuses
• Ne jamais laisser le bateau
dans l’eau lorsqu’il n’est
pas utilisé
• Connaître et suivre les
règles locales de sécurité et
de navigation
• Ne pas trop gonfler
• Suivre l’ordre de gonflage
indiqué dans le manuel
• Dégonfler un peu si laissé
au soleil
4.64 inch
REVISED24 November 9, 2011
Classic Accessories, Inc.
PONTOON BOAT WARNING LABEL
M A N U E L D ’ U T I L I SAT I O N D U B AT E A U P O N T O N CO LO R A D O
C E R T I F I C AT D ’ O R I G I N E E T N U M É R O S
D ’ I D E N T I F I C AT I O N D E CO Q U E
CERTIFICAT D’ORIGINE
Ce bateau ponton est fourni avec un formulaire de certificat d’origine. Si votre province requiert que
vous immatriculiez votre bateau ponton, vous devrez inscrire le numéro d'identification de coque sur le
formulaire. Vérifiez la réglementation de votre province sur la conduite des bateaux pour savoir si votre
bateau ponton doit être immatriculé.
PRODUCT SPECIFICATIONS
Code: LOCALISER
PB-200
LE N.I.C. (NUMÉRO D’IDENTIFICATION DE COQUE)
Name: FRAME FOR 9-FOOT PONTOON BOAT, WITH WHEEL
:
Un N.I.C. ou « numéro d'identification de coque » est obligatoire pour tout bateau ponton. Chaque bateau
ponton sera assigné un numéro unique à cette embarcation. Le numéro assigné devra figurer à trois
endroits sur le bateau ponton (deux endroits sur bateau ponton et un endroit sur l'armature du bateau).
Il existe
N.I.C. suron
chaque
ponton.
Ils sont
situés
à l’arrière,
l’intérieur
du bateau.
IMPORTANT!!
Theunnumbers
the frame
pieces
and
retail
packagevers
must
all match!!
acturers Serial Number (reset
er on January 1st every year)
Le N.I.C. se trouve sur
la surface en PVC du
fond, au même niveau
USCG MIC Code
que
l’étiquette de
hese letters do not
change)
mise en garde située à
l’intérieur du bateau.
e:
* A - January
Month & Year of Certification or
Manufacture *
MODEL YEAR (This number changes for
each Model Year. Indicates the year
delivered to Classic.)
XXQ00001L708
Ponton gauche
USCG Mandatory
12 digit HIN
indiqué ici
B - February
C - March
D - April
E - May
F - June
G - July
H - August
I - September
J - October
K - November
L - December
Les numéros N.I.C. se
trouvent sur les plaques de
Stamp
HIN on both
motor
l’armature
arrière.
mount plates that are
welded to the rear frame.
XXQ00001L708
Exemple d’un numéro N.I.C.
25
Page 53 of 56
M A N U E L D ’ U T I L I SAT I O N D U B AT E A U P O N T O N CO LO R A D O
GONFLAGE
GONFLAGE CORRECT
Pendant le gonflage, gonflez jusqu’à ce que les plis aient disparus et que la toile soit
ferme au toucher, mais NE dépassez PAS 2,5 psi (0,17 bar) dans les chambres à air
principales.
ATTENTION – NE PAS SURGONFLER VOTRE BATEAU PONTON
La température de l’eau et les conditions météorologiques ont un effet sur la pression
de l'air du bateau. Dans un climat froid, votre bateau ponton perdra de la pression car
l’air se contractera. Si cela arrive, il vous faudra remettre de l’air.
Dans un climat chaud, l’air augmentera. Laissez sortir de l’air pour éviter que les
pontons éclatent du fait du trop de pression. Évitez d’exposer votre bateau ponton à
des températures extrêmes (chaud ou froid).
ATTENTION
Quand les jours sont chauds et ensoleillés, gardez le bateau ponton dans l’eau
ou à l’ombre (si gonflé sur la terre ferme). Cela réduira le risque de surdilatation
des chambres à air du ponton, posé par les températures grimpantes, et qui peut
provoquer la déchirure des coutures, un décollement et des trous.
Évitez l’asphalte, le sable, le gravier ou le béton en plein soleil dans la mesure où ils
irradient une forte température au sol.
Prenez également en compte le fait que les changements d’altitude feront que l’air
dans les chambres à air internes se dilatera ou diminuera. Si vous voyagez à une
altitude élevée avec le bateau ponton gonflé, vérifiez régulièrement la pression dans
les pontons pour éviter la surpression. Si vous voyagez à une altitude plus basse,
il vous faudra peut-être ajouter de l’air afin de maintenir une bonne pression des
pontons.
AVERTISSEMENT- VÉRIFIEZ TOUJOURS LA PRESSION DE L’AIR DES
PONTONS AVANT ET APRÈS CHAQUE UTILISATION
26
M A N U E L D ’ U T I L I SAT I O N D U B AT E A U P O N T O N CO LO R A D O
U T I L I SAT I O N D ' U N M OT E U R É L EC T R I Q U E
E T D E L A B AT T E R I E
UTILISATION D’UN MOTEUR AVEC VOTRE BATEAU PONTON
Fixez le moteur sur le support de fixation destiné à accueillir le moteur à l’arrière du bateau et suivez
attentivement les instructions d’installation et les consignes de sécurité fournies avec le moteur.
Le fait d’utiliser un moteur et une batterie affectera la distribution du poids à bord du bateau.
Avant d’utiliser le bateau avec un moteur pour la première fois, vérifiez et modifiez si nécessaire la
position du siège et de votre cargaison afin que le bateau flotte à niveau sur l’eau.
AVERTISSEMENT - CE BATEAU PONTON N’EST PAS HOMOLOGUÉ POUR ÊTRE
UTILISÉ AVEC UN MOTEUR HORS-BORD À ESSENCE OU DIÉSEL.
AVERTISSEMENT - SUIVEZ TOUTES LES CONSIGNES DE SÉCURITÉ ET LES
INSTRUCTIONS FOURNIES AVEC LE MOTEUR ÉLECTRIQUE.
IMPORTANT - IL EST RECOMMANDÉ D’UTILISER UN MOTEUR ÉLECTRIQUE
AVEC UN ARBRE D’UNE LONGUEUR MAXIMUM DE 36 PO. (91 CM) AVEC D’UNE
POUSSÉE DE MOTEUR MAXIMUM DE 30 LBS (14 KG).
UTILISATION D’UNE BATTERIE AVEC VOTRE BATEAU PONTON
Assurez-vous d’arrimer la batterie à la plateforme arrière grillagée afin d’éviter qu’elle ne se déplace
ou soit renversée lorsque vous êtes sur l’eau. Pour une distribution optimale du poids à bord du
bateau, nous vous recommandons de placer la batterie le plus près possible du dos du siège (centre
du bateau).
AVERTISSEMENT - LES BATTERIES PEUVENT AVOIR DES FUITES DE GAZ
OU DE LIQUIDE ET RISQUENT D’EXPLOSER. FAITES PREUVE D’EXTRÊME
PRÉCAUTION ET SUIVEZ TOUTES LES CONSIGNES DE SÉCURITÉ FOURNIES AVEC
LA BATTERIE.
AVERTISSEMENT - ASSUREZ-VOUS QUE LE MOTEUR ET LA BATTERIE SONT
SOLIDEMENT FIXÉS AU BATEAU AVANT ET PENDANT CHAQUE UTILISATION.
AVERTISSEMENT - UTILISEZ UNIQUEMENT UNE BATTERIE MARINE
HOMOLOGUÉE. UTILISEZ UN CÂBLAGE BLINDÉ ADÉQUAT POUR ÉVITER LES
COURT-CIRCUITS.
27
M A N U E L D ’ U T I L I SAT I O N D U B AT E A U P O N T O N CO LO R A D O
A SS E M B L A G E E T U T I L I SAT I O N
Il est très important de suivre ces consignes afin d’assembler avec succès et en
toute sécurité votre bateau ponton de Classic Accessories.
Faites particulièrement bien attention aux consignes en caractères gras et aux
informations ayant le symbole
à côté.
28
M A N U E L D ’ U T I L I SAT I O N D U B AT E A U P O N T O N CO LO R A D O
Avant de commencer, assurez-vous que vous avez bien toutes
les pièces.
Pièces dures
IMPORTANT: Toutes les petites pièces se trouvent dans la
poche centrale de l'un des sacs de rangement des pontons,
repéré par une étiquette pour faciliter son identification.
2 armatures latérales
de pontons (gauche et droite)
Outils recommandés: maillet en caoutchouc
1 cadre de siège
Petites pièces (Sac de petites pièces situé dans une
poche d'un sac de ponton)
2 rustines pour chambres à air des pontons
(deux rustines adhésives)
1 siège
(siège rabattable avec vis, rondelle, écrous de blocage et écrous à oreilles installés)
1 adaptateur de gonflage avec un tuber
2 appui-pieds (gauche et droite)
1 clé de valve de gonflage
1 armature de plateforme arrière
1 porte canne à pêche avec axe à épaulement
1 plate-forme arrière
2 tolets
2 goupilles fendues pout tolets
Pièces souples
2pontons
8 axes à épaulement
pour armature
1 jupe inférieure
Pièces des rames
2 rames
(4 parties ou 2 par rame)
1 ancre type sac avec cordon de 25 pi (7,6 m)
29
M A N U E L D ’ U T I L I SAT I O N D U B AT E A U P O N T O N CO LO R A D O
A SS E M B L A G E E T U T I L I SAT I O N
1. Assurez-vous qu’il ne manque aucune pièce.
(Voir liste des pièces à la page 25).
2. Identifiez le ponton droit et le ponton gauche.
On peut repérer les ponton droit et gauche par les étiquettes << R >> (droit) et << L >> (gauche) cousues
à l'interieur de la poche qui se trouve sur chaque ponton.
3. Gonflez partiellement les chambres à air.
La valve se trouve sur le dessus du ponton, devant la poche principale (A).
Pressez
et tournez
le bouton
central
La valve comporte un bouton en son centre qui permet d’ouvrir et de fermer
la valve en pressant dessus et en tournant un quart de tour. LA VALVE EST
OUVERTE LORSQUE LE BOUTON EST ABAISSÉ, ET FERMÉ LORSQU’IL EST
RELEVÉ. AVANT DE GONFLER, ASSUREZ-VOUS QUE LA VALVE EST EN POSITION
FERMÉE.
Dévissez le capuchon de la valve, assurez-vous que la valve est fermée et
insérez l’adaptateur de gonflage dans la valve puis tournez-le pour le fixer (C).
Gonflez le ponton à l'aide d'une pompe à pied, ou d'un compresseur, muni d'un
embout conique (D).
Inflation Valve
Gonflez le ponton aux 3/4. Ne gonflez pas le ponton au-delà des 3/4 de sa capacité car ceci
rendra très difficile l’étape suivante qui consistera à fixer les pontons à l’armature du bateau.
Répétez cette étape pour l’autre ponton.
Adaptateur
de gonflage
Insérez
dans la
valve et
tournez
pour
gonfler
Rectangle métallique
Armature du ponton
Boucle avec
passage de sangle
4. Fixez les pontons aux armatures.
Chaque ponton s'attache à une armature métallique de
ponton à l'aide de quatre bandes de toile.
Repérez les armatures de ponton gauche et droite.
À l'avant de chaque armature de ponton (ce qui sera l'avant
du bateau) se trouve une étiquette « L » (gauche) ou une
étiquette « R » (droite) indiquant la gauche ou la droite.
Petite sangle
Longue sangle
Placez l'armature de ponton droite au dessus du ponton
droit, comme l'indique l'illustration. Il y a un « L » (gauche)
ou un « R » (droite) à l'intérieur de la poche de chaque
ponton. Le tube droit le plus long de chaque armature doit
être du même côté du ponton que la fermeture à glissière
du ponton.
Petite sangle
Longue sangle
Fermeture à glissière
AVANT
30
M A N U E L D ’ U T I L I SAT I O N D U B AT E A U P O N T O N CO LO R A D O
À présent, attachez les deux sangles intérieures et les deux sangles extérieures du ponton à
l’armature du ponton. Enfilez les sangles de la façon suivante:
1. Passez la sangle à travers le rectangle métallique de l’armature…
2. Revenez vers la boucle...
3. Passez à travers la boucle...
4. Faites correspondre les parties autoagrippantes.
5. Pliez le reste de la sangle et faites-la passer dans le rectangle métallique puis rangez-la entre
le ponton et la toile.
Répétez l’opération avec les trois sangles restantes.
Répétez l’opération avec le ponton gauche.
5.
4.
2.
1.
5. Gonflez les pontons complètement.
Terminez de gonfler les pontons conformément aux
instructions de l’étape 3.
Gonflez-les à environ 2,5 psi (0,17 BAR). Gonflez-les
jusqu’à ce qu’ils soient fermes mais sans qu’ils soient
durs. NE PAS surgonfler les pontons.
3.
6. Déterminez l’emplacement du siège.
L’emplacement du siège déterminera le centre de gravité du bateau. L’endroit où vous fixerez le siège dépendra de votre
taille et de la quantité d’équipement que vous comptez transporter sur le bateau.
Utilisez l’information suivante en tant que guide pour vous aider à préparer le bateau et obtenir un équilibre optimum
dans l’eau. Après l’installation, chargez le bateau de l’équipement dont vous aurez besoin pour pêcher et utilisez le
bateau dans de l’eau peu profonde pour déterminer s’il s’avère nécessaire de modifier la position du siège afin de mieux
répartir le poids sur le bateau.
• Si vous mesurez jusqu’à 5 pi. 6 po. (1,68 m) de hauteur, placez les vis avant du
siège (sous le siège) dans le 1/3 avant des barres du cadre du siège.
• Si vous mesurez jusqu’à 6 pi. (1,83 m) de hauteur, placez les vis avant du siège
(sous le siège) dans la partie centrale des barres du cadre du siège.
• Si vous mesurez plus de 6 pi. (+1,83 m) de hauteur, placez les vis avant du siège
(sous le siège) dans le 1/3 arrière des barres du cadre du siège.
• Si vous remplissez le panier de rangement avec des articles lourds, vous devrez
modifier la position du siège en l’avançant afin de compenser la charge de
manière et afin que le bateau demeure équilibré. La nouvelle distance du siège à l’avant dépendra du poids de votre
équipement et vous devrez faire un premier essai dans de l’eau peu profonde avec le siège à son nouvel emplacement
avant de vous lancer.
• Avancez le siège en fonction du poids de votre cargaison en l’avançant de 1 po. (3 cm) à chaque fois puis vérifiez à
nouveau l’emplacement du siège pour vous assurer la distance est suffisante.
7. Fixez le siège au cadre du siège.
Trouvez les quatre vis de 2 po. (5 cm) qui se trouvent sous le
siège. Dévissez les écrous à oreilles et retirez les rondelles et
les rondelles de sécurité. Faites en sorte que les vis soient
orientées vers le bas et insérez-les dans les deux barres
du cadre du siège puis placez le siège à l’emplacement
qui correspond le mieux à votre taille et à votre poids (voir
ci-dessus). Après avoir déterminé l’emplacement du siège,
fixez les rondelles, les rondelles de sécurité et les écrous à
oreilles sur les vis puis serrez-les afin que le siège demeure
en place.
31
M A N U E L D ’ U T I L I SAT I O N D U B AT E A U P O N T O N CO LO R A D O
8. Fixez le cadre de siège aux armatures de ponton.
Insérez les tubes de la plate-forme de siège sur les tiges de l'armature de
ponton, le siège étant orienté vers l'avant. L'avant des armatures de ponton
porte les lettres « L » (gauche) ou « R » (droite). Il peut être nécessaire de
taper LÉGÈREMENT avec un maillet en caoutchouc pour ajuster. Alignez
les trous et verrouillez à l'aide de quatre axes à épaulement. Vous DEVEZ
verrouiller les attaches de sécurité sur les quatre axes pour vous assurer
que le cadre ne se défait pas.
9. Enfilez le cordon de l'ancre
type sac.
Faites d'abord passer le cordon dans la
poulie de cordon d'ancre située à l'avant
d'une des armatures de ponton. Continuez
à passer le cordon à travers les guides et
sous tous les tubes de l'armature.
Insérez ensuite le cordon à travers le guide
du tube de cordon arrière [1] sur le cadre de
la plate-forme arrière. Terminez en passant
le cordon dans la poulie montée dans le
cadre arrière de la plate-forme et attachez
le cordon à l'ancre type sac.
NB: le siège et les pontons
n'apparaissent pas ici pour
plus de clareté
1
Fixez cette
extrémité du
cordon à l'ancre
type sac
NB: le support d’ancre peut être placé d’un côté
ou de l’autre de l’armature de la plateforme
arrière. Insérez la clé à extrémité ronde dans
le bas du goujon d’ancre tout en tenant l’écrou
situé au-dessus du goujon avec une clé réglable
pour le desserrer.
Poulie avant de
l'ancre
10. Fixez l'armature de la plate-forme arrière
et la plate-forme de rangement grillagée
(porte-bagages).
Pour pouvoir fixer l'armature de la plate-forme arrière,
vous devez d'abord attacher partiellement la plate-forme
de rangement. Commencez par glisser les languettes
métalliques courbées dans les fentes soudées à l'arrière
de chaque armature de ponton.
Poussez ensuite les tubes de la plate-forme arrière dans
les tubes ouverts à l'arrière de chaque armature de ponton. Assurez-vous d'insérer les guides
métalliques à l'arrière de la plate-forme de rangement dans les trous correspondants dans
l'armature de la plate-forme arrière quand vous poussez les tubes ensemble.
Attachez les coins arrière avec deux axes d'épaulement. Ils permettent de fixer fermement
l'armature de la plate-forme arrière aux armatures de ponton. Assurez-vous d'insérer chaque axe
à travers l'armature de la plate-forme arrière et à travers les armatures de ponton. Verrouillez les
deux axes d'épaulement.
11. Insérez les tolets.
Insérez un tolet dans le haut des deux supports de tolets sur les armatures
de pontons. Il y a trois positions pour les tolets. Nous vous conseillons de
commencer par la position la plus à l'avant. Si votre siège est reculé, vous
préférerez peut-être la position centrale ou celle à l'arrière. Verrouillez chaque
tolet à l'aide d'une goupille fendue pour tolet.
32
Un support pour moteur
peut être installé d’un
côté ou de l’autre
M A N U E L D ’ U T I L I SAT I O N D U B AT E A U P O N T O N CO LO R A D O
12. Insérez l'appui-pieds.
Insérez l'appui-pieds dans l'armature de ponton comme l'indique
l'illustration. Commencez par une position au milieu de la
plage de réglage, alignez les trous et verrouillez avec deux axes
d'épaulement.
13. Fixez la jupe inférieure.
Écartez les deux moitiés arrière de la jupe derrière le
trou circulaire du siège et, en travaillant à partir de
l’avant, placez l’ouverture de la jupe autour du bas
du siège. Fixez à nouveau le crochet et les languettes
auto-agrippantes au dos de la jupe.
14. Installez les rames et les embouts des rames
Tout d’abord, assemblez les rames composées de deux
pièces. Alignez les trous afin que le bouton s’encastre
dans la poignée.
Pour emboîter une rame dans un tolet, placez la partie la
plus étroite de la rame dans le tolet. Faites ensuite glisser
la rame jusqu’à ce que l’embout se trouve appuyé contre
le tolet. Les embouts sont ajustables.
Embout
de rame
*Conseil pratique: Les rames n’auront pas besoin d’être
démontées afin de les placer dans les tolets.
15. Fixez le système d'ancrage.
Le système d'ancrage comprend un sac de toile pouvant contenir
du poids et un cordon passé le long de l'armature (étape 9).
Vous pouvez remplir le sac de pierres ou de poids métalliques
(non inclus). En général, 2,7 à 3,6 kg (6 à 8 livres) suffiront pour
vous ancrer si la brise est légère. Cependant, le poids nécessaire
dépendra de votre propre poids, du poids de votre cargaison, des
courants et des vents.
Enfilez le cordon qui est fixé au sac de toile autour de la poulie qui
est montée sur l’armature de la plateforme arrière. Fixez le bout
libre à l’armature de la plateforme arrière.
33
M A N U E L D ’ U T I L I SAT I O N D U B AT E A U P O N T O N CO LO R A D O
16. Fixez le porte-canne.
Le porte-canne peut être placé dans trois
positions différentes, sur le support de tolet
gauche ou droit. Vous pouvez tenir votre
canne vers l'arrière (1), vers le côté (2) ou
vers l'avant (3).
Le porte-canne s’attache avec des axes à
épaulement, comme à l'étape 8.
Pour utiliser le porte-canne, commencez
par ouvrir la sangle auto-agrippante à son
extrémité. Mettez l’arrière de la canne dans
le porte-canne, puis faites-la tourner pour
faire passer la poignée du moulinet dans la
découpe sur le côté du porte-canne. Tout en
maintenant la canne d’une main, enroulez la
bande auto-agrippante autour du l’avant du
moulinet avec l’autre main pour fixer la canne
dans le porte-canne.
17. Trousse de réparation pour chambre à air.
Deux rustines pour chambres à air sont incluses avec votre bateau pour réparer les déchirures ou les trous dans les
chambres à air de ponton.
Nous vous recommandons de les ranger dans l'une des poches pour les avoir à disposition en cas de réparation.
18. Effectuez les derniers réglages.
Sur terre ferme, asseyez-vous sur la bateau et réglez la position des appui-pieds et des tolets des rames en fonction de la
longueur de vos jambes et de votre préférence.
Faites flotter votre bateau ponton dans de l’eau peu profonde. Asseyez-vous confortablement puis placez vos pieds
sur les appui-pieds et vérifiez si l’embarcation se trouve de niveau dans l’eau. (Ceci est plus facile avec une personne
demeurant à terre)
AVERTISSEMENT - Le but est de trouver votre point d’équilibre. Lorsque vous flottez sur
l’embarcation, celui-ci devrait être de niveau dans l’eau.
AVERTISSEMENT - Si vous devez ajuster le siège ou les appui-pieds sur les pontons ou les appuipieds, ramenez l’embarcation sur la rive et effectuez les ajustements nécessaires.
AVERTISSEMENT – NE VOUS TENEZ PAS DEBOUT SUR LE BATEAU LORSQUE VOUS ÊTES SUR L'EAU.
VOUS RISQUEZ DE PERDRE L'ÉQUILIBRE ET DE TOMBER PAR-DESSUS BORD.
AVERTISSEMENT – IL EST DÉCONSEILLÉ D’UTILISER CE BATEAU EN EAU SALÉE.
Exercez-vous à avancer et à reculer afin de vous familiariser avec les manoeuvres. Ensuite, attrapez des poissons et
profitez de votre bateau!
34
M A N U E L D ’ U T I L I SAT I O N D U B AT E A U P O N T O N CO LO R A D O
R É PA R AT I O N S E T G U I D E D E D É PA N N A G E
Réparation des trous et déchirures présents dans les chambres à air des pontons
Si la chambre à air du ponton est déchirée ou
trouée, utilisez les rustines incluses pour la
réparer. Il sera peut être nécessaire de retirer
la chambre à air de l’enveloppe du ponton.
Consultez le Guide de dépannage pour les
instructions de cette étape. Pour réparer un trou
ou une déchirure, suivez les étapes ci-dessous.
1. Pour une réparation optimale, il est important
de coller la rustine sur une surface propre,
sèche et d’une température d’au moins 50° F
(10° C).
Laissez la rustine
dépasser d’environ
1 po. (2,5 cm) au-delà
de la déchirure
2. Utilisez un tampon alcoolisé pour nettoyer la
surface à réparer. Si vous n’avez pas de tampon alcoolisé, mélangez un volume
d’alcool isopropylique et un volume d’eau. Après avoir nettoyé la surface, laissez-la
sécher complètement.
3. À l’aide d’une paire de ciseaux, découpez une rustine de la bonne taille. Laissez
la rustine dépasser 1 po. (2,5 cm) au delà des bords de la déchirure. Découpez la
rustine en arrondissant les coins, ceci évitera que les coins ne se décollent après
avoir fixé la rustine.
4. Décollez environ 3 à 6 mm de l’endos en papier, collez la partie décollée de la
rustine en veillant à ce que la rustine dépasse d’environ 1 po. (2,5 cm) au-delà de la
déchirure.
5. Retirez le reste de l’endos en papier en collant avec précaution la rustine sur la
déchirure. Faites attention à ne pas créer de bulles d’air.
6. Frottez fermement la rustine afin qu’elle soit correctement collée et laissez-la poser
pendant 4 heures avant d’utiliser le bateau.
35
M A N U E L D ’ U T I L I SAT I O N D U B AT E A U P O N T O N CO LO R A D O
R É PA R AT I O N S E T G U I D E D E D É PA N N A G E
Si votre bateau semble se dégonfler, il est possible que cela ne soit pas à cause d’une fuite. Les changements
de température, l’altitude et le contact de l’eau froide (l’eau risque de refroidir l’air contenu à l’intérieur des
chambres à air des pontons) peuvent affecter l’air à l’intérieur des chambres à air. Si aucun de ces facteurs n’a
changé, vérifiez qu’il n’y a pas de fuite. Suivez les étapes ci-dessous.
1. Commencez par effectuer une inspection visuelle des enveloppes des pontons. La toile de l’enveloppe du
ponton est-elle déchirée ? L’enveloppe présente-t-elle de nombreuses entailles ou éraflures superficielles?
Si c’est le cas, cela risque d’indiquer que la chambre à air est déchirée ou présente une fuite.
2. Vérifiez qu’il n’y a pas de fuite en écoutant si de l’air s’échappe de la chambre à air à d’endroits suspects.
Il vous est aussi possible de verser de l’eau savonneuse sur les zones suspectes. Une fuite produira des
bulles. Si vous trouvez un trou, réparez-le en suivant les méthodes indiquées dans ces instructions.
Si vous ne trouvez pas de fuite en suivant ces méthodes, vérifiez les valves de
gonflage:
3. Inspectez-les visuellement, assurez-vous que la valve se ferme correctement et
que le capuchon de la valve se ferme complètement.
Vérifiez les bords de la
valve ne présentent
pas de fuites
4. Vérifiez qu’il n’y a pas de fuite en écoutant si de l’air s’échappe. Il vous est aussi
possible de verser de l’eau savonneuse autour de la valve. Si vous découvrez
que la valve présente une fuite autour du bord, la valve est probablement
desserrée.
Vérifier que la valve ne fuit pas
Cage de la valve de gonflage
(incorporée à la chambre à air du ponton)
du ponton) afin de plus facilement tourner la valve. Faites
attention à ne pas déchirer la chambre à air.
S’il s’avère difficile de tourner la valve, retirez
complètement la valve et ajoutez une petite quantité de
graisse à base
dans le sens inverse à celui des aiguilles d’une
de silicone sur Tournez
montre pour desserrer
le joint torique
Clé de valve
de gonflage
de la valve et
remontez les
pièces.
Valve de
gonflage
Si la valve ne
fuit pas autour
du bord, la
valve est
probablement
défectueuse.
Joint torique
de la valve
La valve de gonflage comporte deux parties. La valve de
gonflage et la cage de la valve. La cage de la valve de
gonflage protège la valve et
est incorporée à la chambre à
air du ponton.
Pour resserrer une valve
desserrée, insérez la clé de
la valve de gonflage dans la
valve et tournez dans le sens
des aiguilles d’une montre.
Il sera peut être nécessaire
de tenir la cage de la valve
de gonflage (elle se trouve à
l’intérieur de la chambre à air
Tournez dans le
sens des aiguilles
d’une montre
pour serrer
Veuillez consultez notre site internet
www.classicaccessories.com pour commander une nouvelle
valve.
Si vous devez retirer la chambre à air du ponton afin de la
réparer, vous devrez complètement dévisser la valve de
gonflage de la cage de la valve. Assurez-vous que les valves
des chambres à air sont alignées avec les ouvertures de
la valve de l’enveloppe. Étant donné que l’enveloppe du
ponton est prisonnière entre la cage
Clé de
valve de
gonflage
de la valve de gonflage et la valve de gonflage, faites
attention à ne pas déchirer ou endommager la chambre à
air ni l’enveloppe du ponton en trop serrant la valve.
36
M A N U E L D ’ U T I L I SAT I O N D U B AT E A U P O N T O N CO LO R A D O
ENTRETIEN ET REMISAGE
TRANSPORTER LE BATEAU PONTON
Le bateau ponton peut être transporté complètement ou partiellement démonté et/
ou gonflé. En raison des contraintes liées aux dimensions du bateau, de nombreux
utilisateurs garderont le cadre intact et choisiront de simplement gonfler et fixer leurs
pontons après avoir atteint leur destination. Vous pouvez transporter votre bateau
en le plaçant sur une camionnette découverte, une remorque ou sur la galerie du
toit de votre véhicule. Si vous transportez un bateau complètement ou partiellement
démonté et/ou gonflé, veuillez vous adresser au constructeur du véhicule, de la
remorque ou de la galerie.
ENTRETIEN DU BATEAU
Le bateau ponton peut être nettoyé avec de l’eau et du savon puis rincé. Utilisez un
chiffon doux pour les endroits difficiles à nettoyer.
REMISAGE SAISONNIER DU BATEAU
Retirez les pontons de l’armature, videz les poches de toit objet pointu risquant de
perforer l’enveloppe. Dégonflez complètement l’enveloppe et pliez-la pour la remiser.
Remisez les pontons à l’écart des objets pointus, de la chaleur et de tout objet
risquant de les endommager. Démontez l’armature et les pièces du bateau et
srangez-les dans une boîte.
37
M A N U E L D ’ U T I L I SAT I O N D U B AT E A U P O N T O N CO LO R A D O
Cette page est laissée vierge intentionnellement
38
M A N U E L D ’ U T I L I SAT I O N D U B AT E A U P O N T O N CO LO R A D O
Cette page est laissée vierge intentionnellement
39
CO LO R A D O P O N T O O N B O AT O W N E R ' S M A N U A L
M A N U E L D ' U T I L I SAT I O N D U B AT E A U P O N T O N CO LO R A D O
IMPORTANT
Your new Classic Accessories pontoon boat has been carefully
inspected before shipment. In case of a problem, do not return
to the store.
Call 1-800-854-2315 between 7:30 AM to 4:00 PM Pacific
Standard Time to help resolve any questions or problems you may have.
IMPORTANT
Votre nouveau bateau ponton de Classic Accessories a été
rigoureusement inspecté avant d’être expédié. En cas de
problème, veuillez ne pas retourner au magasin.
Appelez le 1.800.854.2315 de 7:30 h à 16 h
(heure du Pacifique) en cas de questions ou de problèmes.
Classic Accessories, Inc., Kent, WA, USA 98032
Tel: (253) 395-3900
Fax: (253) 395-3991
www.classicaccessories.com
Email: [email protected]
CLASSIC ACCESSORIES, INC.
KENT, WA USA 98032 © 2 0 1 1
classicaccessories.com
Designed in the U.S.A.
Mis au point aux États-Unis.
Classic Accessories, Inc., Kent, WA É.-U. 98032
Téléphone: (253) 395-3900Télécopie: (253) 395-3991
www.classicaccessories.com
Courriel: [email protected]
69660, 69664
40
11cF55_12421