1
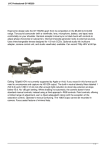
Contents
QuickStart Guide
The Tiffen Company, 90 Oser Avenue, Hauppauge, New York 11788 • 631-273-2500 • 800-645-2522 • www.tiffen.com
Tiffen Steadicam Operations, Glendale, CA • 818-843-4600 • 1-800-593-3331 • www.steadicam.com
Pilot™ QuickStart Guide © manual version 5/14/2010 J. Holway / L. Hayball / The Tiffen Company
Copyright The Tiffen Company 2010, All rights reserved
Steadicam® reserves the right to change specifications without prior notice.
0510
p/n LIT-804000
camera mounting plate
The Pilot™ Sled
fore and aft
adjustment knob
stage
Camera mounting plate
Pilot™ Sled
loose
side to side
adjustment knob
docking ring
All four screws must be loose to free the camera mounting plate.
gimbal
tight
“CarbonLite”
expandable
post
gimbal
handle
Make sure to tighten all four screws on the camera mounting plate
when you attach your camera.
monitor
Pilot™ Backpack
post extension
clamp
monitor
clamp
(With integrated MERLIN™ storage pocket.)
bottom post
adjustment
clamp
battery mount
(V-Lock)
Stage connectors
Rear: RCA
video input
2
threads for
attaching
weights
Front: 2.1mm DC power jack (center
pin positive). Supplies voltage directly
from batteries. 11-17V for lithium
batteries, 12.5V for rechargeable AA’s
and 15V for alkaline AA’s.
Included accessories
T-handle allen wrench, 2.1mm DC
power cable, RCA video cable, BNC
to RCA adaptor, camera mounting
screw and anti-rotation pin.
3
Balance
Attaching the camera
Static Balance
First, find your camera’s center of gravity. Try balancing it on something round like
a pencil both fore and aft and side to side. Then, attach the center of the camera
mounting plate 1/4” to 1/2” forward of the camera’s fore and aft c. g., and centered
over your camera’s side to side c.g.
First, adjust your bottom heaviness by
moving the gimbal on the post.
Fine-tune the fore aft and side to side
balance with the knobs on the stage.
Secure the camera to the mounting plate
with the screws provided. Use either two
screws or one screw and an anti-rotation
pin.
Place the camera onto the sled.
Tighten the four knobs securely.
The camera is now positioned so its
center of gravity is slightly behind the
centerline of the main posts. (See the blue
tape in the photo below.) This is ideal for
achieving good dynamic balance.
Only loosen the gimbal with the sled
horizontal.
Adjusting the fore and aft balance.
Slide the main post until everything is in
balance, then move the gimbal towards
the camera about one half inch and
tighten the clamp. Let go of the sled and
let it rotate through vertical. It should
take about three seconds. Raise the
gimbal to decrease the drop time; lower it
to make the drop time longer.
This is how a typical set-up should
look, with the gimbal fairly close to the
camera.
Grossly adjust the fore aft balance by
moving the lower spar as shown in the
three photos below.
Adjusting the side to side
balance.
The docking bracket and balancing stud
Dynamic Balance
The sled hangs by the docking ring
on the forked portion of the docking
bracket. To balance the sled, spin the
docking bracket towards you and slip
the gimbal handle over the stud.
Dynamic balance is a term we use for a
sled that stays level (main post vertical)
as it is panned, i.e., it pans flat.
Be sure the stand is secure and won’t
tip over; use sandbags for safety.
We need to balance the sled in all
three axes: top to bottom, side to
side, and fore and aft. In general, we
want the sled to hang upright and not
be very “bottom-heavy.”
4
Note: SteadiStand™ (p/n 601-7910)
is available as an optional accessory.
Note: We typically trim
or alter this fine balance
to help us aim the camera
— for instance to hold
headroom.
You have several possible adjustments,
including moving the spar as shown
(left), adding weights, and sliding the
monitor or battery independently to
achieve dynamic balance.
Download and read “The Dynamic
Balance Primer” on www.steadicam.com
for more information on this complex
subject. What’s great is the Pilot™
has many options to help you achieve
dynamic balance.
5
The Pilot™ Vest
Vest & Arm
left shoulder strap
with buckles
The Pilot™ Arm
arm post
Forearm section
right
shoulder
strap
weight
adjustment
knob
release pin
arm keeper
chest
pad
chest straps
with buckles
Upper arm section
spring
weight
adjustment
knob
chest
straps
double action
hinge
socket block
back pad
spring
socket
waist pad
socket block height
adjustment and spar
length adjustment
waist belts
with buckles
The arm rides in the backpack in two
pieces.
To assemble the arm, align the two sections and insert the pin.
Socket adjustments
The hip pads fit around your hip bones, not above
them. If the vest is too short, lengthen the spar by
loosening the four tee handle screws on the socket
block and slide the spar to fit.
6
As shown in the left photo, set the upper “side to side”
adjustment to two to three turns out, and the bottom
screw all the way in.
7
Vest & Arm
Putting on the vest
Making it float
The vest should be tight and not slip on your body. The front spar should be vertical.
The vest should be long enough to engage your hip bones, but not so long that you
can’t lift your leg without disturbing the vest.
This is how you want to look wearing
the Steadicam Pilot — natural and
relaxed, with your hips turned slightly
towards the sled. Note that the sled
is not at your side, but more at a 45°
angle to your hips.
To use
the vest,
open the
left shoulder
buckle, put
on the vest,
and reconnect
the buckle.
Attach the right chest belt with female
buckle across the chest plate and connect it to the left chest belt with the male
buckle. Then tighten up the belts by
adjusting the belt’s length.
If the rig is falling away from you,
tighten the upper “Tee” head screw.
If the rig wants to come too close,
loosen the upper screw.
If the rig falls to your right, screw
the top side to side adjustment
in. If it falls left, turn the top side
to side adjustment to show more
threads.
With everything adjusted properly and
with a natural stance, the rig should
“float” next to you. A gentle touch with
your left hand just below the gimbal
guides the camera, while the right hand
booms and places the whole sled in place.
Connect the left and right waist belts together and adjust the belts to the desirable
length for a comfortable fit. Be sure the left belt lies within the belt guide which is
attached to the left side of the waist pad.
se the optional
U
extension belt
if required.
If the rig won’t float next to
you, you must adjust your
posture and/or adjust the
angle of the arm:
Be careful to maintain a good and
consistent posture while making
these adjustments, or you will be
fine tuning all day...
Setting the arm’s lift
You must be carrying the sled to adjust the
arm lift. Adjust the lift with the arm angled
slightly up — the knob will turn easily.
Adjusting the arm
You’ve adjusted the balance of the sled,
and put on your vest, now you need to
adjust the arm to carry the load.
Insert the arm into the socket block fully
as shown.
8
Use the two “Tee” headed screws to set
the “in and out” angle of the arm. Start
with the upper screw almost all the way
in if you look like Michael (above). If
you have a big belly, start with the upper
screw further out.
Set the top screw and just barely tighten
the bottom screw.
Each arm section should settle to a slightly
upward angle as shown in the photos.
The two screws work in tandem. To make
further adjustments, you must loosen
one in order to tighten the other. Don’t
overtighten these screws!
Adjust the forearm (the section nearest
the sled) first, then the “upper arm”
section.
Stand naturally and boom all the way up and down. Both arm sections should
track together. Do not bend over or lean back as you boom up and down.
Adjust these screws again after you pick
up the Steadicam.
9
Adding weight and increasing length
Weight Kit &
Telescoping Post
A 5.2 pound camera on the Pilot:
Use the telescoping post and the weight
kit to increase inertia (improve stability)
and/or to move the gimbal relative to the
camera.
Here are some examples of how to use the posts and the weights.
First, with a 5.2 pound camera on the Pilot:
With the Pilot and a heavy camera, all combinations of weights and post extension will work.
Now, with a 1.1 pound camera on the Pilot:
No weights: less inertia,
All weights up: Gimbal
Gimbal lower (lens higher). closer to camera, inertia increases in pan.
All weights low: Gimbal
lower (increases lens
height), even more inertia than all weights up.
No weights.
All weights up,
gimbal closer
to camera.
Weights up with post
extended, more inertia.
No weights, post extended, gain lens height and
more inertia in tilt and roll,
but no increase in pan.
With a very light camera you may need
to add weights just to properly load up
the arm (the arm needs at least 2 lbs of
camera), and/or get the gimbal reasonably
close to the camera in the shortest mode.
The gimbal is really too low (above left) without
the weights attached to the stage.
With weights (above right), the gimbal is in a
better position for operating.
10
Longer posts:
Gimbal much further
from camera, tilt and
roll inertia increased
dramatically.
(Shown with all
weights low and no
weights).
With a light camera and a short post, however,
the weights can’t be added to the lower spar
without getting the gimbal too low.
11
Low mode
You can work in what’s called “low
mode” with the Pilot and get the lens
much lower than in normal or “high”
mode, and even lower with the
extended post.
Monitors
In these pictures, the optional F-bracket
(P/N 078-7393-01) is being used. With
the post extended, you don’t need the
F-bracket for low mode operating,
but the lens will be higher.
The 5.8” 4:3/16:9 monitor accepts both PAL and NTSC signals and it has two video
inputs.The monitor operates on a nominal 12V.
The menu screens cycle with the menu button, and there are controls for brightness,
contrast, color, tint, horizontal and flip image (good for low mode operating).
With the types of cameras usually used
with the Pilot, there’s no easy or strong
way to mount them from the top. We
usually leave the camera mounted as it
is in high mode, so the camera is upside
down. If you leave the monitor in the
same position, the image will be right
side up as you shoot, but the image must
be reversed in editing.
With the 5.8” monitor it’s possible to
place it above the spar and reverse the
image for shooting (not shown).
menu down up power
If you need to keep the recorded
image right side up, you’ll need to
design a lightweight cage to hold your
camera. Make the cage so you can still
add accessories, open the camera’s
viewfinder, access all controls, change
batteries, and change tapes or cards.
Don’t bend over to get
the lens lower!
Typical monitor controls shown.
12
Maintain good form as
shown in the photos.
With the camera right side up in
low mode, you must rotate the
Pilot’s monitor above the spar
as shown in the photo.
13
Accessories &
Part Numbers
P/N
Description
FFR-000045
ENDURA CHARGER, PORTABLE, SINGLE CHANNEL
FFR-000046
ENDURA E7-S LI-ION BATTERY, 71WH V-MOUNT
BATTERY PACK
FFR-000048
ENDURA E-7S STARTER KIT
MSC-200503
MONITOR UNIVERSAL AC ADAPTER, 12V X 1A
078-5238-01
BACKPACK, PILOT
078-7393-01
LOW MODE KIT, BRACKET
601-7910
ASSEMBLY STEADI-STAND
801-7920-04
START WEIGHT W/O-RING
801-7920-05
MIDDLE WEIGHT W/O-RING
FFR-000030
OBIE LIGHT
801-7800
MERLIN/PILOT VEST
801-7200-02
ASSY, ARM WITH PILOT POST
804-0000
ASSY, SLED PILOT
804-7300
ASSY, AA BATTERY MOUNT, PILOT
804-7310-01
ASSY, V-LOCK BATTERY MOUNT, PILOT
804-7310-02
ASSY, ANTON BAUER BATTERY MOUNT, PILOT
804-7305
ASSY, DUMMY AA BATTERY**
804-7900 ASSY, DOCKING BRACKET, PILOT
804-7290
MERLIN ARM POST CONVERSION KIT
804-7291
PILOT ARM POST CONVERSION KIT
MSC-200500
MONITOR, 5.8” 4:3/16:9 NTSC/PAL LCD
**Voltage at the top stage DC power plug can be reduced in AA battery pack
type PILOTS using Alkaline AA batteries by installing two optional DUMMY
AA battery cells (p/n 804-7305) in place of Alkaline battery cells. This will
allow 12V only accessories to be operated from the DC power plug.
14
15