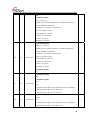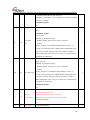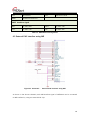
1
WIZ610wi User’s Manual ( Version 2.0.0 ) ©2013 WIZnet Co., Ltd. All Rights Reserved. ☞ For more information, visit our website at http://www.wiznet.co.kr -1- Upgrade History Date Version Comment 2009-01-31 V1.0 Release 2009-03-16 V1.1 -Gateway mode 8080 port access added -Client mode WAN setting added -Serial Packing Condition added -Serial Command added 2009-05-18 V.1.2 -Client mode IP setting amended -Power Consumption fact amended -IGMP function added -Server connection trying interval function added on the serial client mode. -Data Packet ConditionTime(SecondÆMillisecond) 2009-06-18 V.1.3 -Serial Command Added 2009-07-14 V.1.4 -Serial Command Amended 2009-08-11 V.1.5 -Serial Command Added Server-Client connection status checking -Reference Schematic Amended(Pin No. 6, 7) 2009-10-30 V.1.6 -Pin description (table 9) Amended. GPIO7 -> nRS232_LED -Reference Schematic Amended (Pin No. 5) -Wizard Program introduction Added 2010-03-09 V.1.7 -Serial Command Added *Socket Connection Status Checking *TCP Server setup(IP address or Domain Name) -SSL module added -Default SSID is changed to ‘WLANAP’ -Serial to WiFi Reference schematic Added 2010-08-03 V.1.8 -Serial command amended 2010-12-01 V.1.9 -Serial command modified & amended -Serial max baud rate modified (Max 921,600bps) -Temperature specification modified -Aging test report added. 2011-01-25 V.1.9.1 -Pin pitch information added at Fig.36 WIZ610wi User’s Manual (WIZnet Co.,Ltd) -2- 2013-06-18 V.2.0.0 -Modified Product Contents ( Removed Data CD ) WIZ610wi User’s Manual (WIZnet Co.,Ltd) -3- WIZnet’s Online Technical Support If you have any questions about our products, please visit our website and submit your questions on the Q&A Board. We will reply your questions as soon as possible COPYRIGHT NOTICE Copyright 2013 WIZnet Co., Ltd. All Rights Reserved. Technical Support: [email protected] Sales & Distribution: [email protected] For more information, visit our website at http://www.wiznet.co.kr WIZ610wi User’s Manual (WIZnet Co.,Ltd) -4- Contents 1. Introduction .............................................................................................................................................................. 1 1.1 Product Specification................................................................................................................................. 3 1.1.1 WIZ610wi Module .......................................................................................................................... 3 1.1.2 WIZ610wi Test Board .................................................................................................................... 5 2. Getting Started ........................................................................................................................................................ 6 2.1. Hardware Installation ............................................................................................................................... 6 2.2. Configuration ............................................................................................................................................... 7 2.2.1 Wizard Program .............................................................................................................................. 7 2.2.2 Connecting the Web page of WIZ610wi ........................................................................... 10 2.2.3 Checking Status............................................................................................................................ 11 2.2.4 Network Setting ........................................................................................................................... 13 2.2.5. Wireless Setting .......................................................................................................................... 15 2.2.5.1. Mode Selection ............................................................................................................... 15 2.2.5.2. IP Configuration in Each Mode ................................................................................ 16 2.2.5.3. Access Point Setup ........................................................................................................ 18 2.2.5.4. Gateway Setup ................................................................................................................ 24 2.2.5.5. Client Setup ...................................................................................................................... 27 2.2.6. Serial Setting ................................................................................................................................ 29 2.2.7. Security Setup .............................................................................................................................. 33 2.2.8. Others.............................................................................................................................................. 33 2.2.8.1. Password ............................................................................................................................ 33 2.2.8.2. Log ....................................................................................................................................... 34 2.2.8.3. Upgrade ............................................................................................................................. 34 2.2.8.4 Factory Default ................................................................................................................. 35 2.2.8.5. Reboot ................................................................................................................................ 37 3. Pin Assignment and Module Size ................................................................................................................ 38 4. Demonstration and Test ................................................................................................................................... 41 5. Serial Configuration ............................................................................................................................................ 45 6. Reference Schematics ........................................................................................................................................ 62 6.1 WIZ610wi Module Pin assign ............................................................................................................. 62 6.2 External PHY interface using MII ....................................................................................................... 63 6.3 RS-232C interface .................................................................................................................................... 64 6.4 Serial to WiFi interface .......................................................................................................................... 65 WIZ610wi User’s Manual (WIZnet Co.,Ltd) -5- 7. Aging test report ................................................................................................................................................. 66 7.1 Test environment...................................................................................................................................... 66 7.2 Test condition ............................................................................................................................................ 66 7.3 Test result .................................................................................................................................................... 67 WIZ610wi User’s Manual (WIZnet Co.,Ltd) -6- Figures FIGURE 1. WIZ610WI TEST BOARD ............................................................................................................................... 5 FIGURE 2. WIZ610WI WIZARD PROGRAM ................................................................................................................... 7 FIGURE 3. WIZ610WI TELNET WINDOW ...................................................................................................................... 8 FIGURE 4. WIZ610WI WIZARD PROGRAM ................................................................................................................... 8 FIGURE 5. WIZ610WI WIZARD PROGRAM ................................................................................................................... 9 FIGURE 6. CONNECTING TO THE WEB PAGE OF WIZ610WI.................................................................................... 10 FIGURE 7. INPUT ID & PASSWORD ............................................................................................................................. 10 FIGURE 8. SYSTEM DATA ............................................................................................................................................... 11 FIGURE 9. ACTIVE CLIENTS ........................................................................................................................................... 12 FIGURE 10. NETWORK SETTING ................................................................................................................................... 13 FIGURE 11. ACTIVE DHCP CLIENT TABLE .................................................................................................................. 14 FIGURE 12. OPERATION MODE.................................................................................................................................... 15 FIGURE 13. CHANGING OPERATION MODE ............................................................................................................... 15 FIGURE 14. ACCESS POINT MODE - 1 ....................................................................................................................... 16 FIGURE 15. ACCESS POINT MODE -2 ......................................................................................................................... 16 FIGURE 16. GATEWAY MODE ....................................................................................................................................... 17 FIGURE 17. CLIENT MODE ............................................................................................................................................ 17 FIGURE 18. AP MODE SETTINGS ................................................................................................................................ 18 FIGURE 19. WIRELESS SECURITY SETUP ...................................................................................................................... 19 FIGURE 20. WIRELESS ADVANCED SETTINGS ............................................................................................................. 21 FIGURE 21. WIRELESS ACCESS CONTROL ................................................................................................................... 22 FIGURE 22. WDS SETTING........................................................................................................................................... 23 FIGURE 23. GATEWAY SETUP ........................................................................................................................................ 24 FIGURE 24. WAN PORT CONFIGURATION ................................................................................................................. 25 FIGURE 25. WAN ACCESS TYPE – STATIC IP ............................................................................................................ 25 FIGURE 26. WAN ACCESS TYPE – DHCP CLIENT.................................................................................................... 26 FIGURE 27. WAN ACCESS TYPE - PPPOE................................................................................................................. 27 FIGURE 28. CLIENT SETUP ............................................................................................................................................ 27 FIGURE 29. SITE SURVEY............................................................................................................................................... 28 FIGURE 30. SERIAL TO ETHERNET CONFIGURATION .................................................................................................. 29 FIGURE 31. PASSWORD SETUP ..................................................................................................................................... 34 FIGURE 32. SYSTEM LOG .............................................................................................................................................. 34 FIGURE 33. UPGRADE FIRMWARE ................................................................................................................................ 35 WIZ610wi User’s Manual (WIZnet Co.,Ltd) -7- FIGURE 34. REBOOT SYSTEM........................................................................................................................................ 37 FIGURE 35. WIZ610WI PIN MAP ............................................................................................................................. 38 FIGURE 36. WIZ610WI BOARD DIMENSIONS (UNIT : MM) ................................................................................... 40 FIGURE 37. SERIAL TERMINAL PROGRAM CONFIGURATION ..................................................................................... 42 FIGURE 38. NETWORK TERMINAL PROGRAM CONFIGURATION ............................................................................... 43 FIGURE 39. RECEIVED DATA BY NETWORK TERMINAL PROGRAM ........................................................................... 43 FIGURE 40. DEVICE TERMINAL PROGRAM .................................................................................................................. 44 FIGURE 41. WIZ610WI MODULE PIN ASSIGNMENT ................................................................................................ 62 FIGURE 42. SCHEMATIC - EXTERNAL PHY INTERFACE USING MII ........................................................................ 63 FIGURE 43. SCHEMATIC – RS-232C INTERFACE ....................................................................................................... 64 FIGURE 44. SCHEMATIC – SERIAL TO WIFI REFERENCE SCHEMATIC ....................................................................... 65 FIGURE 43. AGING TEST ENVIRONMENT ..................................................................................................................... 66 WIZ610wi User’s Manual (WIZnet Co.,Ltd) -8- Tables TABLE 1. PRODUCTS CONTENTS. .................................................................................................................................... 3 TABLE 2. PRODUCTS SPECIFICATION - WIRELESS.......................................................................................................... 3 TABLE 3. PRODUCTS SPECIFICATION - HARDWARE ...................................................................................................... 4 TABLE 4. PRODUCTS SPECIFICATION - SOFTWARE ........................................................................................................ 4 TABLE 5. SYSTEM DATA ................................................................................................................................................. 12 TABLE 6. AUTHENTICATION METHOD.......................................................................................................................... 20 TABLE 7. WEP CONFIGURATION .................................................................................................................................. 20 TABLE 8. WIRELESS ADVANCED SETTINGS .................................................................................................................. 22 TABLE 9. FACTORY DEFAULT VALUE ............................................................................................................................. 36 TABLE 10. WIZ610WI PIN FUNCTION........................................................................................................................ 39 TABLE 11. SERIAL CONFIGURATION FRAME FORMAT ................................................................................................ 45 TABLE 12. SERIAL CONFIGURATION REPLY FRAME FORMAT ..................................................................................... 45 TABLE 13. SERIAL CONFIGURATION STX & ETX ...................................................................................................... 45 TABLE 14. SERIAL CONFIGURATION REPLY CODE ...................................................................................................... 46 TABLE 15. WIZ610WI PIN ASSIGNMENT ................................................................................................................... 63 TABLE 15. AGING TEST RESULT ..................................................................................................................................... 67 WIZ610wi User’s Manual (WIZnet Co.,Ltd) -9- 1. Introduction WIZ610wi is the gate way module which provides a bridge for RS-232 or Ethernet to IEEE802.11 b/g wireless communications. Devices with the interface of RS-232 serial or Ethernet can established a wireless network which can enable remote monitoring, management and controlling. Main Features Embedded 802.11b/g Wireless Networking Access Point, Client, Gateway, Serial to WLAN mode Supported Ethernet to Wireless Bridging Security with 64/128 bit WEP, WPA, WPA2(AES) MII, UART, U.FL(WLAN) Interface Ready to use serial to wireless application Max 25Mbps Data Streaming Compact Size : 39mm X 32mm X 4.7mm RoHS Compliant 1 Products Contents (WIZ610wi-EVB) WIZ610WI Module WIZ610wi Evaluation Board Serial Cable (Connect Serial Device to Test Board) Network Cable (Crossover Cable) Power (DC 5V 2A Adaptor) 2 Antenna (2dBi PCB type + Coaxxial Cable) Table 1. Products Contents. C 1.1 P Product Specificatio S on 1.1.1 WIZ610wi Module Wireless ITE EM Specificaation Wireless Standard IEEE802.1 11b/g Fre equency Ran nge 2.412~2..485GHz Ou utput Power 802.11b: 16dBm@11 1Mbps (To olerance(+/-1 1dBm) 802.11g: 14dBm@6~ ~54Mbps Recceive Sensitivity Data Rates Mo odulation Type 802.11b: -65dBm@1 11Mbps 802.11g: -76dBm@5 54Mbps 54Mbps--1Mbps 11g: OFD DM(64QAM, 16QAM, QP PSK, BPSK) 11b: DSSS(CCK, DQPS SK, DBPSK) Tab ble 2. Produ cts Specifica ation - Wireless Hard dware ITE EM Interface Tem mperature Humidity Serrial Specificaation MII, UAR RT, Power, 1.2 27mm Pitch Header Pin U.FL(wireeless) Operatio on: -30℃~70 0℃ (Refer to o the 7. Agin ng test reporrt) Storage: -40℃~115℃ ℃ Operatio on: 10% to 90%, 9 Non-Co ondensing Storage: 5% to 90%, Non-Conde ensing Baud Ratte : Max 921 1,600bps Stop bitss: 1 3 Parity: None, Odd, Even Flow Control: XON/XOFF(software), CTS/RTS(hardware), none Power 3.3V Power Consumption Under 480mA(3.3V) Dimension Weight 39mm X 32mm X 4.7mm Ø 3mm hole X 1 8.0g Table 3. Products Specification - Hardware Software ITEM Description Operation Mode Access Point, Client, Gateway, Serial to Wireless LAN Protocol ARP, UDP, TCP, Telnet, ICMP, IGMP, DHCP, PPPoE, BOOTP, HTTP, TFTP WEP 64/128big Security WPA/WPA2 PSK/AES/TKIP 802.1x(Radius) SSL Management HTTP, Telnet, Serial, UDP Notification Event Logging Table 4. Products Specification - Software 4 1.1.2 WIZ610wi Test Board Figure 1. WIZ610wi Test Board 5 2. Getting Started This manual describes all configurations in detail. For the quick and easy installation, please refer to “WIZ610wi Quick Installation Guide” 2.1. Hardware Installation For the testing, module and test board should be prepared. STEP1: Insert WIZ610wi module in the socket of test board. STEP2: Connect the test board to the HUB or PC by using a network cable. STEP3: Connect the test board to the serial device by using the RS-232 serial cable. STEP4: Insert the power supply connector to the test board by using the 5V DC power adaptor. 6 2.2. Configuration 2.2.1 Wizard Program Execute Wizard Program. You can download the Wizard Program from WIZnet webstie. Figure 2. WIZ610wi Wizard Program ⓐ: If you click ⓒSearch button, details about WIZ610wi on the same network will be displayed. You can check IP address, Subnet Mask, Gateway, DHCP, MAC Address, Standard Type (802.11b or g) and SSID. ⓑ IP Info: If you select a WIZ610wi, the IP address information is displayed. ⓓ You can check or modify the IP address, Subnet Mask and Gateway of a WIZ610wi module. ⓔ MAC Addr: It displays the MAC Address of a WIZ610wi. ⓕ Enable DHCP: You can enable or disable DHCP Server function. After configuring ⓓ and ⓕ, click Set button for completing the configuration. ⓖ Local System: It displays IP and MAC addresses of the PC where Wizard Program is installed. ⓗ Refresh: After changing IP address of the PC, click Refresh button to display the updated information. ⓘ DOS: It opens Command Prompt window. ⓙ Ping: It sends Ping command to the selected WIZ610wi. ⓚ Telnet: If you click Telnet Button, the window for telnet connection is shown. The default 7 login ID and password are admin. Figure 3. WIZ610wi Telnet Window ⓛ WEB: If you click WEB button, the web configuration window will be shown. For the detail about web configuration, refer to 2.2.2 Connecting the webpage of WIZ610wi. ⓜ EXIT: Wizard Program will be closed. Figure 4. WIZ610wi Wizard Program ⓝ: Select a WIZ610wi on the left window and click Get button. The wireless LAN configuration detail of the selected module will be displayed after 4 seconds. You can check the detail of SSID, Authentication, Encryption Mode, Key length, Key Format, Key Value, Data Rate, Tx Power, Work Mode, Channel and etc. You can’t change the configuration. 8 Figure 5. WIZ610wi Wizard Program ⓟ Serial Comm: You can test the function of “Serial to Wireless”. After connecting PC and WIZ610wi using serial cable, execute serial terminal program. ⓠ Select protocol type – UDP or TCP, and input port number. Port Open button is enabled at the UDP mode, and Connect button is enabled at the TCP mode. ⓡ Transferring data are displayed. ⓢ Input data to be transmitted, and click Send button. 9 2.2.2 Connecting the Web page of WIZ610wi 1) Open a web browser on your PC and input “192.168.1.254”, the default IP address of WIZ610wi. Figure 6. Connecting to the Web page of WIZ610wi Notice : Configure the network parameters of WIZ610wi and your PC. ¾ The default IP address of WIZ610wi is “192.168.1.254”. Your PC’s IP address should start with these three sets of numbers “192.168.1.XXX”. ¾ WIZ610wi and PC can be connected through wireless network. Connect to WIZ610wi from PC by using default SSID “WLANAP” 2) A pop up will request you to input your User ID and Password. Default User ID : admin Password : admin Figure 7. Input ID & Password 10 2.2.3 Checking Status 1) System Data Figure 8. System Data ITEM Description Firmware Version The firmware version of WIZ610wi is displayed Firmware Date The last date and time of firmware upgrade MAC Address(LAN) the MAC Address of WIZ610wi for Ethernet communication. IP Address the IP address of WIZ610wi. 11 Network Mask the Network Mask of WIZ610wi. Default Gateway the Gateway of WIZ610wi. DHCP Server shows the DHCP server function is activated or not. DHCP Start IP Address shows the first IP address to be assigned from DHCP server. DHCP Finished IP Address shows the last IP address to be assigned from DHCP server. MAC Address(WLAN) the MAC Address for wireless communication. SSID the SSID of WIZ610wi. Channel the wireless channel of WIZ610wi. Table 5. System Data Notice : WIZ610wi supports the MAC addresses for both Ethernet and Wireless interfaces. 2) Active Client Figure 9. Active Clients In this page, the information of clients connecting to WIZ610wi is displayed. If you click “Refresh” button, the client list and information are updated. 12 2.2.4 Network Setting You can configure network parameters of WIZ610wi. Figure 10. Network Setting y IP Address: The default IP Address is set as “192.168.1.254”. y Subnet Mask: The default Subnet Mask is set as “255.255.255.0”. y Default Gateway: The default Gateway is set as “0.0.0.0”. y DHCP: If you want to activate the DHCP Server function, select the “Server”. If not, select “Disable”. Notice: When the WIZ610wi’s IP address is managed by another DHCP server in the upper layer, the DHCP function in your wireless module will be disabled. All your clients connecting to your WIZ610wi can not recognize your module as a DHCP server. y DHCP Client Range: When WIZ610wi operates as the DHCP Server, the IP address range must be assigned in order for the clients to connect. If the DHCP server function is disabled, this DHCP Client Range is not activated. y Show Client : If you click the “Show Client” button, a window is popped up to show a list of clients. 13 Figure 11. Active DHCP Client Table y Apply Changes : By clicking this button, the modified values are applied. After changing, the page is refreshed to re-connected to the new IP address. 14 2.2.5. Wireless Setting 2.2.5.1. Mode Selection You can select one of Access Point, Gateway and Client for the wireless connection mode. Figure 12. Operation Mode Access Point is the default mode. If you select Gateway or Client and click the “Setup” button, the progress bar will be shown. Figure 13. Changing Operation Mode 1) Access Point Mode In this mode, all Ethernet ports and wireless interface are bridged together and NAT function is disabled. All the WAN related function and firewall are not supported. 2) Gateway Mode In this mode, your device can connect to the internet via ADSL/Cable Modem. The NAT is enabled and PCs in LAN ports share the same IP to ISP through WAN port. WAN connection type can be setup in WAN page by using PPPOE, DHCP client, PPTP client or static IP. 3) Client Mode In this mode, your device act as a client. If you configure PC or application device as DHCP client, Access Point will be the DCHP Server and WIZ610wi doesn’t act as DHCP Server. 15 2.2.5.2. IP Configuration in Each Mode 1) Access Point Mode Figure 14. Access Point Mode - 1 - The IP address assigned to WIZ610wi is for administration and web configuration. - Even though the WIZ610wi is configured as DHCP Server, the PC will acquire IP address from IP Sharing device or ADSL/Cable Modem. Figure 15. Access Point Mode -2 - If there is not IP Sharing Device or ADSL/Cable modem, WIZ610wi will assign the IP addresses which is in DHCP IP range to PCs through wired or wireless network. 16 2) Gateway Mode Figure 16. Gateway Mode WIZ610wi operates as DHCP Server for the wireless communication. WIZ610wi operates as Static/DHCP/Client/PPPoE for the wired (Ethernet) communication. 3) Client Mode Figure 17. Client Mode WIZ610wi can be set IP as Static or DHCP client at ‘Client Setup>WAN Port Setup’. And also WIZ610wi can be act DHCP Server simultaneously by assigning adding 100 of first DHCP server. For example, if DHCP server’s client range is XXX.XXX.XXX.2~100, then WIZ610wi’s assigning DHCP Client IP address to application board is XXX.XXX.XXX.102~200. 17 2.2.5.3. Access Point Setup After selecting the AP mode and please click “Setup” button, the page below is shown. Figure 18. AP Mode Settings y Alias Name : Input the name for WIZ610wi. y Band : Select communication protocol of WIZ610wi. 802.11g protocol is compatible with 802.11b. y SSID: Input SSID for wireless communication. All devices on the same wireless network should have same SSID. The SSID can have max 32bytes characters composed of alphabets and numbers. Notice: this field is case-sensitive Channel Number: : Select the channel frequency which you will use for wireless communication. Auto: If you select Auto, the connection is automatically processed to the channel assigned by AP. When AP is booted, it investigates wireless channel environment and selects the lowest using channel. Manually Select a Channel : You can select a channel in the range of 1~13.. y Mode : AP : IF AP is selected, WIZ610wi operates as Access Point. WDS Repeater : WDS(Wireless Distribution System) that can be used for the 18 communication between WIZ610wi and WIZ610wi. When this mode is selected, AP function operates at the same time. y Security : Configure the security options for WIZ610wi. When you click “Setup” button, below page appears. Figure 19. Wireless Security Setup Authentication : You can select an authentication method for the clients to connect to AP. Field Description Open System or No authentication is imposed to the WIZ610wi. Shared Key When enabling WEP, the configuration is activated. Open The client authentication is performed by RADIUS server. System with 802.1x Configure the port number, IP address and Password of RADIS server. Shared Key WEB function is activated. Input the Key value. WPA RADIUS WPA: Wi-Fi Protected Access WPA is based on TKIP(Temporal Key Integrity Protocol) IEEE802.11i standard which complements WEP(Wired Equivalent Privacy). WPA is the upgraded authentication methods by applying 802.1x and EAP (Extensible Authentication Protocol). WPA PSK WPA Pre-Shared-Key is the authentication method using PreShared Key. Configure PSK format and input value for PSK. WPA2 RADIUS WPA2 is using AES(Advanced Encryption Shared) algorithm. AES is more strengthened encryption method rather than RC4 which is used for WEP or WPA. WPA2 RADIUS performs AES encryption and RADIUS server authentication. If WIZ610wi uses WPA2, it can be compatible with devices using WPA1. 19 WPA2 PSK WPA2-PSK uses Advanced Encryption Standard(AES) for encryption Keys together with WPA PSK method. Table 6. Authentication Method Encryption : It configures authentication mode for security of wireless network. There are options of WEP and None. If WEP is selected, the below items are activated for configuration. ITEM key Length Key Format Description Configure the length of WEP Key. Option : 64 or 128bit Configure the format of WEP Key. Option : ASCII(5 Characters) or Hex(10 Character) Default Tx Key Max 4 Tx Key values can be configured. Select one of them. Encryption Key Input the key value. 1~4 Table 7. WEP Configuration 20 y Advanced Settings : If you click the “Setup” button, below page is appeared. Figure 20. Wireless Advanced Settings Field Fragment Threshold Description This value specifies the maximum size for a packet before data is fragmented into multiple packets. If you experience a high packet error rate, you may slightly increase the Fragmentation Threshold. Setting the Fragmentation Threshold too low may result in poor network performance. Only minor reduction of the default value is recommended. In most cases, it should remain as its default value of 2346. RTS Threshold When you encounter inconsistent data flow, only minor reduction of the default value, 2347, is recommended. If a network packet is smaller than the preset RTS threshold size, the RTS/CTS mechanism 21 will not be enabled. The Router sends Request to Send (RTS) frames to a particular receiving station and negotiates the sending of a data frame. After receiving an RTS, the wireless station responds with a Clear to Send (CTS) frame to acknowledge the right to begin transmission. The RTS Threshold value should remain as its default value of 2347. Preamble Type Beacon Interval The default value is 100. Enter a value between 1 and 65,535 milliseconds. The Beacon Interval value indicates the frequency interval of the beacon. A beacon is a packet broadcast by the Router to synchronize the wireless network. Table 8. Wireless Advanced Settings y Access Control : By registering the MAC address of a client, WIZ610wi blocks or allows the client to access. If you click the “Setup” button, page below appears. Figure 21. Wireless Access Control Wireless Access Control Mode : This option allows you to enable or disable the “Wireless Access Control Mode”. (Options: Disable / Allow Listed / Deny Listed) Disable: Not use “Wireless Access Control Mode”. Allow Listed: clients with their MAC registered in the Control List are permitted to access WIZ610wi Deny Listed: clients with their MAC registered in the Control List are denied to access 22 WIZ610wi y WDS Setting : If AP mode is set as WDS Repeater, WDS Setting button is activated. WDS is Wireless Distribution System that is working as a wireless bridge between AP and AP. If you click the “Setup” button, the page below appears. Figure 22. WDS Setting Input wireless MAC address of the device to be connected. Apply Changes : Add the MAC address into the WDS list Reset : Discard all changes in all fields 23 2.2.5.4. Gateway Setup <Notice> When changed to Gateway mode, wired network is disconnected, It because WIZ610wi’s wire port act as WAN Port. So to solve this problem.. 1. Connect WIZ610wi through wireless 2. Check WAN IP of Gateway mode setup page 3. Connect ‘http://WAN_IPaddress:8080 (8080 port) First time it must be input ‘8080’, but next time no need to add ‘8080’ Gateway mode can be used when you want to connect to the Internet through an ADSL/Cable Modem, or IP Sharing Device. By clicking the “Setup” button, you can configure your PPPoE, DHCP Client, PPTP or Static IP settings Figure 23. Gateway Setup y Alias Name: Refer to “2.2.4.3 Access Point Setup”. y Band: Refer to “2.2.4.3 Access Point Setup”. 24 y SSID: Refer to “2.2.4.3 Access Point Setup”. y Channel Number: Refer to “2.2.4.3 Access Point Setup”. y Security: Refer to “2.2.4.3 Access Point Setup”. y Advanced Settings: Refer to “2.2.4.3 Access Point Setup”. y Access Control: Refer to “2.2.4.3 Access Point Setup”. y WAN Port : If configures WAN port. It configures the network environment for the connection to WIZ610wi. Figure 24. WAN Port Configuration 9 WAN Access Type ¾ Static IP : Manually input your IP address, Subnet Mask, Default Gateway and DNS. Figure 25. WAN Access Type – Static IP ¾ DHCP Client : An IP address can be acquired from a DHCP server. The 25 DNS information can be automatically acquired from a DHCP server or set manually (Set DNS Manually). Figure 26. WAN Access Type – DHCP Client 9 PPTP ¾ Virtual Server: Virtual Server also known as Port Forwarding associates a port number with a private IP address(internal network). This technique allows clients from outside a network to access devices within the LAN (internal network). ¾ DMZ: This feature allows one network user to be exposed to the Internet for special-purposes such as Internet gaming or videoconferencing. DMZ hosting forwards all the ports at the same time to one PC. The Port Range Forward enhances the security of your device because only a range of ports are opened for access. DHCP should be disabled in order to avoid any changes in your IP address. Static IP address is recommended when using the DMZ ¾ Remote Management : Configure the port number for the connection to WIZ610wi from a remote site. Default Port Number is set as “8080”. ¾ URL Filter: It enables to connect or disconnect to the specified URL. ¾ MAC Filter: Prevent access from a device with a specific MAC address ¾ IP Filter: Prevent acess from a device with a specific IP address ¾ DDNS(Dynamic DNS) : Once the DDNS server registers yours MAC address, your device can connect to the internet regardless of your address. DDNS service can be provided by www.no-ip.com. (You need to pay some fee). After registering some information at www.no-ip.com, input your E-mail address and password in the figure shown below. When you click the “Update” button, the status will change from“Not Connected” to “Connected” 26 Figure 27. WAN Access Type - DDNS 2.2.5.5. Client Setup In client mode, WIZ610wi connects to an access point. Figure 28. Client Setup y Alias Name: Input the name for WIZ610wi. y Band: Select a communication protocol for your module. It supports 802.11b, 802.11g and 802.11b/g mode. y SSID: Input the SSID of an access point. If you don’t know your SSID, you can use the “Site Survey” to search and connect to an AP. y Security: Configure security settings (these should match your AP’s settings) y Advanced Settings: Refer to “2.2.4.3 Access Point Setup”. y Site Survey: If you click the “Site Survey’ button, all access points near your module are listed as shown in the figure below. Please select one AP and click “Connect” 27 button. If PC or application device is set as DHCP Client, the AP will operates as its DHCP server and WIZ610wi doesn’t act as DHCP Server. When you connect to an AP with security enabled ,the “Wireless Security Setup Page” will appear automatically to set-up your security settings. By using the “Site Survey”, Band, SSID and Security can be configured all at the same time. Figure 29. Site Survey 28 2.2.6. Serial Setting For the ‘Serial to Wireless’ communication, you can configure serial parameters. Figure 30. Serial to Ethernet Configuration y Status: Check this combo box to enable serial communication y Protocol: Select UDP or TCP y Mode: Select one mode among Server, Client and Mixed. This mode is to select the communication method based on TCP. TCP is the protocol which establishes the connection before data communication. In server mode, WIZ610wi waits for the connection from a client. In client mode, WIZ610wi operates as client at the TCP Client mode on the process of connection, and tries to connect to the server’s IP and Port. Mixed modes supports both of Server and Client at the same time. Below describes in details regarding each mode 29 9 TCP server mode In order to operate this mode, Local IP, Subnet, Gateway Address and Local Port Number should be configured. In monitoring applications, the server mode can be useful since it can listen for any connection from clients, and establish a connection for remote management. 1. A client connects to the WIZ610wi which is in TCP Server mode. 2. As the connection is established, data can be transmitted in both directions – from the host to the WIZ610wi, and from the WIZ610wi to the host 9 TCP client mode In TCP Client mode, your module will attempt to connect to a specified server. In order to operate this mode, Local IP, Subnet, Gateway Address, Server IP, and Server port number should be set. If the server IP has a domain name, please use the DNS function. 1. When power is supplied, WIZ610wi board operating as TCP client mode actively establishes a connection to the server. 2. Once the connection is established, data can be transmitted in both directions – from the host to the WIZ610wi and from WIZ610wi to the host 30 9 Mixed mode In this mode, WIZ610wi normally operates as a TCP Server and waits for a connection request from a client. However, if WIZ610wi receives data from the serial device before connection is established, WIZ610wi changes to the client mode and sends the data to the server. Therefore, in the mixed mode, the server mode has higher priority than the client mode. Mixed mode takes advantages of both client and server mode. The client mode may be used for sending out emergency reports in an urgent situation while the server mode may be used for remote management. y Server IP : Input server IP or input Domain Name. If both input, priority is IP address. y Server Port : Input server port. y -Reconnect Interval: Set the interval retrying connecting to server. y Baudrate: Configure serial communication speed. y Databits: Configure databits. y Parity: Configure parity checking option. (option: None, Odd, Even) y Stopbits: Configure stop bit option.(Option: 1, 2) y FlowControl: Configure flow control option. (option: none, Xon/Xoff, RTS/CTS) y Aux Port Configuration You can control serial devices through the serial port of WIZ610wi by using AUX port, while you can keep serial to WiFi data communication port. 31 y - Status: You can enable Aux Port. - Protocol : Aux port can use only UDP protocol. - Mode : You can select server or client mode. - Server IP : If you select the client mode, Server IP is enabled. - Server Port: Input the port number of the server. Data Packing Condition : You can specify how the serial data can be packed to be sent to the Ethernet. There are 3 delimiters time, size and character. If all of them are set as ‘0’, whenever the serial data is arrived, they are sent to the Ethernet immediately. - Time: This field specifies the waiting time. When there is no more input from the serial port, the module will wait for the specified time and then send out the serial data to the network. For example, if 2000 ms is specified, the module will send out the packet at 2000 ms after the last input from the serial port. If there is no data in the serial buffer, the module will not send out any data packets. (‘0’: Function Disable) - Size: This field specifies the size limit in the serial buffer. Once the serial buffer reaches this limit, the data will be sent out to the Ethernet. If the serial buffer is greater than the size limit, the module will create an Ethernet packet and store the extra data, and send out to the Ethernet when the limit is reached again. (‘0’: Function Disable) 32 - Character: Register a character to trigger the conversion of serial data to network packets. Whenever the registered character is inside the serial buffer, all the data before the registered character is sent out to the network excluding the character itself. The character must be in Hexadecimal. (‘0’ : Function Disable) If any one of these conditions is met, the data will be sent to Ethernet. Ex) Delimiter: Size=10, Char=0x0D Serial data : 0123456789abc Ethernet data : 0123456789 ☞ “abc” remains in the serial buffer of the module and will not be sent until the specified size or character has been fulfilled. y Save : Save the configuration values. y Reset : Discard all changes in all fields 2.2.7. Security Setup Refer to “2.2.4.3. Access Point Setup’. 2.2.8. Others 2.2.8.1. Password You can change the password of WIZ610wi 33 Figure 31. Password Setup 2.2.8.2. Log The log information can be saved. In order to use this function, check the combo box “Enable Log”. The log will include information such as wireless, DDNS, WAN and DHCP. . Figure 32. System Log 2.2.8.3. Upgrade In this page, you can upgrade the firmware of your WIZ610wi. Browse the firmware file by clicking the “Find” button. If you click “Upload” button after selecting firmware file, the firmware starts uploading. This process will take about 60 seconds. 34 Figure 33. Upgrade Firmware 2.2.8.4 Factory Default If you click the “Factory Default” button, all settings value are restored to the factory default setting. The factory default values are shown below: Field Default Value IP Address 192.168.1.254 Subnet Mask 255.255.255.0 Default Gateway 0.0.0.0 DHCP Server DHCP Client Range 192.168.1.2~192.168.1.100 DNS Server 0.0.0.0 Serial Status Disable Serial Mode Server Server IP 0.0.0.0 Server Port 5000 Baudrate 38400 Databits 8 Parity None Flow Control None Wireless Mode AP Alias Name Wireless_AP Band 2.4GHz (B +G) 35 SSID WLANAP Channel 1 AP Mode AP Authentication Open system or Shared Key Encryption None Fragment Threshold 2346 RTS Threshold 2346 Preamble Type Long Preamble Beacon Interval 100ms Inactivity Time 30000ms Broadcast SSID Enable WMM Enable Password Admin Log Disable Table 9. Factory Default Value 36 2.2.8.5. Reboot In this page, you can reboot your module. Figure 34. Reboot System 37 3. Pin Assignment and Module Size Figure 35. WIZ610WI PIN Map No Name In/Out Description 1 CTS I UART : CTS 2 RTS O UART : RTS 3 - - - 4 HW_Trigger I Low : Entering serial command mode High : Exit serial command mode 5 nRS232_LED O 6 Serial RX/TX LED (Active Low) Reserved 7 SOUT O UART : TXD 8 SIN I UART : RXD 9 DC_IN 3.3V Power 10 DC_IN 3.3V Power 11 GND GND 12 GND GND 13 RXERR I MII Receive Data Error 14 COL I MII collision 15 W_LED O Wireless LED (Active Low) 16 MDC I SMI Clock 38 17 RESET I Active High If this signal asserted more than 3 sec, factory reset performed. 18 MDIO I/O SMI In/Out Data 19 GND GND 20 GND GND 21 RXC I MII receive clock 22 RXDV I MII receive data valid 23 RXD2 I MII receive data 24 RXD0 I MII receive data 25 RXD1 I MII receive data 26 RXD3 I MII receive data 27 GND GND 28 GND GND 29 TXC I MII transmit clock 30 TXEN O MII transmit enable 31 TXD3 O MII transmit data 32 TXD2 O MII transmit data 33 TXD0 O MII transmit data 34 TXD1 O MII transmit data 35 GND 36 CRS GND I Carrier sense Table 10. WIZ610wi Pin Function 39 Figure 36. WIZ610WI Board Dimensions (unit : mm) 40 4. Demonstration and Test In this chapter, an example is provided for you to test the functionality of WIZ610wi. The testing environments are the followings: <Hardware> A PC equipped with a RS-232 serial port WIZ610WI module and WIZ610WI base board Connect PC and module’s Ethernet port by using an Ethernet Cable(Direct or Crossover) Connect PC and module’s serial port by using a serial cable <Software> Hyper Terminal (or any other terminal program) STEP1. ① Connect the PC and WIZ610wi base board by using a serial cable. ② Connect the PC and WIZ610wi base board by using an Ethernet cable. ③ Turn on the power switch of WIZ610WI base board. STEP2. (WIZ610wi Environment Setup) ① On your PC, go to the “Network Setting” and connect to your WIZ610wi in the “Wireless Network Connection”. ② In your web browser, input IP address of WIZ610wi (Default : 192.168.1.254). If configuration page appears, click “Serial setup” menu and set the serial parameters. STEP3. (Data Transmission) ① Execute terminal program at the PC. (Ex: Hyper Terminal) ② Set the baud rate as the same value of WIZ610wi. 41 Figure 37. Serial Terminal Program configuration ③ Connect to “WIZ610wi” in the Wireless Network Setting of your PC ④ Execute one more terminal program, and set IP address and Port number. 42 Figure 38. Network Terminal Program configuration ⑤ Input any characters in the Hyper Terminal for Serial. (In the example below, “01234567890” is input). The same characters are outputted in the Hyper Terminal for Network. A Serial to Wireless LAN test was performed. Figure 39. Received Data by Network Terminal Program ⑥ In the same way, input any character at the screen of terminal program for network, and check if same character is displayed at the screen for serial. (Ethernet to Serial) ※ The above test can also be performed in a program called, “Device Terminal program”, which is easy and simple to use. 43 Figure 40. Device Terminal Program Device Terminal is a program which integrates both serial and network communications into one user interface so that you can test your WIZnet gateway module easily. As shown in above Figure, the upper part of the program allows you to configure your serial setting of WIZ610wi. By clicking the “Open” button, serial communication is enabled. The lower part of the program allows you to configure the network settings. You can test both TCP Client and TCP Server modes at the same time. If the Server Mode is enabled, Device Terminal will operate as server mode, and the WIZ610wi module will work as client mode. The PC where the Device Terminal is operating will work as a server, the IP address of the PC should be set as Server IP of the module. If Server mode is not checked, Device Terminal will operate as client mode, and the module as server. For the IP address and port, please input your IP address and port number of WIZ610wi and click the “Connect” button to start a network communication. When serial and network terminals are connected, input any character in the Data Input window and click “Send” button. You can check the data is transferred into the another window. 44 5. Serial Configuration Serial Command Format It is possible to configure WIZ610wi by using serial command. Pin number 4 of WIZ610wi is Hardware trigger pin.(‘1’: H/W trigger disable, ‘0’: enable) Or you can use h/w trigger switch of WIZ610wi EVB board < Frame Format > Command Frame format Descriptor STX Command code Parameter ETX Length(bytes) 1 2 Variable 1 Table 11. Serial Configuration Frame format Reply Frame format Descriptor STX Reply code Parameter ETX Length(bytes) 1 1 Variable 1 Table 12. Serial Configuration Reply Frame format STX & ETX Setting Comments STX ‘<’ : Hex = 3Ch ETX ‘>’ : Hex = 3Eh Table 13. Serial Configuration STX & ETX Reply Code Reply Comments S Command was successful F Command failed 45 0 Invalid STX 1 Invalid command 2 Invalid parameter 3 Invalid ETX E Enter Serial Command Mode Table 14. Serial Configuration Reply Code Command Code Com Get/ mand Set Comments Time Parameter (sec) Network * Command Syntax RF Get Firmware <RF> Version * Response Syntax 1 <Svx.x.x> * Command Syntax <RA> RA Get MAC Address * Response Syntax 1 <S0xx.xx.xx.xx.xx.xx_1xx.xx.xx.xx.xx.xx> 0:Ethernet MAC address, 1:Wireless MAC address, * Command Syntax RI Get IP Address <RI> 1 * Response Syntax <Sxxx.xxx.xxx.xxx> * Command Syntax WI Set IP Address <WIxxx.xxx.xxx.xxx> 2 * Response Syntax <S> * Command Syntax RS Get Subnet Mask <RS> 1 * Response Syntax <Sxxx.xxx.xxx.xxx> 46 * Command Syntax WS Set Subnet Mask <WSxxx.xxx.xxx.xxx> 2 * Response Syntax <S> * Command Syntax RG Get Gateway <RG> 1 * Response Syntax <Sxxx.xxx.xxx.xxx> * Command Syntax WG Set Gateway <WGxxx.xxx.xxx.xxx> 2 * Response Syntax <S> * Command Syntax <RD> RD Get DHCP Server * Response Syntax 1 <Sx> 1:Enable, 0:Disable * Command Syntax <WDx> WD Set DHCP Server 1:Enable, 0:Disable 2 * Response Syntax <S> * Command Syntax RH Get DHCP Start/End IP <RH> * Response Syntax 1 <Sxxx.xxx.xxx.xxx_xxx.xxx.xxx.xxx> Start IP address_End IP address * Command Syntax WH Set DHCP Start/End IP <WHxxx.xxx.xxx.xxx_xxx.xxx.xxx.xxx> Start IP address_End IP address 3 * Response Syntax <S> Wireless DL Get Active Client List * Command Syntax <DL> 1 * Response Syntax <Sxxxxxxxxxxxx_xx_xx_xx[:xxxxxxxxxxxx_xx_xx_xx:…]> 47 MAC address_Channel_TxRate_RSSI * Command Syntax <RL> RL Get DHCP Client * Response Syntax List <Sxxx.xxx.xxx.xxx_xxxxxxxxxxxx[:xxx.xxx.xxx.xxx_xxxxxxxxxxxx:…] 1 > IP address_MAC address * Command Syntax <WV0> or <WV1_xxx.xxx.xxx.xxx[_xxx.xxx.xxx.xxx]> WV Set DNS Server 0:Auto_DNS server IP address, 1:Manual 1 * Response Syntax <S> * Command Syntax <RV> RV Get DNS Server * Response Syntax 1 <Sx_xxx.xxx.xxx.xxx[_xxx.xxx.xxx.xxx]> or<S0> 0:Auto_DNS server IP address, 1:Manual * Command Syntax <RT> * Response Syntax <S0_xxx.xxx.xxx.xxx_xxx.xxx.xxx.xxx_xxx.xxx.xxx.xxx_xxx.xxx.xxx.x xx> or RT Get WAN Port <S1_xxx.xxx.xxx.xxx_xxx.xxx.xxx.xxx_xxx.xxx.xxx.xxx> or 2 <S2_User Name_Password> 0:Static, 1:DHCP Client, 2:PPPoE -Static: 0_Ipaddress_Subnet_Gateway_DNS -DHCP Client: 1_IPaddress_Subnet_Gateway -PPPoE: 2_UserName_Password 48 * Command Syntax <WT0_xxx.xxx.xxx.xxx_xxx.xxx.xxx.xxx_xxx.xxx.xxx.xxx_xxx.xxx.xxx .xxx> or <WT1> or <WT2_User Name_Password> WT Set WAN Port 1 0:Static, 1:DHCP Client, 2:PPPoE -Static: 0_Ipaddress_Subnet_Gateway_DNS -DHCP Client: 1 -PPPoE: 2_UserName_Password * Response Syntax <S> * Command Syntax RC Get Connection status <RC> * Response Syntax 1 <Sx> 0: Not Connect, 1:Connect TCP WC Set connection close * Command Syntax <WC> * Response Syntax <S> * Command Syntax <QZ> * Response Syntax QZ Get Current <Sx> system status 0:Normal 1 1:During Flash Erase 2:During Flash Write 3:During Firmware Upgrade Wireless * Command Syntax DB Get Wireless Band <DB> * Response Syntax 1 <Sx> 0: 11b+g, 2: 11b, 3:11g GB Set Wireless * Command Syntax Band <GBx> 2 49 0: 11b+g, 2: 11b, 3:11g * Response Syntax <S> * Command Syntax DO Get Operation Mode <DO> * Response Syntax 1 <Sx> 0:AP, 1:Gateway, 2: AP+WDS, 3:Client * Command Syntax GO Set Operation Mode <GOx> 0:AP, 1:Gateway, 2: AP+WDS, 3:Client 20 * Response Syntax <S> * Command Syntax <DS> DS Get SSID * Response Syntax 1 <Sxxxx~> 1~32 chars * Command Syntax <GSxxxx~> GS Set SSID 1~32 chars 1 * Response Syntax <S> * Command Syntax <DC> DC Get Channel * Response Syntax 1 <Sx> 0:Auto, 1~13:Channel number * Command Syntax <GCx> GC Set Channel 0:Auto, 1~13:Channel number 2 * Response Syntax <S> * Command Syntax DW Get WDS <DW> 1 * Response Syntax 50 <Sx_x_xxxxxxxxxxxx_xxx~> 1:Master, 2:Slave _count_MACaddress_Comment[_MACaddress_Comment_...] * Command Syntax <GWx_x_x_xxxxxxxxxxxx_xxx~> GW Set WDS 1:Master, 2:Slave _count_MACaddress_Comment[_MACaddress_Comment_...] 1 * Response Syntax <S> * Command Syntax <DP> DP Get Tx Power * Response Syntax 1 <Sxx> 0: off, 1~16: power(dBm) * Command Syntax <GPxx> GP Set Tx Power 0: off, 1~16: power(dBm) 2 * Response Syntax <S> * Command Syntax <DR> DR Get Data Rate * Response Syntax 1 <Sxx> xx: 1/2/5/11/24/36/48/54 * Command Syntax <GRxx> GR Set Data Rate xx: 1/2/5/11/24/36/48/54 3 * Response Syntax <S> * Command Syntax DH Get Broadcast SSID <DH> * Response Syntax 1 <Sx> 0:Enable, 1:Disable GH Set Broadcast * Command Syntax SSID <GHx> 1 51 0:Enable, 1:Disable * Response Syntax <S> * Command Syntax <DM> DM Get WMM * Response Syntax 1 <Sx> 1:Enable, 0:Disable * Command Syntax <GMx> GM Set WMM 1:Enable, 0:Disable 1 * Response Syntax <S> * Command Syntax <DA> DA Get MAC Access * Response Syntax Control <Sx_x_xxxxxxxxxxxx_xxx~> 1 0:Disable, 1:AllowListed, 2:DenyListed[_count[_MACaddress_Comment]] * Command Syntax <GAx_x_x_xxxxxxxxxxxx_xxx~> GA Set MAC Access 0:Disable, 1:AllowListed, Control 2:DenyListed[_1:add,2:delete_count_MACaddress_Comment] 5 * Response Syntax <S> * Command Syntax <DI> DI Get Site Survey * Response Syntax 15 <Sxxxx_xxxxxxxxxxxx_xx_xx_x> SSID_BSSID_Channel_RSSI_Security * Command Syntax <GIxxxx~_xxx~> GI Set Connect AP SSID_Security Key Before using <GI> command, perform the site survey using <DI> commands and connect to a SSID. If WEB is used for AP authentication, and the defalut keyID is not '1', the 52 3 connection is not established. In this cause, use <GU>command for the connection. * Response Syntax <S> * Command Syntax <DN> DN Get Alias Name * Response Syntax 1 <Sxxx~> Alias Name, Max Length: 29 characters * Command Syntax <GNxxx~> GN Set Alias Name Alias Name, Max Length: 29 characters 1 * Response Syntax <S> * Command Syntax Module QP Get Status Checking <QP> * Response Syntax 2 <Sx_xxxx_xxxxxxxxxxxx_xx_xxM_xx> Conn_status 0: not connected, 1: connected. Conn status_SSID_BSSID_CHAN_RATE_RSSI Security * Command Syntax <DU> * Response Syntax <Sx_x_x_x_x_x_x_x> AuthMode_Encrypt[_DefaultKey_KeyLength_KeyFormat_KeyVa DU Get Security Status lue_radiusPasswd_radiusIP_radiusPort] AuthMode: 0(Open or Shared), 1(Open), 2(802.1x), 3(Shared), 1 4(WPA), 5(WPA-PSK), 6(WPA2), 7(WPA2-PSK) Encrypt: 0(None),1 (WEP), 2(TKIP), 3(AES), 4(TKIP_AES) DefaultKey: 1~4 KeyLength: 0(None), 1(WEP64), 2(WEP128) KeyFormat(WEP): 0(Ascii), 1(Hex) KeyFormat(WPA-PSK): 0(Passphrase), 1(Hex) GU Set Security * Command Syntax Control <GUx_x_x_x_x_x_x_x> 15 53 AuthMode_Encrypt[_DefaultKey_KeyLength_KeyFormat_KeyVa lue_radiusPasswd_radiusIP_radiusPort] AuthMode: 0(Open or Shared), 1(Open), 2(802.1x), 3(Shared), 4(WPA), 5(WPA-PSK), 6(WPA2), 7(WPA2-PSK) Encrypt: 0(None),1 (WEP), 2(TKIP), 3(AES), 4(TKIP_AES) DefaultKey: 1~4 KeyLength: 0(None), 1(WEP64), 2(WEP128) KeyFormat(WEP): 0(Ascii), 1(Hex) KeyFormat(WPA-PSK): 0(Passphrase), 1(Hex) * Response Syntax <S> Serial * Command Syntax <RK> RK Get Protocol * Response Syntax 2 <Sx> 0: TCP, 1: UDP * Command Syntax <WKx> WK Set Protocol 0: TCP, 1: UDP 1 * Response Syntax <S> * Command Syntax <RM> RM Get Mode * Response Syntax 2 <Sx> 0:Client, 1:Mixed, 2:Server * Command Syntax <WMx> WM Set Mode 0:Client, 1:Mixed, 2:Server 1 * Response Syntax <S> * Command Syntax RX Get Server IP <RX> 1 * Response Syntax <Sxxx.xxx.xxx.xxx> 54 Server IP address * Command Syntax <WXxxx.xxx.xxx.xxx> WX Set Server IP Server IP address 2 * Response Syntax <S> * Command Syntax <RP> RP Get Port * Response Syntax 1 <Sxxxxx> Port number: 0~65535 * Command Syntax <WPxxxxx> WP Set Port Port number: 0~65535 1 * Response Syntax <S> * Command Syntax <RB> * Response Syntax <Sxxxxx> RB Get Baudrate_Dat [Baudrate] 1: 115200, 2: 57600, 3: 38400, aBit_Parity_Fl 4: 19200, 5: 9600, 6: 4800, 7: 2400, 8: 1200, ow_Stopbits 0: 230400, 9:460800, a: 921600 2 [data byte] 7: 7bit, 8: 8bit [parity] 0: no parity, 1: Odd, 2: Even [Flow control] 0: no, 1: Xon/Xoff, 2: RTS/CTS [Stop bits]; 1: 1stop, 2:2stop * Command Syntax <WBxxxxx> Baudrate_Dat WB Set aBit_Parity_Fl ow_Stopbits [Baudrate] 1: 115200, 2: 57600, 3: 38400, 4: 19200, 5: 9600, 6: 4800, 7: 2400, 8: 1200, 5 0: 230400, 9:460800, a: 921600 [data byte] 7: 7bit, 8: 8bit [parity] 0: no parity, 1: Odd, 2: Even [Flow control] 0: no, 1: Xon/Xoff, 2: RTS/CTS 55 [Stop bits]; 1: 1stop, 2:2stop * Response Syntax <S> * Command Syntax RW Get Domain Name <RW> * Response Syntax 2 <Sxxxx~> Domain name: Max 64 characters * Command Syntax WW Set Domain Name <WWxxxx~> Domain name: Max 64 characters 2 * Response Syntax <S> * Command Syntax <QT> QT Get Time * Response Syntax 1 <Sxxxxx> 0~65535 * Command Syntax <OTxxxxx> OT Set Time 0~65535 1 * Response Syntax <S> * Command Syntax <QS> QS Get Size * Response Syntax 1 <Sxxx> 0~255 * Command Syntax <OSxxx> OS Set Size 0~255 1 * Response Syntax <S> * Command Syntax QC Get Char <QC> 1 * Response Syntax 56 <Sxx> 00~ff * Command Syntax <OCxx> OC Set Char 00~ff 1 * Response Syntax <S> * Command Syntax QI Get Inactivity Time <QI> * Response Syntax 1 <Sxx> 00~60 * Command Syntax OI Set Inactivity Time <OIxx> 00~60 1 * Response Syntax <S> * Command Syntax <QU> * Response Syntax QU Get TCP <Sx> Connection 0~1 Option 0: Try TCP connection at the TCP client mode regardless of 1 serial data 1: Try TCP connection at the TCP client mode when serial data is received * Command Syntax <OUx> 0~1 OU Set TCP 0: Try TCP connection at the TCP client mode regardless of Connection serial data Option 1: Try TCP connection at the TCP client mode when serial 1 data is received * Response Syntax <S> RU Get Get Aux port * Command Syntax 1 57 <RU> * Response Syntax <Sx_x_x_a.b.c.d_x> Enable[_Protocol_Mode_ServerIP or Domain_ServerPort] Enable: 0(Disable), 1(Enable) If Disable is set, data can be omitted. Protocol: 0(UDP), 1(TCP) Mode: 0(Server), 1(Client) ServerIP: a.b.c.d format Domain: xxx.yyy.zzz ServerPort: 0~65535 * Command Syntax <WUx_x_x_a.b.c.d_x> Enable[_Protocol_Mode_ServerIP or Domain_ServerPort] Enable: 0(Disable), 1(Enable) If Disable is set, data can be omitted. WU Set Set Aux port Protocol: 0(UDP), 1(TCP) 1 Mode: 0(Server), 1(Client) ServerIP: a.b.c.d format Domain: xxx.yyy.zzz ServerPort: 0~65535 * Response Syntax <S> * Command Syntax <RE> * Response Syntax RE Get Get data flow <Sx> 1 0~2 0: Transmit serial data to the main and aux port. (default) 1: Transmit serial data to the main port 2: Transmit serial data to the aux port * Command Syntax <WEx> WE Set Set data flow 0~2 1 0: Transmit serial data to the main and aux port. (default) 1: Transmit serial data to the main port 58 2: Transmit serial data to the aux port If module is rebooted or any configuration value is changed, it returns to default. * Response Syntax <S> * Command Syntax <RZ> * Response Syntax <Sx_xxx_xxx> Enable(0-1)[_String1_String2] RZ Get Get insert 0: disable, default value, String can be omitted. tag 1: enable 1 String1, String2: It is available when Enable is set as “1”. String1 is the string which is added when transmitted from main port to serial. String2 is the string which is added when transmitted from aux port to serial. It is composed of maximum 16 characters * Command Syntax <WZx_xxx_xxx> Enable(0-1)[_String1_String2] 0: disable, default value, String can be omitted. 1: enable WZ Set Set insert tag String1, String2: It is available when Enable is set as “1”. String1 is the string which is added when transmitted from 1 main port to serial. String2 is the string which is added when transmitted from aux port to serial. It is composed of maximum 16 characters. * Response Syntax <S> * Command Syntax <CCxxx.xxx.xxx.xxx_xxxxx> CC Set Change TCP Server IP address_port (0~65535) Client Mode Change main port mode to TCP client mode. 1 * Response Syntax <S> CS Get Connection * Command Syntax 1 59 status <CS> * Response Syntax <OK> : TCP is well connected <FAIL> : TCP is not connected The same command with <RC> that except response format. * Command Syntax <CQxxxxx> CQ Set Change Port number: 0~65535 Server mode Change main port mode to TCP server mode. 1 * Response Syntax <S> Others * Command Syntax WF Set Factory <WF> Default * Response Syntax 20 <S> * Command Syntax WR Set <WR> Restart 20 * Response Syntax <S> error code S <S> or <Sxx…> Commend is successfully applied F <F> Failed to apply 0 <0> "<" is wrong 1 <1> There is not in command list 2 <2> Wrong Parameter factor 3 <3> ">" is wrong 4 <4> Do not work in current mode No more add list. 5 <5> -Limit*WDS: 4 list *ACL: 16 list 60 If input "_" in fact, should input"__" instead of "_". For example SSID, PSK etc. <DS> --> <S11__22>: SSID: 11_22 <GS11_22> --> <S>: SSID: 11_22 <QP> --> <S1_11__22_000102030405_...>: SSID: 11_22 If multi command input, response time be delayed For example DA, GA, DW, GW Notice Security Available mode AP/GW Mode AuthMode: 0-7 EncryptType: 0-3 Client Mode AuthMode: 1,3,5,7 EncryptType: 0,1,4 **Security Example parameter <GU5_2_0_0_12345678> <GU4_2_0_0_12345678_abcd_192.168.123.111_1812> 61 6. Reference Schematics In this chapter, the reference schematics are provided for the WIZ610wi’s MII & UART interfaces. 6.1 WIZ610wi Module Pin assign Figure 41. WIZ610wi Module Pin Assignment MII interface signal TXD[0..3] MII transmit data TXEN MII transmit enable TXC MII transmit clock RXDV MII receive data valid RXD[0..3] MII receive data RXC MII receive clock 62 COL MII collision RXER MII Receive Data Error CRS MII Carrier sense UART interface signal SIN RS-232C RXD SOUT RS-232C TXD CTS RS-232C CTS RTS RS-232C RTS Table 15. WIZ610wi Pin Assignment 6.2 External PHY interface using MII Figure 42. Schematic - External PHY Interface using MII As shown in the above schematic, each MII interface signal of WIZ610wi can be connected to MII interface by using an external PHY chip. 63 6.3 RS-232C interface Figure 43. Schematic – RS-232C Interface As shown above diagram, each UART interface signal can be connected to the interface of RS-232C transceiver chip. (e.g. Sipex’s SP3232EBEY RS-232C Transceiver chip) 64 6.4 Serial to WiFi interface Figure 44. Schematic – Serial to WiFi Reference Schematic 65 7. Aging test report 7.1 Test environment Figure 45. Aging test environment 7.2 Test condition 1) Test condition : -30℃ ~ +70℃ (Humidity 90%) 2) Low temperature test : Testing after 1 hour storage in the chamber at -30℃ condition. 3) High temperature test : Testing after 1 hour storage in the chamber at +70℃ and 90%(humidity) condition. 66 7.3 Test result Date Time Setting Setting Current Current temp. humidity temp. humidity Pass / Fail 2009.04.09 17:00 25℃ 50% 25℃ 50% Pass 2009.04.09 22:00 70℃ 90% 70℃ 90% Pass 2009.04.10 08:30 -30℃ 0% -30℃ 0% Pass 2009.04.10 11:00 25℃ 50% 25℃ 50% Pass 2009.04.10 16:00 70℃ 90% 70℃ 90% Pass 2009.04.10 21:30 -30℃ 0% -30℃ 0% Pass 2009.04.11 10:50 10℃ 0% 10℃ 0% Pass 2009.04.11 14:10 25℃ 50% 25℃ 50% Pass 2009.04.11 17:30 40℃ 65% 40℃ 65% Pass 2009.04.11 20:50 55℃ 75% 55℃ 75% Pass 2009.04.12 14:40 70℃ 90% 70℃ 90% Pass 2009.04.13 12:40 70℃ 90% 70℃ 90% Pass 2009.04.14 12:40 70℃ 90% 70℃ 90% Pass 2009.04.14 23:40 25℃ 50% 25℃ 50% Pass 2009.04.15 12:40 -30℃ 0% -30℃ 0% Pass 2009.04.15 13:40 -30℃ 0% -30℃ 0% Pass 2009.04.15 16:40 25℃ 50% -30℃ 50% Pass Table 16. Aging test result 67