1
GV-370
User Manual
Version 1.33
Table of Content
Chapter 1 Features and Specification ................................................. 4
Features....................................................................................... 4
Specification ............................................................................... 5
Accessories ................................................................................. 8
Overview..................................................................................... 9
Detailed Hardware Functions ................................................... 10
Chapter 2 Getting Started ................................................................. 11
Download Application onto the SD Card ................................. 11
Attaching GV-370 to the Mount/Cradle ................................... 17
Charging your GV-370 ............................................................. 18
Chapter 3 Software Application........................................................ 19
System Menu ............................................................................ 19
Photo View................................................................................ 19
Movie Playback ........................................................................ 21
MP3 Player ............................................................................... 22
Setup ......................................................................................... 24
Chapter 4 Navigation Application .................................................... 27
Starting Intellinav ..................................................................... 27
Getting GPS Signal........................................................... 27
Car Cursor......................................................................... 27
Entering Data on the Intellinav System ............................ 28
Moving Through the Screens............................................ 28
Resetting the GV-370........................................................ 28
Working with the Map .............................................................. 29
Map View.......................................................................... 29
Maneuver Detail ............................................................... 29
Panning the Map ............................................................... 29
2
Route List.......................................................................... 30
Location Information ........................................................ 30
POI Information................................................................ 31
Planning Your Route................................................................. 31
Setting a Single Destination.............................................. 31
Using Shortcuts................................................................. 40
Managing Your Favorites List .................................................. 41
Setting Your Options................................................................. 42
Display Options ................................................................ 42
Route Options ................................................................... 43
Speed Alert........................................................................ 44
Localization ...................................................................... 45
GPS Information............................................................... 46
System Information .......................................................... 46
Navigation Software License Agreement ................................. 47
Chapter 5 Troubleshooting ............................................................... 48
► If the GV-370 does not boot up successfully or does not
function properly .............................................................. 48
► Reset ............................................................................ 48
► Safely Remove Hardware ............................................ 49
► Update the firmware of GV-370 .................................. 50
3
Chapter 1
Features and Specification
Features
•
A complete vehicle navigation solution in one box
•
Simple touch-screen operation
•
3.5” screen, 65536 colors, bright TFT LCD
•
Fast and easy to use::
- Attach, turn it on and go!
- Large screen icons for easy touch-screen access
- User-friendly keypads and menus
- Clear voice-guidance instruction
- Built-in rechargeable battery and adapter to power/charge from cigarette lighter
- Easily mounted and can be removed quickly. Completely portable
•
Built-in antenna with optional MMCX-type connector for external antenna use
•
SD storage card expansion slot
•
Supports MP3 and movie files (dat and mpg format)
•
Supports Photo viewing (.jpg)
4
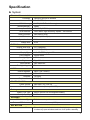
Specification
► System
Electrical Characteristics
Processor
OS
ROM Memory
SDRAM Memory
Memory Card Slot
GPS Receiver
USB Connector
USB Version
Operation time
Charge time
Samsung S3C2410-266MHz
WinCE.NET 4.2 core
64MB (NAND Flash Memory)
64MB
SD/MMC (2GB Max)
SiRF StarⅢ High sensitivity chipset – 20 Channel
Mini USB (5 pins)
Ver 1.1 (Active Sync)
2.5 hrs
4 hrs
DISPALY
Display Size H*W
Pixels H*W
Display Type
3.5” (Diagonal)
240*320 (QVGA)
COLOR TFT Daylight LCD
Color Number
65536 colors
Backlight Type
LED*6
Brightness
Typ. 320 cd/m
Touch Screen
20% Haze film
Backlight Keypad
Blue color
AUDIO
Internal Speaker
Codec
Amplifier
Earphone Jack
Mono (1W / 8ohms)
IIS interface
1W @5V
3.5mm Stereo
POWER SOURCE
Power Source
Mini USB : DC 5.0V/1A
Power Switch
Slide Switch (Battery ON/OFF)
Battery
Battery Cell Type
Built-in Lithium-ion rechargeable Battery
Battery Capacity
1400mAh
ANTENNA
GPS Antenna Type
Built-in ceramic patch antenna
External GPS Antenna
Active external antenna (MCX)
KEY BUTTON
Power
Press the power button to turn on the device, press it again
to close any open windows and turn it off (enter a standby
5
mode)
Menu
Zoom In
Press Menu button to go back to System menu
Press Zoom In button to zoom in (Car Navigation Only)
Zoom Out
Press Zoom Out button to zoom out (Car Navigation Only)
Mute
Press Mute button to mute voice, press button again to go
back to normal.
Roll rock
Roll up to make volume up; roll down to make volume down
Reset
Use the stylus tip to press down the reset button through the
hole to reset the system.
LEDs
Power status
Key Button Backlight
Solid Red – Battery Low
Solid Amber – Battery is being charged
Solid Green – Battery full charged
Solid Blue – When 4.5V~5.5V DC power is supplied through
Mini USB Connector and the device is turned
on.
Backlight On for 3 seconds then Off – When power is
supplied by Li-ion battery and the device is
turned on, and you press any button such as
Menu/Mute/Zoom I n/Zoom Out/Volume
Up/Volume Down buttons.
Mechanical
Dimension
Weight
Stylus Pen
4.33 x 3.42 x 1.00 in. (110 x 86.8 x 25.5mm)
0.40 lbs (183g)
98.5mm * φ4.5mm
Temperature
Operating
Storage
Humidity
Certification
FCC Approved, CE marked
6
14° ~ 140°F
(-10° ~ 60°C)
-4° ~ 158°F (-20°C ~ 70°C)
Operational up to 95% non-condensing
► GPS Specification
Electrical Characteristics
GPS Chipset
Frequency
SiRF Star III
L1, 1575.42 MHz
C/A Code
1.023 MHz chip rate
Channels
20 channel all-in-view tracking
ACCURACY
Position Horizontal
Velocity
Time
10 meters, 2D RMS
1-5 meters 2D RMS, WAAS corrected
0.1m/sec
1 micro-second synchronized to GPS time
DATUM
Datum
Default: WGS-84
ACQUISITION RATE
Hot start
Warm start
1 sec., average
38 sec., average
Cold start
42 sec., average
Reacquisition
0.1 sec. average
GPS Protocol
Default: NMEA 0183 (Secondary: SiRF binary)
PROTOCOL
GPS Output format
GGA(1sec), GSA(1sec), GSV(5sec), RMC(1sec), GLL, VTG
is optional
DYNAMIC CONDITION
Acceleration Limit
Less than 4g
Altitude Limit
18,000 meters (60,000 feet) max.
Velocity Limit
515 meters/sec. (1,000 knots) max.
Jerk Limit
20 m/sec**3
System UI language
Navigation software UI and voice
command
English, German, French, Italian,
Spanish, Dutch
English, Spanish, French
7
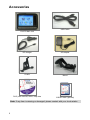
Accessories
USB Cable
GV-370 Main Unit
DC charger
Cradle
DVD (user manual, driver, map data
AC adapter
Mount
2GB SD card (optional)
Note: If any item is missing or damaged, please contact with your local retailer.
8
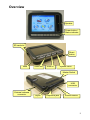
Overview
Speaker
Power button /
Status indicator
SD card slot
Reset
button
Mute
Zoom out
Zoom in
System menu
Master Switch
USB
connector
External antenna
connector
Stylus
Earphone jack
Volume control
9
Detailed Hardware Functions
Power button
Press the power button to turn on the GV-370, press it again to
close any open windows and turn it off (enter a standby mode).
NOTE: The GV-370 device needs about 2 seconds to enter the
standby mode or come back to normal operating state.
Thus, the power button may not function well if you
continue to press it again within 2 seconds.
Main Control Buttons
System Menu
Mute
Zoom Out (Car Navigation Only)
Zoom In (Car Navigation Only)
Status Indicator
Charging: orange.
Charging completed: green.
battery low: red.
SD card slot
The PC applications and map data can be stored in the SD card.
RESET button
Use the stylus tip to press down the reset button through the hole
to reset the system.
Earphone jack
Plug the earphone or headset to the socket, you can listen to the
navigation voice guide or enjoy your favorite MP3 music.
External antenna
connector
For you to connect an optional MMCX-type external antenna.
Speaker
Allow the MP3 and Voice Navigation through the built-in speaker
in the back side of the device.
Stylus
You can use the stylus pen instead of your finger to tap or input
on the screen.
USB connector
Connect the GV-370 to PC via an USB cable for data transfer
and battery charging.
Master switch
Slide the master switch to “OFF” position to prevent from
accidentally turning on the device by touching the power button.
If you want to use this device, be sure to slide the master switch
to the “ON” position.
On the back of the GV-370 is a master slide switch to cut off
power to the unit. It is used to disable the unit in transit from the
factory and if the unit will be in storage for long periods of time.
Be sure that the master slide switch is in the “ON” position when
you remove the unit from the box. The GV-370 will NOT charge
if the master slide switch is in the “OFF” position
Volume control
Control the volume up and volume down.
10
Chapter 2
Getting Started
Before using the GV-370, please fully charge the unit’s battery with the
included AC wall charger. When in the charge mode, the status indicator
will be amber. When the battery is fully charged, the status indicator will
be green.
Download Application onto the SD Card
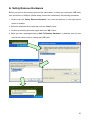
STEP 1:
You have 2 options to download the application software and map data to your SD card.
Option 1 (card reader): Insert the SD card into your existing card reader, which is connected
to your PC. (This is the recommended method for a faster and more secure data transfer rate.)
Option 2 (by ActiveSync): If you do not have an SD card reader, insert the SD card into the
GV-370 and use the provided USB cable to connect GV-370 with your PC. (Before you can use
this method, you must install the USB driver for GV-370 and the Microsoft ActiveSync.
Please see the following note for details.)
Install the USB driver and Microsoft ActiveSync
Turn on the GV-370. Insert the application DVD into the DVD-ROM drive. Use the
provided USB cable to connect the GV-370 with your PC. Windows will detect a
New Hardware and pops up a dialog box for you to install the driver.
11
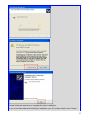
Check the “Install from a list or specific location” item and click on Next button.
Click on “Browse” button and locate the “USB_Driver” folder in the DVD. That’s where the
USB driver files stored.
12
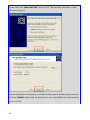
Please follow the instruction to complete the driver installation.
If you do not have Microsoft ActiveSync installed in your PC, please install it now. Please
13
double click on the “MSASYNC.EXE” from the DVD. Then follow the instruction to install
Microsoft ActiveSync.
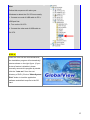
After the USB driver and ActiveSync are installed, please open a windows explorer and you
will find a “SDMMC” folder under the Mobile Device icon. The SDMMC is the SD card drive
on your GV-370.
14
Hint:
Follow this sequence will make your
Windows to detect the GV-370 more easily:
1. Connect one end of USB cable to PC’s
USB port first.
2. Turn on the GV-370.
3. Connect the other end of USB cable to
GV-370.
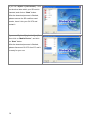
STEP 2:
Insert the DVD into the DVD-ROM drive;
the installation program will automatically
start as shown on the right figure. (If your
Autorun feature is disabled, please
manually execute this program by double
click the "auto.exe" from the root
directory of DVD.) Click on "Make System
Disk" button to load the application
software and default map file to the SD
card.
15
If you use “Option 1 (card reader)”, click
on the drive letter which your SD card is
inserted, and click on “Start” button.
After the download process is finished,
please remove the SD card from card
reader, insert it into your GV-370 and
restart it.
If you use “Option 2 (by ActiveSync)”,
then click on “Mobile Device”, and click
on “Start” button.
After the download process is finished,
please disconnect GV-370 from PC and it
is ready for your use.
16
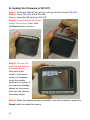
Attaching GV-370 to the Mount/Cradle
Release
Lock
1. Place the GV-370 at a downward angle into the base of the cradle.
2. Push the top of GV-370 inward until the top clip locks into place.
3. Clean windshield glass thoroughly with glass cleaner.
4. Moisten suction cup and attach mount to the windshield.
5. Lock mount lever by moving forward.
●
●
To release, bring lever back and pull on the suction cup’s clear tab to release suction.
Never pull on mounting arm to remove from glass,
It is suggested that you attach the mount in the appropriate place in your car. Do not
mount in front of an airbag panel, or block the driver's vision.
WINDSHIELD MOUNTING DISCLAIMER
State law prohibits drivers in California and Minnesota from using suction mounts on their
windshields while operating motor vehicles. Other dashboard or friction type mounting options
should be used. Globalsat does not take responsibility for any fines, penalties, or damages that
may be incurred as a result if disregarding this notice. (see: California Vehicle Code Section
26708(a); Minnesota Statutes 2005, Section 169.71. It is the responsibility of the user to verify their
own state and local ordinances to avoid violation.
17
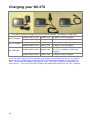
Charging your GV-370
You have 3 options to charge your GV-370: by AC adapter, Car charger or USB cable.
By AC adapter
By Car charger
By USB cable
master switch is ON
power is on
battery is being charged.
master switch is ON
power is off
battery is being charged.
master switch is ON
power is on
battery is being charged.
master switch is ON
power is off
battery is being charged.
master switch is ON
power is on
USB cable provides the power to
GV-370. The battery is not being
charged.
master switch is ON
power is off
battery is being charged.
On the back of the GV-370 is a master slide switch to cut off power to the unit. It is used to
disable the unit in transit from the factory and if the unit will be in storage for long periods of
time. Be sure that the master slide switch is in the “ON” position when you remove the unit
from the box. The GV-370 will NOT charge if the master slide switch is in the “OFF” position.
18
Chapter 3
Software Application
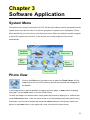
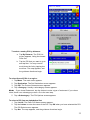
System Menu
The system menu screen controls the GV-370. All the main features can be accessed from the
system menu from the five icons. For the four programs on system menu (Navigation, Photo,
Music and Movie), you can only run one of them at a time. When you switch to another program
or press the “system menu button” on the device, the current program will be closed
automatically.
Navigation
application
Photo View
MP3
Player
Movie
Playback
Setup mode
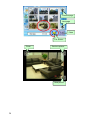
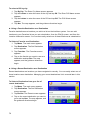
Photo View
Click on the Photo icon in system menu to enter the Photo Viewer. All the
image files on the GV-370’s memory card will be scanned and displayed as
thumbnails..
In the image window, tap the up button to display previous page, or down button to display
next page. Tap the close button to exit the Photo Viewer.
To show an image in full screen mode, simply select the picture by tapping on it, and then tap
on the full screen button. In the full screen mode, it will automatically play each picture every
5 seconds. You can also manually tap the up and down buttons to view previous and next
picture or tap close button on the upper left corner to exit the full screen mode.
19
Previous page
Next page
Close
Full Screen
Close
Previous picture
Next picture
20
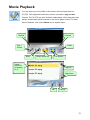
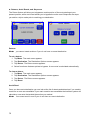
Movie Playback
You can store your movie files in the memory card and play them on
GV-370. The supported movie files must be encoded in mpg and dat
formats. The GV-370 has a full function media player, which has play, stop,
pause, forward and rewind functions in the movie player control. To enter
Movie Playback, click on the Movie icon in system menu.
Rewind
Forward
Play /
Pause
Close
Stop
Select movie file
Full Screen
Select
movie file
by tapping
on it.
Page up
Page down
OK
Cancel
21
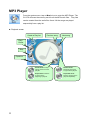
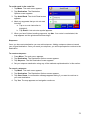
MP3 Player
From the system menu, tap on Music icon to enter the MP3 Player. The
GV-370 will scan the memory card for all the MP3 audio files. Play lists
can be created from the audio files found. All the songs are played
sequentially from a play list.
► Playback screen
Create a Play list
Previous song
Next song
Play /
Pause
Stop
Equalizer
22
Normal mode: It stops
playing at the end of the
play list.
Random mode:
Randomly playing the
songs from the play list.
Repeat mode: Continue
to play from the
beginning of play list.
Sequential mode:
Play the songs from the
play list sequentially.
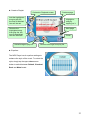
► Create a Playlist
Go back to Playback screen
Previous page
Add the highlighted
song to play list,
the text of selected
item will be red.
Highlight a
song by
tapping on it.
Remove the
highlighted song
from play list, the
text of deselected
item will be black.
Add all songs to play list.
Next page
Close
Remove all songs from play list.
► Equalizer
The MP3 Player has 4 equalizer settings to
enhance the style of the music. To select the
style, simply tap the up or down arrow
button to switch between Default, Classical,
Rock and Metal mode.
23
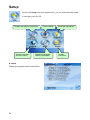
Setup
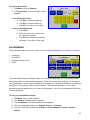
Click on the Setup icon from system menu, you can enter the setup mode
to configure your GV-370.
Display the system information
Set the language
and time zone
Display the program
version information
► About
Display the program version information.
24
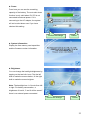
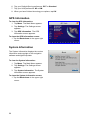
Power setting
Backlight adjustment
Screen
correction
► Power
From here you can see the remaining
capacity of the battery. The auto shut down
function is only valid when GV-370 is not
connected to external power. If it is
connecting to the AC adapter, the system
will not be shut down even if you have
checked this setting.
Confirm the change
Cancel
► System Information
Display the free memory card capacities
and the firmware version information.
► Brightness
You can change the backlight brightness by
tapping on the two bulb icons. Tap the left
bulb to make the screen darker, or the right
bulb to make the screen brighter.
Note: The backlight has 1~6 levels from left
to right. For battery conservation, a
brightness of level 4, 5 and 6 will be same if
there is no external power connected.
Confirm the change
Cancel
25
► Regional Setting
Set the User Interface language and the
time zone.
Confirm the change
► Screen Calibration
If you perform a hard reset, a new
calibration setting of the screen is required.
Tap on the center of the cross-hair, repeat
the action when it appears on the four
corners of the screen.
26
Cancel
Chapter 4
Navigation Application
Starting Intellinav
Tap the Navigation button from main menu screen. A warning screen appears. Tap I Agree
after you have read and agreed to the warning. The map view appears and you are ready to set
your first destination!
Getting GPS Signal
To use the Intellinav program to guide you to a destination, the GV-370’s GPS antenna must
receive GPS signals. GPS signals can be obstructed by ceilings, trees, and nearby tall
buildings. Signals can also be obstructed by the roof of your vehicle. For best results, position
your GV-370 where it has the best possibly view to the sky.
The very first time turning on the device it may take as long as 15 minutes to obtain a valid GPS
fix. Once the first GPS fix is obtained, thereafter, it should normally take no more than 30
seconds to 1 minute to obtain a valid GPS fix.
Car Cursor
The status of the GPS signal is represented in the car cursor color:
Green: 4 or more satellites
Yellow: 3 satellites
Red: less than 3 satellites
Gray: no satellite at all
Only when the car cursor is green will you be receive accurate GPS tracking and navigation.
27
Entering Data on the Intellinav System
The Intellinav program doesn't have a keyboard.
Instead, you tap the screen to enter data. When
you are entering data, a screen containing the
letters of the alphabet appears:
As you tap the buttons on the keyboard, the list
at the top of the screen scrolls to show the next
item that matches the Letters you've tapped.
If you need to enter numbers, tap the 1-2-3
button, and the numeric keyboard appears:
Moving Through the Screens
The Intellinav program shows you one screen at a time. Each time you tap a button, a new
screen appears.
If you want to return to go to the previous screen, tap the
in the upper right corner of the
screen. If you want to go back to the map view directly, tap the
button on the upper left
corner of the screen.
Resetting the GV-370
You should never have to reset the GV-370 under normal circumstances. However, in the
event that a problem cannot be corrected, you may reset the device by pressing the Reset
button on the bottom of the unit, using a pen or paper clip.
28
Working with the Map
The Intellinav program gives you many ways of looking at the map. You can see your current
position, view any of the turns on a route, and the map to view other areas. You can zoom in
and out, and find information about specific locations.
Map View
The map view on the Intellinav program shows
your current location.
At the bottom of the map is a scale indicating
your current zoom level. On the upper right is the
compass. On the center right and left are zoom
in and out buttons, respectively.
Maneuver Detail
If you have set a destination, the map displays
additional information. As you navigate to a
destination, the top of the map displays the
name of the next street, the direction of your
next turn and the distance to the turn.
At the bottom of the map you see the estimate of
how much time remains before arriving at your
destination, the remaining distance to your
destination, and your current speed.
On the upper left is an arrow indicating the direction and the type of maneuver ahead, as well
as the remaining distance to the next maneuver.
Panning the Map
You can pan the map by tapping and dragging
the map. To return to the regular map view,
press the
button.
29
Route List
If you have set a destination, you can view a list of the maneuvers that make up your route.
To view the route list:
1. Tap Menu. The Main Menu appears.
2. Tap Destination. The Destination
3.
4.
Option screen appears.
Tap Route List.
Tapping an item on the list and then
tapping Show will display the detail
directions for that turn.
Location Information
You can find location information about any point on the map by pressing firmly on the map
for one second. A screen appears giving you the opportunity to set the location as the Start
or the Destination, and save the location to your Favorites list, or view information.
From the Information screen you have several options:
Set Start Location
Set Stopover (with an existing route)
Set Destination
Save This Location
Information
Setting the location as a starting point is useful if you are trying to find the distance between two
locations. Setting the location as your destination is a quick way to set a destination. Saving the
location adds the location to your Favorites list (you'll learn more about Favorites later in this
manual). You can also get additional information about the current location, including latitude
and longitude.
30
POI Information
To view information about a POI on the map, tap
on the icon on the map. The POI(S) screen will
appear.
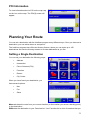
Planning Your Route
You can set a destination with the Intellinav program many different ways. Once you have set a
destination, you can add a detour or a stopover.
The Intellinav program also offers an Itinerary feature, where you can enter up to 100
destinations and use the Itinerary screen to re-order addresses as you like.
Setting a Single Destination
You can set your destination the following ways:
Address
Intersection
Point of Interest (POI)
Favorites
Recent
City Center
When you have found your destination, you
have several options:
Nav
Fav
Show
Nav calculates the route from your current location (or the location you set as a starting point)
to the destination.
FAV adds the destination to your Favorites list. Your Favorites list is a list of locations that you
31
can add destinations to. You can also enter a name for a destination and delete destinations
from the list.
Show displays the location on the panning map without calculating a route. You can also use it
to manually set a starting point.
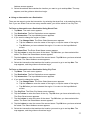
► Using an Address as a Destination
There are two ways to enter the address: by selecting the street first, or by selecting the city
first. If you use Street First and too many records match, you will be asked to use City First.
Note: You will be prompted for the street name first, then the house number.
To Enter an Address as a Destination Using Street First:
1. Tap Menu. The main menu appears.
2. Tap Destination. The Set Destination screen appears.
3. Tap Address. The Input Method screen appears.
4. If you need to change the region:
a. Tap Change State. The Enter State Name screen appears.
b. Tap the Letters to enter the name of the region or State, or tap the name in the
list.
c. Tap OK when you have selected the region or State. You will return to the Input
Method screen.
5. Tap Street First. The Enter Street Name screen appears.
6. Tap the Letters to enter the name of the street. Tap OK when you have selected the
street. The Enter House Number screen appears.
7. Tap the Numbers or Letters A-D to enter the house number. Tap OK. The Select
Address screen appears.
8. Select the address that matches the location you want to go to and tap Nav. The map
appears, and the guidance directions begin.
To Enter an Address as a Destination Using City First:
1. Tap Menu. The main menu appears.
2. Tap Destination. The Set Destination screen appears.
3. Tap Address. The Input Method screen appears.
4. If you need to change the region or State:
a. Tap Change State. The Enter State Name screen appears.
b. Tap the Letters to enter the name of the region or State, or tap the name in the
list.
c. Tap OK when you have selected the region. You will return to the Input Method
screen.
5. Tap City First. The Enter City Name screen appears.
6. Tap the Letters to enter the name of the City. Tap OK when you have selected the City.
The Enter Street Name screen appears.
7. Tap the Letters to enter the name of the street. Tap OK when you have selected the
street. The Enter House Number screen appears.
8. Tap the Numbers or Letters A-D to enter the house number. Tap OK. The Select
32
Address screen appears.
9. Select the address that matches the location you want to go to and tap Nav. The map
appears, and the guidance directions begin.
► Using an Intersection as a Destination
There are two ways to enter the intersection: by selecting the street first, or by selecting the city
first. If you use Street First and too many records match, you will be asked to use City First.
To Enter an Intersection as a Destination Using Street First:
1. Tap Menu. The main menu appears.
2. Tap Destination. The Set Destination screen appears.
3. Tap Intersection. The Input Method screen appears.
4. If you need to change the region or State:
a. Tap Change State. The Enter State Name screen appears.
b. Tap the Letters to enter the name of the region, or tap the name of the region.
c. Tap OK when you have selected the region. You return to the Input Method
screen.
5. Tap Street First. The Enter Street Name screen appears.
6. Tap the Letters to enter the name of the street. Tap OK when you have selected the
street. The Enter 2nd Street Name screen appears.
7. Tap the Letters to enter the name of the second street. Tap OK when you have selected
the street. The Select Address screen appears.
8. Select the intersection that matches the location you want to go to and tap Nav. The
map appears, and the guidance directions begin.
To Enter an Intersection as a Destination Using City First:
1. Tap Menu. The main menu appears.
2. Tap Destination. The Set Destination screen appears.
3. Tap Intersection. The Input Method screen appears.
4. If you need to change the region:
a. Tap Change State. The Enter State Name screen appears.
b. Tap the Letters to enter the name of the region, or tap the name of the region.
c. Tap OK when you have selected the region. You return to the Input Method
screen.
5. Tap City First. The Enter City Name screen appears.
6. Tap the Letters to enter the name of the city. Tap OK when you have selected the city.
The Enter Street screen appears.
7. Tap the Letters to enter the name of the street. Tap OK when you have selected the
street. The Enter 2nd Street Name screen appears.
8. Tap the Letters to enter the name of the second street. Tap OK when you have selected
the street. The Select Address screen appears.
9. Select the intersection that matches the location you want to go to and tap Nav. The
map appears, and the guidance directions begin.
33
► Using a Point of Interest (POI) as a Destination
There are many points of interest that you can select as a destination. Generally, you choose a
category and then choose one of four methods of selecting the specific point of interest.
Sometimes you must first select a subcategory (such as Museum within the category of
Attractions) before you can choose a selection method.
The four methods of selecting a specific point of interest include two for nearby POIs and two
for all POIs in a region.
To select a nearby POI as a destination:
1. Tap Menu. The main menu appears.
2. Tap Destination. The Set Destination
screen appears.
3. Tap POI. The Points of Interest screen
appears.
4. Tap a Category. Usually a subcategory
screen appears.
Note: If you choose Restaurant, tap the
letters to enter a type of restaurant. If you
choose Hotel, there is no subcategory screen.
Go to the next step.
5. Tap a Subcategory. The POI Options
screen appears.
To select a nearby POI from an
alphabetical list:
a. Tap Alphabetical. The Enter POI
Name screen appears.
b. Tap the Letters to enter the name
of the POI. Tap OK when you have
selected the POI. The POI Select
screen appears, displaying the
address of the POI.
c. Tap Nav. The map appears, and
the guidance directions begin.
34
To select a nearby POI by distance:
a. Tap By Distance. The POI List
screen appears, listing the closest
POIs first.
b. Tap the POI that you want to go to
and tap Nav. You may need to
scroll down the list by tapping the
scroll bar. The map appears, and
the guidance directions begin.
To select from all POIs in a region:
1. Tap Menu. The main menu appears.
2. Tap Destination. The Set Destination screen appears.
3. Tap POI. The Points of Interest screen appears.
4. Tap a Category. Usually a subcategory screen appears.
Note: If you chose Restaurant, tap the Letters to enter a type of restaurant. If you chose
Hotel, there is no subcategory screen. Go to the next step.
5. Tap a Subcategory. The POI Options screen appears.
To select a POI from an alphabetical list:
1. Tap List All. The Enter POI Name screen appears.
2. Tap the Letters to enter the name of the POI. Tap OK when you have selected the POI.
The POI Select screen appears.
3. Tap Nav. The map appears, and the guidance directions begin.
35
To select a POI by city:
1. Tap By City. The Enter City Name screen appears.
2. Tap the Letters to enter the name of the city and tap OK. The Enter POI Name screen
appears.
3. Tap the Letters to enter the name of the POI and tap OK. The POI Select screen
appears.
4. Tap Nav. The map appears, and the guidance directions begin.
► Using a Favorite Destination as a Destination
Favorite destinations are locations you add to a list on the Intellinav system. You can add
locations to your Favorites list as you set a destination, from the POI(S) screen, and from the
Location Information screen. You can then easily select one of these locations as a destination.
To Select a Favorite as a Destination:
1. Tap Menu. The main menu appears.
2. Tap Destination. The Set Destination
screen appears.
3. Tap Favorites. The Favorites screen
appears.
4. Tap on the favorite you want to use as a
destination and tap Nav. The map
appears, and the guidance directions
begin.
► Using a Recent Destination as a Destination
Recent destinations are locations you have navigated to recently. You can easily select one of
these locations as a destination. Managing your recent destinations list is covered later in this
section.
To Select a Destination from your list of
recent destination:
1. Tap Menu. The main menu appears.
2. Tap Destination. The Set Destination
screen appears.
3. Tap Recent. The Recent screen appears.
4. Tap on the recent destination you want to
go to and tap Nav. The map appears, and
the guidance directions begin.
36
► Using a City Center as a Destination
Sometimes you may want to use the Intellinav system to get to a city, but not to a specific
location within the city. To do this you select a City Center as a destination.
As with selecting a Point of Interest, there are several methods of selecting a city center: two
for nearby city centers and one for all city centers in a region.
To Select a nearby City Center as a
destination:
1. Tap Menu. The main menu appears.
2. Tap Destination. The Set Destination
screen appears.
3. Tap City Center. The City Center screen
appears.
To select from an alphabetical list:
a. Tap Alphabetical. The Enter City Name screen appears.
b. Tap the Letters to enter the name of the city. Tap OK when you have selected
the city. The City Center screen appears.
c. Tap Nav. The map appears, and the guidance directions begin.
To select by distance:
a. Tap By Distance. The City List screen appears, listing the closest city centers
first.
b. Tap the city that you want to go to and tap Nav. You may need to scroll down the
list by tapping the scroll bar. The map appears, and the guidance directions
begin.
To select from all City Centers in a region:
1. Tap Menu. The main menu appears.
2. Tap Destination. The Set Destination screen appears.
3. Tap City Center. The City Center screen appears.
To select a city center in a region or State:
a. Tap List All. The Enter City Name screen appears.
b. Tap the Letters to enter the name of the city. Tap OK when you have selected
the city. The City Center screen appears.
c. Tap Nav. The map appears, and the guidance directions begin.
37
► Detours, Avoid Roads, and Stopovers
The Detour feature will allow you to bypass a certain portion of the route starting at your
present position, while avoid road allows you to bypass the entire road. Stopovers are stops
you add to a trip to make prior to reaching your destination.
Detours
Note: you cannot create a detour if you do not have a current destination.
To set a detour:
1. Tap Menu. The main menu appears.
2. Tap Destination. The Destination Options screen appears.
3. Tap Detour. The Detour screen appears.
4. Select from three distance options to bypass. A new route is calculated automatically.
To clear a detour:
1. Tap Menu. The main menu appears.
2. Tap Destination. The Destination Options screen appears.
3. Tap Detour. The Detour screen appears.
4. Tap Reset.
Avoid Road
Once you have set a destination you can look at the list of streets and determine if you need to
mark one or more as unavailable. If you mark a section as unavailable the Intellinav system will
calculate a new route that avoids the section you marked.
Note: You cannot avoid a road if you do not have a current destination.
38
To avoid roads in the route list:
1. Tap Menu. The main menu appears.
2. Tap Destination. The Destination
Options screen appears.
3. Tap Avoid Road. The Avoid Road screen
appears.
4. Mark any segments that you do not want
included:
a. Tap on a route instruction to
highlight it.
b. Tap Avoid. A do-not-enter symbol appears.
5. When you have finished marking segments, tap Nav. Your route is recalculated, the
map appears and the guidance directions begin.
Stopovers
Once you have set a destination you can add a stopover. Adding a stopover does not cancel
your original destination. Once you reach your stopover, you will be prompted to continue to the
destination.
To create a stopover:
1. Press Menu. The main menu appears.
2. Tap Destination. The Destination Options screen appears.
3. Tap Stopover. The Set Destination screen appears.
4. Set your stopover destination using any of the methods explained earlier in this section.
To cancel a stopover:
1. Tap Menu. The main menu appears.
2. Tap Destination. The Destination Options screen appears.
3. Tap Clear Route. A confirmation message appears asking if you want to continue to
your next destination.
4. Tap Yes. The map appears and navigation continues.
39
Using Shortcuts
The shortcut feature provides you quick access
to some of the most important destinations while
you're on the road, including:
Home
ATM
Gas
Hospital
Parking
Restaurant
Tourist Information
By tapping any of the POI categories, you will
see a list of the nearest POIs sorted by distance.
40
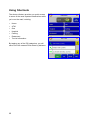
Managing Your Favorites List
You can edit the destinations you add to your favorites list to give them descriptive names. You
can also remove destinations from your favorites list.
To manage your favorites list:
1. Tap Menu. The main menu appears.
2. Tap Destination. The Destination
Options screen appears.
3. Tap Favorite. The Favorites screen
appears.
To edit a favorite:
a. Tap on the favorite you want to
edit.
b. Tap Edit. The Edit Favorites
screen appears.
c. Enter a descriptive name for this
favorite.
d. Tap OK when you are done.
To delete a destination from your favorite
list:
a. Tap on the favorite you want to
delete.
b. Tap Del. The favorite is removed
from the list.
c. Tap OK to close the Favorites
screen.
41
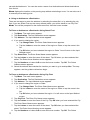
Setting Your Options
You can set many different options to customize the Intellinav system and make it work your
way. These options include:
Display Options
Route Options
Speed Alert
Localization
GPS Information
System Information
Display Options
The display options give you control over the appearance of the map. You can change the
following:
Orientation
Guidance
Day/Night
POI Icons
Color
3D View
There are two orientation settings. Heading turns the map as you drive so that you are always
moving toward the top of the screen. North keeps the map oriented with North at the top of the
map, like a traditional paper map.
There are two guidance settings, which control whether or not the maneuver detail screen
appears when you near your next maneuver. If you use the auto setting, the maneuver detail
screen appears.
The day/night setting controls the background of the screen. If you choose auto, the Intellinav
system will automatically switch to a darker version of your color scheme soon after sunset, to
reduce the glare in the vehicle. You can also choose to use either the day or night setting at all
times.
There are three options for displaying POI icons. If you choose default, the most commonly
displayed categories of POI icons will appear on the map at zoom levels of 1000 ft and closer. If
42
you choose off, no POI icons are displayed. If you choose custom, you can choose which
categories of POI icons you want displayed.
The color settings control the background color of the map. You can choose from four different
colors.
The 3D view settings control your view of the map. “2D” shows you the map in traditional 2D
mode. High, Medium, and Low show you a 3D version of the map, with a different angle for
each value. If you use any of the 3D settings you will not be able to tap on a location to view
location information.
To set your display settings:
1. Tap Menu and then Settings.
2. Tap Display Options. The Display Options screen appears.
3. Tap your Orientation preference: Heading or North.
4. Tap your Guidance preference: Auto or Manual.
5. Tap your Day/Night preference: Auto, Night, or Day.
6. Tap your POI Icons preference: Default, Off, or Custom.
When you tap Custom the POI Options screen appears.
a. Tap on the categories you want displayed. The categories to be displayed are
highlighted.
b. You can use Select All and Clear All to quickly highlight or clear categories.
c. When you have highlighted the categories you want displayed, tap OK. You
return to the Display Options screen.
7. Tap your Color preference: Yellow, Grey, White, or Fuchsia.
8. Tap your 3D View preference: 2D, High, Medium, or Low.
9. When you have finished choosing your options, tap OK.
Route Options
The route options give you control over the navigation of your trip. You can change the
following:
Method
Ferries
Toll Roads
Carpool
Turns
43
There are four method settings. Quickest calculates the route that should take the least amount
of time. Major calculates a route that uses major roads whenever possible. Shortest calculates
the route that is shortest in distance. Local calculates a route that uses local roads whenever
possible.
The ferries setting indicates whether ferries should be included when your route is calculated. If
you include ferries, the route will take you to the ferry terminal, but the total time for the route
does not take into account the ferry schedule or time spent on the ferry.
The toll roads setting indicates whether you want to include or exclude toll roads when your
route is calculated. If you include toll roads, those roads will be used if appropriate for the
method you selected.
The carpool setting indicates whether or not you want to include carpool or high occupancy
vehicle (HOV) restrictions in the calculation of your route.
The turns setting indicates whether or not you want to make more or less turns.
To set your route settings:
1. Tap Menu and then Settings.
2. Tap Route Options. The Route Options screen appears.
3. Tap your Method preference: Quickest, Major, Shortest, or Local.
4. Tap your Ferries preference: Include or Exclude.
5. Tap your Toll Roads preference: Include or Exclude.
6. Tap your Carpool preference: Include or Exclude.
7. Tap your Turns preference: Reduced or Normal.
8. When you have finished choosing your options, tap OK.
Speed Alert
You can use the speed alert feature to warn you if your vehicle is exceeding the speed limit.
There are two speed alert options: auto speed alert and fixed speed alert. Auto speed alert
uses the type of road to determine the probable speed limit. Fixed speed alert lets you enter a
speed and will warn you if that speed is exceeded.
Auto speed alert is based on road class and may not necessarily reflect the actual speed limit.
Please use this feature only as a reference
44
To set the speed alert:
1. Tap Menu and then Settings.
2. Tap Speed Alert. The Speed Alert screen
appears.
To set auto speed alert:
a. Tap Atuo. A warning appears.
b. Tap OK to close the warning.
c. Tap OK. You return to the map.
To set a fixed speed alert:
a. Tap Fixed.
b. Enter the speed you want to use
as a maximum speed.
c. Tap OK after reading the warning
message. You return to the map.
Localization
The localization options give you control over the settings affected by your location, including:
Language
Time Zone
Daylight Savings Time
Units
There are three language settings. When you change the language, all of the screen names
and controls will be in the selected language. There are six time zone settings, for all areas of
the United States. There are two daylight-savings options, to determine whether or not daylight
savings time is currently in effect at your location. There are two settings for units, which
determine how the distance to your location is expressed. You can choose between Mi (miles)
or KM (kilometers).
To set your localization settings:
1. Tap Menu. Menu screen appears.
2. Tap Settings. Settings screen appears.
3. Tap Localization. The Localization screen appears.
4. Tap your Language preference: English, French, or Spanish.
5. Tap your Time Zone preference: Eastern, Central, Mountain, Pacific, Alaska or
Hawaii.
45
6. Tap your Daylight Saving preference: DST or Standard.
7. Tap your Units preference: Mi or KM.
8. When you have finished choosing your options, tap OK.
GPS Information
To view the GPS Information:
1. Tap Menu. The Main Menu appears.
2. Tap Settings. The Settings screen
appears.
3. Tap GPS Information. The GPS
Information screen appears.
To close the GPS Information screen:
1. Tap the Back-Arrow in the upper right
corner.
System Information
The System Information displays the version
information and copyright of the navigation
software and digital map data.
To view the System Information:
1. Tap Menu. The Main Menu appears.
2. Tap Settings. The Settings screen
appears.
3. Tap System Information. The System
Information screen appears.
To close the System Information screen:
1. Tap the Back-Arrow in the upper right
corner.
46
Navigation Software License Agreement
The mapping and navigation software ("Software") and map data ("Data") is provided for your
personal, internal use only and not for resale. It is protected by copyright, and is subject to the
following terms and conditions which are agreed to by you, on the one hand, and Netropa
("LICENSEE"). If you do not agree to the terms of this agreement, promptly exit the program.
Your rights under this License will terminate automatically without notice if you fail to comply
with any term(s) of the License.
© 2006 NAVTEQ
All rights reserved
The Data for areas of Canada includes information taken with permission from Canadian
authorities, including: © Her Majesty the Queen in Right of Canada, © Queen's Printer for
Ontario, © Canada Post Corporation, GeoBase® .
NAVTEQ holds a non-exclusive license from the United States Postal Service® to publish and
sell ZIP+4® information.
©United States Postal Service® 2006. Prices are not established, controlled or approved by
the United States Postal Service®. The following trademarks and registrations are owned by
the USPS: United States Postal Service, USPS, and ZIP+4.
47
Chapter 5
Troubleshooting
► If the GV-370 does not boot up successfully or does not
function properly
1. Please check if the Application software is properly installed in the memory card.
2. Please check if the SD memory card is inserted into the SD expansion slot.
3. Please check if the battery power. (A red light indicates the battery power is low and needs
to be charged. A orange light indicates that it is in charging status, and the green light will be
on when the battery is fully charged.)
4. Perform the “Reset” to restart the device.
► Reset
If your GV-370 is down or it encounters an unexpected error, you can reset it. You will need to
use a stylus or pencil to press the reset button. Pressing the reset button will restart the system
retaining all the information stored on the device.
If your car windows equipped with Window Films for reducing heat and blocking
the harmful UV rays, it may also slightly affect the receiving of GPS signal. Thus,
the cold start time will take longer then usual.
If the car is moving, it may also affect the time for GPS fix. We suggest that you
stop the car while you turn on the GV-370 for a quicker GPS fix time.
Please avoid excessive heat and humidity. Please do not leave the GV-370 in
your car under the direct sunshine with windows closed. Place it in a high
temperature environment may damage its LCD display or the device.
48
► Safely Remove Hardware
Before you remove the memory card from the card reader, or before you unplug the USB cable
from the device or USB port, please safely remove the hardware by the following processes:
1. Double click the "Safely Remove Hardware" icon from the task bar on the right bottom
corner of desktop.
2. Select the hardware device and then click the "Stop" button.
3. Confirm by selecting the device again and click "OK" button.
4. When you see a message showing "Safe To Remove Hardware" on desktop, then you can
remove the memory card or unplug the USB cable.
49
► Update the firmware of GV-370
Step 1: Unzip the “NK.nb0.zip” and you will get the file named “NK.nb0”.
Step 2: Copy “NK.nb0” into a SD card.
Step 3: Insert the SD card into GV-370.
Step 4: Press and hold the power
button, don’t let go. Then, click
the Reset button one time.
Step 5: You are still
pressing and holding
the power button.
Now look at the
screen, it will show
some text message
when the update
process is on going. If
you see the message
shown on the screen,
then you can release
the power button.
Step 6: When the update process is finished, you will be asked to press the
Reset button to restart the device.
50
FCC Notices
This device complies with part 15 of the FCC rules. Operation is subject to the following two
conditions:
(1) This device may not cause harmful interference, and
(2) This device must accept any interference received, including interference that may cause
undesired operation.
FCC RF Exposure requirements:
This device and its antenna(s) must not be co-located or operation in conjunction with any
other antenna or transmitter.
NOTE: THE MANUFACTURER IS NOT RESPONSIBLE FOR ANY RADIO OR TV
INTERFERENCE CAUSED BY UNAUTHORIZED MODIFICATIONS TO THIS EQUIPMENT.
SUCH MODIFICATIONS COULD VOID THE USER’S AUTHORITY TO OPERATE THE
EQUIPMENT.
© 2006 Globalsat Technology Corporation. All rights reserved. .
Globalsat and G-Sat are registered trademarks of Globalsat Technology Corporation. Intellinav
and Intellinav log are registered trademarks of Netropa Corp.
All other trademarks are the property of their respective owners.
Map data provided by Navteq
51