1
Messaging System
Oracle FLEXCUBE Universal Banking
Release 11.5.0.0.0
[July] [2014]
Messaging System
Table of Contents
1.
ABOUT THIS MANUAL................................................................................................................................ 1-1
1.1
1.2
1.3
1.4
1.5
1.6
2.
INTRODUCTION ........................................................................................................................................... 1-1
AUDIENCE .................................................................................................................................................. 1-1
ORGANIZATION .......................................................................................................................................... 1-1
CONVENTIONS USED IN THIS MANUAL ....................................................................................................... 1-2
GLOSSARY OF ICONS .................................................................................................................................. 1-2
RELATED DOCUMENTS ............................................................................................................................... 1-2
MESSAGING SYSTEM - AN OVERVIEW ................................................................................................. 2-1
2.1
INTRODUCTION ........................................................................................................................................... 2-1
2.1.1
Features Provided for Processing Outgoing Messages ..................................................................... 2-1
2.1.2
Features Provided for Processing of Incoming Messages ................................................................. 2-2
2.1.3
Archival and Retrieval of Information ............................................................................................... 2-2
2.1.4
Set- up Messaging Preferences .......................................................................................................... 2-2
2.2
MESSAGE NOTIFICATION PROCESS ............................................................................................................. 2-3
2.2.1
Outgoing EMS Process ...................................................................................................................... 2-3
2.2.2
Incoming EMS Process ...................................................................................................................... 2-6
3.
MAINTAINING MESSAGING BRANCH PREFERENCES ..................................................................... 3-1
3.1
INTRODUCTION ........................................................................................................................................... 3-1
3.2
CAPTURING MESSAGING BRANCH PARAMETERS MAINTENANCE SCREEN .................................................. 3-1
3.3
FEATURES OF MESSAGING BRANCH PREFERENCES SCREEN ....................................................................... 3-2
3.4
DETERMINING MESSAGE QUEUES .............................................................................................................. 3-5
3.4.1
Maintaining Queues ........................................................................................................................... 3-6
3.5
MAINTAINING MESSAGE TYPES ................................................................................................................. 3-7
3.5.1
Maintaining Message Type for Account Opening .............................................................................. 3-8
3.6
PERFORMING PDE VALIDATIONS ON SWIFT MESSAGES ........................................................................... 3-9
3.6.1
Processing PDE Messages .............................................................................................................. 3-11
3.7
MAINTAINING AGREEMENTS WITH SENDER/RECEIVER BIC ..................................................................... 3-12
4.
MAINTAINING MEDIA TYPES .................................................................................................................. 4-1
4.1
4.2
4.3
5.
INTRODUCTION ........................................................................................................................................... 4-1
MAINTAINING MESSAGE MEDIA DETAILS .................................................................................................. 4-1
FEATURES OF THE MEDIA MAINTENANCE SCREEN ..................................................................................... 4-2
MAINTAINING MEDIA CONTROL SYSTEMS ....................................................................................... 5-1
5.1
INTRODUCTION ........................................................................................................................................... 5-1
5.2
MAINTAINING MESSAGE MEDIA CONTROL ................................................................................................ 5-1
5.3
FEATURES ON MCS DETAILED SCREEN...................................................................................................... 5-2
5.3.1
SWIFT Server on UNIX ..................................................................................................................... 5-4
5.3.2
Specifying File Prefix......................................................................................................................... 5-5
5.3.3
Saving Details you have maintained .................................................................................................. 5-5
6.
MAINTAINING ADDRESSES FOR CUSTOMER ..................................................................................... 6-1
6.1
INTRODUCTION ........................................................................................................................................... 6-1
6.2
CUSTOMER ACCOUNT ADDRESS MAINTENANCE SCREEN........................................................................... 6-1
6.2.1
Saving Record .................................................................................................................................... 6-6
6.2.2
Address Maintenance at Customer (CIF) Level................................................................................. 6-6
7.
MAINTAINING ADVICE FORMATS ......................................................................................................... 7-1
7.1
INTRODUCTION ........................................................................................................................................... 7-1
7.2
ADVICE FORMAT MAINTENANCE SCREEN .................................................................................................. 7-1
7.2.1
Indicating Messages that should Use Format .................................................................................... 7-3
7.3
AUTOMATIC PRINTING OF ADVICES GENERATED DURING EOD PROCESSING ............................................. 7-4
7.3.1
Starting the background process ....................................................................................................... 7-4
7.3.2
Printing of Advices............................................................................................................................. 7-5
8.
PROCESSING OUTGOING MESSAGES ................................................................................................... 8-1
8.1
INTRODUCTION ........................................................................................................................................... 8-1
8.2
MANUAL GENERATION OF OUTGOING MESSAGES...................................................................................... 8-2
8.2.1
Features of Outgoing Message Browser ............................................................................................ 8-3
8.3
CHOOSING MESSAGES TO BE VIEWED IN AN OUTGOING BROWSER............................................................. 8-6
8.4
OPERATIONS YOU CAN PERFORM ON AN OUTGOING MESSAGE ................................................................... 8-7
8.4.1
New Advice for Bank Realization Certificate .................................................................................. 8-14
8.4.2
Processing Outgoing Messages with PDE Trailer .......................................................................... 8-16
8.5
VIEWING MULTIPLE MESSAGES FROM PREVIEW SCREEN ......................................................................... 8-19
9.
RETRIEVING AN ARCHIVED MESSAGE ................................................................................................ 9-1
9.1
INTRODUCTION ........................................................................................................................................... 9-1
9.2
INVOKING MESSAGE HISTORY RETRIEVAL SUMMARY SCREEN.................................................................. 9-1
9.2.1
Features of Message History Retrieval Summary Screen .................................................................. 9-2
10.
PROCESSING INCOMING MESSAGES .............................................................................................. 10-1
10.1 INTRODUCTION ......................................................................................................................................... 10-1
10.2 VIEWING INCOMING MESSAGES ............................................................................................................... 10-1
10.2.1
Background Processing of Incoming Messages ............................................................................... 10-1
10.2.2
Manual Processing of Incoming Messages ...................................................................................... 10-1
10.2.3
Features on Incoming Message Browser ......................................................................................... 10-2
10.2.4
Operations that you can perform on an Incoming Message ............................................................ 10-4
10.2.5
Viewing Details of Incoming Message ............................................................................................. 10-8
10.2.6
Editing Incoming Message............................................................................................................... 10-9
10.3 VIEWING SWIFT NOTIFICATION MESSAGES .......................................................................................... 10-10
11.
DEFINING FREE FORMAT MESSAGES ............................................................................................ 11-1
11.1 INTRODUCTION ......................................................................................................................................... 11-1
11.2 INVOKING FREE FORMAT MESSAGE MAINTENANCE SCREEN ................................................................... 11-1
11.3 FEATURES OF FREE FORMAT MESSAGE SCREEN....................................................................................... 11-3
11.3.1
Entering Details of a Free Format Message ................................................................................... 11-6
11.3.2
Entering an Advice Format using Format Editor ............................................................................ 11-6
11.3.3
Importing Advice Format from an ASCII File on the Server ........................................................... 11-7
11.3.4
Importing Advice Format from ASCII File on Client ...................................................................... 11-7
11.3.5
Sending Free Format Message ........................................................................................................ 11-7
11.3.6
Saving Record .................................................................................................................................. 11-8
11.3.7
Viewing SWIFT Messages ............................................................................................................... 11-8
11.4 MAINTAINING COMMON GROUP MESSAGES............................................................................................. 11-9
12.
12.1
12.2
12.3
12.4
12.5
12.6
13.
13.1
MAKING QUERY..................................................................................................................................... 12-1
INTRODUCTION ......................................................................................................................................... 12-1
PROCEDURE .............................................................................................................................................. 12-1
MAKING QUERY BASED ON MORE THAN ONE CRITERION .......................................................................... 12-1
SELECTING SAME CRITERION TO APPLY ONE OR MORE CONDITIONS ...................................................... 12-2
ORDERING DETAILS OF QUERY ................................................................................................................ 12-4
USING WILDCARDS TO MAKE QUERY ....................................................................................................... 12-5
REPORTS .................................................................................................................................................. 13-1
INTRODUCTION ......................................................................................................................................... 13-1
13.2 SMS LOG REPORT .................................................................................................................................... 13-1
13.2.1
Contents of Report ........................................................................................................................... 13-2
13.3 UNSUCCESSFUL MESSAGES REPORT......................................................................................................... 13-3
13.3.1 Contents of Report ........................................................................................................................... 13-3
13.4 SUCCESSFUL MESSAGES REPORT ............................................................................................................. 13-4
13.4.1
Contents of Report ........................................................................................................................... 13-4
13.5 SMS LOG REPORT .................................................................................................................................... 13-5
13.5.1
Contents of Report ........................................................................................................................... 13-6
13.6 UNSUCCESSFUL MESSAGES REPORT......................................................................................................... 13-7
13.6.1
Contents of Report ........................................................................................................................... 13-8
1.1
1.
Introduction
About this Manual
This manual is designed to help acquaint you with the Messaging System module of Oracle
FLEXCUBE.
The module supports various types of media. Besides standard media modes like Mail, Telex and
SWIFT you can also use other media types supported by the Media Control System (MCS)
installed at the node at which the database of your branch is installed. Oracle FLEXCUBE gives
native support for media like Mail, Telex, and SWIFT using EMS as the MCS.
You can obtain information about to a particular field by placing the cursor on the relevant field
and striking the <F1> key on the keyboard.
1.2
Audience
This manual is intended for the following User/User Roles:
1.3
Role
Function
Back office data entry clerk
Input functions for contracts
Back office managers/officers
Authorization functions
Product Managers
Product definition and authorization
End of Day operators
Processing during End of Day/Beginning of Day
Financial Controller/Product Managers
Generation of reports
Organization
This manual is organized into the following chapters:
Chapter 1
About this Manual gives information on the intended audience. It also lists the
various chapters covered in this User Manual.
Chapter 2
Messaging System - An Overview is a snapshot of the features that the module
provides.
Chapter 3
Maintaining Messaging Branch Preferences specifies the messaging branch
preferences.
Chapter 4
Maintaining Media Types discusses the procedure to maintain details of the
media through which messages can be transmitted from and to your bank.
Chapter 5
Maintaining Media Control Systems discusses details pertaining to Media
Control Systems.
Chapter 6
Maintaining Addresses for a Customer discusses the procedure for maintaining
1-1
addresses for the customers.
1.4
Chapter 7
Maintaining Advice Formats explains the procedure for maintaining advice
formats.
Chapter 8
Processing Outgoing Messages explains the procedure involved in generating
an outgoing message.
Chapter 9
Retrieving an Archived Message deals with the process of retrieving archived
messages.
Chapter 10
Processing Incoming Messages explains processing all incoming messages.
Chapter 11
Defining Free Format Messages explains process of defining free format
messages.
Chapter 12
Making a Query explains the query process.
Chapter 13
Reports provides a list of reports that can be generated in this module.
Conventions Used in this Manual
Important information is preceded with the
1.5
symbol
Glossary of Icons
This User Manual may refer to all or some of the following icons.
Icons
Function
Exit
Add row
Delete row
Option List
1.6
Related Documents
You may need to refer to any or all of the User Manuals while working on the Messaging module:
Core Services
Settlements
Interest
User Defined
1-2
2.1
Introduction
2.
Messaging System - An Overview
The Messaging module of Oracle FLEXCUBE is designed to handle your outgoing and incoming
messages. The module supports various types of media. Besides standard media modes like
Mail, Telex and SWIFT you can also use other media types supported by the Media Control
System (MCS) installed at the node at which the database of your branch is installed. Oracle
FLEXCUBE gives native support for media like Mail, Telex, and SWIFT using EMS as the MCS.
While defining a product, you can indicate the messages that should be generated for the events
that take place during the lifecycle of contracts involving the product. When the events for which a
message should be generated occur, the message will be automatically generated and sent to
the concerned party. The message will be transmitted to the customer’s address through the
media that you have specified, and in the format and language that you maintain for the customer
– message combination.
While entering the details of a contract you can choose to generate or suppress the message.
You also have the option to prioritize the urgency with which a SWIFT message should be
generated.
2.1.1 Features Provided for Processing Outgoing Messages
In the case of outgoing messages, the module provides for the generation of messages using
formats that you can define. By maintaining message formats you can ensure consistency across
the branches of your bank. The module provides a host of features to enter or authorize
testwords and to interface with media control systems to actually generate the message.
Several customer addresses for a given media
With Oracle FLEXCUBE’s multi-branch set up, the customers of your bank can operate their
accounts from several locations. Based on the convenience of your customers, you can send
messages to locations of their choice.
Oracle FLEXCUBE provides for the setting up of several addresses for a given customer - media
combination.
In addition, you can also associate a language with an address. All messages sent to the address
will be expressed in the language that you indicate.
Free format messages
In the course of your daily banking operations you may want to generate messages that are not
automatically generated by the system or you may have to communicate a message that is very
specific to a customer.
In Oracle FLEXCUBE, you can personalize a message by defining a free format message and
linking it to a customer - address combination. Whenever the message is to be generated it will
bear the personalized format that you have defined.
2-1
MCS maintenance
The messages that are sent from and delivered to your bank are transmitted and received from
sources that are external to Oracle FLEXCUBE. In Oracle FLEXCUBE, these external sources
are called Media Control Systems (MCS).
In a distributed environment, the database of a branch is located in a node or server. The MCS of
the messages are also installed in a node. Thus, while defining an MCS you need to also indicate
the node in which it is installed.
2.1.2 Features Provided for Processing of Incoming Messages
In case of incoming messages, you can set up of various message queues and direct incoming
messages to them. You can further grant selective access to the queues to personnel at your
bank who are authorized to handle incoming messages.
2.1.3 Archival and Retrieval of Information
Archival is the process of storing old messages for future retrieval. While defining messaging
preferences for your branch, you can specify the number of days for which an outgoing message
should be kept in the Outgoing Message Browser. Messages will be automatically archived after
the number of days specified for your branch.
You can retrieve the messages that have been archived at anytime and process them just as you
would any other message.
2.1.4 Set- up Messaging Preferences
You can specify messaging preferences that will govern the workflow aspects of the messaging
system module at your branch. You can indicate the following preferences:
The number of days for which outgoing messages should be kept in the Browser for
every branch
Whether a testword is required for Telex messages
The activities on a message that require authorization
The PDE (Possible Duplication Emission) Archival period
The text for duplication check
The Hold Mail text to be displayed
The Swift Key arrangement values
Whether Authorization is required for the actions like Cancel, Hold, Change Node, Test
Word. etc. on a Generated Message.
2-2
2.2
Message Notification Process
The Electronic Messaging Process is for both incoming and outgoing messages in Oracle
FLEXCUBE.
In Incoming EMS Process, a job is scheduled to poll the incoming folder on timely basis. Once a
message is received in the folder, the job picks the message and sends it to an internal JMS
queue. An MDB listening on the queue reads the message and identifies the media and
processes the message.
In Outgoing EMS Process a job is scheduled to poll the outgoing messages that are generated
but not handed off. Each messages polled is sent to an internal JMS queue. An MDB, acting
upon the internal JMS queue picks the message from queue and sends the message to
appropriate destination (Folder, or e-mail, or JMS queue).
2.2.1 Outgoing EMS Process
The Outgoing EMS Process is in two layers. The EMS process as part of jobs in FCJ scheduler,
polls the outgoing message table of FLEXCUBE for generated and un-send messages. The job
then sends minimal data about the message to be handed off, to an internal JMS queue. The
EMS process as part of an MDB that listens on internal JMS queue builds final message and
sends to their intended destinations.
The ‘EMS out’ job is available as factory shipped.
The Outgoing EMS Process as part of jobs scheduler is as follows:
Once the job is triggered, it polls outgoing messages table for generated and unsent
messages.
Each message is then sent to an internal JMS queue.
The job is then rescheduled to fire next time.
The Outgoing EMS Process in MDB is as follows:
An MDB listens on the internal EMS outgoing queue and it builds the final message sent
to intended destinations.
In case of any exception while processing, message is sent to a deferred queue.
2-3
The following diagram illustrates outgoing EMS process in scheduler.
2-4
The following diagram illustrates outgoing EMS process in MDB.
2-5
2.2.2 Incoming EMS Process
The Incoming EMS Process is in two layers. The EMS process as part of jobs in FCJ scheduler,
polls the pre configured folder for messages and sends the messages read, to EMS internal
queue. The EMS process as part of an MDB listening on internal JMS queue, identifies the
message from queue and calls the incoming messages service package to process the message.
The ‘EMS in’ job is available as factory shipped.
The Incoming EMS Process as part of jobs scheduler is as follows:
Once the job is triggered, it polls for messages in a folder (Configured for incoming
messages).
Each message is then sent to an internal JMS queue.
The job is then rescheduled to fire next time.
The Incoming EMS Process in MDB is as follows:
An MDB that listens on the internal EMS incoming queue receives the message.
The media details are identified and incoming message processing package is called to
process the message.
In case of any exception while processing, message is sent to a deferred queue.
In case of messages directly arriving to JMS queue instead of a folder; the same MDB is
configured to listen on specific queue.
2-6
The following diagram illustrates incoming EMS process in Job Scheduler.
.
2-7
The following diagram illustrates incoming EMS process in MDB.
2-8
3.
3.1
Maintaining Messaging Branch Preferences
Introduction
The messaging preferences that you indicate for your branch will govern the workflow aspects of
the messaging system module. You can specify messaging preferences for your branch in the
‘Messaging Branch Preferences’ screen. In this screen you can indicate:
The number of days for which outgoing messages should be kept in the browser
Whether a test word is required for telex messages
The activities on a message that require authorization
The PDE Functional Validation / archive period
The Text for hold mail and duplicate check
You can specify preferences only for the branch from which you logged onto Oracle
FLEXCUBE.
3.2
Capturing Messaging Branch Parameters Maintenance
screen
To invoke the ‘Messaging Branch Parameters Maintenance’ screen, type ‘MSDPREF’ in the field
at the top right corner of the Application tool bar and click the adjoining arrow button.
If you are maintaining preferences for a new branch of your bank, select ‘New’ from the Actions
Menu or click new icon on the toolbar. The ‘Messaging Branch Parameters Maintenance’ screen
is displayed without any details.
If you are calling a branch preference record that has already been defined, double-click a record
of your choice from the summary screen. In the ‘Summary’ screen, all the branch preference
records that you have entered will be displayed in a tabular form. The screen is shown below:
3-1
3.3
Features of Messaging Branch Preferences screen
In the ‘Messaging Branch Parameters Maintenance’ screen you can only maintain (create or
modify) the preferences for the current logged in branch. However, you can view the preferences
maintained for other branches.
Following are the details captured here:
Branch
Specify the branch for which you are maintaining the preferences.
Message Archive Period
Archival is the process of storing old messages for future retrieval. You can specify the number of
days for which an outgoing message should be kept in the Outgoing Message Browser.
A message will be automatically archived after the number of days that you specify. You can unarchive the details of outgoing message that has been archived by invoking the ‘Message History
Retrieval’ screen. After you un-archive an outgoing message you can process it just as you would
any other outgoing message.
It is recommended that you indicate a value of ‘one’ in this field. In this case, only those
messages that have been triggered for generation today will be displayed in the Outgoing
Message Browser.
PDE Archive Period
Specify the number of days for which messages should be kept in the queue for PDE Possible
Duplicate Emission) identification. System does not consider messages for PDE identification
post the PDE archive period maintained here.
The PDE archive period should be less than or equal to message archival days.
Text for Duplicate
Every message is maintained in the Outgoing Browser, as an un-generated copy of the original.
When the copy is generated, it will contain, along with the contents of the original message, any
additional text that you have maintained in the Text for Duplicate field.
Hold Mail Text
All the mail advices generated for a customer for whom ‘Add Hold Mail Text’ is checked at the
Customer Address Maintenance would have the hold mail text maintained in this field. This text
will be displayed on top of the message.
Test Word Check
You can indicate whether a testword needs to be entered before a telex message is generated
from and received at your branch. You can state your preference from the Yes/No option that is
available.
3-2
PDE Functional Validation
Check this box to indicate that system should identify an outgoing message as PDE (Possible
Duplicate Emission) using functional key or not.
The PDE validation is done either using the hash value of the SWIFT message or using the
tag/field value of the message. If this option is checked, Oracle FLEXCUBE identifies duplicate
messages by performing PDE functional validations also. Hash value based validation shall be
done irrespective of this option being checked.
Indicating the activities that require authorization
You can perform several activities on a message that is to be generated from your branch and on
those that have come in for your branch. For example, from the outgoing or incoming browser,
you can change the address to which a message should be sent.
In the branch preferences screen, you can indicate the activities which when performed on an
incoming or outgoing message, would require subsequent manual authorization for the message.
Several activities have been listed in this screen. A message, on which an activity which has
been selected in this screen is performed, would require subsequent manual authorization for the
activity to take effect. A message, on which an activity not selected in this screen is performed,
would be automatically authorized with the activity taking effect.
The activities that you can choose from are:
Cancel
Hold
Change Node
Testword
Auth Repair Incoming
Carry Forward
Change Media
Regenerate
Regenerate
Change Address
Reinstate
Release
Carried Forward
Branch Move
Change Media
Change Priority
Testword Check
3-3
Auth Repair Incoming
A message on which you perform an activity that requires authorization will be available for
further processing only after it is authorized.
SK Arrangement
You can choose the action to be performed on the message based on the Swift Key arrangement
with the receiver. The options available for choosing are:
Validate – If you choose this option, the system validates if a SK arrangement exists
between your bank and the receiver. If Yes, then the original SWIFT message is
generated otherwise, the message will go to repair.
Generate FFT- If you choose this option, the system validates if a SK arrangement exists
between your bank and the receiver. If Yes, then the original SWIFT message is
generated otherwise, MT 999 (Free Format Messages) will be generated instead of the
SWIFT message.
No Validation- If you choose this option, you are instructing the system not to Validate but
send the original SWIFT message always.
Processing SWIFT Messages if SK arrangement is ‘Validate’ in the static messaging table:
Oracle FLEXCUBE checks for the value in the branch’s SK arrangement Field
If the field value is ‘No validate’, Oracle FLEXCUBE will generate messages the normal
way.
If the SWIFT keys have been exchanged then the swift message will be generated
If SWIFT keys have not been exchanged with the receiver and the value of SK
arrangement for the branch is ‘Validate’ then the following messages will go to repair:
MT420, MT754 and MT756. For all other messages, the original SWIFT message gets
generated whether swift key exists or not.
If SWIFT keys have not been exchanged with the receiver and the value of SK
arrangement for the branch is ‘Generate FFT’ then the message MT999 would be
generated instead of original SWIFT message.
Generation of MT999
Message header is changed from the original header to MT999
That portion of the message after tag 21 will be prefixed with tag 79 followed by the
original SWIFT message
The message will be populated with the same contents as the original SWIFT message
with the respective SWIFT tags
The system will generate MT999 even if the SWIFT Key Arrangement does not exist with
the receiver. MT999 will be generated for the following SWIFT messages:
MT750 – Advice of Discrepancy
MT734 – Advice of Refusal
MT752 – Authorization to pay, accept or Negotiate
3-4
Saving the record
After you have made the mandatory entries, save the record. This record should be authorized
before the End of Day process (EOD) is run.
Click ‘Exit’ or ‘Cancel’ button to return to the Application Browser.
3.4
Determining Message Queues
For a combination of the following, you can specify the branch (queue) to which the message is to
be routed:
Media – represents the delivery media. Typically, your entry would be SWIFT, SFMS.
BIC/IFSC Code - represents the receiver’s BIC for which a message is to be routed to a
specific queue in a particular branch. You can choose to specify the wildcard ALL entry
in this field. You can also capture the IFSC Code here if the media you have selected is
‘SFMS’.
Message Type - indicates the message type for which routing procedure is required. You
can choose to specify the wildcard ALL option as well.
Currency – indicates the currency of the incoming message. For example in an MT103 it
would be from tag 32A. This is an additional parameter to determine the booking branch
and queue. You can also choose to maintain the wildcard ALL entry.
Booking Branch - indicates the branch in which incoming messages are routed. A set of
all the branches having the same SWIFT BIC as that mentioned in the BIC code field is
displayed in the option list.
This maintenance can be performed through the ‘Message Queue Mapping Maintenance’ screen.
To invoke this screen, type ‘MSDINRUT’ in the field at the top right corner of the Application tool
bar and click the adjoining arrow button.
While processing MT700 and MT701 messages the System ensures the following:
3-5
MT700 and MT701 are routed to the branch using the Incoming Routing specifications
maintained in this screen
For MT700, in case the branch of the corresponding MT701 is different from that of the
MT700 it is re-aligned to the branch of the MT700
MT701 messages are processed only after the receipt of MT 700
You can maintain the same BIC for the main branch as well as the sub-branch.
3.4.1 Maintaining Queues
All Incoming SWIFT and Non Swift Messages are routed through a messaging queue. You need
to maintain different user queues to which incoming messages are directed. Users with
appropriate rights are allowed to access a particular queue.
To invoke this screen, click Messages in the Application Browser, select Queues and click
Detailed under it. You can invoke the ‘Message Queue Maintenance’ screen by typing
‘MSDQUEUE’ in the field at the top right corner of the Application tool bar and clicking the
adjoining arrow button.
In this screen you can capture the following details for a queue:
A name to identify the queue uniquely throughout the system.
A short description of the queue
The codes of various SWIFT and Non SWIFT messages that would be routed to this
queue.
Select collection queue flag if the unique queue you are maintaining here is a collection
Queue.
3-6
The codes of various SWIFT and Non SWIFT messages list in the grid is not applicable for
the collection queue.
You can assign a message to more than one messaging queue. At the time of maintaining rules
for a message (discussed in the subsequent sections of this document), you can select the
appropriate queue for each rule from the list of queues to which the message is linked.
Select ‘Add’ from the Actions menu in the Application tool bar or click add icon to add a message
to the queue being defined. To remove a message from the queue, Select ‘Delete’ from the
Actions menu in the Application tool bar or click delete icon.
Refer to CN Module for more details on Collection Queue.
3.5
Maintaining Message Types
You can maintain message types in Oracle FLEXCUBE through the ‘Message Type Maintenance’
screen. To invoke ‘Message Type Maintenance’ screen, type ‘MSDMSTYP’ in the field at the top
right corner of the Application tool bar and click the adjoining arrow button.
You will need to capture the following information in this screen:
Module
Specify the module for which you are maintaining message types. The adjoining option list
displays all module codes available in Oracle FLEXCUBE. You can select the appropriate one.
Message Type
Specify the message type for which SWIFT codes can be maintained.
Description
Enter a brief description of the message type.
3-7
Priority
Specify the priority in which a message is to be sent is displayed. You have the option to change
the priority. To change the priority specified for a message, click the button marked ‘Change
Priority’. Thereafter, select an option from the option-list that is available for this field.
SWIFT/SFMS Message Type
Indicate the SWIFT/SFMS message type in which the free format message should expressed.
For the following message types in BC module, you need to indicate the SWIFT message type as
MT999:
DISCREPANCY_REQ
ACCEPT_REFUSAL
DISCREPANCY_AUT
Generate at input
Check this box to indicate that this message is to be generated at the time of input of the contract,
and not after authorization.
Show in product
Check this box to indicate that this message will be available in the product to be maintained
against a particular event.
3.5.1 Maintaining Message Type for Account Opening
You can maintain a specific message type to be associated with account opening event class.
3-8
Specify the following details.
Module
Specify the module as ‘DE’.
Message Type
Specify as ‘ACC_OPADV’.
For further details, refer the section ‘Maintaining Message Types’ in this User Manual.
You can specify a format for this message using the ‘‘Advice Format Maintenance’ screen. Then
you can associate this message to the event class maintained for account opening.
Refer the chapter Maintaining Advice Formats in this User Manual for details about format
maintenance.
3.6
Performing PDE Validations on SWIFT Messages
Oracle FLEXCUBE allows you to tag SWIFT messages (both incoming and outgoing) as
duplicate if it identifies that the same message was sent/received earlier. Once the message is
detected as a duplicate message the trailer of the message is appended to reflect this
information.
This is applicable only for MT103 and MT202 messages.
3-9
For incoming SWIFT messages which have a PDE trailer, system interprets the trailer information
and sets aside those messages marking its process status as ‘Exception’. However, Oracle
FLEXCUBE allows you to either accept or reject the message identified as a PDE, from the
Incoming message browser.
For outgoing SWIFT messages, system performs certain PDE validations, to identify duplicate
messages. Following are the two types of PDE validations that the system performs:
Hash Value Based PDE Validation
Message field (Tags) Based PDE Validation
Hash Value Based PDE Validation
System calculates the hash value of a message when the message is generated and stores it in a
data store. System then compares this value with the hash values in the message log to identify
duplicates.
System performs hash value validation on messages as a mandatory check.
Message field (Tags) Based PDE Validation
Tag based PDE validation is performed only for Customer Transfer (MT103) and Bank Transfer
(MT202) messages. You can decide the tag value based on which system needs to perform the
validation.
Tag value validation is done only if you have selected the ‘PDE Functional Validation’ option
in the ‘Messaging Branch Parameters Maintenance’ screen.
System uses the following fields to compare and identify whether a message is a PDE or not.
This data is factory shipped.
Customer Transfer MT103
Message Tag
Option
Tag Description
50
A, K, F
Ordering Customer
32
A
Interbank Settlement Amount
32
A
Currency
32
A
Value Date
57
A, B, C, D
Account With Institution
59
A or No letter
Ultimate Beneficiary
Bank Transfer MT202
Message Tag
Tag Description
Field Position
32
A
Interbank Settlement Amount
3-10
Message Tag
Tag Description
Field Position
32
A
Currency
32
A
Value Date
58
A or D
Beneficiary Institution
You can also choose not to use any of the above tags for comparison. Along with the above
fields the Sender and Receiver BIC are also used for procedural validation.
3.6.1 Processing PDE Messages
The system detects the messages (Incoming/Outgoing) as PDE messages by performing the
validations discussed in the above section. The Incoming and Outgoing PDE messages are
processed by the system in the following manner:
3.6.1.1 Incoming PDE Messages
In the case of incoming messages, EMS picks up the incoming messages and inserts it into a
data store. If the incoming message has a PDE trailer (message contains the text ‘PDE:’} then the
system will mark the process status as ‘Stopped due to PDE’. After due validations, you can
release the message from the incoming PDE message queue. Once these messages are
accepted it will continue to get uploaded as a normal message. If the PDE trailer is NOT present
in the incoming message, then the message upload will continue as normal.
In the case of incoming messages with a PDE trailer, the ‘PDE Flag’ check box in the ‘Incoming
Message Browser’ screen will be checked.
For more details on the PDE indication of an incoming message in the Incoming Message
Browser, refer section ‘Viewing the details of an Incoming Message’ in ‘Processing Incoming
Messages’ chapter of this User Manual.
3.6.1.2 Outgoing PDE Messages
In the case of outgoing messages you can decide to do any of the following if the system detects
a message as a duplicate, based on the PDE validations:
Auto release the message with the PDE trailer
Release the message without the PDE trailer
Reject the message
System displays an override when it finds a message to be a duplicate one. In this case the
message is parked in the PDE queue and you can either opt to release the message without the
PDE trailer or else release it with the PDE trailer. If you opt to release the message with the PDE
trailer then the message is appended with PDE, else the message is released without PDE. You
can also choose to reject the message. In this case the message status will be changed to ‘E’
(Exception) and this will not be picked up by EMS (Electronic Messaging System).
3-11
Due to message size restrictions in Oracle FLEXCUBE, sometimes a single message is
physically split into multiple parts and each one is stored in a distinct record in the outgoing
message data store. A message is marked as ‘PDE’ if ALL the split messages are found to be
duplicates.
All the messages in the PDE queue (Incoming and Outgoing) are completely processed by
EMS prior to initiating EOD operations.
For more details on outgoing messages in PDE queue refer section ‘Processing Outgoing
Messages with PDE Trailer’ in ‘Processing Outgoing Messages’ chapter of this User Manual.
3.7
Maintaining Agreements with Sender/Receiver BIC
You can maintain agreement with the sender/receiver BIC through the ‘Agreements with
Sender/Receiver BIC Maintenance’ screen. You can invoke the ‘Agreements with
Sender/Receiver BIC Maintenance’ screen by typing ‘ISDCCYRS’ in the field at the top right
corner of the Application tool bar and clicking the adjoining arrow button.
You need to capture the following information in this screen:
BIC Code
Specify the BIC code. The value entered here must be a valid BIC code in the system with the
options Generate MT102, Generate MT102+ and Generate 101 selected.
Message Type
Select the message type from the option list.
MT101
MT102
MT102+
3-12
Direction
Indicate whether the BIC-currencies amount maintenance is for incoming or outgoing or both type
of messages. You have the following options here.
Incoming
Outgoing
Both
Product for Consol Debt
Specify the product for consolidated debit entry to ordering customer. This can be specified for
incoming MT101.
No. of Transactions per Message
Specify the total number of transactions for each message (MT101).
Cutoff Incoming
Specify the cutoff time in hours and minutes for the incoming messages.
Cutoff Outing
Specify the cutoff time in hours and minutes for the outgoing messages.
3.7.1.1 Transaction Currency Limit Details
The details displayed here depend on the direction specified. They are used for MT101, MT102
and MT102+.
If the direction is Incoming, these fields indicate the transaction limit for individual
transactions in the incoming message.
If the direction is Outgoing, these fields indicate the transaction limit for individual
transactions in the outgoing message.
If the direction is Both, these fields indicate the transaction limit for individual transactions
in the outgoing and incoming message.
Incoming MT101
If the message is an incoming MT101, on receiving the message the following checks will be
made before uploading the transactions.
If the Sender has an agreement for Incoming MT101.
If the Cut-off time for Incoming MT101 for the receiver has not passed.
Check for the Transaction currency & Transaction amount limit.
Check for the debit authority of the Instructing party, in case the instructing party is
different than the ordering customer.
3-13
4.1
Introduction
4.
Maintaining Media Types
Advices and messages are generated at the specified events in the lifecycle of contracts involving
the front-end modules of Oracle FLEXCUBE. In the ‘Media Maintenance’ screen, you should
maintain the different media through which these advices and messages would be generated
(from and to your bank).
At your bank, you can only receive or route messages through a media that you have maintained
in this screen. These specifications can be made only at the main branch and will be applicable to
all the branches of your bank.
The Messaging System (MS) Module supports various types of media. Besides standard media
modes like Mail, Telex and SWIFT you can also maintain, other media like CHIPS, Email or any
other country or customer specific media.
4.2
Maintaining Message Media Details
You can invoke the ‘Message Media Maintenance’ screen by typing ‘MSDMEDIA’ in the field at
the top right corner of the Application tool bar and clicking on the adjoining arrow button.
If you are maintaining details of a new media type, select ‘New’ from the Actions Menu, or click
new icon on the toolbar. The ‘Message Media Maintenance’ screen is displayed without any
details.
If you are calling a Message Media Maintenance record that has already been defined, doubleclick a record from the summary screen. In the ‘Summary’ screen, all the media maintenance
records that you have entered will be displayed in a tabular form.
4-1
In this screen, you can maintain the following:
4.3
The media types that can be used to transmit messages from and to your bank, and
The compatible media for the media type you are maintaining.
Features of the Media Maintenance screen
For each media type that you maintain, you should indicate the following parameters:
Indicating a Code to identify a Media Type
In Oracle FLEXCUBE, each media type that you maintain is identified with a fifteen-character
code called ‘Media Code’. You can follow your own convention for devising this code. A Media
Type could be SFMS, SWIFT, Mail, Telex, RTGS/SFMS etc.
The code that you assign a media type should be unique as it is used to identify the media. When
you need to indicate that a message should be transmitted through a particular media type, you
just need to specify the code assigned to the media type. The message will be routed
automatically through the media.
You can enter a short description of the media type that you are maintaining. The description will
help you identify the code that it represents.
Opting for message markers
You can opt to append end-message markers to outgoing messages generated in a media.
These markers are referred to as “Padding Characters” in Oracle FLEXCUBE. Padding
characters would, typically, be a standard set of characters, probably repeated. The padding
characters that you specify will be inserted, automatically, at the end of every outgoing message
in the media. You can indicate the padding characters that mark the end of an outgoing message
(in a specific media) in the Message Suffix field.
When defining a media, you can also capture the padding characters that mark the end of
incoming messages in the media. The system identifies the end of an incoming message, in a file
containing several messages, when it encounters the padding characters you have captured for a
media type. Enter the padded characters that mark the end of incoming messages in a media in
the Message Terminator field.
For Message suffix to be used for Outgoing messages, the ‘Padding Required’ option should be
selected.
Repeating a set of padding characters
If you opted to suffix an outgoing message with a set of padding characters, indicate in the
‘Number of Characters’ field the number of times the set should be repeated.
The padding characters will be suffixed to every outgoing message in the media as many times
as you specify.
4-2
Halting the processing of messages
At any time, you can opt to halt the processing of messages in a specific media. To halt the
processing of incoming and outgoing messages in a media, invoke this screen and navigate to
the maintenance record for the media, and choose the ‘Stop Processing’ option. When you save
your changes to the record, Oracle FLEXCUBE will stop processing messages in the media.
Indicating the Compatible Media for a media type
For each media type that you maintain, you can also indicate other media that are compatible.
The format of compatible media should be similar.
Example
You are maintaining details for the media type 'mail'. You have indicated media type 'Fax' as compatible
media.
In this case, whenever a message is faxed, it will be in the mail format defined for the message in the
‘Advice Format File Maintenance’ screen.
You can indicate compatible media by selecting the relevant media codes from the picklist
available. To add compatible media for a media type, select the code that identifies the
compatible media, and click add icon. To delete compatible media, select the codes that identify
the media, and click delete icon.
The compatible media that you indicate for a media type should have already been
maintained as a media type.
Setting the Priority
While maintaining media types, you can set the usage priority for each media type that you
maintain. Consequently, when dispatching messages to customers, the media type used for
sending the message will be the one that is higher on the priority rating. For instance, let us
assume that the following are the types of media that you bank uses to send advices to
customers:
SFMS
SWIFT
Mail
Telex
Fax
You have assigned the following priority to each of these media types:
Media Type
Media Priority
SFMS
1
SWIFT
2
Mail
3
4-3
Media Type
Media Priority
Telex
4
When dispatching messages to customers, the system will, by default, select the media type in
the ascending order of the priority that you have specified.
The rating that you specify can be anything between 1 and 99. A rating of one would indicate
that the usage of the particular media type is highest on the priority list; whereas, a rating of 99
indicates that the usage or the particular media type is of lowest priority.
Saving the record
After you have made mandatory entries, save the record. A media maintenance record that you
have created should be authorized by a user, bearing a different Login ID, before the End of Day
processes are triggered. Click ‘Exit’ or ‘Cancel’ button to return to the application.
4-4
5.
5.1
Introduction
Maintaining Media Control Systems
The messages that are sent from and delivered to your bank are transmitted and received over
sources that are external to Oracle FLEXCUBE. We shall call these external sources Media
Control Systems (MCS).
In a distributed environment, the database of a branch is located in a node or server. The MCS of
the messages are also installed in a node. Thus, while defining an MCS, you also need to
indicate the node in which it is installed.
An MCS can handle only one media, hence you need to set up several media control systems for
the various media types maintained for your bank. Apart from indicating the media type for an
MCS, you can indicate separate directories from which Oracle FLEXCUBE should read and write
incoming and outgoing messages for a given media.
You can maintain MCS details in the ‘Message Media Control Maintenance’ screen. The details
that you specify in this screen control the medium of delivery and reception of messages.
5.2
Maintaining Message Media Control
You can invoke ‘Message Media Control Maintenance’ screen by typing ‘MSDMCS’ in the field at
the top right corner of the Application tool bar and clicking on the adjoining arrow button.
If you are maintaining details of a new media control system select ‘New’ from the Actions Menu
or click new icon on the toolbar. The ‘Message Media Control Maintenance’ screen is displayed
without any details.
If you are calling an MCS record that has already been defined, double-click a record of your
choice from the summary screen. In the ‘Summary’ screen, all the media control system records
that you have entered will be displayed in a tabular form.
5-1
5.3
Features on MCS Detailed Screen
You can capture the following details on this screen.
Delivery Type
You can specify the delivery type here. Oracle FLEXCUBE gives you two options viz. Folder and
Queue. Depending on the selection you make, you must specify the details in the corresponding
fields as follows.
Folder – If you choose ‘Folder’ as the delivery type, you must specify the In Directory and
the Out Directory. Further, after selecting ‘Folder’, if you check the option ‘Unix Swift
Server’ for a UNIX SWIFT server, then you must specify the Unix In-Directory and the
Unix Out-Directory. For a Windows Server the In-Directory and Out-Directory must be
maintained.
Queue – If you select ‘Queue’ as the delivery type, you must specify In Queue, Out
Queue and the type of queue – i.e. ‘Microsoft Message Queue’ or WebSphere
Messaging Queue’.
Media Control System
In Oracle FLEXCUBE, each media control system that you maintain is identified by a 15character code called an MCS code. You can follow your own convention for devising this code.
The code that you assign an MCS should be unique as it is used to identify the external source.
5-2
Node
A node is the Database instance on which Oracle FLEXCUBE is installed. On assigning a code to
an MCS, you can indicate the node or server at which the MCS is located. A branch’s database is
located in a node and an MCS is also installed in a node. Thus, while defining an MCS, you need
to indicate the node at which it has been installed.
Media
You need to also specify the media for which your bank is using the MCS. For example, if you set
up an MCS say ‘MCSSWIFT’ and indicate the media type as SWIFT, it indicates that Oracle
FLEXCUBE can receive and transmit SWIFT messages through the MCS ‘MCSSWIFT’.
The following diagram illustrates a typical MCS setup:
Mail
Telex
MCS 1a
MCS 1b
S.W.I.F.T.
MCS 1c
Branch 1
Node 2
Branch 4
Node 1
Branch 2
MCS 2a
MCS 2b
MCS 2c
Branch 3
Mail
Telex
S.W.I.F.T.
Status
You need to indicate the status of an MCS. The status options available are:
Active and
Passive
It is only when an MCS is active that messages will be directed to it. If, for instance, an MCS
located at the node in which your branch operates malfunctions, you can indicate that the MCS is
passive. In this case, Oracle FLEXCUBE will not write into or read from the directories on the
node. No message will be routed through a passive MCS.
5-3
In Directory and Out Directory
If the Delivery Type is ‘Folder' and the SWIFT server is a Windows server then apart from
indicating the node on which an MCS is located, you should specify the full path of the directories
from which Oracle FLEXCUBE should read and write incoming and outgoing messages
respectively.
File Prefix
For the MCS you are maintaining, you should identify the outgoing message files generated in a
different media with unique prefixes. Enter the unique identifier in this field.
In Queue
If the Delivery type is Queue then you should enter the full path of the queue in the node or server
into which the MCS should store the incoming message hand-off file. Oracle FLEXCUBE, by
default, will pickup and read all incoming messages transmitted through the specified media from
this queue.
Out Queue
Enter the full path of the queue in the node or server into which the message hand-off file from
Oracle FLEXCUBE for the specified media should be stored. The MCS, which is also, located on
the same node, will by default store the outgoing messages in this queue.
Unix Swift Server
At your bank, if the SWIFT server is on UNIX, check this option. Subsequently, in this screen, you
should specify the default In and Out Directories for the SWIFT message hand-off files.
To continue with your normal banking operations you can connect to another node and indicate
the directory on that node from which Oracle FLEXCUBE should read from and write into.
5.3.1 SWIFT Server on UNIX
If the SWIFT server at your bank is on UNIX, you should indicate it in this screen. Subsequently,
you should specify the default In and Out Directories for the SWIFT message hand-off files.
Specifying the UNIX In-Directory
You can specify the full path of the directory on the SWIFT server where you would like to store
incoming SWIFT message files. Oracle FLEXCUBE will pickup and process all incoming SWIFT
message files from this directory.
Specifying the UNIX Out-Directory
In this screen, you can also specify the directory on the SWIFT server where you would like to
store outgoing SWIFT message hand-off files.
5-4
5.3.2 Specifying File Prefix
For the MCS you are maintaining, you should identify outgoing message files generated in the
media with unique prefixes. Oracle FLEXCUBE will automatically prefix outgoing message handoff files for the MCS with the prefix that you specify.
5.3.3 Saving Details you have maintained
After you have made the mandatory entries, save the record. An MCS record that you have
created should be authorized by a user, bearing a different Login ID, before the End of Day
process (EOD) is run.
Click ‘Exit’ or ‘Cancel’ to return to the Application Browser.
5-5
6.
6.1
Introduction
Maintaining Addresses for Customer
The messages and advices that are sent to the customers of your bank can be transmitted to
various addresses through the media types that you maintain in the ‘Media Maintenance’ screen.
In this ‘Address Maintenance’ screen, some of the details that can be maintained are:
the media through which messages to a customer should be transmitted
the address(es) of a customer for each media type
the answer-back code for a telex advice
a ‘Test Word’ for the customer
the messages that should be sent to an address
the language in which messages should be sent to a customer address
specifying the Delivery By as ‘FILEFACT’ while maintaining the Customer Address
Information for MT 102 Type of messages.
A customer of your bank can have several addresses for a given media. To distinguish between
one address and another for the same media, you can capture an address for every ‘Location’.
The addresses that you maintain for a customer in this screen are in addition to the ones
maintained in the Customer Information File (CIF) of the Core module.
6.2
Customer Account Address Maintenance Screen
You can invoke the ‘Account Address Maintenance’ screen by typing ‘MSDCACAD’ in the field at
the top right corner of the Application tool bar and clicking on the adjoining arrow button. The
‘Account Address Maintenance’ screen is shown below:
6-1
If you are querying for a customer address record that has already been defined, select the
‘Summary’ option under ‘Account Address’. In the View screen, all the customer address records
that have been maintained so far will be displayed in a tabular form. Double-click a record to open
it.
If you are maintaining a new address for an account select ‘New’ from the Actions Menu, or click
new icon on the toolbar. The screen is displayed without any details.
If you are modifying some of the details of the existing record, select the ‘Unlock’ option from the
Actions Menu and proceed.
Customer Account Number
It is the relevant customer account number in the current branch against which you are
maintaining an address, based on a selected media and location. The branch code gets defaulted
alongside.
A single customer can have any number of accounts. You can choose to link a specific location
with an account number. Maintaining multiple locations for the customer facilitates the sending of
interest and account statements to more than one address of the customer.
If an address is maintained at the Customer Account Definition level, all statements pertaining to
the particular account will be sent only to the address specified at the account level, irrespective
of the message and location maintenance for the Customer.
Media
Select the media code for which you want to set-up addresses. Choose a code from the optionlist of valid media codes maintained in the ‘Media Maintenance’ screen.
A customer of your bank can have several addresses for a particular media. The media
supported include:
Mail
E-Mail
Telex
SWIFT
FAX
FILEACT(this is an interface to the TIPA network)
SFMS
RTGS/SFMS
Each media type is identified by a 15 character Media Code.
6-2
Location
As discussed earlier, a customer of your bank can have several addresses for the same media.
To differentiate between one address of a customer account and another for a given media, it is
mandatory for you to select a unique location for each address. The location that you specify for
an address is used as a unique identifier for the customer account address.
The values made available against the option list here are maintained through the ‘Account
Address Location Maintenance’ screen.
Refer to the section ‘Location Maintenance’ in the chapter titled ‘Maintaining Customer Accounts’
in the Core Entities (CE) User Manual for relevant information.
Language
In this screen you can specify the language in which the messages sent to the address should be
expressed. You can choose a language code from the factory shipped option list available for this
field.
The language code that you specify is taken to be the default language in which all messages
sent to the address will be expressed.
To send a message to a customer in a particular language you should have also maintained
a message format for the language in the ‘Advice File Maintenance’ screen.
Country
Here, you select the relevant country code where your customer resides. All countries maintained
through the ‘Country Name Maintenance’ screen are made available here.
Test Keyword
Specify the test word allotted to a customer. This field is applicable only if the message is
transmitted through Telex (ie. media is TELEX).
Answerback
Specify the answerback code for the customer. This field is applicable only if a message is
transmitted through ‘Telex'. It cannot be more than 20 characters in length. It is a free format text.
Deliver By
Select how statements sent to the customer by mail should be delivered from the adjoining option
list.
All the values maintained through the ‘Message Location Maintenance’ screen will be displayed in
the option list.
6-3
Add Hold Mail Text
If this option is checked, then all the mail advice generated for this customer and location would
have the hold mail text displayed on top of the message. As a consequence, these mail advices
would not be dispatched to the customer unless required. Check this box to indicate you want
the hold mail text to be displayed on top of the message.
To recall, you maintain a hold mail text through the 'Messaging Branch Parameter Maintenance'
screen.
This field is applicable only if the media is ‘MAIL’.
Send by E-Mail
If your customer has an e-mail address, you can opt to capture it by clicking on the box adjacent
to the ‘Send by E-Mail’ option. Enter the e-mail address for the selected customer account, media
and location combination in the first line of the Address field. You can capture addresses such as
fax, mail, etc, for different media and location combinations.
Name
Here, you specify the name of the customer for whom you are maintaining the address details.
This address maintenance is for a particular customer account based on a unique media and
location combination.
Address
Enter the detailed address to which messages and advices generated should be sent to, for a
particular customer account under the selected media and location combination. The format of
the address depends on the media through which the message is transmitted.
If the address is for the media type ‘Mail’, you can enter the customers address in the four rows
under this field. Each line that you enter can contain a maximum of 35 characters.
If the media of transmission is Telex, the address should be expressed numerically.
If you are defining a SWIFT address, the address should be of eight or eleven characters
alphanumeric.
Default Address
If you check against this option, the address specified against the chosen ‘Location’ and ‘Media’
combination becomes the default or the primary address of the customer.
Messages and advices generated against the selected customer account are always sent to the
primary or the default address of the corresponding customer.
You can maintain multiple addresses at a customer account level through this screen.
6-4
Module
A message type is always associated with a module. In some cases, a message may be
associated with more than one module. An example could be a payment message that is
generated by the trade, treasury and remittances departments of the bank. Once you select the
module, the ‘Message Type’ gets defaulted alongside.
You can use the wildcard ‘All’ indicating that all messages for the customer belonging to any
module should be sent to the address being defined.
Example
Ms. Keturah Smith has five accounts with Kuber’s bank. Three of the accounts were opened at Kuber’s
bank, London, and two at Kuber’s bank Surrey.
Ms. Smith had requested that an account statement be sent to her every month by mail with the following
instructions:
the account statements for the accounts at London should be sent by mail to her residential
address at London
the statements for the accounts at Surrey should be sent to her office address.
In this screen you should indicate:
Module + Message Type -- Accounting (AC) + Account Statement
Module -- All
Copies – 1
You should also maintain a new customer address record for Ms. Smith’s Surrey address and a
unique location for that address.
Copies
You can indicate the number of copies of the message that should be sent to this location each
time it is generated. The number you specify here, will be the default number of copies of the
message that will be generated each time a message is sent to this location through the media
you have specified.
If you indicate that more than one copy should be sent to a location, the first message will be the
original and the others will be marked as ‘copy’.
For payment messages, Oracle FLEXCUBE will default ‘one’ indicating that only one
payment message will be generated. You will not have an option to change it.
Format
You can specify the format in which a message should be sent to a customer’s address. To
recall, you have defined the default format for a message type in through the ‘Advice Format
Maintenance’ screen.
6-5
If you leave this field blank the default format specified for a message type in the Advice format
screen will be used. However, if you want to personalize a message to make it specific to a
customer, you can indicate the code of the format that should be used for the advice - customer
combination.
Example
You have maintained a standard format for the account statements that are sent from your bank in the
‘Advice Format Maintenance’ screen.
However, for Mr. Andrew Scott, a non-resident customer you want to personalize the account statement
rather than send him the standard one defined in the advice format screen.
To make this possible you can indicate the code of a format that you defined specific to Mr. Scott. Whenever
an account statement is sent to Mr. Scott from your bank, it will be in the format that you have defined in this
screen. Please note that the special format should first be defined in the advice format screen before it can
be associated with Mr. Scott's address.
Primary Address
When defining addresses for a message type, you have to identify an address as the primary
address. This option will be available only if the message type is ‘FX_CONFIRMN’.
If you maintain multiple FX Confirmation Message types for the ‘SWIFT’ Media for a customer
across different locations, the T-Copy will be generated only for the address that is marked as the
‘Primary Address’ of the counterparty.
Refer the ‘Continuous Linked Settlements’ chapter of the Foreign Exchange User Manual for
details on processing CLS deals in Oracle FLEXCUBE.
To add additional modules to the list, you can click on the add icon. To delete a row, click on the
delete icon.
6.2.1 Saving Record
After you have made the mandatory entries, save the record. A customer address record that you
have created should be authorized by a user, bearing a different Login Id, before the End of Day
(EOD) process can begin. Click ‘Exit’ or ‘Cancel’ to return to the Application Browser.
6.2.2 Address Maintenance at Customer (CIF) Level
You also have the provision to maintain customer addresses at the customer (CIF) level. You can
invoke the ‘Customer Address Maintenance’ screen by typing ‘MSDCUSAD’ in the field at the top
right corner of the Application tool bar and clicking on the adjoining arrow button.
The screen is shown below:
6-6
If you are maintaining a new address for a customer select ‘New’ from the Actions Menu, or click
new icon on the toolbar. The screen is displayed without any details.
If you are calling a customer address record that has already been defined, double-click on a
record from the summary screen. In the ‘Summary’ screen, all the customer address records that
you have entered are displayed in a tabular form.
Customer No
Specify the customer (CIF) number, assigned to a customer in the ‘Customer Information
Maintenance’ screen, before you capture the different addresses of the customer. The name of
the customer whose address you are maintaining is automatically displayed when you indicate
the customer’s identifier.
Media
The types of media for which you can capture addresses include Mail, E-Mail, Telex, SWIFT, FAX
and FILEACT interface to TIPA network. The Media details maintained in ‘Media Maintenance’
screen will appear in the list of values.
Location
As discussed earlier, a customer of your bank can have several addresses for the same media.
To differentiate between one address of a customer and another for a given media, it is
mandatory for you to specify a unique location for each address. The location that you specify for
an address is used as a unique identifier for the customer address.
A single customer can have any number of accounts. You can choose to link a specific location
with an Account Number. Maintaining multiple locations for the customer facilitates the sending of
interest and account statements to more than one address of the customer.
If an address is maintained at the Customer Account Definition level, all statements pertaining to
the particular account will be sent only to the address specified at the account level, irrespective
of the message and location maintenance for the Customer.
6-7
You can choose from the available list and indicate the Account Number, which should be linked
with the respective address.
You are allowed to link a customer address with an account only for a specific branch, which
means that the branch should be a valid branch code in the system. If you use the wildcard ‘All’
indicating that the customer address and account linkage is valid in all the branches of your bank,
you will not be able to exercise this option.
Language
In this field, you can specify the language in which the messages sent to the address should be
expressed. You can choose a language code from the option list available against this field.
The language code that you specify is taken to be the default language in which all messages
sent to the address are expressed.
Remember that to send a message to a customer in a particular language you should have
also maintained a message format for the chosen language through the ‘Advice Format
Maintenance’ screen.
Country
Here, you select the relevant country code where your customer resides. All countries maintained
through the ‘Country Name Maintenance’ screen are made available here.
Answerback
Specify the answerback code for the customer. This field is applicable only if a message is
transmitted through ‘Telex'. It cannot be more than 20 characters in length. It is a free format text.
Test Keyword
Enter the test word allotted to a customer. This field is applicable only if the message is
transmitted through Telex (i.e. media is TELEX).
Deliver By
Select how statements sent to the customer by mail should be delivered from the adjoining option
list.
All the values maintained through the ‘Message Location Maintenance’ screen will be displayed in
the option list.
Send by E-mail
If your customer has an e-mail address, you can opt to capture it by clicking on the box adjacent
to the ‘Send by E-Mail’ option. Enter the e-mail address for the customer, media and location
combination in the first Address field. You can capture addresses such as fax, mail, etc., for the
combination in the remaining address fields.
6-8
Name
Specify the name of the customer here.
Address
Enter the detailed address to which messages and advices generated should be sent to, for a
particular customer account under the selected media and location combination. The format of
the address depends on the media through which the message is transmitted.
If the address is for the media type mail, you can enter the customers address in the four rows
under this field. Each line that you enter can contain a maximum of 35 characters.
If the media of transmission is Telex, the address should be expressed numerically.
If you are defining a SWIFT address, the address should be of eight or eleven characters
alphanumeric.
The valid address (e-mail or Telex or SWIFT) must be entered in the first line of the Address
field only for it to be used.
Add Hold Mail Text
If this option is checked, then all the mail advice generated for this customer and location would
have the hold mail text displayed on top of the message. As a consequence, these mail advices
would not be dispatched to the customer unless required. Check this box to indicate you want
the hold mail text to be displayed on top of the message indicating the branch.
50F Party Details
Specify the party details related to the ordering customer as a 5-line input here. Line 1 indicates
the party identifier and lines 2 to 5 indicate the name and address details of the party.
You can use either of the following line formats with option F:
Line 1 (Party Identifier) /34x (Account)
Lines 2-5 (Name & Address) 1!n/33x (Number)(Details)
Line 1 (Party Identifier) 4!a/2!a/27x4!a/30x (Code)(Country Code)( Identifier)
Lines 2-5 (Name & Address) 1!n/33x (Number)(Details)
Or
The details specified here are used for a stricter validation of the details related to the ordering
customer. The validations are carried out according to the rules indicated below:
Validations for line1, party identifier (applicable for the second format listed above):
Line 1 has to comply with (Code)(Country Code)(Identifier) format where the country
code should be a valid ISO country code
6-9
The first 4 characters specified should be a valid party identifier code supported by
SWIFT
Validations for lines 2 to 5, name and address details of the party:
The first line must start with number 1
Line numbers must appear in numerical order
Line number 2 cannot be used without line number 3 and vice versa
Line number 4 cannot be used without line number 5 and vice versa
Line number 4 should have the format YYYYMMDD and this date must not be
greater than the date on which the message was sent to SWIFT
Line numbers 3, 5, 6 and 7 should be followed by a valid ISO country code
Line numbers 3, 4, 5, 6, 7 and 8 should not repeat. Line numbers 1 and 2 can repeat.
Line 8 is used as additional information. When the account identifier format is used,
then in the case of Line 8 being used, either line 6 or line 7 should be used. When
the party code identifier format is used, then Line 8 can be the continuation of line 1,
line 6 or line 7. Line 6 or 7 need not be mandatorily be used
During contract input, the ordering customer record is searched in the customer addresses
maintained and if found the corresponding 50F details are defaulted to the contract. If not found,
the address details default from customer maintenance.
These validations are carried out for the following outgoing message types and appropriate error
messages are displayed incase of any mismatches.
MT101
MT102
MT102+
MT103
MT103+
MT210
MT910
6.2.2.1 Specifying Message Address
For a customer address - message type combination, you can indicate the branch (es) from
which the message can be sent to the address. With Oracle FLEXCUBE, you can offer your
customers the facility to effect a transaction from any of the branches of your bank. Hence, you
can indicate the branches from where a message should be generated. You can select a branch
code from the option list that is available.
You can use the wildcard ‘All’ indicating that the message can be sent to the address in the
defined format from all the branches of your bank. For example, if you indicate ‘All’ in the branch
field for the message type ‘payment message’ it would mean that the address is applicable
whenever a payment message is generated from any of the branches of your bank.
6-10
Message Type
A message type is always associated with a module. You should indicate the messages to be
sent to the address you have defined for the customer, by picking up the message types for the
respective module.
You can use the wildcard ‘All’ indicating that all messages for the customer should be sent to
the address being defined.
Example
Ms. Keturah Smith has five accounts with Kuber’s bank. Three of the accounts were opened at Kuber’s
bank, London, and two at Kuber’s bank Surrey.
Ms. Smith had requested that an account statement be sent to her every month by mail with the following
instructions:
the account statements for the accounts at London should be sent by mail to her residential
address at London, and
the statements for the accounts at Surrey should be sent to her office address.
In this screen you should indicate:
Module + Message Type -- Accounting (AC) + Account Statement
Branch -- London
Module -- All
Copies – 1
You should also maintain a new customer address record for Ms. Smith’s office address and a
unique location for that address. . Under that maintenance, a similar record to the one indicated
above (Module – AC, Message Type – Account Statement) needs to be saved for the Surrey
Branch.
Copies
You can indicate the number of copies of the message that should be sent to this location each
time it is generated. The number you specify here, will be the default number of copies of the
message that will be generated each time a message is sent to this location through the media
you have specified.
If you indicate that more than one copy should be sent to a location, the first message will be the
original and the others will be marked as ‘copy’.
For payment messages, Oracle FLEXCUBE will default ‘one’ indicating that only one
payment message will be generated. You will not have an option to change it.
6-11
Format
You can specify the format in which a message should be sent to a customer’s address. The
default format for a message type needs to be defined through the ‘Advice Format Maintenance’
screen.
You can choose to use the default format defined for the message type or you can indicate
another format for the message. If you leave this field blank the default format specified for a
message type in the Advice Format screen will be used. However, if you want to personalize a
message to make it specific to a customer, you can indicate the code of the format that should be
used for the advice - customer combination.
Example
You have maintained a standard format for the account statements that are sent from your bank in the
Advice Format screen.
However, for Mr. Andrew Scott, a non-resident customer you want to personalize the account statement
rather than send him the standard one defined in the Advice Format screen.
To make this possible you can indicate the code of a format that you defined specific to Mr. Scott. Whenever
an account statement is sent to Mr. Scott from your bank, it will be in the format that you have defined in this
screen. Please note that the special format should first be defined in the advice format screen before it can
be associated with Mr. Scott's address.
Primary Address
When defining addresses for a message type, you have to identify an address as the primary
address. This option will be available only if the message type is ‘FX_CONFIRMN’.
If you maintain multiple FX Confirmation Message types for the ‘SWIFT’ Media for a customer
across different locations, the T-Copy will be generated only for the address that is marked as the
‘Primary Address’ of the counterparty.
Refer the ‘Continuous Linked Settlements’ chapter of the Foreign Exchange User Manual for
details on processing CLS deals in Oracle FLEXCUBE.
If addresses at both the customer account level and the customer (CIF) level are maintained,
Oracle FLEXCUBE picks up the maintenances done at the customer account level to generate
messages and advices. However, if the addresses at an account level are not maintained, Oracle
FLEXCUBE picks up the maintenances done at the customer (CIF) level to generated messages
and advices.
6-12
7.1
Introduction
7.
Maintaining Advice Formats
The advices that are generated from your bank will have a definite format. In the ‘Advice Format
Maintenance’ screen you can specify formats and indicate the messages and advices that should
use the formats you have defined.
By maintaining message formats you can ensure consistency across the branches of your bank.
You can maintain advice formats either by:
Using the format editor on the screen to enter the format, or
Importing the format from an ASCII file which can be located either on the:
Server
Client
Message formats are maintained at the bank level and will be applicable to all the branches
of your bank.
7.2
Advice Format Maintenance Screen
You can invoke the ‘Advice Format Maintenance’ screen by typing ‘MSDADVFT’ in the field at the
top right corner of the Application tool bar and clicking on the adjoining arrow button.
If you are maintaining a new advice format, select ‘New’ from the Actions Menu or click new icon
on the tool bar. The ‘Advice Format Maintenance’ screen is displayed without any details.
You can specify the following details pertaining to a format.
Format
In Oracle FLEXCUBE, each format that you define is identified by a fifteen-character code called
a Format code. You can follow your own convention for devising this code.
7-1
The code that you assign to a format should be unique as it is used to identify the format. You
can compare simple conditions while defining message formats. When you need to use a format
that you have defined, you need to just specify the code assigned to the format. The details of the
format will automatically become applicable to the message. After you assign a code to a format
you can indicate:
The number of lines that should be contained in a page when the advice is printed.
The number of columns that should be contained in a page when the advice is printed.
The language of the message.
The form type attached to the format.
Language
A message can be sent to a customer in different languages. To make this possible, you need to
maintain a format in different languages. While maintaining addresses for a customer in the
‘Customer Address Maintenance’ screen you can indicate the format and language in which a
message should be sent.
Form Type
Specify the form type that applies to the message. Select a form type from the adjoining optionlist.
Entering an advice format using the format editor
To enter a format using the format editor, click free format text icon positioned next to Format
Text. In the note pad that is invoked you can actually tailor an advice to suit your requirements.
The format editor has certain keywords which signify different options which you can use to
create a format. The following table contains a comprehensive list of the key words that can be
used in the format editor.
Keyword
Significance
#RH
Indicates the start of the report header section.
#PH
Indicates the beginning of the header for a page.
#EH
Indicates both the end of the header section of the report or the end header of a
page.
#RF
Indicates the start of the report footer section.
#PF
Indicates the start of the footer of a page.
#EF
Indicates both the end of the footer of a report or page.
#B
Indicates the start of the body of the message.
#EB
Indicates the end of the body of the message.
#CL
Indicates that you can collapse a line.
7-2
Keyword
Significance
#EC
Indicates the end of a line that you have collapsed.
#LOOP
Indicates the beginning of a loop.
#ENDLOOP
Indicates the end of a loop.
#IF
Indicates a conditional section.
#ANDIF
Indicates a conditional section.
#ORIF
Indicates a conditional section.
#ENDIF
Indicates the end of a conditional.
Importing an advice format from an ASCII file on the server
The server indicates the machine on which the database of your bank is installed. To import a
format from an ASCII file on the server:
1. Click against the field marked Server.
2. Specify the full path to the file on the server which contains the format you want to import.
3. Thereafter, click ‘Import’ button.
The file containing the format of the message will be displayed on the screen.
Importing an advice format from an ASCII file on the client
Client refers to your own machine. To import a format from an ASCII file on the client:
1. Click against the field marked Client.
2. Specify the full path to the file on the client which contains the format you want to import.
3. Thereafter, click ‘Import’ button.
The file containing the format of the message will be displayed on the screen.
7.2.1 Indicating Messages that should Use Format
After you have defined a format and assigned it a code you can indicate the list of messages that
should use the format.
The format that you define for a message in this screen is taken to be the default format that will
be used whenever the message is generated from your bank.
7-3
For each message that you specify, you can also indicate the specific details of the following, for
which the format should be used:
Module
Branch
Currency
Product
Media
Thus, you can specify a different format for the various combinations of the above.
To add a message to the list of messages that can use the format, enter the details of the
message and click add icon. To delete a message from the list, select the message and click
delete icon.
For all the five combinations you can use the wildcard ‘ALL’ indicating that the format is
applicable for records in that category. For example, if you indicate ‘ALL’ in the branch field for
the message type payment message it would mean that the format is applicable whenever a
payment message is generated from any of the branches of your bank.
Saving the record
After you have made the mandatory entries, save the record. A user, bearing a different Login ID
should authorize an advice format maintenance record that you have created, before the End of
Day processes (EOD) are begun.
Click ‘Exit’ or ‘Cancel’ button to return to the Application Browser.
In the summary screen, all the advice format records that have already been saved, will be
displayed in a tabular form; double-click a record of your choice to open it. You can also invoke
this screen by typing ‘MSSADVFT’ in the field at the top right corner of the Application tool bar
and clicking on the adjoining arrow button.
7.3
Automatic Printing of Advices generated during EOD
processing
In addition to generation of advices, Oracle FLEXCUBE automatically prints the advices that are
scheduled to be generated during End Of Day (EOD) processing. Account Statements, Loan
statements are examples of advices that are scheduled to be generated during EOD processing.
7.3.1 Starting the background process
In Oracle FLEXCUBE, you need to run the background process to generate and print advices. In
addition to the generation of the advices, system will also print the advices that are scheduled to
be generated during EOD processing. You can start or stop a process in the ‘Jobs Browser’
screen. You can invoke the ‘Jobs Browser’ screen by typing ‘CSSJOBBR’ in the field at the top
right corner of the Application tool bar and click on the adjoining arrow button.
7-4
You can specify any of the following details to search for a process:
The module to which the process is related
The name or identification of the process
The status of the process
Click ‘Search’ button to search for the process based on the search criteria specified. Check the
required process in the search results table and click ‘Start’ button to start the process. Click
‘Stop’ button to stop the process, at any point.
7.3.2 Printing of Advices
In Oracle FLEXCUBE, advices are generated during batch processing. If you have started the
background process, system will search for the messages that are not generated. The advices
may be of two kinds:
Advices that are not generated during contract authorization (If you had not opted for
message generation at the time of contract authorization)
Advices that are scheduled to be generated during End of Day operations.
As soon as the message is generated, system will check whether the advice was
scheduled to get generated during EOD. If so, the advice will be sent for spooling and
printing.
If the advice is not scheduled to be generated during EOD, system will move on to generate the
next advice without printing the advice.
7-5
8.1
Introduction
8.
Processing Outgoing Messages
Here, the procedure involved in generating an outgoing message is explained. To recall, you
have already maintained:
the type of messages that can be generated at your bank
formats for the various messages
the media through which messages should be transmitted
a media control system to receive and transmit messages for a given media
the addresses for a customer for a given media
In each module of Oracle FLEXCUBE, you can define products. While defining products you also
indicate the messages that should be associated with an event in the life cycle of a contract
involving the product.
A contract goes through several events during it’s lifecycle. A message for an event is triggered
for generation when the event is authorized.
Example
You have defined a product to cater to short term loans. You have indicated that the following messages
should be generated when events take place:
Event
Message
INITIATION
Initiation Advice
LIQUIDATION
Liquidation Advice
When you initiate a short-term loan involving the product an Initiation Advice will be triggered for generation.
Similarly, if you make a repayment on the loan, the liquidation advice defined for the event will be triggered
for generation.
In this context advices and messages are commonly referred to as messages.
Depending on the product - message - customer details that you have set up, Oracle FLEXCUBE
determines the address and the media through which the message should be transmitted.
If a message is to be transmitted through mail, it has to be printed. If the message is to be
transmitted through Telex, you will have to enter the testword (if it is required for the message).
The messages that are to be transmitted through media like Telex and SWIFT will be sent by the
Media Control System (MCS) which is connected to the node in which the database of your
branch is installed.
A message that is triggered for generation can be sent in the background or can be generated
on-line. An outgoing message will be processed based on the preference that you state.
8-1
The messages that are triggered by an automatic event like the generation of a tracer for an
LC, billing notice and delinquency notice for a loan, etc., will be put in the Outgoing Browser by
the automatic function itself. This is because events triggered by an automatic function do not
require authorization.
8.2
Manual Generation of Outgoing Messages
If the background message process is not running, all the messages that are triggered for
generation will be displayed in the Outgoing Message Browser from where you can generate the
message.
You can generate messages from the Outgoing Browser at any time in the day. You can invoke
the ‘Outgoing Message Browser Summary’ screen by typing ‘MSSOUBRS’ in the field at the top
right corner of the Application tool bar and clicking on the adjoining arrow button.
8-2
8.2.1 Features of Outgoing Message Browser
The following details of a message will be displayed in ‘Message Browser - Outgoing’ screen:
The branch from where the message is created
The DCN (Delivery Control Number) of the message which is a unique, systemgenerated reference number for the message
The reference number of the contract for which the message belongs (for an account
statement it will be the account number.)
You can fetch the transactions of all branches and query the other branch transaction and
proceed with authorization of the same. The system displays the branch in the query fields of the
option list.
The module to which the contract belongs (Loans and Deposits, Bills and Collections,
etc.)
The type of message that is to be generated (e.g., debit advice, credit advice, etc.)
The recipient of the message
The currency in which the amount or account is expressed
The amount that is contained in the message. For example, if the message is a loan
initiation advice, it is the loan amount; if it is a liquidation advice, it is the liquidation
amount, and so on. Messages that do not involve an amount, like an acknowledgment
tracer, will not have an amount.
The media through which a message is to be sent is displayed.
The currency in which the amount or account is expressed
The status of a message
SWIFT Message Type
Node
Priority
Name
Address
Location
Message Status - A message that is displayed on the Outgoing Message Browser can
bear one of the following statuses:
held
carried forward
released
canceled
reinstated
8-3
repair
generated
un-generated
sent
test word required
test word authorization
free format
printed
For a message that was put into the repair status, the exception that occurred while the
message was being processed will be shown. The following details of the message will
also be displayed, and you have an option to change them. They are:
the address to which a message should be sent
the media through which the message is transmitted
the priority with which a message should be sent and
the branch from where the message should be sent
the node from which the message is generated
Test word
Exception
Running number
Hold / Release Status
Test date
Test word Narrative
The Ack/Nak status of the outgoing message. Each record displayed in the outgoing
browser is checked to see if the message type requires acknowledgement processing or
not. If acknowledgement processing is required, the Status of the message is fetched
from the messaging tables and displayed in the outgoing browser as Ack/Nak status.
Otherwise, this field is displayed as ‘Not Required’. The Ack/Nak status could be one of
the following:
Accepted (A)
Rejected (N)
Pending (O)
Not Required (X)
External Reference Number
8-4
This is a unique message identification number that will be used to identify an incoming
message coming from an external system. This is defined as the ICN number. On upload
of an incoming message into Oracle FLEXCUBE, this number, given by the external
system, will be stored in Oracle FLEXCUBE and passed on to the contract generated as
a result of the incoming message. If the incoming message results in an outgoing
message, the ICN number will be linked to the outgoing message also.
This number will help you in creating a relationship between the incoming message, the
resultant contract in Oracle FLEXCUBE, and the outgoing message, if any.
For instance, if an incoming MT103 results in an FT transaction, then ICN number of the
incoming MT103 will be linked to the FT contract generated due to the upload of the
incoming payment message.
If an Incoming message results in an outgoing contract (outgoing message), Oracle
FLEXCUBE will store the External reference number (ICN Number) at the following
levels.
Incoming Message Level
Contract Level (Resulted due to the Incoming message)
Outgoing message (As a result of the above contract)
The ’Delivery By‘ i.e. message generated for SWIFT and FILEACT network and Query
facility.
RTGS Network and Funding status will be defaulted for the following message types:
CUST_TSFR_RTGS
BANK_TSFR_RTGS
COVER_RTGS
DIRDR_RTGS
Funding Status will be updated during the processing of incoming MT102 and MT109.
The List of RTGS Message type and its description is shown in the table below:
Message
Description
SWIFT
Message
CUST_TSFR_RTGS
Used when a Pay message generation is for a corporate
and sent through the RTGS Network.
MT 103
BANK_TSFR_RTGS
Used when a message belongs to an interbank deal and
sent through the RTGS Network.
MT 202
8-5
8.3
Message
Description
SWIFT
Message
DIRDR_RTGS
Used when a direct debit message is sent through the
RTGS Network.
MT 204
COVER_RTGS
Used when a cover payment is sent through the RTGS
Network.
MT 202
Entry By
Maker Dt Stamp
Authorised by
Checker Dt Stamp
Authorisation Status
Once Auth
Mod No
DCN List
Bulk
Selected
Testing Status
Any or Original
Original DCN
Delivered Status – this indicates whether or not the message was delivered to the
receiving system
Choosing Messages to be viewed in an Outgoing
Browser
You can choose to view the details of the outgoing messages on this Browser based on one or
more of the following:
DCN – select only a specific message if the Delivery Control Number is known
Reference Number – select all messages related to a specific contract or an account
Module – select the messages of a specific module
Message Type – select a specific message type (e.g. DEBIT_ADVICE, LIQDNOTC etc)
Receiver – select messages directed to a specific receiver
Media – select messages channeled through a particular media
8-6
SWIFT Message Type – select only SWIFT messages of a particular type (e.g. 103, 199
etc)
Message Status – select messages of one of the following six statuses :
Cancelled
Reinstated
Repair
Sent
Ungenerated
Generated
Authorization Status - select authorized or unauthorized messages
Hold/Release Status – select messages of one of the following three statuses:
Hold
Released
Carry Forward
Based on the values provided for one or more of the above, all messages which conform to the
values queried for, will be displayed. If none of the options are filled all the messages in the
outgoing browser will be fetched.
Example
Case 1
You have specified that you want to view details of the ‘authorized’ messages. You have also selected ‘ungenerated’ against Message Type.
All the messages that are authorized and yet to be generated will be displayed.
Case 2
You wish to view all messages placed on hold and carry forward a few selected ones out of them.
You have to select “Hold” in the Hold/Release Status and query. That fetches all the messages placed on
hold.
You then tick against the messages you want to carry forward, and press the ‘Carry Forward’ button.
You have specified that you wish to view details of messages placed on hold, and select ‘hold’ and query.
Details of all messages that have been placed on hold are displayed. If you then wish to move any of the
displayed messages to ‘Carry Forward’ stage, you can click the ‘Carry Forward’ button. The Release Option
screen is displayed, where you must select the Carry Forward radio button.
You can also release messages that have been placed on hold (without moving to Carry Forward stage), by
clicking the ‘Release’ button and then selecting the Release radio button in the ‘Release Option’ screen.
Both options (Release and Carry Forward) would need authorization if you have so indicated in the
‘Messaging Branch Preferences’ screen.
8.4
Operations you can perform on an outgoing Message
8-7
The operations that you can perform on an outgoing message are determined by the rights that
you have been assigned in the Security Management System (SMS) module of Oracle
FLEXCUBE. If a function in the Outgoing Browser is disabled, it means that the function is not
allowed for the record.
The message(s) for which the particular operation needs to be performed, is selected using the
checkbox against it, and the corresponding button for that operation is pressed. The action
performed will require authorization if it is so maintained in the Messaging Branch Preferences.
Generate
Generating a message
This is the first step in sending a message. All the messages that have been
triggered for generation by the various modules of Oracle FLEXCUBE are
displayed in the Outgoing Browser. You can click the generate button from the
Browser to:
generate an ungenerated message that is displayed in the outgoing
Browser
generate the messages which have been put into repair status (that is
after the exception has been resolved)
If the message is to be transmitted through mail, the message needs to be
printed. If the message is to be transmitted through Telex, you will have to enter
the testword (if it is required for the message).
When you choose to generate a message, Oracle FLEXCUBE checks the
status of the contract for which it is to be generated. If the contract has been
reversed the message will not be generated. If the message is placed on ‘Hold’
it will not be generated until it is released from the ‘Hold’ status. If any of the
maintenance related to the message is unauthorized, the message will be put in
the repair queue and the reason for which the message was put on repair will be
displayed.
While generating messages in the Background mode, Oracle FLEXCUBE
picks up messages marked with high priority earlier than messages marked with
a lower priority
While generating the outgoing messages, the branch is always updated as
originator branch (current branch). Hence the outgoing browser lists all the
messages which are originated in current branch. You can view and print the
messages generated in the originator branch.
Hold
Placing a message on hold
Messages that are put on hold are temporarily stopped from being generated.
You can also place messages that are to be generated in the future on hold.
Typically, messages are kept on hold if they meet certain hold criteria that are
applicable for the message medium. In respect of an outgoing message that
has been put on hold, the Supervisor can choose to either release the message,
or move it forward to the Carry Forward status, after viewing its details. Such
carried forward messages can subsequently be released after being authorized.
Messages placed on Hold must either be carried forward or released before
8-8
you execute the End of Day processes at the branch. The System raises an
error in respect of any messages still in Hold status, during the End of Day
process. However, if it is a cancelled message then system will not raise any
error, even if it is in Hold status.
Release
Releasing a message on Hold
In respect of an outgoing message that has been put on hold, the Supervisor
can choose to either release the message, or move it forward to the Carry
Forward status, after viewing its details.
Carry
Forward
Carrying forward a message on Hold
Messages carried forward to the subsequent days will not be generated during
the current day but will be marked for generation later.
Messages that have been Carried Forward can be put back on Hold.
Cancel
Cancelling a message
Ungenerated messages and those that have been put on Hold, can be
cancelled.
The status of the message will be marked as ‘Canceled’. However, you will be
prompted to print a copy of the message before it is actually canceled.
This activity needs to be authorized, if you have indicated so in the
Messaging Branch Preferences screen.
This operation will not have any impact on EOD processing, even if it is held and
then cancelled.
TW Input
Input a testword
Telex messages for which a testword is required will be put into the repair
status. In order to remove such a message from the repair status input the
Testword by selecting the message and pressing the ‘TW Input” button.
The complete telex message will be displayed on the screen and you will be
prompted to enter the testword.
The test word entry for a telex message will have to be authorized if you
have indicated so in the Messaging Branch Preferences screen. If the testword
entry requires authorization then on successfully entering the testword, the
message will move from the repair status to an unauthorized status. In this case,
the message can be generated only after the testword entry is authorized.
TW Auth
Authorizing a Testword
A telex message for which you entered a testword should be authorized if you
have specified so in the Messaging Branch Preferences screen.
During the authorization of a telex message the authorizer will be required to reenter the testword.
8-9
Reinstate
Reinstating a message
Cancelled messages can be reinstated. This action is equivalent to the undo
facility for cancellation.
Change
Priority
Changing the priority of a message
You can change the priority with which a payment message that is yet to be
generated should be sent.
While generating a message Oracle FLEXCUBE picks up messages marked
with high priority earlier than messages marked with a lower priority while
processing these with background jobs.
Change
Media
Changing the media through which a message is transmitted
You have the option to re-direct a message from one media to another before it
is generated.
On indicating a change in the media of transmission, you should also indicate
the address and location to which the message should be sent. You may require
to effect a change in the media of transmission for a message due to a failure of
the medium at the bank’s or the counterparty’s end.
It is important to note that the media through which you to redirect a
message should be available to the customer.
Print/Spool
Printing a message
Messages that are transmitted through mail should be printed. You can also
choose to print the details of messages transmitted through other media types.
When you select the print option, you will be prompted to indicate whether you
want to spool or print it on-line.
The system also provides an option to spool the advices in PDF format. When
you click the Print/Spool button, you can spool the selected advice in PDF file.
Resend
Resending a message
You have the option to transmit a message that has already been sent.
The original message that was generated will be re-generated.
View
Viewing the contents of a message
A single generated message can be selected and its contents viewed using this
option. Viewing multiple messages in one go is not supported.
Change
Address
Changing the address to which a message is to be sent
You can change the address to which a message should be sent by selecting
the message and clicking this option. The details of the individual message will
appear on the screen, with the address fields enabled.
8-10
Enter the new address to which the message should be sent and press ’OK’ to
save.
Note that change of address can be done only before a message is generated.
Change
Branch
Moving a message to another branch
A message that was generated from your branch can be sent from another
branch of your bank. To move a message from one branch to another by
selecting the message and clicking this option. The details of the individual
message will appear on the screen, with the Branch field enabled. Select the
branch to which the message needs to be moved.
You may require to effect a change in the branch from which a message is to be
transmitted due to the failure of a medium at the bank’s or the counterparty’s
end or because it is economical to generate the message from a branch located
closer to the location of the customer’s address.
Change
Node
Changing the node from which a message should be generated
In a distributed environment, the database of one or several branches of your
bank can be located at a node or server. The Media Control System is also
installed at a node. Thus, while defining an MCS you have also indicated the
node in which it is installed.
You can change the node from which a message should be generated by
selecting the message and clicking this option. The details of the individual
message will appear on the screen, with the Node field enabled. Select the node
from the list of values, from where the message needs to be generated.
You may require to change the node through which Oracle FLEXCUBE should
interface with an MCS if the status of the MCS which is located at the node in
which the database of your bank is installed is passive.
Handoff
Handing off a message
You can hand-off a generated message to MCS. The message will be stored in
the MCS in the ASCII format and can be used for any purpose.
Undo
Undoing the previous action
You can reverse the last action that you performed on a message from the
Outgoing Message Browser.
Authorize
Authorizing operations
The operations that you perform on a message from the Outgoing Browser have
to be authorized by a user bearing a different Login ID. The operations that
would require authorization depends on the authorization preferences that you
stated in the Messaging -- Branch Preferences screen.
The operations for which authorization is necessary should be authorized before
the message is sent from your bank.
On-Line
Authorizing operations on-line
8-11
Auth
The on-line authorization option simplifies the regular authorization procedure
and helps save time.
The regular authorization procedure would require that the user who performed
the operation sign off from Oracle FLEXCUBE and a user with adequate rights
logs in and authorizes the operation.
When you choose the on-line authorization option, the login screen is displayed.
An Oracle FLEXCUBE user with authorization rights can Login right away and
authorize the activity on-line. To authorize the operations performed on the
outgoing Browser, click the ‘On-Line Auth’ button and have another user login to
authorize the activity.
Copy
Sending a copy of a message
You can send a copy of a generated message to another party involved in a
contract. To send a copy of a message to another party, select the message
and use this option. The message details will be shown with the Receiver details
enabled.
You can specify the following details for sending the message copy:
Media
This option will be enabled only if the Any Message Copy option is selected.
You can specify the media by which the message should be sent.
Name
This indicates the name of the receiver. The system will default this value from
the Receiver name. However you can change the name.
Location
8-12
Specify the location of the receiver.
Address 1-4
This indicates the address of the Receiver. The system will default the values
from the Receiver details.
However you can change the address details.
During copy, system will validate that either the Receiver is specified or the
Name and Address field is specified else will generate an error message
appropriately.
Set
Transaction
Branch
The system defaults the current branch as the transaction branch. You have to
click the ‘set transaction branch’ button to select the branch from the
‘Transaction Branch’ screen. After selecting the transaction branch, when you
click on search the system will list the messages of other branch transactions.
Here you are allowed to book other branch transactions from the logged in
branch. Also, you can query other branch transactions from the logged in
branch. The system defaults the logged-in branch by default as the transaction
branch.
Select the appropriate branch from the list of branches available in the option
list.
While clicking ‘Ok’ button, the system validates the access rights of the selected
branch and function for the user. If you don’t have appropriate rights on the
selected branch and function, the system would raise an error message. If you
select a valid branch, the system updates the same as transaction branch and
the transaction would be posted for this branch.
The system performs the action level access rights validation only on ‘Save’
operation.
8-13
8.4.1 New Advice for Bank Realization Certificate
System can generate a new advice for bank realization certificate for export bill.
BC_GRFORM_DTL advice is generated in the liquidation events (such as LIQD, LPUR, LCRY
and LDIS) for export bill contract. In daily message out (MSTB_DLY_MSG_OUT) table using the
GRNO option separate advice for each GR number can be generated. System generates the
advice for GR Number only if the realization type is marked as ‘Fully Realized’ at the time of
liquidation. This is applicable on partial liquidation also.
You can search advices by clicking the ‘Advanced Search’ button from the ‘Outgoing Message
Browser Summary’ Screen. The ‘Advanced Search’ screen is displayed.
You can search any advice based on the following parameters:
DCN
Reference Number
Module
Message Type
Receiver
Media
Swift Message Type
Address 1
Message Status
Hold/Release Status
8-14
Authorization Status
GRNO –You can filter the advice for specific GR number using this option.
Advice for GR number has the following tags:
_CONTRACTREFNO - this is used to display the bills contract reference number
_DRAWERNAME_ - this is used to display the drawer name
_DRAWERADDRLINE1_ - this is used to display the address
_DRAWERADDRLINE2_ - this is used to display the address
_DRAWERADDRLINE3_ - this is used to display the address
_DRAWERADDRLINE4_ - this is used to display the address
_GRAMT_ - this is used to display the GR amount which is captured in GR Form screen
_CCY_ -this is used to display the currency code of the contract
_LCCY_ - this is used to display the local currency
_ GRAMTLCY _ - this is used to display the GR amount in local currency which is captured in GR
Form screen
_INVOICENO_ - this is used to display the invoice number which is captured in GR forms screen
_INVOICEDT_ -this is used to display the invoice date which is captured in GR Forms screen
_GRNO_ - this is used to display the GR number
_GRDATE_ - this is used to display the GR date which is captured in GR Forms screen
_FREIGHTAMT_ - this is used to display the Freight amount which is captured in GR Forms
screen
_FREIGHTLCCYAMT_ - this is used to display the freight amount in local currency which is
captured in GR Form screen
_BANKCHGAMT_ - this is used to display the bank charges which is captured in GR Forms
screen
_BANKCHGLCCYAMT_ - this is used to display the bank charges in local currency
8-15
_INSAMOUNT_ - this is used to display the insurance amount which is captured in GR Form
screen
_INSAMOUNTLCY_ - this is used to display the insurance in local currency which is captured in
GR Form screen
_FOBVALUE_ - this is used to display the value of GRAMTLCY – FREIGHTLCCYAMT –
INSAMOUNTLCY
_REALIZATIONDT_ - this is used to display the liquidation date
_APPLICATIONDT_ - this is used to display the current branch date
_SHIPPINGBILLDT_ - this is used to display the shipping bill date which is captured in GR Forms
screen
_SHIPPINGBILLNO_ - this is used to display the shipping bill number which is captured in GR
Forms screen
_GOODSDEST_ - this is used to display the goods destination
8.4.2 Processing Outgoing Messages with PDE Trailer
System identifies outgoing messages with a PDE (Possible Duplicate Emission) trailer and parks
it in the PDE queue. From the PDE queue you can opt to either release the message with/without
the PDE trailer or reject the message. You can release or reject an outgoing message with a PDE
Trailer using the PDE Detailed screen. You can invoke the ‘PDE Detailed’ screen by typing
‘MSDETPDE’ in the field at the top right corner of the Application tool bar and clicking on the
adjoining arrow button.
The following details of the message are displayed in the above screen:
Branch Code
8-16
Reference Number
ESN
DCN
Remark
Message
You need to capture the following information in the above screen:
Status
Select the status of the message from the drop-down list. The options available are:
Release with PDE
Release without PDE
Reject
In order to view the details of the record click ‘Detail’ button. The details of the record are
displayed in the ‘PDE Detail’ screen.
The following details of the message are displayed:
Module Id
Reference Number
User Ref No
Message
8.4.2.1 Viewing Outgoing Messages with PDE Trailer
You can view all the PDE messages parked in the PDE queue using the ‘PDE Summary’ screen.
You can invoke the PDE Summary screen by typing ‘MSSETPDE’ in the field at the top right
corner of the Application tool bar and clicking on the adjoining arrow button.
8-17
In the above screen you can query for a record based on any of the following parameters:
Branch Code
Reference Number
Module Id
User Ref No
Based on the query, the following details of the record which match the query parameter are
displayed:
Module Id
Reference Number
User Ref No
PDE Type
Message
In order to view the details of each record select the record and click ‘Detail’ button. The details of
the selected record are displayed in the ‘PDE Detail’ screen.
For more details on PDE validations on outgoing messages refer section ‘Performing PDE
Validations on SWIFT Messages’ in ‘Maintaining Messaging Branch Preferences’ chapter of this
User Manual.
8-18
8.5
Viewing Multiple Messages from Preview Screen
You can preview messages of multiple contracts at a time in ‘Message Preview Browser’ screen.
To invoke this screen type ‘MSDMPREV’ in the field at the top right corner of the Application tool
bar and clicking the adjoining arrow button.
You can specify the following details:
Module
Specify the module name in which you want to preview messages. You can also select the
appropriate one from the option list.
Contract Reference Number
Specify the reference number of the contract for which you want to preview the message. This
option is enabled only when ‘Single Contract’ is selected from the Contract Option.
8-19
You can view all the unauthorized messages of all branches. On clicking the 'NEW' button
from the 'Action' menu, a window pops up with default branch as the current logged in Branch.
You can choose the Branch from the option list and click 'OK' button for viewing the messages of
the selected Branch..
Product
Specify the code that identifies the product. You can also select the appropriate one from the
option list. This option is enabled only for the multiple contracts.
Counterparty
Specify the customer name of the contract. You can also select the appropriate one from the
option list. This option is enabled only for the multiple contracts.
Contract Options
Specify the contract options that you are maintaining for message preview. You can select one of
the following options:
Single contract
Multiple Contracts
Note the following:
If single contract option is selected then contract reference number should be given. Click the ‘P’
button to view all the DCN generated for the contract. You can select a DCN and preview the
message. Click the ‘Preview’ button to view the message for the selected DCN.
If Multiple Contracts option is selected, then the ‘Contract Reference Number’ option is disabled
and you can select the product and the counterparty. Click ‘P’ button, the system displays all the
contract reference numbers for which the message can be generated in the ‘Multiple Message
Preview’ block. Select Contract reference number and click ‘Preview’ button to view ‘Message
Details’ screen of the particular contract reference number.
Print Options
Specify the print options that you are maintaining for message preview. You can select one of the
following options:
DCN Preview
Server Pool
Print
DCN Preview – Select this option to specify the DCN reference number which should be
previewed.
Server Pool - Select this option to spool the messages to a remote server or to the local system.
To spool the messages maintain the server path or local system path in RPDPARAM screen.
8-20
Print - Select this option to print the messages.
DCN
Check this box to select the DCN which should be previewed or printed.
Contract Reference Number
Check this box(es) to specify the contract numbers that should be selected for message preview.
Click ‘P’ button, the DCN detail is displayed and this can be selected for viewing the message.
Click ‘Preview’ button to view the message details.
8-21
9.1
Introduction
9.
Retrieving an Archived Message
Archival is the process of storing old messages for future retrieval. To recall, while defining
messaging preferences for your branch you have also specified the number of days for which an
outgoing message should be kept in the Outgoing Message Browser.
A message will be automatically archived after the number of days that you specified in the
‘Messaging Branch Preferences’ screen. You can choose to retrieve the outgoing messages that
have been archived by invoking the ‘Message History Retrieval Summary’ screen.
9.2
Invoking Message History Retrieval Summary Screen
You can invoke the ‘Message History Retrieval Summary’ screen by typing ‘MSSUNARC’ in the
field at the top right corner of the Application tool bar and clicking on the adjoining arrow button.
The Unarchive Outgoing message screen is displayed.
9-1
9.2.1 Features of Message History Retrieval Summary Screen
The following details of the outgoing messages that were archived will be displayed:
The DCN of the message (Delivery Control Number – a unique identifying number for
each message)
The module for which the message was generated
The reference number of the transaction for which the message was triggered
The type of message that was triggered
The media through which it was transmitted
The recipient of the message
The date on which it was triggered for generation
To query messages, click on the ‘Search’ button.
Click ‘View Message’ to view the archived message in the standard Oracle FLEXCUBE message
viewer.
Click ‘Exit’ or ‘Cancel’ to return to the Application Browser.
9-2
10.1 Introduction
10. Processing Incoming Messages
To recall, in the ‘MCS Maintenance’ screen, you have indicated the Media Control Systems that
are connected to the node in which the database of your branch is installed. You have also
specified the media that the MCS should handle. Besides, you have specified a hand-off directory
into which all incoming messages transmitted through a specific media should be stored.
The final destination of an incoming message is the end user queue. These queues represent
departments responsible for acting on the received messages.
10.2 Viewing Incoming Messages
All incoming messages that are intended for your bank will be handled based on the MCS
specifications that you have maintained for your branch. You can choose to receive the incoming
messages in the ASCII format from an MCS, and manually direct them to the appropriate queues,
or indicate that the background process should automatically pickup incoming messages from an
MCS and transfer them to the appropriate queues.
10.2.1 Background Processing of Incoming Messages
If you indicate that incoming messages for your branch should be processed in the background,
messages will be routed to the relevant queues as and when they come in without manual
intervention.
You can configure the background process to begin when the Beginning of Day process is run or
you can invoke it at any time in the day. This screen (CSSJOBBR / CSSJMNTR) can also be
used to check whether the background process is running for outgoing and incoming messages.
Messages that are transmitted by mail will have to be handled manually. Messages transmitted
through media like Telex and S.W.I.F.T. will be automatically routed to the relevant queues. A
unique reference number (DCN) is assigned to each incoming message.
Incoming messages, which have an error, will be moved to the error queue.
10.2.2 Manual Processing of Incoming Messages
You will have to manually process incoming messages if:
the background message process is not running
to route messages that cannot be routed to a user queue automatically
If the background process is not running, the messages that have come in to your bank will be
stored in the incoming directory located on the node at which the database of your branch is
installed. To recall, you have specified this directory in the ‘MCS maintenance’ screen. On
invoking the Incoming Message Browser, you should upload all the messages from the directory
on the node. All the incoming messages will be displayed in the Incoming Browser.
10-1
From the ‘Incoming Message Browser’ screen, you can receive messages that have come in
through the MCS connected to the node in which the database of your branch is installed. You
can invoke the ‘Incoming Message Browser’ screen by typing ‘MSSINBRS’ in the field at the top
right corner of the Application tool bar and clicking on the adjoining arrow button.
10.2.3 Features on Incoming Message Browser
From the Incoming Message Browser you can:
upload incoming messages from the incoming directory on the node
check Testwords for Telex messages
authorize the Testword check for messages
link an incoming message to a contract
route the incoming messages to appropriate queues
The following details of an incoming message will be displayed:
the branch
the DCN assigned to the incoming message -- the DCN is the delivery control number
used to identify the message. It is a 10-digit number prefixed with a letter of the English
alphabet. The DCN ID is made up as follows:
1-2 Characters -- Last two digits of the current year
10-2
3-5 Characters -- Day of the year (Julian Date)
6-10 Characters -- Sequential number starting from 00001 each day
Reference number
Sender’s code - the name address and location of the sender of the message
Media - the media through which the message was transmitted
SWIFT/SFMS message type of the message
the name address and location of the sender of the message
Testword (in case of a Telex message)
Audit trail details – like Maker ID and Date stamp, authorization status etc.
the queue in which the message is stored
the MCS through which the message was routed
the reference number assigned to the message by the sender
the currency and the amount involved in the message.
The value date and status of the message - whether the message has been processed or
is still unprocessed or is in Repair.
Suppress options
External Reference Number
Multi Credit Reference Number
RTGS Network
Process
Modification Number
PDE Flag
Required Execution Date
You can set some of the above parameters to make a query. Specify the details in the respective
fields and click ‘Search’ button to view the details.
Checking the testword for a telex message
Telex messages that come into your bank need to be checked for validity if you have specified so
in the messaging branch preferences screen. This is done by entering a testword. The test word
that you enter depends on the testword arrangement with the counterparty, the important aspects
of the message like customer, date and currency.
If the testword you enter does not match the telex testword the message is registered as a
defective message and put into the repair status.
10-3
External Reference Number
This is a unique message identification number that will be used to identify an incoming message
coming from an external system. This is defined as the ICN number. On upload of an incoming
message into Oracle FLEXCUBE, this number, given by the external system, will be stored in
Oracle FLEXCUBE and passed on to the contract generated as a result of the incoming
message. If the incoming message results in an outgoing message, the ICN number will be linked
to the outgoing message also.
This number will help you in creating a relationship between the incoming message, the resultant
contract in Oracle FLEXCUBE, and the outgoing message, if any.
For instance, if an incoming MT103 results in an FT transaction, then ICN number of the incoming
MT103 will be linked to the FT contract generated due to the upload of the incoming payment
message.
If an Incoming message results in an outgoing contract (outgoing message), Oracle FLEXCUBE
will store the External reference number (ICN Number) at the following levels.
Incoming Message Level
Contract Level (Resulted due to the Incoming message)
Outgoing message (As a result of the above contract)
RTGS Network
The service identifier of the RTGS network will be picked up from field 113 of block 3 header of
the incoming message and displayed here.
For TARGET 2 clearing network, the service identifier specified for the network in the ‘Clearing
Networks’ screen will be defaulted and displayed here.
10.2.4 Operations that you can perform on an Incoming Message
View
Delete
Viewing and deleting the contents of a message
To view the contents of an incoming message:
Highlight the message you want to view and
Click the ‘View Message’ button on the Browser
The contents of the message will be displayed in a separate screen.
Print
Printing a message
You can choose to print the details of an incoming message. To print the details
of an incoming message,
Highlight the message you want to print and
10-4
Click the ‘Print button’ on the Browser
When you select the print option, you will be prompted to indicate whether you
want to spool or directly print the message.
Change
Branch
Changing the Branch of the message
Select the message for which Branch has to be changed
Click on “Change Branch” button.
The details of the message will be displayed with only the Branch field enabled.
Choose the new branch from the list of values provided and save the message.
TW Auth
Authorizing a Testword
A telex message for which you entered a testword should be authorized before it
can be routed to a user queue (if you have specified so in the Branch Preferences
screen).
To authorize a test word that was entered for a telex message, click the ‘TW Auth’
button from the Browser on this screen.
During the authorization of a testword the authorizer will be required to re-enter
the testword.
Move To
Queue
Routing a message to a queue
After you have made the checks that are necessary for the media through which a
message is transmitted you can route the message to a user queue. To change
the queue in which an incoming message should be stored:
Select the message
Click the ‘Move to Queue’ button
Select a queue from the adjoining option list
The message will be automatically moved to the queue that you specify. The final
destination of an incoming message is the end-user queue. These queues
represent departments or printers responsible for acting on the received
messages. Once a message is lodged into an end user queue, it can be viewed
on-screen or printed by the users who have access to the queue.
You can move messages from one end user queue to another as well.
For a message that was transmitted through Telex, you should enter the
testword and have it authorized before you can route it to the relevant end user
queue.
Link
Contract
Linking the message to a contract
In the browser, select the message with which you want to associate a contract
and click on the ‘Link Contract’ button. The Reference Number option-list is
enabled for the selected message. You can select the appropriate contract from
10-5
the list. The message will be subsequently associated with the contract selected
here.
Upload
Uploading incoming messages
If the background process for incoming messages is not running you will have to
upload the messages that have come into your bank from the incoming directory
on the node to which your branch is connected.
To upload messages from the incoming directory (specified in the MCS
maintenance screen) click the ‘Upload’ button. All messages that were stored in
the Incoming Directory will be uploaded to Oracle FLEXCUBE and displayed in
the Incoming Message Browser.
Edit
Editing the Incoming Message
Click ’Edit Message’ button if you wish to make changes to the SWIFT/SFMS
message, especially the messages marked for repair. This is explained in the next
Section.
Authorize
Authorizing the Incoming Message
Use ‘Authorize’ button to authorize the message. All the amendments made to a
SWIFT/SFMS payment message have to be authorized by a user with appropriate
authorization rights. At the time of authorizing, Oracle FLEXCUBE will display the
earlier version of the SWIFT/SFMS payment message along with the amended
version, in the same window.
A list of all the errors due to which the message was marked for repair is also
displayed. The authorizer can view all the errors and also verify the changes that
were made to correct them. After verification, if all the details are found to be
appropriate, the message is authorized.
Oracle FLEXCUBE maintains a detailed audit log of all amended SWIFT/SFMS
Payment Messages. The following details are captured for each authorized
message:
User ID of the person who authorized the amendments
Date and time of authorization
At any point during the verification and authorization process, the authorizer
can choose to cancel the entire operation without changing the status of the
message.
Force
Force Releasing Messages
Use ‘Force Release’ button to forcibly release all Payment Message Transactions
with ‘Funding Exception’ status and insufficient funds. In other words, the system
will post the required accounting entries for such transactions regardless of
insufficient funds in the accounts. However, an override will be displayed. The
system will also maintain a detailed audit trail for such transactions. A user with
appropriate rights can perform this function.
Supress
Suppressing the Incoming Message
10-6
To suppress a message, click ‘Suppress’ button in the Incoming Browser and
invoke the ‘Suppress Message’ screen. The following options are available to
suppress a Payment Message:
Suppress Message Generation
Suppress Full
No Suppress
Specifying the ‘Suppress Message Generation’ option
If you select this option, Oracle FLEXCUBE will stop the generation of the
Payment Message. However, the system will post the necessary accounting
entries for the messages being suppressed.
Indicating the ‘Suppress Full’ option
If you select the full suppress option for a message, the system will not post the
related accounting entries. Advice generation will also be stopped. In other words,
the system will not pick up the Payment Message for any further processing.
Specifying the ‘No Suppress’ option
A message marked with the ‘No Suppress’ option will be processed like any other
normal Incoming SWIFT/SFMS Payment Message.
Specifying the remarks for a suppressed message
You can specify the reason for suppressing a Payment Message in the ‘Remarks’
field.
Search
Querying for a specific set of Messages
To avoid wading through all the SWIFT/SFMS messages, you can make search
for specific records which are relevant to you at a particular time. For instance you
may want to see all messages belonging to a particular message type. The
‘Search’ button makes this possible. Specify the required criteria and click the
‘Search’ button. The system will identify all records that satisfy the criteria and
display them.
Click ‘Exit’ or ‘Cancel’ to return to the Application Browser.
10-7
10.2.5 Viewing Details of Incoming Message
You can view an incoming message in the Incoming Message Summary screen by selecting the
message and clicking ‘Details’ button.
The following details regarding the incoming message are displayed in the above screen:
DCN
Reference Number
Sender
Media
Swift/SFMS Message Type
Queue
Operation
Status
Currency
Amount
Value Date
External Reference Number
Multi Credit Reference Number
Branch
Media Control System
Node
10-8
Test Word
Repair Reason
Name
Address
Location
Process
PDE Flag
Suppress Options
Remarks
Auth By
Entry By
Mod No
Checker Date Stamp
Maker Date Stamp
Suppress Status
Funding Exception Status
Cover Match Status
Authorization Status
10.2.6 Editing Incoming Message
An incoming message can be edited by invoking the ’Edit‘ function in the Incoming Messages
Browser. On pressing the ‘Edit Message’ button, the message is displayed in edit mode. Only a
user with requisite rights for editing can edit an incoming message.
10-9
If editing is possible for the user, the message is displayed and is available for amendment. The
list of fields, which can be modified are maintained through back-end database tables
appropriately during implementation of Oracle FLEXCUBE. Most typically, fields like amount,
currency would be maintained as non-modifiable whereas fields such as value date could be
maintained as modifiable. Based on the maintenance in these tables, the appropriate fields are
enabled for amendment.
On saving the amendment of the message, a new version is created and must be authorized. The
screen shown above displays two versions of an incoming message. If the verifier needs to reject
the change for any reason the same can be mentioned in the ‘Reject Reason’ field.
In the case of incoming messages with a PDE trailer, the ‘PDE Flag’ check box in the
‘Incoming Message Browser’ screen will be checked. In the ‘Edit Message’ screen, check
‘Remove Trailer’ option to remove the PDE trailer (message contains the text {‘PDE:’}) and save
the message.
10.3 Viewing SWIFT Notification Messages
SWIFT provides the following two types of notification messages to Oracle FLEXCUBE:
ACK/NACK acknowledgement messages indicating whether the message has been
successfully delivered to SWIFTNet FIN service, from where it gets forwarded to the
receiving system
Delivery notification messages indicating whether the message was successfully
delivered to the receiving system
You can access these notifications messages using ‘SWIFT Message Notification Browser’
screen. You can invoke this screen by screen by typing ‘MSSNOTIF’ in the field at the top right
corner of the Application tool bar and clicking on the adjoining arrow button.
10-10
In this screen you can specify any of the following details to search for a message:
Sender’s code
Status
MUR or the message user reference number
DCN or the delivery control number used to identify the message
SWIFT message type
Authorization status
Contract reference number
You can view an incoming notification message by selecting the message and clicking ‘Details’
button.
A back-ground job running on this browser updates the outgoing browser with the ACK/NAK and
the delivery status of the message. The sender MUR from SWIFT is used to match the
corresponding outgoing browser record.
10-11
11.1 Introduction
11. Defining Free Format Messages
In the course of your daily banking operations you may want to generate messages that are not
automatically generated by the system or you may have to communicate a message that is very
specific to a customer. You can enter the details of such messages in the form of a free format
message.
The details of a Free Format Message can be entered in the Free Format Message Maintenance
screen. In this screen some of the details you can indicate are:
The format of the message
The recipient of the message
The media through which the message should be transmitted
The address and location to which the Free Format Message should be sent
11.2 Invoking Free Format Message Maintenance Screen
You can also invoke the Free Format Message screen by typing ‘MSDFFT’ in the field at the top
right corner of the Application tool bar and clicking on the adjoining arrow button.
The screen is shown below:
11-1
Click new icon in the toolbar of the screen or select ‘New’ from the Actions menu in the
Application toolbar. The system will display ‘Transaction Branch’ screen. Here you can select the
transaction branch.
Here you are allowed amend the contracts booked in other branches from the logged in branch.
Also, you can query other branch amended transactions from the logged in branch. The system
defaults the logged-in branch by default as the transaction branch.
The query for transactions in other branches can be done only from the summary screens
and not from the detail screens.
Transaction Branch
Select the appropriate branch from the list of branches available in the option list.
While clicking ‘Ok’ button, the system validates the access rights of the selected branch and
function for the user. If you don’t have appropriate rights on the selected branch and function, the
system would raise an error message. If you select a valid branch, the system updates the same
as transaction branch and the transaction would be posted for this branch.
The system performs the action level access rights validation only on ‘Save’ operation.
11-2
11.3 Features of Free Format Message Screen
You can specify the following details on this screen.
Module
Select the module from the drop-down menu, for which you are entering the details in this screen.
Customer
Select the code of the customer to whom the message is addressed, from the option list. If the
recipient is not a customer of your bank, then specify his/her name in this field.
Media
You can indicate the media through which the Free Format Message should be transmitted. The
media through which you can channel a Free Format Message depends on the media types that
you have maintained for your branch in the ‘Media Maintenance’ screen. You can choose a
media code from the option list that is available. SFMS, SWIFT, Mail etc. are some of the options
available.
The following SFMS messages are supported by the system:
IFN 199
IFN 299
IFN 399
IFN 499
IFN 599
IFN 699
IFN 799
IFN 899
IFN 999
Location
You should also specify the location of the address. To recall, the location that you specify for an
address is the unique identifier between the other addresses of the customer for a given media.
The address of the customer will be automatically displayed based on the customer-locationmedia combination that you indicate if it has already been maintained in the system.
Node
You can indicate the node from where this Free Format Message has to be generated.
11-3
Name
In the case of a walk-in customer, enter the name of the customer to whom the message is to be
addressed. If the recipient of the message is a customer of your bank, the customer’s name will
be automatically displayed when you indicate the customer’s CIF number in the “Customer” field.
Address
If the recipient of the message is a customer of your bank, the customer’s address will be
automatically displayed based on the Customer-Media-Location combination that you have
specified.
You will be required to enter the address in the case of a Walk-in customer. The format of the
address depends on the media through which the Free Format Message is transmitted.
If the address is for the media type Mail, you can enter the customer s address in the four rows
under this field. Each line that you enter can contain a maximum of 35 characters.
If the media of transmission is Telex, the address should be expressed numerically.
If you are defining a SWIFT address, the address should be of eight or eleven alphanumeric
characters.
Contract Reference Number
You can indicate the code assigned to the customer who is the recipient of the message. This is
the code that you assigned to the customer in the Customer Information File (CIF). This shows all
the contract reference numbers along with branch code for those branches for which you have
access to.
11-4
Form
If the message to be sent is in the form of a template, you can choose the template from the
option list.
Hold
Messages that are put on hold are temporarily stopped from being generated. If you have
indicated that messages should be generated in the background, the Free Format Message that
you have defined will be immediately sent when you save the record. If for some reason you do
not want to immediately send the message, you can place it on hold. In this case, the message
will appear in the Outgoing Message Browser, but will be in the hold status. You will have to
release the message before you generate it from the Outgoing Browser.
Copies
Enter the number of copies of the Free Format Message that should be sent to the customer at
the time it is generated.
If you indicate that more than one copy should be sent to a location, the first message will be the
original and the others will be marked as ‘copy’.
11-5
Testword Required
Indicate whether a test word needs to be inserted the telex message manually before it is
generated from your branch.
The following details are displayed on the screen:
Reference Number
Date
Tags
11.3.1 Entering Details of a Free Format Message
You can enter the details of a Free Format Message either by:
Using the format editor on the screen, or
Importing the format from an ASCII file. This can be located either on the server or the
client.
11.3.2 Entering an Advice Format using Format Editor
To enter a format using the format editor, click free format text icon positioned next to the text of
the message. In the note pad that is invoked you can actually tailor an advice to suit your
requirements. Keywords to format the advice (similar to what is used in the Advice Format
Maintenance) can be used here too in order to get the desired format. The following table
contains a comprehensive list of the key words that can be used in the format editor.
Keyword
Significance
#NL
Indicates the number of lines that should be contained in a page when the
message is printed
#NC
Indicates the number of columns that should be contained in a page when
the message is printed
#RH
Indicates the start of the Report Header section
#PH
Indicates the beginning of the Header for a page
#EH
Indicates both the end of the Header section of the report or the end of
Header section of a page
#RF
Indicates the start of the Report Footer section
#PF
Indicates the start of the Footer of a page
#EF
Indicates both the end of the Footer of a report or page
#B
Indicates the start of the body of the message
#EB
Indicates the end of the body of the message
11-6
Keyword
Significance
#CL
Indicates that you can collapse a line
#EC
Indicates the end of a line that you have collapsed
#LOOP
Indicates the beginning of a loop
#ENDLOOP
Indicates the end of a loop
#IF
Indicates a Conditional section
#ANDIF
Indicates a Conditional section
#ORIF
Indicates a Conditional section
#ENDIF
Indicates the end of a Conditional section
11.3.3 Importing Advice Format from an ASCII File on the Server
The server indicates the machine on which the database of your bank is installed. To import a
format from an ASCII file on the server:
Select the radio button against ‘Server’.
Specify the full path to the file on the server which contains the format you want to import.
Thereafter, click ‘Import’ button.
The file containing the format of the message will be displayed on the screen.
11.3.4 Importing Advice Format from ASCII File on Client
Client refers to your own machine. To import a format from an ASCII file on the client:
Click against the field marked Client,
Specify the full path to the file on the client which contains the format you want to import,
and
Thereafter, click ‘Import’ button.
The file containing the format of the message will be displayed on the screen.
11.3.5 Sending Free Format Message
A Free Format Message will be sent depending on your specifications in the ‘Background
Process’ screen.
If the background process is running, a free format text that you define will be
immediately sent at the time you save the record.
11-7
If the background process is not running, the Free Format Message that you have
defined will be displayed in the Outgoing Message browser from where you can process
as you would any other outgoing message.
11.3.6 Saving Record
After you have made the mandatory entries, save the record. A free format record that you have
defined should be authorized by a user bearing a different login ID, before the End of Day (EOD)
process is run. Click ‘Exit’ or ‘Cancel’ to return to the Application Browser.
11.3.7 Viewing SWIFT Messages
You can view the SWIFT messages by clicking the ‘SWIFT Messages’ tab. The screen will be
displayed as follows.
11-8
11.4 Maintaining Common Group Messages
You can maintain common messages that need to be sent to a group, in the ‘Common Group
Message Maintenance’ screen. You can invoke the ‘Common Group Message Maintenance’
screen by typing ‘MSDCOMMS’ in the field at the top right corner of the Application tool bar and
clicking the adjoining arrow button.
You can specify the following details in this screen:
Customer
Select the code of the customer to whom the message is addressed, from the option list.
Media
Select the media through which the common group message is transmitted. The following options
are available:
SFMS
SWIFT
If you select SWIFT, BIC Directory validations are carried out and if you select SFMS, IFSC
directory validations are carried out for the media.
Location
Specify the location of the address. The location of an address is the unique identifier between
the other addresses of the customer for a given media.
11-9
Node
Select the node at which the database of your branch is installed, from the option list provided.
Name
Specify the name of the customer to whom the message is to be addressed. If the recipient of the
message is a customer of your bank, the customer’s name will be automatically displayed when
you specify the customer code.
Address 1-4
If the recipient of the message is a customer of your bank, the address gets automatically
displayed based on the Customer-Media-Location combination that you have specified.
You need to specify the address in case of a walk-in customer.
Form
Select a template from the option list, if you wish to send the message in the form of a template.
SWIFT Message Type
Select the type of the SWIFT message to be sent to the customer from the option list provided.
Number of Copies
Specify the number of copies of the message that should be sent to the customer at the time it is
generated.
Response To
Select the type of the previous SWIFT message, in response to which the common group
message is being sent. The following options are provided in the drop-down list:
Incoming
Outgoing
Reference Number for Query
When a common group message is sent, the reference number specified here will help to query
and fetch the original message date and MT type from the Incoming/Outgoing Browser,
depending on the value of ‘Response To’.
Hold
Check this box to indicate that you want to keep the generation of the message on hold.
Messages that are put on hold are temporarily stopped from being generated. The message will
have to be released before it can be generated.
Import File
Specify the full path of the file on the server which contains the format you want to import.
11-10
Server
Select this option to import a format from an ASCII file on the server. The server indicates the
machine on which the database of your bank is installed.
The following fields are displayed on this screen:
Reference number
This is the system generated unique reference number for the message, called DCN.
Date
The Date defaulted will be the system date.
Click ‘Import’ button to import the file and display the format of the message on the screen.
Save the record after specifying the mandatory details and click ‘Exit’ or ‘Cancel’ button to return
to the Application Browser
11-11
12. Making Query
12.1 Introduction
When you are in the Outgoing or Incoming Message Browser, all the messages that were
transmitted from and received at your branch are displayed. This may amount to hundreds of
messages. To avoid wading through this mass of data, you can make a query to obtain
information that is relevant to you at a particular time.
For example, you may want to obtain information on the messages that were sent to just two
customers, on a specific date. Or you may want to see all outgoing messages across modules,
sent during a specific period. The Advanced Search function makes this possible for you.
To make an advanced search, click ‘Advanced Search’ button either from the Outgoing or
Incoming Browser as the case may be. The ‘Advanced Summary’ screen is displayed.
12.2 Procedure
The Query screen, will display all the fields that appear in the messaging module. These fields
form the criteria based on which you can make a query.
If you do not wish to carry the query through, click ‘Clear Query’ button. The query screen is
cleared and you can proceed to make a new query.
12.3 Making Query based on more than one criterion
Suppose you want to obtain information based on more than one criterion. For example, you may
want to view the details of all the guarantees generated for the Letters of Credit module from your
branch located at London.
12-1
Procedure
The procedure to make such a query involves the following steps:
Accept
The Accept button
And
The And button
Step 1
Select ‘Module’ under ‘Fields’, and then from the Operator drop-down list choose Equal To and
LC under Value. Then click the Accept button.
Step 2
Click the ‘And’ button. Repeat step one with the criteria value, as Message type, select
Guarantee under value clicking accept and add buttons in the sequence described for the first
criterion.
Step 3
Click the ‘And’ button. Repeat step one with the criteria value, as Branch select London under
Value clicking accept and add buttons in the sequence described for the first criterion.
Step 4
The query that you have made will be displayed in the Query screen. Check it for correctness and
click ‘Ok’ button.
The Outgoing Message Browser will display details of all the Guarantees generated for the LC
module from your branch at London.
12.4 Selecting Same Criterion to Apply One or More
Conditions
Now, you may want to make a query to see the debit advices (in the Letters of Credit module)
that were generated from the London branch involving three different customers (Wendy Klien,
Silas Reed and Keturah Smith).
This involves specifying a customer code one by one all of which come under the same criterion
module -- LC (listed out under Fields) and indicating a message type for which you want details.
This is where the ‘Or’ button on the query screen comes into play. You can choose to use the
keyboard to key in the query or you can follow the following procedure to make a query.
Procedure
Step 1
Select Module under Fields, and then from the Operator drop-down list choose Equal To and LC
under Value. Then click the ‘Accept’ button.
12-2
Step 2
Click the And button. Repeat step one with criteria Field as “Branch”, Operator being “Equal To”
and “London” under Value. Click the ‘Accept’ and ‘Add’ buttons in the sequence described in Step
1.
Step 3
Click the And button. Repeat step one for Field with the criteria value, as Message Type. Then
select Debit message under Value clicking the ‘Accept’ and ‘Add’ buttons in the sequence
described for the first criterion.
Step 4
To cull out details of the debit advices involving these three customers, click the And button.
Repeat Step 1 with the ‘Field’ as ‘Name’. Select say Ms. Keturah Smith under Value. Then click
the accept button.
To select another customer, click the Or button and then click Name in the Fields list, specify the
Operator as Equal To and pick out the customer name Mr. Silas Reed from the Value option list
then click the Accept button.
Repeat the process for the third customer, Ms. Wendy Klien.
Step 5
The query that you have made is displayed on the Query screen.
MODULE = LC AND BRANCH = LONDON AND MSG_TYPE = DR_ADV AND NAME = SILAS
REED OR NAME = KETURAH SMITH OR NAME = WENDY KLIEN
Check it for correctness and click ‘Ok’ button to see the query through. The Outgoing Message
Browser will display details of all the debit advices generated for the LC module from your branch
at London to the three customers that you specified.
12-3
12.5 Ordering Details of Query
Oracle FLEXCUBE also provides you the option to order the information that you have made a
query on. You can further specify that the ordered information should be arranged in ascending or
descending order.
Suppose you have made a query to obtain details of the debit messages that were generated by
the Data Entry module of Oracle FLEXCUBE, and you wish to order the information in the
ascending order of the customer to whom the message was sent.
Make the query following the procedure detailed under the head making a Query after you have
specified the entire criterion for the query, select the required ordering option from the Order By
drop-down list. The list contains the following options:
Ascending
Descending
Click the option of your choice, say, Descending.
Click the ‘Accept’ button and click ’Ok’. The details of the query that you have made will be
displayed on the Outgoing Browser ordered on the basis of the customer to whom the message
was sent. The details will further be sorted in the alphabetic order.
If you decide to cancel the ordering you have specified, click ’Clear Query’. The screen clears and
you can specify a new order.
12-4
12.6 Using Wildcards to make Query
You need not always specify the criteria for a query. You can use wild cards such as:
Wild Card
Description
Implication
_
Underscore
To match a single character
%
Percent
To match any string of multiple characters
Using %
For instance, if you have to check the messages relating to one particular Loans product LD01,
you can query for records with Reference Number like ‘%LD01%’ since all the contract reference
numbers with that product will invariably contain that string.
Once you click the Accept button and make a query, the ‘Outgoing Message Browser’ screen
displays all the Free Format Texts.
Using _
When you are searching for strings of specific length which vary in only one character – for
instance, all branches like 001, 002, 003 – can be represented as 00_. Searching for 00_ will
fetch all the messages for all these three branches.
12-5
13. Reports
13.1 Introduction
All activities that are performed in the Messaging System (MS) module are recorded. The inputs
you have made at different stages are pieced together and can be extracted in the form of
meaningful reports as and when you may require them. The various report programs and
reporting features available under the Messaging System module are explained in this chapter.
You can generate the following reports for the Messaging System module:
SMS Log Report
Successful Messages Report
Unsuccessful Messages Report
13.2 SMS Log Report
You can select the following options based on which the report can be generated.
You can specify the operation date for which the report has to be generated.
You can generate the report for specific User ID
You can also generate the report based on the operation
To invoke the screen ‘Security Management System Log Report’, type ‘MSRMSRPT’ in the field
at the top right corner of the Application tool bar and clicking on the adjoining arrow button. The
screen ‘Security Management System Log Report’ is displayed below:
13-1
You can specify the following parameters:
User ID
Specify valid User ID for which you want to generate the report from the adjoining option list.
Operation
Select valid mode of operation for which you want to generate the report from the adjoining dropdown list.
Operation Date
Select operation date of the selected operation for which you want to generate the report from the
adjoining calendar.
13.2.1 Contents of Report
The parameters specified while generating the report are printed at the beginning of the report.
The contents of the SMS Log Report have been discussed under the following heads:
13.2.1.1
Header
The Header carries the title of the Report, information on the branch code, the branch date, the
user id, the module name, the date and time at which the report was generated and the page
number of the report.
Body Branch
This is the branch code
Document Reference
This is the document control number generated by the system.
User ID
This is the user ID.
Date
This is the date of the log.
Operation
This is the type of operation.
Receiver
This is the name of the receiver.
Currency
This is the currency.
Amount
This is the amount.
Terminal ID
This is the terminal ID.
13-2
13.3 Unsuccessful Messages Report
To invoke the ‘Upload Exception’ screen, type ‘MSRPLEXP’ in the field at the top right corner of
the Application tool bar and clicking on the adjoining arrow button. The screen is displayed below:
13.3.1 Contents of Report
The contents of the Unsuccessful Messages Report have been discussed under the following
heads:
13.3.1.1
Header
The Header carries the title of the Report, information on the branch code, the branch date, the
user id, the module name, the date and time at which the report was generated and the page
number of the report.
13.3.1.2
Body
Reference Number
This is the reference number of the repair.
Repair Reason
This is the reason for the repair.
13-3
13.4 Successful Messages Report
You can generate Successful Messages report using ‘Successful Messages Report’ screen. To
invoke the screen, type ‘MSRPLSUX’ in the field at the top right corner of the Application tool bar
and clicking on the adjoining arrow button. The screen is displayed below:
13.4.1 Contents of Report
The contents of the Successful Messages Report have been discussed under the following
heads:
13.4.1.1
Header
The Header carries the title of the report, information on the branch code, the branch date, the
user id, the module name, the date and time at which the report was generated and the page
number of the report.
13.4.1.2
Body
External Reference
This is the external reference number of the contract.
FLEXCUBE Reference Number
This is the Oracle FLEXCUBE number.
13-4
Contract Status
This is the contract status of the contract.
Auth Status
This is the authorization status of the contract.
Maker ID
This is the ID of the maker.
Maker Date Stamp
This is the date on which the maker created the contract.
Checker ID
This is the ID of the checker.
Checker Date Stamp
This is the date on which the checker verified the contract.
13.5 SMS Log Report
You can select the following options based on which the report can be generated.
1. You can specify the operation date for which the report has to be generated.
2. You can generate the report for specific User ID
3. You can also generate the report based on the operation
To invoke the screen ‘Security Management System Log Report’, type ‘MSRMSRPT’ in the field
at the top right corner of the Application tool bar and clicking on the adjoining arrow button. The
screen ‘Security Management System Log Report’ is displayed below:
13-5
You can specify the following parameters:
User ID
Specify valid User ID for which you want to generate the report from the adjoining option list.
Operation
Select valid mode of operation for which you want to generate the report from the adjoining
drop-down list.
Operation Date
Select operation date of the selected operation for which you want to generate the report from
the adjoining calendar.
13.5.1 Contents of Report
The parameters specified while generating the report are printed at the beginning of the report.
The contents of the SMS Log Report have been discussed under the following heads:
13.5.1.1
Header
The Header carries the title of the Report, information on the branch code, the branch date, the
user id, the module name, the date and time at which the report was generated and the page
number of the report.
Body Branch
This is the branch code
13-6
Document
Reference
This is the document control number generated by the system.
User ID
This is the user ID.
Date
This is the date of the log.
Operation
This is the type of operation.
Receiver
This is the name of the receiver.
Currency
This is the currency.
Amount
This is the amount.
Terminal ID
This is the terminal ID.
13.6 Unsuccessful Messages Report
To invoke the ‘Upload Exception’ screen, type ‘MSRPLEXP’ in the field at the top right corner of
the Application tool bar and clicking on the adjoining arrow button. The screen is displayed
below:
13-7
13.6.1 Contents of Report
The contents of the Unsuccessful Messages Report have been discussed under the following
heads:
13.6.1.1
Header
The Header carries the title of the Report, information on the branch code, the branch date, the
user id, the module name, the date and time at which the report was generated and the page
number of the report.
13.6.1.2
Body
Reference Number
This is the reference number of the repair.
Repair Reason
This is the reason for the repair.
13-8
Messaging System
[July] [2014]
Version 11.5.0.0.0
Oracle Financial Services Software Limited
Oracle Park
Off Western Express Highway
Goregaon (East)
Mumbai, Maharashtra 400 063
India
Worldwide Inquiries:
Phone: +91 22 6718 3000
Fax:+91 22 6718 3001
www.oracle.com/financialservices/
Copyright © [2007], [2014], Oracle and/or its affiliates. All rights reserved.
Oracle and Java are registered trademarks of Oracle and/or its affiliates. Other names may be trademarks of their
respective owners.
U.S. GOVERNMENT END USERS: Oracle programs, including any operating system, integrated software, any programs
installed on the hardware, and/or documentation, delivered to U.S. Government end users are "commercial computer
software" pursuant to the applicable Federal Acquisition Regulation and agency-specific supplemental regulations. As
such, use, duplication, disclosure, modification, and adaptation of the programs, including any operating system,
integrated software, any programs installed on the hardware, and/or documentation, shall be subject to license terms and
license restrictions applicable to the programs. No other rights are granted to the U.S. Government.
This software or hardware is developed for general use in a variety of information management applications. It is not
developed or intended for use in any inherently dangerous applications, including applications that may create a risk of
personal injury. If you use this software or hardware in dangerous applications, then you shall be responsible to take all
appropriate failsafe, backup, redundancy, and other measures to ensure its safe use. Oracle Corporation and its affiliates
disclaim any liability for any damages caused by use of this software or hardware in dangerous applications.
This software and related documentation are provided under a license agreement containing restrictions on use and
disclosure and are protected by intellectual property laws. Except as expressly permitted in your license agreement or
allowed by law, you may not use, copy, reproduce, translate, broadcast, modify, license, transmit, distribute, exhibit,
perform, publish or display any part, in any form, or by any means. Reverse engineering, disassembly, or decompilation of
this software, unless required by law for interoperability, is prohibited.
The information contained herein is subject to change without notice and is not warranted to be error-free. If you find any
errors, please report them to us in writing.
This software or hardware and documentation may provide access to or information on content, products and services
from third parties. Oracle Corporation and its affiliates are not responsible for and expressly disclaim all warranties of any
kind with respect to third-party content, products, and services. Oracle Corporation and its affiliates will not be
responsible for any loss, costs, or damages incurred due to your access to or use of third-party content, products, or
services.


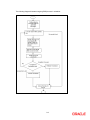
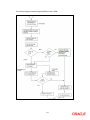
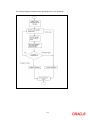
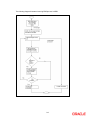
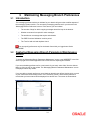
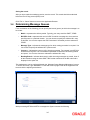
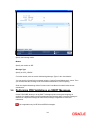
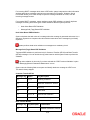
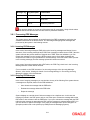
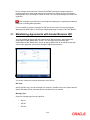

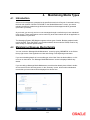
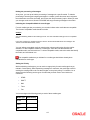

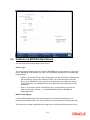


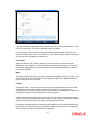
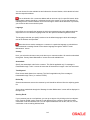
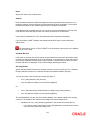
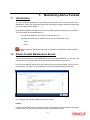
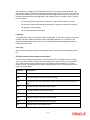
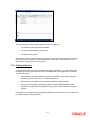
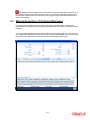

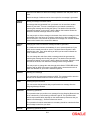
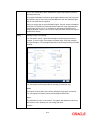
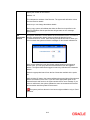

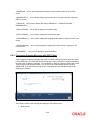
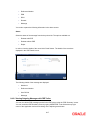


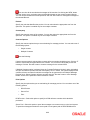
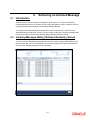

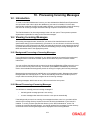
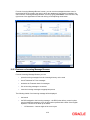

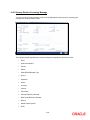

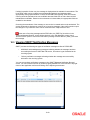
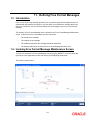
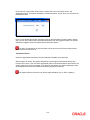
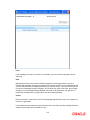
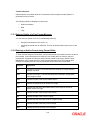

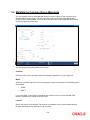
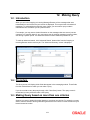
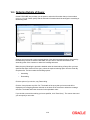
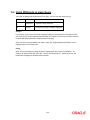


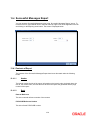

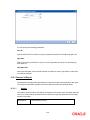

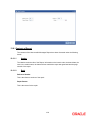

![[December] [2010] Oracle Part Number E51712-01](http://vs1.manualzilla.com/store/data/005705420_1-4b383e67b8ec6628c44005398bb7935f-150x150.png)