1
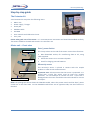
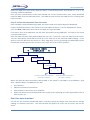
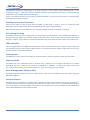
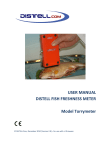
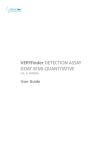
 USER MANUAL DISTELL FISH FATMETER Model FFM‐992 (small sensor) Model FFM‐692 (large sensor) © DISTELL.Com, December 2010 (Version 2.7) – for use with v2 firmware distell‐ing. pres.part. verb. 1. to distell. 2. to rapidly analyse fat content of food products using microwave technology. ...the art of distell‐ing... Contents Introduction ........................................................................................................................................ 5 General description ..................................................................................................................................................... 5 Principle of operation .................................................................................................................................................. 5 Fatmeter update ......................................................................................................................................................... 5 Accuracy of results ...................................................................................................................................................... 6 Accuracy guide ............................................................................................................................................................ 6 FFM‐692 ............................................................................................................................................................... 6 FFM‐992 ............................................................................................................................................................... 6 Technical data ............................................................................................................................................................. 6 Step‐by‐step guide .............................................................................................................................. 7 The Fatmeter kit .......................................................................................................................................................... 7 Meter unit – Front view ............................................................................................................................................... 7 Data / power Socket ............................................................................................................................................. 7 Microstrip sensor ................................................................................................................................................. 7 Meter unit – Back view ............................................................................................................................................... 8 Read button (Yes) ................................................................................................................................................. 8 Reset button (No) ................................................................................................................................................ 8 Power supply / charger ............................................................................................................................................... 8 Check pad ................................................................................................................................................................... 8 Data cable ................................................................................................................................................................... 9 CD‐ROM ...................................................................................................................................................................... 9 User manuals & calibration charts .............................................................................................................................. 9 Carry case ................................................................................................................................................................... 9 Getting started .................................................................................................................................. 10 Switch on .................................................................................................................................................................. 10 Measuring product samples ...................................................................................................................................... 10 Calibration check ...................................................................................................................................................... 11 Check pad procedure ......................................................................................................................................... 11 Failed check pad test .......................................................................................................................................... 11 Comparing the meter with laboratory analysis ......................................................................................................... 11 Preparing laboratory samples ............................................................................................................................ 12 Laboratory checklist ........................................................................................................................................... 12 If the results do not compare favourably ........................................................................................................... 12 Menu Structure ......................................................................................................................................................... 13 Product menu .................................................................................................................................................... 13 Research menu .................................................................................................................................................. 13 Samples menu .................................................................................................................................................... 14 Download menu ................................................................................................................................................. 14 Add Product option ............................................................................................................................................ 14 Date & Time menu ............................................................................................................................................. 14 Rental Key option ............................................................................................................................................... 15 Data Management System ................................................................................................................ 16 Installation ................................................................................................................................................................ 16 Requirements..................................................................................................................................................... 16 Installing the DMS .............................................................................................................................................. 16 Running the DMS ...................................................................................................................................................... 16 Historical data download .......................................................................................................................................... 16 Step 1: Connecting the meter ............................................................................................................................ 16 Step 2: Configure the DMS ................................................................................................................................. 16 Step 3: Initiate the download from the meter .................................................................................................... 17 Real time data download .......................................................................................................................................... 17 Enabling real‐time data download ..................................................................................................................... 18 Fatmeter User Manual Page 3 ...the art of distell‐ing... Annotating the data ................................................................................................................................................. 18 DMS data files .......................................................................................................................................................... 18 Printing data ............................................................................................................................................................. 18 Exporting data .......................................................................................................................................................... 18 Data Management Software help ............................................................................................................................ 18 Advanced topics ....................................................................................................................................................... 18 Hints and Suggestions ....................................................................................................................... 19 Preparation of samples ............................................................................................................................................. 19 Operation of the Fatmeter ........................................................................................................................................ 19 Cleaning and general care ........................................................................................................................................ 19 Before calling for service ........................................................................................................................................... 20 Warranty and repair ................................................................................................................................................. 20 Contact Details ................................................................................................................................. 21 Fatmeter User Manual Page 4 ...the art of distell‐ing... Introduction General description THE DISTELL FATMETER was developed in response to demand from various customers for a meter that could measure lipid content of fish, meat and poultry products simply, and non‐destructively. The hand held instrument is placed in contact with the sample and the fat/oil content is displayed on the instrument’s digital readout, providing instant processing or quality control information. The value is also stored in memory for later downloading to computer. These features are invaluable for organisations requiring collation and reporting information, especially where HACCP and TQM regimes are in force. There are calibrations available for a large number of fish and meats of commercial importance. There is also the option of having Distell prepare a specific calibration of your choice, where required. The instrument is non‐destructive and non‐invasive in use, and for this reason can be used equally well on live or dead fish, small live animals, whole pieces of meat, or minced meat products. Please note however, that the instrument cannot measure samples that are frozen, and it is necessary to fully defrost such samples before measurement. Principle of operation The lipid content of naturally occurring fish is related to the water content, and the measurement of one can serve to determine the other if the relationship is known. The Fish Fatmeter utilises this fact in establishing the fat content. The instrument uses a microstrip sensor which is sensitive to the water content of the sample. Using stored calibration data the instrument converts the response of the sensor to a percentage fat/oil content that is shown on the meter’s display. The principles of the method were defined after a number of years of research and development conducted by the Torry Research Station (TRS) of the UK’s Ministry of Agriculture, Fisheries and Food (MAFF) in Aberdeen, Scotland. Calibrations were obtained using large numbers of fish covering many species. Results of this work and other related research have been published in the scientific and technical press by staff of TRS. This instrument has been further developed by Distell. The Fatmeter is covered by various patents in several countries. Fatmeter update The first Fatmeter models were supplied to customers within the fish and meat industry in July 1992. Since then the Fish Fatmeter has become universally known and is in use throughout the world. Distell has received invaluable feedback from customers about the use of the Fatmeter in the field. This allows us to constantly improve and refine the Fatmeter and to give you hints and tips on its use. Also, we received numerous enquiries regarding the operation and accuracy of the Fatmeter, and how the results compare with the current, historical methods used in industry. It would seem that the sampling and analysis procedures are far from standardised and varies from country to country, and even from company to company within these countries. Even where the same laboratory equipment is used, there are different sampling techniques apparent, which seems to give varying results. This manual should be treated as a guide. It is not fully comprehensive, but is provided simply to help you understand the Fatmeter, how it operates, and how to eliminate factors that may affect your Fatmeter User Manual Page 5 ...the art of distell‐ing... results. If, having read this manual, you still have a query or a problem then please do not hesitate to contact our customer services department at the address shown at the end of this manual. Accuracy of results The accuracy of the Fatmeter depends upon the fat/oil content of the sample being measured and ranges from an uncertainty in the fat content of (+/‐) 1% (95% confidence interval) at low levels to (+/‐) 4% at very high levels (greater than 45%). Therefore it is advisable that the operator follows the measurement methodology rigorously, and always takes readings as described in wall charts supplied. Accuracy guide The FFM‐692 (large sensor) Fatmeter benefits from better representational accuracy than the more compact FFM‐992 (small sensor) Fatmeter. The accuracy of the meters is shown below: FFM‐692 Fat/Oil Reading Accuracy 2 to 15% from ± 0.5%, rising to ± 1.0% (13‐15% at 14%) 16 to 30% from ± 1.0%, rising to ± 2.0% (28‐32% at 30%) 31% and above from ± 2.0%, rising to ± 4.0% (46‐54% at 50%) FFM‐992 Fat/Oil Reading Accuracy 2 to 15% from ± 1.0%, rising to ± 1.5% (12.5‐15.5% at 14%) 16 to 30% from ± 1.5%, rising to ± 2.5% (27.5‐32.5% at 30%) 31% and above from ± 2.5%, rising to ± 4.0% (46‐54% at 50%) The results achieved will allow the operator to take swift decisions regarding feeding or processing of the fish species being measured. Other methods currently in use for determining the lipid content of fish samples are destructive and slow, e.g. In fish, a section or fillet of the fish is taken and analysed for fat/oil content by weighing, and using solvents to extract the fat, or, by driving off the water content by heating. These methods, unlike the Distell Fatmeter, obviously cannot be used on live fish. Technical data This User Manual does not cover the technical side of the Fatmeter in great depth. You can find a copy of our Technical Manual on the CD‐ROM that is supplied with the meter, or you can download a copy from our website. This will help you explore the technical aspects of the Fatmeter’s operation, as well as how to create custom calibrations. Fatmeter User Manual Page 6 ...the art of distell‐ing... Step‐by‐step guide The Fatmeter kit Your Fatmeter kit comprises the following items: •
Meter unit •
Power supply / charger •
Check pad •
USB data cable •
CD‐ROM •
User manuals and Calibration charts •
Carry case Please take good care of the meter. It is a measurement instrument and should be handled carefully. The meter should be cleaned and stored in its case after use. Meter unit – Front view LCD Display
Data / power Socket The 7‐way socket on the side of the meter serves three functions: • Data download socket, for transferring data to PC, using cable supplied. Power switch
•
Allows the meter to run on external power •
Used for charging internal batteries Microstrip sensor The microstrip sensor is placed in contact with the sample product in order to take measurements. Data / power socket
Microstrip sensor Important note: Please ensure that the sensor is protected. It is sealed with a PTFE film which must be intact for reliable operation. Do not attempt to remove this film. If this film is damaged then the meter should be returned to Distell for service and repair. Note: the photograph above shows the FFM‐692 model, where the power switch and the data / power socket are on the same side. On the FFM‐992 model these are on opposite sides, but their function is identical. Fatmeter User Manual Page 7 ...the art of distell‐ing... Meter unit – Back view Read button (Yes) Reset / No button •
Press and hold this button to take a reading; •
Press to answer ‘Yes’ to any Yes / No question on the display. Reset button (No) • Press to reset the measurement routine, or to abort an incomplete series of readings; •
Read / Yes button Press to answer ‘No’ to any Yes / No question on the display. Power supply / charger Only the unit supplied with your kit should be used to charge the battery pack, or power the meter. This is connected to the 7‐way outlet on the meter. The charger supply unit simply plugs into the mains socket, accepting input mains voltage from 110v–
240v AC, 50–60 Hz. The charger unit comes complete with various plug configurations for use around the world. A red LED will illuminate when charger / power supply is switched on. The battery pack should be fully charged after a period of 12 hours. When charging is complete, first disconnect the charger from the mains and then from the meter. The power supply / charger can also be used to power the meter during use while also charging the internal batteries at a reduced rate. Check pad All scientific instruments need regular calibration. In the case of the Fatmeter an annual calibration is recommended. Where the meter is subject to intensive use, a twice yearly calibration check is recommended. So that you can be sure that the meter is operating to specifications, it is always best to take measurements on the check pad prior to commencing work. The check pad provides the user with a quick daily check that the calibration has not changed significantly since last calibration. It should be noted, however, that the results obtained do not verify your meter’s precise calibration, but they do give an assurance that there has been no significant change. The pad has two rectangular slots which provide a representative reading of the high and low range of a stated species selection. A series of eight readings should be taken in each of these slots (firm pressure should be applied). The average readings obtained should fall within ± 2% of the values stated on the pad. Because of the compressible nature of the pad, different operators may obtain slightly different results on the check pad, using the same instrument. It is therefore recommended that one person be made responsible for this daily check, so that consistent daily checks are carried out. Fatmeter User Manual Page 8 ...the art of distell‐ing... Data cable Always use the data cable supplied for downloading to computer. Connect the 7‐way plug to outlet on meter and the other end directly into a USB port on your computer. CD‐ROM The CD contains the user manuals, Data Management System, calibration charts, and other useful information. User manuals & calibration charts A hard copy of the user manual, calibration charts and the calibration certificate is included. Carry case The Fatmeter kit is supplied in a robust carry case, and comes complete with 2 keys for security of your Fatmeter. Fatmeter User Manual Page 9 ...the art of distell‐ing... Getting started Verify that battery has been charged. Switch on Switch on the Meter and allow the meter to cycle through its start up procedure. Part of the start up procedure is to show how many readings are currently stored in the meter. You may wish to download and erase any stored readings before taking new measurements. You can find out about the download procedure in the ‘Data Management System’ section. After around 15 seconds the meter is ready for use. The display will show the last calibration setting used, and will look something like the example below: Calibration Setting
TROUT-1
SN=8
Y
Yes
Number of samples used to calculate average N
No
The normal process at this stage is to: •
Wait five minutes for the meter to stabilise. •
Perform the daily test on the check pad. You can read about this below, in ‘Calibration Check’. Measuring product samples It is extremely important to follow the instructions on the calibration chart supplied for the fish you are measuring. The checklist before sampling is as follows: •
You have chosen the correct fish calibration. •
You have checked to ensure that the fish product is indeed a natural fish product, free of additives and other additions. •
Select the fish samples at random from the batch. Where you are measuring smaller whole fish, e.g. sprat, sardine, small herring, small mackerel, etc., then the samples should be grouped according to size. •
For best accuracy always follow the measurement recommendations on your calibration chart. •
Temperature of the fish to be measured should be between 0 and 10 C, with no ice crystals present in the samples. •
Ensure that the sensor is placed firmly against the skin of the fish, thus ensuring that there are no air pockets between the sensor and the sample to be measured. o
•
It is normal to experience variability in the individual readings when they are taken at different parts of the fish. For this reason, the meter will take multiple samples and then average them to produce a final value. For the most accurate results, be sure to follow the procedure detailed on the calibration chart. This includes (a) the number of readings to take, (b) the number of fish to measure and (c) the locations to take the measurements. If followed correctly, the meter will give a fat percentage that represents the fat content of the fish. The measurement may represent fillets of the fish, the whole fish, or a specific section of the fish. Again, check the calibration chart to find out what the final meter reading actually represents. Fatmeter User Manual Page 10 ...the art of distell‐ing... Normally eight readings should be taken but this should be confirmed by checking the calibration chart. You can change the number of readings that the meter will take before averaging by using the ‘Samples’ menu option. See the ‘Menu Structure’ section for more details. The Fatmeter can store up to 1000 sets of readings. These can be downloaded to a PC running the Data Management System. See the ‘Data Management System’ section for more information on how to do this. There is also an option to download the data in real time, i.e. as the readings are taken, and this is covered in the same section. Calibration check Each morning it is important to check that the calibration of the fatmeter has not changed from the previous check. The check is carried out using the check pad supplied. Check pad procedure •
Select the correct calibration from the menu. Press Reset / No on the fatmeter to confirm that you have selected the correct calibration setting. The chosen setting (e.g. SALMON‐1) should agree with the calibration setting stated on the check pad. •
There are two ranges on the check pad, high and low. •
Locate the sensor in low range aperture, ensuring a steady pressure is applied to the fatmeter to keep the sensor head fully in contact with the pad. Press and hold the Read / Yes button until the reading is stable, then release. Repeat this until the average reading is displayed. •
Now locate the sensor in high range aperture and repeat the procedure above. Assuming that the readings agree with your previous checks, then you can proceed to take measurements on your daily product samples. Failed check pad test If the Fatmeter displays values that are not within the tolerance shown on the check pad then something has changed from the last test. Possible areas for error include: •
Inexperienced operator carrying out the checks;
•
Incorrect calibration setting chosen; •
Sensor not properly located in aperture, thus not in contact with the pad. If the checks using the check pad have been carried out correctly then we must suspect that the calibration in the Fatmeter has somehow changed. There are three options at this point: •
Carry out a check in Iso‐Propanol Solutions, and verify that the fatmeter results agree with calibration table supplied on the rear of your calibration certificate; •
If this check is OK, then the pad itself must be faulty. A faulty check pad is, however, very rare. •
If this check confirms that the Fatmeter has drifted out of calibration then please contact Distell to arrange for the Fatmeter to be returned for service and re‐calibration. If in doubt, please contact Distell for advice. We will talk you through the check procedure, and advise accordingly. Comparing the meter with laboratory analysis Sometimes, especially in a research environment, you may wish to compare the Fatmeter results with data obtained from laboratory analysis. This section will help to ensure that the correct laboratory process is followed so that the two sets of results can be compared. Fatmeter User Manual Page 11 ...the art of distell‐ing... Preparing laboratory samples It is important that all of the fish to be represented by the fatmeter measurements is packaged and sent to the laboratory for the analysis. Consult the laboratory analysis procedure on the relevant calibration chart for details. The sample should be stored in a sealed polythene bag immediately after measurement. This will ensure that the product sample does not lose any moisture before analysis. Laboratory checklist •
Whole carcass, fillets, or sections of the fish, should be received at the lab, properly packed and sealed. The parts of the fish to be measured are shown on the calibration chart; this may or may not include skin, fins, belly walls, etc. •
The sample should be blended in order to create a homogeneous mix. •
The laboratory personnel must take three samples of product from different parts of the blend for the chemical analysis. This will confirm the homogeneity obtained by the blending process. •
The average of the laboratory triplicate analysis should be compared with the triplicate readings taken using the Fatmeter. •
The results should be compared with consideration to the accuracy claims presented at the beginning of this user manual. If the results do not compare favourably Check the Fatmeter use, as follows: •
Has the correct calibration been used on the Fatmeter? •
Has the Fatmeter been checked on the check pad? •
Is the operator proficient in the use of the Fatmeter? •
Is the fish sample truly within the specification of the Fatmeter calibration being used? •
Check the product for species identification, measurement technique, size, and preparation. Check the laboratory procedure as follows: •
Analytical method being used •
Sample preparation is OK •
Three samples from different parts of the blend have been analysed If, after these checks, there is still a significant difference please contact Distell for advice and help. Fatmeter User Manual Page 12 ...the art of distell‐ing... Menu Structure When the standard measurement display is shown (see the example at the start of this chapter) you can access the menu by pressing the Reset / No button. The Choices menu screen will appear in the order shown below. There are six options. Cycle through the options by pressing Reset / No until the correct one is displayed then press Read / Yes. TROUT-1
SN=8
Y
N
Choices Menu
PRODUCT RESEARCH
SAMPLES
DOWNLOAD ADD PRODUCT
SET TIME*
RENTAL KEY* * Only one of the SET TIME and RENTAL KEY options will be available. Product menu In the Product menu you can choose which of the product calibration settings you wish to use. Simply choose the calibration that corresponds with the type of fish and measurement type you wish to analyse. The detail of each product calibration setting is shown on the associated calibration chart. Y
TROUT‐1 CHOICES MENU
PRODUCT
SEABASS‐1
G.BREAM‐1
N
CARP‐1
OTHER
Note: You can have up to 48 different calibrations programmed into your Fatmeter Research menu In the Research menu you can choose which of the research calibration settings you wish to use. The Fatmeter is normally supplied with the following settings: RESEARCH‐1, FISH‐1, FISH‐2 ... FISH‐5. The RESEARCH‐1 calibration setting is used to create a new calibration setting. Settings FISH‐1 to FISH‐5 can be programmed with your custom calibration data where required. Full details are available in our Technical Guide, which is available on the CD‐ROM and from our website. Y
RESEARCH‐1 FISH‐1 CHOICES MENU
RESEARCH
FISH‐2 N
FISH‐3 FISH‐4 FISH‐5 Fatmeter User Manual Page 13 ...the art of distell‐ing... Samples menu Our calibration charts are designed around using 8 samples, i.e. one fish with 8 readings, two fish with 4 readings each, etc. Using 8 samples offers the best balance of accuracy and rapid measurement performance, but you can choose between 1 and 16 samples here. CHOICES MENU
SAMPLES
N
Y
Samples=1 Samples=2
Samples=3
. . .
Samples=16
Download menu The Download menu allows you to send any stored sample data to a connected PC running the Data Management System. The DMS is documented later in this guide, and the download procedure is covered there. Y
CHOICES MENU
DOWNLOAD
N
No Data Standard D/L
(If no data has been recorded) (If data is ready for download) Add Product option Using this menu provides the ability to programme the meter with additional calibrations. This facility is especially useful for those who wish to refine existing meter calibrations or create a new calibration setting based on their own data. Full instructions on how to use this facility are in the Technical Manual, available on the CD‐ROM and from the Distell website. Y
CHOICES MENU
ADD PRODUCT
N
Waiting data Date & Time menu You should check the date and time when you first receive the meter, and update it if necessary. Each sample that is recorded by the meter has a date and time stamp, so it is recommended that the date and time be kept accurate. This will then ensure that all downloads reflect the correct date and time. Note that if a meter is configured as a rental meter then this option will not be available. Fatmeter User Manual Page 14 Y
...the art of distell‐ing... CHOICES MENU
SET TIME
N
Minutes Hours Day
Month
Year Rental Key option If your meter has been supplied as part of a rental agreement then the Rental Key menu option will be available. This allows you to enter a sequence of eight numbers and letters that is specific to your meter, and is used to change your rental settings, e.g. change the rental expiry date. You can read more about rental keys at http://www.distell.com/downloads/rentalkey.pdf. Y
CHOICES MENU
RENTAL KEY
N
Enter code Fatmeter User Manual Page 15 ...the art of distell‐ing... Data Management System Installation Requirements The Data Management System, referred to as the ‘DMS’, requires a PC running Windows XP or later and a free USB socket for data downloads. Installing the DMS This section tells you how to install the program on your system and how to run the program. It is best to close all programs before installing the software. You should have at least 5 Mb of hard disk space available for the installation. •
Insert the CD in the computer; •
Find the ‘Installation files’ folder on the CD then open the ‘Data Management Software (DMS)’ folder; •
Run the DMSInstaller.exe file and follow the prompts to complete the installation Running the DMS Click the Windows Start button on your desktop, select programs, select Distell then locate the DMS icon from the files listed there. You can use the program straight away after installation. The program enables you to download, print, save, and export data, quickly and efficiently. The DMS also allows you to create and upload your own custom calibrations to the Fatmeter (see the Technical Manual on the CD‐ROM and on the Distell website). All program functions are accessed using the menu and toolbar options. There is a comprehensive on‐line help facility, which is available by clicking on the Help menu option. Historical data download This function enables you to download readings that are stored in the Fatmeter. The data includes the date and time of the sample, the calibration setting that was used, the number and values of the individual samples taken, and the average value of the samples. To illustrate the procedure, we'll assume that you have taken some sample readings with the Fatmeter and are ready to download them to your PC. Step 1: Connecting the meter Connect the meter to a USB port on your PC, using the data cable supplied with the meter, then turn the meter on. When the cable is connected the USB driver software installed on the PC will create two ‘virtual serial ports’. Normally these are COM3 and COM4, but this may change if you have other USB virtual serial devices installed. Your computer will normally reserve COM1 and COM2 for built‐in hardware, or for legacy purposes Step 2: Configure the DMS Start the DMS then use the Preferences option under the Edit menu to select the COM port to use. If the USB driver created COM3 and COM4 then you would choose COM4 here. In general you should always select the virtual COM port with the higher number. If you see an error message when you Fatmeter User Manual Page 16 ...the art of distell‐ing... select the COM port then ensure that the meter is connected properly and turned on. If it is, try selecting a different COM port. Once you have connected the meter and selected the correct communication port, select Download Historical Data from the Download menu. The DMS will now monitor the COM port for incoming data from the meter. Step 3: Initiate the download from the meter Once the DMS is ready and waiting for data, the meter needs to be told to begin the download. Find the ‘Download’ option in the choices menu (see ‘Menu Structure’). At the ‘Standard D/L’ option, press the Read / Yes button then look for the data arriving at the DMS. If no data is seen at the DMS then you may have selected the wrong COM port. Go back to step 2 and try an alternative port. Once the data has been safely downloaded then you can, if you wish, erase the data from the meter. You can, alternatively, allow data to build up in the meter up to the maximum 1000 readings. If you wish to clear the data from the meter at a later stage then you can go through the download process but without connecting the meter to the PC, then reply Yes to the ‘Erase?’ question. Y
No Data CHOICES MENU
DOWNLOAD
N
Standard D/L
Downloading
Download Complete Erase? Y N If Yes then data is erased from the meter‘s memory If No then data is retained in the meter‘s memory When the data has been successfully downloaded, it will appear in the DMS in a spreadsheet / grid form. With the data in the DMS you can now: •
Print the data •
Add extra columns of information •
Save the data in native form as an .FMD file. •
Export the data as a Comma Separated Value (.CSV) file for exporting into other applications such as Excel, Access, etc. Real time data download You can use this function to download data in real time, sample by sample, each time that an average reading is created by the meter. The real time data will appear on screen line by line as you use the meter. Fatmeter User Manual Page 17 ...the art of distell‐ing... The purpose of the real time facility is to allow the user to see sample data instantaneously, as the readings are taken. Each time that an average reading is generated by the meter, it downloads the sample data via the USB communications port. There is no specific process in the meter to download data in real time; the samples are automatically sent to the PC as they are taken. Enabling real‐time data download Connect the meter to the PC and start the DMS, as described in steps 1 and 2 of ‘Historical Data Download’, above, then select ‘Real‐time download’ from the Download menu. Data will now appear in the DMS once the average reading has been recorded in the meter. Annotating the data The DMS presents the data in a grid with one row for each set of samples. You can add extra columns to the grid using the ‘Add a new column’ option of the Edit menu, and use that column to add notes about any given sample. Extra columns can also be deleted using the ‘Delete column’ option of the Edit menu. DMS data files Like most applications, the DMS can save data to a file on disk and load it back in again. Data is stored in a proprietary format in files with a .FMD extension. The Open and Save options under the File menu are used to load and save these data files. Printing data The DMS can print a report of the data for audit purposes. The Print option is under the File menu. Exporting data The DMS was never intended to be an analysis tool. Instead, you can export the data to a Comma Separated Value file (.CSV) for use within a spreadsheet or database. To export the data, select Save As... under the File menu, then select ‘CSV files (*.CSV)’ in the ‘Save as type’ option. Data Management Software help The DMS program provides an On‐Line Help Facility. This can be accessed at any time when using the software program. Advanced topics The DMS has the capability to create custom calibrations and to upload those calibrations to the meter. These are areas that are not expected to be of interest to most users, so they are not documented here. You can, however, read more about them in our Technical Manual, which is available on the CD‐ROM or can be downloaded from the Distell website. Fatmeter User Manual Page 18 ...the art of distell‐ing... Hints and Suggestions Preparation of samples Always ensure that the sample for measurement is wider than the sensor and that it has a minimum thickness of 25mm. This ensures that there are no reflections from the underlying surface, which could result in spurious readings. Be particularly careful when the sample is on a metal surface, as this will increase the risk of the reflected signal interfering with the readings. Ensure that the product for measurement is fully defrosted, and prepared in accordance with instructions. Operation of the Fatmeter The meter operator should check the stability of the calibration settings of the Fatmeter each day on the check pad supplied before general use. The Fatmeter should be switched on 5 minutes prior to use, to allow the meter to stabilise. Ensure that you have chosen the correct calibration setting for the product to be measured. Ensure that measurements are taken in a consistent and repeatable manner. Ensure that the sensor head is firmly in contact with the product. We suggest that the meter is held in a vertical position. If the meter is tilted backwards or forwards then a different section of the product is being read, and this can affect repeatability of the measurements. After pressing the Read / Yes button, always allow the reading to stabilise before releasing the button. The reading is only stored by the meter upon release of the button. Once the reading is stable, be sure to release the button before removing the meter from the sample. If the displayed reading takes a long time to settle then this is a good indication that there are pockets of air in the sample. Try pressing the meter further into the product to expel any air, but ensure that the product thickness is still at least 25mm. If the meter displays Out Of Range, possible causes could be: •
You have chosen the wrong calibration setting. •
The fat specification of the product is beyond the ‘range of experience’ set for this product. •
There are large air pockets or cavities located in the product directly beneath the sensor. •
The product thickness is insufficient. When ‘Battery Low’ is shown on the display, or the display becomes very faint, the battery needs recharging. Cleaning and general care The Fatmeter is a sealed unit and is waterproofed to IP 67 prior to leaving the factory. However, we do not recommend that the unit be immersed in water or any other fluid. Tampering with the unit, opening the seals, etc., will immediately invalidate the warranty. Your Fatmeter is encased in impact resistant plastic, with the sensor head made from stainless steel and PTFE. Take care not to pierce the PTFE film – i.e. avoid placing the sensor head‐on to abrasive or rough surfaces. The unit may be cleaned with a damp cloth, using a mild solution of detergent. Be aware that some household cleaners may contain chemicals which could seriously damage the plastic enclosure. Avoid the use of any petroleum based solvent cleaners. Fatmeter User Manual Page 19 ...the art of distell‐ing... The unit should be charged regularly. Where the unit is in constant use, we recommend that the power supply be connected to the meter when at all possible. This will ensure that you have a fully charged battery available when necessary. Your Distell Fatmeter is a precision instrument. Ensure that the unit is stored securely in transit. Do not drop or otherwise misuse the equipment, as this may invalidate the warranty. Before calling for service Should you have reason to believe that a fault has occurred, please first of all check the obvious: •
Is the unit switched on? •
Have the batteries been charged? Should any fault persist, please telephone our Help Desk for advice and/or to report the fault. Warranty and repair Your Distell Fatmeter is fully warranted against manufacturing defect for a period of 12 months. Please refer to Warranty Terms and Conditions. Should you have occasion to return the unit for repair, please telephone our Help Desk, report the fault and ask for advice. Please quote date of purchase and give a full description of the fault. Fatmeter User Manual Page 20 ...the art of distell‐ing... Contact Details The DISTELL FISH FATMETER is manufactured in the UK by DISTELL.COM UNIT 5, OLD LEVENSEAT FAULDHOUSE WEST LOTHIAN EH47 9AD SCOTLAND TELEPHONE: +44 (0)1501 770124 FAX: +44 (0)1501 772424 WEBSITE : www.distell.com EMAIL: [email protected] Fatmeter User Manual Page 21