Download Console Drawer User`s Manual

Transcript
Console Drawer
User’s Manual
This Product is designed, developed and manufactured as contemplated for
general use, including without limitation, general office use, personal use
and household use, but is not designed, developed and manufactured as
contemplated for use accompanying fatal risks or dangers that, unless
extremely high safety is secured, could lead directly to death, personal injury,
severe physical damage or other loss (hereinafter “High Safety Required
Use”), including without limitation, nuclear power core control, airplane
control, air traffic control, mass transport operation control, life support, weapon
launching control. You shall not use this Product without securing the
sufficient safety required for the High Safety Required Use. If you wish to use
this Product for High Safety Required Use, please consult with our sale
person in charge before such use.
Linux is a registered trademark or trademark of Linus Trovalds in the United States
of America and other countries.
The name and logo TurboLinux are trademarks or registered trademarks of
TurboLinux, Inc.
Caldera System and OpenLinux are trademarks or registered trademarks of Caldera
Systems Inc.
Red Hat and any trademarks or logos based on Red Hat are the trademark or
registered trademarks of Red Hat, Inc. in the United States of America and other
countries.
Other names such as product names are the registered trademarks or trademarks
of their respective companies.
All rights reserved, copyright © FUJITSU COMPONENT LIMITED 2002
Contents
Preface ....................................................................................................... 1
Conventions ....................................................................................................... 1
Packing List ....................................................................................................... 1
Important Notices ........................................................................................ 3
Safety .................................................................................................................. 3
Precautions .................................................................................................. 3
Disposal ....................................................................................................... 4
Moving Console Drawer .................................................................................... 4
Installation ................................................................................................... 5
Installing Console Drawer ................................................................................. 5
Installation Procedure .................................................................................. 5
Connecting and Removing Cables ............................................................... 8
Connecting Cables ............................................................................................ 8
Removing Cables .............................................................................................. 8
Connecting to Ports ........................................................................................... 9
Operation .................................................................................................. 10
Operating Console Drawer ............................................................................. 10
Adjusting the Monitor ....................................................................................... 13
Basic Adjustment Procedure ..................................................................... 14
Resolution and Refresh Rate .................................................................... 15
Using a Linux Operating System .....................................................................15
Keyboard Operation .........................................................................................16
Pointing Device Operation ...............................................................................16
Using CRT/KB Switcher ..................................................................................17
Storing Console Drawer .................................................................................. 18
Cleaning Console Drawer ............................................................................... 20
Technical Specifications ............................................................................ 21
i
ii
Preface
Congratulations on your purchase of the server rack mountable Console Drawer.
Using this product will greatly improve the efficiency and functionality of the workspace
around your racks. Space that was used in previous layouts can now be used more
freely due to our compact sliding module design.
The 15-inch TFT monitor has a resolution of 1024 to 768 dots with 16,770,000
colors. Also, it is equipped with a keyboard and 2-button pointing device.
Conventions
Symbols and terminology that are used in this manual are described below.
Caution
This symbol indicates the possibility of physical damage (such as
damage to the Console Drawer) or physical injury, which may result if
by ignoring this symbol the Console Drawer is operated incorrectly.
This logo indicates supplemental information, comments or hints.
-
Text that is preceded by a number (such as 1.) indicates that the operation must
be done in the order indicated.
Reference to important chapter titles and terminology are in brackets [ ].
Packing List
Make sure that the items in the following list were included in the shipping package.
- Console Drawer
1 ea.
- Guide Rail
2 ea.
- Screws
10 ea.
- Screw Gasket
8 ea.
- Power Cable (2 m)
1 ea.
- Operation Manual (this manual)
1 ea.
- Warranty
1 ea.
(Make sure that the warranty includes all the required information.)
We recommend keeping the box and packing material in which the Console Drawer
was purchased. They may be required when moving it to another location.
If something is missing from the package, contact your place of purchase or a
Fujitsu maintenance person.
1
Caution
Please note the safety information in [Important Notices].
1. Check the package delivered and whether the Console Drawer has been damaged when unpacking.
2. Remove the rubber stabilizer from the front left side of the Console Drawer.
The rubber stabilizer is inserted to prevent the Console Drawer from
sliding when installing or moving it. Be sure to keep it after finishing
the installation for when it needs to be used again.
Rubber stabilizer removal diagram
2
Important Notices
This chapter contains cautions that must be taken when operating the Console
Drawer and information related to safety. Carefully read this chapter to use the
Console Drawer correctly.
Safety
Caution
Precautions
This device adheres to the safety regulations related to information processing
equipment such as electronic office machines that are used in an office environment. If you have any questions please contact your place of purchase or a Fujitsu
maintenance person.
-
-
-
-
To prevent extreme bumping or shaking when moving the Console Drawer use
the original shipping container or a box similar to it.
During installation and before using the Console Drawer, carefully read [Installation] and the section about environmental conditions in [Technical Specifications] to use the Console Drawer correctly.
Moving the Console Drawer from a cold environment to the installation location
may cause condensation to occur. Before using the Console Drawer allow it to
dry out completely and to reach the ambient temperature of the installation location.
Make sure that the local power supply voltage is within the acceptable range of
the Console Drawer. Make sure that the rated voltage meets the specifications of
this device (Refer to [Technical Specifications] and the model plate on this
device).
The power cable for the Console Drawer is specially certified. Do not connect it
to anyplace other than a grounded wall outlet.
Arrange the immediate area around the Console Drawer's power socket and the
rack's power outlet so that the plug can be quickly pulled.
Lay all the cables so that they will not be damaged. Refer to the relevant sections
in [Installation] when connecting and removing cables.
Do not connect or remove the data transmission cables during thunderstorms.
Do not allow foreign substances (such as necklaces or paperclips) or liquids
inside the Console Drawer.
3
-
-
-
-
In an emergency (such as: damage to the housing, parts or cables; or liquid or a
foreign object has fallen into the Console Drawer) remove the power cable as
soon as possible and contact your place of purchase or a Fujitsu maintenance
person.
Only licensed engineers can repair the Console Drawer. An unlicensed user that
opens the Console Drawer and makes incorrect repairs may cause electric
shock or fire.
Avoid using the keyboard when in poor health or for extended periods of time.
Always hold the connector portion and do not jerk the cables when removing
them.
Avoid operating the Console Drawer with wet hands.
Do not unplug connectors with wet hands.
Do not place such unnecessary items as cups on the top of the Console Drawer.
Do not modify or repair the Console Drawer.
Only licensed personal can uncouple, remove or switch parts (such as electromagnetic wave devices) which bear a warning mark (such as a lightening bolt).
Only the resolution and refresh rate specified in the monitor explanation in
[Technical Specifications] can be set. Doing settings other than those noted may
damage the monitor. Contact your place of purchase or a Fujitsu maintenance
person if you have any questions.
To prevent interference it is necessary to adequately isolate the data cables
connected to peripheral equipment.
Unplug the power plug from the grounded power outlet if there is a power
outage.
Follow the instructions in the appropriate section in [Operation] when cleaning
the server.
Keep this manual with the Console Drawer. If you give the Console Drawer to a
third party give them this manual also.
Disposal
This device is manufactured with metal and plastic parts. Dispose of it according the
relevant government regulations.
Moving Console Drawer
Caution
When moving the Console Drawer to a different location, use the box
in which it was purchased or a box that protects the product from
bumping and shaking. Do not unpack the Console Drawer until the
move has been completed.
4
Installation
Caution
Please note the safety information in [Important Notices].
Installing Console Drawer
Caution
Maintain the area around the equipment when using the Console
Drawer (See [Technical Specifications] for more information).
Avoid dust, humidity and extreme temperatures. Installation may require more than two people in some situations. Be careful not to pinch
your fingers or hands between the guide rails and the Console Drawer.
Installation Procedure
1. Adjust the length of the guide rails on the inner side of the rack supports. Place
the screw gaskets in the holes on the rack, and then fix the screws in the upper
and lower holes on the guide rails. (Set the left and right guide rails at the same
height.)
Install the guide rails with the guides toward the front so that the
Console Drawer can be mounted on them.
Attach the guide rails on the inner side of the rack support.
See the installing the guide rail diagram on page 6.
5
Installing the guide rail diagram
6
2. After fixing the front and the back of the left and right guide rails insert the Console
Drawer from the front of the guide rails.
Be careful that the latch lever (see page 11) does not come loose. If
the latch lever comes loose the Console Drawer may slip. If the
Console Drawer does not slide easily into the guide rail or is heavy, lift
and insert it with two or more people.
3. Push the Console Drawer in until it stops, and then tighten the two screws on the
front of the Console Drawer to fix it in place.
Installing the Console Drawer diagram
7
Connecting and Removing Cables
Caution
Read the Console Drawer manual before connecting the cables. Do
not connect or remove the cables during a thunderstorm. When
unplugging cables hold them by the plug, not the cable. Connect and
remove cables in the following order.
Connecting Cables
1. Unplug the power cords, from the power outlets, of all the equipment that is
effected.
2. Connect the keyboard cable, mouse cable and the monitor cable to their
respective pieces of equipment.
3. Plug the power cable into the Console Drawer.
4. Plug the power cable into a grounded power outlet.
Connecting cables to Console Drawer diagram
Removing Cables
Unplug the power cords, from the power outlets, of all the equipment that are
effected, then remove each cable.
8
Connecting to Ports (When CRT/KB Switcher is attached to the back of
the Console Drawer.)
Caution
Adhere to the cautions in [Connecting and Removing Cables] when
connecting and disconnecting ports. Also, cut the power of the
effected equipment while you are working.
You can connect as many servers as there are ports.
1. Connect the keyboard cable to the KB port, the mouse cable to the Mouse port
and the monitor cable to the COMMON DISP port.
2. Use the dedicated cable to connect the server keyboard port (PS/2) and the
mouse port (PS/2) to the KB/Mouse port (6-pin mini DIN).
3. Connect the terminal monitor cable to the 1 DISP port (15-pin mini D-SUB).
Connecting ports diagram
If you are using a separate CRT/KB switcher, rather than the back of
the Console Drawer, refer to the operation manual for the CRT/KB
switcher.
9
Operation
Caution
Pull the Console Drawer toward slowly until the slide rails lock.
If they do not lock, the weight of the Console Drawer may cause it to
move.
Be careful not to pinch your hand when doing such activities as pulling
or pushing the slide module and opening and closing the LCD.
Operating the Console Drawer
1. If the rubber stabilizer has not been removed yet, remove it now.
2. Push down on the latch lever on the front left side of the Console Drawer. Pull out
the Console Drawer until it clicks.
Before pulling it out, make sure that the two screws on the front of the
Console Drawer are tightly fixed to the rack.
10
Pulling out the slide module diagram
11
3. Push up on the LCD lock on the left side of the handle, and then grasp the handle
and open the top of the monitor.
4. Turn on the power by pushing the POWER button.
Open the monitor completely.
Opening the LCD diagram
12
Adjusting the Monitor
The five buttons and two LEDs on the monitor are explained in order from left to right.
Power button:
Power lamp (green):
Indicator lamp (orange):
Menu button:
▼ Button:
▲ Button:
Button:
Push this button to turn on the power to the monitor.
Also, pushing this button while the monitor is on cuts
the power to the monitor.
This lamp lights when the power to the monitor is on
and goes out when the power to the monitor is off.
This lamp lights when the monitor is in energy-saving
mode.
Push this button to adjust the monitor.
Push this button when selecting downward and to
change values in a decreasing direction.
Push this button when selecting upward and to change
values an increasing direction.
Push this button to select or enter things.
You can eliminate screen noise by adjusting the
PHASE on
the setting menu.
Caution
Be careful when applying a strong force to the equipment when the
Console Drawer is pulled out and the monitor is opened and being
used, as there is a risk that the rack may fall over.
Do not strongly press on the monitor's screen, scratch it with sharp
objects or place magnetic objects near it. Doing so may damage the
monitor.
13
Basic Adjustment Procedure
1. Push the menu button to open the menu.
2. Select the item to be adjusted with the ▼ button and the ▲ button.
3. Switch to the various adjustment screens with the button.
4. Change setting values with the ▼ button and the ▲ button.
5. Apply setting values and return to the menu screen with the
button.
6. Push the menu button to close the menu. (The menu button automatically closes
if no button operations are done for a set time.)
* For Auto, after pushing the
re-opens.
Symbol
Displayed term
button, auto adjustments are done and the menu
Adjustment details
BRIGHTNESS
Adjust the brightness.
CONTRAST
Adjust the contrast.
H-POSITION
Adjust the horizontal position of the image.
V-POSITION
Adjust the vertical position of the image.
PHASE
Adjust the phase (eliminate screen noise).
CLOCK
Adjust the width of the display.
AUTO ADJUST
Automatically adjusts the position of the
image, the width of the display and the phase
to optimum values.
LANGUAGE
Select the language used for the menu.
COLOR CONTROL
Adjust the tone.
AUTO
OSD-DISPLAY POSITION Adjust the position of the menu.
14
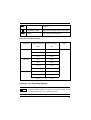
MODE
RESET
MODE SELECTION
No adjustment function (Setting not
enabled).
OSD-DISPLAY TIME
Adjust the time display that is on the menu.
RESET
Return to factory default status.
Resolution and Refresh Rate
Resolution
640 × 480
800 × 600
1024 × 768
Horizontal frequency
Vertical frequency
(KHz)
(Hz)
31.5
60.0
37.9
72.0
37.5
75.0
35.1
56.0
37.9
60.0
48.1
72.0
46.9
75.0
48.4
60.0
56.5
70.0
60.0
75.0
Mode
VESA
Using a Linux Operating System
Caution
Carefully read the cautions on page 16 to correctly set and use the
Console Drawer with a Linux operating system.
15
-
We recommend a resolution of 1024 x 768 dots, 16 bit color and a refresh rate of
60 Hz for X Window System settings. We recommend a resolution of 1024 x 768
dots, 16 bit color and a refresh rate of 70 Hz when using X Window with Turbolinux
Server 6.5. The screen will not function properly under other settings.
-
When executing the kon command on the console screen with RED HAT LINUX
7J PROFESSIONAL SERVER and Red Hat Linux 7.2 Professional, open the /etc/
kon.cfg file with a text editor application and do the following changes.
[Before Changes]
VGA:Normal
VGA
640 680 768 800 480 491 493 525
1
79 29
[After Changes] (The value in line 4 changes from "1" to "0")
VGA:Normal
VGA
640 680 768 800 480 491 493 525
0
79 29
Before using the Console Drawer in a Linux system, be sure to carefully read the rerelease note that is attached to the Linux bundled model.
Keyboard Operation
Full keyboard operation is possible by working with the Fn key.
Pointing Device Operation
Lightly touch or tap the operation surface to operate the pointing device.
Moving the pointer: Just lightly touch the operation surface in the direction you want
to move the cursor.
Single click:
Lightly tap the operation surface once, or click the left button
once.
Double click:
Lightly tap the operation surface twice, or click the left button
twice.
16
Caution
(1) The pointing device has been designed to be operated with one
finger, do not use it in the following ways:
1) while wearing gloves;
2) with a pen, ballpoint pen or pencil etc;
3) with two or more fingers;
4) operating while something is placed on the operation surface.
(2) Normal operation may become impossible if the operation
surface gets wet such as when there is high humidity or the
operator's hands are damp or sweaty. Thoroughly dry or wipe the
operation surface before use.
(3) Do not do operations with pointed metal objects such as pens as
it may damage the pointing device.
Using CRT/KB Switcher
Even if the settings are the same, the image position may be different when using
various types of CRT controllers when setting up multiple servers. Generally
resolution and refresh rate (vertical frequency) are the same for all servers, therefore
just a set of one type of parameters supports these settings, which are stored for the
screen. Displays on other servers are effected by correcting an on-screen image
that has shifted.
To correct shifted displays, change the following settings.
1. Set the refresh rate of servers that have displays with incorrect images to a
different value.
2. Select the best screen display and the save it.
17
As multiple refresh rates for resolution can generally be set, you can use multiple
options for the screens.
Storing Console Drawer
The Console Drawer can be stored in the rack when a monitor and keyboard are not
needed.
Slide the Console Drawer in and out of the rack slowly.
1. Push the monitor power button to turn off the power to the monitor.
2. Hold the handle and slowly close the monitor. Be sure that the LCD lock catches.
3. Push the locking springs on both sides of the slide rail and slide the Console
Drawer into the rack. Be sure the latch lever catches.
Caution
Be careful not to pinch your fingers or hands in the guide rails, slide
rails, or the Console Drawer itself when storing the Console Drawer.
If the latch lever is not set the Console Drawer may slide out if the rack
is moved.
We recommend turning off the monitor's power when it is not in use,
to conserve electricity.
18
Inserting the slide module diagram
19
Cleaning Console Drawer
Caution
Turn off the power and unplug the power cable from the power socket.
Do not use cleansers that contain abrasives; or such organic
solvents as benzene or thinner; or disinfectant alcohol.
Do not apply water and cleanser or spray type cleaners directly to the
Console Drawer. If liquids enter the interior of the Console Drawer it
may result in malfunctions or damage.
Wipe the Console Drawer and monitor with a dry cloth. If the dirt is excessive, wipe
it off with a soft cloth that has been thoroughly wrung out after being dipped in
household cleanser diluted with water.
Remove dust with a soft brush.
Clean the keyboard and pointing device with a sterile cloth.
Lightly wipe the monitor screen with a soft dry cloth such as gauze. Remove dust
with a soft brush.
20
Technical Specifications
Model:
NC14003-T551 (Japanese)
NC14003-T552 (USA array)
- Electrical specifications
Voltage range rating:
100 to 240 V AC
Frequency:
50/60Hz
Amperage rating:
100 V/0.7 A, 200 V/0.4 A
- External dimensions
Guide rail:
30 mm (W) x 593 to 750 mm (sliding adjustment) (D) x
43.0 mm (H)
Main parts:
(W) x (D) x (H)
(1) Slide rail contracted:
485 mm x 642 mm x 42.0 mm
(2) Slide rail extended:
485 mm x 1117 mm x 42.0 mm
(3) When (2) and the LCD are fully opened:
485 mm x 1077 mm x 345 mm
-
Weight
12.0Kg
- Operating environment
Temperature:
15 to 35o C when in use.
(Avoid humid operating conditions)
Conforms to the operating environment of servers.
- Monitor
Panel Monitor:
Resolution:
Pitch:
Refresh rate:
Colors:
Brightness:
Connector:
Power consumption:
15-inch color liquid crystal TFT
Maximum horizontal 1024 dots x vertical 768 lines
0.297 mm x 0.297 mm
Maximum 75 Hz
Maximum 16,777,216 (Dithering)
200 cd/m2
15-pin mini D-SUB (Analog RGB)
Maximum 40 W or less
3.6 W or less in standby mode
9.0 W or less with back light off
1.5 W or less with LCD and power switch off
21
- Keyboard
Array:
Number of keys
Connector
Japanese, USA array
Japanese (87 keys), USA array (83 keys)
6 pin mini DIN (PS/2)
- Pointing Device
Model:
Resolution:
Connector:
Static Touch Pad
240 cpi (Characters Per Inch)
6 pin mini DIN (PS/2)
- Button
Number of buttons
2 buttons
22
Console Drawer
User’s Manual
Published February 2002
Published by FUJITSU COMPONENT LIMITED
Printed in Japan
-
The contents of this manual may be modified for improvements without prior
notice.
Fujitsu bears no responsibility for infringement of patent or other rights of third
parties ascribable to the use of data in this manual.
Reprinting of this manual without permission is prohibited.
L85-80XXX-01
020325(5) NA