1
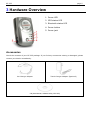
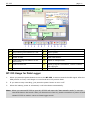
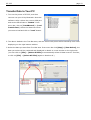
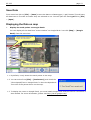
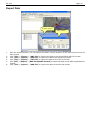
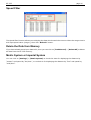
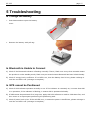
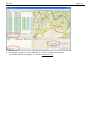
BT-335 Bluetooth Data Logger User Manual Version 1.2 BT-335 page 2 Table of Content 1 Introduction and Features................................................................................................. 3 Introduction....................................................................................................................3 Features.........................................................................................................................3 2 Specifications .................................................................................................................... 4 System Specifications ......................................................................................................4 Bluetooth Specifications ...................................................................................................4 3 Hardware Overview ........................................................................................................... 5 Accessories.....................................................................................................................5 Power Button ..................................................................................................................6 Power Jack .....................................................................................................................6 LED Function ..................................................................................................................6 Usage ............................................................................................................................6 4 Software Utility for Data Logger ........................................................................................ 8 Software Utility Features ..................................................................................................8 Install the Software Utility ................................................................................................8 Setup Software Utility ......................................................................................................8 BT-335 Usage for Data Logger......................................................................................... 11 Transfer Data to Your PC................................................................................................. 12 Save Data .................................................................................................................... 13 Displaying the Data on map ............................................................................................ 13 Export Data .................................................................................................................. 15 Speed Filter .................................................................................................................. 16 Delete the Data from Memory ......................................................................................... 16 Metric System or Imperial System ................................................................................... 16 5 Troubleshooting .............................................................................................................. 17 ► Change the Battery .................................................................................................... 17 ► Bluetooth is Unable to Connect .................................................................................... 17 ► GPS cannot be Positioned............................................................................................ 17 6 Appendix ......................................................................................................................... 18 Automatic Geotagging with “locr GPS Photo” ..................................................................... 18 Download and install...................................................................................................... 18 Basic steps for Geotagging your photos ............................................................................ 18 BT-335 page 3 1 Introduction and Features Introduction The BT-335 is the combination of a GPS receiver and a data logger with Bluetooth interface and built-in active antenna for high sensitivity to tracking signal. Based on the SiRF star III Low power chip set and supports all functions (Single Sat updates in reduced visibility, Superior urban canyon performance, FoliageLock for weak signal tracking, etc.). The BT-335 is well suited to system integrations including PDA, Smart phone, Tablet PC and Notebook PC with Bluetooth devices. It satisfies a wide variety of applications that are purposes in automotive and outdoor recreation navigation systems. The BT-335 records time, date, speed, altitude and GPS location at preset intervals. Based on the SiRF star III chipset, BT-335 offers accurate position tracking capabilities. All recorded GPS information can be downloaded to the computer. It is a convenient, economical way for later review of your recorded histories. Simply connect the BT-335 to your PC or Notebook by Bluetooth interface, and then download the track-log to your PC for use with Windows based software utility. User can easily export the recorded points to Google Earth and Google Maps. It is ideal application in fleet management, marine navigational aids, traveling and consumer personal use. Features The main features of BT-335 Bluetooth GPS data logger 1. Allowing user to store up to 60000 points. 2. Preset saving intervals (Time/Distance). 3. Configuration Wizard helps you to quickly make the configuration. 4. User friendly Windows based software utility. User may use the software utility to do the following functions: Upload recorded data Change Recording Interval Configuration setting Delete recorded data Exporting and mapping your recorded data: (1) Exploring to KML (Interface with Google Earth) (2) CSV format (Excel file format) (3) Text format (4) RMC Compatible Format (5) GPX format BT-335 page 4 2 Specifications System Specifications Electrical Characteristics Frequency L1, 1575.42 MHz C/A Code 1.023 MHz chip rate Channels 20 all-in-view tracking Tracking Sensitivity -159 dBm Accuracy Position Horizontal 10m 2D RMS (SA off) WAAS enabled 5m 2D RMS (SA off) Time 1 micro-second synchronized to GPS time Velocity 0.1m/sec 95% (SA off) Datum Datum WGS-84 Acquisition Rate Hot start 1 sec., average (with ephemeris and almanac valid) Warm start 38 sec., average (with almanac but not ephemeris) Cold start 42 sec., average (neither almanac nor ephemeris) Reacquisition 0.1 sec. average (interruption recovery time) Protocol GPS Output Data NMEA 0183 protocol, and supports command: GGA(1sec), GSA(1 sec), GSV(5 sec), RMC(1sec) ( VTG and GLL are optional) GPS transfer rate 38400,N,8,1 Dynamic Condition Acceleration Limit Less than 4g Altitude Limit 18,000 meters (60,000 feet) max. Velocity Limit 515 meters/sec. (1,000 knots) max. Jerk Limit 20 m/sec**3 Power Voltage Built-in rechargeable battery(1650 mAh) and 5V DC input charging circuit Operation Time 15 hr. After fully recharged, in continuous mode >20 hr in trickle power mode Physical Characteristics Dimension 72.5mm x 40.4mm x 26mm Weight 75g Temperature Operating -20°~ 60°C Storage -30°~ 80°C Humidity Up to 95% non-condensing Bluetooth Specifications ● ● ● ● ● ● ● Bluetooth V1.2 Compliant Supply Voltage : 2.8V ~ 3.3V Frequency Range : 2.402 ~ 2.480 GHz Receiver Sensitivity : -80 dBm Transmit Power : Class 2 Transmitting Range : 10 m (Depends on environment) Power Consumption : 45 mA (Typical) BT-335 page 5 3 Hardware Overview 1. Power LED 2. GPS status LED 3. Bluetooth status LED 4. Power button 5. Power jack Accessories Check the contents of your BT-335 package. If you find any accessories missing or damaged, please contact your dealer immediately. Car Charger Adapter Travel Charger Adapter (Optional) CD (User Manual, Software Utility, GPS info) BT-335 page 6 Power Button Power on: Press the power button 1 second until the GPS status LED is on. Power off: Press the power button 1 second until the GPS status LED is off. Power Jack The power jack lets you to connect either a DC car power charger (included) or AC power charger (included) to recharge the internal battery. Please note that the adapter rating 5V, 1.2 A, positive pole center. LED Function Bluetooth Status LED (Blue): Blinking (Slowly) ---- Not connected to any Bluetooth device. Blinking (Quickly) ---- Connected to other Bluetooth device. GPS Status LED (Green): Blinking ---- GPS position is fixed Steady light ---- GPS position is not fixed Battery Status LED (Red/Yellow): Red ---- Battery power is critically low. Yellow ---- Battery is charging now. LED off ---- Battery is partially full or fully charged. Usage For PDA with built-in Bluetooth 1. Press to turn on the power of BT-335. 2. Please refer to the user manual of PDA to enable the Bluetooth of PDA connection to the BT-335. Some PDA may need the Bluetooth passkey, the passkey is “0000”. 3. Check the number of COM port used by Bluetooth. 4. Run the suitable mapping/navigation software and select the correct COM port & baud rate: 38400. For PDA with Bluetooth Compact Flash card 1. Press to turn on the power of BT-335. 2. Please refer to the user manual of your Bluetooth devices connecting to BT-335. Some Bluetooth devices may need the Bluetooth passkey, the passkey is “0000”. 3. Check the number of COM port used by Bluetooth. 4. Run the suitable mapping/navigation software and select the correct COM port & baud rate: 38400. For Notebook with Bluetooth device 1. Press to turn on the power of BT-335. 2. Please refer to the user manual of your Bluetooth devices connecting to BT-335. Some Bluetooth devices may need the Bluetooth passkey, the passkey is “0000”. BT-335 page 7 3. Check the number of COM port used by Bluetooth. 4. Run the suitable mapping/navigation software and select the correct COM port & baud rate: 38400. Note: The Bluetooth device in most of the applications have an “auto-detect” feature that you do not need to select the Baud Rate. BT-335 page 8 4 Software Utility for Data Logger Software Utility Features Upload Recorded Data: User can upload recorded data and save it to PC. Information Stored: 1. Only Position 2. Position, Time, Date, Speed. 3. Position, Time, Date, Speed, Altitude. User programmable via software utility. Speed Filter: Disables data save if speed falls below a threshold value. Distance Filter Disable data save if data logger hasn’t moved greater than the selected radius. Saving Intervals: User defined saving interval (Time or Distance). User programmable via utility. Converting Output Format (1) Exploring to KML ( Interface with Google Earth) (2) CSV format (Excel file format) (3) Text format (4) RMC Compatible Format (5) GPX format Configuration Wizard Using Configuration Wizard to help you quickly set the settings. Install the Software Utility 1. Insert the software utility CD into your CD-ROM drive. 2. Double click on “DataLogger_Setup.exe”, and follow the instruction to install the BT-335 software utility. Setup Software Utility 1. Turn on the power of BT-335, and then connect it your PC by Bluetooth. 2. Check the COM port which is connected by BT-335. Click from [Start] > [All Programs] > [GlobalSat Data Logger] > [Data Logger PC Utility] to start the GlobalSat BT-335 utility. The Configuration Wizard appears when the first time you start the program. It helps you to quickly setup the configuration with step by step instructions. y Step 1: Select Device Type. Please select “BT335”. BT-335 page 9 y Step 2: Check the COM port which is used by the Bluetooth, and set the COM port here. y Step 3: Select the saving interval. There are 3 options you can choose, including “Walk/Jog”, “Bicycle”, and “Vehicle”. y Step 4: Select the Metric or Imperial unit. y Step 5: Select the directory for exporting files. y When you finished the setup, a successful message appears and all settings are saved in system. 3. The BT-335 utility will import the setting you just made from Configuration Wizard. If you did not use Configuration Wizard to do the settings, please manually select the correct COM port and set the Baud Rate to “38400”. If later on you want to enable Configuration Wizard again, please click from menu bar, [File] > [Quick Configuration]. BT-335 4. page 10 From menu bar, click on [Settings] > [Configuration] to open the Device Configuration dialog box. f Data logging format: There are three options for you to choose those data items to be recorded. f Enable WAAS/EGNOS/MSAS: Enable the WAAS/EGNOS/MSAS feature to acquire more precise position. f Disable data logging if speed falls below a threshold: If your speed is below this specified value, BT-335 will not save the data of current position. f Disable data logging if distance is less than the selected radius: If the distance between your last point and current point is less than this specified value, BT-335 will not save the data of current position. f Data logging interval Mode User defined interval (time or distance) for recording the data. If you click the “Set the default logging interval” button, it will be set to By time 30 seconds. f System information It shows the current memory usage status. f Operation Mode You can set whether you want to enable the GPS feature, Data logger feature or both. 5. When you have done the configuration setup, press OK button to save the settings to BT-335. 6. These settings will take effect when next time you restart the device. BT-335 page 11 Tool Bar Configuration Google Maps Tree Bar Status Bar 1 Open a training file. 8 The Configuration for GPS device. 2 Save training information to a file. 9 Metric system. 3 Preference 10 Delete records. 4 Select all files. 11 Load Track Points. 5 Export training information to the KML format. 12 Export to Google Earth. 6 Export to CSV file. 13 Display program information, version number and copyright. 7 Export to the text file. BT-335 Usage for Data Logger 1. When you press the power button to turn on the BT-335, it starts to search the GPS signal. After the GPS position is fixed, it will begin to record and save the position data. 2. If you want to stop recording, just press the power button to turn it off. 3. When the battery power is exhausted, it will shut down automatically. Note: When you connect BT-335 to your PC, BT-335 will enter the “data transfer mode”, it can not record the data in this mode. After you disconnect it from PC, please remember to power off and restart BT-335 to make it return to Data Logger mode. BT-335 page 12 Transfer Data to Your PC 1. Turn on the power of BT-335, and then connect it to your PC by Bluetooth. Start the software utility. Select the correct COM port and set the Baud Rate to “38400”. From menu bar, click on [TrackRecord] > [Load Track Points]. Select the data item which you want to load and click on “Load” button. 2. The data is loaded in the Tree Bar area, and the entire track points will be sorted by time order displaying on the right bottom window. 3. Select the data you want from Tree Bar area. From menu bar click [Map] > [View Points]; the data you select will be combined and displayed in details in a new window or the right side. (You can click on [File] > [Select All Files] to automatically select all data record in Tree Bar, or click on [File] > [Select All Files] again to deselect all.) BT-335 page 13 Save Data From menu bar click on [File] > [Save] to save the data to a DataLogger (*.gsd) format. This will save all data items in Tree Bar no matter they are selected or not. You can open the saved gsd file by [File] > [Open]. Displaying the Data on map 1. Display the track points on Google Earth: You can display all the data from “active window” on Google Earth. Just click [Map] > [Google Earth] from the menu bar. Check the root record to display all information. Check “TrackPoints” to display the route by red line. Check any point which you want to display its position and information in map. 1.1 By default, it only shows the track points on the map. 1.2 You can select from [File] > [Preference], and check the “Show Speed/Time in Google Earth” to have the Speed and Time info of the points shown on the map. 1.3 To display the route on Google Earth, you must install Google Earth and the internet connection is also needed. For more information, please visit http://earth.google.com/. BT-335 2. page 14 Display the track points on Google Maps: You can display all the data from “active window” on Google Maps. Just click [Map] > [Show Track Points in Google Maps] from the menu bar. To display the track points on Google Maps, your PC must have the internet connection enabled. 3. Display one track point on Google Maps: You can double click on any track point to display its position on Google Maps. Double click on any track point to display its position on Google Maps window. BT-335 page 15 Export Data Inactive window Active window 1. 2. 3. 4. 5. 6. With the export function, you can export the data in “active window” to the following five kinds of data format. Click [File] > [Export] > [KML File] to export the data to the Google Earth KML file format. Click [File] > [Export] > [CSV File] to export the data to the Excel file format. Click [File] > [Export] > [TXT File] to export the data to the TXT file format. Click [File] > [Export] > [RMC Compatible Format] to export the data to the RMC Compatible file format. Click [File] > [Export] > [GPX File] to export the data to the GPX file format. BT-335 page 16 Speed Filter The Speed filter function allows you to display the data which match the criteria. Select the range criteria and input speed value (integer), then click “Refresh” button. Delete the Data from Memory If you have already saved your data to PC, then you can click on [TrackRecord] > [Delete All] to delete all data from the BT-335 memory. Metric System or Imperial System You can click on [Settings] > [Metric System] to check this item for displaying the distance by “meters” and speed by “km/hour”, or uncheck it for displaying the distance by “feet” and speed by “mile/hour”. BT-335 page 17 5 Troubleshooting ► Change the Battery 1. Push downwards to open the battery cover. 2. Remove the battery with pull tag. ► Bluetooth is Unable to Connect A) Check if the Bluetooth indicator is flashing normally. That is, flash once every three seconds means the product is under standby mode; flash once per second means Bluetooth has been linked already. B) Check if energy level is sufficient. If red LED is on, then the battery level is low, please recharge it until the red LED is off (recharge is complete). ► GPS cannot be Positioned A) Check if GPS indicator operates normally or not. If the indicator is constantly on, it means that GPS is in operation; if the indicator is flashing, it means GPS is positioned already. B) If GPS cannot be positioned for a long time, apply GPS info software to make a Cold Start first, and then move to an open space performing the positioning task. C) Check if power level is low. If the red LED is on, it means the power is insufficient, please recharge it until the red LED is off (recharge is complete). BT-335 page 18 6 Appendix Automatic Geotagging with “locr GPS Photo” “locr” is a completely new way of organizing photographs using geographical information. Its many great features include: • The ability to find photos again much more easily, giving you a clear overview of your photograph collection, regardless of its size! • Automatic descriptions are generated for every photo based on geographical information. • Photos can also be shared with friends and family. locr is based on photographs with geotags. A geotag provides information about the position at which the photo was taken. Geotags can either be defined manually or automatically via GPS. Download and install On the locr web site (http://www.locr.com) click on “Downloads” and follow the instructions on the screen. To install the locr GPS Photo software, double-click the “locrGPSPhoto.exe” file. Follow the instructions on the screen. You can find “locrGPSPhoto110.exe” and the user manual file in CD-ROM. Basic steps for Geotagging your photos 1. Record GPS data. Remember to bring your BT-335 GPS data logger with you and turn on it while you are taking the picture. 2. Take photos. Before taking the photo simply set the camera time and date according to the system time displayed on the computer you want to use for uploading the photos later. 3. From BT-335 PC software, export your data logger file as “.rmc” format. Start locr GPS Photo program. Click “Add” button to load your photos and GPS Track files (.rmc). Then click “Automatic geotagging…” button to automatically add geographical information to photos. BT-335 4. For details operations of “locr GPS Photo”, please read the user manual “locrGPSPhoto-Manual_EN.pdf” or web site www.locr.com. page 19 BT-335 page 20 FCC Notices This device complies with part 15 of the FCC rules. Operation is subject to the following two conditions: (1) This device may not cause harmful interference, and (2) This device must accept any interference received, including interference that may cause undesired operation. FCC RF Exposure requirements: This device and its antenna(s) must not be co-located or operation in conjunction with any other antenna or transmitter. NOTE: THE MANUFACTURER IS NOT RESPONSIBLE FOR ANY RADIO OR TV INTERFERENCE CAUSED BY UNAUTHORIZED MODIFICATIONS TO THIS EQUIPMENT. SUCH MODIFICATIONS COULD VOID THE USER’S AUTHORITY TO OPERATE THE EQUIPMENT.