1
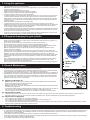
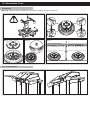
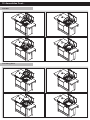
1. General CAUTION For Outdoor use only! This appliance may not be used in an exterior enclosed balcony, porch or entertainment area. IMPORTANT Read these instructions carefully so as to familiarise yourself with the appliance before use. Retain these instructions for future reference. GB 1. General This appliance complies with BS EN 498: 2012 and SANS 1539: 2012. This appliance must only be used with an approved hose and regulator. The gas cylinder is to be used only in the upright position and located in the designated position indicated in the BBQ. Only to be used with a gas cylinder that does not exceed 500mm in height. Gas appliances require ventilation for efficient performance and to ensure the safety of users and other persons in close proximity. Use outdoors only! Country of use Appliance categories Allowable gases and operating pressure DK, FI, NO, NL, SE, BE, ES, FR, IE, IT, PT, GB, CH PL I3B/P (30) I3+ (28-30/37) I3B/P (37) Butane @ 28-30mBar Propane @ 37mBar Butane @ 37mBar Propane @ 37mBar Butane/Propane mixtures @ 37mBar Butane @ 28-30mBar Propane @ 28-30mBar Butane/Propane mixtures @ 28-30mBar (South Africa 2.8kPa) Five Jet Turbo Burner Outer Ring Jet number (x4) 0.50 0.50 Inner Burner Jet number (x1) 0.55 0.55 Nominal usage Gross nom. heat input Gas supply sources Butane - 742 grams/hour Butane - 742 grams/hour Butane - 771 grams/hour 5.1 kW per burner 5.1 kW per burner 5.3 kW per burner (5.1 kW x 2 = 10.2 kW in total) (5.1 kW x 2 = 10.2 kW in total) (5.3 kW x 2 = 10.6 kW in total) An approved hose and regulator connected to a refillable gas container not exceeding 11kg and complying with local regulation in force Country name abbreviations AT = Austria DK = Denmark GB = United Kingdom NO = Norway BE = Belgium ES = Spain IE = Ireland PL = Poland CH = Switzerland FI = Finland IT = Italy PT = Portugal DE = Germany FR = France NL = Netherlands SE = Sweden Note: Marking 0.50 / 0.55 on the injector indicates that the size of the injector is 0.50mm / 0.55mm 2. Safety information Warning: accessible parts may be hot. Keep young children away at all times. Do not leave the appliance un-attended whilst operational. The appliance consumes fuel and air for combustion and gives off gasses like carbon monoxide that could be harmful. Carbon monoxide is a clear odorless gas that causes flu-like symptoms and can cause possible death if inhaled by a person in an enclosed area without ample ventilation. Use protective gloves when handling hot components. Turn off the gas supply on the gas container after use. Do not modify the appliance. Modifying the appliance may be dangerous. The hose and seal on the regulator must be checked for wear or damage before every use and before connecting to the gas cylinder (see fig.1). Ensure the appliance is used away from flammable materials. Minimum safe distances are 1.2m above the appliance and 600mm to the rear and sides of the appliance (see fig. 2). Do not use an appliance that is damaged, leaking, or which does not operate properly. Keep gas cylinders away from heat and flames. Do not place on a stove or any other hot surface. Fig.1 Ensure that the assembled unit is stable and does not rock. Do not cover or change the primary air supply openings in the burners as this will affect the performance of the product and may lead to an unstable flame. In the event of burn back, (where the flame burns back and ignites at the jet), immediately turn off the gas supply by first closing the control valve on the gas cylinder and then the appliance valve. After the flame is extinguished remove the regulator and check the condition of its seal. Replace the seal if in doubt. Re-light the appliance as described in Section 3 below. Should the flame light back persistently return the product to your authorized CADAC repair agent. Do not modify the appliance or use it for anything which it has not been designed for. During use, part of the appliance will become hot, particularly the cooking areas and the hood. Avoid touching hot parts with your bare hands. The use of oven gloves is recommended. This appliance consumes oxygen and needs ventilation for optimum performance and for the safety of those in close proximity. Do not move the appliance while in use. The parts sealed by the manufacturer or its agent must not be altered by the user. NOTE: Do not obstruct the ventilation openings of the container compartment during appliance installation. Do not twist or pinch the hose. Ensure that it is kept away from the BBQ body so as to prevent deterioration/damage to the hose caused by heat. Fit one end of the low pressure hose onto the regulator nozzle, and the other end onto the BBQ nozzle by pushing the ends on as firmly as possible. Clamp into position using a hose clamp at both ends of the hose. The hose used must comply with BS 3212:1991 / SABS 1156-2 or equivalent. In South Africa the regulator used must be 2.8kPa and complies with SANS 1237. Ensure that the connections are made securely and do not allow gas to leak. Check for gas leaks before using the appliance. For use with an approved hose and regulator connected to a refillable gas container not exceeding 11kg and complying with local regulation in force. 3. Using the appliance Use this appliance only on a firm level surface. NB! Before use, please ensure you insert one penlight battery (AA) into the battery compartment for the piezo igniters (See Fig 4.) Before use ensure that the drip cup is in place. Place the cylinder inside the cabinet in the space provided. Make sure the gas cylinder is correctly fitted to the appliance. Ensure the cylinder control valve is in the open position. To light the appliance using the automatic igniter with the lid open, push in and turn the control knob in an anti-clockwise direction to allow the gas to flow and then turn the knob anti-clockwise to the HIGH position. This will cause the automatic lighter to light the burner. Should the burner not ignite the first time, turn the control knob to the OFF position and wait 5 minutes, repeat the process until the burner ignites. Note! Both burners are fitted with an automatic igniter. To light the burners manually, remove the cooking surface from its location. Ignite a match or firelighter and position it next to the burner. Turn on the gas supply to that burner only by pushing the control valve in and turning it in an anti-clockwise direction. This will ignite the burner. Once the burner is ignited, carefully replace the cooking surface. Use the control knobs to adjust the individual burner flame intensity to the desired level by turning the knob anti-clockwise. First to ignite the burner, and further to decrease the heat intensity. To turn the burner off, Turn the control knob fully clockwise. After use, first close the valve on the gas cylinder. When the flame is extinguished, close the burner control valves on the appliance by turning control knobs fully clockwise. Fig.2 OFF HI 4. Fitting and changing the gas cylinder Before connecting the appliance to a gas cylinder, ensure that the rubber seal on the regulator is in position and in good condition. Carry out this check each time you fit the appliance to a gas cylinder (see fig. 1). Blow out any dust from the cylinder opening to prevent possible blockage of the jet. Ensure the gas cylinder is fitted or changed in a well ventilated location preferably outdoors, away from any source of ignition such as naked flames, and away from other people. Make sure that the gas cylinder is kept upright at all times. Hand tighten the regulator onto the cylinder until it is fully engaged. If there is a leak on your appliance (smell of gas) turn off the gas supply at the gas cylinder, and extinguish all sources of ignition in the vicinity of the appliance. If you wish to check for leaks on your appliance, use soapy water which is applied to the suspected area. A formation of bubbles will indicate a gas leak. Check that all the connections are securely fitted and re-check with soapy water. If you cannot rectify the gas leak, do not use the appliance. Contact your local CADAC stockist for assistance. When changing a gas cylinder, first close the cylinder valve and then the appliance valve, making sure the flame is extinguished and unscrew the regulator. Re-fit the regulator to a full cylinder following the same precautions as described above. After the appliance has been fully assembled, perform a gas leak test before operating the appliance. LO MED Off HI MED 5. General Maintenance LO Ignite / High Medium Low Fig.3 There are no predetermined maintenance intervals for this appliance. It is dangerous to use an appliance with a cracked or perished seal and/or hose. Inspect both seals and hose regularly and replace if they are not in order before using the appliance. If the appliance was in use it will be hot. Allow to cool sufficiently before attempting any maintenance. CADAC BBQ's are fitted with specific CADAC jets to regulate the correct amount of gas. Should the hole in the Jet become blocked this may result in a small flame or no flame at all. Do not attempt to clean the Jet with a pin or other such device as this may damage the orifice, which could make the appliance unsafe. Refer to Table 1 for jet sizes. 5.1. Replacing a Blocked Jet NOTE: Ensure the cylinder valve is closed, then disconnect the appliance from the gas cylinder. Remove the cooking surface to expose the burner. Remove the Burner to expose the five jets. NOTE: Ensure not to mix the jets, as they differ in size, and thus will interfere with the performance and safety of the appliance. Unscrew the blocked Jet with a suitable spanner and replace it with a new Jet. Do not use pliers on the Jet as they can cause damage, making the Jet unusable or impossible to remove. Do not over tighten as this may damage the Jet. To re-assemble, reverse the above procedure. AA Fig.4 5.2. Replacement of Hose The hose length should not be less than 0.8m or exceed 1.2m. Check the expiry date on the hose and replace when necessary. Fitting of a hose is described in Section 2. Only an LPG hose that complies with SANS 1156-2, BS 3212 or DIN4815 may be used with this appliance. 5.3. Replacement of Regulator Use a 30mbar LP gas regulator with gas category I3B/P(30) Use a 30mbar Butane regulator or a 37mbar propane regulator with gas category I3+. Use a 37mbar LP gas regulator with gas category I3B/P(37) It is important that the connection between the regulator outlet and the low pressure hose is tight and that it is secured with a metal hose clamp. Always check the joint for gas leaks as described in section 4 above. 6. Troubleshooting A normal flame is blue and may have an orange or yellow tip. If the flame is completely yellow, it may be that the jet is not securely fitted. Re-tighten the jet to ensure there is no gas leakage. An overfilled gas cylinder can also cause large yellow flames. If this is the case the cylinder should be returned to the filling station and checked by weight. Check that the primary air supply apertures (holes) in the Burners are clear and free of obstructions. If the flame power drops or the gas will not light, check that the gas cylinder still contains gas (shake to hear the noise made by a liquid). If there is still gas, the jet might have become blocked or partially blocked. If you suspect a blocked jet, follow the instructions above. 14.Cleaning 7. Warranty Cont.... Ensure to clean your BBQ after every use. If you have not used for a long period of time, clean it thoroughly before use. To clean the body, simply wipe with a damp cloth using a little detergent if necessary. Do not use abrasive cleaners or scourers as this will cause permanent damage to the painted surface. Even though stainless steel is remarkably resistant to tarnish and rust relative to ordinary steels, it still requires proper care. We recommend the following: After use, clean the stainless steel surfaces with clean water and a soft cloth for light cleaning, while a commercially available stainless steel cleaner with a soft cloth should be used for tougher areas. Ensure that you remove all excess stainless steel cleaner after cleaning your BBQ. To repair minor tea staining or pitting, you can use a light, non-metallic scourer. It is important that you rub with the natural grain of the stainless steel surface to avoid leaving visible scratch marks. Between uses, it is a good idea to leave the barbeque covered to prevent dust and air borne salts settling on the stainless steel surfaces. If left for too long, these particles can act as rust centres. With a small amount of care, your investment in quality stainless steel will keep its beautiful finish as well as its value for a long time to come. 8. Storage Handle the appliance with care. Do not drop it. After use, wait until the appliance has cooled down, disconnect it from the gas cylinder and store in a cool dry place away from heat. Keep the hood closed when not in use to prevent dirt and insects falling into the unit, which may affect the gas flow. Use a CADAC BBQ cover, especially if the unit is stored outdoors. 9. Spares and Accessories Always use genuine CADAC spares as they have been designed to give optimum performance. Spares and Accessories Description Jet (Outer Ring) Jet (Inner Burner) Part No. 0.50 0.55 Description Grill Plate Wok Wok Stand Baking Stone Part No. 98504-4 98378 98504-1 98504-5 Description Paella Pan Chopping Board Skottel Dish Surefire Lighter Part No. 98504-3 98504-6 98504-2 601 10. Returning The Appliance For Repair Or Service Do not modify the appliance. This may cause the appliance to become unsafe. Any modifications will render the CADAC (Pty) Ltd warranty null and void. If you cannot rectify any fault by following these instructions, contact your local CADAC stockist for inspection and/or repair. 11. Warranty CADAC (Pty) Ltd hereby warrants to the ORIGINAL PURCHASER of this CADAC Gas Barbecue, that it will be free of defects in material and workmanship from the date of purchase as follows: Valves: Plastic parts: Enamel parts: Painted parts: Burner: 5 Years No Warranty 2 Years (Only valid if the VE has not been damaged or chipped) Year 2 Years The warranty will only apply if the unit is assembled and operated in accordance with the printed instructions. CADAC may require reasonable proof of your date of purchase. THEREFORE, YOU SHOULD RETAIN YOUR SALES SLIP OR INVOICE. This Limited Warranty shall be limited to the repair or replacement of parts that prove defective under normal use and service and which on examination shall indicate, to CADAC's satisfaction, they are defective. Before returning any parts, contact the customer service representative in your region using the contact information provided with your manual or call 0860 223 220 (RSA only). If CADAC confirms the defect and approves the claim, CADAC will elect to replace such parts without charge. CADAC will return parts to the purchaser, freight or postage prepaid. This Limited Warranty does not cover any failures or operating difficulties due to accident, abuse, misuse alteration, misapplication, vandalism, improper installation or improper maintenance or service, or failure to perform normal and routine maintenance, including but not limited to damage caused by insects within the burner tubes, as set out in this owner's manual. Deterioration or damage due to severe weather conditions such as hail, hurricanes, earthquakes or tornadoes, discoloration due to exposure to chemicals either directly or in the atmosphere, is not cover by this Limited Warranty. There are no other express warrants except as set forth herein and any applicable implied warranties of merchantability and fitness are limited in duration to the period of coverage of this express written Limited Warranty. Some regions do not allow limitation on how long an implied warranty lasts, so this limitation may not apply to you. CADAC is not liable for any special, indirect or consequential damages. Some regions do not allow the exclusion or limitation of incidental or consequential damages, to this limitation or exclusion may not apply to you. CADAC does not authorize any person or company to assume for it any obligation or liability in connection with the sale, installation, use, removal, return, or replacement of its equipment; and no such representations are binding on CADAC. This Warranty applies only to products sold at retail. To enjoy and ensure longevity of your CADAC product, please refer to the cleaning and maintenance section of the user manual with particular attention to the care of the Stainless Steel. 12. Assemblies cont. 12.1 Side Tables Step 1 • Repeat the above steps for the left side table. Step 1a Step 1b Step 2 Step 3 Step 4 Step 4a Step 5 Step 5a 12. Assemblies Cont... 12.2 Burners Warning!: Please remove the plastic jet cover before installing the burner (Step 1a) Step 1a Step 1c Step 1b Step 1d Step 1e 12.3 Chopping Board Step 1a Step 1b 12. Assemblies Cont... 12.4 Wok Step 1a Step 1b Step 2a Step 2b 12.5 Baking Stone Step 1a Step 1b Step 2a Step 2b 12. Assemblies Cont... 12.6 Grill Plates Step 1a Step 1b 12.7 Paella Pan Step 1a Step 1b 12.8 Skottel Dish Step 1a Step 1b