1
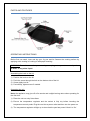
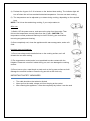
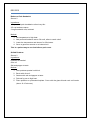
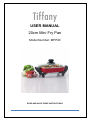
USER MANUAL
20cm Mini Fry Pan
Model Number: MFP20
READ AND SAVE THESE INSTRUCTIONS
BEFORE FIRST USE
Read and follow the instructions in this user manual even if you feel you are familiar with the
product, and find a place to keep it handy for future reference.
For your convenience record the complete model number (located on the product identification
plate) and the date you received the product, together with your purchase receipt and attach to
the warranty and service information. Retain in the event that warranty service is required.
NOTE: The rating of this product (as marked on the product identification plate) is based on
specific loading tests. Normal use or the use of other recommended attachments may draw
significantly less power.
IMPORTANT SAFEGUARDS
When using any electrically powered product, basic safety precautions should always be
followed, including the following:
PLEASE READ ALL INSTRUCTIONS CAREFULLY BEFORE USING THIS PRODUCT
WARNING!: - to reduce the risk of fire, electrical shock or injury to persons or property:
1. Carefully read all instructions before operation and save them for future reference.
2. Remove and safely discard any packaging material before using the frypan for the
first time.
3. To eliminate a choking hazard for young children, remove and discard the protective
cover that is fitted to the power plug of the appliance.
4. Always operate the product from a power source of the same voltage, frequency and
rating as indicated on the product identification plate.
5. Do not place the appliance near the edge of a bench or table during operation. Ensure
that the surface is level, clean and free of water.
6. Keep the appliance a minimum distance of 200mm from walls, curtains, and other
heat or steam sensitive areas/materials.
7. Do not place on or near a gas burner, electric element or in or near a heated oven.
8. Do not use the appliance on a sink or drain board.
9. Always insert the temperature control probe into the probe socket before inserting the
power plug into a power outlet and switching on the appliance. Ensure the probe
socket is completely dry before inserting the temperature control probe.
10. The appliance must be used with the temperature control probe provided. Do not use
any other probe or connector.
11. To protect against electric shock, do not immerse power cord or temperature control
probe in water or any other liquid, or allow moisture to come in contact with these
parts.
12. Ensure the temperature control probe has cooled before removing it from the
appliance.
13. Always remove the temperature control probe before cleaning the appliance.
14. If using plastic utensils whilst cooking, do not leave in the appliance while hot.
15. Do not place the hot glass lid under cold water.
16. Always have the glass lid positioned correctly on the appliance throughout operation,
unless stated in the recipe to have it removed.
17. The glass lid has been specially treated to make it stronger, more durable and safer
than normal glass, however it is not unbreakable. The glass lid may break or weaken
when struck extremely hard, and it could at a later time shatter into many small pieces
without apparent cause.
18. Do not leave the appliance unattended when in use.
19. Do not touch hot surfaces. Use the handles for lifting and carrying the appliance.
20. Extreme caution must be used when the appliance contains hot oil or other liquid. Do
not move the appliance during cooking. Allow the appliance to cool before removing
oil or other liquid.
21. The appliance is not intended to be operated by means of an external timer or a
separate remote control system.
22. Always keep the appliance clean.
23. Switch off at the power outlet and allow probe to cool, then remove the probe and
unplug.
24. Do not place anything on top of the appliance when the lid is in position, when in use
and when stored.
25. Fully unwind the cord before use.
26. Do not let the cord hang over the edge of a table or counter, touch hot surfaces, or
become knotted.
27. Children should be supervised to ensure they do not play with the appliance.
28. This appliance is not intended for use by persons (including children) with reduced
physical, sensory or mental capabilities, or lack of experience or knowledge, unless
they have been given supervision or instruction concerning use of the appliance by a
person responsible for their safety.
29. This appliance is for household use only. Do not use this appliance for anything other
than its intended use. Do not use in moving vehicles or boats. Do not use outdoors.
Misuse may cause injury.
30. It is recommended to regularly inspect the appliance. To avoid a hazard do not use
the appliance if the power cord, power plug, temperature control probe or appliance
becomes damaged in any way.
PARTS AND FEATURES
OPERATING INSTRUCTIONS
Before first use wash, rinse and dry your fry pan and lid. Season the cooking surface by
applying a thin coating of cooking oil with paper toweling.
WARNING: Do not immerse the power cord, power plug or temperature control probe
in water or any other liquid.
Assembling the knob on the lid:
1)
2)
3)
4)
Position the knob on the lid.
Push the screw through the hole on the bottom side of the lid.
Screw tightly into lid.
Periodically, tighten screw if needed.
Operating the unit:
Note: the appliance may give off a fine smoke and a slight burning odour when operating for
the first time.
1) Place the unit on a dry flat surface.
2) Ensure the temperature regulator and the socket is fully dry before inserting the
temperature control probe. Plug the cord into a power outlet and then turn the power on.
3) The temperature regulator will light up to show that the pan has power & that it is ‘On’.
4) Preheat the fry pan for 5-10 minutes on the desired heat setting. The indicator light will
turn off when the unit has reached its desired temperature. You can now start cooking.
5) The temperature can be adjusted up or down during cooking, depending on the required
heat.
NOTE: The lid can be used during cooking, if your recipe states to.
After use:
1) Switch ‘Off’ the power source, and remove the plug from the socket. Then
remove the temperature control probe from the fry pan. CAUTION: The
temperature control probe and lead may be hot!! Let the fry pan cool before
removing any parts and cleaning.
2) Once completely cool, clean the appliance with warm soapy water, and a soft
cloth.
Hot plate care and cleaning:
1) Do not use sharp metal utensils/knives on the cooking surface, as it will
scratch the non-stick coating.
2) The temperature control probe is not permitted to make contact with the
hotplate. Please do not store it inside the fry pan, as it can damage the cooking
surface.
3) Do not use a nylon, metal brush or steel wool on the fry pans surface as it will
damage the non-stick surface. Clean the fry pan with a soft cloth only.
IMPORTANT SAFETY MEASURES
•
•
•
The cable should not be twisted or kinked
Never pull on the cable, always pull from the plug at the socket
After cleaning the appliance, it must be completely dry before it can be used
TEMPERATURE CONTROL PROBE
•
•
•
•
You must be careful with the temperature control probe as it is sensitive to knocks and
falls.
Always use the temperature control probe that comes with your appliance. Do not use
another control probe.
If the temperature control probe appears damaged, stop using it immediately.
If the supply cord is damaged, it must be replaced by a special cord or assembly
available from the manufacturer or its service agent.
CLEANING
WARNING: Ensure you have unplugged the appliance and allowed it to
completely cool before undertaking any cleaning.
DO NOT USE STEEL WOOL SCOURING PADS, ABRASIVE CLEANERS, OR SCRAPE THE
HOT PLATE WITH METAL UNTENSILS. ALL OF THESE METHODS MAY DAMAGE THE NON
STICK SURFACE.
DO NOT USE AN ABRASIVE CLEANER AS IT MAY DAMAGE THE EXTERIOR FINISH.
Part Name
Non-stick surface
Method
Clean the hotplate after use with a soft wet cloth. Ensure the
hot plate is completely cool. If the residue is difficult to clean,
put a little water in the fry pan and turn it on. The hot plate
Fry Pan outer
Temperature control probe
Glass lid
Dishwasher safe
will be heated and the residue should be easily cleaned.
Clean the outside of the fry pan with warm soapy water and
a soft cloth. Do not use a thinner, benzene, or any other
harsh chemicals which may damage the surface.
Clean with a soft cloth or paper towel. Never immerse the
temperature control probed, plug or cord in water or any
other liquid.
Wash the lid in warm soapy water using a soft cloth or
sponge, rinse and dry thoroughly.
Your fry pan and glass lid is dishwasher safe for easy
cleaning. Remove the probe and power cord before placing
the fry pan into the dishwasher.
STORAGE
Store the fry pan upright with the lid in position. Take care when storing the temperature
control probe, as it needs to be stored where it will not be knocked and able to fall onto the
ground, as this can cause damage.
GAF Control (Sales) Pty Ltd
Po Box 19
Altona North Victoria, 3025
Tel: 1300 659 489
RECIPES
Barbecue Pork Sandwich
Serves 2
Ingredients:
1 cup cooked pork shredded or sliced very thin
2/3 cup barbecue sauce
2 large sandwich rolls, buttered
Method:
1. Set temperature to high heat.
2. Add pork and barbecue sauce. Stir well, allow to reach a boil.
3. Lower the temperature and simmer for 30 minutes.
4. Serve a generous amount on a buttered roll.
This is a perfect way to use that leftover pork roast.
Grilled Potatoes
Serves 2
Ingredients:
Potatoes as needed
Olive oil
Salt and pepper to taste
Method:
1. Slice potatoes quarter inch thick.
2. Brush with olive oil.
3. Season with salt and pepper to taste.
4. Preheat fry pan to high heat.
5. Place potatoes on preheated hotplate. Cover with the glass lid and cook until tender
(about 10-15 minutes).
Basic Pikelets
Makes approximately 15
Ingredients:
1 cup self raising flour
2 teaspoons sugar
1 egg
2 teaspoons melted butter or margarine
½ cup milk
Method:
1. Sift the flour into a bowl, add sugar. Make a well in the centre and break in the egg.
Add the butter and almost all of the milk.
2. Beat lightly with a wooden spoon until the mixture is smooth adding extra milk if the
mixture is too thick.
3. Heat the fry pan on low-medium heat.
4. Add spoonfuls of the mixture to the fry pan, cook until bubbles break on the surface.
Flip the pikelets and cook on the other side.
5. Serve hot or cold with your desired topping.
Beef Stroganoff
Serves 2
Ingredients:
1 ½ tbsp olive oil
400g beef strips
1 tbsp butter
1/3 cup mushrooms
¼ cup onion, thinly sliced
¼ cup sour cream
½ cup beef gravy
1 tsp Dijon mustard
Salt and pepper to taste
Method:
1. Set the temperature to high.
2. Heat oil. Sauté beef until cooked through. Remove and keep warm.
3. Add butter to the fry pan. Sauté mushrooms and onions.
4. Lower the temperature to medium. Add sour cream, gravy and Dijon mustard. Simmer
for 2 minutes.
5. Return beef to fry pan. Season with salt and pepper.
Steamed rice or pasta goes well with this dish.