1
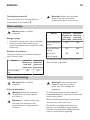
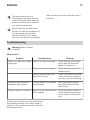
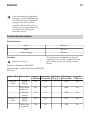
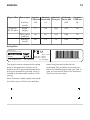
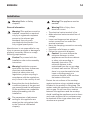
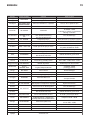
LAGAN
HGA4K
GB
ENGLISH
4
4
ENGLISH
Contents
Safety information
Safety Instructions
Product description
Daily use
Hints and tips
4
5
8
9
10
Care and cleaning
Troubleshooting
Technical information
Installation
10
11
12
14
Subject to change without notice.
Safety information
Before the installation and use of the appliance, carefully read
the supplied instructions. The manufacturer is not responsible if
an incorrect installation and use causes injuries and damages.
Always keep the instructions with the appliance for future
reference.
Children and vulnerable people safety
•
•
•
•
•
•
•
This appliance can be used by children aged from 8 years
and above and persons with reduced physical, sensory or
mental capabilities or lack of experience and knowledge if
they have been given supervision or instruction concerning
use of the appliance in a safe way and understand the
hazards involved.
Do not let children play with the appliance.
Keep all packaging away from children.
Keep children and pets away from the appliance when it
operates or when it cools down. Accessible parts are hot.
If the appliance has a child safety device, we recommend you
activate it.
Cleaning and user maintenance shall not be made by
children without supervision.
Children of less than 3 years should be kept away unless
continuously supervised.
ENGLISH
5
General Safety
•
•
•
•
•
•
•
•
•
•
The appliance and its accessible parts become hot during
use. Do not touch the heating elements.
Do not operate the appliance by means of an external timer
or separate remote-control system.
Unattended cooking on a hob with fat or oil can be
dangerous and may result in fire.
Never try to extinguish a fire with water, but switch off the
appliance and then cover flame e.g. with a lid or a fire
blanket.
Do not store items on the cooking surfaces.
Metallic objects such as knives, forks, spoons and lids should
not be placed on the hob surface since they can get hot.
Do not use a steam cleaner to clean the appliance.
If the supply cord is damaged, it must be replaced by the
manufacturer, an authorized Service or similarly qualified
persons in order to avoid a hazard.
Where the appliance is directly connected to the power
supply, an all-pole isolating switch with a contact gap is
required. Complete disconnection in compliance with the
conditions specified in overvoltage category III must be
guaranteed. The earth cable is excluded from this.
When you route the mains cable, make sure that the cable
doesn't come into direct contact (for example using insulating
sleeving) with parts that can reach temperatures of more than
50°C above room temperature.
Safety Instructions
Installation
Warning! Only a qualified
person must install this
appliance.
• Remove all the packaging.
• Do not install or use a damaged
appliance.
• Obey the installation instruction supplied
with the appliance.
• Keep the minimum distance from the
other appliances and units.
6
ENGLISH
• Always be careful when you move the
appliance because it is heavy. Always
wear safety gloves.
• Seal the cut surfaces with a sealant to
prevent moisture to cause swelling.
• Protect the bottom of the appliance from
steam and moisture.
• Do not install the appliance adjacent to
a door or under a window. This prevents
hot cookware to fall from the appliance
when the door or the window is opened.
• If the appliance is installed above
drawers make sure that the space,
between the bottom of the appliance
and the upper drawer, is sufficient for air
circulation.
• The bottom of the appliance can get hot.
Make sure to install a non-combustile
separation panel under the appliance to
prevent access to the bottom.
Refer to the Assembly Instructions.
Electrical Connection
Warning! Risk of fire and
electrical shock.
• All electrical connections should be made
by a qualified electrician.
• The appliance must be earthed.
• Before carrying out any operation make
sure that the appliance is disconnected
from the power supply.
• Make sure that the electrical information
on the rating plate agrees with the
power supply. If not contact an
electrician.
• Make sure the appliance is installed
correctly. Loose and incorrect electricity
mains cable or plug (if applicable) can
make the terminal become too hot.
• Use the correct electricity mains cable.
• Do not let the electricity mains cable
tangle.
• Make sure that a shock protection is
installed.
• Use the strain relief clamp on the cable.
• Make sure the mains cable or plug (if
applicable) does not touch the hot
•
•
•
•
•
•
•
•
appliance or hot cookware, when you
connect the appliance to the near
sockets
Do not use multi-plug adapters and
extension cables.
Make sure not to cause damage to the
mains plug (if applicable) or to the mains
cable. Contact an Authorised Service
Centre or an electrician to change a
damaged mains cable.
The shock protection of live and
insulated parts must be fastened in such
a way that it cannot be removed without
tools.
Connect the mains plug to the mains
socket only at the end of the installation.
Make sure that there is access to the
mains plug after the installation.
If the mains socket is loose, do not
connect the mains plug.
Do not pull the mains cable to disconnect
the appliance. Always pull the mains
plug.
Use only correct isolation devices: line
protecting cut-outs, fuses (screw type
fuses removed from the holder), earth
leakage trips and contactors.
The electrical installation must have an
isolation device which lets you disconnect
the appliance from the mains at all poles.
The isolation device must have a contact
opening width of minimum 3 mm.
Gas connection
• All gas connections should be made by a
qualified person.
• Before installation, make sure that the
local distribution conditions (nature of the
gas and gas pressure) and the
adjustment of the appliance are
compatible.
• Make sure that there is air circulation
around the appliance.
• The information about the gas supply is
on the rating plate.
• This appliance is not connected to a
device, which evacuates the products of
combustion. Make sure to connect the
7
ENGLISH
appliance according to current
installation regulations. Pay attention to
requirements regarding adequate
ventilation.
Use
Warning! Risk of injury, burns
and electrical shock.
• Remove all the packaging, labelling and
protective film (if applicable) before first
use.
• Use this appliance in a household
environment.
• Do not change the specification of this
appliance.
• Make sure that the ventilation openings
are not blocked.
• Do not let the appliance stay unattended
during operation.
• Set the cooking zone to “off” after each
use.
• Do not put cutlery or saucepan lids on
the cooking zones. They can become hot.
• Do not operate the appliance with wet
hands or when it has contact with water.
• Do not use the appliance as a work
surface or as a storage surface.
• When you place food into hot oil, it may
splash.
Warning! Risk of fire and
explosion
• Fats and oil when heated can release
flammable vapours. Keep flames or
heated objects away from fats and oils
when you cook with them.
• The vapours that very hot oil releases
can cause spontaneous combustion.
• Used oil, that can contain food remnants,
can cause fire at a lower temperature
than oil used for the first time.
• Do not put flammable products or items
that are wet with flammable products in,
near or on the appliance.
Warning! Risk of damage to the
appliance.
• Do not keep hot cookware on the control
panel.
• Do not let cookware to boil dry.
• Be careful not to let objects or cookware
fall on the appliance. The surface can be
damaged.
• Do not activate the cooking zones with
empty cookware or without cookware.
• Do not put aluminium foil on the
appliance.
• Use only stable cookware with the
correct shape and diameter larger than
the dimensions of the burners.
• Make sure the flame does not go out
when you quickly turn the knob from the
maximum to the minimum position.
• Use only the accessories supplied with
the appliance.
• Do not install a flame diffuser on the
burner.
• The use of a gas cooking appliance
results in the production of heat and
moisture. Provide good ventilation in the
room where the appliance is installed.
• Prolonged intensive use of the appliance
may call for additional ventilation, for
example opening of a window, or more
effective ventilation, for example
increasing the level of mechanical
ventilation where present.
• This appliance is for cooking purposes
only. It must not be used for other
purposes, for example room heating.
• Do not let acid liquids, for example
vinegar, lemon juice or limescale
remover, touch the hob. This can cause
matt patches.
Care and cleaning
• Clean regularly the appliance to prevent
the deterioration of the surface material.
• Deactivate the appliance and let it cool
down before you clean it.
• Disconnect the appliance from the
electrical supply before maintenance.
• Do not use water spray and steam to
clean the appliance.
ENGLISH
8
• Clean the appliance with a moist soft
cloth. Only use neutral detergents. Do
not use abrasive products, abrasive
cleaning pads, solvents or metal objects.
• Do not clean the burners in the
dishwasher.
Disposal
• Contact your municipal authority for
information on how to discard the
appliance correctly.
• Disconnect the appliance from the mains
supply.
• Cut off the mains cable and discard it.
• Flat the external gas pipes.
Warning! Risk of injury or
suffocation.
Product description
10 Removable pan supports
Cooking surface layout
Control knob
5
6
7
8
9
4
3
The burner control knobs are situated on
the right side of the hob.
1
2
10
1
2
3
4
5
6
7
8
9
Auxiliary burner
Rapid burner
Semi Rapid burner
Semi Rapid burner
Semi Rapid burner control knob
Semi Rapid burner control knob
Rapid burner control knob
Auxiliary burner control knob
Ignition button
Symbol
Description
there is no gas supply/off position
there is maximum
gas supply
there is minimum
gas supply
ENGLISH
9
Daily use
If after a few attempts the burner
does not ignite, check that the
crown and its cap are in correct
positions.
Warning! Refer to Safety
chapters.
Burner overview
1
2
3
4
5
1
2
3
4
5
Burner cap
Burner crown
Ignition candle
Injector
Thermocouple
Ignition of the burner
Always ignite the burner before
positioning pots or pans
To ignite the burner:
1. Push the electric ignition button witch is
marked by a little spark , at the same
time turn the relevant control knob
anticlockwise to maximum position .
2. Keep the knob pushed for about 5 sec;
this will allow thermocouple to heat up,
and the safety device to switch off,
otherwise the gas supply would be
interrupted.
3. After the flame is regular, adjust it as
preferred.
Warning! Do not keep control
knob pressed for more than 15
seconds. If the burner does not
light after 15 seconds, release
the control knob, turn it into off
position and wait for at least 1
minute before trying to light the
burner again.
In the absence of electricity you
can ignite the burner without
electrical device; in this case
approach the burner with a
flame, push the relevant knob
down and turn it counterclockwise to maximum gas
release position.
Warning! Maintain extreme
caution while operating with
open fire in kitchen environment.
Manufacturer declines any
responsibility in case of misuse of
flame.
If the burner accidentally goes
out, turn the control knob to the
off position and wait for at least
1 minute before trying to light it
again.
When switching on the mains,
after installation or a power cut,
it is quite normal for the spark
generator to be activated
automatically.
ENGLISH
10
Turning the burners off
To put the flame out, turn the relevant
control knob to the symbol
.
Warning! Always turn the flame
down or switch it off before
removing the pans of the burner.
Hints and tips
Warning! Refer to Safety
chapters.
Burner
Energy savings
• If possible, always place lids on the pans.
• As soon as liquid starts boiling, turn
down the flame to barely keep the liquid
simmering.
minimum maximum
diameter of diameter
pots and
pots and
pans (mm) pans (mm)
Front right (Auxiliary)
80
180
Back left (Semirapid)
120
220
Diameter of cookware
Use pots and pans with bottom fitting the
size of burner used.
Back right
(Semi-rapid)
120
220
Burner
minimum maximum
diameter of diameter
pots and
pots and
pans (mm) pans (mm)
Front left (Rapid)
180
The bottom of the cookware should be as
thick and flat as possible.
260
Care and cleaning
Warning! Refer to Safety
chapters.
General information
Warning! Switch the appliance
off and let it cool down before
you clean it.
Warning! For safety reasons, do
not clean the appliance with
steam blasters or high-pressure
cleaners.
Warning! Do not use abrasive
cleaners, steel wool pads or
acids, they will damage the
appliance.
To remove any food remains wash the
enamelled elements, caps and crowns, with
warm soapy water.
Wash stainless steel elements with water,
and then dry with a soft cloth.
This model is equipped with electrical
ignition, it is obtained through ceramic
"candle" with electrode. Keep them well
clean to avoid difficult lightning.
ENGLISH
11
The pan supports are not
dishwasher proof, they must be
washed by hand. After cleaning,
make sure that the pan supports
are correctly positioned.
After cleaning, be sure to wipe dry with a
soft cloth.
Periodically ask the After Sales
Service to check the conditions of
the gas supply pipe and the
pressure adjuster, if it is fitted
(this service is not free of charge).
Troubleshooting
Warning! Refer to Safety
chapters.
What to do if...
Problem
Possible cause
Remedy
There is no spark when light- There is no electrical supply
ing the gas
Check that the unit is plugged in and the electrical
supply is switched on.
There is no electrical supply
Check the house electric installation fuse.
Burner cap and crown are
placed incorrectly
Check if the burner cap and
crown have been replaced
correctly, e.g. after cleaning.
The flame extinguishes immediately after ignition
Thermocouple is not heated
up sufficiently
After lightning the flame,
keep the knob pushed for
about 5 sec.
The gas ring burns unevenly
Burner crown is blocked with Check if the main injector is
food residues
not blocked and the burner
crown is clear of food particles.
If there is a fault, first try to find a solution to
the problem yourself. If you cannot find a
solution to the problem yourself, contact the
After Sales Service.
ENGLISH
12
If you operated the appliance
wrongly, or the installation was
not carried out by a registered
engineer, the visit from the
customer service technician or
dealer may not take place free
of charge, even during the
warranty period.
Technical information
Hob dimensions
width
580 mm
depth
500 mm
built in height
34 mm
This appliance is designed for use with
natural gas but can be converted for use
with other gas type according to table
below.
Gas data
Appliance Class: 3
Appliance Category: II2ELs3B/P
Appliance gas supply: Natural gas G20 (2E)
20 mbar
Type of Gas Burner type
G20 20
mbar
G2.350 13
mbar
Injectors
Nominal
1/100 mm Power kW
Nominal
Flow g/h
Reduced
Power kW
by-pass
1/100 mm
Rapid
(large)
119
3.0
-
0.75
40
Semi-rapid
(medium)
96
2.0
-
0.45
30
Auxiliary
(small)
70
1.0
-
0.33
26
Rapid
(large)
181
3.0
-
0.75
40
Semi-rapid
(medium)
150
2.0
-
0.45
30
ENGLISH
13
Type of Gas Burner type
Injectors
Nominal
1/100 mm Power kW
Nominal
Flow g/h
Reduced
Power kW
by-pass
1/100 mm
Auxiliary
(small)
105
1.0
-
0.33
26
Rapid
(large)
77
2.8
204
0.75
40
Semi-rapid
(medium)
66
2.0
145
0.45
30
Auxiliary
(small)
46
1.0
73
0.33
26
G30/G31
37-37 mbar
Rating Plate
Made In Italy
© Inter IKEA Systems B.V. 1999
ZO
21552
TYPE 00000000-0/00
PQM
000-000-00
0694
230 V ~ 50 Hz
G00 00 mbar = 00 kW
G00 00 mbar = 00 g/h
PNC. 000000000
S.N. 000 00000
The graphic above represents the rating
plate of the appliance (without serial
number which is generated dynamically
during the production process), which is
located at its underneath surface of the
casing.
Dear Customer, please apply here aside
the sticker you can find in the dedicate
0000000000000000000000
plastic bag inserted inside the hob
packaging. This will allow us to assist you
better, by identifying precisely your hob, in
case you will need in future our assistance.
Thank you for your help!
14
ENGLISH
Installation
Warning! Refer to Safety
chapters.
General information
Warning! This appliance must be
installed, connected or repaired
only by a registered competent
person to the relevant gas
standard. Use only parts
provided with the product. Use
only original spare parts.
Manufacturer is not responsible for any
injury to persons and pets or damage to
property caused by failure to comply
following requirements.
Caution! To proceed with the
installation refer to the assembly
instructions.
Warning! Installation process
must follow the laws, ordinances,
directives and standards
(electrical safety rules and
regulations, proper recycling in
accordance with the regulations,
etc.) in force in the country of use!
Ensure that the local distribution
conditions (nature of the gas and
gas pressure) and the adjustment
of the appliance are compatible
before proceeding with the
installation.
The parameters of adjustment
setting for this appliance are
stated on the rating plate (refer
to the Technical information
chapter).
Warning! The appliance must be
earthed!
Warning! Risk of injury from
electrical current.
• The electrical mains terminal is live.
• Make electrical mains terminal free of
voltage.
• Loose and inappropriate plug and
socket connections can make the
terminal overheat.
• Have the clamping connections correctly
installed.
• Use strain relief clamp on cable.
• Follow the connection diagram.
Caution! You must observe the
minimum distances to other
appliances and furniture cabinets
or other units according to
Assembly Instruction. The
minimum distance to be
maintained from the cut out edge
to lateral wall must be 100 mm. If
there is no oven beneath the hob
insert a dividing panel at a
minimum distance of 20 mm from
the bottom of the hob.
Protect the cut surfaces of the worktop
against moisture using a suitable sealant
included in the product in fitting bag. The
sealant seals the appliance to the work top
with no gap. Do not use silicon sealant
between the appliance and the worktop.
Avoid installing the appliance next to doors
and under windows as hot cookware may
be knocked off the rings when doors and
windows are opened.
ENGLISH
Gas connection
Warning! Only a qualified
person must install this
appliance.
Warning! This appliance is not
connected to a combustion
products evacuation device.
Installation must comply with current local
regulation.
The connection of the cooktop to the gas
pipe network or gas cylinder must be made
by means of a rigid copper or steel pipe
with fittings complying with local
regulations, or by means of a continuous
surface stainless steel hose complying with
local regulations.
If you see any abnormalities do
not repair the pipe, contact local
After Sales Service (refer to the
Service chapter).
The connection must be installed correctly,
fixed into hob connection pipe. Otherwise it
will cause leakage of gas.
Warning! Once the installation is
complete, check the perfect seal
of every pipe fixing. Use soapy
water, never flame.
Electrical connection
The electrical work necessary to install the
appliance must be done by a qualified
electrician or competent person, according
to the current regulations
Before connecting, check that the nominal
voltage of the appliance stated on the
rating plate, corresponds to the available
supply voltage. Also, check the power
rating of the appliance and ensure that the
wire is suitably sized to suit the appliance
15
power rating (refer to the Technical
information chapter).
The plug has to be fitted in a proper socket.
If connecting the appliance directly to the
electric system, it is necessary that you
install a double pole switch between the
appliance and the electricity supply, with a
minimum gap of 3 mm between the switch
contacts. The double pole has to be of a
type suitable for the required load in
compliance with the current rules.
The connection cable has to be placed in
order that, in each part, it cannot reach a
90 °C temperature. The blue neutral cable
must be connected to the terminal block
marked with "N". The brown (or black)
phase cable (fitted in the terminal block
contact marked with "L") must always be
connected to the live phase.
The rating plate is located on the lower
casing of the hob.
Replacement of the connection cable
Warning! The replacement of the
connection cable requires the
specific equipment of a
technician.
16
ENGLISH
To replace injectors:
1
2
In this case, only cable type H05V2V2-F
T90 must be used. The cable section must
be suitable to the voltage and the working
temperature. The yellow/green earth wire
2 must be approximately 2 cm longer than
the brown (or black) phase wire 1
(previous figure).
Gas setting conversion
This model is designed for use
with natural gas but can be
converted for use with butane or
propane gas providing the
correct injectors. The injectors not
supplied with the appliance have
to be ordered from After Sales
Service (refer to the Service
chapter).
For data concerning injector replacement,
refer to the chapter Technical information
Warning! Conversion or
replacement can only be
performed by a registered
installer.
1. Remove pan support.
2. Remove burner cap and crown.
3. With a socket spanner 7 unscrew and
remove the injectors, replace them with
the ones required for the type of gas in
use.
4. Reassemble the parts, following the
same procedure backwards.
Replace the rating label (placed
near gas supply pipe) with
relevant one for the new type of
gas supply before sealing the
appliance. If the appliance is
already sealed please stick it
directly on the user manual
booklet after Technical
information chapter close to the
rating plate drawing.
You can find this label in
package supplied with
appliance.
If the feeding gas pressure will
be different or variable,
comparing with the required, you
must install an appropriate
pressure adjuster, which is not
supplied with the product and if
needed must be ordered
separately from the local After
Sales Service (refer to the Service
chapter). The pressure adjuster
must be fitted on gas supply
pipe, in compliance with the rules
of the force.
The rating plate is located on the lower
casing of the hob.
Conversion to G2.350 gas
• Auxiliary and semi-rapid burner: after
you assembly the injectors ( 3 in
following figure), screw their cages
17
ENGLISH
(diameter 10 mm, 1 in following figure)
on, included in the supply (primary air
regulators) ;
• Rapid burner: after assembly the
injectors ( 3 in following figure), screw
their cages (diameter 16 mm, 2 in
following figure) on, included in the
supply (primary air regulators) ;
2. Set the gas tap to the minimum flame
position then turn the control knob from
minimum to maximum several times. If
the flame is unstable or extinguished,
follow the procedure further.
3. Re-ignite the burner and set to
minimum.
4. Remove the control knob.
5. To adjust, use a thin bladed screwdriver
and turn the adjustment screw until the
flame is steady and does not extinguish,
when the knob is turned from minimum
to maximum, and vice versa (see
following picture).
4
1
2
3
6. Repeat this procedure for all burners.
7. Reassemble the knobs.
Warning! If the appliance is
connected to liquid gas (G31
propane or G30 butane), the
regulation screw must be
fastened as tightly as possible.
Gas setting conversion (for Hungary only)
Caution! In both cases use the
special cap tool 4 and a
screwdriver to secure the cages.
Caution! Be sure to remove the
cap tool before reassembling the
burners.
Adjusting flame level
When hob has been fully installed, it is
necessary to check the minimum flame
setting:
1. Turn the gas tap to the maximum
position and ignite.
This appliance has the gas
settings not applicable for
Hungary. If you install this
appliance in Hungary you must
change the gas settings.
Warning! Conversion or
replacement can only be
performed by a registered
installer.
To replace injectors:
1. Remove pan support.
2. Remove burner cap and crown.
3. With a socket spanner 7 unscrew and
remove the injectors, replace them with
ENGLISH
the ones required for the type of gas in
use.
4. Reassemble the parts, following the
same procedure backwards.
To adjust the minimum level of the burners:
1.
2.
3.
4.
Light the burner.
Turn the knob on the minimum position.
Remove the knob.
With a thin screwdriver, adjust the
bypass screw position.
18
• For G20 (2H) 25 mbar turn the
bypass screw 1/2 of a turn
clockwise.
• For G30/G31 (3B/P) 30/30 mbar
tighten the bypass screw fully and
undo approximately 1/2 of a turn.
• For G25.1 (2HS) 25 mbar tighten the
bypass screw fully and undo
approximately 1/4 of a turn.
Warning! Make sure the flame
does not go out when you quickly
turn the knob from the maximum
position to the minimum position.
ENVIRONMENTAL CONCERNS
Recycle the materials with the symbol .
Put the packaging in applicable containers
to recycle it. Help protect the environment
and human health and to recycle waste of
electrical and electronic appliances. Do not
dispose appliances marked with the symbol
with the household waste. Return the
product to your local recycling facility or
contact your municipal office.
ENGLISH
Country
België
Belgique
19
Phone number
070 246016
Call Fee
Opening time
Binnenlandse gesprekskosten
8 tot 20 Weekdagen
Tarif des appels nationaux
8 à 20. En semaine
България
00359888164080
0035924274080
Такса за повикване от страната
От 9 до 18 ч в работни дни
Česká republika
246 019721
Cena za místní hovor
Danmark
70 15 09 09
Landstakst
8 až 20 v pracovních dnech
man. - fre. 09.00 - 20.00
lør. 09.00 - 16.00
1 søndag pr. måned, normalt første
søndag i måneden
Deutschland
+49 1806 33 45
32*
* 0,20 €/Verbindung aus dem Festnetz
max. 0,60 €/Verbindung
aus dem Mobilfunknetz
8 bis 20 Werktage
Ελλάδα
211 176 8276
Υπεραστική κλήση
8 έως 20 κατά τις εργάσιμες ημέρες
España
91 1875537
Tarifa de llamadas nacionales
De 8 a 20 en días laborables
France
0170 36 02 05
Tarif des appels nationaux
9 à 21. En semaine
Trošak poziva 27 lipa po minuti
radnim danom od ponedjeljka
do petka od 08:00 do 16:00
Hrvatska
00385 1 6323 339
Ireland
0 14845915
National call rate
8 till 20 Weekdays
Ísland
5880503
Innanlandsgjald fyrir síma
9 til 18. Virka daga
Italia
02 00620818
Tariffa applicata
alle chiamate nazionali
dalle 8 alle 20 nei giorni feriali
Κυπρος
22 030 529
Υπεραστική κλήση
8 έως 20 κατά τις εργάσιμες ημέρες
Lietuva
5 230 06 99
Nacionalinių pokalbių tarifai
Pr. - Ketv.: 8:00 - 12:00, 12:45 - 17:00
Pnkt.: 8:00 - 12:00, 12:45 - 15:45
Magyarország
061 998 0549
Belföldi díjszabás
Hétköznap 8 és 10 óra között
Nederland
0900 235 45 32
and/or
0900 BEL IKEA
15 cent/min., starttarief 4.54 cent
en gebruikelijke belkosten
ma - vr 08.00 - 20.00,
zat 09.00 - 20.00
(zondag gesloten)
Norge
815 22052
Takst innland
8 til 20 ukedager
Österreich
0810 300486
max. 10 Cent/min.
Mo - Fr 8.00 - 20.00 Uhr
Polska
012 297 8787
Stawka wg taryfy krajowej
Od 8 do 20 w dni robocze
Portugal
211557985
Chamada Nacional
9 às 21. Dias de Semana
*excepto feriados
România
021 211 08 88
Tarif apel naţional
8 - 20 în zilele lucrătoare
Действующие телефонные тарифы
с 8 до 20 по рабочим дням
Время московское
Россия
8 495 6662929
Schweiz
Tarif für Anrufe im Bundesgebiet
8 bis 20 Werktage
Suisse
Tarif des appels nationaux
8 à 20. En semaine
Tariffa applicata
alle chiamate nazionali
dalle 8 alle 20 nei giorni feriali
(02) 3300 2554
Cena vnútroštátneho hovoru
8 až 20 v pracovných dňoch
Suomi
030 6005203
Lankapuhelinverkosta
0,0835 €/puhelu + 0,032 €/min
Matkapuhelinverkosta 0,192 €/min
arkipäivisin 8.00 - 20.00
Sverige
0775 700 500
lokalsamtal (lokal taxa)
mån-fre 8.30 - 20.00
lör-sön 9.30 - 18.00
031 5500 324
Svizzera
Slovensko
Türkiye
212 244 0769
Ulusal arama ücreti
Hafta içi saat 09:00’dan 18:00’a kadar
Україна
044 586 2078
Міжміськи дзвінки платні
9 - 21 В робочі дні
United Kingdom
020 3347 0044
National call rate
9 till 21. Weekdays
Slovenija
www.ikea.com
Србија
www.ikea.com
ENGLISH
20
*
ENGLISH
21
ENGLISH
22
ENGLISH
23
867305114-A-092014
© Inter IKEA Systems B.V. 2014
21552
AA-1116721-01