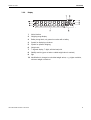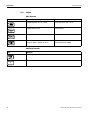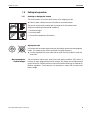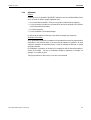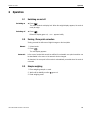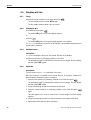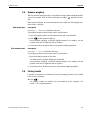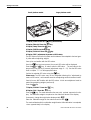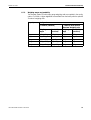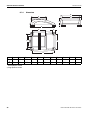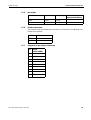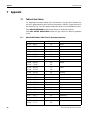
1
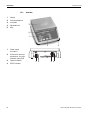
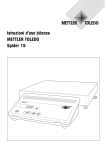
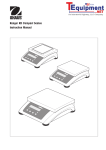
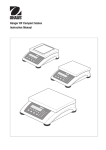
KERN & Sohn GmbH
Ziegelei 1
D-72336 Balingen-Frommern
Tel. 0049 –[0]7433-9933-0
Fax. 0049 –[0]7433-9933-149
Postfach 40 52
72332 Balingen
e-mail: [email protected]
Web: www.kern-sohn.com
Operating Instructions
Compact scales
KERN FTB
Version 2.0 01/2007
FTB-BA-e-0720
ME-Nr.: 22017139
FTB-BA-en-0720
Table of contents
Table of contents
Page
1
1.1
1.2
1.3
Introduction .....................................................................................4
Safety instructions .............................................................................4
Description ......................................................................................5
Putting into operation ........................................................................9
2
2.1
2.2
2.3
2.4
2.5
2.6
2.7
Operation ......................................................................................12
Switching on and off .......................................................................12
Zeroing / Zero point correction ..........................................................12
Simple weighing .............................................................................12
Weighing with tare ..........................................................................13
Dynamic weighing ..........................................................................14
Printing results ...............................................................................14
Cleaning ........................................................................................15
3
3.1
3.2
3.3
3.4
3.5
3.6
3.7
Settings in the menu ......................................................................16
Operating the menu ........................................................................16
Overview .......................................................................................18
Scale settings (SCALE) ....................................................................20
Application settings (APPLICATION) ..................................................23
Terminal settings (TERMINAL) ..........................................................24
Configuring interfaces (COMMUNICATION) .........................................25
Diagnosis and printing out of the menu settings (DIAGNOS) ................28
4
4.1
4.2
Interface description ......................................................................29
SICS interface commands ................................................................29
TOLEDO Continuous mode ..............................................................32
5
Event and error messages ..............................................................34
6
6.1
Technical data and accessories ......................................................36
Technical data ................................................................................36
7
7.1
7.2
Appendix ......................................................................................40
Table of Geo Values ........................................................................40
Sample protocols ............................................................................43
8
Index ............................................................................................44
User manual ME-Nr.22017139 01/07
3
FTB-BA-en-0720
Introduction
1
Introduction
1.1
Safety instructions
CAUTION!
Do not use scale in hazardous areas!
Our product range includes special devices for hazardous areas.
CAUTION!
Use only scales with Protection Class IP65, if:
• the scale is used in wet areas
• wet cleaning is necessary
• the scale is used in a dusty environment
Even with Protection Class IP65, the scale must not be used in environments with corrosion risk.
▲ Never flood the scale or immerse it in liquid.
DANGER!
Electric shock hazard!
▲ Always pull out the mains plug before any work on the device.
DANGER!
Electric shock hazard if the mains cable is damaged!
▲ Check the mains cable for damage regularly and replace it immediately if it is damaged.
▲ On the rear side of the device, maintain a clearance of at least 3 cm in order to
prevent the mains cable bending too much.
CAUTION!
On no account open the device!
The warranty is void if this stipulation is ignored. The device may only be opened by
authorized persons.
4
User manual ME-Nr.22017139 01/07
FTB-BA-en-0720
Introduction
CAUTION!
Handle the compact scale with care.
The scale is a precision instrument.
▲ When the weighing pan has been removed, never clean the area under the load
plate holder with a solid object!
▲ Do not put excessive loads on the scale.
▲ Avoid banging the weighing pan.
Disposal
➜ Observe the valid environmental regulations when disposing of the scale.
If the device has a rechargeable battery:
The battery contains heavy metals and therefore must not be disposed of with normal
waste.
➜ Observe the local regulations for disposing of environmentally hazardous materials.
Note
Use with foodstuffs
Parts coming into contact with foodstuffs have smooth surfaces and are easy to clean.
The materials used do not splinter and are free of harmful substances.
With foodstuffs, it is recommended to use the supplied protective cover.
➜ Clean the protective cover regularly and carefully.
➜ Replace damaged or very dirty protective cover immediately.
1.2
Description
The compact scales are available in a small and large size in various capacities and
resolutions.
The power supply is carried out via a built-in power supply device, an internal
rechargeable battery with an external mains adapter or an external battery.
One of the following options can also be ordered:
• Additional interface RS232
• Ethernet interface
User manual ME-Nr.22017139 01/07
5
FTB-BA-en-0720
Introduction
1.2.1
1
Display
2
Scale specifications
3
Load plate
4
Adjustable foot
5
Keys
1
Power supply
connection
2
Fast and fine pressure
equalization, only with
Protection Class IP65
3
Optional interface
4
RS232 interface
6
Overview
1
2
3 4
User manual ME-Nr.22017139 01/07
FTB-BA-en-0720
Introduction
1.2.2
Display
1
Active interface
2
Weighing range display
3
Battery charge level; only present on scales with a battery
4
Symbol for displaying net values
5
Symbol for dynamic weighing
6
Weight units
7
7-segment display, 7 digits, with decimal point
8
Stability monitor (goes out when a stable weight value is reached)
9
Sign
10 Identification for changed or calculated weight values, e. g. higher resolution,
minimum weight not reached
User manual ME-Nr.22017139 01/07
7
FTB-BA-en-0720
Introduction
1.2.3
Keypad
Main functions
Key
Function in operating mode
Function in the menu
Switching device on / off, abort
To the last menu item –End-
Setting scale to zero
Scrolling back
Taring scale
Scrolling forward
Transfer key
Activating menu item
Long key press: Calling up menu
Accepting selected setting
Additional functions
Key
Function
Switching weight unit
Clear key
8
User manual ME-Nr.22017139 01/07
FTB-BA-en-0720
Introduction
1.3
1.3.1
Putting into operation
Selecting or changing the location
The correct location is crucial to the accuracy of the weighing results!
➜ Select a stable, vibration-free and if possible a horizontal location.
The ground must be able to safely bear the weight of the fully loaded scale.
Observe the following environmental conditions:
• No direct sunlight
• No strong drafts
• No excessive temperature fluctuations
Aligning the scale
Only scales that have been aligned precisely horizontally provide accurate weighing
results. The certified scales have a spirit level to simplify alignment.
➜ Turn the adjustable feet of the scale until the spirit level’s air bubble is inside the
inner circle.
Major geographical
location changes
The manufacturer adjusts each scale to the local gravity conditions (GEO value). In
the event of major geographical location changes, this setting must be adjusted by a
service technician. Certified scales must also be recertified observing the national certification regulations. These steps are not necessary for scales with an internal calibration weight.
User manual ME-Nr.22017139 01/07
9
FTB-BA-en-0720
Introduction
1.3.2
Connecting the power supply
CAUTION!
Before connecting the scale to the mains, check whether the voltage value printed on
the rating plate corresponds with the local mains voltage.
▲ Never connect the device if the voltage value printed on the rating plate is different
to the local mains voltage.
➜ Plug the mains plug into the socket.
After connection, the device performs a self-test. When the zero display appears,
the device is ready to weigh.
➜ Calibrate the device in order to obtain the greatest possible precision, see
Section 3.3.1.
Scales with a built-in battery can work independently from the mains for approximately 30 hours in normal operation. A prerequisite for this is that the background
lighting is switched off and that no peripheral devices are connected.
The device automatically switches to battery operation as soon as the mains supply
is interrupted. When the mains supply is restored, the device automatically switches
back to mains operation.
The battery symbol indicates the present charging level of the battery. 1 segment corresponds to approx. 25 % capacity. When the symbol flashes the battery must be
charged (min. 4 hours). The charging period is extended if work is continued during
charging. The battery is protected against overcharging.
Note
The battery’s charging capacity can be reduced under continuous mains operation.
➜ To maintain the charging capacity, after a maximum of 4 weeks discharge the battery completely before recharging it.
1.3.3
Monitoring the test substances
The metrology features of the balance and any possible available adjusting weight
must be checked at regular intervals within the scope of quality assurance. For this
purpose, the answerable user must define a suitable interval as well as the nature and
scope of this check. Information is available on KERN’s home page (www.kernsohn.com) with regard to the monitoring of balance test substances and the test
weights required for this. Test weights and balances can be adjusted quickly and at
a reasonable price in KERN’s accredited DKD calibration laboratory (return to national
normal).
10
User manual ME-Nr.22017139 01/07
FTB-BA-en-0720
Introduction
1.3.4
Adjustment
General:
According to the EU guideline 90/384/EEC balances must be verified officially if they
are to be used as follows (legally regulated area):
• For commercial transactions if the price of goods is determined by weighing
• For the production of medines in pharmacies as well as for analyses in the medical
and pharmaceutical laboratory
• For official purposes
• For the production of finished packages
In case of doubt, please contact your local office of weights and measures.
Verification Information:
An EU qualification approval is available for those balances marked as appropriate for
verification in the technical data. In the event that the balance is applied in an area
subject to verification as described above, it must be officially verified and re-verified
at regular intervals.
Re-verification of a balance is carried out in compliance with the respective legal provisions of the states. The term of verification validity for balances in Germany, for
example, is normally 2 years.
The legal provisions of the country of use are to be observed.
User manual ME-Nr.22017139 01/07
11
FTB-BA-en-0720
2
Operation
Operation
2.1
Switching on
Switching on and off
➜ Press
.
The scale conducts a display test. When the weight display appears, the scale is
ready to weigh.
Switching off
➜ Press
.
Before the display goes out, -OFF- appears briefly.
2.2
Zeroing / Zero point correction
Zeroing corrects the influence of slight changes on the load plate.
Manual
1. Unload scale.
2. Press
.
The zero display appears.
Automatic
In the case of scales that cannot be certified, the automatic zero point correction can
be deactivated in the menu or the amount can be changed.
As standard, the zero point of the scale is automatically corrected when the scale is
unloaded.
2.3
Simple weighing
1. Place weighing sample on scale.
2. Wait until the stability monitor
goes out.
3. Read weighing result.
User manual ME-Nr.22017139 01/07
12
FTB-BA-en-0720
Operation
2.4
2.4.1
Weighing with tare
Taring
➜ Place the empty container on the scale and press
.
The zero display and the symbol NET appear.
The tare weight remains saved until it is cleared.
2.4.2
Clearing the tare
➜ Unload scale and press
.
The symbol NET goes out, the zero display appears.
or
➜ Press
.
The symbol NET goes out, the gross weight appears in the display.
If A.CL-tr is activated in the menu, the tare weight is automatically cleared as soon
as the scale is unloaded.
2.4.3
Automatic taring
Prerequisite
A-tArE is activated in the menu, the symbol T flashes in the display.
➜ Place the container or packaging material on the scale.
The packaging weight is automatically saved as the tare weight, the zero display
and the symbol NET appear.
2.4.4
Chain tare
Prerequisite
The tare function CHAIn.tr is activated in the menu.
With this function it is possible to tare several times if, for example, cardboard is
placed between individual layers in a container.
1. Place the first container or packaging material on the scale and press
.
The packaging weight is automatically saved as the tare weight, the zero display
and the symbol NET appear.
2. Weigh the weighing sample and read/print out the result.
3. Place the second container or packaging material on the scale and press
again.
The total weight on the scale is saved as the new tare weight. The zero display
appears.
4. Weigh the weighing sample in the second container and read/print the result.
5. Repeat the last two steps for other containers.
13
User manual ME-Nr.22017139 01/07
FTB-BA-en-0720
Operation
2.5
Dynamic weighing
With the dynamic weighing function, it is possible to weigh restless weighing samples
such as live animals. If this function is activated, the symbol
appears in the display.
With dynamic weighing, the scale calculates the mean value from 56 weighing operations within 4 seconds.
With manual start
Prerequisite
AVErAGE -> MAnuAL is selected in the menu.
The weighing sample must be heavier than 5 scale divisions.
1. Place the weighing sample on the scale and wait until it has stabilized.
2. Press
to start dynamic weighing.
During dynamic weighing, horizontal segments appear in the display, and the
dynamic result is then displayed with the symbol *.
3. Unload the scale to be able to start a new dynamic weighing operation.
With automatic start
Prerequisite
AVErAGE -> AUtO is selected in the menu.
The weighing sample must be heavier than 5 scale divisions.
1. Place the weighing sample on the scale.
The scale starts the dynamic weighing automatically.
During dynamic weighing, horizontal segments appear in the display, and the
dynamic result is then displayed with the symbol *.
2. Unload the scale to be able to perform a new dynamic weighing operation.
2.6
Printing results
If a printer or computer is connected to the scale, the weighing results can be printed
out or sent to a computer.
➜ Press
.
The display contents are printed out and transferred to the computer. See
Section 7.2 for sample protocols.
User manual ME-Nr.22017139 01/07
14
FTB-BA-en-0720
Operation
2.7
Cleaning
CAUTION!
Electric shock hazard!
▲ Before cleaning with a damp cloth, pull out the mains plug to disconnect the unit
from the power supply.
CAUTION!
When the weighing pan has been removed, never clean the area under the load plate
holder with a solid object!
This could damage the weighing cell.
Other cleaning information:
• Use damp cloths.
• Do not use any acids, alkalis or strong solvents.
• Do not clean using a high-pressure cleaning unit or under running water.
• If very dirty, remove the weighing pan, protective cover (if present) and adjustable
feet and clean these items separately.
• Follow all the relevant instructions regarding cleaning intervals and permissible
cleaning agents.
15
User manual ME-Nr.22017139 01/07
FTB-BA-en-0720
3
Settings in the menu
Settings in the menu
Settings can be changed and functions can be activated in the menu. This enables
adaptation to individual weighing requirements.
The menu consists of 6 main blocks containing various submenus on several levels.
3.1
3.1.1
Operating the menu
Calling up the menu and entering the password
The menu differentiates between 2 operating levels: Operator and Supervisor. The
Supervisor level can be protected by a password. When the device is delivered, both
levels are accessible without a password.
Operator menu
1. Press
and keep it pressed until COdE appears.
2. Press
again.
The menu item tErMINL appears. Only the submenu dEVICE is accessible.
Supervisor menu
1. Press
and keep it pressed until COdE appears.
2. Enter the password and confirm with
.
The first menu item SCALE appears.
Note
No supervisor password has been defined when the device is first delivered. Therefore
respond to the password inquiry with
when you call up the menu for the first time.
If a password has still not been entered after a few seconds, the scale returns to weighing mode.
Emergency password for Supervisor access to the menu
If a password has been issued for Supervisor access to the menu and you have forgotten it, you can still enter the menu:
➜ Press
User manual ME-Nr.22017139 01/07
3 times and confirm with
.
16
FTB-BA-en-0720
Settings in the menu
3.1.2
Selecting and setting parameters
COdE
CAL
dISPLAY
tErMINL
APPLIC
SCALE
tArE
...
dEVICE
SLEEP
Scrolling on one level
ACCESS
COMMUNI
PWr.OFF b.LIGHt
➜ Scroll forward: Press
➜ Scroll back: Press
Activating menu items/
accepting selection
➜ Press
.
Exiting menu
1. Press
.
COM 1
rESEt
MOdE
dIAGNOS
COM 2
End
...
PriNtEr PArAMEt rSt.COMX
.
.
The last menu item END appears.
2. Press
.
The inquiry SAVE appears.
3. Confirm inquiry with
to save the settin^^urn to weighing mode.
-or➜ Press
17
to discard changes and return to weighing mode.
User manual ME-Nr.22017139 01/07
FTB-BA-en-0720
Settings in the menu
3.2
Level 1
Level 2
SCALE
CAL
Overview
dISPLAY
Level 3
Level 4
Level 5
Level 6
Page
20
UNIt1
g, kg, oz, lb, t
UNIt2
g, kg, oz, lb, t
22
rESOLU
UNt.rOLL
ON, OFF
A-tArE
ON, OFF
ChAIn.tr
ON, OFF
A.CL-tr
ON, OFF
ZErO
AZM
OFF; 0.5 d; 1 d; 2 d; 5 d; 10 d
rEStArt
ON/OFF
FILtEr
VibrAt
LOW, MEd, HIGH,
PrOCESS
UNIVEr, dOSING
StABILI
FASt, StAndrd, PrECISE
tArE
APPLIC
tERMINL
COMMUNI
22
22
22
22
rESEt
SUrE?
23
AVErAGE
OFF, AUtO, MAnuAL
23
rESEt
SUrE?
23
dEVICE
SLEEP
OFF, 1 min, 3 min, 5 min
PWr OFF
YES, NO
b.LIGHt
ON, OFF
24
ACCESS
SUPErVI
24
rESEt
SUrE?
24
COM 1/COM 2 MOdE
25
Print
A.Print
CONtINU
dIALOG
CONt.OLd
dIAL.OLd
dt-b
dt-G
User manual ME-Nr.22017139 01/07
GrOSS
ON, OFF
tArE
ON, OFF
nEt
ON, OFF
GrOSS
ON, OFF
tArE
ON, OFF
nEt
ON, OFF
18
FTB-BA-en-0720
Settings in the menu
Level 1
Level 2
Level 3
Level 4
Level 5
Level 6
Page
COnt-Wt
2nd.dISP
PriNtEr
PArAMEt
COMMUNI
dIAGNOS
OPtION
tEmPLat
StdArd, tEMPLt1,
tEMPLt2
ASCi.Fmt
LINE.FMt
MULtI
GLE
LENGtH
1 ... 100
SEPArAt
, ;...
Add LF
0 ... 9
25
SIN-
bAUd
300 ... 38400
PAritY
7 nonE, 8 nonE, 7 odd,
8 odd, 7 EVEN, 8 EVEN
H.SHAKE
NO, XONXOFF, nEt 422,
nEt 485
NEt.Addr
0 ... 31
ChECSuM
ON, OFF
Vcc
ON, OFF
25
rSt.COMx
SUrE?
26
EtH.NEt
IP.AddrS, SUbNEt, GAtEWAY
26
USb
USb tESt
26
diGitAL
IN 1 ... 4
OFF, ZErO, tArE, Print, 26
CLEAr, Unit
OUT 1 ... 4
OFF, StAbLE, bEL.Min,
AbV.Min, UndErLd,
OVErLd, StAr
LINE 1 ...
LINE 20
NOt.USEd, HEAdEr, GrOSS, 27
tArE, nEt, StArLN,
CrLF, F FEEd
dEF.PrN
tEmPLt1/
tEMPLt2
tESt SC
intErN/ExtErN
28
KboArd
dISPLAY
SNr
LiSt
rESEt.AL
19
SUrE?
User manual ME-Nr.22017139 01/07
FTB-BA-en-0720
Settings in the menu
3.3
Scale settings (SCALE)
3.3.1
CAL – calibration (adjustment)
As the acceleration value due to gravity is not the same at every location on earth, each
balance must be coordinated – in compliance with the underlying physical weighing
principle - to the existing acceleration due to gravity at its place of location ( only if the
balance has not already been adjusted to the location in the factory). This adjustment
process must be carried out during the initial start-up, after change in location and
variation of surrounding temperature. It is also recommendable to adjust the balance
periodically during weighing operation in order to obtain exact measured values.
This menu item is not available for certified scales without internal calibration weight.
Adjusting of non verifiable balances
External
For scales without an internal calibration weight:
1. Unload scale.
2. Activate menu item CAL with
. The scale determines the zero point.
–0- appears in the display. The calibration weight to be placed on the scale then
flashes in the display.
3. If necessary, change the weight value displayed with
4. Place the calibration weight on the scale and confirm with
.
.
The scale calibrates with the calibration weight loaded. After calibration is completed, -donE- appears briefly in the display, and the scale automatically returns
to weighing mode.
Adjusting of verifiable balances
• Switch off the scale.
• Remove the scale bottom plate by undoing the Torx TX20 retaining screws .Impor-
tant: In order to remove the bottom plate it is necessary to break the certification
seal affixed to it! Once this seal has been destroyed, the scale must be recertified
by an accredited organization, and a new certification seal must be affixed before
the instrument may be used as a certified scale again!
• Hold down the service switch (pushbutton) on the analogprint (indicated by an
arrow in the drawings below, while at the same time switching on the scale. Keep
the service switch pressed in until "Scale" appears in the display.
User manual ME-Nr.22017139 01/07
20
FTB-BA-en-0720
Settings in the menu
Small platform model
1.Display "Scale":Press the
2.Display "Metrolo":Press the
3.Display "ramp":Press the
4.Display "SNR":Press the
5.Display "SCAL.bld":Press the
Large platform model
-key (within 20sec)
-key
-key
-key
-key
6.Display "GEO" (adjustment by means of GEO value):
The GEO value can be set in this block and the balance also adapted to the local gravity ratios without adjusting weights.
Case a)You are familiar with the GEO values.
Once the
-key has been pressed, the current GEO value will be displayed.
Press the
or
-key, in order to alter the GEO value. . The next value is displayed every time the key is pressed (adjustment range: 0 - 31). See the GEO value
chart in chapter 7.1.1 for the appropriate value.
Confirm the selected GEO value using the
-key.
Please note: The GEO value may not be readjusted following this "adjustment by
means of GEO value", as this would cause the set adjusting values to become invalid.
Case b)You are NOT familiar with the GEO values. In this case adjustment must be
made using adjusting weights (see item 8).
Press the
-key.
7.Display "LIN-CAL:" Press the
8.Display "CAL:" Press the
-key.
-key.
Press the
-key. The scale determines the zero point. -preload- appears in the display. The calibration weight to be placed on the scale then flashes in the display.
If necessary, change the weight value displayed with
Place the calibration weight on the scale and confirm with
The scale calibrates with the calibration weight loaded. After calibration is completed,
-done- appeats briefly in the display.
21
User manual ME-Nr.22017139 01/07
FTB-BA-en-0720
Settings in the menu
Return to weighing mode:
Press the
-key, "END" will appear on the display
Press the
-key, order to save the alterations. "Save" will appear on the display.
Press
3.3.2
-key. to confirm. Following this the balance will return to weighing mode.
DISPLAY – weighing unit and display accuracy
UNIt1
Select weighing unit 1: g, kg, oz, lb, t
UNIt2
Select weighing unit 2: g, kg, oz, lb, t
rESOLU
Select readability (resolution), model-dependent
UNt.rOLL
When UNT.rOLL is switched on, the weight value can be displayed in all available
units with
.
Notes
• On certified scales, the weighing units oz and lb are displayed with the symbol *.
• On certified scales, resolutions that deviate from the scale definition are displayed
without a weighing unit and with the symbol *.
• On dual-range/dual interval scales, resolutions marked with |<–> 1/2| are
divided up into 2 weighing ranges / intervals, e.g. 2 x 3000 d.
3.3.3
TARE – tare function
A-tArE
Switching on/off automatic taring
CHAIn.tr
Switching on/off chain tare
A.CL-tr
Switching on/off automatic taring with automatic clearing of the tare weight when the
load is removed from scale
3.3.4
ZERO – automatic zero update
On certified scales, this menu item does not appear.
AZM
Switching on/off automatic zero update and selecting zeroing range.
Possible settings: OFF; 0.5 d; 1 d; 2 d; 5 d; 10 d
3.3.5
When the Restart function is activated, the last zero point and tare value are saved.
After switching off / on or after a power interruption, the device continues to work with
the saved zero point and tare value.
ON/OFF
3.3.6
VIbrAt
LOW
RESTART – automatic saving of zero point and tare value
FILTER – adaptation to the ambient conditions and the weighing type
Adaptation to the ambient conditions
• Very steady and stable environment. The scale works very quickly, but is very
sensitive to external influences.
MEd
• Normal environment. The scale operates at medium speed.
User manual ME-Nr.22017139 01/07
22
FTB-BA-en-0720
Settings in the menu
• Restless environment. The scale works more slowly, but is insensitive to external
HIGH
influences.
Adaptation to the weighing process
PrOCESS
UNIVEr
• Universal setting for all weighing samples and normal weighing goods
dOSING
• Dispensing liquid or powdery weighing samples
Adjusting the weighing speed
StAbILI
FASt
• The scale operates very fast.
StAndrd
• The scale operates at medium speed.
PrECISE
• The scale operates with the greatest possible reproducibility.
The slower the scale works, the greater the reproducibility of the weighing results.
3.3.7
RESET – resetting scale settings to factory settings
Confirmation inquiry
SUrE?
• Reset the scale settings to factory settings with
• Do not reset scale settings with
3.4
3.4.1
Application settings (APPLICATION)
AVERAGE – determining the average weight for an unstable load
OFF
Calculating average weight switched off
AUtO
Calculating average weight with automatic start of the weighing cycle
MAnuAL
Calculating average weight with manual start of the weighing cycle via
3.4.2
SUrE?
RESET – resetting application settings to factory settings
Confirmation inquiry
• Reset the application settings to factory settings with
• Do not reset the application settings with
23
User manual ME-Nr.22017139 01/07
FTB-BA-en-0720
Settings in the menu
3.5
3.5.1
Terminal settings (TERMINAL)
DEVICE – Sleep mode, energy-saving mode and display backlighting
This menu item only appears on devices in mains operation.
SLEEP
When SLEEP is activated, the scale switches off display and backlighting after the
time period set when not in use. The display and backlighting are switched on again
at the press of a key or if the weight changes.
Possible settings: OFF, 1 min, 3 min, 5 min
This menu item only appears on devices in battery operation.
PWr OFF
When PWr OFF is activated, the device switches itself off automatically after
approx. 3 minutes when not in use.
Switching the display backlighting on/off.
b.LIGHt
On scales with a battery, the background lighting switches itself off automatically if
there has been no activity on the scale for 5 seconds.
Note
This menu item is accessible without a Supervisor password.
3.5.2
ACCESS – password for Supervisor menu access
Password entry for Supervisor menu access
SUPErVI
Request to enter password
ENtER.C
➜ Enter the password and confirm with
Request to repeat the password entry
rEtYPE.C
➜ Enter the password again and confirm with
• The password can consist of up to 4 characters.
Notes
• The key
must not be part of the password. It is required for confirming the
password.
• The key
may only be used in combination with another key.
• If you enter an impermissible code or make a typing error in the repetition,
COdE.Err. appears in the display.
3.5.3
SUrE?
RESET – resetting terminal settings to the factory settings
Confirmation inquiry
• Reset terminal settings to the factory settings with
• Do not reset the terminal settings with
User manual ME-Nr.22017139 01/07
24
FTB-BA-en-0720
Settings in the menu
3.6
3.6.1
Configuring interfaces (COMMUNICATION)
COM1/COM2 -> MODE – operating mode of the serial interface
Print
Manual data output to the printer with
A.Print
Automatic output of stable results to the printer (e. g. for series weighing operations)
CONtINU
Ongoing output of all weight values via the interface
dIALOG
Bi-directional communication via MT-SICS commands, control of the scale via PC
CONt.OLd
As per CONtINU, see above, but with 2 fixed blanks in front of the unit (compatible
with Spider 1/2/3)
dIAL.OLd
As per dIALOG, see above, but with 2 fixed blanks in front of the unit (compatible
with Spider 1/2/3)
dt-b
DigiTOL-compatible format.
GROSS
• Transfer of the gross weight, identified with "G"
tArE
• Transfer of the tare weight
nEt
• Transfer of the net weight
dt-G
As per dt-b, see above, gross weight identified with "G"
COnt-Wt
TOLEDO Continuous mode
2nd.dISP
For connecting a second display (automatically activates the 5-V voltage supply at
Pin 9)
3.6.2
COM1/COM2 -> PRINTER – settings for protocol printout
This menu item only appears if the mode "Print" or "A.Print" is selected.
Selecting protocol printout
tEmPLat
StdArd
• Standard printout
tEmPLt1
• Printout in accordance with Template 1
tEmPLt2
• Printout in accordance with Template 2
Selecting formats for the protocol printout
ASCi.FmtT
LINE.Fmt
• Line format: MULtI (multi-line) or SINGLE (single-line)
LENGtH
• Line length: 0 ... 100 characters, appears only with line format MULtI
SEPArAt
• Separator: , ; . / \ _ and space; appears only with line format SINGLE
Add LF
• Line feed: 0 ... 9
3.6.3
COM1/COM2 -> PARAMET – communication parameter
bAUd
Selecting baud rate: 300, 600, 1200, 2400, 4800, 9600, 19200, 38400 baud
PAritY
Selecting parity: 7 none, 8 none, 7 odd, 8 odd, 7 even, 8 even
H.SHAKE
Selecting Handshake: NO, XONXOFF, nEt422, nEt485 (network operation
as per RS485 standard via the optional RS422/RS485 interface, only for COM1)
25
User manual ME-Nr.22017139 01/07
FTB-BA-en-0720
Settings in the menu
NET.Addr
Assigning network address: 0 ... 31, only for NET 485
ChECSuM
Activating checksum byte (appears only in TOLEDO Continuous mode)
Vcc
Switching 5V voltage, e.g. for a bar code reader, on / off
3.6.4
COM1/COM2 -> RESET COM1/RESET COM2 – resetting serial interface to factory
settings
Confirmation inquiry
SUrE?
• Reset interface settings to factory settings with
• Do not reset the interface settings with
3.6.5
OPTION – configuring options
If no option is installed or is not yet configured, N.A. appears in the display.
Configuration of the Ethernet interface
EtH.NEt
IP.AddrS
• Enter IP address
SUBNEt
• Enter Subnet address
GAtEWAY
• Enter Gateway address
Configuration of the USB interface
USb
USb TEST
• Test of the USB interface. After the test has been passed, rEAdY appears in the
display.
Configuration of the digital inputs/outputs
diGitAL
IN 1 ... 4
Configuring inputs 1 ... 4
OFF
• Input not assigned
ZErO
• Key
tArE
• Key
PriNt
• Key
CLEAr
• Key
UNIt
• Key
OUT 1 ... 4
• Configuring outputs 1 ... 4
OFF
• Output not assigned
StAbLE
• Stable weight value
bEL.MIN
• Minimum weight not reached
AbV.MIN
• Minimum weight reached or exceeded
UNdErLd
• Insufficient load
OVErLd
• Overload
StAr
• Changed/calculated value
User manual ME-Nr.22017139 01/07
26
FTB-BA-en-0720
Settings in the menu
3.6.6
tEMPLt1/tEMPLt2
LINE 1 ... 20
DEF.PRN – configuring templates
Selecting Template 1 or Template 2
Select line
NOt.USEd
• Line not used
HEAdEr
• Line as header. The contents of the header must be defined via an interface com-
mand, see Section 4.1.
27
GROSS
• Gross weight
tArE
• Tare weight
nEt
• Net weight
StARLN
• Line with ***
CrLF
• Line feed (blank line)
F FEEd
• Page feed
User manual ME-Nr.22017139 01/07
3.7
Diagnosis and printing out of the menu settings (DIAGNOS)
tESt SC
Internal
Testing scale with internal calibration weight
• -Int CAL- appears in the display during the test.
• After completion of the test, ideally *d=0.0g briefly appears in the display, after
which the scale changes to the next menu item KboArd.
External
Testing scale with external calibration weight
1. The scale checks the zero point. -0- appears in the display. The test weight
flashes in the display.
2. If necessary, change the weight value displayed with
3. Put the calibration weight on the scale and confirm with
.
.
4. The scale checks the calibration weight put on them.
5. After the test is completed, the deviation from the last calibration briefly appears
in the display, ideally *d=0.0g, after which the scale changes to the next menu
item KboArd.
KboArd
PUSH 1 ... 6
Keyboard test
• Press the keys
in order. If the key works, the
scale changes to the next key.
Note
You cannot abort the keyboard test!
If you have selected the menu item KboArd, you must press all keys.
dISPLAY
Display test: The scale displays all functioning segments
SNr
Display of the serial number
LiSt
Printout of a list of all menu settings
rESEt.AL
Resetting all menu settings to the factory settings
SUrE?
Confirmation inquiry
• Reset all menu settings to the factory settings with
• Do not reset the menu settings with
FTB-BA-en-0720
4
Interface description
Interface description
4.1
SICS interface commands
The compact scales FTB support the command set MT-SICS (METTLER TOLEDO
Standard Interface Command Set). With SICS commands, it is possible to configure,
query and operate the scales from a PC. SICS commands are divided up into various
levels.
4.1.1
LEVEL 0
LEVEL 1
LEVEL 2
Available SICS commands
Command
Meaning
@
Reset the scale
I0
Inquiry of all available SICS commands
I1
Inquiry of SICS level and SICS versions
I2
Inquiry of scale data
I3
Inquiry of scale software version
I4
Inquiry of serial number
S
Send stable weight value
SI
Send weight value immediately
SIR
Send weight value repeatedly
Z
Zero the scale
ZI
Zero immediately
D
Write text into display
DW
Weight display
K
Keyboard check
SR
Send and repeat stable weight value
T
Tare
TA
Tare value
TAC
Clear tare
TI
Tare immediately
C2
Calibrate with the external calibration weight
C3
Calibrate with the internal calibration weight
I10
Inquire or set scale ID
I11
Inquiry of scale type
P100
Print out on the printer
P101
Print out stable weight value
P102
Print out current weight value immediately
User manual ME-Nr.22017139 01/07
29
FTB-BA-en-0720
Interface description
Command
Meaning
PWR
Power On/Off
SIRU
Send weight value in the current unit immediately and repeat
SIU
Send weight value in the current unit immediately
SNR
Send stable weight value and repeat after every weight change
SNRU
Send stable weight value in the current unit and repeat after every weight change
SRU
Send weight value in the current unit and repeat
ST
After pressing the Transfer key, send the stable weight value
SU
Send stable weight value in the current unit
TST2
Start test function with external weight
TST3
Start test function with internal weight
LEVEL SPECIAL CLR
30
Clear
I31
Header for the printout
ICP
Send configuration of the printout
LST
Send menu settings
M01
Weighing mode
M02
Stability setting
M03
Autozero function
M19
Send calibration weight
M21
Inquire/set weight unit
P
Print text
P130
Weight value, unit and price
PRN
Print out at every printer interface
RST
Restart
SFIR
Send weight value immediately and repeat quickly
SIH
Send weight value immediately in high resolution
SWU
Switch weight unit
SX
Send stable data record
SXI
Send data record immediately
SXIR
Send data record immediately and repeat
U
Switch weight unit
User manual ME-Nr.22017139 01/07
FTB-BA-en-0720
Interface description
4.1.2
Requirements for communication between scale and PC
• The scale must be connected to the RS232, RS485, USB or Ethernet interface of a
PC with a suitable cable.
• The interface of the scale must be set to "Dialog" mode, see Section 3.6.1.
• A terminal progam must be available on the PC, e.g. HyperTerminal.
• The communication parameters baud rate and parity must be set in the terminal
program and on the scale to the same values, see Section 3.6.3.
User manual ME-Nr.22017139 01/07
31
FTB-BA-en-0720
Interface description
4.2
4.2.1
TOLEDO Continuous mode
TOLEDO Continuous commands
The scale supports the following input commands in TOLEDO Continuous mode:
4.2.2
Command
Meaning
P <CR><LF>
Print out the current result
T <CR><LF>
Tare the scale
Z <CR><LF>
Zero the display
C <CR><LF>
Clear the current value
Tx.xxx <CR><LF>
Define tare
Output format in TOLEDO Continuous mode
Weight values are always sent in the following format in TOLEDO Continuous mode:
Status
Field 1
1
2
3
4
5
STX
SWA SWB SWC MSD
Field 2
6
7
8
9
10
11
–
–
–
–
LSD MSD
12
13
14
15
16
17
18
–
–
–
–
LSD
CR
CHK
Field 1
6 digits for the weight value that is sent without a decimal point and unit
Field 2
6 digits for the tare weight that is sent without a decimal point and unit
STX
ASCII characters 02 hex, characters for "start of text"
SWA, SWB, SWC
Status words A, B, C, see below
MSD
Most significant digit
LSD
Least significant digit
CR
Carriage Return, ASCII characters 0D hex
CHK
Checksum (2-part complement of the binary sum of the 7 lower bits of all previously sent
characters, incl. STX and CR)
32
User manual ME-Nr.22017139 01/07
FTB-BA-en-0720
Interface description
Status word A
Status Bit
Function
Selection
6
5
Decimal
position
X00
0
1
Numerical
increment
4
3
2
1
0
0
0
0
X0
0
0
1
X
0
1
0
0.X
0
1
1
0.0X
1
0
0
0.00X
1
0
1
0.000X
1
1
0
0.0000X
1
1
1
X1
0
1
X2
1
0
X5
1
1
Status word B
Status word C
Function / value
Bit
Function / value
Bit
Gross / net: Net = 1
0
0
0
Sign: Negative = 1
1
0
1
Overload = 1
2
0
2
Movement = 1
3
Print request = 1
3
lb/kg: kg = 1
4
Extended = 1
4
1
5
1
5
Powerup = 1
6
Manual taring, only kg = 1
6
User manual ME-Nr.22017139 01/07
33
FTB-BA-en-0720
Event and error messages
5
Event and error messages
Error
Cause
Remedy
Display Dark
• Back lighting set too dark
➜ Set back lighting (b.LIGHt)
brighter
• No mains voltage
➜ Check mains
• Unit switched off
➜ Switch on unit
• Mains cable not plugged in
➜ Plug in mains plug
• Brief fault
➜ Switch device off and back on
again
• Load plate not on the scale
➜ Place load plate on the scale
• Weighing range not reached
➜ Set to zero
• Weighing range exceeded
➜ Unload scale
Insufficient load
Overload
➜ Reduce preload
• Result not yet stable
➜ If necessary adjust vibration
adapter or weigh dynamically
• Function not permissible
➜ Unload scale and set to zero
• Zeroing not possible with over-
➜ Unload scale
load or insufficient load
• No calibration
➜ Unplug the mains plug then plug
it back in; switch unit off and then
back on in battery mode
➜ Calibrate scale
➜ Contact your dealer or local representative
• Printout not yet ended
➜ End printout
➜ Repeat required action
• Switching the weighing unit
impermissible during dynamic
weighing
• EAROM checksum error
➜ End dynamic weighing
➜ Switch weighing unit
➜ Unplug the mains plug then plug
it back in; switch unit off and then
back on in battery mode
➜ Contact your dealer or local representative
34
User manual ME-Nr.22017139 01/07
FTB-BA-en-0720
Event and error messages
Error
Cause
Remedy
Weight display unstable
• Restless installation location
➜ Adjust vibration adapter
• Draft
➜ Avoid drafts
• Restless weighing sample
➜ Dynamic weighing
• Contact between weighing pan
➜ Remedy contact
and/or weighing sample and
surroundings
Incorrect weight display
• Mains fault
➜ Check mains
• Incorrect zeroing
➜ Unload scale, set to zero and
repeat weighing operation
• Incorrect tare value
➜ Clear tare
• Contact between weighing pan
➜ Remedy contact
and/or weighing sample and
surroundings
• Scale tilted
User manual ME-Nr.22017139 01/07
➜ Level scale
35
FTB-BA-en-0720
Technical data and accessories
6
Technical data and accessories
6.1
6.1.1
Technical data
Type key
The compact scales FTB are available with various capacities and platforms that can
be seen from the complete type designation.
6.1.2
General data
FTB
Applications
• Weighing
• Dynamic weighing
Settings
• Resolution selectable
• Weighing unit selectable: g, kg, oz, lb, t
• Taring function: manual, automatic, chain tare
• Automatic zero point correction when the scale is switched on and during oper-
ation
• Filter for adapting to the ambient conditions (vibration adapter)
• Filter for adapting to the weighing type, e.g. dispensing (weighing process
adapter)
• Switch-off function, sleep mode for mains-operated devices, energy-saving
mode for battery operation
• Display lighting
Accuracy class OIML/NTEP
III
Display
• LCD (liquid crystal display), digits 16 mm high, with back lighting
Keypad
• Pressure point membrane keypad
• Scratch-proof labeling
Housing
• Diecast aluminum housing; chromium nickel steel weighing pan
• Dimensions, see Page 38
Protection Class (IEC 529,
DIN 40050, EN60529)
36
• Small platform model
IP43 (not with Ethernet interface)
• Large platform model
IP65
User manual ME-Nr.22017139 01/07
FTB-BA-en-0720
Technical data and accessories
6.1.3
Weighing ranges and readability
The compact scales FTB with strain gauge weighing cells are supplied in the configuration 2 x 3000 d. Higher legibilities are available from the factory with the optional
"Premium" weighing cells.
Capacity
Configuration
2 x 3000 d (standard)
1 x 6000 d (with optional
"Premium" weighing cells
Weighing
ranges
Readability
(certified)
Weighing
range
Readability
(certified)
3 kg
1.5 kg / 3 kg
0.5 g / 1 g
3 kg
0.5 g
6 kg
3 kg / 6 kg
1g/2g
6 kg
1g
15 kg
6 kg / 15 kg
2g/5g
15 kg
2g
35 kg
15 kg / 35 kg
5 g / 10 g
35 kg
5g
60 kg
30 kg / 60 kg
10 g / 20 g
60 kg
10 g
User manual ME-Nr.22017139 01/07
37
FTB-BA-en-0720
Technical data and accessories
6.1.4
Dimensions
B
D
E
C
A
K
F
H
I L
G
SM
1)
2)
LA
1)Small
2)
A
B
C
D
E
F
G
H
I
K
L
335
265
100
240
200
46
276
208
216
–
–
370
360
115
350
240
52
310
304
310
–
–
platform model
Large platform model
38
User manual ME-Nr.22017139 01/07
FTB-BA-en-0720
Technical data and accessories
6.1.5
6.1.6
Net weights
Model
without battery with battery
with internal calibration
weight (without battery)
small
4.6 kg
5.3 kg
–
big
8.2 kg
8.9 kg
–
Interface connections
The compact scale can be fitted with a maximum of 2 interfaces. The following combinations are possible:
6.1.7
COM1
COM2
RS232
–
RS232
Ethernet
Assignment of the interface connections
Pin
RS232
(COM1/COM2)
1
–
2
TxD1/2
3
RxD1/2
4
–
5
GND
6
–
7
–
8
–
9
VCC
User manual ME-Nr.22017139 01/07
39
FTB-BA-en-0720
Appendix
7
Appendix
7.1
Table of Geo Values
For weighing instruments verified at the manufacturer’s, the geo value indicates the
country or geographical zone for which the instrument is verified. The geo value set in
the instrument (e.g."Geo 18") appears briefly after switch-on or is specified on a label.
Table GEO VALUES 3000e shows the geo values for European countries.
Table GEO VALUES 6000e/7500e shows the geo values for different gravitation
zones.
7.1.1
GEO VALUES 3000e, OIML Class III (European Countries)
Geographical latitude
40
Geo value
Country
46°22' – 49°01'
18
Austria
49°30' – 51°30'
21
Belgium
41°41' – 44°13'
16
Bulgaria
42°24' – 46°32'
18
Croatia
48°34' – 51°03'
20
Czechia
54°34' – 57°45'
23
Denmark
57°30' – 59°40'
24
Estonia
59°48' – 64°00'
25*
Finland
64°00' – 70°05'
26
41°20' – 45°00'
17
45°00' – 51°00'
19*
47°00' – 55°00'
20
Germany
34°48' – 41°45'
15
Greece
45°45' – 48°35'
19
Hungary
63°17' – 67°09'
26
Iceland
51°05' – 55°05'
22
Ireland
35°47' – 47°05'
17
Italy
55°30' – 58°04'
23
Latvia
47°03' – 47°14'
18
Liechtenstein
53°54' – 56°24'
22
Lithuiania
49°27' – 50°11'
20
Luxemburg
50°46' – 53°32'
21
Netherlands
57°57' – 64°00'
24*
Norway
64°00' – 71°11'
26
France
User manual ME-Nr.22017139 01/07
FTB-BA-en-0720
Appendix
Geographical latitude
Geo value
Country
49°00' – 54°30'
21
Poland
36°58' – 42°10'
15
Portugal
43°37' – 48°15'
18
Romania
47°44' – 49°46'
19
Slovakia
45°26' – 46°35'
18
Slovenia
36°00' – 43°47'
15
Spain
55°20' – 62°00'
24*
Sweden
62°00' – 69°04'
26
45°49' – 47°49'
18
Switzerland
35°51' – 42°06'
16
Turkey
49°00' – 55°00'
21*
United Kingdom
55°00' – 62°00'
23
* factory setting
User manual ME-Nr.22017139 01/07
41
FTB-BA-en-0720
Appendix
7.1.2
GEO VALUES 6000e/7500e OIML Class III (Height £)
Geografische Breite
42
Geo-Wert
00°00' – 12°44'
5
05°46' – 17°10'
6
12°44' – 20°45'
7
17°10' – 23°54'
8
20°45' – 26°45'
9
23°54' – 29°25'
10
26°45' – 31°56'
11
29°25' – 34°21'
12
31°56' – 36°41'
13
34°21' – 38°58'
14
36°41' – 41°12'
15
38°58' – 43°26'
16
41°12' – 45°38'
17
43°26' – 47°51'
18
45°38' – 50°06'
19
47°51' – 52°22'
20
50°06' – 54°41'
21
52°22' – 57°04'
22
54°41' – 59°32'
23
57°04' – 62°09'
24
59°32' – 64°55'
25
62°09' – 67°57'
26
64°55' – 71°21'
27
67°57' – 75°24'
28
71°21' – 80°56'
29
75°24' – 90°00'
30
User manual ME-Nr.22017139 01/07
FTB-BA-en-0720
Appendix
7.2
Sample protocols
Weighing with tare
G
T
N
0.1085 kg
0.0145 kg
0.0940 kg
Dynamic weighing
Dyn WT
T
Printout with header
43.52 kg
3.78 kg
KERN & Sohn GmbH
www.kern-sohn.com
G
T
N
G = Gross weight
N = Net weight
T = Tare
0.1085 kg
0.0145 kg
0.0940 kg
Dyn WT = dynamically determined weight
Protocol of the scale settings (menu point List, see page 28)
SOFTWARE VER 7-0-1.01b
SCALE
------------METROLO
:NO APPr
SNR
:0000000
Scale Build
SCAL.TYP :2MULT.RN
BAS.UNIT :kg
SCL.CAP1 :1.5000 kg
RESOL.1
:0.0005 kg
SCL.CAP2 :3.000 kg
RESOL.2
:0.001 kg
GEO
:19
DISPLAY
UNIt1
:kg
UNIt2
:g
RESOLU
:0.0005 kg
UNt.rOLL :ON
tArE
A-TArE
:OFF
CHAIn.tr :OFF
A.CL-tr
:OFF
PB.TArE
:ON
ZERO
Z-CAPT
:-2 18
AZM
:2 d
RESTART
:ON
FILTER
VIBRAT
:MED
PROCESS
:UNIVEr
StABILI
:FASt
Min.WEiG
SEt.VAL
:0.200 kg
ONOFF
:OFF
APPLICATION
------------DYNAMIC
:OFF
COMMUNICATION
------------COM 1
MODE
1:Print
PriNtEr
tEmPLat 1:StdArd
ASCi.Fmt
LINE.FMT1:MULTI
LENGtH 1:0
ADD LF 1:0
PARAMET
BAUD
1:9600
PAriTY 1:8 nonE
H.SHAKE 1:XONXOFF
ChECSUM 1:OFF
Vcc
1:OFF
COM 2
MODE
2:DIALOG
PARAMET
BAUD
2:9600
PAriTY 2:8 nonE
H.SHAKE 2:XONXOFF
ChECSUM 2:OFF
Vcc
2:OFF
OPTION
EtH.NEt
:N.A.
USB
:N.A.
DEF.PrN
tEmPLt1
LINE 1
:HEAdEr
LINE 2
:CrLF
LINE 3
:GROSS
LINE 4
:tArE
LINE 5
:nEt
LINE 6
:F FEEd
LINE 7
:STARLN
LINE 8
:CrLF
tEmPLt2
TERMINAL
------------DEVICE
SLEEP
:OFF
B.LIGHt
:OFF
User manual ME-Nr.22017139 01/07
43
KERN & Sohn GmbH
D-72322 Balingen-Frommern
Postfach 4052
E-Mail: [email protected]
Tel: 0049-[0]7433- 9933-0
Fax: 0049-[0]7433-9933-149
Internet: www.kern-sohn.de
Konformitätserklärungen
Declaration of conformity for apparatus with CE mark
Konformitätserklärung für Geräte mit CE-Zeichen
Déclaration de conformité pour appareils portant la marque CE
Declaración de conformidad para aparatos con marca CE
Dichiarazione di conformitá per apparecchi contrassegnati con la marcatura CE
English
Deutsch
Français
Español
Italiano
We hereby declare that the product to which this declaration refers conforms with the
following standards.
Wir erklären hiermit, daß das Produkt, auf das sich diese Erklärung bezieht, mit den
nachstehenden Normen übereinstimmt.
Nous déclarons avec cela responsabilité que le produit, auquel se rapporte la présente
déclaration, est conforme aux normes citées ci-après.
Manifestamos en la presente que el producto al que se refiere esta declaración est´´a de
acuerdo con las normas siguientes
Dichiariamo con ciò che il prodotto al quale la presente dichiarazione si riferisce è
conforme alle norme di seguito citate.
Electronic Scale:
KERN FTB
Mark applied
[year] [code] M
1)
1)
EU Directive
Standards
73/23EEC Low
Voltage
EN61010-1
89/336EEC EMC
EN55022 Emission Kl. B:
EN61000-3-2
EN61000-3-3
EN50082-1
EN45501 1)
90/384EEC Non
automatic
weighing
Instruments 1)
Approval/Testcertificate N°
T6179 1)
applies only to certified balances
gilt nur für geeichte Waagen
valable uniquement pour les balances vérifiées
sólo aplicable a balanzas verficadas
la dichiarazione vale solo per le bilance omologate
Date: 24.01.2007
Signature:
Gottl. KERN & Sohn GmbH
Management
Gottl. KERN & Sohn GmbH, Ziegelei 1, D-72336 Balingen, Tel. +49-[0]7433/9933-0,Fax +49-[0]7433/9933-149
Notice
Certified balances and balances used for legal applications have the EU type approval. The year of
the initial verification is shown next to the CE mark. Such balances are verified in the factory and carry
the „M“ mark on the actual balance and the packaging. The year of initial verification is shown next to
the CE mark. The GEO value of verified balances explains for which location of use the balance has
been verified. This GEO value is shown on the balance itself and on the packing. Further details see
GEO value table.
Hinweise
Für geeichte/eichpflichtige Waagen liegt eine EU Bauartzulassung vor. Das Jahr der ersten Eichung
ist neben dem CE Zeichen aufgeführt. Solche Waagen sind ab Werk geeicht und tragen die
Kennzeichnung „M“ auf dem Gerät selbst und auf der Verpackung. Der GEO-Wert gibt bei vom
Hersteller geeichten Waagen an, für welchen Aufstellungsort die Waage geeicht ist. Dieser GEO-Wert
befindet sich auf der Waage sowie der Verpackung. Genaueres ist der GEO-Wert-Tabelle zu
entnehmen.
Remarques
Les balances vérifiées/admissibles à la vérification font l’objet d’une approbation de modèle UE.
L’année de la vérification primitive est indiqués à côté de la marque CE. Ces balances sont vérifiées
d’origine et portent la marque „M“ sur l’appareil lui-même et sur l’emballage. Le valeur GEO indique le
lieu d’utilisation pour lequel la balance été vérifiée. Ce valeur GEO se trouve sur la balance ainsi que
sur l’emballage. Veuillez trouver plus de détails dans le tableau GEO.
Notas
Las balanzas verificadas/verificables cuentan con una aprobación de modelo UE. El año de la primera
verificación está indicado al lado del distintivo CE. Estas balanzas están verificadas en fábrica y llevan
la designación „M“ sobre el propio aparato y sobre el embalaje. El valor GEO indica el lugar de
ubicación por lo cual la balanza está verificado. El valor se encuentra sobre la balanza así como sobre
el embalaje. Por favor toman demßas detalles de la tabla GEO.
Avvertenza
Per le bilance approvate esiste un’approvazione CE del tipo. L´anno della prima verifica è indicato a
fianco della marcatura CE. I tipi marcati con un contrassegno „M“ su sfondo verde peino possono
essere impiegati da subito. Il coefficiente GEO di bilance omolgate indca per quale luogo la bilancia è
stata omologata. Questo coefficiente GEO si trova sulla bilancia e sull’imballo. Ulteriroi informazioni
vedi tabella coefficente GEO.
GEO-WERT-Tabelle / GEO-value table
geographische
Breite /geographical latitude
0°
9°
15°
19°
22°
25°
28°
30°
33°
35°
37°
40°
42°
44°
46°
48°
51°
53°
55°
58°
60°
63°
66°
69°
73°
77°
0‘
52‘
6‘
2‘
22‘
21‘
6‘
41‘
9‘
31‘
50‘
5‘
19‘
32‘
45‘
58‘
13‘
31‘
52‘
17‘
49‘
30‘
24‘
35‘
16‘
52‘
-
9°
15°
19°
22°
25°
28°
30°
33°
35°
37°
40°
42°
44°
46°
48°
51°
53°
55°
58°
60°
63°
66°
69°
73°
77°
85°
Höhe über Meer in Metern / altitude
52‘
6‘
2‘
22‘
21‘
6‘
41‘
9‘
31‘
50‘
5‘
19‘
32‘
45‘
58‘
13‘
31‘
52‘
17‘
49‘
30‘
24‘
35‘
16‘
52‘
45‘
0-650
650-1300
1300-1950
1950-2600
2600-3250
4/5
5/6
6/7
7/8
8/9
9 / 10
10 / 11
11 / 12
12 / 13
13 / 14
14 / 15
15 / 16
16 / 17
17 / 18
18 / 19
19 / 20
20 / 21
21 / 22
22 / 23
23 / 24
24 / 25
25 / 26
26 / 27
27 / 28
28 / 29
29 / 30
3/4
4/5
5/6
6/7
7/8
8/9
9 / 10
10 / 11
11 / 12
12 / 13
13 / 14
14 / 15
15 / 16
16 / 17
17 / 18
18 / 19
19 / 20
20 / 21
21 / 22
22 / 23
23 / 24
24 / 25
25 / 26
26 / 27
27 / 28
28 / 29
2/3
3/4
4/ 5
5/6
6/7
7/8
8/9
9 / 10
10 / 11
11 / 12
12 / 13
13 / 14
14 / 15
15 / 16
16 / 17
17 / 18
18 / 19
19 / 20
20 / 21
21 / 22
22 / 23
23 / 24
24 / 25
25 / 26
26 / 27
27 / 28
1/2
2/3
3/4
4/5
5/6
6/7
7/8
8/9
9 / 10
10 / 11
11 / 12
12 / 13
13 / 14
14 / 15
15 / 16
16 / 17
17 / 18
18 / 19
19 / 20
20 / 21
21 / 22
22 / 23
23 / 24
24 / 25
25 / 26
26 / 27
0/1
1/2
2/3
3/4
4/5
5/6
6/7
7/8
8/9
9 / 10
10 / 11
11 / 12
12 / 13
13 / 14
14 / 15
15 / 16
16 / 17
17 / 18
18 / 19
19 / 20
20 / 21
21 / 22
22 / 23
23 / 24
24 / 25
25 / 26