1
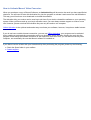
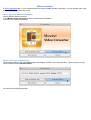
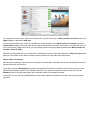
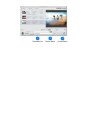
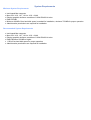
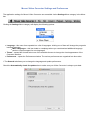
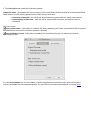
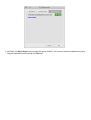
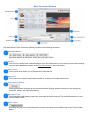
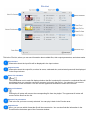
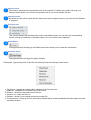
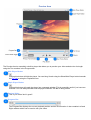
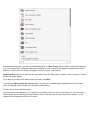
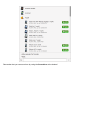
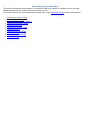
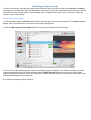
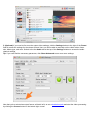
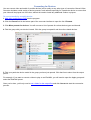
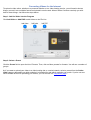
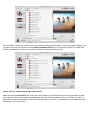
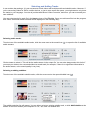
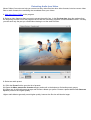
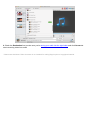
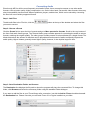
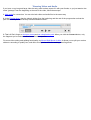
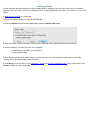
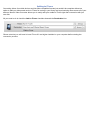
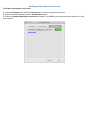
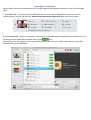
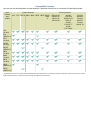
Movavi Video Converter 4 for Mac
User guide
Table of Contents
Movavi Video Converter 4 for Mac ........................................................................................................ 3
Activating Software .............................................................................................................................. 4
Online Activation ............................................................................................................................... 5
Offline Activation ............................................................................................................................... 6
License Types ................................................................................................................................... 9
Trial Limitations ............................................................................................................................... 10
Quick Start Guide .............................................................................................................................. 11
Overview ............................................................................................................................................ 14
System Requirements ..................................................................................................................... 15
Supported Formats .......................................................................................................................... 16
Program Settings ............................................................................................................................. 17
Movavi Video Converter Interface ..................................................................................................... 20
Main Converter Window .................................................................................................................. 21
File List ............................................................................................................................................ 23
Preview Area ................................................................................................................................... 25
Preset Tree ...................................................................................................................................... 27
Adding Media for Conversion ............................................................................................................ 30
Converting Video and Audio ............................................................................................................. 31
Choosing an Output Format ............................................................................................................ 32
Converting for Devices .................................................................................................................... 35
Converting Videos for the Internet .................................................................................................. 36
Selecting and Adding Tracks .......................................................................................................... 38
Reducing Video Size ....................................................................................................................... 39
Extracting Audio from Video ........................................................................................................... 41
Converting Audio ............................................................................................................................. 43
Trimming Video and Audio .............................................................................................................. 45
Rotating Videos ............................................................................................................................... 46
Changing the Output Path .............................................................................................................. 47
Adding to iTunes ............................................................................................................................. 48
Contacting Support ............................................................................................................................ 49
SuperSpeed Conversion .................................................................................................................... 50
Enabling SuperSpeed Conversion .................................................................................................. 51
SuperSpeed Indication .................................................................................................................... 52
Compatible Formats ........................................................................................................................ 53
Welcome to Movavi Video Converter User's Manual! Here you will find the detailed instructions on how to
process media files in Movavi Video Converter 4 for Mac!
How to Activate Movavi Video Converter:
When you purchase a copy of Movavi Software, an Activation Key will be sent to the email you have specified at
checkout. You will need to enter this Activation Key into the program to activate it and remove the trial limitations.
This way you will not have to re-download or reinstall the software.
The Activation Key you receive can be used up to six times if you wish to reinstall the software or your operating
system. When you have used up your key's activation count, you can always contact support to receive a new
one. However, please note that the Activation Key can only be used on one computer.
Online Activation is the quickest and easiest way to activate your software, however, it requires a stable Internet
connection.
If you do not have a stable Internet connection, you can use Offline Activation: your program can be activated
by by sending an automatically generated e-mail to our Activation server and then entering the reply into the
program. Even though an Internet connection is still required to send an e-mail, you can send it from any other
computer, not necessarily the one that Movavi software is installed on.
If you did not receive a letter with your Activation Key after purchasing the program, please try the following:
• Check the Spam folder in your mailbox.
• Contact support
Online Activation
Automatic (Online) Activation is a fast and easy way to activate your software when the computer on which you
installed your Movavi software is connected to the Internet.
Step 1: Open the Activation Dialogue.
Launch Movavi Video Converter.
Open the Movavi Video Converter 4 menu and select Activate Software.
The following dialogue will appear:
Step 2: Enter the Activation Key
In the Activation dialogue, click Enter Activation Key. The Activation dialogue will display a field for your
Activation Key.
Type or paste your Activation Key into the field and click Enter Activation Key to activate your program.
If Online Activation fails, try the following:
• Make sure you have entered the Activation Key correctly and try again.
• Click Activate Offline and perform and offline activation.
• If activation still fails, contact our support team.
Offline Activation
If Online Activation fails, or your computer does not have a stable Internet connection, you can activate your copy
of Movavi Video Converter by e-mail.
Step 1: Open the Activation Dialogue
Launch Movavi Video Converter.
In the Movavi Video Converter 4 menu, select Activate Software.
You will see the following window:
Step 2: Enter Your Activation Key
Click Activate Offline. The Activation dialogue will display a field for your Activation Key. Type or paste your key
into the field and click Activate Offline.
You will see the following window:
Step 3: Send an Activation E-Mail
Movavi Video Converter will generate a message that you will need to send to the activation server. Click Copy
to copy the contents of the message to the clipboard or click Save to save the message as a text file. When
you reach a computer that has Internet access, paste this text into the message body and send the e-mail to
[email protected]. The server's reply e-mail will contain a Registration Key.
Step 4: Enter Your Registration Key
When you have received your Registration Key, enter it into the corresponding field of the Activation Dialogue
and click Activate. Your program will now be activated.
If activation fails, try the following:
• Make sure you have entered the Activation Key and the Registration Key correctly and try again.
• Contact our support team.
License Types
Movavi products are licensed on a per computer basis, not per user, site or company. Therefore, if a person
uses two computers, he or she has to purchase two licenses of the product in order to install and use it on every
computer. There are two types of license available: Personal license and Business license.
The Personal license allows you to use the program for non-commercial purposes in a non-business,
non-commercial environment (e.g. at home). To use the program in corporate, government, or business
environments, you will need to purchase a Business license.
Once you've purchased a license for Movavi Video Converter and received your activation key, you will need to
activate your copy of the program.
There are two ways to activate Movavi software:
• Automatic (Online) Activation — the fastest and easiest way to activate the program. It is the recommended
option if the computer on which you install Movavi software is connected to the Internet.
• Manual (Offline) Activation - recommended when the computer on which Movavi software is installed cannot
be connected to the Internet, or when the online activation fails.
Trial Limitations
Before you activate Movavi Video Converter, it will be running in Trial mode. The trial contains all of the features
of the full version, however the trial version is limited in the following ways:
• The Trial lasts only 7 days since installation. After that, you will be offered to activate the software or
purchase an Activation Key.
• A watermark will be added on top of converted videos
• Audio files will only be converted 1/2 length
• When using SuperSpeed mode, files will only be converted 1/2 length.
Quick Start Guide
Using Movavi Video Converter, you can perform any kind of format change in just a few steps – the procedure
will not be significantly different no matter which formats you are converting or from.
Step 1: Add Files
To start with, you will need to add some files into the program. To do that, use the buttons at the top of the
window:
- click this button to add video files
- click this button to add audio files
- click this button to add an entire DVD, complete with bonus videos.
Step 2: Choose a Preset
Click the drop-down arrow next to the Preset field to open the list of presets. They are divided into format and
device presets:
• More presets for formats opens a list of formats such as MP4, AVI, MOV, and others, each complete with a
set of various resolutions;
• More presets for devices opens a list of device types and brands, which you can browse to find your
particular device's model. Using one of these presets will automatically convert media with such settings that
it will be playable on this device out of the box.
For example, to convert your videos for the iPad mini, you will need to go to More presets for devices, open the
Apple category, and select iPad mini.
You can even prepare your videos for uploading to social networks: go to More presets for formats, open the
Online Video category, and select the service and resolution that you prefer, for example, YouTube HD 720p. Or,
if you just need to change the format, you can quickly access the most popular formats under More presets for
formats > General Video.
Most format categories offer you a selection of resolutions, however, there will always be a Same as input option
which you can select if you want to keep the same resolution for this video after conversion.
Step 3: Start Converting!
Now almost everything is ready to start converting your media files. All that's left is to set a destination where the
program will store the new files.
To do that, check the Destination field right underneath the Preset list. By default, the files will be saved in the
Movavi Library folder, located in your Movies directory. If you want to change the output folder, just click the
Browse button to the right and specify the necessary folder in the dialogue window.
Once you're all set, click the Convert button in the bottom right corner and the Converter will start processing
your files.
Overview
This chapter provides general information about Movavi Video Converter:
•
•
•
•
System Requirements
Supported Formats
Program Settings
SuperSpeed Conversion
Minimum System Requirements:
•
•
•
•
•
•
System Requirements
Intel-based Mac computer
Mac OS X 10.6, 10.7, 10.8 or 10.9 – 64-bit
Display graphics minimum resolution of 1024x768x32-bit color
RAM 128 MB
Minimum 60 MB of free hard disk space is needed for installation, minimum 750 MB for proper operation
Administrative permissions are required for installation
Recommended System Requirements
•
•
•
•
•
•
Intel-based Mac computer
Mac OS X 10.6, 10.7, 10.8 or 10.9 – 64-bit
Display graphics minimum resolution of 1024x768x32-bit color
RAM: Minimum 256 MB or higher
1 GB of free hard disk space for proper operation
Administrative permissions are required for installation
Supported Formats
Movavi Video Converter Settings and Preferences
The application settings for Movavi Video Converter are accessible via the Settings Menu category in the Menu
bar:
Clicking the Settings Menu category will display the following options:
• Language – this menu item expands into a list of languages: clicking one of them will change the program's
interface language.
• More Languages – this item leads to a webpage where you can download additional language
packs or request support for new languages.
• Theme – expand the list and select one of the available themes to change the visual appearance of the
Converter interface.
• Preferences – opens the Preferences window. The various preferences are organized into three tabs:
I. The General tab allows you to change the language and update preferences.
Check the Automatically check for updates box to make sure your Video Converter is always up-to-date.
II. The Conversion tab contains the following options:
Output file name – determines the course of action if the output folder already contains a file with the specified
name when a new file is being placed into the folder during conversion:
• Overwrite existing file - the old file will be permanently replaced with the newly converted file.
• Automatically rename files - new files will be automatically renamed, and both files will be
preserved.
After conversion:
Open output folder - if this option is enabled, the folder containing your newly converted files will be opened
automatically as soon as the conversion process is finished.
Play notification sound - if this option is enabled, the Converter will notify you when it has finished
converting your files.
III. In the Acceleration tab, you can enable or disable SuperSpeed conversion mode, which allows you to
convert compatible files at unmatched speeds. You can find out more about SuperSpeed conversion here.
• And finally, the Show Player option toggles the player visibility. You can also enable and disable the player
using the dedicated button beneath the File List.
This chapter presents the Movavi Video Converter user interface and its elements:
•
•
•
•
Main Converter Window
File List
Preview Area
Preset Tree
Main Converter Window
The main Movavi Video Converter window consists of the following elements:
Add Media Buttons
Use these buttons to add video, audio files, and entire DVDs.
File List
The File List contains vital information about your files and allows you to manage some output settings.
You can find a detailed run-down of the File List interface in the next section.
Preview Area
The Preview Area allows you to play back the selected file.
Preset List
The Preset List contains ready-made presets for a variety of formats and devices.
Preset Settings Button
Clicking this button will bring up the selected format's Settings window, where you can change the
resolution, bitrate, and other parameters.
Destination Field
The Destination field displays where the converted files will be saved. The default destination is your
Movavi Library folder.
Add to iTunes
Checking this box prior to launching the conversion will allow you to add the file to the iTunes media
library.
Convert Button
Clicking this button will launch the conversion process.
File List
This is the File List, where you can see information about added files, their output parameters, and select tracks.
Input Column
Information about the input file will be displayed in the Input column.
Output Column
Information about the output file, such as its name, estimated size, and selected preset will be displayed
in the Output column.
Select File Checkbox
and
The checkboxes next to each file display whether that file is selected for conversion: unchecked files will
be skipped when you start the conversion process, but kept in the file list – for example, if you want to
convert them in the next batch. You can use the uppermost checkbox to select all or no files.
Remove File Button
Clicking the X button will remove the corresponding file from the playlist. The uppermost X button will
remove all the files from the list.
Selected File Information
This is the file you have currently selected. You can play it back in the Preview area.
Output Preset
Here, you can see which format the file will be converted to. You can also find this information in the
Preset field in the bottom part of the Converter window.
Output File Size
The number represents the approximate size of the output file. Clicking this number will bring up a
dialogue which allows you to set the compression rate if you need a smaller file size.
Output File Name
By default, the file will be saved with the same name as the original, however you can click the filename
to change it.
Track Selection
This column displays the selected video, audio, and subtitle tracks. You can click the corresponding
arrows to bring up a selection of available tracks, or to turn off the track completely.
Rotate Button
Clicking this button will bring up the Rotate panel which allows you to rotate the selected file.
Show\Hide Player
Clicking this button will toggle the player visibility.
Furthermore, right-clicking a file in the File List will bring back the following context menu:
•
•
•
•
•
•
Play/Pause - toggles the selected file's playback in the Preview Area.
Duplicate - duplicates the selected entry in the file list.
Remove - deletes the selected file from the list.
Remove All - clears the File List.
Rename - allows you to rename the selected output file
File Information - brings up the File Information window which contains detailed information about the video
and audio streams.
Preview Area
The Preview Area is essentially a built-in player that allows you to preview your video and also trim its length
using the Trim markers in the Progress bar.
Hide Player Button
Clicking this button will hide the player. You can bring it back using the Show/Hide Player button beneath
the File List or using the Playback menu.
Unpin Player Button
Clicking this button will unpin the player into a separate window. This is especially useful if you have two
monitors. You can always double-click the player window's Title Bar to bring it back.
Preview Video
This is your video! Isn't it great?
Progress Bar
The Progress Bar displays the current playback position and the file's duration. It also contains Left and
Right markers which can be used to trim your video.
Preview Mode Toggle
Use these buttons to switch the preview mode: Input mode will display the original video, and Output
mode will display how your output video will approximately look like in terms of size, proportions, video
quality, etc.
Play Button
Clicking this button will start the selected file's playback.
Previous Frame Button
Clicking this button will rewind the video by one frame backward.
Next Frame Button
Clicking this button will skip one frame forward.
Full Screen
Clicking this button will turn on the full screen preview mode.
Volume
Clicking this button will bring up the volume control where you can set the volume level for the preview. It
will not affect the volume of the output video after conversion.
Preset Tree
Selecting which format your files will be converted to is done with the help of presets: each preset contains a set
of pre-defined settings related to the selected format, configured in such a way that you would be able to convert
video and audio with the optimal parameters. Since you may need to convert media for a wide variety of formats,
devices, with various codecs, resolutions, et cetera, we've organized the multitude of presets into a convenient
Preset Tree, which you can use to easily find exactly the one you need.
To open the Preset tree, find the Preset field in the bottom part of the converter interface and click anywhere
within it. The Preset List will appear. On the first screen, you will see your most recently used presets, and if you
haven't used any presets yet, it will display some of the most popular video formats.
Beneath the list of formats, you will also see two options:
• More presets for formats - click this option to see a list of format presets,
• More presets for devices - click this option if you want to convert videos for a particular device.
And finally, you can also use the Search bar to find the necessary format or device presets:
If you click the More presets for formats option, you will first see a list of general categories:
• General Video - contains a list of presets for the most popular formats, such as AVI, MP4, MKV, and others.
You can use this category if you do not have specific requirements and just need to change a video's format.
• DVD-Compatible Video - choosing one of these presets will convert your video into a DVD-compatible
format, meaning that the converted video will be ready to be recorded to a DVD straight after conversion
without any additional encoding.
• HD Video - this category contains some popular formats for HD videos in 720p and 1080p resolutions.
• Online Video - if your goal is to upload your video to a video hosting service such as YouTube or Facebook,
use one of these presets to ensure that your videos are in a format that these services accept.
• Web-Compatible Video - this category contains presets for formats that are best for embedding into blogs
and websites, such as FLV and WebM.
Beneath these categories, you will see an alphabetical list of video format groups. Click on each format category
to see a list of presets for different codecs and resolutions. Click a category title again to collapse the list of its
subitems. Click on any item within a category to select it as your output preset.
Audio format groups can be found at the very bottom of the list. Each group contains a set of presets for various
bitrate and quality options.
If you want to go back to the main Preset List screen, click Back.
If you click the More presets for devices option, you will see an alphabetically organized list of device types
(such as Android) and manufacturers (like Apple or Blackberry).
To find a preset for a particular device:
Find your device's manufacturer. For example, if you need to convert a video for an iPhone 5C, you will need to
find the Apple group. Click the group to expand it. Then, click a list item to select this device's preset – for our
example we would need the iPhone 5C preset.
Remember that you can save time by using the Search bar at the bottom!
Adding Media for Conversion
There are several ways of adding media files to the converter.
Adding Video and Audio Files:
Before converting media files, you will need to add them to the File List. You can do that using one of the
following ways:
1. Drag video or audio files from the Finder onto the File List. The files will automatically be added to the list.
2. Use the buttons:
for adding video files
for adding music and other audio files
3. Open the File menu and select one of the menu items:
Add Video - for adding video files
Add Audio - for adding audio files
Add Folder - add the contents of an entire folder at once
Adding DVDs:
1. Click the Add DVD button in the upper left part of the converter window or open the File menu and click Add
DVD.
2. The Open DVD dialog will appear. Navigate to the VIDEO_TS folder on your DVD and click Open Folder.
3. The files on your DVD will be added to the list in the correct order, with the main movies and bonus files
labeled appropriately.
Converting Video and Audio
This section will describe the procedure of converting media for a number of situations, as well as some
additional actions Movavi Video Converter can help you with.
For a basic tutorial of the converting process, please refer to the Quick Start Guide section of this manual.
•
•
•
•
•
•
•
•
•
•
•
Choosing an Output Format
Converting for Devices
Converting Videos for the Internet
Selecting and Adding Tracks
Reducing Video Size
Extracting Audio from Video
Converting Audio
Trimming Video and Audio
Rotating Videos
Changing the Output Path
Adding to iTunes
Choosing an Output Format
For your convenience, selecting an output format in Movavi Video Converter is done using Presets. A Preset is
a combination of parameters such as video and/or audio codec, frame size, and bitrate that can help you convert
media files with the optimal quality. These settings can be changed at any time, and you can even create any
number of your own presets.
To select an output preset:
1. Click anywhere inside the Preset field located in the lower part of the converter interface. The Preset List will
appear. Here you will be able to see your most recently used presets.
2. Click the More presets for formats item to access the list of video and audio formats.
3. You will see a list of format groups. Click the necessary group to expand it. You will then be offered a choice
of several resolution sizes, as well as an option labeled Same as input that allows you to convert the video
without changing its resolution. Some format groups, such as MP4, also allow you to choose a video codec if the
selected format supports more than one.
4. Click the necessary preset to select it.
5. (Optional) If you need to fine-tune the output video settings, click the Settings button to the right of the Preset
field to access the settings for the chosen format. Here you will be able to manually set the video codec, frame
size, bitrate type, and more. Switch to the the Audio tab at the top of the Settings window to access the audio
channel settings.
Tip: If you can't find the necessary parameter, click Show Advanced to see even more settings.
Now that you've selected an output format, all that's left is to set a destination path and start the video processing
by clicking the Convert button in the bottom right corner!
Converting for Devices
You can convert video and audio for mobile devices just as easily as any other type of conversion. Movavi Video
Converter includes a wide variety of device presets, each tailored especially for a particular device to ensure that
your video will be played out of the box, without the need to install any additional codecs or players.
To convert media for a mobile device:
1. Add video, audio files or DVD into the program.
2. Click the Preset field in the bottom part of the converter interface to open the list of Presets.
3. Click More presets for devices. You will now see a list of presets for various device types and brands.
4. Find the group with your device's brand. Click the group to expand it and show the related devices.
5. Find your particular device model in the group you have just opened. Click that line to select it as the output
preset.
For example, if you want to convert a video to play on an iPad Mini, you will need to open the Apple group and
select the iPad Mini preset.
Once you're done, you'll only need to set a folder for the output files and click Convert to start the conversion
process.
Converting Videos for the Internet
To upload a video online, whether to a personal website or to a video hosting service, you will need to do two
things: convert it into a suitable format and upload it onto the web. Movavi Video Converter can help you with
both of those things. Just follow the steps below.
Step 1: Add the Video into the Program
Click Add Video or Add DVD to add videos to the File List:
Step 2: Select a Preset
Click the Preset field to open the list of Presets. Then, click on More presets for formats. You will see a number of
groups.
A. If you want to upload your video to a video hosting site or a social network, select a preset from the Online
Video category depending on which website it is intended for and which resolution you prefer. If you're not sure
which website is best for uploading your videos, you can consult our comparison page.
B. If you want to upload the videos to your own website or blog and have some control over which formats to use,
you can select one of the presets from the Web-Compatible Video group. These include MP4, FLV, SWF and
WebM, considered to be the most convenient formats for uploading videos online.
Step 3: Choose a Destination Folder and Convert
Make sure that the Destination line shows the correct folder. If not, click Browse and specify the folder to store
your videos in. Once you're ready, click Convert to start the video processing. When your videos are ready, all
that's left is to either upload them to the video hosting service you prefer, or upload them to your website's server
and create a link to your video.
Selecting and Adding Tracks
In our modern day and age, it is not uncommon to find videos with multiple audio and subtitle tracks. However, if
you're converting videos for DVDs, mobile devices, or just to save some disc space, you might want to only leave
the tracks in your language. You can do just that with Movavi Video Converter, and more: you can even add your
own subtitles!
You can select tracks for each file in the Input column of the File List. Once you add some files into the program,
their video, audio and subtitle streams will be displayed in the following way:
Selecting audio tracks:
To select one of the available audio tracks, click the arrow next to the sound icon ( ) to open the list of available
audio streams:
Click a stream to select it. This will be the audio stream in the output file. You can also always select No Audio if
you want your video to be converted without a sound track (for example, if there is no significant information in
the audio stream, or the sound quality is very low).
Selecting or adding subtitles:
To select one of the available subtitle tracks, click the arrow next to the speech bubble icon (
)
The subtitle selection list will appear. You can either select an existing subtitle track, or click Add Subtitles at the
bottom of the list to browse your computer for .srt, .ass, and .ssa subtitle files.
Reducing Video Size
Movavi Video Converter can help you not only quickly change the format of video or audio files, but also save
disk space by compressing your files. Many format and device presets will help you reduce the size of your
output videos by using a smaller resolution, lower bitrate, or simply because some video codecs are better at
compressing videos than others. However, you can further reduce video size if you're prepared to sacrifice some
video quality.
1. Add media into the program. Use the buttons in the upper left corner of the converter interface to add video,
audio files, and DVDs.
2. Choose an output preset:
• Choose a preset with smaller resolution than that of the original video. This can help significantly cut in size,
as even changing the resolution from 1080p to 720p can give save up to a few gigabytes without significant
loss of quality. You can find the original video's resolution in the Input column of the File List.
• Choose presets with the most recent video codecs, as they have been created with the latest technology
in mind and can yield better video compression with smaller quality loss. For example, the H.264 codec is
currently considered one of the best codecs in terms of size and quality.
3. Set the compression rate.
3.1 In the Output column of the File List, click the blue size link next to the file icon (
).
3.2 The compression pop-up will appear. Drag the slider to the left to set a smaller output size, but be aware that
this will decrease video quality. You will see the Quality and Bitrate change as you move the slider.
3.3 Click Apply to set the new compression rate. You can do this for each file individually.
4. Set the destination folder for the output files by clicking the Browse button and click Convert to start the
conversion process and compress your videos.
Extracting Audio from Video
Movavi Video Converter can help you convert not only video files into other video formats, but also convert video
files to audio formats, thus extracting the soundtrack from your videos.
1. Add video files or DVDs to the program.
2. Select a video fragment that you want to extract the audio from. In the Preview Area, drag the markers from
the beginning and the end of the progress bar so that the necessary fragment is located between them. This way,
you can save only the part you need without having to cut the audio file later.
3. Select an audio preset:
3.1 Click the Preset field to open the list of presets.
3.2 Open the More presets for formats category and scroll to the bottom to find audio preset groups.
3.3 Open one of the audio preset groups and choose a bitrate you prefer. Choose a preset labeled with Same as
input to preserve the original quality.
Higher audio bitrates generally mean higher quality, however the file size will also be larger.
4. Check the Destination line to make sure you're saving your audio into the right folder and click Convert to
start converting video into audio!
* Please note that Movavi Video Converter is not intended for making illegal copies of copyrighted material.
Converting Audio
Even though MP3 is still the most frequently used audio format, there are ample reasons to use other audio
formats, such as better quality, higher compression, etc. On the other hand, just as with video formats, there may
arise incompatibility issues across different platforms, players, and devices, which can be solved by converting
the files into a more widely supported format.
Step 1: Add Files
To add audio files to the File List, click the
you want to convert.
button at the top of the window and select the files
Step 2: Choose a Preset
Click the Preset field to open the list of presets and go to More presets for formats. Scroll to the very bottom of
the list to find audio format groups. The General Audio group contains presets for converting the audio to various
formats, retaining the original quality. The other groups contain presets of various bitrates for a single format. The
bitrate determines the amount of data that can be played back each second of audio and directly impacts the
audio quality. Higher bitrates generally mean higher quality, however, it also implies larger file size.
Step 3: Set a Destination Folder and Convert
The Destination line displays the file path to where the program will place the converted files. To change this
folder, click Browse and select the necessary folder using the standard Finder dialogue.
If you want to add the files to your iTunes library after conversion, just tick the Add to iTunes checkbox beneath
the Destination line. Please note that you will need iTunes 6.0 or higher installed on your Mac.
When you've set everything up, click Convert to start the audio processing. Your files will be ready in a few
minutes at most.
Trimming Video and Audio
If you have a very long and large video but only want to share a part of it with your friends, or you just want to trim
some "garbage" from the beginning or the end of the video, follow these steps:
1. Add media for conversion. You can trim both video and audio files in the same way.
2. In the Preview Area, drag the triangle sliders from the beginning and the end of the progress bar so that the
part of the video you want to keep is located between them.
3. That's it! Don't forget to choose a preset and set a destination path. When you click the Convert button, only
the fragment you've selected will be saved in the output file.
For more video cutting and splitting functionality, try Movavi Split Movie for Mac. It allows you to split your movies
without re-encoding or quality loss, and offers more precise tools for marking video fragments.
Rotating Videos
It often happens that great videos are filmed upside down or sideways, but you don't have to tilt your head 90
degrees every time when you can just rotate the video. Using Movavi Video Converter, you can do it in just a few
clicks:
1. Add videos or DVDs for conversion.
2. Select the video you want to rotate in the File List.
3. Click the Rotate button below the File List to open the Rotate video panel:
4. Click the Rotate CCW and Rotate CW buttons to rotate the video counterclockwise and clockwise.
5. Choose whether you want the video to be cropped:
• Automatically crop video to fit the frame
• Keep original image
This is especially important for wide videos, as they may turn out to be too narrow after rotation and slight
cropping can fit the video better inside the frame.
6. Click Apply. Now you can go on to choosing a preset and setting a destination path. Once you're done, click
Convert to start the video processing.
Changing the Output Path
The Destination line located in the bottom part of the converter interface allows you to change the folder where
Movavi Video Converter will place the output files.
The default destination for saving your files is your Movavi Library, located in your /User/Movies folder. However,
you can easily change it using one of the following ways:
• Click the Browse button and specify the necessary folder using the standard Finder dialogue.
• Click the text in the Destination field and type in the necessary path.
• Click the arrow button next to the Destination field. This will open a list which will contain the following
options:
• Your User's Movies/Movavi Library folder
• The output folder is the same as input: selecting this option will place the output files right next to
the input files.
• Any folder paths you have recently used.
You can always quickly open the selected folder by clicking the arrow to the right of the Browse button and
selecting Open output folder. This will open the folder in Finder so that you can check its contents.
Adding to iTunes
Converting videos for mobile devices and into Mac-compatible formats just wouldn't be complete without an
option to add your videos and music to iTunes for storing in your library and synchronizing them across all of your
devices. Movavi Video Converter allows you to easily add your media to iTunes right after conversion with just
one click.
All you need to do is check the Add to iTunes checkbox beneath the Destination line:
Please note that you will need to have iTunes 6.0 and higher installed on your computer before starting the
conversion process.
Contacting Support
We can provide technical support and assistance for you if you encounter any problems with our software,
any questions or suggestions. Please be as complete as possible in your request. The better you describe the
problem the sooner we will be able to solve it.
Please review the FAQ section prior to contacting the support team. It is possible, that your question is answered
on these pages: http://www.movavi.com/support/
We guarantee :
• Free technical support by email [email protected]
• Response time - 3 business days.
• Patches, fixes, extended help and other related information.
SuperSpeed Conversion
SuperSpeed Conversion
The new version Movavi Video Converter allows you to quickly convert your files between compatible formats
without re-encoding and losing quality with the new SuperSpeed mode.
SuperSpeed conversion is applicable when you convert files between formats which support the same video or
audio codecs, which allows Movavi Video Converter to skip the re-encoding process and simply move the video
and audio stream from one format into another, which allows the files to be converted with both unbelievably high
speeds and zero quality loss.
However, as SuperSpeed conversion does not re-encode video or audio streams, it can only accelerate
conversion under the following conditions:
• The codec, resolution, bitrate, and other video parameters remain unchanged
• The video cannot be rotated or compressed
Therefore, if you change the video resolution or any other parameters, the conversion will run as usual. Don't
worry, it's still very fast!
Tip: you will still be able to trim your file before conversion in SuperSpeed mode.
Enabling SuperSpeed Conversion
To Enable SuperSpeed conversion:
1. Open the Settings menu and click Preferences to open the program preferences.
2. In the Preferences window, click the Acceleration button.
3. Check the Enable SuperSpeed conversion checkbox. Click OK to save your preferences and return to the
main window.
SuperSpeed Indication
Movavi Video Converter indicates that a file or format supports SuperSpeed conversion in one of the following
ways:
1. In the File List – if the files you have added into the converter support SuperSpeed conversion into the
selected format, your file will have the "SuperSpeed conversion supported" label in the Input column.
2. In the Preset List – when you browse the Preset list, presets which support SuperSpeed conversion for any of
the files you have added will be marked with a green
icon.
Note that the icon only appears next to presets labeled with Same as input, which means that the output file's
resolution will remain unchanged.
Compatible Formats
You can use the following table to check whether a particular format can be converted in SuperSpeed mode:
Input
formats
and
codecs
AVI
Output formats
FLV M2TS MKV MOV MP4 MPG iPad3
iPad
4
Device presets*
iPhone 5S,
Kindle
iPhone 5C,
Fire HDX
iPhone 4,
Kindle Fore
iPhone 4S
HD 8.9"
Kindle
Fire HD 7"
Kindle
Fire Tablet
Google
Nexus 4
Google
Nexus 7
Google
Nexus 10
AVI
(H.264)
AVI
(MPEG-4)
FLV
(H.264)
M2TS
(H.264)
M2TS
(MPEG-2)
MKV
(H.264)
MOV
(H.264)
MP4
(H.264)
MP4
(MPEG-4)
MPG
(MPEG-2)
* SuperSpeed conversion to a device preset is available if the input file resolution is no higher than the device resolution: 1280×720 for iPad 3/4, Amazon
Kindle and Google Nexus, 1136×640 for iPhone 5/5C/5S, and 960×640 for iPhone 4/4S.