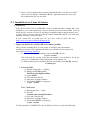
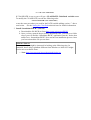
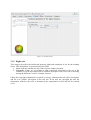
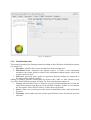
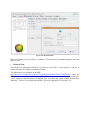
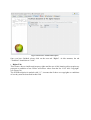
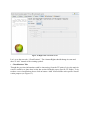
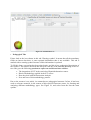
1
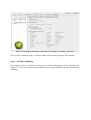
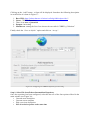
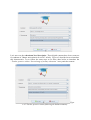
[UVa]
ECP-2007-EDU-427015/Share.TEC
Resource Integration Companion Kit
RICK
USER GUIDE
(IT INCLUDES WORKSHEETS)
Date
01st February 2011
Author
María Jesús Rodríguez-Triana (UVa Team)
Contact
[email protected]
eContentplus
This project is funded under the eContentplus programme1,
a multiannual Community programme to make digital content in Europe more accessible, usable and exploitable.
1
OJ L 79, 24.3.2005, p. 1.
1
[UVa]
Abstract
(for dissemination):
¡Error!
Marcador
no definido.
This document includes both the installation and the user guides, and a couple of
worksheets envisioned as a kind of tutorials that intend to familiarize users with RICK by
means of their examples. The first worksheet is devoted to illustrate the steps needed to be
followed in order to annotate a learning resource using RICK. The second one, introduces
the user to the batch mode, exemplifying how to enrich previous metadata records, with a
common description, simultaneously.
2
[UVa]
Contents
Figures.......................................................................................................................................4
Version History........................................................................................................................6
1 Generic Description...............................................................................................................7
2 How to install RICK..............................................................................................................7
2.1 Installation Process for Windows (XP/Vista)...........................................................................................7
2.2 Installation Process for Mac OS X............................................................................................................9
2.3 Installation for Linux & Solaris..............................................................................................................10
3 User Manual.........................................................................................................................12
3.1 Main Functionalities...............................................................................................................................12
3.2 Toolbar....................................................................................................................................................13
3.2.1 Repository configuration........................................................................................................13
3.3 Annotation interface................................................................................................................................15
3.3.1 General tab..............................................................................................................................17
3.3.2 Life-Cycle tab.........................................................................................................................18
3.3.3 Meta-metadata tab (shortly removed)....................................................................................19
3.3.4 Technical tab..........................................................................................................................20
3.3.5 Rights tab................................................................................................................................21
3.3.6 Classifications tab...................................................................................................................22
3.3.7 Pedagogical tab.......................................................................................................................24
3.4 Summary: metadata completeness..........................................................................................................25
4 RICK Worksheet: Enriching a resource...........................................................................26
4.1 Overview of the example........................................................................................................................26
4.2 Enriching a metadata record with RICK.................................................................................................27
5 RICK Worksheet: Enriching several resources................................................................42
5.1 Overview of the example........................................................................................................................42
5.2 Enriching several metadata records simultaneously with RICK.............................................................42
3
Figures
Figure 1: Select the program features you want to install and pay attention to the
installation path, it will be used later......................................................................................8
Figure 2: RICK main functionalities.....................................................................................12
Figure 3: Click on "Start process" to continue....................................................................13
Figure 4: Toolbar file options................................................................................................13
Figure 5: Toolbar tools options..............................................................................................13
Figure 6: Toolbar help options..............................................................................................13
Figure 7: Repository default configuration..........................................................................14
Figure 8: Adding a new repository for harvesting...............................................................15
Figure 9: Adding a new repository for publishing...............................................................15
Figure 10: Annotation Interface............................................................................................17
Figure 11: General tab............................................................................................................18
Figure 12: Life Cycle tab........................................................................................................19
Figure 13: Meta-metadata tab...............................................................................................20
Figure 14: Technical tab.........................................................................................................21
Figure 15: Rights tab..............................................................................................................22
Figure 16: Classifications tab.................................................................................................23
Figure 17: Multicultural classification of the "Teacher practice context" based on the
Italian taxonomy.....................................................................................................................23
Figure 18: Pedagogical tab.....................................................................................................24
Figure 19: Summary and save menu.....................................................................................25
Figure 20: First step - Choose task.......................................................................................28
Figure 21: Select file from Fedora Intermediate Repository..............................................28
Figure 22: Open file "examples/WorksheetEnriching.xml"...............................................29
Figure 23: Start enriching process........................................................................................29
Figure 24: General tab - First view of the content obtained from the XML.....................30
Figure 25: Add new title.........................................................................................................31
Figure 26: General description of the article........................................................................32
Figure 27: LifeCycle................................................................................................................33
Figure 28: Meta-Metadata.....................................................................................................34
Figure 29: Resource technical description............................................................................35
Figure 30: Rights and restrictions of use..............................................................................36
Figure 31: Classifications form..............................................................................................37
Figure 32: Educational level of our teacher’s practice........................................................37
Figure 33: Resource discipline...............................................................................................38
Figure 34: Skill level of the students......................................................................................38
Figure 35: Classifications set..................................................................................................39
Figure 36 : Pedagogical description of this resource according to our teacher’s
experience................................................................................................................................40
Figure 37: Final summary of the enrinching process..........................................................41
Figure 38: Toolbar tools options............................................................................................42
Figure 39: Configuring the CIRDFA Repository for harvesting.......................................43
Figure 40: First step - Choose the option "Edit the existing descriptions of multiple
resources"................................................................................................................................44
Figure 41: Select all the files harvested from the CIRDFA Repository............................44
Figure 42: Click on "Start process" to continue..................................................................45
Figure 43: List of downloaded resources and their completeness state in relation to the
"General" description............................................................................................................45
Figure 44: State of the Classification description before enriching its content.................46
Figure 45: Teacher practice context following the Italian taxonomy................................47
Figure 46: Description of the Generic Skills developed with use of the selected resources
...................................................................................................................................................48
Figure 47: Classification tab after applying changes...........................................................49
Figure 48: Pedagogical description of the digital resources after applying changes........49
Figure 49: Final summary of the enriching process using the batch mode.......................50
Version History
Version
Date
Author(s)
Version 0.1
26/05/2010 María Jesús
Version 0.2
20/07/2010 María Jesús
Initial structure of the document and brief
description of each section.
Worksheets Review
Version 0.3
25/11/2010
How to install RICK
Version 0.4
18/12/2010
Version 0.5
27/01/2010
Version 0.6
03/01/2011
Version 0.7
07/01/2011
Version 0.8
14/02/11
Version 0.9
15/02/2011
Rodríguez-Triana
Rodríguez-Triana
María Jesús
Rodríguez-Triana
María Jesús
Rodríguez-Triana
María Jesús
Rodríguez-Triana
María Jesús
Rodríguez-Triana
Paolo Tosato &
Beatriz
CarramolinoArranz
Beatriz
CarramolinoArranz
María Jesús
Rodríguez-Triana
Description
Main functionalities
Toolbar description
Annotation interface
Review and feedback
Review and feedback
Update
1 Generic Description
RICK (Resource Integration Companion Kit) is a learning resources annotation tool for
teacher educators or expert annotators. It is based on CMM (Common Metadata Model), a
metadata model based on LOM2.
Since the metadata available in existing repositories cannot be expected to be CMM
compliant, or even new CMM-based metadata could be required to be created or enriched, the
Share.TEC project has envisioned the need of providing a supporting tool for the useroriented interactive annotation of resources, both from scratch or from existing annotations
that need to be enriched with TE-specific metadata following the CMM and the TEO
(Teacher Education Ontology) ontology. Taking into account that those tagged resources are
expected to be applied in the European context, it has been provided multilingual interface (at
the moment Bulgarian, Dutch, English, Italian, Spanish and Swedish) and a multicultural
functionality that shows the educational peculiarities of each context.
RICK has been envisioned as a system expansion tool, then, its main objective can be
understood as a means for enriching existing metadata records stored in the federated
repositories, adapting them to be processed by the main Share.TEC system.
2 How to install RICK
* Read this document in its entirety before installing “Standalone RICK”.
Although you can use the JAVA Web Start version without no installation process, we highly
recommend you install the “Standalone RICK” version on your computer if you expect to use
it off line. Accessing “JWS RICK” remotely is possible, but you could find some problems
due to the Internet connection. The “Standalone RICK” installation process requires two
steps:
1. Install Java 6.0 JRE.
2. Install “Standalone RICK”.
Below we describe the installation process for Windows, Mac and Linux OS. Feel free to skip
the section that does not apply to your system.
2.1 Installation Process for Windows (XP/Vista)
1. Install Java 6.0 (Note: If you have installed previous versions of Java you might
want to uninstall them.)
1. Download the file jdk-6u16-windows-i586.exe. Or choose the most appropriate
version for your system from http://www.java.com/en/download/manual.jsp
2. Double-click on the previously downloaded file and follow the installation
instructions (basically select next until installation is complete). Pay attention
to the installation path, it will be required later.
2
LOM specification: http://ltsc.ieee.org/wg12/files/LOM_1484_12_1_v1_Final_Draft.pdf
Figure 1: Select the program features you want to install and pay attention to the installation
path, it will be used later.
2. Update the PATH & CLASSPATH environment variables
Once you have installed Java, it is necessary to configure the environment variables to
execute JAVA application from every location of your system.
For Windows XP:
1. Choose Start -> Control Panel -> System -> Advanced
2. Click on Environment Variables, under System Variables, find PATH, and
click on it.
3. In the Edit tab, modify PATH by adding the location of the class to the current
PATH value. If you do not have the item PATH, you may select to add a new
variable and add PATH as the name and the location of the class as the value.
For Windows Vista:
1.
2.
3.
4.
Right click on “My Computer” icon
Choose “Properties” from the context menu
Click on “Advanced system settings”
In the Edit tab, modify PATH by adding the location of the class to the current
PATH value. If you do not have the item PATH, you may select to add a new
variable and add PATH as the name and the location of the class as the value.
If you're not sure where to add the path, add it to the right end of the "Path" in the User
Variables. A typical value for PATH is:
C:\Program Files\Java\jdk1.6.0_<version>\bin
Click "Set", "OK" or "Apply" and close de window.
Notes:
◦ PATH environment variable is a series of directories separated by semicolons (;) and is not case sensitive. Microsoft Windows looks for
programs in the PATH directories in order, from left to right.
◦ You should only have one bin directory for a JDK in the path at a time.
Those following the first instance are ignored. If one is already present,
update it to jdk1.6.0_<version>\bin.
◦ If you are not sure where to add the path, add it to the right end of the
PATH in the User Variables.
◦ Find more information in
http://www.oracle.com/technetwork/java/javase/install-windows189425.html
To check whether CLASSPATH is set on Microsoft Windows NT/2000/XP, execute
the following:
C:> echo %CLASSPATH%
If CLASSPATH is not set you will get a CLASSPATH: %CLASSPATH%. To
modify the CLASSPATH, execute the following order or use the same procedure you
used for the PATH variable (adding a point “.” after a semi-colon):
SET CLASSPATH=%CLASSPATH%;.
3. Install “Standalone RICK” software (run.bat)
1. Download the file RICK.rar from http://www.gsic.uva.es/RICK/
2. Once you have unrared the previously downloaded file, you will see a folder
where you will find the “Standalone RICK” application (an apple). Notice that
unlike Java, “Intemediate RICK” does not have an installation process. Once
you have unrared the file you are done.
2.2 Installation Process for Mac OS X
1. Install Java
YOU MAY HAVE JAVA ALREADY. Keep in mind that Macs already have Java
installed so you could skip this step if Java is already present in your machine. You
can check the Java version you have by opening a command window and executing
"java –version". Also, you may want to go ahead, install “Standalone RICK” (see next
step) and then check the version you have.
If you would like to install java 6.0 you may want to check the site
http://www.java.com/en/download/manual.jsp. Notice that there is a Java 6.0 version
for 64-bit, Intel-based Mac computers (http://support.apple.com/kb/HT1856)
2. Install “Standalone RICK”: (run.sh)
1. Download the file RICK.rar from: http://www.gsic.uva.es/RICK/
2. Once you have unrared the previously downloaded file, you will see a folder
where you will find the “Standalone RICK” application (run.sh). Once you
have unrared the file you are done.
2.3 Installation for Linux & Solaris
1. Install Java
YOU MAY HAVE JAVA ALREADY. Keep in mind that Macs already have java
installed so you could skip this step if java is already present in your machine. You can
check the java version you have by opening a command window and executing "java –
version". Also, you may want to go ahead, install “Standalone RICK” (see next step)
and then check the version you have.
If you would like to install java 6.0 you may want to check the site
http://www.java.com/en/download/manual.jsp.
2. Update the PATH & CLASSPATH environment variables
Once you have installed Java, it is necessary to configure the environment
variables to execute JAVA application from every location of your system (for
more info Path Setting Tutorial).
1. To find out if the java executable is in your PATH, execute:
% java -version
This will print the version of the Java executable, if it can find it. If you get
error java: Command not found. Then path is not properly set.
To find out which java executable the first one found in your PATH, execute:
% which java
2. For bash Shell:
a) Edit the startup file (~/ .bashrc)
b) Modify the PATH variable:
PATH=/usr/local/jdk1.6.0/bin
c) export PATH
d) Save and close the file
e) Open new Terminal window
f) Verify the PATH is set properly
% java -version
For C Shell (csh):
a) Edit startup file (~/ .cshrc)
b) Set Path
set path=(/usr/local/jdk1.6.0/bin )
c) Save and Close the file
d) Open new Terminal window
e) Verify the PATH is set properly
% java -version
To check whether CLASSPATH is set on Solaris or Linux, execute the following:
C:> echo %CLASSPATH%
If CLASSPATH is not set you will get a CLASSPATH: Undefined variable error.
To modify the CLASSPATH, execute the following order:
SET CLASSPATH=%CLASSPATH%;.
or use the same procedure you used for the PATH variable adding a point “.” after a
semi-colon. See the Setting the Class Path technical note for further information.
3. Install “Standalone RICK”: (run.sh)
a. Download the file RICK.rar from http://www.gsic.uva.es/RICK/
b. Once you have unrared the previously downloaded file, you will see a folder
where you will find the “Standalone RICK” application (run.sh). Notice that
unlike Java, “Intemediate RICK” does not have an installation process. Once
you have unrared the file you are done.
Software Sources
At some point you might be interested in looking at the following sites. In
particular, those using a platform different from Windows or Mac OS X might
need to access software from:
•
Java: http://java.sun.com/javase/downloads/index.jsp
3 User Manual
3.1 Main Functionalities
The first window of this tool will offer you the main functionalities, as it is shown in Figure
2:
1. Creating a new description: if you want to describe one learning object form scratch,
click on this piece of the apple (Figure 2, number 1) or choose File – New
Description on the tool bar. This opens a menu in which you can select a template
from local.
2. Creating a template: you can create a template to use as the basis for creating new
descriptions. To achieve this aim, click on this piece of the apple (Figure 2, number 2)
or choose File – New Template on the tool bar.
3. Enriching a previous description: it is possible to enrich one previous description
clicking on this piece of the apple (Figure 2, number 3) or choosing File – Open
description. You will be asked for the source of the file (local or external repository).
If you choose to open a local file, the “Open dialogue box” will appear; otherwise, if
you decide download the metadata record from the repository, the tool will connect to
the repository to find all the records available (go to “Repository configuration” for
further information). Then select the file you want to open and click Open.
4. Enriching several descriptions at the same time: similar to previous option, clicking
on this functionality (Figure 2, number 4) several resources could be open at the same
time for their edition both from local or from an external repository. If you choose to
open a local file, the “Open dialogue box” will appear; otherwise, if you decide
download the metadata record from the repository, the tool will connect to the
repository to find all the records available (go to “Repository configuration” for
further information). Then select those files you want to open and click Open.
Figure 2: RICK main functionalities
To start the annotation process, click on the “Start Process” button located at bottom of the
window and the annotation interface will appear .
Figure 3: Click on "Start process" to continue
3.2 Toolbar
The toolbar offers three different types of functionalities:
1. File: offer the same functionalities provided in the main window (see section Main
Functionalities for a more detailed description).
Figure 4: Toolbar file options
2. Tools: this menu allows the user to configure source and destiny repositories (this
functionality is detailed in Section 3.2.1) and choose the interface language. Clicking
on “Select language” all the available languages will be shown, currently Bulgarian,
Dutch, English, Italian, Spanish and Swedish.
Figure 5: Toolbar tools options
3. Help: clicking on the “Show help panel” option, the left panel will be showed or
hidden depending on the previous state.
Figure 6: Toolbar help options
3.2.1 Repository configuration
This functionality allows the user to register repositories that will be either harvested or used
for publishing the obtained metadata records. Depending on the repository type, there are
some requirements: repositories used for harvesting have to be reachable via OAI-PMH3
3
OAI-PMH: The Open Archives Initiative Protocol for Metadata Harvesting
(http://www.openarchives.org/OAI/openarchivesprotocol.html)
protocol and those devoted to publishing must offered an SPI 4 interface. By default both
repositories, the one used for harvesting and the one used for publishing, will be the
Share.TEC Repository (see Figure 7). By the way, other repositories can be registered as
follows: clicking on the “Add” button, the form shown in Figure 8 will be shown. Those
required fields have been highlighted with an asterisk.
Figure 7: Repository default configuration
The first field represents the repository base URL and a couple of examples have been given
in order to detect this value easily. These examples are based on the regular expression that
this kind of URLs usually follow when OAI-PMH or SPI are used for harvesting or
publishing.
The name is expected to be a string in human language. This will be the label that will be
shown to the user for its identification.
The user and password must be filled just in case they are need. For example, this situation is
very common in repositories used for publishing, since specific permissions could be required
to modify or include metadata content.
The purpose defines if the repository will be used for harvesting or publishing. If it is use for
harvesting, then the different types of metadata models and sets that currently exists will be
obtained (just in case there is an open internet connection)., allowing the user to specify a
more concrete subset of metadata records. On the other hand, if the repository is being
registered for publishing, the user will be asked for introducing the path of a truststore file
and its password (both must me provided by the repository admin).
Figures 8 and 9 exemplify the registration of the Share.TEC Repository for harvesting and
publishing. The base URLs foe each purpose are:
4
SPI: Simple Publishing Interface
(ftp://ftp.cen.eu/CEN/Sectors/TCandWorkshops/Workshops/CWA16097.pdf)
•
•
Harvesting: http://fedora-production.sharetec.it.fmi.uni-sofia.bg:8080/oaiprovider/?
Publishing: http://fedora-production.sharetec.it.fmi.uni-sofia.bg:8080/fedora
Introducing the repository description is recommended to specify the “metadata set” from
where metadata will be harvested (this restriction will reduce the time needed for harvesting)
or published (otherwise, it will be difficult to find them out of a collection).
Figure 8: Adding a new repository for harvesting
Special attention should be paid when the purpose of the repository is “publishing”. The user
has to introduce the same user and password that have been assigned in the Share.TEC
Portal. Afterwards, it is mandatory to provide the truststore file. Clicking on “Find
truststore ...” choose the file “client.keystore”, which password is “changeit”. Remember to
activate the check button “Save as default” in those repository descriptions that will be in use.
Figure 9: Adding a new repository for publishing
3.3 Annotation interface
Looking at Figure 7, the user will see the common view of the annotation interface. It is
divided into 5 areas:
1. Title: contains the title of the resource that is currently selected.
2. Buttons: allows the user to finish the annotation process and go to the next step. If a
template is being use, a button will appear offering the option of cleaning its content.
3. Resources: this panel is only shown if several resources are being edited at the same
time. It contains the set of selected resources and two views: if the the user is using the
template, he can decide which subset of resources will be updated with the changes
introduced in the template; otherwise, using the single view, the content of selected
resource is shown allowing to introduce changes only in this item.
4. Tabs: each tab represent the different areas used to describe resources. General
gathers together the main fields that characterize a resource such as title, description,
language or keywords. Life Cycle registers all those people or entities who have
contributed to the current state of the resource (authors, editors, publishers …). MetaMetadata stores the set of people or entities who have been involved in the resource
annotation process. Technical includes the digital content location and use this
information to classify the resource according to its format (MIME types 5). Rights
defines the restrictions of use. Classifications offers an educational description of the
digital content according to three different branches: knowledge area, educational and
skill level. And finally, Pedagogical identifies those aspects related to the employment
mode, interactivity type or its pedagogical structure.
5. Forms: contain the set of fields used to describe the digital content according to the
*
different areas. Those attributes preceded by
are required, that is to say: to obtain
a proper resource description this information must be known. Regarding this
property, the quality of each tab is measured taking into account the completeness of
its attributes, distinguishing among three possible situations:
Mandatory information missing
Recommended fields missing
Full description
The state of each form is shown in its tab title.
6. Help: this panel shows the description of each tab and its attributes when the user
clicks on the icon located next label:
5
MIME types: http://www.iana.org/assignments/media-types/
Figure 10: Annotation Interface
3.3.1 General tab
This category groups the general information that describes a learning object (or digital
content) as a whole. The elements used for that description are:
1. Identifier: a required element that represents a globally unique label that identifies the
learning object. This element is defined by the designation of the cataloguing scheme
(DOI, HANDLE, ISBN, ISSN, PURL, URI, URL or URN) and its assigned value in
the catalogue.
2. Title: this value is mandatory and should contain the name given to the learning object
at least in its mother tongue language. It is recommended to provide this information
in other languages in order to facilitate future searches, mainly in English.
3. Descriptions: as well as it happens with the title, this is a mandatory field that should
contain the description of the digital content using the resource language and
preferably any one else, underlining the English like one of most useful in this kind of
context.
4. Language: this element is required and represents the primary human language used
to communicate the content of the resource to the intended user.
5. Keywords: are a set of words or phrases that describes the learning object. The
keywords can be provided in several languages. To add a new language it is necessary
to choose one from the list offered in the combo box and press on “Add language”.
After it, a new column will appear in the table, and each keyword, represented by the
rows, can be translated into so many languages the table contains.
If any element from 1 to 4 is missing, the general description will not verify the minimum
requirements the quality, and it will be represented by the error symbol. If all these 4 values
are provided but not the keywords, the information will be enough but incomplete (denoted by
the warning icon). An finally if every field is introduced, the description will be complete
(symbolized with a tick).
Figure 11: General tab
3.3.2 Life-Cycle tab
This category describes the history and current state of the learning object and those entities
who have been involved during that process. To complete the description of these contributors
it is necessary to specify the Role played (auhor, publisher, editor, content provider or
unknown) the Date when it happens, the Name and Surname and, whenever possible, the
information contact via Email.
This information can be introduced typing or importing a specific Vcard file that contains the
required content. To add a contributor it is mandatory to provide all the information apart
from the Email.
The Life Cycle description will not verify the minimum requirements if there is no
contributor, which is represented by the symbol error. If at least one entity or person has been
introduced, the description will be complete (symbolized with a tick).
Figure 12: Life Cycle tab
3.3.3 Meta-metadata tab (shortly removed)
This category describes the metadata record itself, gathering together the identifier of the
current metadata record, the description of those contributors who have been involved in the
metadata generation process and the language employed to describe the learning object.
As it was mentioned in the Life Cycle tab, to complete the description of these contributors it
is necessary to specify the Role played (creator or validator) the Date when it happens, the
Name and Surname and, whenever possible, the information contact via Email.
This information can be introduced typing or importing a specific Vcard file that contains the
required content. To add a contributor it is mandatory to provide all the information apart
from the Email
The Meta-metadata description will not verify the minimum requirements if the identifier or
at least one contributor is missing, which is represented by the symbol error. If both are
given, the category will be enough filled but to be complete the language will have to be
provided (symbolized with a tick).
Figure 13: Meta-metadata tab
3.3.4 Technical tab
This category describes the technical requirements and characteristics of the learning object
by means of its:
1. location: which means the URL that provides access to the digital content.
2. format: represents the technical datatype of the learning resource. It can be obtained
automatically activating the option “Obtain format automatically” whenever the
location has been introduced and the url of the resource contains the file extension.
To minimum information required in this tab is the “Resource location” (represented by
warning) and it will be complete if the format is known (represented by tick). Otherwise, if
none of these fields are filled, an error symbol will be shown in the tab tittle.
Figure 14: Technical tab
3.3.5 Rights tab
This category describes the intellectual property rights and conditions of use for the learning
object. This information is represented by two fields:
1. Costs: indicates whether the use of the resource implies payment.
2. Copyright: if there are copyrights or other restrictions associated to the use of the
resource, it will be necessary to fill in a further description with a free text or choosing
among the different Creative Common Licences.
Filling the copyright information is required (warning), otherwise this tab will be incomplete
and an error symbol will appear in the title tab. If not only the copyright but also the
information related to the costs is introduced, the completeness of this tab will be reached
(tick).
Figure 15: Rights tab
3.3.6 Classifications tab
This category describes the learning content according to three different classification systems
(see Figure 15):
1. Discipline: classifies the resource in relation to the knowledge area.
2. Educational level: categorizes the digital resource in terms of the educational
institution, the teacher practice context or the information cultural agency where such
resource has been used.
3. Skill level: represents those grades of experience that the students are supposed to
develop working with the resource.
Adding or editing a previous classification (by means of the “Add” or “Edit” buttons) a pop
up, will be shown (find an example in Figure 18). Each classification consists of:
1. Context: this field allows user to choose a specific description taking into account the
multicultural aspects regarding one of the available countries. If there is no restriction
the first option “None specific context” will be chosen by default.
2. Source: if there are several topics in the selected classification, this combo splits them
by topics.
3. Taxonomy: each combo represent a deeper specification level to describe the previous
selection.
Figure 16: Classifications tab
Figure 17: Multicultural classification of the "Teacher practice context" based on the
Italian taxonomy
Though the information provided in this tab it is not mandatory is very relevant from the
educational point of view. That is the reason why if one or several classifications are missing
the completeness state of this tab will appear like correct though incomplete (represented by
warning), otherwise if every parameter is described the tab will be shown as complete
(represented by tick).
3.3.7 Pedagogical tab
This section regards metadata that are specific for teacher educators communities and that are
not considered in the most well known standards used to describe learning resources (DC,
LOM ...). The pedagogical description of the digital resource takes into account the following
fields:
1. Employment mode: is a feature which defines what fruition modalities (presence,
distance or blended) are supported by the digital content.
2. Interactivity type: describes the prevalent nature of the interaction that is to be
activated by the digital content.
3. Digital content type: states the specific type of digital content taking into account the
level of pedagogical structuring, the level of formalization and the intended end-user
role. Mainly there a two groups the pedagogically structured (resources for learners,
pedagogically design patterns, lesson plans and learning design units) and the nonpedagogically structured. By selecting among different types of digital content, a
further questionnaire will be shown in order to provide more specific features
(pedagogical structure, didactic strategy or collaboration level).
Figure 18: Pedagogical tab
As it was mentioned in the previous tab, though the information provided in the pedagogical
description it is not mandatory is very relevant from the educational point of view. That is the
reason why if one or several classifications are missing the completeness state of this tab will
appear like correct though incomplete (represented by warning), otherwise if every parameter
is described the tab will be shown as complete (represented by error).
3.4 Summary: metadata completeness
This last window offers a summary informing about the completeness of each tab and allows
the user to return to the previous description (1), exit without saving (2) or save changes (3).
Figure 18 shows an example where some categories are complete, others are recommended to
be enriched and the rest are incomplete. It is important to take into account that those
descriptions that do not contain the mandatory information will not be offered to the
community, so if the user uploads them, they will not be shown from the portal.
Figure 19: Summary and save menu
If the user wants to save the description locally it will be required the path of the output file.
In order to upload the description to the Share.TEC repository, remember to configure the
publishing repository (see section 3.2.1).
As figure 19, it is possible to obtain the analysis of the metadata quality. This information will
be provided by means of a file called “MetadataQuality_Date_Time.txt”that will be created in
the tool folder.
4 RICK Worksheet: Enriching a resource
4.1 Overview of the example
This activity is devoted to offer an overview of RICK behaviour in the most common scenario
that involves the enrichment of metadata records. This scenario intends to illustrate the
capabilities of RICK current prototypes, thus providing certain level of evidence on the
validity of the design and implementation decisions.
The scenario explains a typical situation in which teacher educators want to share, by means
of the Share.TEC System, resources that have previously been annotated and stored in other
existing repositories (probably lacking specific teacher education metadata). The support of
the Share.TEC system (including RICK and MMF) to the scenario can be carried out in two
phases. In a first phase (that has been previously executed) the MMF supports the potential
migration of metadata records harvested from the existing repository before they are stored
into the Share.TEC intermediate repository. In the second phase (implemented along this
Worksheet), the user of the RICK tool enriches the harvested metadata records by adding
specific metadata (mainly regarding Teacher Education issues) thus making the enriched
records ready to be harvested by the Share.TEC Central Repository.
4.2 Enriching a metadata record with RICK
Once the records from the external repository, lacking TE specific information, are stored into
the Share.TEC Intermediate Repository, they can be enriched before making them available to
the Share.TEC Central Repository. In this example we will suppose that the user in charge
of enriching the record has certain knowledge of the semantics of the TE specific fields of
the CMM.
The first step for RICK is to harvest metadata records to be enriched from the Share.TEC
Intermediate Repository. Then, the forms-based Graphical User Interface of the RICK tool
will be used to enrich the description of these resources (introducing some relevant LOM
information as well as TE specific metadata conforming to the CMM structure and TEO
vocabularies). Once the user considers that he/she has entered all the appropriate TE metadata
(the RICK tool at least will tell the user which mandatory metadata is still missing) he/she
asks the RICK tool to store the enriched CMM metadata record into the Share.TEC
repository. The TE-specific new version of this metadata record can then be used, once it is
harvested by the Share.TEC central repository, by the Share.TEC searching and brokering
functions so as to decide whether these resources can be used to more precisely respond to
other teacher educators’ queries.
Step 1: Select File from Fedora Intermediate Repository
Once the user has opened the tool, the main window offers four options (see Figure 20):
▪ Generate new description
▪ Generate a new template
▪ Edit a previous description
▪ Edit several descriptions at the same time
Please, select the third one and, if you have internet connection, click on button “Find in
Repository”. For enabling the user to select the metadata record to enrich, RICK launches a
new window showing the titles list obtained from those metadata records stored in the
Share.TEC Intermediate Repository (see Figure 21).
Figure 20: First step - Choose task
Among the different shown resources please, select the one called “Social network analysis
support for an IBL wiki-based course” and click on “Download”.
If there is no internet connection available, click on button “Find Locally”. Then, open the
folder “examples” and select the file “WorksheetEnriching.xml”.
Figure 21: Select file from Fedora Intermediate Repository
Figure 22: Open file "examples/WorksheetEnriching.xml"
Now, click on “START PROCESS” button (see Figure 23). The tool will download the
information from the repository and will show several forms to describe the resource. Some
fields will contain the retrieved information from the original description of this resource.
Figure 23: Start enriching process
Step 2: Resource description
The user, by means of the RICK tool, should review the migration results and add some
additional information that would improve the resource description. The following figures
show how RICK enables the representation of the idea of the resource that a teacher educator
has in mind.
▪ General Tab:
Paying attention to the different fields we can realize that almost all this information has been
obtained from the original metadata instance, apart from the “Identifier Catalogue” (see
Figure 24). Taking into account that all the fields marked with the symbol “*” are
mandatory, the user will have to provide this information. This is the case of the catalog used
to describe the resource identifier. Please, choose “URL” from the “Catalogue” list.
Figure 24: General tab - First view of the content obtained from the XML
The paper titled: “Social network analysis support for an IBL wiki-based course” is available
in: http://gsic.tel.uva.es/download.php?lang=en&article=123. The main ideas of this
document are collected in the following abstract:
“Inquiry-Based Learning can be benefited from computer support enabling more effective and deeper learning processes.
Existing approaches to support collaboration, such as interaction analysis based on the idea of social networks, can be applied to this goal. We present in this paper our current work towards the application of two existing tools (SAMSA and RoleAdaptIA) to an IBL-based course for pre-service teachers in our
University.”
In order to interact with the tool, the reader could add this description in his/her mother
tongue. Please, click on button “Add” under the label “Title”. A pop up will appear asking for
the language and the text. Select the language from the list and write the translation of the title: “Social network analysis support for an IBL wiki-based course”. After, click on “Accept”
(see Figure 25).
Figure 25: Add new title
The topic of this learning object could be described by means of the keywords “ InquiryBased Learning (IBL), Social Network Analysis (SNA), collaborative learning, Interaction Analysis (IA), and Wiki-based course ” (see Figure 26). These keywords are
shown in the keywords table. Please, in the keywords section, select from the language dropdown list your mother tongue, and then click on “Add language” button. A new column will
appear in the keywords table. Please, place the cursor on the corresponding cell and translate
each keyword into the new language (see Figure 26).
Figure 26: General description of the article
Once the user has finished this task, select the next tab called “LifeCycle”. At his moment the
tab “General” will change showing a “tick”. It means that not only mandatory but also optional fields have been filled. If along the process steps we use the button “Refresh” the tool will
actualize the state of the current tab, showing a tick, warning or error symbol as appropriate.
▪ LifeCycle Tab:
The set of authors can be seen at the beginning of the document, as well as their organizations
and emails address (see Figure 27)
Alejandra Martínez-Monés1, Sara Villagrá-Sobrino2, Roberto Santos-Fernández2, Rocío Anguita-Martínez2,Iván M. Jorrín-Abellán3
1
Department of Computer Science. University of Valladolid, Spain
2
Department of Pedagogy. University of Valladolid, Spain.
3
CIRCE. University of Illinois at Urbana-Champaign, USA
[email protected], {rocioan, sarena, rsanfer}@pdg.uva.es, [email protected]
As it happened in the previous tab, this information has been automatically obtained from the
original metadata instance. If the user wants to:
▪ add one contributor, please click on “Add”. A pop up with required fields will arise.
▪ modify one of the existing authors, please select one them and then click on “Edit”. A
pop up with current author description will arise and its fields can be changed.
▪ delete one contributor, please select the one you want to remove and click on
“Delete”. After this, this person will disappear from the list.
Figure 27: LifeCycle
Once you have finished, please click on the next tab “Meta-Metadata”. At this moment, the
tab “LifeCyle” should show a “tick”.
▪ Meta-metadata Tab:
This information was not available in the original description (based on DC) so the user will
have to fill out these fields. Please, follow these steps (see Figure 28):
1. Choose “URL” from the Identifier “Catalogue” list.
2. Copy in the “entry ”field the “URL”: http://fedora32.it.fmi.unisofia.bg:8080/fedora/get/Worksheet:record.540923a8675550f638f65c133cdb880d
3. Add a new contributor. Click on “Add” button and fill in all the fields with your personal information.
4. The description of this metadata is written in English, so please: choose “En - English”
from the “Language” list.
Figure 28: Meta-Metadata
When you finish, go to he next tab: “Technical”. The previous one should change its state and
show a “tick”.
▪ Technical Tab:
This tab has no information filled. As you can see in the tab, a “stop symbol” is shown. It
means that there are unknown mandatory fields.
The digital object is available in the URL:
http://gsic.tel.uva.es/uploaded_files/87330_Martinezetal-RealTime-ICLS2008.pdf. Copy the
URL of this resource in the “Location” field. As it can be seen in this address, its extension is
“.pdf”. If the user does not know the MIME Type, just check the option “Obtain format automatically”. The tool will suggest the MIME Type more appropriate (see Figure 29).
Figure 29: Resource technical description
Once you have finished, please click on the next tab “Rights”. At this moment, the tab
“Technical” should show a “tick”.
▪ Rights Tab:
This resource has no intellectual property rights and the use of this learning object requires no
payment or condition of use. Please select these values from the list “Cost” and “Copyright”
(see Figure 30).
The field Description is marked with “**”, it means that if there are copyrights or conditions
of use they must be described in this field.
Figure 30: Rights and restrictions of use
Let’s go to the next tab: “Classifications”. The element Rights should change its state and
show a “tick” instead of the warning symbol.
▪ Classifications Tab:
Though the previous information could be interesting, from the TE point of view the main incentive would be to share how he/she has worked with this paper (specific TE fields). To introduce a new classification please click on button “Add” located under each specific classification purpose (see Figure 31).
Figure 31: Classifications form
The following experience description belongs to a teacher educator that applied this resource
in her own practice, specifically in her Doctorate lectures about “Research Methodology” at
the Faculty of Education in the University of Valladolid (Spain), with the aim of delivering
this article among the students to be analyzed (see Figure 32). Then, please click on the button
“Add” and a new form will be shown.
Figure 32: Educational level of our teacher’s practice
The practice consisted on providing the document that students had to read, focused on a
teaching and research methodology that followed the Information and Communication
Technologies applied to Education (ICT applied to Education) course for “Postgraduated
Teachers”. This information represents the purpose “discipline”. Please, select from the lists
the elements shown in Figure 33.
Figure 33: Resource discipline
We will provide another classification: please click on the button “Add” and a new form will
be shown. Our teacher proposed this activity to the students with the purpose of illustrating
them different methodologies that they could apply in their future practices. This description
provides the information to classify the resource in terms of the “Skill level”. Please, select
from the lists the elements showed in Figure 34.
Figure 34: Skill level of the students
When the user changes to the last tab (“Pedagogical”), the Classification state will be turned
into a “tick”.
Figure 35: Classifications set
▪ Pedagogical Tab:
Please look at the icon shown in this tab: Warning symbol. It means that all the mandatory
fields are known but there is some optional information that is not available. This tab is
marked with a warning symbol because all this information is optional.
To fill this form, our teacher has been asked again, and this is her pedagogical description of
the resource: The teacher delivered this article to each one of the students attending to her lecture. She gave the following questions to reflect on and discuss later with her:
• The integration of ICT in the curricula of Spanish education centers.
• Kind of methodology applied in the ICT course.
• How they deal with the Interaction Analysis.
• Pros and cons of this methodology practice.
Due to the resource is an article, its content has no pedagogical structure. In fact, it has been
used as reference material, in the context of this specific Doctorate course, for learning and
analyzing different methodology types. See Figure 36, and select from the lists the same
options.
Figure 36 : Pedagogical description of this resource according to our teacher’s experience
Once you have finished, click on “Finish” button, located on the right top of the window.
Step 3 - Metadata Publishing
Last window shows a summary of the process and the completeness of the metadata (see
Figure 37). The user can store this metadata in local and/or publish it into the intermediate
repository.
Figure 37: Final summary of the enrinching process
Please, check that the option “Publish into repository” has been activated and click on “SAVE
changes”. (**This last functionality has been blocked temporally**)
At the end of the process, the Start Window will be shown again. Once the user finishes the
annotation process, RICK validates this information and generates a metadata record with the
resource description and publishes the generated CMM metadata instance in the Share.TEC
Intermediate Repository. As soon as the information from the Intermediate Repository is
harvested and ingested in the Central Repository, it will be available for searching and
brokering.
5 RICK Worksheet: Enriching several
resources
5.1 Overview of the example
The following example illustrates a common scenario where a currently federated repository
contains information about their resources but not regarding to the pedagogical aspect.
“Athena, who is an expert annotator of TE resources and has a wide knowledge of the CMM
and the TEO vocabularies, has spent many hours describing her resources from scratch,
filling those more objective fields (title, description, keywords, authors …). After this process,
she has realized that many of them have similar profiles from a TE point of view:
▪ All of them belong to a common discipline: “Training of trainers”
▪ They have been used in the same educational level: “Tertiary Education”
▪ All of them are tutorials for resource-based learning: it means that all of them share the
same pedagogical description. These resources can be employed in blended learning
scenarios, their pedagogically structure type is guided, and finally, the use of these
resources requires working individually and in small groups.
Obviously, if Athena had known the resources profile from the beginning, she could have
defined a template with this description and have applied it in the annotation process
avoiding providing this information in every resource. However, it is not necessary to review
them one by one, by means of RICK she can add these fields easily.”
The following section shows how to enrich a set metadata records when resources present
similar characteristics using RICK.
5.2 Enriching several metadata records simultaneously with
RICK
Step 0: Configure the source repository
To download the previous metadata records, first it is necessary to add the new repository.
Please, go to the “Tool bar” and choose“Tool/Repository Configuration” (see Figure 36).
Figure 38: Toolbar tools options
Clicking on the “Add” button , a form will be displayed. Introduce the following description
in each field as it is done in Figure 37:
1.
2.
3.
4.
5.
Base URL: http://fedora.sharetec.it.fmi.uni-sofia.bg:8080/oaiprovider/?
Name: CIRDFA Repository
There is no user or password
Purpose: harvesting
Metadat set: among the list of sets choose the one called “CIRDFA_Collection”
Finally check the “Save as default” option and click on “Accept”.
Figure 39: Configuring the CIRDFA Repository for harvesting
Step 1: Select File from Fedora Intermediate Repository
Once the repository has been configured, select the last one of the four options offered in the
main window (see Figure 38):
▪ Generate new description
▪ Generate a new template
▪ Edit a previous description
▪ Edit several descriptions at the same time
Now, click on the “Find in Repository” button as it is pointed out in the mentioned Figure
(internet connection is required to harvest the repository).
Figure 40: First step - Choose the option "Edit the existing descriptions of multiple resources"
The tool launches a new window showing the titles list obtained from those metadata records
stored in the CIRDFA Repository (see Figure 39). Please, activate the “Select all” option and
click on “Download”.
Figure 41: Select all the files harvested from the CIRDFA Repository
Now, click on “START PROCESS” button and the tool will download the information from
the repository.
Figure 42: Click on "Start process" to continue
Step 2: Resource description
Looking at Figure 41, you will find on the left the set of resources and an icon describing the
completeness state of their description attending to each category.
Figure 43: List of downloaded resources and their completeness state in relation to the "General" description
Changing to “Single view” and selecting one item from the list, you will see the description
already available in CIRDFA's repository about each resource.
▪ Classifications Tab:
Jumping to the Classification tab you can see that the description of this tab is incomplete in
many cases (see Figure 42). Though some of them contain some annotations, do not be
worried about duplicating their description, new tags will be add just in case there is no one
equals.
Figure 44: State of the Classification description before enriching its content.
All the resources used in this example have the following profile: they are tutorials offered
for resource-based learning in order to complete the students’ view about a teaching and
research methodology that followed the Information and Communication Technologies
applied to Education (ICT applied to Education) course for “Postgraduated Teachers”.
Now we will introduce each one of these characteristics step by step
First, you will classify these resources in terms of discipline. Click on the “Add” button
located under this label and a pop up will appear with the same form shown in Figure 43.
Since this area do not depend on any specific context, leave the default option (“None specific
context”). Do the same with the source field, since it has no subbranch the source will not
change. Finally, to find the proper knowledge area, choose from the boxes the options:
“Education / Teacher training and education science broad programs/ Edcucational
technololgy”. When you have finished, click on “Accept” and a new line with your
description will appear in the discipline table.
Let's move on the educational level description. These digital contents have been resources
for students of “Master universitario de nivelo” in Italy. Figure 43 describes how to introduce
this characteristic. Try to follow the same steps as we have done before to introduce the
“Teacher practice context / Second stage of tertiary education” in no particular context.
Figur
e 45: Teacher practice context following the Italian taxonomy
The last educational classification is based on skills. With the use of these resources is
expected to work on the students' skill on explaining and illustrating. Figure 44 describes how
to introduce the “illustrate” skill. Follow the same steps to introduce the skill “explain”.
Figure 46: Description of the Generic Skills developed with use of the selected resources
As we said before, all these resources have the same description so, select all of them and
click on “Apply changes”. Looking at the resource list, you will see how all the resources
states have turned into a green tick (Figure 45).
Figure 47: Classification tab after applying changes
▪ Pedagogical Tab:
As well as the previous tab, regarding the pedagogical point of view all these resources share
the same profile. All of them are tutorials for resource-based learning that can be employed in
blended learning scenarios. Their type of pedagogically structure is guided, and finally, the
use of these resources requires working individually and in small groups. Figure 46 offers a
whole view of this tab after adding the new description.
Figure 48: Pedagogical description of the digital resources after applying changes
Try to introduce all these characteristics and pay attention when apply changes to all
resources: their states will turn from a yellow warning to a green tick. Once you have
finished, click on “Finish” button, located on the right top of the window.
Step 3 - Metadata Publishing
Last window shows a summary of the process and the completeness of the metadata (see
Figure 47). The user can store this metadata in local and/or publish it into the intermediate
repository.
Figure 49: Final summary of the enriching process using the batch mode
Please, check that the option “Publish into repository” has been activated and click on “SAVE
changes”.
Now, we have a set of metadata records with almost the maximum quality. To achieve this
state, Athena only had to study the common characteristics of her resources and introduce this
information easily using RICK. Scenarios like this one occur frequently when users work with
big amounts of resources that belong to one specific context.
At the end of the process, the Start Window will be shown again. Once the user finishes the
annotation process, RICK validates the content, generates all the metadata records and
publishes them in the Share.TEC Intermediate Repository. As soon as the information from
the Intermediate Repository is harvested and ingested in the Central Repository, users will
find all the information added about Teacher Education, what was previously not possible in
CIRDFA, the original repository used by Athena.