1
™ EXIO II User’s Manual Version 1.0 © 2009-2010 NeoMedia Europe AG, Würselen (Germany) While the information in this manual has been compiled with great care, it may not be deemed an assurance of product characteristics. NeoMedia shall be liable only to the degree specified in the terms of sale and delivery. The information contained herein is proprietary and is provided solely for the purpose of allowing customers to operate and/or service NeoMedia scanners and is not to be released, reproduced, or used for any other purpose without the written permission of NeoMedia. Information and specifications in this manual are subject to change without notice. No liability for technical errors or omissions. Trademarks NeoMedia and EXIO are registered trademarks of NeoMedia Technologies, Inc. Throughout this manual, other trademarked names may be mentioned. These may also be trademarks or registered trademarks of their respective owners. Rather than putting a trademark (TM or ®) symbol in every occurrence of a trademarked name, we are using the names only in an editorial fashion, and to the benefit of the trademark owner, with no intention of infringement. NeoMedia Europe AG Jens-Otto-Krag-Str. 11 52146 Würselen Germany T: +49 2405 499 22-0 F: +49 2405 499 22-99 [email protected] www.neom.com Table of contents – Page 3 Table of contents ABOUT THIS MANUAL 6 INTRODUCTION 7 CHAPTER 1 CHAPTER 2 UNPACKING AND CONNECTING YOUR EXIO II 8 Packaging contents Acquainting with the reading system Product components Rear panel connectors Connecting your EXIO II Inserting the SIM card Connecting to the power supply Connecting to the power supply 9 10 10 10 11 11 11 12 CONFIGURING YOUR EXIO II VIA IN-DEVICE TOUCHSCREEN 16 Accessing the setup menu Understanding the settings icons Retrieving information (Menu: Information) Setting up the interfaces (Menu: Connection) Selecting the interfaces Defining a hostname Configuring a Proxy Server Enabling and configuring GPRS Configuring Ethernet Configuring USB Configuring validation (Menu: Validation) Defining display messages (Menu: Messages) Diverse service settings (Menu: Service) Changing setup menu PIN number Importing, exporting and restoring to factory default settings Updating EXIO II Uploading media files 17 19 21 22 22 23 25 27 30 32 33 35 37 37 39 41 43 NeoMedia Europe AG Jens-Otto-Krag-Str. 11 52146 Würselen Germany T: +49 2405 499 22-0 F: +49 2405 499 22-99 [email protected] www.neom.com Page 4 - Table of contents CHAPTER 3 Changing the language (Menu: Language) Defining the barcode types (Menu: Decoder) Calibrating the touchscreen (Menu: Display) Configuring the sound (Menu: Sound) Adjusting the printer (Menu: Printer) Setting up the time (Menu: Time) Using the camera (Menu: Camera) Saving settings 46 47 48 50 51 52 54 56 CONFIGURING YOUR EXIO II VIA WEB BROWSER INTERFACE 57 Installing the driver for USB cable Connecting EXIO II to the host system Locating the driver file Loading the driver Starting web interface configuration Retrieving information (Menu: Information) Setting up the interfaces (Menu: Connection) Entering a hostname Using a proxy server Enabling and configuring GPRS Configuring Ethernet Configuring USB Configuring validation (Menu: Validation) Defining display messages (Menu: Messages) Miscellaneous service settings (Menu: Service) Changing setup menu PIN number Importing, exporting and restoring to factory default settings Updating EXIO II Viewing system log Changing the language (Menu: Language) Defining the barcode types (Menu: Decoder) Calibrating the touchscreen (Menu: Display) Configuring the sound (Menu: Sound) Adjusting the printer (Menu: Printer) Setting up the time (Menu: Time) Configuring the camera (Menu: Camera) Saving settings 58 58 59 59 60 62 63 63 64 65 66 67 68 69 71 71 72 73 74 75 76 77 78 79 80 81 82 A P P E N D I X A MISCELLANEOUS Warranty conditions of NeoMedia Europe AG 1. Warranty coverage 2. Warranty period 3. Warranty procedure NeoMedia Europe AG Jens-Otto-Krag-Str. 11 52146 Würselen Germany T: +49 2405 499 22-0 F: +49 2405 499 22-99 [email protected] www.neom.com 83 84 84 84 84 Table of contents – Page 5 4. Suspension of the warranty 5. Operating mistakes 6. Additional regulations Declaration of conformity Digital Inputs / Outputs Pin assignment and wiring description Pin-out of black RJ45 connector Open Source Software notice Elektra Fontconfig Freetype libjpeg libpng zlib OpenNTPD PPPD NeoMedia Europe AG Jens-Otto-Krag-Str. 11 52146 Würselen Germany T: +49 2405 499 22-0 F: +49 2405 499 22-99 [email protected] www.neom.com 85 85 85 87 89 89 89 90 90 91 91 91 91 91 92 94 Page 6 - About this manual About this manual Many thanks for choosing our EXIO II reading system. This manual comprises all information to install and run your EXIO II reading system. Furthermore, it contains important instructions on configuring userspecific parameters – either via the in-device touchscreen (Chapter 2) or via web browser interface (Chapter 3). Please read the following instructions carefully to ensure the best possible usage and performance from your EXIO II reading system. Please contact our support for any further questions. NeoMedia Europe AG Jens-Otto-Krag-Str. 11 52146 Würselen Germany Phone Fax E-Mail +49 2405 49922-50 +49 2405 49922-99 [email protected] NeoMedia Europe AG Jens-Otto-Krag-Str. 11 52146 Würselen Germany T: +49 2405 499 22-0 F: +49 2405 499 22-99 [email protected] www.neom.com Introduction – Page 7 Introduction EXIO II is a multi-application smart scanner that has been designed to read and process 2D symbols (such as Data Matrix codes from mobile phone displays) as well as printed 1D and 2D barcodes. By combining a high-speed digital scanner processor and high-resolution camera, EXIO II automatically recognizes 2D barcodes sent as multimedia message service (MMS), enhanced message service (EMS), or smart message (picture message) to any compatible mobile phone. The cutting-edge technology of the EXIO II smart scanner allows your customers to redeem mobile tickets and coupons. It makes it easy and affordable for you to use creative new mobile marketing text messaging programs to track and reach customers. With a colour LCD touch-screen and video playback capability, the EXIO II can be customized to display targeted content and brand messages. It is the ideal tool for one-to-one marketing applications and highly targeted customer campaigns. NeoMedia Europe AG Jens-Otto-Krag-Str. 11 52146 Würselen Germany T: +49 2405 499 22-0 F: +49 2405 499 22-99 [email protected] www.neom.com Seite 8 - Unpacking and connecting your EXIO II – Packaging contents CHAPTER 1 Unpacking and connecting your EXIO II This chapter introduces the EXIO II reading system and describes how to connect it. Packaging contents Product components Rear panel connectors Inserting the SIM card Connecting to the power supply Connecting a data cable (optional) NeoMedia Europe AG Jens-Otto-Krag-Str. 11 52146 Würselen Germany T: +49 2405 499 22-0 F: +49 2405 499 22-99 [email protected] www.neom.com Unpacking and connecting your EXIO II – Packaging contents - Page 9 Packaging contents Please check the completeness of your EXIO II package. The package consists of: 1 EXIO II with inserted 2 GByte microSD storage card 1 wall plug power (Europe, UK, USA) supply with 3 exchangeable mains adapters 1 USB cord (USB-A to USB-B) 1 Ferrite (Star-Tec) Note: If any of these items are missing or damaged, please contact our support. Retain the shipping box in case you need to ship the scanner NeoMedia Europe AG Jens-Otto-Krag-Str. 11 52146 Würselen Germany T: +49 2405 499 22-0 F: +49 2405 499 22-99 [email protected] www.neom.com Page 10 - Unpacking and connecting your EXIO II – Acquainting with the reading system Acquainting with the reading system Product components Brand name Touch-screen display with integrated on-screen keypad Scanner window Rear panel connectors On/off switch Serial connector (for maintenance purposes) USB client connector 2 USB host connectors Power connector Digital in/out connector Ethernet connector NeoMedia Europe AG Jens-Otto-Krag-Str. 11 52146 Würselen Germany T: +49 2405 499 22-0 F: +49 2405 499 22-99 [email protected] www.neom.com Unpacking and connecting your EXIO II – Connecting your EXIO II - Page 11 Connecting your EXIO II To run EXIO II, you need a SIM card with the following specifications: 3.3 V small size activated for GPRS Inserting the SIM card Unscrew the sim card cover (marked with a SIM card logo) under the EXIO II reader and take it off as shown in the picture below. The black SIM card holder is now visible. To open the holder move it in direction of the speaker grill and fold it up. Unsert the SIM card as indicated. Fold the holder down and move it back until it locks. Put the cover back in place and fasten the locking screw. Unscrew the sim card cover NeoMedia Europe AG Jens-Otto-Krag-Str. 11 52146 Würselen Germany T: +49 2405 499 22-0 F: +49 2405 499 22-99 [email protected] www.neom.com Page 12 - Unpacking and connecting your EXIO II – Connecting your EXIO II Connecting to the power supply Connect the correct mains adapter to fit your local wall socket to the wall plug power supply. Remark: Power connectors vary from country to country. Make sure you using the appropriate mains adaptor. The provided wall plug power supply 3 exchangeable mains adapters. To remove and change the adapter, slide panel down vertically into position as described in c. Insert then appropriate adaptor into the power supply as described in d. are has the the Remark: Your EXIO II provides a wide range of connectivity options. Apart from establishing a connection to the backend via the built-in GPRS data modem, there is the possibility to use the built-in Ethernet or USB interface to establish a cable connection to your host system Important: Only connect one data cable at a time (i.e. Ethernet or USB client interface) and attach the supplied ferrite to this cable. Position the ferrite approx. 10 cm from the connector facing towards the EXIO II device. NeoMedia Europe AG Jens-Otto-Krag-Str. 11 52146 Würselen Germany T: +49 2405 499 22-0 F: +49 2405 499 22-99 [email protected] www.neom.com Unpacking and connecting your EXIO II – Connecting your EXIO II - Page 13 Connect your EXIO II to the provided wall plug power supply and plug the power supply into a standard power outlet. Switch on the EXIO II reading system with the on/off-switch at the rear of the device. The switch locks in to positions: ON: pushed-in / OFF: released Press the switch to lock in the ON position “Connecting…“ will appear on the display, then “Ready” which indicates the device readiness for operation. Remark: The default connection is Ethernet. If you want to connect EXIO II via GPRS, you have to configure it via the setup mode. Please refer to “Enabling and configuring GPRS” on page 27. Following messages will be then displayed: “Initializing system…”, then “Connecting…“ and possibly “Updating…“. After a few seconds “Ready” will appear on the display to indicate the device readiness for operation. This signifies that the inserted SIM card is activated for GPRS, the available PIN number has been properly entered, the APN name has been correctly entered and the device is online. NeoMedia Europe AG Jens-Otto-Krag-Str. 11 52146 Würselen Germany T: +49 2405 499 22-0 F: +49 2405 499 22-99 [email protected] www.neom.com Page 14 - Unpacking and connecting your EXIO II – Connecting your EXIO II Important: If EXIO II hasn’t been properly connected to GPRS, some error messages may appear. If the message “GPRS Error – Please specify SIM PIN” appears, it means that you entered the wrong PIN number. In this case, please read chapter “Changing setup menu PIN number” on page 37. The error message “GPRS Error – No SIM card” indicates that the SIM card is missing. You must ensure that the SIM card is correctly inserted. In this case, please read chapter “Inserting the SIM card” on page 11. NeoMedia Europe AG Jens-Otto-Krag-Str. 11 52146 Würselen Germany T: +49 2405 499 22-0 F: +49 2405 499 22-99 [email protected] www.neom.com Unpacking and connecting your EXIO II – Connecting your EXIO II - Page 15 The error message „GPRS Error – Automatic APN selection failed, please enter manually!” specifies that the GPRS APN is invalid or the GPRS network is not available. In this case, please refer to chapter “Enabling and configuring GPRS” on page 27. Please contact our support for any further questions. NeoMedia Europe AG Jens-Otto-Krag-Str. 11 52146 Würselen Germany T: +49 2405 499 22-0 F: +49 2405 499 22-99 [email protected] www.neom.com Seite 16 - Configuring your EXIO II via in-device touchscreen CHAPTER 2 Configuring your EXIO II via in-device touchscreen Important: There are two ways to configure and setup the EXIO II reading system – either via the in-device touchscreen (Chapter 2) or via web browser interface (Chapter 3). This chapter describes how to configure the EXIO II via device to meet your specific needs and individual area of application. On the one hand, you can set some display variables like time, date and language, but also maintain media files and define messages to be displayed. On the other hand, you can set up the communication between EXIO II and host system, and define which types of 2D barcodes will be decoded. Retrieving device information Setting up the interfaces Configuring validation Defining display messages Servicing (Updating & uploading files) Changing the language Defining the barcode types Calibrating the touchscreen Configuring the sound Adjusting the printer Setting up the time Using the camera NeoMedia Europe AG Jens-Otto-Krag-Str. 11 52146 Würselen Germany T: +49 2405 499 22-0 F: +49 2405 499 22-99 [email protected] www.neom.com Configuring your EXIO II via in-device touchscreen - Page 17 Accessing the setup menu To activate the configuration mode of your EXIO II and access the setup menu, please process as follows: Touch the upper left corner and then the upper right corner of the display. Enter the menu PIN and touch the green checkbox to confirm. Important: The default menu PIN number is set to “1234”. Remark: Change the menu PIN to a personal PIN number to avoid unwanted manipulation of the EXIO II system („Service“ -> “Security”). Please refer to chapter “Changing setup menu PIN number” on page 37. NeoMedia Europe AG Jens-Otto-Krag-Str. 11 52146 Würselen Germany T: +49 2405 499 22-0 F: +49 2405 499 22-99 [email protected] www.neom.com Seite 18 - Configuring your EXIO II via in-device touchscreen Tap Exit button to exit the setup menu. Important: After tapping “OK” on any of the setup pages, the changes are accepted and active. However, they are not permanently stored and are reset to the original values after a system reset or power-off. Tapping “Save” permanently applies the changes to non-volatile memory as new default values. Remark: After editing and before leaving the setup menu with Exit, apply changes. by tapping Save”. To completely quit the configuration mode, tap the buttons Back and Exit as often as indicated. “Ready” indicates the device readiness for operation. NeoMedia Europe AG Jens-Otto-Krag-Str. 11 52146 Würselen Germany T: +49 2405 499 22-0 F: +49 2405 499 22-99 [email protected] www.neom.com Configuring your EXIO II via in-device touchscreen - Page 19 Understanding the settings icons Once you have accessed the configuration mode and entered into the setup menu, following settings application icons will appear. Tap any settings application icon to get started. Tap Back or Cancel to get back the EXIO II’s setup menu. Information Connection Validation Messages Service Language Decoder Displays EXIO II system information like serial number, firmware version, MAC address, IMEI and serial numbers of CPU module and hardware. Get information on the host name, use and configure the proxy server, GPRS, Ethernet and USB device. Configure the concentrator and define regular expressions. Specify the messages that will be displayed when initializing the EXIO II, in idle and offline mode as well as during and/or after the decoding of barcodes. Change the PIN number to access the configuration mode, update your device and settings as well as load and manage media files. Change the language of the configuration mode. Select the type of 2D and 1D barcodes to be decoded. NeoMedia Europe AG Jens-Otto-Krag-Str. 11 52146 Würselen Germany T: +49 2405 499 22-0 F: +49 2405 499 22-99 [email protected] www.neom.com Seite 20 - Configuring your EXIO II via in-device touchscreen Display Sound Printer Time Camera Define the brightness of the display and calibrate the touch screen. Define the sound volume. Configure the printer that has been connected to the EXIO II reading system. Set the clock and date, and define the time zone. Displays a video live stream of the camera image in a separate window. NeoMedia Europe AG Jens-Otto-Krag-Str. 11 52146 Würselen Germany T: +49 2405 499 22-0 F: +49 2405 499 22-99 [email protected] www.neom.com Configuring your EXIO II via in-device touchscreen - Page 21 Retrieving information (Menu: Information) Switch in the configuration mode as described in chapter “Accessing the setup menu” on page 17. Tap the Information icon to get information on the device: − Firmware version − Serial number − MAC address − CPU Module Serial Number − IMEI − Hardware Serial Number Tap the Back button to return to the setup menu. Tap the Exit button to quit the configuration mode. “Ready” indicates the device readiness for operation. NeoMedia Europe AG Jens-Otto-Krag-Str. 11 52146 Würselen Germany T: +49 2405 499 22-0 F: +49 2405 499 22-99 [email protected] www.neom.com Seite 22 - Configuring your EXIO II via in-device touchscreen Setting up the interfaces (Menu: Connection) Selecting the interfaces Switch in the configuration mode as described in chapter “Accessing the setup menu” on page 17. Tap the Connection icon to access the interface types. Remark: Tap any settings application icon to get started. Tap Back or Cancel to come back the EXIO II’s setup menu. Tap Exit to leave the configuration mode. Ready indicates the device readiness for operation. NeoMedia Europe AG Jens-Otto-Krag-Str. 11 52146 Würselen Germany T: +49 2405 499 22-0 F: +49 2405 499 22-99 [email protected] www.neom.com Configuring your EXIO II via in-device touchscreen - Page 23 Defining a hostname Switch in the configuration mode as described in chapter “Accessing the setup menu” on page 17. Tap the Connection icon to access the interface types. Tap the Hostname icon. A hostname may be already keyed in. Remark: The default hostname is always the serial number. Tap OK to confirm it. Otherwise tap in the text entry field to open the virtual keyboard that can be used like a standard hardware keyboard. NeoMedia Europe AG Jens-Otto-Krag-Str. 11 52146 Würselen Germany T: +49 2405 499 22-0 F: +49 2405 499 22-99 [email protected] www.neom.com Seite 24 - Configuring your EXIO II via in-device touchscreen Use the [←] key of the onscreen keyboard to delete the existing hostname and enter another one. Remark: Use the keys [abc] and [ABC] to switch between lower and upper case letters. Use the key [12.,] to switch into the numerical mode and the key [&<|] to insert special characters. Remark: Use the key [↵] next to the text entry field to hide the onscreen keyboard. Tap the key for OK to confirm the new hostname or the left key Cancel to go back to the submenu “Connection”. Tap the Back button to return to the setup menu. Tap the Exit button to quit the configuration mode. “Ready” indicates the device readiness for operation. NeoMedia Europe AG Jens-Otto-Krag-Str. 11 52146 Würselen Germany T: +49 2405 499 22-0 F: +49 2405 499 22-99 [email protected] www.neom.com Configuring your EXIO II via in-device touchscreen - Page 25 Configuring a Proxy Server Switch in the configuration mode as described in chapter “Accessing the setup menu” on page 17. Tap the Connection icon to access the interface types. Tap the Proxy Server icon. Check the box Use Proxy Server to use a proxy server. Tap in the entry field for Server to type the IP address of the proxy server. A virtual keyboard will be displayed. NeoMedia Europe AG Jens-Otto-Krag-Str. 11 52146 Würselen Germany T: +49 2405 499 22-0 F: +49 2405 499 22-99 [email protected] www.neom.com Seite 26 - Configuring your EXIO II via in-device touchscreen Remark: The onscreen keyboard can be used as a usual keyboard. Use the [←] key to delete entries. Use the keys [abc] and [ABC] to switch between lower and upper case letters. Use [12.,] to switch in the numerical mode and the [&<|] to insert special characters. Tap in the other entry fields for Port, Username and Password to define the proxy port number, secure it with username and password. Remark: Use the key [↵] next to the text entry field to hide the onscreen keyboard. Tap the key for OK to confirm your proxy server settings or the left key Cancel to go back to the submenu “Connection”. Tap the Back button to return to the setup menu. Tap the Exit button to quit the configuration mode. “Ready” indicates the device readiness for operation. NeoMedia Europe AG Jens-Otto-Krag-Str. 11 52146 Würselen Germany T: +49 2405 499 22-0 F: +49 2405 499 22-99 [email protected] www.neom.com Configuring your EXIO II via in-device touchscreen - Page 27 Enabling and configuring GPRS Switch in the configuration mode as described in chapter “Accessing the setup menu” on page 17. Tap the Connection icon to access the interface types. Tap the GPRS icon. If GPRS was already enabled, Network Operator and network signal quality will be checked and displayed. Remark: For enabling the GPRS functionality, check the box Enable GPRS and press OK. The next time you enter the GPRS icon again, Network Operator and Signal Quality will be checked and displayed. PIN number , GPRS access point name (APN), User Name and Password will be automatically identified and will be already displayed. NeoMedia Europe AG Jens-Otto-Krag-Str. 11 52146 Würselen Germany T: +49 2405 499 22-0 F: +49 2405 499 22-99 [email protected] www.neom.com Seite 28 - Configuring your EXIO II via in-device touchscreen Important: PIN number will be checked after tapping the OK button. You will be allowed only three attempts to key in the correct PIN number. If you fail, the SIM card will block you out. Remark: If the error message GPRS Error – Automatic APN selection failed, please enter manually appears, please enter the access point name manually. . Tap in the appropriate entry fields for APN to key in and/or change the GPRS access point name. The virtual keyboard will open. Remark: The onscreen keyboard can be used as a usual keyboard. Use the [←] key to delete entries. Use the keys [abc] and [ABC] to switch between lower and upper case letters. Use [12.,] to switch in the numerical mode and the [&<|] to insert special characters. Remark: Use the key [↵] next to the text entry field to hide the onscreen keyboard. NeoMedia Europe AG Jens-Otto-Krag-Str. 11 52146 Würselen Germany T: +49 2405 499 22-0 F: +49 2405 499 22-99 [email protected] www.neom.com Configuring your EXIO II via in-device touchscreen - Page 29 Tap in the other entry fields for Username and Password to secure the GPRS connection with username and password. Scroll down the list to select the frequency band. This will be initially set by default to Auto. Tap the key for OK to confirm your GPRS settings or the left key Cancel to go back to the submenu “Connection”. Tap the Back button to return to the setup menu. Tap the Exit button to quit the configuration mode. “Ready” indicates the device readiness for operation. NeoMedia Europe AG Jens-Otto-Krag-Str. 11 52146 Würselen Germany T: +49 2405 499 22-0 F: +49 2405 499 22-99 [email protected] www.neom.com Seite 30 - Configuring your EXIO II via in-device touchscreen Configuring Ethernet Switch in the configuration mode as described in chapter “Accessing the setup menu” on page 17. Tap the Connection icon to access the interface types. Tap the Ethernet icon. Check the box Enable Ethernet to allow a connection with Ethernet. Check the box Use DHCP to activate DHCP. Tap in the next entry fields to define the IP Address, the Netmask, the Gateway address, the domain name server (DNS) and the Domain name. The virtual keyboard will open. NeoMedia Europe AG Jens-Otto-Krag-Str. 11 52146 Würselen Germany T: +49 2405 499 22-0 F: +49 2405 499 22-99 [email protected] www.neom.com Configuring your EXIO II via in-device touchscreen - Page 31 Remark: The onscreen keyboard can be used as a usual keyboard. Use the [←] key to delete entries. Use the keys [abc] and [ABC] to switch between lower and upper case letters. Use [12.,] to switch in the numerical mode and the [&<|] to insert special characters. Remark: Use the key [↵] next to the text entry field to hide the onscreen keyboard. Tap the key for OK to confirm your Ethernet settings or the left key Cancel to go back to the submenu “Connection”. Tap the Back button to return to the setup menu. Tap the Exit button to quit the configuration mode. “Ready” indicates the device readiness for operation. NeoMedia Europe AG Jens-Otto-Krag-Str. 11 52146 Würselen Germany T: +49 2405 499 22-0 F: +49 2405 499 22-99 [email protected] www.neom.com Seite 32 - Configuring your EXIO II via in-device touchscreen Configuring USB Switch in the configuration mode as described in chapter “Accessing the setup menu” on page 17. Tap the Connection icon to access the interface types. Tap the USB icon. Use the scroll down list to specify the mode of connection. There are 3 options: Ask on connection, Mass Storage and Ethernet. Tap the key for OK to confirm your USB settings or the left key Cancel to go back to the submenu “Connection”. Tap the Back button to return to the setup menu. Tap the Exit button to quit the configuration mode. “Ready” indicates the device readiness for operation. NeoMedia Europe AG Jens-Otto-Krag-Str. 11 52146 Würselen Germany T: +49 2405 499 22-0 F: +49 2405 499 22-99 [email protected] www.neom.com Configuring your EXIO II via in-device touchscreen - Page 33 Configuring validation (Menu: Validation) Switch in the configuration mode as described in chapter “Accessing the setup menu” on page 17. Tap the Validation icon. Concentrator URL may be already keyed in. Tap in the text entry field to open the virtual keyboard and change the existing URL. NeoMedia Europe AG Jens-Otto-Krag-Str. 11 52146 Würselen Germany T: +49 2405 499 22-0 F: +49 2405 499 22-99 [email protected] www.neom.com Seite 34 - Configuring your EXIO II via in-device touchscreen Use the [←] key of the onscreen keyboard to delete the existing concentrator URL and enter another one. Remark: Use the keys [abc] and [ABC] to switch between lower and upper case letters. Use the key [12.,] to switch into the numerical mode and the key [&<|] to insert special characters. Remark: Use the key [↵] next to the text entry field to hide the onscreen keyboard. Tap the entry field for Regular Expression to open the virtual keyboard and define a new expression. Use the scrollbar to set the Reread Delay. This sets the time period before the EXIO II scanner can read the same barcode a second time. Setting a reread delay protects against accidental rereads of the same barcode. Tap the key for OK to confirm the validation settings or the left key Cancel to go back to the setup menu. Tap the Exit button to quit the configuration mode. “Ready” indicates the device readiness for operation. NeoMedia Europe AG Jens-Otto-Krag-Str. 11 52146 Würselen Germany T: +49 2405 499 22-0 F: +49 2405 499 22-99 [email protected] www.neom.com Configuring your EXIO II via in-device touchscreen - Page 35 Defining display messages (Menu: Messages) In this section, you can define the messages that will appear on the display when a barcode is being read. Switch in the configuration mode as described in chapter “Accessing the setup menu” on page 17. Tap the Messages icon. Default messages may be already keyed in. Remark: Use the vertical scroll bar to move up and down to the different messages. NeoMedia Europe AG Jens-Otto-Krag-Str. 11 52146 Würselen Germany T: +49 2405 499 22-0 F: +49 2405 499 22-99 [email protected] www.neom.com Seite 36 - Configuring your EXIO II via in-device touchscreen Tap in an entry field to open the virtual keyboard and change the existing message. Initialize indicates the display message for initializing, e.g. after restarting EXIO II. Idle specifies the message which will be displayed when EXIO II is ready for scanning codes. Code check indicates the message which will be displayed after a code has been read. In the meantime, the code will be checked for validity. Concentrator unreachable indicates the message which will be displayed if the concentrator is unreachable. Offline specifies the message which will be displayed when network connection is failing. Initial connect specifies the message which will be displayed when EXIO II is first connecting. No regular expression match indicates the message which will be displayed when the code comparison with the regular expression failed. Remark: The onscreen keyboard can be used as a usual keyboard. Use the [←] key to delete entries. Use the keys [abc] and [ABC] to switch between lower and upper case letters. Use [12.,] to switch in the numerical mode and the [&<|] to insert special characters. Remark: Use the key [↵] next to the text entry field to hide the onscreen keyboard. Tap the key for OK to confirm your message settings or the left key Cancel to go back to the setup menu. Tap the Exit button to quit the configuration mode. “Ready” indicates the device readiness for operation. NeoMedia Europe AG Jens-Otto-Krag-Str. 11 52146 Würselen Germany T: +49 2405 499 22-0 F: +49 2405 499 22-99 [email protected] www.neom.com Configuring your EXIO II via in-device touchscreen - Page 37 Diverse service settings (Menu: Service) Changing setup menu PIN number Switch in the configuration mode as described in chapter “Accessing the setup menu” on page 17. Tap the Service icon to access the submenus. Tap the Security icon. NeoMedia Europe AG Jens-Otto-Krag-Str. 11 52146 Würselen Germany T: +49 2405 499 22-0 F: +49 2405 499 22-99 [email protected] www.neom.com Seite 38 - Configuring your EXIO II via in-device touchscreen Important: The default menu PIN number is set to “1234”. Remark: Change the menu PIN to a personal PIN number to avoid unwanted manipulation of the EXIO II system („Service“ -> “Security”). Please refer to chapter “Changing setup menu PIN number” on page 37. The default Setup PIN number is already keyed in. Tap OK to confirm it. Otherwise tap in the text entry field to open the virtual keyboard and change the Setup PIN. Remark: The onscreen keyboard can be used as a usual keyboard. Use the [←] key to delete entries. Use the keys [abc] and [ABC] to switch between lower and upper case letters. Use [12.,] to switch in the numerical mode and the [&<|] to insert special characters. Tap the key for OK to confirm the setup PIN number or the left key Cancel to go back to the submenu “Service”. Tap the Back button to return to the setup menu. Tap the Exit button to quit the configuration mode. “Ready” indicates the device readiness for operation. NeoMedia Europe AG Jens-Otto-Krag-Str. 11 52146 Würselen Germany T: +49 2405 499 22-0 F: +49 2405 499 22-99 [email protected] www.neom.com Configuring your EXIO II via in-device touchscreen - Page 39 Importing, exporting and restoring to factory default settings Switch in the configuration mode as described in chapter “Accessing the setup menu” on page 17. Tap the Service icon to access the submenus. Tap the Settings icon. NeoMedia Europe AG Jens-Otto-Krag-Str. 11 52146 Würselen Germany T: +49 2405 499 22-0 F: +49 2405 499 22-99 [email protected] www.neom.com Seite 40 - Configuring your EXIO II via in-device touchscreen To import settings, plug-in the USB flash drive in the EXIO II where you want to import the settings. Tap then the button Import from USB Drive. To export settings, plug-in the USB flash drive in the EXIO II to where you want to export the settings. Tap then the button Export to USB Drive. To reset the device settings to factory default ones, tap the button Restore Factory Defaults and confirm by tapping on Yes. Tap the Back button to return to the submenu “Service”. Tap the Back button to return to the setup menu. Tap the Exit button to quit the configuration mode. “Ready” indicates the device readiness for operation. NeoMedia Europe AG Jens-Otto-Krag-Str. 11 52146 Würselen Germany T: +49 2405 499 22-0 F: +49 2405 499 22-99 [email protected] www.neom.com Configuring your EXIO II via in-device touchscreen - Page 41 Updating EXIO II After restarting EXIO II, the update document will check the new settings. You can update your EXIO II using the menu function EXIO Update from the configuration mode. Switch in the configuration mode as described in chapter “Accessing the setup menu” on page 17. Tap the Service icon to access the submenus. Tap the EXIO Update icon. NeoMedia Europe AG Jens-Otto-Krag-Str. 11 52146 Würselen Germany T: +49 2405 499 22-0 F: +49 2405 499 22-99 [email protected] www.neom.com Seite 42 - Configuring your EXIO II via in-device touchscreen Tap the button Start Update to start updating your settings. Remark: You can change the Update Server URL by tapping in the entry field and using the virtual keyboard. Remark: The onscreen keyboard can be used as a usual keyboard. Use the [←] key to delete entries. Use the keys [abc] and [ABC] to switch between lower and upper case letters. Use [12.,] to switch in the numerical mode and the [&<|] to insert special characters. Tap the key for OK to confirm your update or the left key Cancel to go back to the submenu “Service”. Tap the Back button to return to the setup menu. Tap the Exit button to quit the configuration mode. “Ready” indicates the device readiness for operation. NeoMedia Europe AG Jens-Otto-Krag-Str. 11 52146 Würselen Germany T: +49 2405 499 22-0 F: +49 2405 499 22-99 [email protected] www.neom.com Configuring your EXIO II via in-device touchscreen - Page 43 Uploading media files You can upload images and videos from the memory card in order to customize and personalize your EXIO II reading system. The backend then can decide when these will be displayed and played. Switch in the configuration mode as described in chapter “Accessing the setup menu” on page 17. Tap the Service icon to access the submenus. Tap the Media Files icon. NeoMedia Europe AG Jens-Otto-Krag-Str. 11 52146 Würselen Germany T: +49 2405 499 22-0 F: +49 2405 499 22-99 [email protected] www.neom.com Seite 44 - Configuring your EXIO II via in-device touchscreen Remark: A second tab “USB Drive” may appear if a USB stick is plugged in. To copy files from the USB stick to the EXIO II memory card, check the box next to the file that you want to copy, and tap then on Install. They will be copied to the tab “Device”. NeoMedia Europe AG Jens-Otto-Krag-Str. 11 52146 Würselen Germany T: +49 2405 499 22-0 F: +49 2405 499 22-99 [email protected] www.neom.com Configuring your EXIO II via in-device touchscreen - Page 45 To delete files from the EXIO II memory card, check the box next to Graphics, Sounds and Videos that you want to delete. Tap then the Delete button to remove the selected files from the device. Tap the Back button to return to the setup menu. Tap the Exit button to quit the configuration mode. “Ready” indicates the device readiness for operation. NeoMedia Europe AG Jens-Otto-Krag-Str. 11 52146 Würselen Germany T: +49 2405 499 22-0 F: +49 2405 499 22-99 [email protected] www.neom.com Seite 46 - Configuring your EXIO II via in-device touchscreen Changing the language (Menu: Language) Switch in the configuration mode as described in chapter “Accessing the setup menu” on page 17. Tap the Language icon to access the language choice. Select a language. Tap the key for OK to confirm the language choice or the left key Cancel to go back to the setup menu. Tap the Exit button to quit the configuration mode. “Ready” indicates the device readiness for operation. NeoMedia Europe AG Jens-Otto-Krag-Str. 11 52146 Würselen Germany T: +49 2405 499 22-0 F: +49 2405 499 22-99 [email protected] www.neom.com Configuring your EXIO II via in-device touchscreen - Page 47 Defining the barcode types (Menu: Decoder) Switch in the configuration mode as described in chapter “Accessing the setup menu” on page 17. Tap the Decoder icon to access the language choice. Check the box next to each code type to switch on the decoding of 1D Barcodes, Data Matrix, QR Code and Aztec Code. Tap the key for OK to confirm your selections or the left key Cancel to go back to the setup menu. Tap the Exit button to quit the configuration mode. “Ready” indicates the device readiness for operation. NeoMedia Europe AG Jens-Otto-Krag-Str. 11 52146 Würselen Germany T: +49 2405 499 22-0 F: +49 2405 499 22-99 [email protected] www.neom.com Seite 48 - Configuring your EXIO II via in-device touchscreen Calibrating the touchscreen (Menu: Display) Switch in the configuration mode as described in chapter “Accessing the setup menu” on page 17. Tap the Display icon. Use the scroll bar to define the touchscreen brightness. Check the box Rotate 180° if you want to flip the display image. Tap the button “Calibrate Touchscreen” if you want to start the touchscreen calibration. Confirm with Yes or go back with No. NeoMedia Europe AG Jens-Otto-Krag-Str. 11 52146 Würselen Germany T: +49 2405 499 22-0 F: +49 2405 499 22-99 [email protected] www.neom.com Configuring your EXIO II via in-device touchscreen - Page 49 Important: Don’t use a pointy item to calibrate the touchscreen, otherwise you may damage the display screen! Tap the key for OK to confirm your settings or the left key Cancel to go back to the setup menu. Tap the Exit button to quit the configuration mode. “Ready” indicates the device readiness for operation. NeoMedia Europe AG Jens-Otto-Krag-Str. 11 52146 Würselen Germany T: +49 2405 499 22-0 F: +49 2405 499 22-99 [email protected] www.neom.com Seite 50 - Configuring your EXIO II via in-device touchscreen Configuring the sound (Menu: Sound) Switch in the configuration mode as described in chapter “Accessing the setup menu” on page 17. Tap the Sound icon. Use the scroll bar to define the volume. Tap the button “Play Sound” if you want to listen to the sound. The sound will be played. Tap the key for OK to confirm your settings or the left key Cancel to go back to the setup menu. Tap the Exit button to quit the configuration mode. “Ready” indicates the device readiness for operation. NeoMedia Europe AG Jens-Otto-Krag-Str. 11 52146 Würselen Germany T: +49 2405 499 22-0 F: +49 2405 499 22-99 [email protected] www.neom.com Configuring your EXIO II via in-device touchscreen - Page 51 Adjusting the printer (Menu: Printer) Switch in the configuration mode as described in chapter “Accessing the setup menu” on page 17. Tap the Printer icon. Use the drop down menu to select the Paper Roll Width. Use the drop down menu to select the Print Quality. Remark: If no printer is connected to the EXIO II, you won’t be able to proceed changing these settings. Tap the key for OK to confirm your settings or the left key Cancel to go back to the setup menu. Tap the Exit button to quit the configuration mode. “Ready” indicates the device readiness for operation. NeoMedia Europe AG Jens-Otto-Krag-Str. 11 52146 Würselen Germany T: +49 2405 499 22-0 F: +49 2405 499 22-99 [email protected] www.neom.com Seite 52 - Configuring your EXIO II via in-device touchscreen Setting up the time (Menu: Time) Switch in the configuration mode as described in chapter “Accessing the setup menu” on page 17. Tap the Time icon. Use the drop down menu to select your Time Zone. Check the box Use NTP if you want to use the Network Time Protocol to synchronize the EXIO II time to the reference time source. If you want to set up manually the time, deactivate the check box Use NTP and use the virtual keypad by tapping on a number in order to insert the current time and date. NeoMedia Europe AG Jens-Otto-Krag-Str. 11 52146 Würselen Germany T: +49 2405 499 22-0 F: +49 2405 499 22-99 [email protected] www.neom.com Configuring your EXIO II via in-device touchscreen - Page 53 Remark: The onscreen keyboard can be used as a usual keyboard. Use the [←] key to delete entries. Use the keys [abc] and [ABC] to switch between lower and upper case letters. Use [12.,] to switch in the numerical mode and the [&<|] to insert special characters. Remark: Use the key [↵] next to the text entry field to hide the onscreen keyboard. Tap the key for OK to confirm your message settings or the left key Cancel to go back to the setup menu. Tap the Exit button to quit the configuration mode. “Ready” indicates the device readiness for operation. NeoMedia Europe AG Jens-Otto-Krag-Str. 11 52146 Würselen Germany T: +49 2405 499 22-0 F: +49 2405 499 22-99 [email protected] www.neom.com Seite 54 - Configuring your EXIO II via in-device touchscreen Using the camera (Menu: Camera) You can use the livestream function of the camera to make snapshot photos and save them to a folder called “Snapshots” on the microSD card inserted into the internal microSD card slot. This microSD card can be accessed via a USB connection (Please refer to “Connecting EXIO II to the host system” on page 58). Switch in the configuration mode as described in chapter “Accessing the setup menu” on page 17. Tap the Camera icon. Remark: The live streamed image of the camera will appear in the window. Remark: You can use the loupe icon to zoom in the live streamed image. Once the image is enlarged, tap on it to reduce the size of the image. NeoMedia Europe AG Jens-Otto-Krag-Str. 11 52146 Würselen Germany T: +49 2405 499 22-0 F: +49 2405 499 22-99 [email protected] www.neom.com Configuring your EXIO II via in-device touchscreen - Page 55 Use the scroll bar to define the Target Brightness of the image that appears in the window. Remark: Target brightness indicates the grey-scale target value selected for automatic camera adjustment. Tap the disk icon to save the live streamed image. Tap the key for OK to confirm your settings or the left key Cancel to go back to the setup menu. Tap the Exit button to quit the configuration mode. “Ready” indicates the device readiness for operation. NeoMedia Europe AG Jens-Otto-Krag-Str. 11 52146 Würselen Germany T: +49 2405 499 22-0 F: +49 2405 499 22-99 [email protected] www.neom.com Seite 56 - Configuring your EXIO II via in-device touchscreen Saving settings Once you have made some settings, these have to be saved. The new parameter set of EXIO II will be then written to Flash memory. Attention: If you do not save, all your parameters and settings will be lost when the device is powered off. Tap the key for Save to save your settings. Tap the Exit button to quit the configuration mode. “Ready” indicates the device readiness for operation. NeoMedia Europe AG Jens-Otto-Krag-Str. 11 52146 Würselen Germany T: +49 2405 499 22-0 F: +49 2405 499 22-99 [email protected] www.neom.com Configuring your EXIO II via web browser interface - Page 57 CHAPTER 3 Configuring your EXIO II via web browser interface Important: There are two ways to configure and setup the EXIO II reading system – either via device (Chapter 2) or via web browser interface (Chapter 3). This chapter describes how to configure the EXIO II via web browser interface in order to carry out all necessary parameterizations and main settings to to achieve the best reading results, adapt them to your specific needs and suit your individual area of application. Connecting the EXIO II to host PC Installing the driver Parametrizing EXIO II Remark: If you use a USB cable as the link between the host PC and EXIO II, you need to install the Windows driver for the USB cable. The driver is provided with the EXIO II and is located on the device memory card. Please refer to chapter “Installing the driver for USB cable” on page 58 to learn how to connect your EXIO II to a host PC and install the driver. Remark: If you use a Ethernet cable as the link between the host PC and EXIO II, connect both Ethernet ports using an Ethernet cable and go directly to chapter “Starting web interface configuration“ on page 60 to keep configuring EXIO II. NeoMedia Europe AG Jens-Otto-Krag-Str. 11 52146 Würselen Germany T: +49 2405 499 22-0 F: +49 2405 499 22-99 [email protected] www.neom.com Seite 58 - MiscellaneousInstalling the driver for USB cable Installing the driver for USB cable Remark: The first time you connect the EXIO II via a USB cable to your host system, you need to help Windows locate and load the appropriate driver from installation directory located on the EXIO II memory card. The procedure depends on your Windows operating system version. Connecting EXIO II to the host system Take your EXIO II and connect it to the host PC USB port using a USB cable. Plug EXIO II into the wall using the provided cable. Switch on your PC and wait until Windows is started. Switch on the EXIO II reading system with the on/off-switch at the rear of the device. Press the switch on button Choose Mass Storage as the USB device mode by tapping on the appropriate button appearing on the EXIO II’s touchscreen. Following messages will be displayed: “Connecting…“ and then “Updating…“. After a few seconds “Ready” will appear on the display. “Ready” indicates the device readiness for operation. NeoMedia Europe AG Jens-Otto-Krag-Str. 11 52146 Würselen Germany T: +49 2405 499 22-0 F: +49 2405 499 22-99 [email protected] www.neom.com MiscellaneousInstalling the driver for USB cable - Page 59 Locating the driver file The Found New Hardware dialog box is displayed on your host system. Open My Computer and go to the Local Disk Volume where the EXIO II has been plugged via the USB cable. Open the folder Driver and select the file EXIO_RNDIS.inf. Copy and paste it to the desktop or your local disk C:/. Loading the driver Unplug the USB cable and plug it in again. Choose Ethernet as the USB device mode by tapping on the appropriate button appearing on the EXIO II’s touchscreen. “Ready” will appear on the display to indicate the device readiness for operation. Remark: If needed, log in with administration rights for the local computer. On the Found New Hardware Wizard window, Select Install from a list of specific location (Advanced) and click Next to continue. Select Search for the best driver in these locations and Include this location in search. Browse to the directory where you have previously saved the driver file EXIO_RNDIS.inf. and click then Next. Remark: If the Windows Logo testing dialog appears, click Continue Anyway. After the appropriate driver is found, click Finish to complete the installation. A new LAN connection has been automatically established. NeoMedia Europe AG Jens-Otto-Krag-Str. 11 52146 Würselen Germany T: +49 2405 499 22-0 F: +49 2405 499 22-99 [email protected] www.neom.com Seite 60 - MiscellaneousStarting web interface configuration Starting web interface configuration Switch on your computer and wait until Windows is started. Connect your EXIO II to your computer using a USB cable. Choose Ethernet as the USB device mode by tapping on the appropriate button appearing on the EXIO II’s touchscreen. “Ready” will appear on the display to indicate the device readiness for operation. The new LAN connection is automatically established. Start your internet browser. Enter following address: http://192.168.77.1 Enter the setup PIN number. NeoMedia Europe AG Jens-Otto-Krag-Str. 11 52146 Würselen Germany T: +49 2405 499 22-0 F: +49 2405 499 22-99 [email protected] www.neom.com MiscellaneousStarting web interface configuration - Page 61 Important: The default menu PIN number is set to “1234”. Remark: Change the menu PIN to a personal PIN number to avoid unwanted manipulation of the EXIO II system („Service“ -> “Security”). Please refer to chapter “Changing setup menu PIN number” on page 37. Click on Login. NeoMedia Europe AG Jens-Otto-Krag-Str. 11 52146 Würselen Germany T: +49 2405 499 22-0 F: +49 2405 499 22-99 [email protected] www.neom.com Seite 62 - MiscellaneousRetrieving information (Menu: Information) Retrieving information (Menu: Information) Start the web browser interface configuration as described in chapter “Starting web interface configuration” on page 60. Click on the Information button to get information on the device: − Firmware version − Serial number − MAC address − CPU Module Serial Number − IMEI − Hardware Serial Number Click on Logout to quit the web interface configuration. Important: Click on Save to save your settings and have them applied. If you do not save, all your parameters will be lost, also in case of a power interruption. NeoMedia Europe AG Jens-Otto-Krag-Str. 11 52146 Würselen Germany T: +49 2405 499 22-0 F: +49 2405 499 22-99 [email protected] www.neom.com MiscellaneousSetting up the interfaces (Menu: Connection) - Page 63 Setting up the interfaces (Menu: Connection) Entering a hostname Start the web browser interface configuration as described in chapter “Starting web interface configuration” on page 60. Click on Connection -> Hostname. A hostname may be already keyed in. Enter the desired host name into the Hostname entry field. Click on Apply to to apply your configuration settings to EXIO. Important: Click on Save to save your settings and have them permanently applied. If you do not save, all your parameters will be lost when the device is powered off. Click on Logout to quit the web interface configuration. NeoMedia Europe AG Jens-Otto-Krag-Str. 11 52146 Würselen Germany T: +49 2405 499 22-0 F: +49 2405 499 22-99 [email protected] www.neom.com Seite 64 - MiscellaneousSetting up the interfaces (Menu: Connection) Using a proxy server Start the web browser interface configuration as described in chapter “Starting web interface configuration” on page 60. Click on Connection -> Proxy Server. Check the box Use Proxy Server. Enter the IP address of the proxy server into the Server entry field. Enter the proxy port number into the Port entry field. Enter a username and password into the corresponding other entry fields to secure your proxy server. Click on Apply to to apply your configuration settings to EXIO. Important: Click on Save to save your settings and have them definitely applied. If you do not save, all your parameters will be lost, also in case of a power interruption. Click on Logout to quit the web interface configuration. NeoMedia Europe AG Jens-Otto-Krag-Str. 11 52146 Würselen Germany T: +49 2405 499 22-0 F: +49 2405 499 22-99 [email protected] www.neom.com MiscellaneousSetting up the interfaces (Menu: Connection) - Page 65 Enabling and configuring GPRS Start the web browser interface configuration as described in chapter “Starting web interface configuration” on page 60. Click on Connection -> GPRS. Check the box Enable GPRS. Network operator and network signal quality will be checked and displayed. A SIM PIN number and a GPRS access point name (APN) may be already displayed. Important: PIN number will be checked after restarting the system. You will be allowed only three attempts to key in the correct PIN number. If you fail, the SIM card will block you out. Enter a new SIM PIN and/or APN into the corresponding entry fields. Secure your GPRS by entering a username and password into the appropriate entry fields. Scroll down the list to select the frequency band. This will be initially set by default to Auto. Click on Apply to to apply your configuration settings to EXIO. Important: Click on Save to save your settings and have them definitely applied. If you do not save, all your parameters will be lost, also in case of a power interruption. Click on Logout to quit the web interface configuration. NeoMedia Europe AG Jens-Otto-Krag-Str. 11 52146 Würselen Germany T: +49 2405 499 22-0 F: +49 2405 499 22-99 [email protected] www.neom.com Seite 66 - MiscellaneousSetting up the interfaces (Menu: Connection) Configuring Ethernet Start the web browser interface configuration as described in chapter “Starting web interface configuration” on page 60. Click on Connection -> Ethernet. Check the box Enable Ethernet to allow a connection with Ethernet. Check the box Use DHCP to activate DHCP. IP Address, Netmask, Gateway address, domain name server (DNS) and Domain name are automatically entered. To define them manually, disable the check box Use DHCP. All entry fields will be empty. Enter then IP Address, the Netmask, the Gateway address, the domain name server (DNS) and the Domain name into the appropriate entry fields. Click on Apply to to apply your configuration settings to EXIO. Important: Click on Save to save your settings and have them definitely applied. If you do not save, all your parameters will be lost, also in case of a power interruption. Click on Logout to quit the web interface configuration. NeoMedia Europe AG Jens-Otto-Krag-Str. 11 52146 Würselen Germany T: +49 2405 499 22-0 F: +49 2405 499 22-99 [email protected] www.neom.com MiscellaneousSetting up the interfaces (Menu: Connection) - Page 67 Configuring USB Start the web browser interface configuration as described in chapter “Starting web interface configuration” on page 60. Click on Connection -> USB. Use the scroll down list to specify the mode of connection. There are 3 options: Ask on connection, Mass Storage and Ethernet. Click on Apply to to apply your configuration settings to EXIO. Important: Click on Save to save your settings and have them definitely applied. If you do not save, all your parameters will be lost, also in case of a power interruption. Click on Logout to quit the web interface configuration. NeoMedia Europe AG Jens-Otto-Krag-Str. 11 52146 Würselen Germany T: +49 2405 499 22-0 F: +49 2405 499 22-99 [email protected] www.neom.com Seite 68 - MiscellaneousConfiguring validation (Menu: Validation) Configuring validation (Menu: Validation) Start the web browser interface configuration as described in chapter “Starting web interface configuration” on page 60. Click on Validation. A Concentrator URL may be already keyed in. Click in the entry field to change and/or enter a new one. A Regular Expression may be already keyed in. Click in the entry field to change and/or enter a new one. Define the Reread Delay in the appropriate entry field. This sets the time period before the EXIO II scanner can read the same barcode a second time. Setting a reread delay protects against accidental rereads of the same barcode. Click on Apply to to apply your configuration settings to EXIO. Important: Click on Save to save your settings and have them definitely applied. If you do not save, all your parameters will be lost, also in case of a power interruption. Click on Logout to quit the web interface configuration. NeoMedia Europe AG Jens-Otto-Krag-Str. 11 52146 Würselen Germany T: +49 2405 499 22-0 F: +49 2405 499 22-99 [email protected] www.neom.com MiscellaneousDefining display messages (Menu: Messages) - Page 69 Defining display messages (Menu: Messages) In this section, you can define the messages that will appear on the display when a barcode is being read. Start the web browser interface configuration as described in chapter “Starting web interface configuration” on page 60. Click on Messages. Default messages may be already keyed in. Click in the entry fields to change the existing message and/or enter a new one. Initialize indicates the display message for initializing, e.g. after restarting EXIO II. Idle specifies the message which will be displayed when EXIO II ready for scanning codes. Code check indicates the message which will be displayed after a code has been read. In the meantime, the code will be checked for validity. Concentrator unreachable indicates the message which will be displayed if the concentrator is unreachable. Offline specifies the message which will be displayed when network connection is failing. NeoMedia Europe AG Jens-Otto-Krag-Str. 11 52146 Würselen Germany T: +49 2405 499 22-0 F: +49 2405 499 22-99 [email protected] www.neom.com Seite 70 - MiscellaneousDefining display messages (Menu: Messages) Initial connect specifies the message which will be displayed when EXIO II is first connecting. No regular expression match indicates the message which will be displayed when the code comparison with the regular expression failed. Click on Apply to to apply your configuration settings to EXIO. Important: Click on Save to save your settings and have them definitely applied. If you do not save, all your parameters will be lost, also in case of a power interruption. Click on Logout to quit the web interface configuration. NeoMedia Europe AG Jens-Otto-Krag-Str. 11 52146 Würselen Germany T: +49 2405 499 22-0 F: +49 2405 499 22-99 [email protected] www.neom.com MiscellaneousMiscellaneous service settings (Menu: Service) - Page 71 Miscellaneous service settings (Menu: Service) Changing setup menu PIN number Start the web browser interface configuration as described in chapter “Starting web interface configuration” on page 60. Click on Service -> Security. The default Setup PIN number is already keyed in. Important: The default menu PIN number is set to “1234”. Remark: Change the menu PIN to a personal PIN number to avoid unwanted manipulation of the EXIO II system („Service“ -> “Security”). Please refer to chapter “Changing setup menu PIN number” on page 37. Enter a new PIN number the entry field Setup PIN. Click on Apply to to apply your configuration settings to EXIO. Important: Click on Save to save your settings and have them definitely applied. If you do not save, all your parameters will be lost, also in case of a power interruption. Click on Logout to quit the web interface configuration. NeoMedia Europe AG Jens-Otto-Krag-Str. 11 52146 Würselen Germany T: +49 2405 499 22-0 F: +49 2405 499 22-99 [email protected] www.neom.com Seite 72 - MiscellaneousMiscellaneous service settings (Menu: Service) Importing, exporting and restoring to factory default settings Start the web browser interface configuration as described in chapter “Starting web interface configuration” on page 60. Click on Service -> Settings. To import settings, plug-in the USB flash drive in the EXIO II where you want to import the settings. Click then on the button Import from USB Drive. To export settings, plug-in the USB flash drive in the EXIO II to where you want to export the settings. Click then on the button Export to USB Drive. To reset the device settings to factory default ones, click on the button Restore Factory Defaults and confirm with OK. Click on Apply to to apply your configuration settings to EXIO. Important: Click on Save to save your settings and have them definitely applied. If you do not save, all your parameters will be lost, also in case of a power interruption. Click on Logout to quit the web interface configuration. NeoMedia Europe AG Jens-Otto-Krag-Str. 11 52146 Würselen Germany T: +49 2405 499 22-0 F: +49 2405 499 22-99 [email protected] www.neom.com MiscellaneousMiscellaneous service settings (Menu: Service) - Page 73 Updating EXIO II Start the web browser interface configuration as described in chapter “Starting web interface configuration” on page 60. Click on Service -> Update. Enter the URL for the server update into the field “Update Server URL”. Click on Apply to to apply your configuration settings to EXIO. Click on the button Start Update to start updating the device. Important: Click on Save to save your settings and have them definitely applied. If you do not save, all your parameters will be lost, also in case of a power interruption. Click on Logout to quit the web interface configuration. NeoMedia Europe AG Jens-Otto-Krag-Str. 11 52146 Würselen Germany T: +49 2405 499 22-0 F: +49 2405 499 22-99 [email protected] www.neom.com Seite 74 - MiscellaneousMiscellaneous service settings (Menu: Service) Viewing system log Start the web browser interface configuration as described in chapter “Starting web interface configuration” on page 60. Click on Service -> System Log. The System Log information will be displayed. Remark: This page is just for information. You cannot make any changes. Important: Click on Save to save your settings and have them definitely applied. If you do not save, all your parameters will be lost, also in case of a power interruption. Click on Logout to quit the web interface configuration. NeoMedia Europe AG Jens-Otto-Krag-Str. 11 52146 Würselen Germany T: +49 2405 499 22-0 F: +49 2405 499 22-99 [email protected] www.neom.com MiscellaneousChanging the language (Menu: Language) - Page 75 Changing the language (Menu: Language) Start the web browser interface configuration as described in chapter “Starting web interface configuration” on page 60. Click on Language. Use the scroll down menu to select the language. Click on Apply to to apply your configuration settings to EXIO. Important: Click on Save to save your settings and have them definitely applied. If you do not save, all your parameters will be lost, also in case of a power interruption. Click on Logout to quit the web interface configuration. NeoMedia Europe AG Jens-Otto-Krag-Str. 11 52146 Würselen Germany T: +49 2405 499 22-0 F: +49 2405 499 22-99 [email protected] www.neom.com Seite 76 - MiscellaneousDefining the barcode types (Menu: Decoder) Defining the barcode types (Menu: Decoder) Start the web browser interface configuration as described in chapter “Starting web interface configuration” on page 60. Click on Decoder. Check the box next to each code type to switch on the decoding of 1D Barcodes, Data Matrix, QR Code and Aztec Code. Click on Apply to to apply your configuration settings to EXIO. Important: Click on Save to save your settings and have them definitely applied. If you do not save, all your parameters will be lost, also in case of a power interruption. Click on Logout to quit the web interface configuration. NeoMedia Europe AG Jens-Otto-Krag-Str. 11 52146 Würselen Germany T: +49 2405 499 22-0 F: +49 2405 499 22-99 [email protected] www.neom.com MiscellaneousCalibrating the touchscreen (Menu: Display) - Page 77 Calibrating the touchscreen (Menu: Display) Start the web browser interface configuration as described in chapter “Starting web interface configuration” on page 60. Click on Display. Set the display brightness by entering a number between 0 and 255 into the Brightness entry field. Check the box Rotate 180° if you want to flip the display image. Click on the button “Calibrate Touchscreen” if you want to start the touchscreen calibration. Confirm with Yes or go back with Cancel. Click on Apply to to apply your configuration settings to EXIO. Important: Click on Save to save your settings and have them definitely applied. If you do not save, all your parameters will be lost, also in case of a power interruption. Click on Logout to quit the web interface configuration. NeoMedia Europe AG Jens-Otto-Krag-Str. 11 52146 Würselen Germany T: +49 2405 499 22-0 F: +49 2405 499 22-99 [email protected] www.neom.com Seite 78 - MiscellaneousConfiguring the sound (Menu: Sound) Configuring the sound (Menu: Sound) Switch in the configuration mode as described in chapter “Accessing the setup menu” on page 17. Click on Sound. Set the sound volume by entering a number between 0 and 63 into the Volume entry field. Click on the button “Play Sound” if you want to listen to the sound. The sound will be played. Click on Apply to to apply your configuration settings to EXIO. Important: Click on Save to save your settings and have them definitely applied. If you do not save, all your parameters will be lost, also in case of a power interruption. Click on Logout to quit the web interface configuration. NeoMedia Europe AG Jens-Otto-Krag-Str. 11 52146 Würselen Germany T: +49 2405 499 22-0 F: +49 2405 499 22-99 [email protected] www.neom.com MiscellaneousAdjusting the printer (Menu: Printer) - Page 79 Adjusting the printer (Menu: Printer) Switch in the configuration mode as described in chapter “Accessing the setup menu” on page 17. Click on Printer. The name of the printer which is connected to EXIO II will be displayed. Use the drop down menu to select the Paper Roll Width. Use the drop down menu to select the Print Quality. Click on Apply to to apply your configuration settings to EXIO. Important: Click on Save to save your settings and have them definitely applied. If you do not save, all your parameters will be lost, also in case of a power interruption. Click on Logout to quit the web interface configuration. NeoMedia Europe AG Jens-Otto-Krag-Str. 11 52146 Würselen Germany T: +49 2405 499 22-0 F: +49 2405 499 22-99 [email protected] www.neom.com Seite 80 - MiscellaneousSetting up the time (Menu: Time) Setting up the time (Menu: Time) Switch in the configuration mode as described in chapter “Accessing the setup menu” on page 17. Click on Time. Use the drop down menu to select your Time Zone. Check the box Use NTP if you want to use the Network Time Protocol to synchronize the EXIO II time to the reference time source. If you want to set up manually the time, deactivate the check box Use NTP and enter time and date into the appropriate entry fields. Click on Apply to to apply your configuration settings to EXIO. Important: Click on Save to save your settings and have them definitely applied. If you do not save, all your parameters will be lost, also in case of a power interruption. Click on Logout to quit the web interface configuration. NeoMedia Europe AG Jens-Otto-Krag-Str. 11 52146 Würselen Germany T: +49 2405 499 22-0 F: +49 2405 499 22-99 [email protected] www.neom.com MiscellaneousConfiguring the camera (Menu: Camera) - Page 81 Configuring the camera (Menu: Camera) Switch in the configuration mode as described in chapter “Accessing the setup menu” on page 17. Click on Camera. Set the camera brightness by entering a number between 0 and 255 into the Target Brightness entry field. Remark: Target brightness indicates the grey-scale target value selected for automatic camera adjustment. Click on Apply to to apply your configuration settings to EXIO. Important: Click on Save to save your settings and have them definitely applied. If you do not save, all your parameters will be lost, also in case of a power interruption. Click on Logout to quit the web interface configuration. NeoMedia Europe AG Jens-Otto-Krag-Str. 11 52146 Würselen Germany T: +49 2405 499 22-0 F: +49 2405 499 22-99 [email protected] www.neom.com Seite 82 - MiscellaneousSaving settings Saving settings Once you have made some settings, these have to be saved. The new parameter set of EXIO II will be then written to Flash memory. Click on Save to save and apply your settings. Attention: If you do not save, all your parameters and settings will be lost when the device is powered off. Click on Logout to quit the web interface configuration. NeoMedia Europe AG Jens-Otto-Krag-Str. 11 52146 Würselen Germany T: +49 2405 499 22-0 F: +49 2405 499 22-99 [email protected] www.neom.com Miscellaneous - Page 83 APPENDIX A Miscellaneous This chapter contains information on: Warranty conditions Declaration of conformity Data sheet Open Source Software notice NeoMedia Europe AG Jens-Otto-Krag-Str. 11 52146 Würselen Germany T: +49 2405 499 22-0 F: +49 2405 499 22-99 [email protected] www.neom.com Page 84 - Miscellaneous – Warranty conditions of NeoMedia Europe AG Warranty conditions of NeoMedia Europe AG 1. Warranty coverage 1. The warranty covers the equipment delivered and all its parts. Parts will, at NeoMedia Europe AG's sole discretion, be replaced or repaired free of charge if, despite proven proper handling and adherence to the operating instructions, these parts became defective due to fabrication and/or material defects. Alternatively, NeoMedia Europe AG reserves the right to replace the defective product with a comparable product with the same specifications and features. Operating manuals and possibly supplied software are excluded from the warranty. 2. Material and service charges shall be covered by NeoMedia Europe AG, but not shipping and handling costs involved in transport from the buyer to the service station and/or to NeoMedia Europe AG. 3. Replaced parts become property of NeoMedia Europe AG. 4. NeoMedia Europe AG is authorized to carry out technical changes (e.g. firmware updates) beyond repair and replacement of defective parts in order to bring the equipment up to the current technical state. This does not result in any additional charge for the customer. A legal claim to this service does not exist. 2. Warranty period The warranty period for this NeoMedia Europe AG product is twelve months. The warranty period begins at the day of delivery. Warranty services carried out by NeoMedia Europe AG do not result in an extension of the warranty period nor do they initiate a new warranty period. The warranty period for installed replacement parts ends with the warranty period of the device as a whole. 3. Warranty procedure 1. If defects appear during the warranty period, the warranty claims must be made immediately, at the latest within a period of 7 days. 2. In the case of any externally visible damage arising from transport (e.g. damage to the housing), the person carrying out the transportation and the sender should be informed immediately. On discovery of damage which is NeoMedia Europe AG Jens-Otto-Krag-Str. 11 52146 Würselen Germany T: +49 2405 499 22-0 F: +49 2405 499 22-99 [email protected] www.neom.com Miscellaneous – Warranty conditions of NeoMedia Europe AG - Page 85 not externally visible, the transport company and the sender are to be immediately informed in writing, at the latest within 3 days of delivery. 3. Transport to and from the location where the warranty claim is accepted and/or the repaired device is exchanged, is at the purchaser's own risk and cost. 4. Warranty claims are only valid if a copy of the original purchase receipt is returned with the device. 4. Suspension of the warranty All warranty claims will be deemed invalid 1. if the label with the serial number has been removed from the device, 2. if the device is damaged or destroyed as a result of acts of nature or by environmental influences (moisture, electric shock, dust, etc.), 3. if the device was stored or operated under conditions not in compliance with the technical specifications, 4. if the damage occurred due to incorrect handling, especially to nonobservance of the system description and the operating instructions, 5. if the device was opened, repaired or modified by persons not contracted by NeoMedia Europe AG, 6. if the device shows any kind of mechanical damage, 7. if the warranty claim has not been reported in accordance with 3a) or 3b). 5. Operating mistakes If it becomes apparent that the reported malfunction of the device has been caused by unsuitable hardware, software, installation or operation, NeoMedia Europe AG reserves the right to charge the purchaser for the resulting testing costs. 6. Additional regulations 1. The above conditions define the complete scope of NeoMedia Europe AG's legal liability. 2. The warranty gives no entitlement to additional claims, such as any refund in full or in part. Compensation claims, regardless of the legal basis, are excluded. This does not apply if e.g. injury to persons or damage to private NeoMedia Europe AG Jens-Otto-Krag-Str. 11 52146 Würselen Germany T: +49 2405 499 22-0 F: +49 2405 499 22-99 [email protected] www.neom.com Page 86 - Miscellaneous – Warranty conditions of NeoMedia Europe AG property are specifically covered by the product liability law, or in cases of intentional act or culpable negligence. 3. Claims for compensation of lost profits, indirect or consequential detriments, are excluded. 4. NeoMedia Europe AG is not liable for lost data or retrieval of lost data in cases of slight and ordinary negligence. 5. In the case that the intentional or culpable negligence of NeoMedia has caused a loss of data, NeoMedia Europe AG will be liable for those costs typical to the recovery of data where periodic security data back-ups have been made. 6. The warranty is valid only for the first purchaser and is not transferable. 7. The court of jurisdiction is located in Aachen, Germany in the case that the purchaser is a merchant. If the purchaser does not have a court of jurisdiction in the Federal Republic of Germany or if he moves his domicile out of Germany after conclusion of the contract, NeoMedia Europe AG's court of jurisdiction applies. This is also applicable if the purchaser's domicile is not known at the time of institution of proceedings. 8. The law of the Federal Republic of Germany is applicable. The UN commercial law does not apply to dealings between NeoMedia Europe AG and the purchaser. NeoMedia Europe AG Jens-Otto-Krag-Str. 11 52146 Würselen Germany T: +49 2405 499 22-0 F: +49 2405 499 22-99 [email protected] www.neom.com Miscellaneous – Declaration of conformity - Page 87 Declaration of conformity NeoMedia Europe AG Jens-Otto-Krag-Str. 11 52146 Würselen Germany T: +49 2405 499 22-0 F: +49 2405 499 22-99 [email protected] www.neom.com Page 88 - Miscellaneous – Declaration of conformity This device uses a Telit GSM/GPRS data module GC864 QUAD, which has been assessed in order to satisfy the essential requirements of the R&TTE Directive 1999/05/EC (Radio Equipment & Telecommunications Terminal Equipments) to demonstrate the conformity against the harmonized standards with the final involvement of a Notified Body. Since the module is installed in conformance to the Telit installations manual, no further evaluation under Article 3.2 of the R&TTE Directive and no further involvement of a R&TTE Directive Notified Body for the final product is required. NeoMedia Europe AG Jens-Otto-Krag-Str. 11 52146 Würselen Germany T: +49 2405 499 22-0 F: +49 2405 499 22-99 [email protected] www.neom.com Miscellaneous – Digital Inputs / Outputs - Page 89 Digital Inputs / Outputs Pin assignment and wiring description EXIO II features two Digital Out and two Digital In lines. These galvanically isolated I/Os are located on the black RJ45 socket (The socket between Ethernet and power socket). Pin-out of black RJ45 connector Pin 1 2 3 4 5 6 7 8 Function +12V from EXIO II (only used if I/Os are powered by Exio II circuitry) VCC to isolated I/Os (Max. 12V DC) Isolated Out 1* Isolated Out 2* Isolated In 1 Isolated In 2 Ground to isolated I/Os Ground from EXIO II (only used if I/Os are powered by EXIO II circuitry) *The sum of the output currents may not exceed 200 mA Important: Both Ethernet and Digital I/O sockets are RJ45 sockets. Please take care to not confuse these two sockets which have totally different function and pin-out. Remark: If the galvanically isolated I/Os are required, just use pins 2 to 7 (please refer to pin-out and drawing). Remark: If digital I/Os connected to the power of EXIO II are required, then connect pins 1/2 and 7/8 respectively to get access to IOs powered from the EXIO II power supply. This way there is no galvanic separation between the EXIO II circuits and the I/O lines. NeoMedia Europe AG Jens-Otto-Krag-Str. 11 52146 Würselen Germany T: +49 2405 499 22-0 F: +49 2405 499 22-99 [email protected] www.neom.com Page 90 - Miscellaneous – Open Source Software notice Open Source Software notice This product includes certain free/open source software. You may obtain the source code of the relevant free and open source software by requesting a source code CD-ROM for a charge covering the cost of performing such distribution, such as the cost of media, shipping and handling, upon written request to NeoMedia at: NeoMedia Source Code Requests NeoMedia Europe AG Jens-Otto-Krag-Str. 11 52146 Würselen Germany This offer is valid for a period of two (2) years from the date of the distribution of this product by NeoMedia. Elektra Copyright © 2004, Avi Alkalay Some rights reserved. Redistribution and use in source and binary forms, with or without modification, are permitted provided that the following conditions are met: Redistributions of source code must retain the above copyright notice, this list of conditions and the following disclaimer. Redistributions in binary form must reproduce the above copyright notice, this list of conditions and the following disclaimer in the documentation and/or other materials provided with the distribution. Neither the name of the Elektra Project nor the names of its contributors may be used to endorse or promote products derived from this software without specific prior written permission. THIS SOFTWARE IS PROVIDED BY THE COPYRIGHT HOLDERS AND CONTRIBUTORS "AS IS" AND ANY EXPRESS OR IMPLIED WARRANTIES, INCLUDING, BUT NOT LIMITED TO, THE IMPLIED WARRANTIES OF MERCHANTABILITY AND FITNESS FOR A PARTICULAR PURPOSE ARE DISCLAIMED. IN NO EVENT SHALL THE COPYRIGHT OWNER OR CONTRIBUTORS BE LIABLE FOR ANY DIRECT, INDIRECT, INCIDENTAL, SPECIAL, EXEMPLARY, OR CONSEQUENTIAL DAMAGES (INCLUDING, BUT NOT LIMITED TO, PROCUREMENT OF SUBSTITUTE GOODS OR SERVICES; LOSS OF USE, DATA, OR PROFITS; OR BUSINESS INTERRUPTION) HOWEVER CAUSED AND ON ANY THEORY OF LIABILITY, WHETHER IN CONTRACT, STRICT LIABILITY, OR TORT NeoMedia Europe AG Jens-Otto-Krag-Str. 11 52146 Würselen Germany T: +49 2405 499 22-0 F: +49 2405 499 22-99 [email protected] www.neom.com Miscellaneous – Open Source Software notice - Page 91 (INCLUDING NEGLIGENCE OR OTHERWISE) ARISING IN ANY WAY OUT OF THE USE OF THIS SOFTWARE, EVEN IF ADVISED OF THE POSSIBILITY OF SUCH DAMAGE. Fontconfig Copyright © 2001,2003 Keith Packard Permission to use, copy, modify, distribute, and sell this software and its documentation for any purpose is hereby granted without fee, provided that the above copyright notice appear in all copies and that both that copyright notice and this permission notice appear in supporting documentation, and that the name of Keith Packard not be used in advertising or publicity pertaining to distribution of the software without specific, written prior permission. Keith Packard makes no representations about the suitability of this software for any purpose. It is provided "as is" without express or implied warranty. KEITH PACKARD DISCLAIMS ALL WARRANTIES WITH REGARD TO THIS SOFTWARE, INCLUDING ALL IMPLIED WARRANTIES OF MERCHANTABILITY AND FITNESS, IN NO EVENT SHALL KEITH PACKARD BE LIABLE FOR ANY SPECIAL, INDIRECT OR CONSEQUENTIAL DAMAGES OR ANY DAMAGES WHATSOEVER RESULTING FROM LOSS OF USE, DATA OR PROFITS, WHETHER IN AN ACTION OF CONTRACT, NEGLIGENCE OR OTHER TORTIOUS ACTION, ARISING OUT OF OR IN CONNECTION WITH THE USE OR PERFORMANCE OF THIS SOFTWARE. Freetype Portions of this software are copyright © 2008 The FreeType Project (www.freetype.org). All rights reserved. libjpeg Copyright © 1991-1998, Thomas G. Lane. This software is based in part on the work of the Independent JPEG Group. libpng Copyright © 2004, 2006-2008 Glenn Randers-Pehrson zlib Copyright © 1995-2004 Jean-loup Gailly and Mark Adler NeoMedia Europe AG Jens-Otto-Krag-Str. 11 52146 Würselen Germany T: +49 2405 499 22-0 F: +49 2405 499 22-99 [email protected] www.neom.com Page 92 - Miscellaneous – Open Source Software notice OpenNTPD atomicio.h: Copyright © 1995,1999 Theo de Raadt. All rights reserved. Redistribution and use in source and binary forms, with or without modification, are permitted provided that the following conditions are met: Redistributions of source code must retain the above copyright notice, this list of conditions and the following disclaimer. Redistributions in binary form must reproduce the above copyright notice, this list of conditions and the following disclaimer in the documentation and/or other materials provided with the distribution. THIS SOFTWARE IS PROVIDED BY THE AUTHOR ``AS IS'' AND ANY EXPRESS OR IMPLIED WARRANTIES, INCLUDING, BUT NOT LIMITED TO, THE IMPLIED WARRANTIES OF MERCHANTABILITY AND FITNESS FOR A PARTICULAR PURPOSE ARE DISCLAIMED. IN NO EVENT SHALL THE AUTHOR BE LIABLE FOR ANY DIRECT, INDIRECT, INCIDENTAL, SPECIAL, EXEMPLARY, OR CONSEQUENTIAL DAMAGES (INCLUDING, BUT NOT LIMITED TO, PROCUREMENT OF SUBSTITUTE GOODS OR SERVICES; LOSS OF USE, DATA, OR PROFITS; OR BUSINESS INTERRUPTION) HOWEVER CAUSED AND ON ANY THEORY OF LIABILITY, WHETHER IN CONTRACT, STRICT LIABILITY, OR TORT (INCLUDING NEGLIGENCE OR OTHERWISE) ARISING IN ANY WAY OUT OF THE USE OF THIS SOFTWARE, EVEN IF ADVISED OF THE POSSIBILITY OF SUCH DAMAGE. atomicio.c: Copyright © 2005 Anil Madhavapeddy. All rights reserved. Copyright © 1995,1999 Theo de Raadt. All rights reserved. Redistribution and use in source and binary forms, with or without modification, are permitted provided that the following conditions are met: Redistributions of source code must retain the above copyright notice, this list of conditions and the following disclaimer. Redistributions in binary form must reproduce the above copyright notice, this list of conditions and the following disclaimer in the documentation and/or other materials provided with the distribution. THIS SOFTWARE IS PROVIDED BY THE AUTHOR ``AS IS'' AND ANY EXPRESS OR IMPLIED WARRANTIES, INCLUDING, BUT NOT LIMITED TO, THE IMPLIED WARRANTIES OF MERCHANTABILITY AND FITNESS FOR A PARTICULAR PURPOSE ARE DISCLAIMED. IN NO EVENT SHALL THE AUTHOR BE LIABLE FOR ANY DIRECT, INDIRECT, INCIDENTAL, SPECIAL, EXEMPLARY, OR CONSEQUENTIAL DAMAGES (INCLUDING, BUT NOT LIMITED TO, PROCUREMENT OF SUBSTITUTE GOODS OR SERVICES; LOSS OF USE, DATA, OR PROFITS; OR BUSINESS INTERRUPTION) HOWEVER CAUSED AND ON ANY THEORY OF LIABILITY, WHETHER IN NeoMedia Europe AG Jens-Otto-Krag-Str. 11 52146 Würselen Germany T: +49 2405 499 22-0 F: +49 2405 499 22-99 [email protected] www.neom.com Miscellaneous – Open Source Software notice - Page 93 CONTRACT, STRICT LIABILITY, OR TORT (INCLUDING NEGLIGENCE OR OTHERWISE) ARISING IN ANY WAY OUT OF THE USE OF THIS SOFTWARE, EVEN IF ADVISED OF THE POSSIBILITY OF SUCH DAMAGE. fake-rfc2553.c, fake-rfc2553.h: Copyright © 2000-2003 Damien Miller. All rights reserved. Copyright © 1999 WIDE Project. All rights reserved. Redistribution and use in source and binary forms, with or without modification, are permitted provided that the following conditions are met: Redistributions of source code must retain the above copyright notice, this list of conditions and the following disclaimer. Redistributions in binary form must reproduce the above copyright notice, this list of conditions and the following disclaimer in the documentation and/or other materials provided with the distribution. Neither the name of the project nor the names of its contributors may be used to endorse or promote products derived from this software without specific prior written permission. THIS SOFTWARE IS PROVIDED BY THE PROJECT AND CONTRIBUTORS ``AS IS'' AND ANY EXPRESS OR IMPLIED WARRANTIES, INCLUDING, BUT NOT LIMITED TO, THE IMPLIED WARRANTIES OF MERCHANTABILITY AND FITNESS FOR A PARTICULAR PURPOSE ARE DISCLAIMED. IN NO EVENT SHALL THE PROJECT OR CONTRIBUTORS BE LIABLE FOR ANY DIRECT, INDIRECT, INCIDENTAL, SPECIAL, EXEMPLARY, OR CONSEQUENTIAL DAMAGES (INCLUDING, BUT NOT LIMITED TO, PROCUREMENT OF SUBSTITUTE GOODS OR SERVICES; LOSS OF USE, DATA, OR PROFITS; OR BUSINESS INTERRUPTION) HOWEVER CAUSED AND ON ANY THEORY OF LIABILITY, WHETHER IN CONTRACT, STRICT LIABILITY, OR TORT (INCLUDING NEGLIGENCE OR OTHERWISE) ARISING IN ANY WAY OUT OF THE USE OF THIS SOFTWARE, EVEN IF ADVISED OF THE POSSIBILITY OF SUCH DAMAGE. daemon.c, sys-queue.h: Copyright © 1990, 1991, 1993 The Regents of the University of California. All rights reserved. Redistribution and use in source and binary forms, with or without modification, are permitted provided that the following conditions are met: Redistributions of source code must retain the above copyright notice, this list of conditions and the following disclaimer. Redistributions in binary form must reproduce the above copyright notice, this list of conditions and the following disclaimer in the documentation and/or other materials provided with the distribution. NeoMedia Europe AG Jens-Otto-Krag-Str. 11 52146 Würselen Germany T: +49 2405 499 22-0 F: +49 2405 499 22-99 [email protected] www.neom.com Page 94 - Miscellaneous – Open Source Software notice Neither the name of the University nor the names of its contributors may be used to endorse or promote products derived from this software without specific prior written permission. THIS SOFTWARE IS PROVIDED BY THE REGENTS AND CONTRIBUTORS ``AS IS'' AND ANY EXPRESS OR IMPLIED WARRANTIES, INCLUDING, BUT NOT LIMITED TO, THE IMPLIED WARRANTIES OF MERCHANTABILITY AND FITNESS FOR A PARTICULAR PURPOSE ARE DISCLAIMED. IN NO EVENT SHALL THE REGENTS OR CONTRIBUTORS BE LIABLE FOR ANY DIRECT, INDIRECT, INCIDENTAL, SPECIAL, EXEMPLARY, OR CONSEQUENTIAL DAMAGES (INCLUDING, BUT NOT LIMITED TO, PROCUREMENT OF SUBSTITUTE GOODS OR SERVICES; LOSS OF USE, DATA, OR PROFITS; OR BUSINESS INTERRUPTION) HOWEVER CAUSED AND ON ANY THEORY OF LIABILITY, WHETHER IN CONTRACT, STRICT LIABILITY, OR TORT (INCLUDING NEGLIGENCE OR OTHERWISE) ARISING IN ANY WAY OUT OF THE USE OF THIS SOFTWARE, EVEN IF ADVISED OF THE POSSIBILITY OF SUCH DAMAGE. PPPD PPPD is copyrighted and made available under conditions which provide that it may be copied and used in source or binary forms provided that the conditions listed below are met. Portions of pppd are covered by the following copyright notices: Copyright © 1984-2000 Carnegie Mellon University. All rights reserved. Copyright © 1993-2004 Paul Mackerras. All rights reserved. Copyright © 1995 Pedro Roque Marques. All rights reserved. Copyright © 1995 Eric Rosenquist. All rights reserved. Copyright © 1999 Tommi Komulainen. All rights reserved. Copyright © 1999 Andrew Tridgell Copyright © 2000 Sun Microsystems, Inc. All rights reserved. Copyright © 2001 Sun Microsystems, Inc. All rights reserved. Copyright © 2002 Google, Inc. All rights reserved. The copyright notices contain the following statements. Redistribution and use in source and binary forms, with or without modification, are permitted provided that the following conditions are met: Redistributions of source code must retain the above copyright notice, this list of conditions and the following disclaimer. Redistributions in binary form must reproduce the above copyright notice, this list of conditions and the following disclaimer in the documentation and/or other materials provided with the distribution. The name "Carnegie Mellon University" must not be used to endorse or promote products derived from this software without prior written permission. For permission or any legal details, please contact NeoMedia Europe AG Jens-Otto-Krag-Str. 11 52146 Würselen Germany T: +49 2405 499 22-0 F: +49 2405 499 22-99 [email protected] www.neom.com Miscellaneous – Open Source Software notice - Page 95 Office of Technology Transfer Carnegie Mellon University 5000 Forbes Avenue Pittsburgh, PA 15213-3890 (412) 268-4387, fax: (412) 268-7395 [email protected] The name(s) of the authors of this software must not be used to endorse or promote products derived from this software without prior written permission. Redistributions of any form whatsoever must retain the following acknowledgments: − − − − "This product includes software developed by Computing Services at Carnegie Mellon University (http://www.cmu.edu/computing/)." "This product includes software developed by Paul Mackerras <[email protected]>". "This product includes software developed by Pedro Roque Marques <[email protected]>". "This product includes software developed by Tommi Komulainen <[email protected]>". CARNEGIE MELLON UNIVERSITY DISCLAIMS ALL WARRANTIES WITH REGARD TO THIS SOFTWARE, INCLUDING ALL IMPLIED WARRANTIES OF MER- CHANTABILITY AND FITNESS, IN NO EVENT SHALL CARNEGIE MELLON UNI- VERSITY BE LIABLE FOR ANY SPECIAL, INDIRECT OR CONSEQUENTIAL DAMAGES OR ANY DAMAGES WHATSOEVER RESULTING FROM LOSS OF USE, DATA OR PROFITS, WHETHER IN AN ACTION OF CONTRACT, NEGLIGENCE OR OTHER TORTIOUS ACTION, ARISING OUT OF OR IN CONNECTION WITH THE USE OR PERFORMANCE OF THIS SOFTWARE. THE AUTHORS OF THIS SOFTWARE DISCLAIM ALL WARRANTIES WITH REGARD TO THIS SOFTWARE, INCLUDING ALL IMPLIED WARRANTIES OF MER- CHANTABILITY AND FITNESS, IN NO EVENT SHALL THE AUTHORS BE LIABLE FOR ANY SPECIAL, INDIRECT OR CONSEQUENTIAL DAMAGES OR ANY DAMAGES WHATSOEVER RESULTING FROM LOSS OF USE, DATA OR PROFITS, WHETHER IN AN ACTION OF CONTRACT, NEGLIGENCE OR OTHER TORTIOUS ACTION, ARISING OUT OF OR IN CONNECTION WITH THE USE OR PERFOR- MANCE OF THIS SOFTWARE. NeoMedia Europe AG Jens-Otto-Krag-Str. 11 52146 Würselen Germany T: +49 2405 499 22-0 F: +49 2405 499 22-99 [email protected] www.neom.com


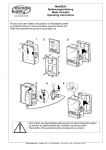

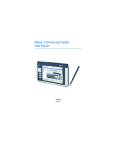
![[1]StorageTek T10000C](http://vs1.manualzilla.com/store/data/005701279_1-def8e2b4b691d6a17c8293fd164d2b7c-150x150.png)