1
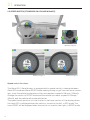
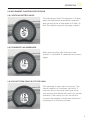
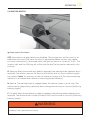
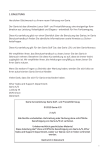
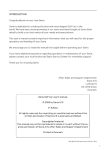
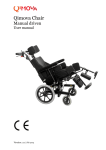
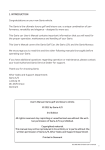
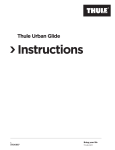
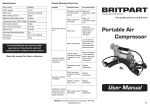
1. INTRODUCTION
Congratulations on your new Garia vehicle.
The Garia is the ultimate luxury golf and leisure car; a unique combination of performance, versatility and elegance – designed to move you.
This Quick Guide is only for reference on how to use the Garia, always refere to the
Garia User’s manual to obtain all information and safty related issues.
This Quick Guide covers the Garia Golf Car, the Garia LSV, and the Garia Monaco.
We encourage you to read the User’s Manual before taking the Garia into use, always store this Quick Guide in a easy accesable place. we encourage you to read the
manuals thoroughly before operating your Garia.
If you have additional questions regarding operation or maintenance, please contact
your local Authorized Garia Service Dealer for support.
Thank you for choosing Garia.
After Sales and Support Department
Garia A/S
Lunikvej 44
DK-2670 Greve
Denmark
Garia Quick Guide: Garia golf and leisure vehicle.
© 2012 by Garia A/S
2nd Edition
All rights reserved. Any reprinting or unauthorized use without the written permission of Garia A/S is prohibited.
Copyrighted material.
This manual may not be reproduced in its entirety or in parts without the
written permission of Garia A/S, After Sales and Support Department
Printed in Denmark
I
TABLE OF CONTENTS
01 OPERATION
1.1 Overview. . . . . . . . . . . . . . . . . . . . . . . . . . . . . . . . . . . . . . . . . . . . . . . . . . . . . . . . . . . . . . . . . . . . . . 3
1.2 Speed switch (standard on LSV and Monaco). . . . . . . . . . . . . . . . . . . . . . . . . . . . . . . . . . . . 4
1.3 Instrument clusTer notifications . . . . . . . . . . . . . . . . . . . . . . . . . . . . . . . . . . . . . . . . . . . . . . . 5
1.3.1 Critical battery level . . . . . . . . . . . . . . . . . . . . . . . . . . . . . . . . . . . . . . . . . . . . . . . . . . . . . . . . . 5
1.3.2 Currently no messages. . . . . . . . . . . . . . . . . . . . . . . . . . . . . . . . . . . . . . . . . . . . . . . . . . . . . . . 5
1.3.3 Do not turn vehicle off for 2 min. . . . . . . . . . . . . . . . . . . . . . . . . . . . . . . . . . . . . . . . . . . . . . 5
1.3.4 Reduced Power. . . . . . . . . . . . . . . . . . . . . . . . . . . . . . . . . . . . . . . . . . . . . . . . . . . . . . . . . . . . . . 6
1.3.5 Service due . . . . . . . . . . . . . . . . . . . . . . . . . . . . . . . . . . . . . . . . . . . . . . . . . . . . . . . . . . . . . . . . . 6
1.3.6 Battery discharge indicator. . . . . . . . . . . . . . . . . . . . . . . . . . . . . . . . . . . . . . . . . . . . . . . . . . 6
1.4 Ignition Switch. . . . . . . . . . . . . . . . . . . . . . . . . . . . . . . . . . . . . . . . . . . . . . . . . . . . . . . . . . . . . . . . 7
1.5 Driving, accelerating . . . . . . . . . . . . . . . . . . . . . . . . . . . . . . . . . . . . . . . . . . . . . . . . . . . . . . . . . . 8
1.6 Stopping, braking. . . . . . . . . . . . . . . . . . . . . . . . . . . . . . . . . . . . . . . . . . . . . . . . . . . . . . . . . . . . . . 9
1.7 Rough terrain driving . . . . . . . . . . . . . . . . . . . . . . . . . . . . . . . . . . . . . . . . . . . . . . . . . . . . . . . . . 10
1.8 Hill hold and roll back . . . . . . . . . . . . . . . . . . . . . . . . . . . . . . . . . . . . . . . . . . . . . . . . . . . . . . . . . 11
1.9 Emergency braking . . . . . . . . . . . . . . . . . . . . . . . . . . . . . . . . . . . . . . . . . . . . . . . . . . . . . . . . . . . 11
02 TRANSPORT & TOWING
2. Tow switch. . . . . . . . . . . . . . . . . . . . . . . . . . . . . . . . . . . . . . . . . . . . . . . . . . . . . . . . . . . . . . . . . . . . 12
2.1 Towing without battery power. . . . . . . . . . . . . . . . . . . . . . . . . . . . . . . . . . . . . . . . . . . . . . . . . 13
2.2 Towing hook. . . . . . . . . . . . . . . . . . . . . . . . . . . . . . . . . . . . . . . . . . . . . . . . . . . . . . . . . . . . . . . . . . 14
2.3 Hauling. . . . . . . . . . . . . . . . . . . . . . . . . . . . . . . . . . . . . . . . . . . . . . . . . . . . . . . . . . . . . . . . . . . . . . 14
II
OPERATION
01
1. OPERATION
1.1 OVERVIEW
Standard or upgrade
Standard on LSV
Standard on Monaco
2
3
8
1
6
9
17
16
10
4
12
7
7
13
11
14
15
5
Monaco Fig. 1.1
1. Indicator stalk
2. Steering wheel
3. Instrument cluster
4. Brake pedal
5. Accelerator pedal
6. Ignition switch
7. Speed switch (standard on LSV and Monaco
8. Refrigerator unit
9. Heated windscreen switch (upgrade)
10.Wiper and washer switch (upgrade)
11.Interior light switch (upgrade)
12.Refrigerator switch (upgrade)
13.Charger plug with LED
14.Ball holder
15.12 V output
16.Bonnet switch
17.Hazard light switch
3
01 OPERATION
1.2 SPEED SWITCH (STANDARD ON LSV AND MONACO)
2
2
1 1
1
1
4
4
3
3
Monaco Fig. 1.2
2 2
2 2
3
3
4
Monaco Fig. 1.3
4
Monaco Fig. 1.4
Speed switch functions:
The Garia LSV / Garia Monaco is equipped with a speed switch to change between
Garia ECO mode and Garia SPORT mode, making driving on golf courses more convenient, since the vehicle accelerates softer and reaches a speed of 16 mph / 25km/h.
Change the switch to SPORT mode and the vehicle can reach a speed of 25mph /
40km/h, and the vehicle will accelerate faster.
The speed switch position is in the cluster in the lower section of the display, where
the term ECO is displayed when the switch is turned to the left, in ECO mode. The
term SPORT will be displayed when the switch is turned to the right, in SPORT mode.
4
OPERATION
01
1.3 INSTRUMENT CLUSTER NOTIFICATIONS
1.3.1 CRITICAL BATTERY LEVEL
Critical battery level: This appears in cluster
when the vehicle has a minimum range left
and can only drive in limp mode at 4 Mph / 6
Kph. The vehicle requires charging urgently.
1.3.2 CURRENTLY NO MESSAGES
When pressing the right button on the
cluster it is possible to reveiw all active messages.
1.3.3 DO NOT TURN VEHICLE OFF FOR 2 MIN
This message is important to respect. The
vehicle requires a “cooldown” period of 2
minutes, due to seriously heavy use. After
two minutes the vehicle will return to normal
operation. The reason for this function is
to avoid overloading of important electrical
components in the drive system.
5
01 OPERATION
1.3.4 REDUCED POWER
Reduce speed for a short period of time, and
the vehicle will return to normal operation.
1.3.5 SERVICE DUE
The service due notification will appear
when the vehicle has reached the milage
or hour limit. Please contact the nearest
Garia dealer to get the service carried out
accordingly.
1.3.6 BATTERY DISCHARGE INDICATOR
Icon
6
Led’s
State of charge in
procent %
80 %
100 %
60 %
80 %
40 %
60 %
20 %
40 %
5 %
20 %
1 %
5 %
OPERATION
01
1.4 IGNITION SWITCH
Fig. 1.6
Ignition switch functions:
OFF: Most electrical applications are disabled. The refrigerator will function for an
additional two hours (the timer function is adjustable, please contact your dealer
for more information), if activated whilst the ignition switch is turned to ”R.N.F”. The
interior light and the 12V plug will still be functioning.The key can be removed in this
position.
R: Reverse. When the accelerator pedal is engaged, the parking brake releases automatically. The vehicle reverses. All electrical functions are in function (affecting battery power). Note: To reverse, turn key to N before turning to R.The reverse warning
indicator is activated when vehicle is reversing (except Monaco).
N: Neutral. The parking brake is engaged when the vehicle comes to a full stop. The
vehicle can be temporarily parked, all electrical applications are in function (affecting
battery power).
F: Forward, when the accelerator pedal is engaged, the parking brake releases automatically. The vehicle drives forward. All electrical functions are in function. (affecting
battery power).
! WARNING
Never push the accelerator pedal when turning the ignition key. The vehicle may move
suddenly if not operated correctly.
7
01 OPERATION
1.5 DRIVING, ACCELERATING
Fig. 1.7
1. Turn Main power switch to “ON”
2. Push the brake pedal and select “N”, and then ”F” for driving forward (or ”R” for
reversing).
3. Make sure that no people or obstacles are in the risk of being injured or damaged
by the vehicle. Push the accelerator pedal very gently and the vehicle will start to
move. Always accelerate carefully.
! CAUTION
Never bring the vehicle to a halt while using the accelerator. Always use brakes to
prevent the vehicle from moving.
NOTE
When accelerator pedal is engaged, the parking brake will release automatically.
8
OPERATION
01
1.6 STOPPING, BRAKING
Fig. 1.8
To brake or stop the vehicle, push the brake pedal carefully. The vehicle will gently
come to a halt. When the vehicle has come to a full stop, the automatic parking brake
will engage. The vehicle will not move until the accelerator pedal is engaged.
If an emergency occurs, the brakes are designed to handle an emergency braking incident. However, after any emergency braking incident, carry out a brake maintenance
check. Please consult a qualified repair shop. Garia recommends that maintenance is
provided by an Authorized Garia Service Dealer.
! WARNING
Any damage or malfunction on the braking system can result in severe injury or
death. Always make sure that the brakes are fully functioning.
9
01 OPERATION
1.7 ROUGH TERRAIN DRIVING
6.5 inches (165 mm)
Garia Monaco Fig. 1.9
Always make sure that the greatest precautions are taken when driving in rough
terrains. The vehicle’s ground clearance is 6.5 inches (approx. 165 mm). Always drive
slowly and always be ready to stop. Rough terrain driving can cause situations that
are damaging to the vehicle, therefore always drive very cautiously. Avoid driving in
hilly areas and at tilted angles. The weight distribution of the vehicle can cause it to
tip unexpectedly when placing the vehicle at excessive tilted angles. The vehicle is not
constructed for rough terrain use and this should be avoided as much as possible.
Garia Monaco Fig. 1.10
10
OPERATION
01
1.8 HILL HOLD AND ROLL BACK
The Garia features a hill hold function which keeps the vehicle at steady speeds when
starting and stopping on a slope.
When stopping, the motor will keep the vehicle steady for two (2-3) seconds before
the parking brake engages.
If the ignition switch is not turned off, the vehicle will remember the amount of torque
added when stopping, and apply the same amount of torque when starting again to
ensure a smooth start and a limited roll back.
Should motor stall appear, the parking brake will engage immediately and the controller will need to be reset with the key switch to “OFF”, following to “N” and finally to “F”
to start driving forward (or “R” for reversing).
1.9 EMERGENCY BRAKING
If the key switch is turned into the “OFF” position when the vehicle is moving, motor braking will stop the vehicle immediately. This type of braking can cause personal
injury. The parking brake will be engaged when the vehicle has come to a full stop.
NOTE: This type of braking is for emergency use only; should the service brake fail.
It can potentially cause personal injuries or damage to the drive train or tires of the
vehicle.
After any emergency braking incident, please contact a qualified repair shop for a
brake safety and function check. It is recommended that maintenance is provided by
an Authorized Garia Service Dealer.
! WARNING
Risk of personal injury!
Brake lights will not come on when performing emergency or motor braking. Only
perform this type of braking when you can closely follow the traffic around you, and
only in emergency situations.
Any damage to or malfunction of the braking system can result in severe injury or
death. Always make sure that the brakes are fully functioning.
11
02 TRANSPORT & TOWING
2. Tow switch
Fig. 5.1
To activate the towing function, the switch in the battery compartment must be
engaged. This can only be done by using the additional key which came with the car at
its delivery. Please note, this key is not the same as the ignition key. It is recommended
that the key is removed from the keyhole whenever the towing function is not activated. Doing this prevents unauthorized removal of the vehicle.
To be able to activate the towing function, the ignition switch on the steering column
must be turned to the ”N”-position. Furthermore it is necessary that the main power
switch in the battery compartment is turned to the “ON”-position. Select “TOW” to
activate the towing function.
Activating the towing function discharges the battery. Do not store vehicle with
towing switch turned to “TOW”, since this eventually will discharge the batteries and
permanently damage the batteries. Fully discharging the batteries shortens the life
of the battery. Activating the towing function disables the ignition information, meaning that the vehicle will not drive.
Always make sure to take the best safety precautions when releasing parking brake.
Activating the towing switch disables most electrical appliances in the vehicle.
! WARNING
The vehicle can roll unexpectedly at all times when the parking brake is released,
even on level ground. This can cause a severe accident or death.
12
TRANSPORT & TOWING
02
2.1 Towing without battery power
Fig. 5.2
If vehicle batteries are completely discharged or malfunctioning and there is no possibility of activating the towing function through the towing switch, the parking brake
can be released by manually engaging the lever on the motor as illustrated above.
Push the lever to release the parking brake and the vehicle can be towed.
Access the lever from the underside of the vehicle or by removing the load area floor.
Once the towing session has taken place, it is of great importance to activate the
parking brake before vehicle is put into service.
Always take the greatest safety precautions when releasing parking brake. If unsure
on how release the parking brake manually it is recommended that you contact the
nearest Garia dealer or service shop.
! WARNING
The vehicle can roll unexpectedly at all times when parking brake is released, even on
level ground. This can cause a severe accident!
Activate automatic parking brake function before vehicle is put into service!
13
02 TRANSPORT & TOWING
2.2 Towing hook
Fig. 5.3
If the vehicle requires to be towed, the towing hook can be mounted underneath the
front body as illustrated above. (Towing hook is standard equipment on all vehicles)
! WARNING
Use caution when towing a vehicle.
Do not attempt to tow vehicle with any other device than an approved automotive
towing rope.
Do not tow vehicle on highways or other public roads not specified for Golf Car use.
Only tow one vehicle at a time.
The vehicle can roll unexpectedly at all times when parking brake is released, even on
level ground. This can cause a severe accident.
Do not exceed 10 mph (16 km/h) while towing.
2.3 Hauling
This Garia Golf Car is not constructed for hauling. This includes other vehicles, trailers
or other devices. Failure to heed this warning will void all applicable warranties.
14