1
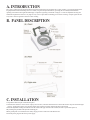
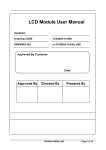
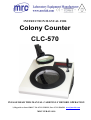
INSTRUCTION MANUAL FOR
Colony Counter
CLC-570
PLEASE READ THIS MANUAL CAREFULLY BEFORE OPERATION
3, Hagavish st. Israel 58817 Tel: 972 3 5595252, Fax: 972 3 5594529 [email protected]
MRC.VER.02-10.10
A. INTRODUCTION
570 Colony Counter has been designed with the most advanced integrated circuit suitable for accurate counting. It is equipped with the latest
ring-shaped fluorescent illuminating device for a stable, non-glare and quiet illumination, providing the user a handy and comfortable
operating environment. The bright red LED display is capable of registering a maximum of 4 digits, i.e. 9999. The adjustable focusing arm
enables the magnifier free rotation to any angle for easy access to petri dish. The marking pen is used for counting. A beeper signals the user
every time a count is registered to assure accurate counting.
B. PANEL DESCRIPTION
C. INSTALLATION
1.Unpack the counter and put it on the desired place.
2.Check the fuse socket for correct electric capacity (120V or 230V). The white mark at the lower side of the fuse box will point toward the right
capacity. To adjust the capacity, eject the fuse socket using a minus screwdriver and turn the fuse socket around.
3.Insert the adjustable focusing arm with lens into the socket at the upper left side of the counter.(see item 1 of panel description A)
4.By touching the petri dish with any kind of marking pen .
5.Back ground plate is reversible (black or white), simply just remove and insert at the desired color.
6.Insert the power plug into the electric power supply.
D. OPERATION
Turn on the electric power to light the LED and fluorescent lamp.
Place the petri dish on the glass surface of the counter by adjusting the dish holder.(see item 6 of panel description A)
Select the background color, black or white.
Adjust the focusing arm with the lens to the desired angle.
Begin counting by touching the petri dish with any kind of marking pen.
If the sensitivity is not ideal, adjust the sensitivity VR located in the rear of the 570 using a minus screwdriver, (see item 4 of the panel
description B) Turn clockwise to increase sensitivity and turn counterclockwise to reduce sensitivity.
E. WORKING ENVIRONMENT
Indoor use
Temperature 5 °O 50 °C (41 °F~122 °F)
Maximum relative humidity 80% for temperatures up to 31 °C, (87.8 °F), decreasing linearly to 50% relative humidity at 40 °C (74 °F)
Mains supply voltage fluctuations not to exceed ±10% of the nominal voltage
Transient over voltage is CAT II
Pollution degree 2
F. MAINTENANCE AND CLEANING
Replacement of the fluorescent lamp 1 Turn off the electric power supply.
2.Remove the screws at the rear of the 570.
3.Take off the power plug base and flexible fixer.
4.Replace with a new SOW fluorescent lamp.
5.Reassemble accordingly.
Fuse replacement
1 .Turn off the electric power supply
2.Take off the fuse socket with minus screwdriver.
3.Replace with a new 200mA/ 250V fuse (a spare fuse is inside the socket)
Wipe with wet cloths or with some soft detergent if needed.
G. SPECIFICATIONS
Working temperature
Readout
Petri Dish Holder
Illumination
Zero Reset Button
Modes of Counting
Power
Fuse of power
Dimension
Net Weight
5°C~ 50 °C (41°F~122°F)
4-digit with red, 0.6" LED display
100-150 mm with holder adjuster
Fluorescent lamp, SOW
Applicable
Any Marking Pen
CAT II, 110-120V/220-240V, 50/60HZ, 28W (switchable)
200 mA/ 250V
30(W)X33 (D) X 10 (H) cm
6.5 Kgs (14.5Lbs.)
H. ACCESSORIES
Power cord with 3 pins
Adjustable focusing arm with magnifier
Pen
Dust-proof cover
Operation manual
Warranty card
I. SALES SERVICE AND WARRANTY
This colony counter is under warranty for one years after its deliver day. Under normal usage our company will provide free maintenance.
This warranty does not cover the fluorescent light, marking pen or any other expendable. If device is damaged by natural disaster or misuse,
the maintenance fee will be charged at your own cost.