1
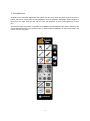
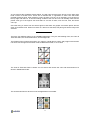
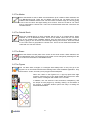
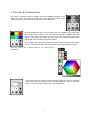
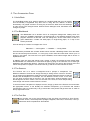
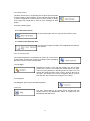
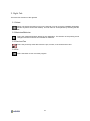
[ChalkBox User’s Manual]
ChalkBox
Nuribom Co., Ltd. Copyright © 2010
Version 1.1
Contents
1. INTRODUCTION ...................................................................................................................................... 3
2. THE DRAWING PANE ............................................................................................................................. 5
2.1 THE POINTER ......................................................................................................................................................................... 5
2.2 THE PEN ................................................................................................................................................................................. 5
2.3 THE MARKER ......................................................................................................................................................................... 6
2.4 THE ORIENTAL BRUSH .......................................................................................................................................................... 6
2.5 THE ERASER............................................................................................................................................................................ 6
2.6 THE FIGURES .......................................................................................................................................................................... 6
3. THE COLOR & THICKNESS PANE ....................................................................................................... 7
4. THE ACCESSORIES PANE ....................................................................................................................... 8
4.1 UNDO/REDO ......................................................................................................................................................................... 8
4.2 THE BLACKBOARD ................................................................................................................................................................. 8
4.3 THE SCREENS ......................................................................................................................................................................... 8
4.4 THE TOOL BOX ...................................................................................................................................................................... 8
4.4.1 Save Screen .............................................................................................................................................................. 9
4.4.1.1 Save Full Screen ...................................................................................................................................................................... 9
4.4.1.2 Save User Selected Area ..................................................................................................................................................... 9
4.4.2 Virtual Keyboard ...................................................................................................................................................... 9
4.4.3 Spotlight ...................................................................................................................................................................... 9
4.4.4 Magnifier ..................................................................................................................................................................... 9
4.4.5 Print ............................................................................................................................................................................... 9
5. RIGHT TAB ............................................................................................................................................. 10
5.1 SELECT.................................................................................................................................................................................. 10
5.2 MAXIMIZE/MINIMIZE ........................................................................................................................................................ 10
5.3 PREVIOUS PEN .................................................................................................................................................................... 10
5.4 EXIT....................................................................................................................................................................................... 10
2
1. Introduction
ChalkBox is an annotation application with which one can write, draw, and erase with the move of a
pointer using one’s own monitor as the blackboard. One can underline a passage, draw polygons, or
save one’s own work. One can also alter the color, the thickness, or even the transparency of one’s
pen.
There are basically two modes of operation for ChalkBox: the Blackboard mode and the Pointer mode.
On the Blackboard mode, one can draw, write, or erase within the Desktop. On the Pointer mode, one
cannot; one can only point.
3
As one looks at the ChalkBox window below, one will notice that there are arrows on the lower right
hand corners of several icons. These are to indicate that, in opposition to other icons that when
pressed get things done, when pressed, a menu of items come up. As an example, go to the Pen on
the top right and select it. A red surrounding embraces the Pen and one can actually write with the
pointer. Now, go to the Figures icon and select it. A menu of items, such as Line, Star, and Circle
come up.
One other thing to notice from the above figure is that there are grayed out inactive places like the
Color & Thickness Pane. When one clicks on a device to write with, this pane goes active ready to be
selected.
There are four different panes to the ChalkBox application. They are the Drawing Pane, the Color &
Thickness Pane, the Accessories Pane, and the Right Tab.
The Drawing Pane is where the pointer, pen, marker, oriental brush, eraser, and polygons are located.
It is where one changes from Pointer mode to Blackboard mode, or vice versa
The Color & Thickness Pane is where one can select and choose the color and the thickness of a
device in Blackboard mode.
The Accessories Pane is where most of the applications are located.
4
The Right Tab is where the one can minimize, go back to the previous device be it the pen, marker, or
brush, or simply exit the application.
2. The Drawing Pane
This is where all the drawing applications are located. The pen, the marker, and the oriental brush are
located here. Also, the pointer, the eraser, and the polygon is located here.
2.1 The Pointer
This is the default pointer that one sees when one starts up the program. Upon selection
of this icon, one is in Pointer mode.
This is the Windows icon that the pointer changes to when one is using the Pen, the
Marker, or the Oriental Brush. One is in the state of drawing, writing, or erasing at this
point. Press the Windows icon to go back to the pointer.
When one goes to the Screens icon on the bottom left and selects either Transparent or
Opaque screens, the pointer changes to that of a pointed cross. This is to indicate that
the screen is movable. Select the cross pointer icon and make the screen size half the
size. Open Notepad and one can start writing on the Notepad while on the other side,
one still has the Opaque screen to write on. One can also see that in this case that the
background image is dynamic as opposed to the static image when one selects the
marker.
2.2 The Pen
Select the Pen to write on-board with the tip of a pen. When selected, one is in
Blackboard mode. There are six default colors that one can select from on the middle of
the ChalkBox window. One can select from a broader range of colors by going to one of
the six colors and right-clicking one’s mouse. There are a total of 127 colors and 13
grayscales to choose from. There are six thicknesses below the colors that one can also
choose.
5
2.3 The Marker
Select the Marker to write or draw on-board with the tip of a marker. When selected, one
is in Blackboard mode. There are six default colors that one can select from on the
middle of the ChalkBox window. One can select from a broader range of colors by going
to one of the six colors and right-clicking one’s mouse. There are a total of 127 colors
and 13 grayscales to choose from. There are six thicknesses below the colors that one
can also choose.
2.4 The Oriental Brush
Select the Oriental Brush to write on-board with the tip of an oriental brush. When
selected, one is in Blackboard mode. There are six default colors that one can select
from on the middle of the ChalkBox window. One can select from a broader range of
colors by going to one of the six colors and right-clicking one’s mouse. There are a total
of 127 colors and 13 grayscales to choose from. There are six thicknesses below the
colors that one can also choose.
2.5 The Eraser
Select the Eraser to erase parts of the screen or the whole screen. When selected, one
is in Blackboard mode. The thickness of the eraser can be changed by selecting from the
six circles from the bottom of the Middle section.
2.6 The Figures
One can draw stars, triangles, or rectangles with wobbly lines or they can go to the
Figures icon on the lower-left half of the Drawing Pane of the ChalkBox application. They
will find lines, circles, and many more polygons at their disposal.
When one clicks on the Figures icon, a pop-up opens with eight
polygons. Selecting any of the eight makes the Figures icon draw
stars, circles, or triangles until another icon is chosen.
In addition, one can select the color, thickness, transparency, and
the shape of each polygon by choosing “setting” on the bottom of
the pop-up. A separate window opens with ways of setting the
aforementioned items.
6
3. The Color & Thickness Pane
The Color & Thickness Pane is initially, when the ChalkBox program is run,
grayed out. This is because the pointer is the focus. When one selects a pen,
marker or brush to draw, the Color & Thickness Pane brightens up.
One has six different colors one can choose from as a default. One can see that
these colors have an arrow in the south easterly direction indicating that there
may be more. Place the pointer on a color and, push and hold the left mouse
button, or simply right click on any of the six colors. There will be provided a color
palette that one can select from as shown below.
On the bottom half of the Color & Thickness Pane is the thickness of each device.
As one could see, there are six thicknesses and the third is selected on the left.
One can select from a broad range of 127 colors and 15
grayscales.
When one selects the eraser from the Drawing Pane, the Color & Thickness
Pane changes to the image to the left. One can erase all by choosing the Clean
All icon or one can erase parts by selecting the thickness.
7
4. The Accessories Pane
4.1 Undo/Redo
The Undo/Redo button is for erasing drawings or reentering data that one has erased.
This functionality is applicable only when one is using the Pen, Marker, or Brush
functionality. It is grayed out when not using any of the three. When there are drawings
to undo, the top color changes to blue. When there are writings to redo, the bottom color
changes to purple.
4.2 The Blackboard
The Blackboard icon is twofold. One is to change the background. Initially, when one
opens the ChalkBox application, the background is the Windows desktop with those
program shortcuts on the side. One can change this, as the need arises, to that of a
green blackboard, a treble clef staff paper, an engineering paper, or a map of the
Korean peninsula.
One can add up to a total of 19 images here. Go to
Start Menu → All Programs → ChalkBox → Config Folder
One should be presented with a folder window which includes a NewPage folder. Enter the folder
and one should be given three files, i.e. korea_map, music sheet and note sheet. Place up to 19
images in this folder. The next time one opens ChalkBox, those same images will be shown in
alphabetical order.
In addition, when one goes and selects a pen, marker, or brush, the images are each saved under
the Blackboard icon. Remember to save these images by going to the Tool Box icon as these get
deleted as new images are piled up. This does not work when one goes to the Screens menu and
selects Transparent or Opaque. One would need to go and save in the Tool Box for those.
4.3 The Screens
The Screens icon is to select a background that is opaque or transparent. The
difference between Screens and simply selecting a writing device is that for Screens,
one is toggling from Blackboard mode and Pointer modeA distinctive feature is that the
Screens can be displaced. For example, one can divide the screen in two. In one half,
one can show a lecture and on the other, one can take notes. Another featuere is that
the background is still in motion. One can see this in the clock; the clock keeps ticking
even though one seems to have frozen the screen.
To exit from either Transparent or Opaque screens, simply go back to the Screens icon and select
the appropriate screen. If one already has selected Transparent, go to Screens and reselect
Transparent to get out. Another way is to go choose the cross pointer and go select the “X” mark on
the top right hand corner.
4.4 The Tool Box
The Tool Box icon is the most extensive of the set. When one presses it, Save Screen,
Record Screen, Virtual Keyboard, Spotlight, Magnifier, and Print, in that order, come up.
What each does is explained in what follows.
8
4.4.1 Save Screen
The Save Screen item is a capturing tool for those who would like
to save content for their children, for the customer who would like
to save the application to send to the tech savvy friend, or simply
for the pupil that would like to save an error message for later
lookup.
It has the following items.
4.4.1.1 Save Full Screen
As the name implies, this is to copy the full screen to a file.
4.4.1.2 Save User Selected Area
This saves the image included in the designated area that the
user selects.
4.4.2 Virtual Keyboard
The Virtual Keyboard is a keyboard that comes up on the screen
of the monitor. Its main use is when one wants to write something
but does not have access to a keyboard.
4.4.3 Spotlight
Selecting the button to the left will provide one with a black
screen with a circle in the middle and a flash light to the right.
This is for giving attention to the thing under the circle. One can
change the shape and size of the circle by going to the brim of
the circle. The shape of the cursor changes to that of a cross.
Left click with one’s mouse and change to one’s liking.
4.4.4 Magnifier
The Magnifier opens up the Windows Magnifier.
4.4.5 Print
The Print functionality is for printing those images that are
already saved in the Blackboard. Select an image from the
Blackboard and select Print.
9
5. Right Tab
There are four functions of the right tab.
5.1 Select
When one selects the topmost icon on the right tab, one can move the ChalkBox application
window anywhere around the desktop. This can also be accomplished by selecting the title
bar.
5.2 Maximize/Minimize
This is the maximize/minimize button for this application. The direction of the pointing arrow
changes inward for minimize and outward for maximize.
5.3 Previous Pen
This is the previously used device be it the pen, marker, or the brush and its color.
5.4 Exit
This is the button to use to exit the program.
10


![[T3kCfg User Manual]](http://vs1.manualzilla.com/store/data/005811198_1-b56f11e7d0771a8aa23c614d4bbca2a5-150x150.png)