1
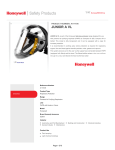
TORNADO T8
Operating and Maintenance Instructions
WARNINGS
Before using this equipment, read the contents of EN 529 : 2005 and familiarise yourself with the requirements for
respiratory protective devices and their potential effects on the wearer.
TORNADO system users must be familiar with workplace hazards prior to using the equipment and must be fully
trained in the use of the apparatus.
This Manual must be read in conjunction with the User Manual for T/POWER and T/FILTER.
T8 is not approved for use with T/A/LINE or AIRLINE FCV.
T/POWER must be fitted with filters selected from the TORNADO range of filters which are appropriate for the
workplace hazard.
This product must only be used with Protector-branded filters manufactured by Scott Health and Safety Limited. The
use of any other filters will negate the approval and will be likely to reduce the level of protection provided.
DO NOT confuse the EN 12941 and EN 12942 TORNADO filter markings with filter markings relating to other EN
standards.
DO NOT use T8 in confined spaces, oxygen deficient atmospheres (<19.5%), oxygen enriched atmospheres (>23%)
or where there is an immediate hazard to life or health.
DO NOT use if the ambient temperature is outside of the range -10°C to +50°C. Humidity levels up to 95% RH do not
present any operational problems.
DO NOT use if the apparatus is damaged. The facemask and air hose must be inspected on every occasion before
use to ensure that no damage of any kind is evident, (eg chemical damage, splits or broken stitching), which could
cause leakage or reduced levels of protection. A monthly inspection of the apparatus is a mandatory requirement in
the UK under COSHH regulations and inspection on a monthly basis is strongly recommended for all other
countries.
Protection will only be obtained if the unit is fitted correctly.
Protection levels may be reduced if wind speed exceeds 2 metres per second.
In the unlikely event of T/POWER failing while in a hazardous atmosphere, there may be a reduction in airflow within
the face-piece. DO NOT REMOVE THE FACE-PIECE. GO IMMEDIATELY to a safe area and then remove the facepiece.
TORNADO face-pieces can be used in certain explosive and flammable atmospheres when used with T/POWER
which is marked as intrinsically safe. It is the employer’s responsibility to ensure that the intrinsic safety approval is
compatible with the particular environment.
At very high work-rates, pressure in the device may become negative at peak inhalation flow.
DO NOT use with a low airflow output.
T8 must not be used where contaminant concentration exceeds 20 times its Occupational Exposure Limit, or 1000
ppm by volume.
It is unlikely that the requirements for leakage will be achieved if hair, spectacle side arms or clothing intrude into
the face-seal.
DO NOT modify facemasks as this will invalidate all approvals and may result in death or injury to the wearer.
TORNADO filters (EN 12942) must not be fitted directly to the face-piece.
1
TORNADO T8
SPECIFICATION
Description:
Classification:
Minimum Design Flow Rate:
Assigned* (Nominal) Protection Factor:
Operating Temperature Limits:
Material:
Inner Mask
Outer Shell
Weight:
Half-mask with hose connection to EN 148-1
EN 12942 TM2
110 L/min
20 (200)
-10°C to +50°C
Silicone Elastomer
Acrylonitrile Butadiene Styrene (ABS)
180 Grams
* According to EN 529 : 2005
If T8 is to be used with a single filter
mounted directly to the mask, filters from
the Pro2000 Range should be selected.
MARKINGS AND MEANINGS
The T8 half-mask markings are in
conformance with EN 12942, as follows:
The following Pro2000
available for use with T8:
Outer Shell Markings:
Marking
SCOTT
EN12942
TM2
T8
Meaning
Part No.
Name of manufacturer
Standard - powered respirator
Class designation
Product name
EC251R
EC220R
EC221R
EC223R
5042674
EC230R
EC238R
EC200R
EC201R
EC203R
5042874
EC219R
Inner Mask Markings:
Marking
Meaning
SHS
CE
0086
S/M
M/L
EN140 : 1998
Manufacturer’s identification mark
CE mark
Certifying body
Size - Small/Medium
Size - Medium/Large
Standard - negative-pressure half-mask
Date of manufacture:
07
Indicates year (2007)
Filter Type
P3
A2 P3
B2 P3
K2 P3
A2 B2 P3
A2 B2 E1 P3
AE1Hg P3
A2
B2
K2
A2 B2
AX
filters
are
Standard
EN 143 : 2000
EN 14387 : 2004
EN 14387 : 2004
EN 14387 : 2004
EN 14387 : 2004
EN 14387 : 2004
EN 14387 : 2004
EN 14387 : 2004
EN 14387 : 2004
EN 14387 : 2004
EN 14387 : 2004
EN 14387 : 2004
Note:
All of the above filters are sold in packs of
20.
WEARING
Indicates month (June)
WARNING:
The half-mask should be examined for
damage of any kind such as deep
scratches, abrasions, cracks and
deterioration
before
every
use.
Damaged parts, components which
have come into contact with solvents
and
parts
that
have
received
significant impact should be replaced.
FILTER SELECTION
T8 can be used either with a T/POWER
respirator in conformance with EN 12942,
or with a single filter mounted directly to
the mask in conformance with EN 140.
Each of the applications described above
use a different type of filter and IT IS
ESSENTIAL that the correct filter type is
selected for the chosen application.
CAUTION:
Whilst the materials which may come
into contact with the wearer's skin are
not known to be likely to cause skin
irritation or other adverse effects to
health, they may cause allergic
reactions in particularly susceptible
individuals.
When T8 is to be used in conjunction with
T/POWER, filters from the TF Range
should be selected. Full details of the
range of filters available can be found in
the T/POWER User Manual.
2
TORNADO T8
Note:
Initial donning procedures should be
supervised by a competent person.
1.
Select the appropriate size of mask:
S/M or M/L.
2.
Check that all parts of T8 are clean
and in good condition.
3.
If using T8 with T/POWER, connect
the breathing hose to the mask. Tighten
the nut, ensuring that the elbow is at a
suitable angle. DO NOT over-tighten. If
fitting a filter directly to the mask, screw
the filter in a clockwise direction, fully into
the side fitting, until finger-tight. DO NOT
over-tighten.
Fig. 2
Note:
The mask should feel firm against the
face with no undue movement. If a correct
fit cannot be achieved or the mask is
uncomfortable, adjust the harness length
using the nape buckle (it may be easier to
do this prior to donning the mask).
4.
Adjust the harness so that the
buckle is away from the mask and the
head pad rests on top of the mask. Place
the strap around the neck (see Fig. 1).
CAUTION:
Excessive
tightening
causes
discomfort and may distort the faceseal.
Fig. 1
7.
Test the face-seal by blocking the
breathing hose/filter inlet with the palm of
the hand and inhaling. Check that the
mask pulls onto the face and remains in
position until the breath is exhaled. If a
leak is evident, check the face-seal and
exhalation valves.
Note:
Once a comfortable fit has been achieved
for a given wearer, there should be no
need to alter the head-strap length when
donning in the future.
Note:
If a correct fit still cannot be achieved or if
the mask continues to leak, it may be
necessary to try the alternative size of
mask.
5.
Place the half-mask on the face
and adjust until the face-seal fits snugly
against the face.
WARNING:
DO NOT use the mask if a correct fit
cannot be achieved or if persistent
leaks are evident.
6.
Pull the head pad onto the crown of
the head (Fig. 2) and adjust the harness,
feeding the harness through the anchors
to equalise the pull of the harness.
8.
If using T8 with T/POWER, arrange
the breathing hose so that it trails freely
down the back and is not kinked, likely to
snag or be crushed.
9.
Follow the instructions
T/POWER User Manual to:
3
in
the
TORNADO T8
i)
ii)
iii)
Attach the breathing hose to
the T/POWER unit;
Perform the air-flow test;
Check the filters.
MAINTENANCE
Inner Mask and Outer Shell:
Inspect for holes, surface damage or
excessive distortion, particularly around
the inlet port. Ensure that the inner mask
is flexible and shows no signs of damage.
The inner mask and outer shell should be
discarded after five years in service,
regardless of condition.
AFTER USE
WARNING:
DO NOT remove the half-mask until
well clear of the hazard area.
1.
Remove
the
half-mask
unscrew the breathing hose or filter.
and
Valve Flaps:
Visually inspect valve flaps every three
months to ensure that they are clean and
undamaged. Valve flaps must be
replaced annually regardless of condition.
Valve flaps in storage have a shelf-life of
five years, after which time they should be
discarded.
2.
When removing a filter which is
fitted directly to the mask, ensure that the
filter is not clogged, saturated or timeexpired. Filters found to be in this
condition must be renewed.
3.
Clean the mask and the outside of
the breathing hose with a synthetic
sponge moistened in a mild solution of
soap and warm water, or TriGeneTM
solution.
Exhalation valve flaps are marked with a
code indicating the year of manufacture.
The code ‘07' corresponds to 2007 and a
dot is added each year thereafter, so ‘07.'
would equate to 2008.
CAUTION:
DO NOT allow water to enter the
breathing hose.
Harness Components:
Check for any signs of possible failure,
paying particular attention to the anchor
tags.
4.
Rinse the mask thoroughly under
clean running water and hang it by the
harness until thoroughly dry.
RECORD INSPECTION AND
MAINTENANCE DETAILS
CAUTION:
DO NOT use radiant heat or sunlight to
speed drying.
Record test and maintenance details on
the Inspection and Maintenance Record
Sheet provided at the back of this
Manual.
5.
Use TriGeneTM wipes to sanitise the
face-seal.
6.
After cleaning, check to ensure that
all components are in good condition.
Information recorded usually includes:
•
Name of employer responsible for
the apparatus.
•
Make,
model
number
or
identification mark of the apparatus,
together with a description of any
distinguishing features, sufficient to
enable clear identification.
•
Date
of
the
inspection/
maintenance together with the
name,
signature
or
unique
authentication
mark
of
the
examiner.
•
Condition of the apparatus, details
of any defects found and any
remedial action taken.
WARNING:
Worn or damaged components MUST
be renewed prior to further use.
STORAGE
When not in use, the equipment should
be stored in a clean, dry environment,
away from direct heat sources between
+10ºC and +30ºC, at a humidity of less
than 65% RH.
4
TORNADO T8
SPARE PARTS
Item No.
Description
Part No.
Mask and Shell Sub Assembly
-
2
Valve Flap Service Kit
2016808
3
Inhale Valve Flap
-
4
Exhale Valve Flap
-
5
Overhaul Kit
2016809
6
Inhale Valve Frame and Pin
-
7
Exhale Valve Cover
-
8
Harness Assembly
2016807
1
9
Breathing Hose
-
TriGene Liquid
(1 Litre)
2008247
TOR7/HOSE/EPDM
-
TriGene Disinfecting Wipes
(Pack of 20)
2004225
5
TORNADO T8
2.
Insert the anchor tags on the
replacement harness into the slots in the
outer shell. Check that each tag clicks
into place and is securely attached.
Ensure that the harness is not twisted or
tangled.
FITTING SPARES
To Replace the Hose:
1.
Remove the hose from the mask by
unscrewing in a counter-clockwise
direction.
2.
Connect the replacement breathing
hose to the mask by screwing in a
clockwise direction. Tighten the nut,
ensuring that the elbow is at a suitable
angle. DO NOT over-tighten.
WARRANTY
The products manufactured at our
factories in Skelmersdale and Vaasa
carry a warranty of 12 months (unless
stated otherwise) for parts, labour and
return to site. The warranty period runs
from the date of purchase by the end
user.
To Replace the Exhale Valve Flaps
and Valve Covers:
1.
Hold the valve cover using the
lower cut-out as leverage and pull to
remove the cover from its housing.
These products are warranted to be free
from
defects
in
materials
and
workmanship at the time of delivery.
SCOTT will be under no liability for any
defect arising from wilful damage,
negligence, abnormal working conditions,
failure
to
follow
the
original
manufacturer’s instructions, misuse or
unauthorised alteration or repair.
2.
Grasp the exhale valve flap and pull
gently to remove from the housing.
3.
Check that the replacement flaps
are in good condition and carefully pull
the stem of each flap through the centre
of the valve frame, until the flap lies flat
against the frame.
Evidence of purchase date will need to be
provided for any claims arising during the
warranty period. All warranty claims must
be directed through SCOTT Customer
Services and in accordance with our
sales return procedure.
4.
Align the valve cover with the slots
in the housing and snap the cover into
place.
To Replace the Inhale Valve Flap:
1.
Working from the inside of the
mask, push out the valve frame, flap and
pin assembly and withdraw from the
mask.
NOTIFIED BODIES
Inspec International Limited (0194)
56 Leslie Hough Way,
Salford,
Greater Manchester,
M6 6AJ,
England.
2.
Remove the valve flap from the
valve pin.
3.
Check that the replacement valve
flap is in good condition and carefully fit
the replacement flap over the valve pin.
BSI Product Services (0086)
Kitemark House,
Maylands Avenue,
Hemel Hempstead,
HP2 4SQ,
England.
4.
Re-fit the valve frame, flap and pin
assembly into the housing in the mask,
taking care to ensure that the valve frame
is correctly seated within the housing.
Check that the flap lies flat against the
frame.
To Replace the Harness:
1.
Push the harness anchor tags from
the outer shell to free the harness
assembly.
6