1
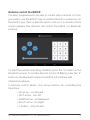
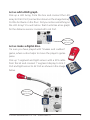
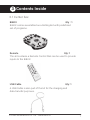
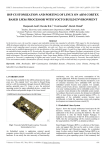
Quick start guide
Kindling
Innovation
in the
Young
Hi I am BIBOX! Thank you for making me one of your prized
possessions! I am a programmable electronic platform and can help
you add intelligence to any electronic device in an easy fashion.
I consist of, mainly two parts :
Hardware: BIBOX, An
Software: BISOFT, which is
electronic platform to which
an easy to use graphical
you can connect a wide
programming environment.
variety of electronic devices
and accessories.
I am designed to work just like how your brain makes sense of the
outside world, Getting input from sense organs, and changing
behavior in response to the received information. You can program
me to take in data from input elements (sensors, switches, etc.) and
give out results using output elements (LEDs, motors etc.). I can help
you build real world gadgets ranging from Robotic toys to
automation of machines. I am already part of many student
communities and have won many prestigious awards. Indian
government organizations like DSIR and DST loved my creative
capability that they funded my company to manufacture many more
like me.This manual serves as a quick start guide for all those who
want to know how to get me started right away. So read this guide
thoroughly, I guarantee FUN for all the days ahead!!
© Evobi Automations Pvt. Ltd - www.bibox.in
1
1 Getting Started
1.1 Exploring innovation kit
Flip open
for Accessories
Push
Input
Elements
Battery &
Battery
&
Charger
Charger
1. Input Elements
2. Output Elements
Output
Elements
3. Battery & Charger
4. Connectors & Cables
Remote
CD
© Evobi Automations Pvt. Ltd - www.bibox.in
USB
Cable
Connectors
& Cables
2
2 BIBOX in Action
2.1 Let’s play
When you take the BIBOX out of the kit, I’m already programmed.
Please switch me ON and leave me on the floor. You will find me
moving around avoiding obstacles.
The distance sensor and battery are already connected to me
Turn ON both the
switches
Please Note that the Distance sensor does NOT work where the room is
having exposure to sunlight. It is recommended, that the BIBOX be placed
in a room exposed to minimal sunlight (Tubelight lit room will work fine).
If you want to stop the motor from running, kindly turn OFF the “motor
switch” as shown in the image below.
Motor switch
In rare cases, if the BIBOX doesn’t power up, kindly charge the Li-Ion
Battery for 4 hours and power up again.
© Evobi Automations Pvt. Ltd - www.bibox.in
3
Remote control the BIBOX
I’ve been programmed to be able to control with a remote. For this,
you need to use the BISOFT app on Android device to control me. On
the BISOFT app, there is Remote option, click on it. A remote control
screen appears.This Remote will control the BIBOX via Bluetooth
protocol.
To start the remote controlling of BIBOX, press the “S” button on the
Bluetooth remote. To End the Remote Control of BIBOX, press the “E”
button on the Bluetooth remote, the BIBOX will continue with
Obstacle Avoidance.
In Remote control Mode:- Use Arrow buttons for controlling the
Directions.
* UP arrow :- Go forward
* LEFT arrow:- Go Left
* DOWN arrow:- Go Backward
* RIGHT arrow:- Go Right
* O button:- Stop the Bot
© Evobi Automations Pvt. Ltd - www.bibox.in
4
Let us add a BAR graph.
Pick up a LED Array, from the box and connect the LED
array to D & E Port (connection shown in the image below).
Put the bot back on the floor. Did you notice something on
the LED Array? You will notice that it acts like a bar graph
for the distance sensor connected to A4 Port.
Kindly notice
the NOTCH
Let us make a digital dice.
I’m sure you have played with “Snakes and Ladders”
game, where a dice helps to move the player’s game
piece.
Pick up 7 segment and light sensor with a 3P3 cable
from the kit and connect 7 segment display to B & C
Port and light sensor to A2 Port as shown in the image
below.
Kindly notice
the NOTCH
© Evobi Automations Pvt. Ltd - www.bibox.in
5
You will notice that the 7 segment display keeps the numbers ticking
between 1 to 6 continuously. Now, cover the light sensor with your
hand, you would notice that, the 7 segment display now stops and
shows one number between 1 to 6. Whenever you expose the light
to the sensor, the display again keeps ticking continuously.
Wow !! You could now play Snakes and Ladders with a digital dice
with your friends.
I’m sure that you enjoyed the first stint with BIBOX. BIBOX works
because of a pre-loaded program, which does a set of actions. You
can edit the same program as per your preference. Please refer to my
detailed user manual. and tutorials on editing the program, in
downloads section of our website.
You could now start dismantling the BOT and start building your
imagination into real time gadgets. From an idea to the realm of your
own creations, it's just your imaginations.
Hope you would enjoy and we would be more than happy to hear
from you anytime.
Refer the tutorials on CD for more projects.
For other interesting projects, latest updates, Softwares, User
Manual, please visit :- http://store.bibox.in/index.php/downloads
© Evobi Automations Pvt. Ltd - www.bibox.in
6
3 Contents Inside
3.1 Center box
BIBOX
Qty : 1
BIBOX comes assembled as a Rolling Bot with predefined
set of programs.
Remote
Qty: 1
This kit contains a Remote Control that can be used to provide
inputs to the BIBOX.
USB Cable
Qty: 1
A USB Cable is also part of the kit for the charging and
data transfer purposes.
© Evobi Automations Pvt. Ltd - www.bibox.in
7
3.2 Input Elements
Light Sensor
Qty : 2
Used to measure the various levels of light intensity.
Distance Sensor
Used to measure distances up to 10cm.
Qty : 2
“Works only indoors with no direct sunlight
hitting the sensor”.
Bend Sensor
Qty : 1
Used to measure bending of an object. This can also
be used to detect the pressure or weight.
Sound Sensor
Qty : 1
Used to measure the various levels of sound intensity.
Heat Sensor
Qty : 1
Used to measure the temperature or heat levels.
3.3 Output Elements
LEDs
Qty: 4
These are light emitting devices in red, green, blue
and white colours.
LED Array
Qty : 1
A group of 8 small LEDs placed on a Single board.
Can be used as a bar graph.
7 Segment Display
Qty : 1
LEDs arranged in a pattern used to display digits
from 0 to 9 and some alphabets.
© Evobi Automations Pvt. Ltd - www.bibox.in
8
3.4 Battery and Charger
Qty : 1
Battery
Specially designed 7.4V Lithium-ion battery
used for powering up BIBOX.
Please do not use this battery with
any another devices / gadgets.
Charger
Qty : 1
Used to charge the battery provided with
BIBOX only
2.5 Connectors and Cables
Qty : 6
3P3 Cables
Used to connect different input and output
elements to the BIBOX.
Qty : 2
L Clamp
This helps in fixing the INPUT and OUTPUT
Accessories to the chassis of the rolling bot.
Already comes attached to the chassis.
For more accessories, visit our online store http://store.bibox.in
© Evobi Automations Pvt. Ltd - www.bibox.in
9
4 Know Your BIBOX
4.1 The different types of components in
BIBOX.
One Line
Ports
Beeper
Program
Button
Motor
Port2
Reset
Button
Motor
Port1
Eight
Line Ports
Eight
Line Ports
Remote
Receiver
OLED
OLED
Four
Line Ports
Four
Line Ports
Battery
Port
USB
Port
Power
ON/OFF
Switch
© Evobi Automations Pvt. Ltd - www.bibox.in
Motor
ON/OFF
Switch
10
4.2 BIBOX OLED Screen
Once powered ON, BIBOX will show a welcome message and is all
set to ROLL!!
POWER UP Screen
STATUS Screen
Bat:55% 0:3:52 R:
Lets Roll !
------------------A1:0 A2:0 A3:0
98d3:31:30034
A4:0 A5:0 A6:0
Android(v2.0.0)
M1:x-0 M2:x-0
1) The Initial Power Up Screen shows the full Bluetooth ID for your
respective BIBOX and the firmware version number.
2) The STATUS Screen shows the status of the device, which includes
Bat, Bluetooth ID, Remote data and PORT values.
3) The PORT values of A1 to A6 as well as Motor port are displayed,
according to what you have set on the program.
Details of the Status Screen:
1) BAT: Battery charge varies from 0% to 99%. 99% shows full charge.
2) Time Function: A time duration (HH:MM:SS) is displayed, This
shows the time since the BIBOX was last programmed and the power
is ON. Max value is 99:59:59
3) Remote Value “ R “ : Shows the remote values whenever the button
is pressed.
4) The different Port values and their status are displayed too.
Bluetooth ID of BIBOX: I’ve have an ID (set of numbers separated by
colon) Example - 98:D3:31:20:02:DA, unique to each BIBOX. This ID is
nothing but the Bluetooth ID of the BIBOX.
The Bluetooth ID is mentioned on the 1st screen of the OLED display
during power ON of BIBOX, as well as on the sticker stuck at the
backside of your BIBOX.
© Evobi Automations Pvt. Ltd - www.bibox.in
11
4.3 The various port details are as follows:
Category
Ports
Accessories to Connect
One Line
Ports
A1 - A6
Input elements like
Sound sensor, distance sensor
etc. Output elements like LEDs
Four Line
Ports
F1 - F4
G1 - G4
Four line Elements like
motor Extender and other
compatible elements *
Eight Line
Ports
B1 - B4
C1 - C4
D1 - D4
E1 - E4
Eight line elements like LED
array, 7-segment display,
extenders etc.
Motor
Ports
Motor1
Motor2
**Components like DC
Motors, Geared DC motors,
Relay elements,
Electro-magnetic elements
Battery
Port
Connect 7.4V BIBOX
certified batteries ONLY.
Refer our website for other
alternative power solutions.
USB Port
Connect the USB cable
to the tablet/ mobile for
programming.
*My Lab is currently working on various add-on boards to enhance your experience.
Stay tuned to our website for latest updates.
**The components connected to the motor ports should never exceed the ratings of
12v, 500mA.
© Evobi Automations Pvt. Ltd - www.bibox.in
12
4.4 Charging Li- Ion Batteries
My battery has been partially charged at the factory, kindly charge
the battery fully for 4 hours before using it for the first time. It is
advisable to charge the battery, when the BAT value falls below 25%.
The OLED screen will flicker, Power LED will be dim and the motor
will not run, showing that the battery is out of charge.
1) First, connect the battery to the Charger component’s Battery
Port.
2) Connect the micro USB Cable to the Charger component’s USB
Port.
3) Plug the other end of the micro USB Cable into any USB compatible mobile charger or any PC / Laptop port to initiate charging.
The battery charging status will be indicated by the 2 green lights on
the charger unit. When the green lights turn OFF, it implies that the
battery has been fully charged.
Li-Ion
Battery
Charger
1
2
USB
compatible
Mobile
charger
3
© Evobi Automations Pvt. Ltd - www.bibox.in
USB
Cable
13
4.5 Some important points to keep in mind:
Extender boards can
be any of these: Servo
Extender Board, Motor
Extender Board, Port
Extender Board.
Specification of
Sensors & LED
Servo motor that
boards that can be
can be connected:
connected to A1 through A6
Micro Servo Motor of
should have a maximum
maximum 200mA current
operating voltage
rating.
of 5 Volts.
DC geared &
non-geared motor
connected to Motor Ports
should have a maximum
operating voltage &
current of 12v & 500mA
The maximum power
supply through battery that
can be connected to
BIBOX is 9 Volts.
respectively.
1) Kindly use each components present in the kit as intended to the
correct Port. Connecting a component to wrong ports, can cause
irreparable damage to the BIBOX and accessories which will void the
warranty.
2) In case you want to connect a new component to BIBOX, and
have doubts on how and which port, kindly contact/email the
support team, before proceeding to get a confirmation about the
connections.
© Evobi Automations Pvt. Ltd - www.bibox.in
14
5 Installing BISOFT
5.1 BISOFT App Installation procedure
The BISOFT app is now available on the Google playstore. Please
search online for “BISOFT” to download the app to your Android
device. If you are unable to find, you can search using this link:https://play.google.com/store/apps/details?id=com.evobi.bisoft&hl=en
“The BISOFT version currently available online is 2.0”
The BISOFT software can be installed on any device that supports
Android 4.0-Ice cream Sandwich version and above.
* The PC version of BISOFT is also available online.
5.2 Using the BISOFT Application
Once the BISOFT software has been installed, you can open the
software, by clicking on the BISOFT icon in the menu list.
Charger
Click "BEGIN" to start the programming process.
© Evobi Automations Pvt. Ltd - www.bibox.in
15
6 Using the BISOFT Application
6.1 BISOFT programming has 3 phases:
1. CONCEPT
2. ASSEMBLY
3. LOGIC
FLOW
1 Concept:
Here, you select the components required for the project. You can
see all the selectable components by scrolling.
For selecting the component, click on the component
you are going to use. Clicking on the component will
make it appear on the extreme right hand side.
To deselect the component, click and hold the
selected component for 3 seconds.
Click on the ‘X’ mark that appears on it’s left side to
remove the component.
Charger
You can select as many components as defined in
your project.
Only one instance of a component can be selected.
© Evobi Automations Pvt. Ltd - www.bibox.in
16
2 Assembly:
In this phase, you connect the components selected in the concept
phase to the virtual BIBOX board present on the screen.
As shown in the figure below, you can see the components
connected to different ports of BIBOX.
a)To connect, click on the component on the left hand side. PORTS,
to which the component can be connected to BIBOX, will be
highlighted. You can then connect them by dragging and dropping
the component towards the PORT.
b)To remove the component which is already connected, tap on that
component and release. It will disappear from that PORT.
c) Special components like BEEPER
Chargerand IR Remote Receiver which
are in-built in BIBOX can be enabled by clicking on it and then used
during programming.
Only one component can be connected to each PORT.
© Evobi Automations Pvt. Ltd - www.bibox.in
17
3 Logic Flow:
In this phase, You create the program required for Your project. There
are various hexagonal elements.
Hexagon element is the smallest part of the program flow. Brief
description of what each hexagon element can do is given in the next
page.
Input
Elements
a) Any program begins with a "START" and terminates with a REPEAT
or END.
b) The program is created by adding the elements one after the other
in a logically correct sequence. To add an element, on the hexagon
grid, you click on the highlighted hexagon [yellow] to bring out the
several options. You click on the appropriate element to build the
program flow.
NOTE: Only components that have been added and connected to
BIBOX shall have their attributes displayed. If you need the attributes
of another component, then add and connect that component to
BIBOX under Concept and Assembly phase.
© Evobi Automations Pvt. Ltd - www.bibox.in
18
This element helps in enabling output components
[LED, Motor, Beeper] and setting their attributes.
This element pauses the sequential flow for a
predefined amount of time as set by the user.
This element helps in branching the logical sequence
by checking for conditions like greater than
/ less than / equal to / not equal to.
The branch can be ended using the END-IF
element.
This element repeats the sequence under its
branch for the set number of times. This
can be ended using the END LOOP element.
The sequential flow must be terminated with a REPEAT
or END. If REPEAT is selected, then the entire
flow will keep repeating from START to
REPEAT element. If END is selected, then,
Charger
the entire flow will be executed only once.
Everytime, IF / LOOP must be ended for the sequence flow to
continue.
© Evobi Automations Pvt. Ltd - www.bibox.in
19
The START hex component has properties, using which you can enable
variables, flags and counter units for a project.
* Variables:- BI DATA 1, BI DATA 2 and BI DATA 3 are temporary data
variables using which you can store data of different input and output
components.
* Flags:- BIFLAG 1, BIFLAG 2, BIFLAG 3 are status indication feature for
a program, to set the BIFLAG 1/2/3 to TRUE / FALSE.
* Counters:- BICOUNTER 1, BICOUNTER 2, BICOUNTER 3 are used for
counting purposes in a program when a certain condition is met.
WAIT hex component has properties of delay in terms of Hours,
Minutes, Seconds and milliseconds. The maximum that can be set for
hours is 23, minutes is 59, seconds is 59, milliseconds is 950.
© Evobi Automations Pvt. Ltd - www.bibox.in
20
Once you have finished creating the Logic Flow, you can SAVE or
UPLOAD or RELOAD the program. We have a set of options on the
right side top of the app as mentioned in the below image.
Open
Save the
saved
program
file
© Evobi Automations Pvt. Ltd - www.bibox.in
Upload the
program to
BIBOX
Bluetooth
Connectivity
Remote
setings
21
You can save the program that you have created, by clicking the
"Save File" option, at the right side top menu. File name for the
program can be any text/ character. Once saved, then the program is
accessible by clicking on the "Load File"
option.
As shown in the image above, you can see the list of programs saved
by you. You can load the programs already saved by you at any point
of time.
The programs saved are of the extension “.bbd” and are stored in the
internal memory of the Android device, inside the folder by the name
“BISOFT”. You can open this folder on your Android device and view
all the list of programs.
Please note that these files are not compatible with any other
software or application.
NOTE :- Programs saved in the older version of BISOFT app (v1.0.7f
and earlier) are NOT compatible with the newer versions of the
BISOFT app (v2.0.0 onwards). You will have to re-create the entire
program again.
© Evobi Automations Pvt. Ltd - www.bibox.in
22
6.2 Downloading programs to BISOFT
You can download ready program files to BISOFT, from the
“downloads” link given earlier. The program file will have the
extension of “.bbd”. You can copy these program files to the folder
“BISOFT” on the internal memory of your ANDROID Device.
Once you have copied the programs, you can now open the program
in BISOFT app, by using the “LOAD”
option. Select the Program
you need, by tapping on it. The program will now open, with the
CONCEPT, ASSEMBLY and LOGIC FLOW all filled & ready.
Now all you need to do is, to do the physical connections of the
accessories to BIBOX and then upload the program. Uploading to
BIBOX is mentioned in the next section.
The above image shows the list of programs that have been saved in
the “BISOFT” folder of your ANDROID device.
© Evobi Automations Pvt. Ltd - www.bibox.in
23
6.3 Program uploading process.
BIBOX supports both Bluetooth and USB protocol of uploading the
program to it, from the android device. Click on “Connectivity
Settings”,
you get two modes - “Bluetooth mode” and “USB
mode”. You select “Bluetooth mode”. When in Bluetooth mode, you
click on "Scan for devices", a list of Bluetooth devices available
appears, in which the BIBOX will also appear.
If you notice closely, below the text BIBOX, a set of numbers are
present, example - “98:D3:31:30:03:57”. This set of numbers will be
the same as given on the sticker at the backside of your BIBOX or on
the 1st screen of the OLED display at power-up.
On selecting the BIBOX with correct ID and then pressing on “upload”
button,
the program will be uploaded to BIBOX.
Once successfully uploaded, the program will start executing in
BIBOX. The desired program that you created using the BISOFT app
should run successfully if your program logic is correctly made.
© Evobi Automations Pvt. Ltd - www.bibox.in
24
Please note that the BIBOX bluetooth scanning and selection is only
a one time process. Once the BIBOX bluetooth ID selection has been
done, then the BISOFT app will automatically save the ID. From next
time onwards, you can directly press the upload button, to upload
the program to BIBOX.
Also, as shown in the image below, if you click on “Connectivity
Settings”, then the BIBOX Bluetooth ID will be listed under “Paired
Devices” of the app.
IMPORTANT POINTS TO BE TAKEN NOTE OF :
1) Always, sync the bluetooth of the BIBOX and that of your android
device before uploading the program.
2) For uploading the program in USB mode, you will require a USB
cable and a OTG (On-The-Go) cable to connect the BIBOX directly to
Android device.
3) Never click on the RESET button of the BIBOX when the uploading
of the program is happening.
© Evobi Automations Pvt. Ltd - www.bibox.in
25
6.4 Remote control.
The BISOFT app has an in-built Remote control option, for controlling
the BIBOX through Bluetooth. You can program the BIBOX, then use
this Bluetooth Remote, to control it, by pressing the respective
buttons. Each button of the Bluetooth Remote control has values that
it corresponds to, which can be seen on the OLED screen of the
BIBOX, at the “R” heading.
STATUS Screen
Bat:55% 0:3:52 R:49
--------------------A1:0 A2:0 A3:0
A4:0 A5:0 A6:0
M1:x-0 M2:x-0
Everytime you open the Bluetooth Remote control, the BISOFT app,
connects to the BIBOX, for synchronisation. After synchronisation,
you can start pressing the buttons of the remote.
NOTE :- For Bluetooth Remote Control to work, the BIBOX should be
powered ON and near proximity to the Android device.
© Evobi Automations Pvt. Ltd - www.bibox.in
26
7 Create Your First Program
7.1 Program Name: Blinking of Light.
In this program, you will blink any LED connected to BIBOX at A1
PORT. The LED will turn ON and OFF every one second.
Step 1:- Concept Phase
Here you choose the component “LED” required for our project.
Step 2:- Assembly Phase
Here you connect the LED to BIBOX’s A1 PORT as shown. you
should physically connect the LED using a 3P3 cable to A1 PORT
only. Kindly see that the battery is also connected. The physical
connection of LED to BIBOX is shown in the next page.
Charger
© Evobi Automations Pvt. Ltd - www.bibox.in
27
Step 3: Logic Flow
The program steps is as shown in the images below. It consists of 5
steps
1) Make light ON at A1 by setting a value to 20 on the property panel
of OUTPUT.
intensity at
20
2) Add wait for 1 second
1 Second
© Evobi Automations Pvt. Ltd - www.bibox.in
28
3) Make light OFF at A1 by setting a value to 0 on the property panel
of OUTPUT.
intensity at 0
4) Add wait for 1 second.
1 Second
5) Repeat.
Upload the program after pairing and connecting through Bluetooth
(Kindly refer 6.3 for connecting & upload). Your LED should start
blinking. You can now create different blinking patterns by changing
the attributes of the wait element and upload the same.
Hope you had fun!!!. Try out different projects or visit our website for
more.
© Evobi Automations Pvt. Ltd - www.bibox.in
29
8 Updating the BIBOX/BISOFT
We frequently upgrade the BIBOX firmware as well as the BISOFT
App for changing features and fixing any bugs. Kindly register on our
website with the Bluetooth ID of your BIBOX, to get this activated.
Please visit – http://store.bibox.in, then click on “Register --> Your
BIBOX”. Fill in the details as required. The Serial number asked is
nothing but the Bluetooth ID mentioned at the backside of your
BIBOX.
BISOFT app updating will be an automatic process, since the android
device will be connected to the internet. You will receive an update
notification, when we release the new version.
BIBOX (Hardware) Firmware updating requires a Windows PC. The
updating process is explained in the video tutorials provided in the CD
of your BIBOX kit. Use step-by-step procedures which describes
tasks that the user must carry out in a specific order.
Once both the BISOFT and the BIBOX are updated, you are ready to
start using them.
As the product is frequently evolved, kindly refer the latest manual in
the “Downloads” section on our Website.
© Evobi Automations Pvt. Ltd - www.bibox.in
30
9 What if something goes wrong?
Don't worry, if your BIBOX or BISOFT doesn't respond
to your instructions.
Email ID :- [email protected]
Phone : - +91 8025743579
Mobile : - +91 90083 33233
Website :- www.bibox.in
- I’ve a support team, who can help you with any problem in regard to
your BIBOX kit.
- I’ve an online FORUM section on our website, where you can post
any issues related to your BIBOX & we will get back to you at the
earliest.
Warranty Information:
If you have any problems with the product you receive, please let the
support team know and will they correct the situation. Please do not
wait more than 7 days after receipt to report problems or defective
products; we will not be able to service the report after 7 days. All
merchandise returns for a refund or credit must be within 7 days in
new, resale-able condition.
We do not accept returns of kits and other products unless there is a
defect in the product. Please inform the support team within 7 days
of receipt if there are any defects. We do not cover return shipment
fee.
The Warranty will become void if the BIBOX brain is
removed from its acrylic sheet protective layer.
© Evobi Automations Pvt. Ltd - www.bibox.in
31
Important Note: It is your responsibility to pack the returned product
appropriately and with enough protection so that it arrives undamaged. We will not be able to replace any products that arrive damaged
to our location, apart from manufacturing defects at our end.
Repairs and Returns :
We try our best to see all the products shipped from our end are free
of defects.In case if anything goes wrong with your BIBOX or BISOFT,
shoot us an email to [email protected] We'll help you troubleshoot by
email, Skype, or phone. If that doesn't work, we'll send you a Return
Material (RM) number.
Just package up your BIBOX and send with the line :"Attn : RM : <RM
number>" to
Evobi Automations Pvt Ltd
1st Floor, Pixel Park A, PESIT South Campus, Hosur Road
Bangalore - 560100 , INDIA
In 2-3 weeks, subject to availability of replacement parts, your BIBOX
will arrive home, good as new. We don't accept returned products
without the RM number, You can request RM number at
[email protected]
© Evobi Automations Pvt. Ltd - www.bibox.in
32
10 What Next!!!!
Feel free to ask questions to us on the usage of the
BIBOX Ultra kit at the following contact details:
Email ID:- [email protected]
Phone: - +91 8025743579
Mobile : - +91 90083 33233
You are welcome to share your BIBOX based projects on our website.
Our website provides a platform to showcase your creative
ideas/projects.
Feel free to post questions on our products and projects at our
‘Forums’ section or at the individual product page on the store. Our
website is intergrated with facebook which makes it easier for you to
share whatever you do with your friends.
You can buy different kinds of accessories (mechanical, electronics,
etc.) and other components needed for your projects from our
website, store.bibox.in
Please mail us your ideas, concepts and suggestions to let us serve
you better.
You can also join our facebook user community,
https://www.facebook.com/groups/bibox.user
You can view all the projects done using the BIBOX kit in the link :http://store.bibox.in/index.php/blog.
© Evobi Automations Pvt. Ltd - www.bibox.in
33