Transcript
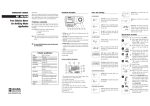
6.
Plug the AC adaptor into the back of the Receiver and the
wall outlet.
7.
Straighten the antenna vertically.
1. Check if you mounted the Transmitter correctly on your mailbox.
Receiver
8.
9.
Trouble shooting
AC Adaptor
Volume control knob
2. For a curb side mailbox, check if the arrows point towards
you when you open the mailbox door.
3. Check if the battery is installed correctly.
4. Check if your mailbox is level.
Adjust the volume control knob on the back of the receiver. You
may turn the sound off and use only the LED light to tell you when
your mail arrives if you wish.
5. Move the receiver to a different location.
6. Units are made as sets, so if you should ever purchase a
replacement unit, do not mix the new with the old.
When you press the reset button down to turn off the red light,
it is best if you do not hold it down for more than 1-2 seconds.
Thank you for buying the Mail Chime.
Curb Side
2
3
1
4
If you have any questions or problems, please call
Set dial on # 4 - Mount with arrows on Transmitter
pointing up towards the top of the mailbox door.
2
1
3
2
3
4
4
1
Wall Mounted
Hanna Products on 309-788-1982.
2
1
3
4
Set dial on # 3 - for mailboxes with large tapered lids.
Mount with arrows on Transmitter pointing up.
Set dial on # 2 - for mailboxes with short tapered lids and flat tops.
Mount with arrows on Transmitter pointing up.
Slot Type
2
1
FCC ID: RNCMAIL-1200
This device complies with Part 15 of the FCC rules. Operation of this device is subject to the following conditions: (1) This
device may not cause harmful interference, and (2) This device must accept any interference received, including
interference that may cause undesired operation. CAUTION: Changes or modifications not expressly approved by the
party responsible could void the user's authority to operate this equipment.
3
4
Hanna Products Inc.
Patent No. 7,506,796
2602 37th Street, Rock Island, IL 61201
Designed in USA
Phone (309) 788-1982 Email: [email protected]
Made in Taiwan
Set dial on # 4 - Mount with arrows
on Transmitter pointing up towards hinge.
page 2
page 3