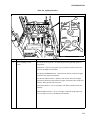
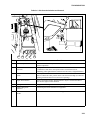
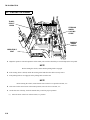
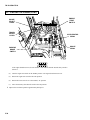
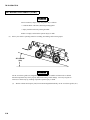
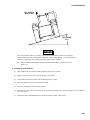
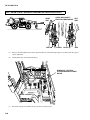
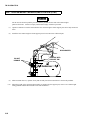
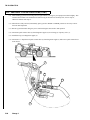
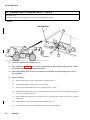
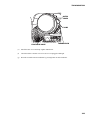
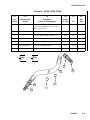
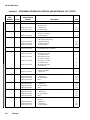
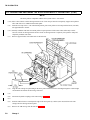
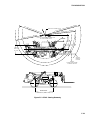
1
TM 10-3930-673-10
TECHNICAL MANUAL
OPERATOR’S MANUAL
INTRODUCTION
1-1
OPERATING INSTRUCTIONS
2-1
PREVENTIVE
MAINTENANCE
2-16
OPERATION
PROCEDURES
2-31
OPERATION UNDER
UNUSUAL CONDITIONS
2-63
OPERATOR MAINTENANCE
INSTRUCTIONS
3-1
TROUBLESHOOTING
PROCEDURES
3-1
OPERATOR MAINTENANCE
PROCEDURES
3-7
REFERENCES
A-1
TR00004
ALL TERRAIN LIFTER ARMY SYSTEM
(ATLAS)
COMPONENTS OF END ITEMS
(COEI) AND BASIC ISSUE ITEMS
(BII) LISTS
B-1
ADDITIONAL
AUTHORIZATION LIST
C-1
NSN 3930-01-417-2886
EXPENDABLE/DURABLE
SUPPLIES AND
MATERIALS LIST
D-1
Approved for public release;
distribution is unlimited.
LOAD RATING CHART
E-1
TRANSPORTABILITY
INSTRUCTIONS
F-1
10,000 LB CAPACITY
ALPHABETICAL INDEX
Index-1
HEADQUARTERS, DEPARTMENT OF THE ARMY
MAY 1998
TM 10-3930-673-10
WARNING
• DO NOT STOP QUICKLY. It is possible to drop a load which could result in load damage, or
injury or death to personnel.
• Do not downshift at high speeds. Vehicle will slow suddenly which could result in load damage, or
injury or death to personnel.
• Do not turn fast. This may cause forklift to tip, lose the load, and possibly cause injury or death to
personnel. This is particularly true in the four wheel steering mode. Turn vehicle in a lower gear or
a slower speed.
WARNING
• Do not travel with the automatic fork level switch in the ON position. It is possible to drop a load
which could result in load damage, or injury or death to personnel.
• Use care when backing up. Have someone direct you if you cannot see where you are going. Watch
clearances. Failure to do so can result in load damage, or injury or death to personnel.
• Do not operate vehicle with the emergency steer switch in the OFF position. If engine power is lost,
there will also be a loss of emergency steering capability. Failure to follow this precaution could
result in injury or death to personnel.
WARNING
• Use care when handling and transporting ammunition pallets. Failure to do so could result in injury
or death to personnel.
• Never move any part of vehicle or load near a power line or overhead wires. Failure to follow this
precaution could result in immediate injury or death to personnel.
• Ensure that counterweights are in place. An unbalanced vehicle could tip over and could cause
injury or death to personnel.
• Always lift load from its resting spot before extending or retracting the boom. Always extend or
retract the boom before lowering load to its resting spot. Failure to do so could cause vehicle
instability and result in injury or death to personnel. Refer to Appendix E for Load Rating Chart.
• Do not lift more than one pallet with forks. Pallets may topple and result in load or vehicle danger
or injury or death to personnel.
• Always retract the boom before lowering or transporting a load. Failure to do so could cause
vehicle instability and result in injury or death to personnel.
a
TM 10-3930-673-10
WARNING
• Do not exceed 45% grade (25°) longitudinally. Vehicle becomes unstable as fluid levels are shifted.
Internal components may not be properly lubricated causing vehicle damage. Tires may slip (loss
of traction) or vehicle may tip, resulting in possible operator injury or death.
• Do not exceed 30% grade (17°) laterally. Vehicle becomes unstable as fluid levels are shifted.
Internal components may not be properly lubricated causing vehicle damage. Tires may slip (loss
of traction) or vehicle may tip, resulting in possible operator injury or death.
• Travel on inclines, slopes, ramps and grades only as follows:
— Loaded Forklift: with forks (and load) pointing uphill.
— Empty Forklift: with forks pointing downhill.
WARNING
When the ATLAS is being operated without counterweight, care must be taken to avoid tipping the
vehicle over. Boom extension must be kept at a minimum. Failure to comply could result in serious
injury or death to personnel.
WARNING
Fuel is very flammable and can explode easily. To avoid serious injury or death:
• Keep fuel away from open flame or any spark (ignition source).
• Keep at least a B-C fire extinguisher within easy reach when working with fuel or on a fuel system.
• Do not work on fuel system when engine is hot; fuel can be ignited by a hot engine.
• Post signs that read “NO SMOKING WITHIN 50 FEET (15 m)” when working with open fuel,
fuel lines or fuel tanks.
WARNING
Use extreme care when lifting counterweight with forklift. Counterweights weigh 5800 lbs (2633.2
kg) and its center of gravity (CG) is off center. Never allow forks to tip forward. Always tie
counterweight lifting eyes to the lifting forklift. Counterweight must be handled using another 10K
ATLAS/10K carriage and lifted through lifting eyes located at the top of the counterweight. Keep
hands or fingers out of holes for counterweight pins. Failure to comply could result in serious injury or
death to personnel.
b
TM 10-3930-673-10
WARNING
CARBON MONOXIDE (EXHAUST GAS) CAN KILL YOU.
Carbon monoxide is a colorless, odorless, DEADLY POISONOUS gas and, when breathed, deprives
body of oxygen and causes SUFFOCATION. Breathing air with carbon monoxide produces
symptoms of headache, dizziness, loss of muscular control, a sleepy feeling, and coma. Permanent
BRAIN DAMAGE or DEATH can result from severe exposure.
The following precautions MUST be followed to ensure personnel are safe whenever arctic heater or
engine is operated for any purpose. Otherwise, injury to personnel may result.
• DO NOT operate arctic heater or vehicle engine in enclosed area without adequate ventilation.
• BE ALERT at all times during vehicle operation for exhaust symptoms. If symptoms are present,
IMMEDIATELY EVACUATE AND VENTILATE the area. Treat affected personnel as follows:
expose to fresh air; keep warm; DO NOT PERMIT PHYSICAL EXERCISE; if necessary, give
artificial respiration as described in FM 4-25.11 and get medical attention.
• BE AWARE; neither the gas particulate filter unit nor field protection mask for nuclear-biologicalchemical protection will protect you from carbon monoxide poisoning.
THE BEST DEFENSE AGAINST CARBON MONOXIDE POISONING IS GOOD
VENTILATION.
WARNING
• Dry cleaning solvent MIL-PRF-680 Type III is an environmentally compliant and low toxic
material. However, it may be irritating to the eyes and skin. The use of protective gloves and
goggles is suggested. Use in well-ventilated areas. Keep away from open flames and other sources
of ignition.
• NOTE: P-D-680 Type II is no longer in use and has been replaced by MIL-PRF-680 Type III.
WARNING
Personnel hearing can be PERMANENTLY DAMAGED if exposed to constant high noise levels of
85 dB (A) or greater. Wear approved hearing protection devices when operating or working within 61
ft (19 m) of vehicle when engine is running. Personnel exposed to high noise levels shall participate in
a hearing conservation program in accordance with TB MED 501. Hearing loss occurs gradually but
becomes permanent over time.
Change 1
c/(d blank)
TM 10-3930-673-10
C2
TECHNICAL MANUAL
TM 10-3930-673-10
Change 2
HEADQUARTERS
DEPARTMENT OF THE ARMY
WASHINGTON D.C., 15 FEBRUARY 2009
OPERATOR’S MANUAL
FOR
ALL TERRAIN LIFTER ARMY SYSTEM (ATLAS)
10,000 LB CAPACITY
(NSN 3930-01-417-2886)
TM 10-3930-673-10, dated 4 May 1998, is changed as follows:
1. Remove old pages and insert new pages.
2. New or changed material is indicated by a vertical bar in the margin.
Remove Pages
Insert Pages
A/(B blank)
A/(B blank)
i thru iii/(iv blank)
i thru iii/(iv blank)
2-19 and 2-20
2-19 and 2-20
B-1 thru B-3/(B-4 blank)
B-1 thru B-4
Index-1 thru Index-2
Index-1 thru Index-2
Cover/(blank)
Cover/(blank)
3. File this change sheet in front of the publication for reference purposes.
DISTRIBUTION STATEMENT A: Approved for public release; distribution is unlimited.
By Order of the Secretary of the Army:
GEORGE W. CASEY JR.
General, United States Army
Chief of Staff
Official:
JOYCE E. MORROW
Administrative Assistant to the
Secretary of the Army
0902905
Distribution:
To be distributed in accordance with the initial distribution number (IDN) 256415,
requirements for TM 10-3930-673-10.
TM 10-3930-673-10
C1
TECHNICAL MANUAL
TM 10-3930-673-10
Change 1
HEADQUARTERS
DEPARTMENT OF THE ARMY
Washington, D.C., 30 November 2005
OPERATOR’S MANUAL
FOR
ALL TERRAIN LIFTER ARMY SYSTEM (ATLAS)
10,000 LB CAPACITY
(NSN 3930-01-417-2886)
TM 10-3930-673-10, dated 4 May 1998, is changed as follows:
1.
Remove old pages and insert new pages.
2.
New or changed material is indicated by a vertical bar in the margin.
Remove Pages
Insert Pages
c/(d blank)
c/(d blank)
A/(B blank)
i thru iii/(iv blank)
2-1 and 2-2
2-17 and 2-18
2-18.1 thru 2-18.3/(2-18.4 blank)
2-21 thru 2-30
2-61 and 2-62
2-67 thru 2-70
2-75 thru 2-88
3-7 and 3-8
A-1 and A-2
B-1 and B-2
C-1 and C-2
D-1 thru D-3/(D-4 blank)
F-5 thru F-12
Front Cover
i thru iii/(iv blank)
2-1 and 2-2
2-17 and 2-18
2-21 thru 2-30
2-61 and 2-62
2-67 thru 2-70
2-75 thru 2-88
3-7 and 3-8
A-1 and A-2
B-1 and B-2
C-1 and C-2‘
D-1 and D-2
F-5 thru F-12
Front Cover
3.
File this change sheet in front of the publication for reference purposes.
Change 1
1
By Order of the Secretary of the Army:
PETER J. SCHOOMAKER
General, United States Army
Chief of Staff
Official:
0517809
DISTRIBUTION:
To be distributed in accordance with the initial distribution number (IDN) 256415, requirements for TM 103930-673-10.
2
Change 1
TM 10-3930-673-10
LIST OF EFFECTIVE PAGES
NOTE
A vertical line in the outer margins of the page indicates the portion of text affected by the
change.
Dates of issue for original and change pages are:
Original 4 May 1998
Change 1 - 30 November 2005
Change 2 - 15 February 2009
TOTAL NUMBER OF PAGES FOR FRONT AND REAR MATTER IS 55 AND TOTAL NUMBER OF CHAPTERS IS
3 CONSISTING OF THE FOLLOWING:
Page
No.
Change
No.
Page
No.
Change
No.
Cover (Back blank) . . . . . . . .
a to b . . . . . . . . . . . . . . . . . . .
c/(d blank) . . . . . . . . . . . . . . .
A/(B blank) . . . . . . . . . . . . . .
i. . . . . . . . . . . . . . . . . . . . . . .
ii/(iv blank). . . . . . . . . . . . . . .
1-1 to 1-15/(1-16 blank) . . . .
2-1. . . . . . . . . . . . . . . . . . . . .
2-2 to 2-16. . . . . . . . . . . . . . .
2-17 to 2-18.3/(2-18.4 blank)
2-19. . . . . . . . . . . . . . . . . . . .
2-20. . . . . . . . . . . . . . . . . . . .
2-21. . . . . . . . . . . . . . . . . . . .
2-22. . . . . . . . . . . . . . . . . . . .
2-23 to 2-24. . . . . . . . . . . . . .
2-25. . . . . . . . . . . . . . . . . . . .
2-26 to 2-28. . . . . . . . . . . . . .
2-29. . . . . . . . . . . . . . . . . . . .
2-30. . . . . . . . . . . . . . . . . . . .
2-31 to 2-60. . . . . . . . . . . . . .
2-61 to 2-62. . . . . . . . . . . . . .
2-63 to 2-66. . . . . . . . . . . . . .
2-67 to 2-70. . . . . . . . . . . . . .
2-71 to 2-75. . . . . . . . . . . . . .
2-76. . . . . . . . . . . . . . . . . . . .
2-77. . . . . . . . . . . . . . . . . . . .
2-78 to 2-87. . . . . . . . . . . . . .
2-88. . . . . . . . . . . . . . . . . . . .
3-1 to 3-6. . . . . . . . . . . . . . . .
3-7 to 3-8. . . . . . . . . . . . . . . .
3-9 to 3-15/(3-16 blank) . . . .
A-1 to A-2 . . . . . . . . . . . . . . .
B-1 to B-4 . . . . . . . . . . . . . . .
2
0
1
2
1
2
0
1
0
1
0
2
1
0
1
0
1
0
1
0
1
0
1
0
1
0
1
0
0
1
0
1
2
C-1. . . . . . . . . . . . . . . . . . . .
C-2. . . . . . . . . . . . . . . . . . . .
D-1. . . . . . . . . . . . . . . . . . . .
D-2 to D-3/(D-4 blank) . . . . .
E-1 to E-2 . . . . . . . . . . . . . .
F-1 to F-4. . . . . . . . . . . . . . .
F-5 . . . . . . . . . . . . . . . . . . . .
F-6 . . . . . . . . . . . . . . . . . . . .
F-7 to F-12. . . . . . . . . . . . . .
F-13 to F-27/(F-28 blank) . .
Index-1 . . . . . . . . . . . . . . . .
Index-2 to Index-3/(Index-4
Blank) . . . . . . . . . . . . . . . . .
Auth. Page (Back blank) . . .
Sample 2028-2 . . . . . . . . . .
Three Blank 2028-2s . . . . . .
Metric Conversion Chart . . .
Back Cover . . . . . . . . . . . . .
0
1
0
1
0
0
1
0
1
0
2
* Zero in this column indicates an original page.
0
0
0
0
0
0
Change 2
A/(B blank)
TECHNICAL MANUAL
No. 10-3930-673-10
HEADQUARTERS
DEPARTMENT OF THE ARMY
Washington, DC, 4 MAY 1998
OPERATOR’S MANUAL
FOR
ALL TERRAIN LIFTER ARMY SYSTEM (ATLAS)
10,000 LB CAPACITY
NSN 3930-01-417-2886
REPORTING OF ERRORS AND RECOMMENDING IMPROVEMENTS
You can help improve this manual. If you find any discrepancies or know a way to improve this TM, let
us know. Mail your letter, DA Form 2028 (Recommended Changes to Publications) or DA Form
2028-2 located in the back of this manual to: Commander, US Army Tank-automotive and Armaments
Command, Attn: AMSTA-AC-NML, Rock Island, IL 61299-7630. A reply will be furnished to you. You
can also provide DA Form 2028-2 information to TACOM via datafax or e-mail. TACOM’s datafax
number is: DSN 793-0726 or (309) 782-0726. E-mail address: amsta-ac-nml@ria-ehm 2.army.mil.
TABLE OF CONTENTS
Page
HOW TO USE THIS MANUAL . . . . . . . . . . . . . . . . . . . . . . . . . . . . . . . . . . . . . . . . . . . . . . . .
CHAPTER 1
Section I.
Section II.
Section III.
CHAPTER 2
Section I.
Section II.
Section III.
Section IV.
CHAPTER 3
Section I.
Section II.
iii
..........................................................
1-1
General Information . . . . . . . . . . . . . . . . . . . . . . . . . . . . . . . . . . . . . . . . . . . . . . . . . . . . . . . . .
Equipment Description and Data . . . . . . . . . . . . . . . . . . . . . . . . . . . . . . . . . . . . . . . . . . . . . . .
Technical Principles of Operation . . . . . . . . . . . . . . . . . . . . . . . . . . . . . . . . . . . . . . . . . . . . . .
1-1
1-3
1-7
...............................................
2-1
INTRODUCTION
OPERATING INSTRUCTIONS
Description and Use of Operator's Controls and Indicators . . . . . . . . . . . . . . . . . . . . . . . . . . . .
Preventive Maintenance . . . . . . . . . . . . . . . . . . . . . . . . . . . . . . . . . . . . . . . . . . . . . . . . . . . . . .
Operation Procedures . . . . . . . . . . . . . . . . . . . . . . . . . . . . . . . . . . . . . . . . . . . . . . . . . . . . . . . .
Operation Under Unusual Conditions . . . . . . . . . . . . . . . . . . . . . . . . . . . . . . . . . . . . . . . . . . . .
2-1
2-16
2-31
2-63
.................................
3-1
Lubrication Instructions . . . . . . . . . . . . . . . . . . . . . . . . . . . . . . . . . . . . . . . . . . . . . . . . . . . . . . . .
Troubleshooting Procedures . . . . . . . . . . . . . . . . . . . . . . . . . . . . . . . . . . . . . . . . . . . . . . . . . . .
3-1
3-1
OPERATOR MAINTENANCE INSTRUCTIONS
DISTRIBUTION STATEMENT A: Approved for public release; distribution is unlimited.
Change 1
i
TM 10-3930-673-10
TABLE OF CONTENTS (CONT)
Page
Section III.
Operator Maintenance Procedures
.............................................
3-7
............................................................
A-1
APPENDIX A
REFERENCES
APPENDIX B
COMPONENTS OF END ITEM (COEI) AND BASIC ISSUE ITEMS (BII) LISTS
Section I.
Section II.
Section III.
APPENDIX C
Section I.
Section II.
APPENDIX D
Section I.
Section II.
.....
B-1
Introduction . . . . . . . . . . . . . . . . . . . . . . . . . . . . . . . . . . . . . . . . . . . . . . . . . . . . . . . . . . . . . . . . .
Components of End Item. . . . . . . . . . . . . . . . . . . . . . . . . . . . . . . . . . . . . . . . . . . . . . . . . . . . . . .
Basic Issue Items . . . . . . . . . . . . . . . . . . . . . . . . . . . . . . . . . . . . . . . . . . . . . . . . . . . . . . . . . . . .
B-1
B-2
B-3
.......................................
C-1
Introduction . . . . . . . . . . . . . . . . . . . . . . . . . . . . . . . . . . . . . . . . . . . . . . . . . . . . . . . . . . . . . . . . .
Additional Authorization List . . . . . . . . . . . . . . . . . . . . . . . . . . . . . . . . . . . . . . . . . . . . . . . . . .
C-1
C-2
...................
D-1
Introduction . . . . . . . . . . . . . . . . . . . . . . . . . . . . . . . . . . . . . . . . . . . . . . . . . . . . . . . . . . . . . . . . .
Expendable/Durable Supplies and Materials List . . . . . . . . . . . . . . . . . . . . . . . . . . . . . . . . . . . .
D-1
D-2
....................................................
E-1
......................................
F-1
ADDITIONAL AUTHORIZATION LIST
EXPENDABLE/DURABLE SUPPLIES AND MATERIALS LIST
APPENDIX E
LOAD RATING CHART
APPENDIX F
TRANSPORTABILITY INSTRUCTIONS
ALPHABETICAL INDEX
ii
Change 2
...................................................
Index-1
TM 10-3930-673-10
HOW TO USE THIS MANUAL
This manual is designed to help maintain the All Terrain Lifter Army System (ATLAS), 10,000 Lb Capacity, NSN 3930-01417-2886. Listed below are some of the special features that have been included to help locate and use the needed information:
A front cover Table of Contents is provided for quick reference to chapters and appendixes that will be used often.
Warning, caution, and note headings, subject headings, and certain other essential information are printed in bold type to make
them easier to see.
In addition to text, there are exploded-view illustrations showing the location of the item being discussed and/or showing how
to take a component off and put it back on.
Chapter 1 of this manual describes the ATLAS and provides equipment data.
Chapter 2 of this manual covers operator’s controls and indicators, preventive maintenance and operating procedures.
Chapter 3 of this manual covers instructions for troubleshooting and operator maintenance instructions.
Appendix A lists any references used in this manual.
Appendix B contains the Components of End Item and Basic Issue Items Lists.
Appendix C covers any Additional Authorized Items for the ATLAS.
Appendix D shows any Expendable and Durable Items required for operating the ATLAS.
Appendix E contains the Load Rating Chart for the ATLAS.
Appendix F contains transportability instructions for the ATLAS.
An alphabetical index is provided to help locate main items in the text.
FOLLOW THESE GUIDELINES WHEN USING THIS MANUAL:
The operator must read through this manual and become familiar with the contents before attempting to operate the ATLAS.
Read all WARNINGS and CAUTIONS before performing any procedure.
Change 2
iii/(iv blank)
TM 10-3930-673-10
1
CHAPTER 1
INTRODUCTION
Para
Contents
Page
1-1.
1-2.
1-3.
1-4.
1-5.
1-6.
1-7.
Section I. General Information
Scope . . . . . . . . . . . . . . . . . . . . . . . . . . . . . . . . . . . . . . . . . . . . . . . . . . . . . . . . . . . . . . . . . . . . . . . . . . . .
Maintenance Forms and Records. . . . . . . . . . . . . . . . . . . . . . . . . . . . . . . . . . . . . . . . . . . . . . . . . . . . . . .
Corrosion Prevention and Control (CPC) . . . . . . . . . . . . . . . . . . . . . . . . . . . . . . . . . . . . . . . . . . . . . . . .
Destruction of Army Material to Prevent Enemy Use. . . . . . . . . . . . . . . . . . . . . . . . . . . . . . . . . . . . . . .
Reporting Equipment Improvement Recommendations (EIR's) . . . . . . . . . . . . . . . . . . . . . . . . . . . . . . .
Equipment Improvement Report and Maintenance Digest (EIR MD) . . . . . . . . . . . . . . . . . . . . . . . . . .
List of Abbreviations . . . . . . . . . . . . . . . . . . . . . . . . . . . . . . . . . . . . . . . . . . . . . . . . . . . . . . . . . . . . . . . .
1-1
1-2
1-2
1-2
1-2
1-2
1-3
1-8.
1-9.
1-10.
Section II. Equipment Description and Data
Equipment Characteristics, Capabilities, and Features . . . . . . . . . . . . . . . . . . . . . . . . . . . . . . . . . . . . . . 1-3
Location and Description of Major Components . . . . . . . . . . . . . . . . . . . . . . . . . . . . . . . . . . . . . . . . . . 1-4
Equipment Data . . . . . . . . . . . . . . . . . . . . . . . . . . . . . . . . . . . . . . . . . . . . . . . . . . . . . . . . . . . . . . . . . . . . 1-6
1-11.
1-12.
1-13.
1-14.
1-15.
1-16.
1-17.
Section III. Technical Principles of Operation
General. . . . . . . . . . . . . . . . . . . . . . . . . . . . . . . . . . . . . . . . . . . . . . . . . . . . . . . . . . . . . . . . . . . . . . . . . . .
Fuel System . . . . . . . . . . . . . . . . . . . . . . . . . . . . . . . . . . . . . . . . . . . . . . . . . . . . . . . . . . . . . . . . . . . . . . .
Engine Lubrication and Cooling Systems . . . . . . . . . . . . . . . . . . . . . . . . . . . . . . . . . . . . . . . . . . . . . . . .
Transmission Lubrication and Cooling Systems . . . . . . . . . . . . . . . . . . . . . . . . . . . . . . . . . . . . . . . . . . .
Steering and Brake System . . . . . . . . . . . . . . . . . . . . . . . . . . . . . . . . . . . . . . . . . . . . . . . . . . . . . . . . . . .
Electrical System . . . . . . . . . . . . . . . . . . . . . . . . . . . . . . . . . . . . . . . . . . . . . . . . . . . . . . . . . . . . . . . . . . .
Hydraulic System. . . . . . . . . . . . . . . . . . . . . . . . . . . . . . . . . . . . . . . . . . . . . . . . . . . . . . . . . . . . . . . . . . .
Section I.
1-7
1-8
1-9
1-11
1-12
1-13
1-14
GENERAL INFORMATION
1-1. SCOPE
a. Type of Manual. This manual contains operation and operator maintenance instructions for the ATLAS.
b. Equipment Name and Model Number. The ATLAS (All Terrain Lifter Army System) Forklift Truck,
SKYTRAK 10000M, NSN 3930-01-417-2886, is equipped with a 6,000 lb and a 10,000 lb lifting carriage. The vehicle is
manufactured by TRAK International, Inc.
c. Purpose of Equipment. The ATLAS is designed for loading and unloading munitions and other palletized
items from transport vehicles and containers. The ATLAS is also designed for use as a standard rough terrain forklift.
d. Special Limitations on Equipment. The ATLAS has no special limitations. Normal limitations such as travel
speed, lift capacity, etc., are discussed in Para 1-10.
1-1
TM 10-3930-673-10
1-2. MAINTENANCE FORMS AND RECORDS
Department of the Army forms and procedures used for equipment maintenance will be those prescribed by DA Pam 738750, The Army Maintenance Management System (TAMMS).
1-3. CORROSION PREVENTION AND CONTROL (CPC)
Corrosion Prevention and Control (CPC) of Army materials is a continuing concern. It is important that any corrosion
problems with the forklift be reported so that the problem can be corrected and improvements can be made to prevent the
problem in the future.
While corrosion is typically associated with rusting of metals, corrosion can also include deterioration of other materials,
such as rubber and plastic. Unusual cracking, softening, swelling, or breaking of these materials may be a corrosion
problem.
If a corrosion problem is identified, it can be reported using Standard Form 368, Product Quality Deficiency Report. Use
of key words such as “corrosion, rust, deterioration, and cracking” will ensure that the information is identified as a CPC
problem.
1-4. DESTRUCTION OF ARMY MATERIAL TO PREVENT ENEMY USE
Command decision, according to the tactical situation, will determine when the destruction of the forklift will be
accomplished. A destruction plan will be prepared by the using organization unless one has been prepared by a higher
authority. For general destruction procedures for this equipment, refer to TM 750-244-6, Procedures for Destruction of
Tank-Automotive Equipment to Prevent Enemy Use (US Army Tank-automotive and Armaments Command).
1-5. REPORTING EQUIPMENT IMPROVEMENT RECOMMENDATIONS (EIR'S)
If your ATLAS needs improvement, let us know. Send us an EIR. You, the user, are the only one who can tell us what
you don’t like about your equipment. Let us know why you don’t like the design or performance. Put it on an SF368
(Product Quality Deficiency Report). Mail it to us at: Commander, US Army Tank-automotive and Armaments
Command, ATTN: AMSTA-TR-E/MPA, Warren, MI 48397-5000. A reply will be furnished to you.
1-6. EQUIPMENT IMPROVEMENT REPORT AND MAINTENANCE DIGEST (EIR MD)
The quarterly Equipment Improvement Report and Maintenance Digest, TB 43-0001-39 series, contains valuable field
information on the equipment covered in this manual. The information in the TB 43-0001-39 series is compiled from
some of the Equipment Improvement Reports that you prepared on the vehicles covered in this manual. Many of these
articles result from comments, suggestions, and improvement recommendations that you submitted to the EIR program.
The TB 43-0001-39 series contains information on equipment improvements, minor alterations, proposed Modification
Work Orders (MWOs), warranties (if applicable), actions taken on some of your DA Forms 2028-2 (Recommended
Changes to Publications), and advance information which will help you in doing your job better and will help in keeping
you advised of the latest changes to this manual. Also refer to DA PAM 310-1, Consolidated Index of Army Publications
and Blank Forms, and Appendix A, References, of this manual.
1-2
TM 10-3930-673-10
1-7. LIST OF ABBREVIATIONS
This list consists of special or unique abbreviations, acronyms or descriptors not contained in MIL-STD-12.
Abbreviation
Description
ATLAS
ROPS
FOPS
All Terrain Lifter, Army System
Roll Over Protective Structure
Falling Object Protective Structure
Section II. EQUIPMENT DESCRIPTION AND DATA
1-8. EQUIPMENT CHARACTERISTICS, CAPABILITIES, AND FEATURES
a. Purpose. The ATLAS is designed for loading and unloading munitions and other palletized items from transport
vehicles and containers. Also, the ATLAS can be used as a forklift truck.
b. Equipment Characteristics, Capabilities, and Features.
(1) The ATLAS can handle boxes, palletized ammunition loads, and other palletized items from transport
vehicles and containers.
(2) The vehicle frame can be tilted 9 degrees to left or right which allows vehicle to be level when traversing a
sideslope.
(3)
The attachment can be raised to a nearly horizontal position for loading and unloading munitions.
(4)
The forks tilt, level, and sideshift to maneuver loads.
(5) With 6K carriage, lifts loads of 6,000 lbs to a height of 28 ft. With 10K carriage, lifts loads of 4,000 lbs to a
height of 27.5 ft, and 10,000 lbs to a height of 17 ft.
(6)
Can tow other vehicles weighing 33,500 pounds or less.
(7)
The operator can select one of three steering modes: two wheel, four wheel, and crab wheel.
(8)
The ATLAS is all weather operational.
(9)
Can ford in up to 36 inches of water.
(10)
Maximum speed of 23 mph over level ground with evenly distributed load.
1-3
TM 10-3930-673-10
1-9. LOCATION AND DESCRIPTION OF MAJOR COMPONENTS
a. Right Side View of the ATLAS.
RADIATOR. Contains coolant which provides engine cooling.
BOOM HOIST CYLINDER. Raises and lowers the boom.
ATTACHMENT. The attachment is required for all forklift operations. The attachment can be raised to a nearly
horizontal position, creating a low profile and extended reach configuration. This configuration is useful in loading
and unloading munitions from transport vehicles and containers.
FUEL TANK. Contains diesel fuel or JP-8 for engine operation.
HYDRAULIC OIL RESERVOIR. Contains hydraulic fluid for the hydraulic system.
FRAME AND THREE-PIECE COUNTERWEIGHT. The frame is a heavy-duty design constructed of 1-3/16 in.
thick steel plates. The frame is equipped with tie-down lugs meeting air transport specifications, tow lugs, a pintle
hook, and a 5800 lb three-piece counterweight. The counterweight is self removable so that axle loading can be
adjusted to meet air transport requirements for some aircraft.
TOOL BOX. Storage area for tools and basic issue items.
RADIATOR
FRAME AND
THREE-PIECE
COUNTERWEIGHT
1-4
BOOM HOIST
CYLINDER
HYDRAULIC
OIL RESERVOIR
TOOL BOX
ATTACHMENT
TR00007
FUEL TANK
TM 10-3930-673-10
b. Left Side View of the ATLAS.
FORKS AND CARRIAGE. Serve as an anchoring point of the forks. Importantly, the fork carriage is equipped
with automatic fork leveling. Moving a switch will keep the forks level when raising or lowering the boom.
ATLAS 6K carriage has a hinged backrest. Remove the pins to tip it to the low profile position.
BOOM. The telescopic, three stage boom is constructed of welded high strength steel. The boom will retract or
extend the reach and height of the forks.
BOOM ANGLE INDICATOR. Shows the angle of the boom relative to the horizon.
NATO SLAVE RECEPTACLE. Connection point for starting a disabled vehicle or for receiving starting assistance
when disabled.
BATTERY BOX. Holds the batteries which provide current for the electric system.
AUXILIARY BATTERY BOX. Holds the batteries which provide auxiliary current for the arctic heater. Not present on
all vehicles.
ENGINE. Provides the necessary power to drive the transmission. The engine also contains sending units for the
Simplified Test Equipment for Internal Combustion Engines (STE/ICE) diagnostics.
ATTACHMENT HOIST CYLINDER. Moves the attachment forward and back.
BOOM
BOOM ANGLE
INDICATOR
NATO SLAVE
RECEPTACLE
BATTERY
BOX
ENGINE
FORKS AND
CARRIAGE
ATTACHMENT
HOIST CYLINDER
AUXILIARY
BATTERY BOX
TR00008
1-5
TM 10-3930-673-10
1-10. EQUIPMENT DATA
Table 1-1 lists data for the ATLAS.
Table 1-1. Equipment Data
ENGINE:
Model. . . . . . . . . . . . . . . . . . . . . . . . . . . . . . . . . . . . . . . . . . . . . . . . . . . . . . . . . . . . . . . . . . . . . . . . . . . . . . . . . . 6BT5.9-C165
Manufacturer . . . . . . . . . . . . . . . . . . . . . . . . . . . . . . . . . . . . . . . . . . . . . . . . . . . . . . . . . . . . . . . . . . . . . . . . . . . . . . . Cummins
Horsepower (2,500 rpm) . . . . . . . . . . . . . . . . . . . . . . . . . . . . . . . . . . . . . . . . . . . . . . . . . . . . . . . . . . . . . . . . . . . . . . . . .165 hp
Number of Cylinders . . . . . . . . . . . . . . . . . . . . . . . . . . . . . . . . . . . . . . . . . . . . . . . . . . . . . . . . . . . . . . . . . . . . . . . . . . . . . . . . 6
Displacement . . . . . . . . . . . . . . . . . . . . . . . . . . . . . . . . . . . . . . . . . . . . . . . . . . . . . . . . . . . . . . . . . . . . . . . . . . . . . . . . .359 in.3
Weight . . . . . . . . . . . . . . . . . . . . . . . . . . . . . . . . . . . . . . . . . . . . . . . . . . . . . . . . . . . . . . . . . . . . . . . . . . . . . . . . . . . . . . . 930 lb
Maximum No Load RPM . . . . . . . . . . . . . . . . . . . . . . . . . . . . . . . . . . . . . . . . . . . . . . . . . . . . . . . . . . . . . . . 2650 to 2750 rpm
TRANSMISSION:
Model. . . . . . . . . . . . . . . . . . . . . . . . . . . . . . . . . . . . . . . . . . . . . . . . . . . . . . . . . . . . . . . . . . . . . . . . . . . . . . . . . . . . . . . . . 1723
Manufacturer . . . . . . . . . . . . . . . . . . . . . . . . . . . . . . . . . . . . . . . . . . . . . . . . . . . . . . . . . . . . . . . . . . . . . . . . . . . . . . . . . . . Funk
Powershift . . . . . . . . . . . . . . . . . . . . . . . . . . . . . . . . . . . . . . . . . . . . . . . . . . . . . . . . . . . . . . . . . . .3 speed forward and reverse
Speed Range
First Gear . . . . . . . . . . . . . . . . . . . . . . . . . . . . . . . . . . . . . . . . . . . . . . . . . . . . . . . . . . . . . . . . . . . . . . . 0-4 mph, level surface
Second Gear. . . . . . . . . . . . . . . . . . . . . . . . . . . . . . . . . . . . . . . . . . . . . . . . . . . . . . . . . . . . . . . . . . . . . 0-8 mph, level surface
Third Gear . . . . . . . . . . . . . . . . . . . . . . . . . . . . . . . . . . . . . . . . . . . . . . . . . . . . . . . . . . . . . . . . . . . . . 0-23 mph, level surface
Weight . . . . . . . . . . . . . . . . . . . . . . . . . . . . . . . . . . . . . . . . . . . . . . . . . . . . . . . . . . . . . . . . . . . . . . . . . . . . . . . . . . . . . . . 846 lb
AXLES AND BRAKES:
Model (Front). . . . . . . . . . . . . . . . . . . . . . . . . . . . . . . . . . . . . . . . . . . . . . . . . . . . . . . . . . . . . . . . . . . . . . PSOC-205-HDB-231
Model (Rear) . . . . . . . . . . . . . . . . . . . . . . . . . . . . . . . . . . . . . . . . . . . . . . . . . . . . . . . . . . . . . . . . . . . . . . PSOC-205-HDB-232
Manufacturer . . . . . . . . . . . . . . . . . . . . . . . . . . . . . . . . . . . . . . . . . . . . . . . . . . . . . . . . . . . . . . . . . . . . . . . . . . . . . . . Rockwell
Weight - Axle Assembly
(Front or Rear) . . . . . . . . . . . . . . . . . . . . . . . . . . . . . . . . . . . . . . . . . . . . . . . . . . . . . . . . . . . . . . . . . . . . . . . . . . . . . . .1,650 lb
DIMENSIONS AND WEIGHT:
Vehicle Operational Weights:
With 6K carriage . . . . . . . . . . . . . . . . . . . . . . . . . . . . . . . . . . . . . . . . . . . . . . . . . . . . . . . . . . . . . . . . . . . . . . . . . . .31,300 lb
With 10 K carriage. . . . . . . . . . . . . . . . . . . . . . . . . . . . . . . . . . . . . . . . . . . . . . . . . . . . . . . . . . . . . . . . . . . . . . . . . .32,600 lb
Roading (both carriages) . . . . . . . . . . . . . . . . . . . . . . . . . . . . . . . . . . . . . . . . . . . . . . . . . . . . . . . . . . . . . . . . . . . . .33,500 lb
Boom Assembly Weight . . . . . . . . . . . . . . . . . . . . . . . . . . . . . . . . . . . . . . . . . . . . . . . . . . . . . . . . . . . . . . . . . . . . . . . .5,165 lb
Inner Boom Weight . . . . . . . . . . . . . . . . . . . . . . . . . . . . . . . . . . . . . . . . . . . . . . . . . . . . . . . . . . . . . . . . . . . . . . . . . . . .1,280 lb
Intermediate Boom Weight . . . . . . . . . . . . . . . . . . . . . . . . . . . . . . . . . . . . . . . . . . . . . . . . . . . . . . . . . . . . . . . . . . . . . . . 955 lb
Outer Boom Weight . . . . . . . . . . . . . . . . . . . . . . . . . . . . . . . . . . . . . . . . . . . . . . . . . . . . . . . . . . . . . . . . . . . . . . . . . . . .1,950 lb
Boom Extend Cylinder . . . . . . . . . . . . . . . . . . . . . . . . . . . . . . . . . . . . . . . . . . . . . . . . . . . . . . . . . . . . . . . . . . . . . . . . . . 600 lb
Max Length in Carry Position:
With 6K carriage . . . . . . . . . . . . . . . . . . . . . . . . . . . . . . . . . . . . . . . . . . . . . . . . . . . . . . . . . . . . . . . . . . . . . . . . . . . 324.2 in.
With 10K carriage . . . . . . . . . . . . . . . . . . . . . . . . . . . . . . . . . . . . . . . . . . . . . . . . . . . . . . . . . . . . . . . . . . . . . . . . . . 356.3 in.
Roading . . . . . . . . . . . . . . . . . . . . . . . . . . . . . . . . . . . . . . . . . . . . . . . . . . . . . . . . . . . . . . . . . . . . . . . . . . . . . . . . . . 356.3 in.
Width . . . . . . . . . . . . . . . . . . . . . . . . . . . . . . . . . . . . . . . . . . . . . . . . . . . . . . . . . . . . . . . . . . . . . . . . . . . . . . . . . . . . . . 100.2 in.
Max Height . . . . . . . . . . . . . . . . . . . . . . . . . . . . . . . . . . . . . . . . . . . . . . . . . . . . . . . . . . . . . . . . . . . . . . . . . . . . . . . . . . .107 in.
Track Width (Tread) . . . . . . . . . . . . . . . . . . . . . . . . . . . . . . . . . . . . . . . . . . . . . . . . . . . . . . . . . . . . . . . . . . . . . . . . . . . 80.3 in.
1-6
TM 10-3930-673-10
Table 1-1 Equipment Data (Cont)
CAPACITIES:
Fuel Tank. . . . . . . . . . . . . . . . . . . . . . . . . . . . . . . . . . . . . . . . . . . . . . . . . . . . . . . . . . . . . . . . . . . . . . . . . . . . . . . . . . . . . 44 gal
Cooling System . . . . . . . . . . . . . . . . . . . . . . . . . . . . . . . . . . . . . . . . . . . . . . . . . . . . . . . . . . . . . . . . . . . . . . . . . . . . . . . . . 8 gal
Hydraulic Oil Reservoir . . . . . . . . . . . . . . . . . . . . . . . . . . . . . . . . . . . . . . . . . . . . . . . . . . . . . . . . . . . . . . . . . . . . . . . . 56.6 gal
Hydraulic System . . . . . . . . . . . . . . . . . . . . . . . . . . . . . . . . . . . . . . . . . . . . . . . . . . . . . . . . . . . . . . . . . . . . . . . . . . . . . . 75 gal
Engine Crankcase . . . . . . . . . . . . . . . . . . . . . . . . . . . . . . . . . . . . . . . . . . . . . . . . . . . . . . . . . . . . . . . . . . . . . . . . . . . . . . . 15 qt
Engine Crankcase w/filter cap. . . . . . . . . . . . . . . . . . . . . . . . . . . . . . . . . . . . . . . . . . . . . . . . . . . . . . . . . . . . . . . . . . . . . 15.3 qt
Transmission . . . . . . . . . . . . . . . . . . . . . . . . . . . . . . . . . . . . . . . . . . . . . . . . . . . . . . . . . . . . . . . . . . . . . . . . . . . . . . . . . . 5.5 gal
Transmission w/filter cap . . . . . . . . . . . . . . . . . . . . . . . . . . . . . . . . . . . . . . . . . . . . . . . . . . . . . . . . . . . . . . . . . . . . . . . 5.75 gal
MISCELLANEOUS:
Max lift height with 6K carriage:
6,000 lb (max height) . . . . . . . . . . . . . . . . . . . . . . . . . . . . . . . . . . . . . . . . . . . . . . . . . . . . . . . . . . . . . . . . . . . .27 ft, 11.5 in.
Max lift height with 10K carriage:
6,000 lb (max height) . . . . . . . . . . . . . . . . . . . . . . . . . . . . . . . . . . . . . . . . . . . . . . . . . . . . . . . . . . . . . . . . . . . . . . 27 ft, 8 in.
8,000 lb . . . . . . . . . . . . . . . . . . . . . . . . . . . . . . . . . . . . . . . . . . . . . . . . . . . . . . . . . . . . . . . . . . . . . . . . . . . . . . . 24 ft, 9.5 in.
10,000 lb . . . . . . . . . . . . . . . . . . . . . . . . . . . . . . . . . . . . . . . . . . . . . . . . . . . . . . . . . . . . . . . . . . . . . . . . . . . . . . . 16 ft, 11 in.
Boom Lift Angle (Maximum) . . . . . . . . . . . . . . . . . . . . . . . . . . . . . . . . . . . . . . . . . . . . . . . . . . . . . . . . . . . . . . . . . .45 degrees
Max reach from load center to front tires with 6K carriage,
(4,000 lb @ 2 ft load center) . . . . . . . . . . . . . . . . . . . . . . . . . . . . . . . . . . . . . . . . . . . . . . . . . . . . . . . . . . . . . . . 24 ft, 3.5 in.
Max reach from load center to front tires with 10K carriage,
(2,000 lb @ 4 ft load center) . . . . . . . . . . . . . . . . . . . . . . . . . . . . . . . . . . . . . . . . . . . . . . . . . . . . . . . . . . . . . . . . . 26 ft, 4 in.
Max reach below grade with 6K carriage . . . . . . . . . . . . . . . . . . . . . . . . . . . . . . . . . . . . . . . . . . . . . . . . . . . . . . . . . . . 33.3 in.
Max reach below grade with 10K carriage . . . . . . . . . . . . . . . . . . . . . . . . . . . . . . . . . . . . . . . . . . . . . . . . . . . . . . . . . . 36.8 in.
Ground Clearance . . . . . . . . . . . . . . . . . . . . . . . . . . . . . . . . . . . . . . . . . . . . . . . . . . . . . . . . . . . . . . . . . . . . . . . . . .15.2 in. min
Curb to Curb Turning Circle (Diameter). . . . . . . . . . . . . . . . . . . . . . . . . . . . . . . . . . . . . . . . . . . . . . . . . . . . . . . . . 27 ft, 10 in.
Frame Oscillation . . . . . . . . . . . . . . . . . . . . . . . . . . . . . . . . . . . . . . . . . . . . . . . . . . . . . . . . . . . . . 9 degrees to the left or right
Fording Depth (Freshwater) . . . . . . . . . . . . . . . . . . . . . . . . . . . . . . . . . . . . . . . . . . . . . . . . . . . . . . . . . . . . . . . . . . . . . . . . .3 ft
Travel Speed (Maximum) . . . . . . . . . . . . . . . . . . . . . . . . . . . . . . . . . . . . . . . . . . . . . . . . . . . . . . . . . . . . . . . . . . . . . . . 23 mph
Section III. TECHNICAL PRINCIPLES OF OPERATION
1-11. GENERAL
This section explains how components of the ATLAS work together. A functional description is given for the fuel
system, engine lubrication system, engine cooling system, steering and brake system, electrical system, and hydraulic
system.
1-7
TM 10-3930-673-10
1-12. FUEL SYSTEM
FUEL
INJECTOR
NOZZLE
FUEL/WATER
SEPARATOR
PRIMARY
FUEL
FILTER
TR00057
FUEL
INJECTION PUMP
FUEL TRANSFER
PUMP
SECONDARY
FUEL
FILTER
Item
TR00032
ETHER START
CYLINDER
Description
Fuel/Water Separator
Removes moisture from fuel.
Primary and Secondary Fuel Filters
Removes larger particles from the fuel before it reaches the injector pump.
Fuel Transfer Pump
Pulls fuel from the fuel tank through the water separator and sends it through the fuel
filters to the fuel injection pump.
Fuel Injection Pump
Sends exact amount of fuel to the injector nozzles.
Fuel Injector Nozzle
Turns the stream of fuel into a fine spray which permits good combustion in the cylinder. There is one nozzle for each cylinder.
Ether Start Cylinder
Contains ether starting fluid for starting cold engine. Starting fluid is released in
measured amounts by pressing the engine primer button.
1-8
TM 10-3930-673-10
1-13. ENGINE LUBRICATION AND COOLING SYSTEMS
ENGINE OIL
COOLER
WATER
PUMP
OIL PUMP
OIL PAN
OIL FILTER
TR00010
Item
Description
Oil Pump
Draws oil from the oil pan, sends it through the oil cooler and then through the oil filter. From the filter, the oil enters the cylinder block to lubricate the engine and is
then returned to the oil pan. From the filter, oil is also sent through the turbocharger
and then returned to the oil pan.
Oil Pan
Contains the oil that lubricates moving parts in the engine.
Engine Oil Cooler
Engine oil flows through the plates of the oil cooler. As the oil warms, heat is transferred to the coolant which flows from the radiator. The coolant flows across the
plates of the oil cooler.
Oil Filter
Removes particles from the oil which could cause damage to the internal parts of the
engine.
Water Pump
Draws coolant from the radiator and sends it through the oil cooler cavity and cylinder block to cool the engine. The coolant then returns to the radiator.
1-9
TM 10-3930-673-10
FAN
RADIATOR/
TRANSMISSION OIL COOLER
TR00078
Item
Description
Fan
Turned by the engine drive belt, the fan creates air flow through the radiator to lower
the temperature of the coolant as it passes through the radiator.
Radiator
ATLAS uses an overflow cooling system. The system is full when two quarts of
coolant are visible in the overflow bottle. Coolant circulates through the radiator to
be cooled after leaving the cylinder block.
1-10
TM 10-3930-673-10
1-14. TRANSMISSION LUBRICATION AND COOLING SYSTEMS
AIR CONDITIONER
CONDENSER COIL
TRANSMISSION
OIL COOLER
HYDRAULIC
OIL COOLER
TRANSMISSION
OIL FILTER
TR00078
Item
Description
Transmission Oil Filter
Located on vehicle right side, just above the boom hoist cylinder on the engine bulkhead. Removes particles in the oil which could damage internal components of the
transmission. A pump inside the transmission produces oil flow through the filter,
transmission, and oil cooler.
Transmission Oil Cooler
Located to the front of the radiator and to the front of the hydraulic oil cooler. Transmission fluid is circulated across the cooler to lower transmission oil temperature.
Hydraulic Oil Cooler
Located between the radiator and the transmission oil cooler and below the air conditioning cooler. Hydraulic fluid is circulated across the cooler to lower the hydraulic
fluid temperature.
Air Conditioner Condenser Coil
Located to the front of the radiator and above the hydraulic oil cooler. Circulates
vaporized refrigerant changing from a vapor to a liquid to provide cool air inside the
cab.
1-11
TM 10-3930-673-10
1-15. STEERING AND BRAKE SYSTEM
STEERING CONTROL VALVE
PARKING BRAKE VALVE
PARKING
BRAKE
FRONT STEERING CYLINDER
AND SERVICE BRAKE
STEER
SELECT
VALVE
BRAKE
CONTROL
VALVE
REAR STEERING CYLINDER
AND SERVICE BRAKE
TR00011
Item
Description
Steering Cylinders
A steering cylinder is mounted at both ends of each axle and controlled by the steering wheel.
Steering Control Valve
Connected directly to the steering wheel and located behind the instrument access
panel. Controls the steering function by directing the flow of hydraulic fluid to the
cylinders.
Steer Select Valve
Mounted in the frame. Allows the selection of two wheel, four wheel, or crab steering through the steer select control, a three position switch.
Brake Control Valve
Located under the cab. Provides a priority flow to the brake system, including the
parking brake. Excess flow is directed by the priority valve to the frame tilt system.
Service Brakes
Dry disc, caliper type brakes are mounted on all four wheels. Brakes are hydraulically actuated by pressing the brake pedal. An accumulator in the braking system
enables a limited number of stops without engine power.
Parking Brake
A spring applied and hydraulically released dry disc brake mounted on the input
shaft at the front axle. A switch in the cab engages and disengages the parking brake.
Parking Brake Valve
Mounted on frame cross piece. Controls application/release of hydraulic fluid pressure to the parking brake.
1-12
TM 10-3930-673-10
1-16. ELECTRICAL SYSTEM
STARTER
MOTOR
CIRCUIT BREAKERS
(INSIDE INSTRUMENT PANEL)
TR00013
BATTERIES
ALTERNATOR
TR00012
Item
Description
Batteries
Provide power for the electrical circuits. Two 12 volt batteries are connected in
series to provide starting power.
Alternator
The 24 volt, 70 amp alternator, an integral part of the charging circuit, provides current to charge the batteries when the engine is running.
Starter Motor
Part of the starting circuit, the starter motor is used to turn the engine flywheel fast
enough to start the engine.
Circuit Breakers
Located inside instrument panel. Switches that open the battery circuit if there is a
shorted, grounded wire or excessive current draw by a defective component in the
corresponding circuit. When the circuit is open, no current will flow through the
electrical system. Circuit breakers will automatically reset once they cool. If a
breaker continually trips, the electrical system requires repair.
1-13
TM 10-3930-673-10
1-17. HYDRAULIC SYSTEM
CENTER TOP VIEW
HYDRAULIC OIL RESERVOIR
DUAL GEAR PUMP
EMERGENCY STEERING
PUMP AND MOTOR
MAIN
CONTROL
VALVE
TR00014
PISTON PUMP
ATTACHMENT
CONTROL
VALVE
BOOM
EXTEND
CYLINDER
HYDRAULIC JOYSTICK
CONTROL VALVE
HYDRAULIC
OIL FILTER
FRAME TILT
VALVE
BOOM HOIST
CYLINDERS
ATTACHMENT
CYLINDER
CARRIAGE
TILT
CYLINDER
FORK
SIDESHIFT
CYLINDERS
FRAME TILT CYLINDER
TR00011
1-14
TM 10-3930-673-10
Item
Description
Hydraulic Oil Reservoir
Contains oil for the entire hydraulic system.
Hydraulic Oil Filter
Removes smaller harmful particles from the oil before the oil returns to the reservoir.
Main Control Valve
Located on the engine compartment bulkhead of the main frame (near back of transmission). Operated by the hydraulic joystick to control: boom hoist/lower and
extend/retract.
Attachment Control Valve
Mounted on the boom point and controlled by an electrical joystick. Controls the
three attachment functions: hoist/lowering, carriage tilt, and fork sideshift.
Frame Tilt Valve
Mounted inside the console located to the right of the operator's seat. Controls the
tilting of the vehicle frame. Operated by frame tilt control lever.
Hydraulic Joystick Control
Valve
Located on the side console in cab. Controls the following boom functions: raise,
lower, extend, and retract.
Dual Gear Pump
Mounted to and driven by the transmission to supply hydraulic oil flow. This two
section pump supplies hydraulic fluid for the following functions: boom hoist, boom
extend, steering, brakes, and frame tilt.
Piston Pump
Mounted to and driven by the transmission. This pump supplies hydraulic fluid for
the following functions: attachment hoist, carriage tilt, and fork sideshift control.
Emergency Steering Pump and
Motor
Located in the vehicle frame forward of the transmission. Supplies 5 gpm of emergency flow to the steering system whenever the starter-run control switch is on and
there is a loss of hydraulic oil pressure. The pump is driven by an electric motor.
Fork Sideshift Cylinders
Two cylinders controlled by the electric joystick. Both cylinders can be operated at
the same time to sideshift forks left or right or move forks together or apart. Cylinders can also be operated individually.
Carriage Tilt Cylinder
Operated by the electric joystick. Moving the lever to the right causes the cylinder to
retract and the fork tips to lower. Moving the lever to the left causes cylinder to
extend and the fork tips to raise.
Attachment Cylinder
This cylinder is controlled by the electric joystick. When the lever is pushed forward,
the cylinder will retract. When the lever is pulled back, the cylinder will extend and
raise the attachment.
Boom Extend Cylinder
This cylinder is controlled by the hydraulic joystick. Moving the lever to the right
extends the cylinder. Moving the lever to the left retracts the cylinder.
Frame Tilt Cylinder
This cylinder is controlled by the frame tilt control joystick. When the lever is moved
forward, the vehicle tilts to the left. Moving the lever back tilts the vehicle to the
right.
Boom Hoist Cylinders
Two cylinders controlled by the boom hoist control joystick. When the lever is
moved forward, the boom lowers. Moving the lever backward causes the boom to
raise.
1-15/(1-16 blank)
TM 10-3930-673-10
1-16
TM 10-3930-673-10
CHAPTER 2
OPERATING INSTRUCTIONS
Para
Contents
Page
2-1.
Section I. Description and Use of Operator's Controls and Indicators
Operator's Controls and Indicators . . . . . . . . . . . . . . . . . . . . . . . . . . . . . . . . . . . . . . . . . . . . . . . . . . . . . 2-1
2-2.
2-3.
2-4.
Section II. Preventive Maintenance
General. . . . . . . . . . . . . . . . . . . . . . . . . . . . . . . . . . . . . . . . . . . . . . . . . . . . . . . . . . . . . . . . . . . . . . . . . . . 2-16
PMCS Procedures . . . . . . . . . . . . . . . . . . . . . . . . . . . . . . . . . . . . . . . . . . . . . . . . . . . . . . . . . . . . . . . . . . 2-16
Lubrication Instructions. . . . . . . . . . . . . . . . . . . . . . . . . . . . . . . . . . . . . . . . . . . . . . . . . . . . . . . . . . . . . . 2-18
2-5.
2-6.
2-7.
2-8.
2-9.
2-10.
2-11.
2-12.
2-13.
2-14.
2-15.
2-16.
2-17.
2-18.
2-19.
2-20.
Section III. Operation Procedures
General. . . . . . . . . . . . . . . . . . . . . . . . . . . . . . . . . . . . . . . . . . . . . . . . . . . . . . . . . . . . . . . . . . . . . . . . . . .
New Vehicle Break-in . . . . . . . . . . . . . . . . . . . . . . . . . . . . . . . . . . . . . . . . . . . . . . . . . . . . . . . . . . . . . . .
Starting the Engine . . . . . . . . . . . . . . . . . . . . . . . . . . . . . . . . . . . . . . . . . . . . . . . . . . . . . . . . . . . . . . . . .
Moving the Forklift . . . . . . . . . . . . . . . . . . . . . . . . . . . . . . . . . . . . . . . . . . . . . . . . . . . . . . . . . . . . . . . . .
Steering the Forklift . . . . . . . . . . . . . . . . . . . . . . . . . . . . . . . . . . . . . . . . . . . . . . . . . . . . . . . . . . . . . . . . .
Stopping the Forklift . . . . . . . . . . . . . . . . . . . . . . . . . . . . . . . . . . . . . . . . . . . . . . . . . . . . . . . . . . . . . . . .
Stopping the Engine. . . . . . . . . . . . . . . . . . . . . . . . . . . . . . . . . . . . . . . . . . . . . . . . . . . . . . . . . . . . . . . . .
6K/10K Fork Carriage Removal/Installation. . . . . . . . . . . . . . . . . . . . . . . . . . . . . . . . . . . . . . . . . . . . . .
Roading the 6K Fork Carriage. . . . . . . . . . . . . . . . . . . . . . . . . . . . . . . . . . . . . . . . . . . . . . . . . . . . . . . . .
Counterweights Removal/Installation . . . . . . . . . . . . . . . . . . . . . . . . . . . . . . . . . . . . . . . . . . . . . . . . . . .
Highway Transport . . . . . . . . . . . . . . . . . . . . . . . . . . . . . . . . . . . . . . . . . . . . . . . . . . . . . . . . . . . . . . . . .
Rail Transport . . . . . . . . . . . . . . . . . . . . . . . . . . . . . . . . . . . . . . . . . . . . . . . . . . . . . . . . . . . . . . . . . . . . .
Loading and Unloading Ammunition and Other Pallets from a Container or Trailer. . . . . . . . . . . . . . .
Rifle Mount . . . . . . . . . . . . . . . . . . . . . . . . . . . . . . . . . . . . . . . . . . . . . . . . . . . . . . . . . . . . . . . . . . . . . . .
Decontamination Unit . . . . . . . . . . . . . . . . . . . . . . . . . . . . . . . . . . . . . . . . . . . . . . . . . . . . . . . . . . . . . . .
Decals and Warning Plates . . . . . . . . . . . . . . . . . . . . . . . . . . . . . . . . . . . . . . . . . . . . . . . . . . . . . . . . . . .
2-31
2-31
2-32
2-36
2-42
2-44
2-44
2-45
2-47
2-48
2-53
2-55
2-57
2-59
2-60
2-61
2-21.
2-22.
2-23.
2-24.
2-25.
2-26.
2-27.
2-28.
2-29.
2-30.
2-31.
2-32.
2-33.
Section IV. Operation Under Unusual Conditions
General. . . . . . . . . . . . . . . . . . . . . . . . . . . . . . . . . . . . . . . . . . . . . . . . . . . . . . . . . . . . . . . . . . . . . . . . . . .
Operation in Extreme Moist Heat . . . . . . . . . . . . . . . . . . . . . . . . . . . . . . . . . . . . . . . . . . . . . . . . . . . . . .
Operation in Extreme Dry Heat (Refer to FM 90-3, DESERT OPERATIONS). . . . . . . . . . . . . . . . . . .
Operation in Extreme Cold (To –25° F) . . . . . . . . . . . . . . . . . . . . . . . . . . . . . . . . . . . . . . . . . . . . . . . . .
Operation with Arctic Kit (To –40° F) . . . . . . . . . . . . . . . . . . . . . . . . . . . . . . . . . . . . . . . . . . . . . . . . . .
Operation in Salt Water Areas . . . . . . . . . . . . . . . . . . . . . . . . . . . . . . . . . . . . . . . . . . . . . . . . . . . . . . . . .
Operation in Dust or Sandstorms. . . . . . . . . . . . . . . . . . . . . . . . . . . . . . . . . . . . . . . . . . . . . . . . . . . . . . .
Fording. . . . . . . . . . . . . . . . . . . . . . . . . . . . . . . . . . . . . . . . . . . . . . . . . . . . . . . . . . . . . . . . . . . . . . . . . . .
Slave Starting. . . . . . . . . . . . . . . . . . . . . . . . . . . . . . . . . . . . . . . . . . . . . . . . . . . . . . . . . . . . . . . . . . . . . .
Towing Other Vehicles . . . . . . . . . . . . . . . . . . . . . . . . . . . . . . . . . . . . . . . . . . . . . . . . . . . . . . . . . . . . . .
Towing the ATLAS . . . . . . . . . . . . . . . . . . . . . . . . . . . . . . . . . . . . . . . . . . . . . . . . . . . . . . . . . . . . . . . . .
Emergency Boom Operations . . . . . . . . . . . . . . . . . . . . . . . . . . . . . . . . . . . . . . . . . . . . . . . . . . . . . . . . .
Rear Window Emergency Exit . . . . . . . . . . . . . . . . . . . . . . . . . . . . . . . . . . . . . . . . . . . . . . . . . . . . . . . .
2-63
2-63
2-63
2-64
2-67
2-74
2-74
2-74
2-76
2-77
2-78
2-81
2-88
Section I. DESCRIPTION AND USE OF OPERATOR'S CONTROLS AND INDICATORS
2-1. OPERATOR'S CONTROLS AND INDICATORS
This section describes, locates, and illustrates the controls and indicators used on the ATLAS.
Change 1
2-1
TM 10-3930-673-10
Table 2-1. Cab Door and Instrument Panel Controls
4
5
3
2
1
TR00016
Key
Control/Indicator
Function
1
Lower Cab Door Release
Opens the upper and lower cab door. Pull back horizontally on the knob to open
the door.
2
Upper Cab Door Release
Opens the upper cab door. Pull down on the knob to release the upper cab door. A
latch on the door that hooks on the fender will hold the door in a full open
position.
3
Travel Select Control
Controls vehicle direction of travel. Move the lever all the way up to travel
forward. Move the lever to the center position for neutral. Move the lever all the
way down to travel in reverse.
4
Range Select Control
Controls vehicle travel speed. Move the lever all the way up to position 3 for high
ground speed. Move the lever to center position 2 for normal speed conditions.
Move the lever all the way down to position 1 for highest torque and pulling
power.
WARNING
Do not travel with t4he automatic fork level switch in the ON position. It is possible to drop a load
which could result in load damage, or injury or death to personnel.
5
2-2
Automatic Fork Level
Indicator Light
Illuminated whenever the automatic fork level switch is in the ON position.
TM 10-3930-673-10
Table 2-1. Cab Door and Instrument Panel Controls - CONT.
6
10
11
7
8
9
TR00016
Key
6
Control/Indicator
Automatic Fork Level Switch
Function
Automatically controls the level of the forks when in the ON position. In the OFF
position, forks can be tilted manually with the electric joystick control.
CAUTION
The windshield wipers should not be operated on dry windows for extended periods of time.
7
Front Window Wiper Switch
A three position switch which controls the front windshield wiper. Move the
switch up for high speed operation, to the middle for OFF, and down for low
speed operation.
8
Window Wash Button
Sprays washer fluid onto the front and rear windows. Push the button and use the
wipers to wash the front and rear windows.
9
Rear Window Wiper Switch
A three position switch which controls the rear windshield wiper. Move the
switch up for high speed operation, to the middle for OFF, and down for low
speed operation.
10
Directional Light Switch
Operates with the ignition key on or off. Move the directional lever right or left to
operate turn signal lights. Pull the tab out to operate four-way hazard flasher.
Move the directional lever right or left to disengage hazard flashers.
11
Steering Wheel
Controls vehicle direction of travel. Turn steering wheel clockwise to turn right,
counterclockwise to turn left.
2-3
TM 10-3930-673-10
Table 2-2. Instrument Panel Gages
1
2
TR00016
Key
Function
Control/Indicator
CAUTION
If coolant temperature exceeds 220° F or the warning light illuminates, shut the engine down
immediately. Do not operate the vehicle continuously at a coolant temperature above 210° F, or
damage to the equipment could result.
1
Water Temperature Gage
Indicates temperature of the engine water/coolant mixture. Normal operating
temperature of water/coolant is between 180° F and 210° F.
CAUTION
If engine oil pressure fluctuates, drops, or if the warning light is illuminated, stop the engine and
find the cause. Do not operate the engine at oil pressures lower than 10 psi, or damage to the
equipment could result.
2
2-4
Engine Oil Pressure Gage
Indicates the pressure at which engine internal lubricating oil is being
maintained. Normal oil pressure at operating temperature is between 30 psi and
90 psi.
TM 10-3930-673-10
Table 2-2. Instrument Panel Gages - CONT.
3
4
6
5
TR00016
Key
Function
Control/Indicator
CAUTION
If transmission oil temperature reaches 250° F or the warning light illuminates, move the
transmission range select lever to NEUTRAL and run the engine at low idle (between 1,000 and
1,200 rpm). Within two or three minutes, the temperature should drop to normal values. If not, stop
the vehicle and correct the problem before continuing, or damage to the equipment could result.
3
Transmission Oil
Temperature Gage
Indicates temperature of the transmission lubricating oil. Transmission oil
temperature must not exceed 250° F.
4
Fuel Gage
Indicates how much fuel remains in the fuel tank.
5
Voltmeter
Indicates electrical system voltage. Normal operating voltage is between 24 and
28.5 volts.
6
Hourmeter
Records the hours of vehicle operation. Used to schedule periodic maintenance
procedures.
2-5
TM 10-3930-673-10
Table 2-3. Dash Lights and Indicators
1
2
3
4
5
6
TR00016
Key
Function
Control/Indicator
NOTE
To test a bulb and circuit, turn the starter-run control keyswitch to ON and press the lens in. If the
light does not illuminate, then either a new bulb is required or the circuit is not functioning properly.
1
High Water Temperature
(Engine) Warning Light
Indicates excessively high engine coolant temperature. Illuminated whenever
coolant temperature exceeds 220° F.
2
Low Oil Pressure (Engine)
Warning Light
Indicates excessively low engine oil pressure. Illuminated whenever oil pressure
drops below 10 psi.
3
High Transmission
Temperature Warning Light
Indicates excessively high transmission oil temperature. Illuminated whenever
transmission oil temperature exceeds 250° F.
4
Lateral Level Indicator
Indicates the angle of the frame relative to the horizon. Assists in maintaining a
level attitude on sideslope up to 9 degrees (15%).
5
Parking Brake Indicator Light
Illuminated when the starter-run control switch is ON and the parking brake is
engaged.
WARNING
Shut vehicle down immediately whenever the low brake pressure warning light is illuminated.
Failure to comply could result in injury or death to personnel.
6
2-6
Low Brake Pressure
Warning Light
Indicates service brake low pressure. Illuminated whenever hydraulic pressure in
the accumulator drops below 650 psi.
TM 10-3930-673-10
Table 2-4. Lighting Switches
1
BO
MARKER
BO
DRIVE
PANEL
BRIGHT
STOP
LIGHT
SERVICE
DRIVE
UNLOCK
DIM
PARK
TR00016
Key
1
Control/Indicator
Service Lighting Control
Switch
TR00019
Function
This switch has five positions. The following shows the lights that operate in
each position:
OFF Position – Only the turn signals, four-way flashers, and the forward, rear,
and boom floodlights will illuminate.
BLACKOUT MARKER Position – Blackout front markers, blackout tail lights,
and blackout stop lights will illuminate.
BLACKOUT DRIVE Position – Blackout front markers, blackout tail lights
(with brake pedal depressed), blackout stop lights, and blackout drive lights will
illuminate. Back-up alarm will not operate.
STOP LIGHT Position – Service stop lights (with brake pedal depressed) will
illuminate.
SERVICE DRIVE Position – Service stop lights (with brake pedal depressed),
service tail lights, and service headlamps will illuminate.
2-7
TM 10-3930-673-10
Table 2-4. Lighting Switches - CONT.
4
5
6
BO
MARKER
BO
DRIVE
PANEL
BRIGHT
STOP
LIGHT
SERVICE
DRIVE
UNLOCK
DIM
PARK
2
3
TR00016
Key
2
Control/Indicator
Auxiliary Lighting Switch
TR00019
Function
This switch has four positions. The following shows the lights that operate in
each position:
OFF Position – Instrument panel lights and parking lights will not illuminate.
PARK Position – Parking lights will illuminate if service light switch is in
SERVICE DRIVE position.
PANEL DIM Position – Instrument panel lights are on with minimum
illumination.
PANEL BRIGHT Position – Instrument panel lights are on with maximum
illumination.
2-8
3
Switch Lock
This lock is used to prevent accidental movement of the main lighting control
switch. Lift lock lever to move service lighting control switch to STOP LIGHT,
SERVICE DRIVE and BO DRIVE positions.
4
Light Switch (Forward Floods)
Controls the forward floodlights.
5
Light Switch (Boom Flood)
Controls the boom floodlight.
6
Light Switch (Rear Floods)
Controls the rear floodlights.
TM 10-3930-673-10
Table 2-5. Boom, Attachment, Frame Tilt and Fork Controls
Boom
Lower
Boom
Retract
Boom
Extend
Boom
Raise
Attachment
Lower
1
Left Fork
Left
Left Fork
Right
2
Attachment
Raise
Fork Tip
Raise
Right Fork
Left
Fork Tip
Lower
Right Fork
Right
3
Frame Tilt
Left
Side Shift
Left
Forks
Apart
Forks
Together
Side Shift
Right
Frame Tilt
Right
TR00020
2-9
TM 10-3930-673-10
Table 2-5. Boom, Attachment, Frame Tilt and Fork Controls - CONT.
Key
Function
Control/Indicator
WARNING
Do not raise or extend the boom unless the frame is level. Failure to comply could cause the load to
drop or machine to tip, resulting in injury or death to personnel.
1
Hydraulic Joystick Control
Controls the movement of the boom: raising, lowering, extending, and retracting.
Push the joystick forward to lower the boom. Pull the joystick back to raise the
boom. Move the joystick to the left to retract the boom. Move the joystick to the
right to extend the boom.
2
Electric Joystick Control
Controls the movement of the attachment and forks: attachment raise and lower,
forks sideshift and carriage tilt. Push the joystick forward to lower the
attachment. Pull the joystick back to raise the attachment.
Move the joystick to the right to lower the fork tips. Move the joystick to the left
to raise the forks tips. The carriage tilt will operate only when the automatic fork
level switch is in the OFF position.
CAUTION
Hold the button until the joystick is returned to the center position. If button is not held, the resulting
hydraulic pressure spike could damage the equipment.
Push the button on top of the joystick down and hold. Move the joystick to the
left to shift the left fork to the left.
Move the joystick to the right to shift the left fork to the right.
Push the button down and hold. Pull the joystick back to shift the right fork to the
right. Push the joystick forward to shift the right fork to the left.
To sideshift both left and right forks to the right, push the button down and pull
the joystick to the right rear corner. Push the button down and push the joystick to
the left front corner to sideshift left. To move the forks apart, push the button
down and pull the joystick to the left rear corner. Push the button down and push
joystick to right front to move the forks together.
3
2-10
Frame Tilt Control
Controls tilt of the frame. Push the lever forward to tilt vehicle left. Pull the lever
back to tilt vehicle right.
TM 10-3930-673-10
Table 2-6. Side Console Switches and Controls
7
6
TR00043
5
Key
4
3
2
1
Control/Indicator
TR00021
Function
1
Heater Temperature Control
Controls the inside cab temperature. Push to decrease temperature. Pull to
increase temperature.
2
Heater/Air Conditioner Selector Switch
A three-position rocker switch controls the use of the heater/air conditioner. Heater/
air conditioner is OFF in the center position. Move switch forward for air
conditioning (white light illuminates) and backward for heater (red light illuminates).
3
Heater/Air Conditioner Blower
Switch
A three-position rocker switch controls the air flow of the heater/air conditioner.
Blower is OFF in the center position. Move switch forward for high (two blowers
operating) and backward for low (one blower operating).
4
Engine Primer Button
Aid for cold weather starting. Push the button to inject a measured amount of
ether into the engine's intake manifold.
5
Parking Brake Switch
A toggle switch that applies/releases the parking brake.
6
STE/ICE Diagnostic
Connector
Connection point for the STE/ICE test equipment.
7
Instrument Resistor
Module
ldentifies the vehicle to the STE/ICE Test equipment.
2-11
TM 10-3930-673-10
Table 2-6. Side Console Switches and Controls - CONT.
9
8
TR00043
TR00021
WARNING
Make sure the Emergency Steer Switch is returned to the ON position when STE/ICE testing is
completed. If engine power is lost, there will also be a loss of emergency steering capability. Failure to
follow this precaution could result in injury or death to personnel.
8
Emergency Steer Switch
9
Auxiliary Fuel Shut-Off Switch Permits cranking the engine without starting during Simplified Test Equipment
for Internal Combustion Engines (STE/ICE) diagnostic testing. The switch is
OFF when up. The switch is ON when down.
2-12
Turns the steering pump circuit off during maintenance activities when it is not
necessary to operate and for cold weather starting. The switch is ON when the red
cover is down and the switch down. The switch is OFF when the red cover is up
and the switch up.
TM 10-3930-673-10
Table 2-7. Miscellaneous Controls Operator Seat and Foot Pedals
1
2
3
SEAT
ADJUSTMENT
LEVER
SEAT
SUSPENSION
TENSIONER
4
TR00022
Key
Control/Indicator
TR00016
Function
1
Engine Start Switch
Controls current flow from the batteries to the electrical system. In the OFF
position, the switch disconnects the flow of current between the battery and the
electrical system. Also, the switch is used to shut the engine down. Once turned
to the OFF position, the fuel solenoid on the fuel injection pump is deactivated,
stopping the flow of fuel from the pump to the injectors. In the RUN position, all
controls and indicators are operable, and the emergency steering pump is
activated. In the START position, only the engine starting motor is engaged and
the fuel solenoid activated.
2
Steer Select Control
Allows the operator to control the steering mode: CRAB (left position), TWO
WHEEL (center position), and FOUR WHEEL (right position).
3
Horn Button
Press the button to sound the horn.
4
Operator's Seat
A lever on the front of the seat controls the back and forth movement. Release the
lever and slide seat forward or backward to suit. A knob underneath the seat
adjusts seat suspension tension. Turn the wheel clockwise to stiffen seat
suspension, and counterclockwise to soften seat suspension. Heater/air
conditioner vents on the lower right side of the seat can be opened, closed, or
turned.
Seat height can be adjusted to any of three positions. Raise the seat by grasping
seat bottom and pulling upward to one of three detent positions. Once in the
highest detent position, lower the seat by raising all the way and then lowering
seat fully.
2-13
TM 10-3930-673-10
Table 2-7. Miscellaneous Controls Operator Seat and Foot Pedals - CONT.
9
5
8
7
9
6
TR00016
Key
Control/Indicator
Function
5
Accelerator Pedal
Controls engine speed. Depress the pedal to increase engine speed. Release
pressure on the pedal to decrease engine speed.
6
Brake Pedal
Applies the service brakes. Depress the pedal to actuate the disc brakes on all
four wheels. The brake lights illuminate when this pedal is depressed if the
service lighting control switch is in the STOP LIGHT or SERVICE DRIVE
position.
7
Transmission Disconnect Pedal Disconnects the transmission from the drive train and, after additional travel,
engages the service brakes. Depressing this pedal allows the operator to increase
the engine rpm without shifting to NEUTRAL, thereby accelerating hydraulic
functions.
8
Steering Wheel Locking Cable
Automatically retracting steel cable used in conjunction with lock in tool box.
When cable is looped around steering wheel and locked, prevents unauthorized
personnel from steering the vehicle.
9
Heater/Air Conditioner Vents
Control the amount and directional flow of heated or cooled air to the operator.
Opening, closing, or turning vents located in front, behind, or beneath the
operator permits airflow to be regulated.
2-14
TM 10-3930-673-10
Table 2-7. Miscellaneous Controls Operator Seat and Foot Pedals - CONT.
10
TR00006
TR00023
Key
Function
Control/Indicator
WARNING
The back-up alarm does not operate in blackout lighting mode. Use extreme caution when backing
in blackout mode. Do not disconnect the back-up alarm at any time, or injury or death to personnel
could result.
CAUTION
Do not allow direct water pressure into the back-up alarm when washing the ATLAS vehicle.
Excessive water will interfere with the back-up alarm operation.
10
Back-up Alarm
Activated whenever the range select lever is placed in reverse travel position. The
alarm does not operate in blackout lighting mode.
2-15
TM 10-3930-673-10
Table 2-7. Miscellaneous Controls Operator Seat and Foot Pedals - CONT.
11
12
TR00024
Key
Control/Indicator
Function
11
Defroster Fans
Turn front and/or rear fan switch to ON position to remove moisture or frost from
front and rear windows.
12
Front Floodlight Controls
Adjusts front floodlight positions. Rotate the handle to turn the floodlight. Turn
the handle assembly to change the axis of the floodlight's rotation.
Section II. PREVENTIVE MAINTENANCE
2-2. GENERAL
Your Preventive Maintenance Checks and Services table lists the inspections and care of your equipment required to keep it in
good operating condition.
2-3. PMCS PROCEDURES
a. The Item Number column of your PMCS is the source for the number used on the TM Number Column on DA Form
2404.
b. The Interval column of your PMCS table tells you when to do a certain check or service.
(1) Before you operate. Always keep in mind the CAUTIONS and WARNINGS. Perform your before (B) PMCS prior
to the equipment leaving the containment area or performing its intended mission.
(2) While you operate. Always keep in mind the CAUTIONS and WARNINGS. Perform your (D) PMCS when the
equipment is being used in its intended mission.
2-16
TM 10-3930-673-10
(3) After you operate. Be sure you perform your after (A) PMCS after the equipment has been taken out of its mission
mode or returned to the containment area.
(4) Do your weekly (W) PMCS once a week.
c. The Procedure column of your PMCS table tells you how to do the required checks and services. Carefully follow these
instructions. If you do not have the tools, or if the procedure tells you to, have Unit Maintenance do the work.
d. If your equipment does not perform as required, refer to the manual troubleshooting section for possible problems.
Report any malfunctions or failures on the proper DA Form 5988-E or refer to DA Pamphlet 738-750.
NOTE
The terms ready/available and mission capable refer to the same status: Equipment is on hand and is
able to perform its combat missions (AR 700-138).
e. Equipment Is Not Ready/Available If column: This column tells you when and why your equipment cannot be used.
f. Always do your PMCS in the same order so it gets to be a habit. Once you've had some practice, you'll spot anything
wrong in a hurry.
g. When you do your PMCS, take along a rag or two.
h. While performing PMCS, observe CAUTIONS and WARNINGS preceding those operations which could endanger
your safety or result in damage to the equipment.
WARNING
• Dry cleaning solvent MIL-PRF-680 Type III is an environmentally compliant and low toxic
material. However, it may be irritating to the eyes and skin. The use of protective gloves and
goggles is suggested. Use in well-ventilated areas. Keep away from open flames and other sources
of ignition.
• NOTE: P-D-680 Type II is no longer in use and has been replaced by MIL-PRF-680 Type III.
(1) Keep it clean: dirt, grease, oil and debris only get in the way and may cover up a serious problem. Clean as you work
and as needed. Use drycleaning solvent (P-D-680) to clean metal surfaces. Use soap and water when you clean rubber or
plastic material.
(2) Bolts, nuts and screws: Check that they are not loose, missing, bent or broken. You can't try them all with a tool, of
course, but look for chipped paint, bare metal or rust around bolt heads. Tighten any bolt, nut or screw that you find loose.
(3) Welds: Look for loose or chipped paint, rust or gaps where parts are welded together. If you find a bad weld, report
it to Unit Maintenance.
Change 1
2-17
TM 10-3930-673-10
2-3. PMCS PROCEDURES (CONT)
(4) Electric wires and connectors: Look for cracked or broken insulation, bare wires and loose or broken connectors.
Tighten loose connections and make sure the wires are in good condition.
(5) Hoses and fluid lines: Look for wear, damage and leaks. Make sure clamps and fittings are tight. Wet spots show
leaks, but a stain around a fitting or connector can also mean a leak. If leakage comes from a loose fitting or connector, tighten
the fitting or connector. If something is broken or worn out, either correct it or report it to Unit Maintenance.
(6) Vehicle must be on level ground in order to get correct fluid level measurement.
i. It is necessary for you to know how fluid leaks affect the status of your equipment. The following are definitions of the
types/classes of leakage you need to know to be able to determine the status of your equipment. Learn and be familiar with
them and REMEMBER - when in doubt, notify your supervisor.
CAUTION
Equipment operation is allowable with minor leakages (Class I or II). Of course, consideration must be
given to fluid capacity in the item/system being checked/inspected. When operating with Class I or II
leaks, continue to check fluid levels as required on your PMCS.
Class I
Seepage of fluid (as indicated by wetness or discoloration) not great enough to form drops.
Class II
Leakage of fluid great enough to form drops, but not enough to cause drops to drip from the item being
checked/inspected.
Class III
Leakage of fluid great enough to form drops that fall from the item being checked/inspected.
2-4. LUBRICATION INSTRUCTIONS
a. Refer to TM 10-3930-673-20-1.
b. See the following diagram for operator lubrication.
FUEL/WATER SEPARATOR
Drain.
Clean canister during each
filter change.
2-18
Change 1
OC
TM 10-3930-673-10
2-4. LUBRICATION INSTRUCTIONS (CONT)
KEY
EXPECTED TEMPERATURES
LUBRICANTS
OE/HDO
(MIL-L-2104)
LUBRICATING OIL,
Engine
CAPACITIES
Above
–10°F
(Above
–23°C)
Below
–10°F
(Below
–23°C)
15 qt (14 l)
Engine Crankcase
Above
+40°F
(Above
+4°C)
Below
+40°F
(Below
+43°C)
OE/HDO
10w/30
CC/CD
OEA
INTERVALS
(Hours of
Normal
Operation)
500
or
AOAP
Oil Can Points
Transmission
Disconnect Master
Cylinder
Hydraulic System
OEA
(MIL-L-46167A)
Oil, Engine, Arctic
GO
(MIL-L-2105D)
GAA
(MIL-G-10924)
5.5 gal
(20.8 l)
OE/HDO
10
OEA
250
As Req.
OE/HDO
10
OEA
250
56.6 gal
(214.2 l)
OE/HDO
10
OE/HDO
10
250
GO
80/90
GO
80/90
250
GO
80/90
GO
80/90
LUBRICATING OIL, 10.6 qt (10 l)
Gear, Multipurpose
(each)
Differential
18 qt (17 l)
Planetary Hubs
2.7 qt (2.6 l)
(each)
TEFLON DRY
LUBE, Fork Shaft and
Fork Wear Pads
As Req.
GREASE,
Automotive and
Artillery Carriage Tilt
Cylinder & Carriage
Pivot Pins
As Req.
Hoist Cylinder,
Attachment Pivot
Pins, & Towing Pintle
As Req.
Propeller Shaft Slip
Joints & U-Joints
(Front and Rear)
As Req.
Tie Rod Ends
Axle Carrier Pins
Steering Knuckle
Bearings & Joints
For Arctic Operation Refer to FM 9-207
Transmission
250
50
(Weekly)
50
See
Note 1
(weekly)
50
(weekly)
GAA
ALL TEMPERATURES
500
(semiannually)
As Req.
50
(weekly)
As Req.
50
(weekly)
As Req.
50
(weekly)
Change 1
2-18.1
TM 10-3930-673-10
2-4. LUBRICATION INSTRUCTIONS (CONT)
KEY
EXPECTED TEMPERATURES
CAPACITIES
Brake Pedal &
Transmission
Disconnect Pedal
Counter Shaft
As Req.
Transmission Input
Shaft Bearing, Slip
Joint & U-Joint
As Req.
As Req.
Boom Extent & Boom
Retract Chain Sheaves
As Req.
Frame Tilt Cylinder
Pins
As Req.
Steering Cylinders
As Req.
NOTES
1. LUBRICATION. During adverse weather or
abnormal dusty conditions, lubrication may require
daily servicing.
2. The lubricating points for the brake pedal and
transmission disconnect pedal counter shaft are
located under the cab (GAA).
3. Lubricate all hinges and door latches with a hand
oiler (OE/HDO).
4. Check the differential oil levels while vehicle is on a
level surface. Oil should be to the bottom of the check
and fill hole (GO, or GAA, see Card 19).
6. WARNING – Do not stand under the
Below
–10°F
(Below
–23°C)
Above
+40°F
(Above
+4°C)
GAA
ALL TEMPERATURES
Boom Pivot & Boom
Hoist Cylinder Pins
5. Lubricate after fording operations (GAA).
Above
–10°F
(Above
–23°C)
Below
+40°F
(Below
+43°C)
For Arctic Operation Refer to FM 9-207
LUBRICANTS
INTERVALS
(Hours of
Normal
Operation)
50
(weekly)
See
Note 1
250
50
See
Note 1
(weekly)
50
50
250
7. During adverse weather, dusty or sand conditions,
change transmission oil and filter element at 250 hour
intervals. For normal off-highway operation, for
operation under rapid change in ambient temperature,
or for operation in presence of chemical fumes, change
at 375 hour intervals. Use MIL-L-2104D hydraulic
transmission fluid when operating the vehicle in
temperatures above –10°F (–23°C), and MIL-L46167A transmission fluid when operating in
temperatures below –10°F (–23°C).
8. To lube the steering knuckle joint, the vehicle may
have to be moved forward or backwards to align
grease fitting with access hole. If the fitting is aligned
with the access hole but grease gun will not go on
fitting, turn the wheels right or left until grease gun fits
on grease fitting (GAA).
attachment and carriage assembly during
9. Raise the boom to approximately 15° to lubricate the
lubrication services. To lube the carriage lube
boom hoist cylinder pins (GAA).
points and tilt cylinder lower points, raise the fork
assembly 48 in. (122 cm) and tilt the carriage
10. Drain hydraulic reservoir every 2000 hours. Change
assembly forward 90°. To lube the tilt cylinder’s head
hydraulic oil filter and add oil (OE/HDO) to reservoir
pivot pin, place the level forks/carriage firmly on the
until oil is visible in sight gage. Operate hydraulic
ground (GAA).
system and check oil level again.
2-18.2
Change 1
TM 10-3930-673-10
2-4. LUBRICATION INSTRUCTIONS (CONT)
CHART A. ENGINE
EXPECTED TEMPERATURE
°F
–50 –40 –30 –20 –10
0
10
20
30
40
50
60
70
80
90
100 110 120
°C
–46 –40 –34 –29 –23 –18 –12
–7
–1
4
10
16
21
27
32
38
43
49
OE/HDO - 10W/30
OEA
LUBRICANTS:
OE/HDO LUBRICATING OIL, ICE, TACTICAL (MIL-L-2104)
OEA LUBRICATING OIL, ICE, ARCTIC (MIL-L-46167)
*See Note 2a
CHART B. TRANSMISSION/HYDRAULIC
EXPECTED TEMPERATURE
°F
–50 –40 –30 –20 –10
0
10
20
30
40
50
60
70
80
90
100 110 120
°C
–46 –40 –34 –29 –23 –18 –12
–7
–1
4
10
16
21
27
32
38
43
49
OE/HDO - 10
OEA
LUBRICANTS:
OE/HDO LUBRICATING OIL, ICE, TACTICAL (MIL-L-46152)
*See Notes 3a, 3b, and 3c
CHART C. DIFFERENTIAL
EXPECTED TEMPERATURE
°F
–50 –40 –30 –20 –10
0
10
20
30
40
50
60
70
80
90
100 110 120
°C
–46 –40 –34 –29 –23 –18 –12
–7
–1
4
10
16
21
27
32
38
43
49
GO - 80W/90
GO - 75
LUBRICANTS:
LUBRICATING OIL, GEAR, MULTIPURPOSE (MIL-L-2105)
*See Notes 5a through 5d
Change 1
2-18.3/(2-18.4 blank)
TM 10-3930-673-10
2
Table 2-8. Operator Preventive Maintenance Checks and Services
Item
No.
Interval
Location
Item to Check/
Service
Procedure
Not Fully Mission
Capable if:
IMPORTANT
PERFORM WEEKLY (W) AS WELL AS
BEFORE (B) OPERATOR'S PMCS IF:
1. You are the assigned operator and have not
operated vehicle since the last weekly
checks.
2. You are operating vehicle for the first time.
WARNING
Personnel hearing can be
PERMANENTLY DAMAGED if
exposed to constant high noise levels of
85 dB (A) or greater. Wear approved
hearing protection devices when
operating or working within 61 ft (19 m)
of vehicle when engine is running.
Personnel exposed to high noise levels
shall participate in a hearing
conservation program in accordance
with TB MED 501. Hearing loss occurs
gradually but becomes permanent over
time.
WARNING
Unless otherwise specified, perform all
maintenance procedures with all
equipment lowered to the ground,
transmission in neutral, parking brake
applied and engine shut off. Failure to
follow these precautions could result in
injury or death to personnel.
2-19
TM 10-3930-673-10
Table 2-8. Operator Preventive Maintenance Checks and Services - CONT.
Item
No.
Interval
Location
Item to Check/
Service
Procedure
Not Fully Mission
Capable if:
CAUTION
New vehicle (break-in) maintenance is
required on the ATLAS at 20 hours and
50 hours. Refer to Para 2-6 and contact
Unit Maintenance to avoid early wear or
damage to the forklift and possible voidance of the warranty.
1
2
2-20
Before/After
Exterior or Forklift
a. Check for oil, fuel, coolant and hydraulic
oil leaks.
Class III leaks are evident.
Before/After
b. Check Cab/Roll Over Protective Structure Obvious damage, cracks,
(ROPS)/Falling Object Protective Structure bends in weldments.
(FOPS) and vehicle frame for obvious
damage, cracks, bends and evidence of
loose mounting hardware.
Before/After
c. Inspect boom, attachment, 6K and/or 10K
carriage, and forks for cracked, bent or
broken members.
Before/After
Wiring is frayed, broken or
d. Check exterior wiring and connectors for
secure mounting, frayed, broken or burned burned.
wires.
Before/After
e. Check frame tilt stops for cracks, bends or
weld and other damage.
Before/After
f. Check that boom hoses and electrical cable Hoses or cables are crossed
or obviously loose.
are snug against hose guide and not
crossed.
Boom, attachment, 6K and/
or 10K carriage, or forks are
bent, cracked, broken or
missing.
Any obvious damage,
cracks or bends in
weldment.
Before/After
Tires, Wheels, and
a. Check tires for damage (i.e., cuts, gouges, One or more tires
Flexible Brake Lines
foreign matter), low tire pressure (refer to unserviceable.
TM 9-2610-200-24). Maintain tire pressure
at 65 psi.
Before/After
b. Check wheels for damage and loose or
missing mounting nuts.
Cracks, loose or missing
mounting nuts.
Before/After
c. Check flexible brake lines for signs of
wear, cuts or damage.
Any signs of wear, cuts or
damage.
Change 2
TM 10-3930-673-10
Table 2-8. Operator Preventive Maintenance Checks and Services - CONT.
Item
No.
Interval
Location
Item to Check/
Service
Not Fully Mission
Capable if:
Procedure
SIGHT
GLASS
TR00026
3
Before
Hydraulic Tank/
Reservoir
With all cylinders retracted, check oil level in
tank. Maintain oil level between marks in the
sight glass.
Change 1
2-21
TM 10-3930-673-10
Table 2-8. Operator Preventive Maintenance Checks and Services - CONT.
Item
No.
Interval
Location
Item to Check/
Service
Not Fully Mission
Capable if:
Procedure
COOLANT
OVERFLOW
BOTTLE
TR00064
Radiator
4
WARNING
The cooling system operates under
pressure which is controlled by the
radiator cap. It is dangerous to remove
the cap while system is hot, because hot
steaming gases will escape and burn
you. Always allow system to cool, then
turn the cap to the first stop and allow
the pressure to escape before removing
the cap completely.
Use coolant overflow bottle to fill or
check coolant level. If coolant is not
visible in overflow bottle, system must
be refilled through the radiator cap.
2-22
Before
a. Check coolant level in the overflow bottle.
Maintain level approximately 1/3 full to 2/3
full (2 qts).
Before
b. Visually check radiator for damage or
obstruction. Remove any obstruction.
Radiator is leaking.
TM 10-3930-673-10
Table 2-8. Operator Preventive Maintenance Checks and Services - CONT.
Item
No.
Interval
Location
Item to Check/
Service
Procedure
Not Fully Mission
Capable if:
ARCTIC HEATER
SWITCH
5
Before
Arctic Heater
a. Open left engine access door.
Before
b. Ensure that coolant valve at left-rear of
engine is fully open.
Before
c. Move arctic heater switch to the ON
Coolant pump not operatposition. Audible sound from coolant pump ing. (If mission requires use
inside arctic heater indicates pump is
of arctic heater).
working.
Before
d. Check arctic heater for security of
mounting and obvious damage.
Damage present that would
prevent proper operation. (If
mission requires use of arctic heater).
Before
e. Check coolant hoses for leaks, cuts, loose
clamps and other obvious damage.
Class III leak is evident.
Before
f. Check valve for leaks.
Class III leak is evident.
Change 1
2-23
TM 10-3930-673-10
Table 2-8. Operator Preventive Maintenance Checks and Services - CONT.
Item
No.
Interval
Location
Item to Check/
Service
Procedure
ENGINE
OIL LEVEL
DIPSTICK
Not Fully Mission
Capable if:
TR00057
6
Before
Engine Oil Level
Check engine oil level on dipstick. Maintain
oil level to between the ADD and FULL
marks.
7
Before
Hydraulic Cylinders Check external hydraulic lines and fittings for Class III leaks are evident.
damage and leaks.
Batteries
8
WARNING
Do not smoke or allow any open flame
or spark in the vicinity while checking
or filling batteries. The batteries generate hydrogen gas, a highly explosive
gas. Injury or death to personnel can
result.
Before
2-24
Change 1
a. Check batteries and battery box for
corrosion and obvious damage.
Corrosion damage to batteries.
TM 10-3930-673-10
Table 2-8. Operator Preventive Maintenance Checks and Services - CONT.
Item
No.
Interval
Location
Item to Check/
Service
Procedure
Not Fully Mission
Capable if:
b. Check battery electrolyte level. If the
electrolyte level is below the top of the
battery plates, notify Unit Maintenance.
Before
9
Before
Windows
Check windows for obvious damage and
broken or cracked windows.
Vision is distorted due to
crack in windshield.
10
Before
Seat and Seat Belt
a. Check seat belt for damage.
Seat belt torn, seat belt
retractor inoperative.
Before
b. Check seat adjustment latch.
Seat latch inoperative or
broken.
Before
c. Check seat suspension adjuster.
Seat adjuster inoperative or
broken.
CAUTION
The windshield wipers should not be
operated on dry windshields for
extended periods of time.
11
Before
Windshield Wipers
a. Check windshield wipers for proper
operation.
Before
b. Check for missing or damaged wiper
blades. If blades are missing or damaged,
notify Unit Maintenance.
Before
c. Check operation of front and rear
windshield wiper washers. Maintain
windshield wiper washer fluid level to top
of reservoir.
Wipers inoperative.
12
Before
Exterior Lights
Check exterior lights for proper operation.
13
Before
Horn and Back-up
Alarm
With engine start switch in the ON position,
move travel select lever to reverse. Check for
back-up alarm operation.
Back-up alarm inoperative.
14
Before
Instrument Panel
and Controls
a. Inspect the instrument panel for broken
glass and unserviceable gauges.
Any of the following gages
are unreadable:
• Water temperature.
• Engine oil pressure.
• Transmission oil
temperature.
2-25
TM 10-3930-673-10
Table 2-8. Operator Preventive Maintenance Checks and Services - CONT.
Item
No.
Interval
Before
Location
Item to Check/
Service
Not Fully Mission
Capable if:
Procedure
b. Press lenses to test warning lights.
Low brake pressure warning
light bulb does not illuminate.
NOTE
Check Nos. 14.1,15, 16 and 17 are performed with the engine running, prior to
the equipment leaving the containment
area or performing its intended mission.
14.1
Before
Emergency Steering Place engine start switch in the ON position
and emergency steer switch in ON position
Pump
(switch down and red cover down). Turn
steering wheel slightly left and right in any
steering mode. Observe that wheels are
turning.
Emergency steering pump
not operational.
EMERGENCY
STEER SWITCH
15
2-26
Before
Systems Operational a. Operate two wheel, four wheel, and crab
Check
steering fully in one direction and then in
the opposite direction. Check for proper
and smooth operation.
Erratic or noisy operation.
Any steering mode not operational.
Pedal is spongy or goes to
floor.
Before
b. Depress the service brake pedal and check
to ensure that pedal is firm and does not
depress completely to floor.
Before
Vehicle does not stop.
c. Place transmission in forward gear and
allow vehicle to move. Operate the service
brakes. Vehicle should stop.
Before
d. With parking brake applied, place travel
select control lever in third gear. Vehicle
should not move.
Change 1
Parking brake does not hold
vehicle.
TM 10-3930-673-10
Table 2-8. Operator Preventive Maintenance Checks and Services - CONT.
Item
No.
Interval
Location
Item to Check/
Service
Procedure
Not Fully Mission
Capable if:
WARNING
• Before operating the boom, use care
to ensure that boom does not come
near overhead wires, power lines or
structures. If boom contacts overhead
power lines or structures, injury or
death to personnel could result. If
lines are near to your operating area,
notify your supervisor prior to starting
work.
• Do not raise or extend the boom
unless the frame is level. Failure to
comply could cause the load to drop
or machine to tip, resulting in injury
or death to personnel.
Before
e. Lubricate attachment pivot pin, quick
attach pivot pin, carriage tilt cylinder pivot
pins, and attachment lift cylinder pins with
grease.
Before
f. Operate the boom extend, retract, raise and Boom operation is erratic.
Boom does not function.
lower. Check for smooth operation.
Before
g. Operate the frame tilt from full left to full
right.
Before
h. Check for corrosion on fork shaft. Wipe
fork shaft with dry rag. Clean fork shaft
with nylon bristle brush and apply teflon
dry lube to shaft. If corrosion is still not
removed, request Unit Maintenance
inspect, clean, and lubricate with Teflon
Dry Lubricant (Item 2.5, Appendix D).
Before
i. Check fork movement, right and left, for
proper operation.
Frame tilt is erratic or does
not tilt.
Neither fork operates.
Change 1
2-27
TM 10-3930-673-10
Table 2-8. Operator Preventive Maintenance Checks and Services - CONT.
Item
No.
Interval
Location
Item to Check/
Service
Not Fully Mission
Capable if:
Procedure
TRANSMISSION
OIL LEVEL
DIPSTICK
TRANSMISSION
OIL LEVEL
FILL
TR00058
16
Before
Transmission Oil
Level
With engine running and transmission at
normal operating temperature, check oil level
on dipstick. Maintain oil level between the
“ADD” and the “FULL” marks.
17
During
Gages and Warning
Lights
Monitor all gages and warning lights during
vehicle operation.
a. Water temperature 180° – 210° F.
Water temperature above
210° F.
b. Normal engine oil pressure 30 psi – 90 psi. Engine oil pressure less than
10 psi (minimum allowable
at idle).
c. Transmission oil temperature does not
exceed 250° F.
Transmission oil temperature exceeds
250° F.
d. Battery voltage indicator in safe zone, 24 – Battery voltage indicator not
in safe zone.
28.5 volts.
2-28
Change 1
TM 10-3930-673-10
Table 2-8. Operator Preventive Maintenance Checks and Services - CONT.
Item
No.
Interval
Location
Item to Check/
Service
Procedure
Not Fully Mission
Capable if:
AIR
CLEANER
INDICATOR
TR00059
When operating in desert or extremely
dusty conditions, clean the primary air
cleaner element after every 4 hours of
operation.
18
After
Air Filters
Check air cleaner indicator.
Indicator shows fully red on
gauge.
2-29
TM 10-3930-673-10
Table 2-8. Operator Preventive Maintenance Checks and Services - CONT.
Item
No.
Interval
Location
Item to Check/
Service
Not Fully Mission
Capable if:
Procedure
FUEL/WATER SEPARATOR
TR00057
19
After
Fuel/Water
Separator
RETAINING NUT
TR00032
Drain water from the water separator:
a. Loosen retaining nut at bottom of sediment
bowl.
b. Pull retaining bracket forward.
c. Remove sediment bowl and discard
contents.
d. Re-install sediment bowl.
e. Swing retaining bracket under sediment
bowl.
f. Tighten retaining nut finger tight.
20
Weekly
Exhaust System
Weekly
a. Check exhaust system for loose or missing Any missing hardware or
evidence of leaks.
clamps or hardware.
b. Check for evidence of leaks at all joints and
connections.
21
Weekly
Engine Lubrication
System
Check for oil leaks at the valve covers,
turbocharger oil line and engine oil filter.
22
Weekly
Fork Wear Pad
Screws
Check fork wear pad screws. If screws are
missing, loose, bent or broken, notify Unit
Maintenance.
2-30
Change 1
Class III leaks are
evident.
TM 10-3930-673-10
2
Section III.
OPERATION PROCEDURES
2-5. GENERAL
It is essential that the operator know how to perform every operation of which the vehicle is capable. This section gives
instructions on starting and stopping the vehicle, on the basic motions of the vehicle, and how to use these instructions to
perform specific tasks for which the equipment was designed.
2-6. NEW VEHICLE BREAK-IN
Controlled break-in is the ideal fitting of all internal moving metal parts. Using the proper oil and preventive maintenance
program during this period will result in long life of the engine.
WARNING
Personnel hearing can be PERMANENTLY DAMAGED if exposed to constant high noise levels of
85 dB (A) or greater. Wear approved hearing protection devices when operating or working within 61
ft (19 m) of vehicle when engine is running. Personnel exposed to high noise levels shall participate in
a hearing conservation program in accordance with TB MED 501. Hearing loss occurs gradually but
becomes permanent over time.
a. Starting the Engine. Refer to Para 2-7. Warm the engine to operating temperature (180° – 190° F) before placing
the engine under load.
b. Operation.
(1)
Avoid constant speeds.
(2)
Use the range select control lever to place the transmission in the appropriate gear to prevent engine lugging.
(3)
Check the gages to ensure normal operation of the engine.
(4)
Check the coolant level and fill as necessary.
(5)
Check the oil level. Add oil as necessary to keep it at the correct level. Do not overfill the crankcase.
(6)
After the first 20 hours of operation, transmission oil and the filter must be changed. Contact Unit Maintenance to
change and lubricate with correct grade of lubricant according to the PMCS. After the first 50 hours of operation,
contact Unit Maintenance to change the following items:
•
•
•
•
Planetary gear oil,
Hydraulic oil filter,
Engine oil and filter,
Differential oil.
2-31
TM 10-3930-673-10
2-7. STARTING THE ENGINE
TRAVEL
SELECT
LEVER
STEERING
WHEEL
LOCKING
CABLE
PARKING
BRAKE
SWITCH
OPERATOR’S
SEAT
TR00016
a. Adjust the operator's seat and suspension so that when your seat belt is buckled you can still depress the foot pedals.
NOTE
Before starting the vehicle, ensure that the parking brake is engaged.
b. If the steering wheel is locked, unlock the steering wheel and allow the cable to slowly retract.
c. If the parking brake is not engaged, set the parking brake switch to ON.
NOTE
Before starting the vehicle, ensure that the travel select lever is placed in Neutral, “N”.
d. If the travel select control is not in the neutral position, move the lever to Neutral, “N”.
e. On the first start of the day, check the neutral safety switch for proper operation.
(1)
2-32
Place the travel select lever in the Forward, “F” position.
TM 10-3930-673-10
AUXILIARY
FUEL SHUT-OFF
SWITCH
EMERGENCY
STEER
SWITCH
TR00015
(2)
Ensure that the auxiliary fuel shut-off switch is OFF (switch up).
WARNING
Do not operate vehicle with the emergency steer switch in the OFF position. If engine power is lost,
there will also be a loss of emergency steering capability. Failure to follow this precaution could result
in injury or death to personnel.
(3)
Ensure that the emergency steer switch is ON (switch down, red cover down).
2-33
TM 10-3930-673-10
2-7. STARTING THE ENGINE (CONT)
ENGINE
START
SWITCH
RANGE
SELECT
LEVER
TRAVEL
SELECT
LEVER
ACCELERATOR
PEDAL
BRAKE
PEDAL
PARKING
BRAKE
SWITCH
TR00016
CAUTION
If the engine should turn over, do not continue. This indicates that the neutral safety switch is
defective.
(4)
Turn the engine start switch to the START position. The engine should not turn over.
(5)
Return the engine start switch to the OFF position.
(6)
Return the travel select lever to the Neutral, “N” position.
(7)
Move the auxiliary fuel shut-off switch to the ON position.
f. Depress the accelerator pedal to approximately half speed.
2-34
TM 10-3930-673-10
CAUTION
Do not crank the starting motor for more than 30 seconds at a time. Continuous cranking can overheat
and damage starting motor.
g. Turn the engine start switch clockwise to the START position. Release the switch as soon as the engine starts. If the
engine fails to start on the first try, wait until engine and starter have come to a complete stop. Then, return the switch
to the OFF position before attempting to start engine again.
CAUTION
• If coolant temperature exceeds 220° F or the warning light is illuminated, shut the engine down
immediately. Do not operate vehicle continuously at a water temperature above 210° F or below
140° F.
• Should oil pressure fluctuate or drop, or if the warning light is illuminated, stop the engine and find
the cause. Do not operate the engine at oil pressure lower than 10 psi.
• If oil pressure does not register within 15 seconds after the engine starts, stop the engine or serious
damage may occur. Stop the engine by turning the engine start switch to the OFF position.
h. After the engine starts, operate engine just above idle for 30 to 60 seconds before driving vehicle. Check the readings
on the gages before moving vehicle. Return engine speed to idle before moving the range select control.
2-35
TM 10-3930-673-10
2-8. MOVING THE FORKLIFT
RANGE
SELECT
LEVER
ACCELERATOR
PEDAL
TRAVEL
SELECT
LEVER
BRAKE
PEDAL
PARKING
BRAKE
SWITCH
TR00016
WARNING
• Do not travel with the automatic fork level switch in the ON position. It is possible to drop a load
which could result in load damage, or injury or death to personnel.
• Use care when backing up. Have someone direct you if you cannot see where you are going.
Watch clearances. Failure to do so can result in load damage, or injury or death to personnel.
CAUTION
The forks extend beyond the end of the carriage. The operator must be aware of the swing of forks
when turning and allow for adequate clearance between forks and other objects.
a. Operating Safely.
2-36
(1)
Do not allow riders on the vehicle.
(2)
Understand vehicle's lifting limitations and keep vehicle under control. DO NOT try to exceed vehicle limitations.
TM 10-3930-673-10
WARNING
Vehicle is less stable when traveling with the load in a raised position. If you must move vehicle with
the load raised above the carry position (bottom of load at 24 inches above the ground, with boom
fully retracted and forks fully tilted to rear):
• Avoid sharp turns and sudden starts/stops.
• Operate all controls smoothly.
• Move very slowly.
• Keep vehicle level.
Failure to follow these precautions could result in injury or death to personnel.
(3)
Always carry the load low (bottom of load 24 inches above the ground) for maximum stability.
CAUTION
Make sure lower cab door is closed when operating vehicle. Vehicle wheels can contact the lower door
if left open when 4-wheel or crab steering is in use.
(4)
Always operate forklift with the lower cab door closed.
WARNING
• Before operating the boom, use care to ensure that boom does not come near overhead wires, power
lines or structures. If boom contacts overhead power lines or structures, injury or death to personnel
could result. If lines are near to your operating area, notify your supervisor prior to starting work.
• Do not raise or extend the boom unless the frame is level. Failure to comply could cause the load to
drop or machine to tip, resulting in injury or death to personnel.
(5)
Should contact with a power line occur, stay on vehicle until the boom is cleared or until current is turned off.
Keep all personnel off vehicle. If you must leave vehicle, JUMP, DO NOT STEP OFF.
2-37
TM 10-3930-673-10
2-8. MOVING THE FORKLIFT (CONT)
WARNING
Travel on inclines, slopes, ramps and grades only as follows:
• Loaded Forklift: with forks (and load) pointing uphill.
• Empty Forklift: with forks pointing downhill.
Failure to comply could result in operator injury or death.
(6)
Know your vehicle's operating limits for ascending, descending, and traversing slopes.
45% GRADE
(24 )
TR00036
WARNING
Do not exceed 45% grade (24°) longitudinally. Vehicle becomes unstable as fluid levels are shifted.
Internal components may not be properly lubricated causing vehicle damage. Tires may slip (loss of
traction) or vehicle may tip, resulting in possible operator injury or death.
(a)
2-38
With or without rated capacity load, for maximum longitudinal stability, do not exceed 45% grades (24°).
TM 10-3930-673-10
TILT VEHICLE
INTO SLOPE
30% GRADE
(17 )
TR00037
WARNING
Do not exceed 30% grade (17°) laterally. Vehicle becomes unstable as fluid levels are shifted.
Internal components may not be properly lubricated causing vehicle damage. Tires may slip (loss of
traction) or vehicle may tip, resulting in possible operator injury or death.
(b)
With or without rated capacity load, for maximum lateral stability, do not exceed 30%
grade (17°).
b. Starting Travel Procedures.
(1)
With engine at idle speed, depress brake pedal to apply the service brakes.
(2)
Make sure the travel select lever is in the Neutral, “N” position.
(3)
Ensure that the forks are raised at least 24 inches above the ground.
(4)
Move the range select lever to the desired gear ratio.
(5)
Move the parking brake switch to OFF position.
(6)
Move the travel select lever to the Forward, “F” position for forward travel, or down to the Reverse, “R” position
for reverse travel.
(7)
Release the brake pedal and depress the accelerator pedal to control vehicle speed.
2-39
TM 10-3930-673-10
2-8. MOVING THE FORKLIFT (CONT)
c. Changing Direction of Travel.
WARNING
DO NOT STOP QUICKLY. It is possible to drop a load which could result in load damage, or injury
or death to personnel.
(1)
Depress the brake pedal to apply service brakes and bring vehicle to a complete stop.
NOTE
When changing direction of travel, reduce engine speed.
(2)
Move the travel select lever through Neutral, “N” to the desired direction.
d. Changing Gear Ratios.
WARNING
Do not downshift at high speeds. Vehicle will slow suddenly which could result in load damage, or
injury or death to personnel.
CAUTION
Operating vehicle in high gear with a heavy load will cause the torque converter to slip excessively
and may cause transmission to overheat.
Upshifting and downshifting should be done in the normal sequence of speeds.
NOTE
Higher gears should be engaged only after reaching the top speed of the next lower gear. If necessary,
vehicle should be slowed by means of the service brakes.
2-40
(1)
Shifting to the next higher gear may be accomplished at any engine RPM while vehicle is in motion.
(2)
When downshifting, DO NOT over-rev the engine. Allow vehicle to slow before shifting to the next lower gear.
TM 10-3930-673-10
TRAVEL
SELECT
LEVER
ACCELERATOR
PEDAL
TRANSMISSION
DISCONNECT
PEDAL
TR00016
e. Accelerating Hydraulic Functions. To accelerate operation of the hydraulic functions, use the following
procedure:
(1)
Depress and hold the transmission disconnect pedal.
(2)
Depress the accelerator pedal to increase and maintain higher engine speed.
(3)
Perform the desired hydraulic functions.
(4)
Reduce engine speed to idle after operations are completed.
(5)
Shift the travel select control lever as necessary.
(6)
Slowly release the transmission disconnect pedal.
2-41
TM 10-3930-673-10
2-9. STEERING THE FORKLIFT
The forklift can be operated in three steering modes as selected with the steer select control switch: four wheel steer, two wheel
steer, and crab steer.
WARNING
Do not turn fast. This may cause forklift to tip, lose the load, and possibly cause injury or death to
personnel. This is particularly true in the four wheel steering mode. Turn vehicle in a lower gear or a
slower speed.
CAUTION
• Before changing steering modes, synchronize steering (refer to Para 2-9, d. Steering System
Synchronization.). Failure to follow this caution will result in vehicle mistracking and tire damage.
• Forks extend beyond end of carriage. Be aware of swing of forks when turning. Allow for
adequate clearance between forks and other objects.
TR00039
a. Four Wheel Steering. Move the steer select control switch to the right position. Front wheels will steer in the
direction that the steering wheel is turned; while the rear wheels will steer in the opposite direction. This mode allows
an extremely short turn radius. It also enables the rear wheels to follow the tracking of the front wheels – an advantage
in mud or sand conditions.
2-42
TM 10-3930-673-10
TR00040
b. Two Wheel Steering. Move the steer select control switch to the center position. Front wheels will steer in the
direction that the steering wheel is turned; while the rear wheels will remain in the fixed forward position. This mode is
used for on-highway travel or at higher speeds.
TR00041
c. Crab Steering. Move the steer select control switch to the left position. All wheels will steer in the same direction.
This mode permits the operator to move vehicle sideways toward the landing point of the load. This is especially
helpful in tight quarters on the job, where there is not enough space to move a conventional forklift back and forth
several times in order to line up at the exact spot in front of the loading location.
d. Steering System Synchronization. Use the following procedures to align the front and rear wheels if wheels are
not set in the same direction after you change steering modes (four wheel, two wheel, crab steer).
(1)
Use the steering wheel to put rear wheels in a straight ahead position.
(2)
Move the steer select control switch in the two wheel position (center).
(3)
Use the steering wheel to adjust front wheels to a straight ahead position.
(4)
Move the steer select control switch to desired mode for continued operation.
2-43
TM 10-3930-673-10
2-10. STOPPING THE FORKLIFT
STEERING
WHEEL
TRAVEL
SELECT
LEVER
ENGINE
START
SWITCH
STEER SELECT
CONTROL
SWITCH
HYDRAULIC
JOYSTICK
BRAKE
PEDAL
PARKING
BRAKE
SWITCH
TR00016
a. Depress the brake pedal to slow vehicle down.
b. Bring vehicle to a complete stop. Move the travel select lever to the Neutral, “N” position.
c. Move the parking brake switch to the ON position.
d. Move the hydraulic joystick left to retract the boom extend cylinder.
e. Push the hydraulic joystick forward to lower the boom until forks are resting on the ground.
2-11. STOPPING THE ENGINE
a. Move the travel select lever to the Neutral, “N” position.
b. Move the parking brake switch to the ON position.
c. Move the hydraulic joystick control lever left to retract the boom extend cylinder.
d. Push the hydraulic joystick control lever forward to lower the boom until forks are resting on the ground.
e. Turn all lights and accessories off.
f. Allow the engine to idle for three minutes.
g. Turn the engine start switch to the OFF position.
h. Perform after operation checks listed in Preventive Maintenance Checks and Services (Section II).
i. Lock the steering wheel with the steering wheel locking cable and lock.
2-44
TM 10-3930-673-10
2-12. 6K/10K FORK CARRIAGE REMOVAL/INSTALLATION
a. Removal.
NOTE
Ensure the forks of the carriage being removed are in a position other than fully shifted inboard or
outboard to minimize trapped hydraulic pressure.
POINT OF ATTACHMENT/ DETACHMENT
(CARRIAGE HOOKS)
REAR
SIDE ACTUATOR
HAIR PIN
COTTER PIN
FORWARD
SIDE ACTUATOR
QUICK ATTACH PIN
(1)
Extend the ATLAS boom 5 - 10 ft. from front of the vehicle.
(2)
Raise the attachment approximately 1 foot, level the 6K carriage and lower it to the ground.
(3)
Depress the manual actuators on the fork sideshift spools of the attachment valve. Actuate the forward side,
followed by the rearward side. The fork sideshift spools are the lower two spools of the valve.
NOTE
• Care should be taken when handling the hoses during carriage interchange so as not to exert forces
on the hoses which may tend to loosen the fitting(s) at the opposite end.
• Keep the engine running during the following steps but do not actuate the electric joystick with the
fork sideshift button depressed.
(4)
Disengage the hair pin cotter pin and remove the quick attach pin.
2-45
TM 10-3930-673-10
2-12. 6K/10K FORK CARRIAGE REMOVAL/INSTALLATION (CONT)
RIGHT
SIDE
YELLOW
QUICK DISCONNECT
PRESSURE DRAIN HOSE LEFT
SIDE
GREEN
BLACK
RED
(5)
Remove the four hydraulic hoses at the quick disconnects in the following sequence; red, black (left side), green,
yellow (right side).
(6)
Install rubber caps on four hydraulic hoses.
HYDRAULIC JOYSTICK
(EXTEND/RETRACT/LOWER
BOOM)
TR00016
(7)
2-46
Retract the carriage tilt cylinder (electric joystick, Fork Tip Lower).
TM 10-3930-673-10
WARNING
The 6K carriage weighs approximately 1,250 lbs. The 10K carriage weighs approximately 2,500 lbs.
Keep out from underneath carriages. Failure to comply could result in injury or death to personnel.
(8)
b.
Lower the boom to disengage the carriage hooks. Retract the boom.
Installation.
(1)
Maneuver the ATLAS so the 6K carriage is centered on the attachment.
(2)
Retract the carriage tilt cylinder (electric joystick, Fork Tip Lower).
(3)
Raise the attachment approximately 1 foot.
(4)
Extend the ATLAS boom 5 - 10 ft. from front of the vehicle.
(5)
Extend the boom to align the attachment with the quick attach hooks on the carriage.
WARNING
The 6K carriage weighs approximately 1,250 lbs. The 10K carriage weighs approximately 2,500 lbs.
Keep out from underneath carriages. Failure to comply could result in injury or death to personnel.
(6)
Raise the boom to engage the attachment with the carriage hooks.
(7)
Raise the carriage tilt until the quick attach pin can be inserted through the carriage and the attachment.
(8)
Insert the quick attach pin and hair pin cotter pin.
NOTE
If hydraulic pressure is too great to connect hydraulic hoses, perform step (10).
(9)
Remove the rubber caps and connect the four hydraulic hoses at the quick disconnects in the following sequence:
yellow, green (right side), black then red (left side).
(10)
Remove rubber cap on quick disconnect pressure drain hose and connect each hydraulic hose to quick disconnect
pressure drain hose to relieve hydraulic pressure.
2-13. ROADING THE 6K FORK CARRIAGE
NOTE
• Your ATLAS will arrive with its 6K carriage riding on the attached 10K carriage. You must
remove and store the 6K carriage if the 10K is to be used. Or, if the 6K carriage will first be placed
in service, you will remove the 6K, remove and store the 10K, and then reattach the 6K carriage to
the ATLAS.
• The aid of an assistant will be required to perform this task, because proximity of the 6K and 10K
carriages will be difficult to determine from inside the cab.
a. Removing the 6K Carriage from the 10K Carriage.
(1)
Use the electronic joystick to move the right 10K fork to the right just enough for the back of the right fork to clear
the weldment on the back of the 6K carriage. Move the left 10K fork to the left just enough for the back of the left
fork to clear the other weldment.
2-13. ROADING THE 6K FORK CARRIAGE (CONT)
2-47
TM 10-3930-673-10
WARNING
The 6K carriage weighs approximately 1,250 lbs. Keep out from underneath 6K carriage. Failure to
comply could result in injury or death to personnel.
(2)
Ensure that the 6K carriage is positioned properly for storage.
(3)
Lower the attachment and level the 10K carriage until the 6K carriage just rests on the ground.
(4)
Back the ATLAS up until the 10K forks are clear of the unloaded 6K carriage.
b. Installing the 6K Carriage on the 10K Carriage.
(1)
Ensure that the 6K forks are inboard of the holes for the 10K forks. If the 6K forks interfere, attach the 6K
carriage, close fork gap and remount the 10K carriage.
(2)
Maneuver the ATLAS so the 10K carriage is centered on the 6K carriage.
WARNING
The 6K carriage weighs approximately 1,250 lbs. Keep out from underneath 6K carriage. Failure to
comply could result in injury or death to personnel.
(3)
Lower the attachment, level the 10K carriage and lower it so the 10K forks are the same height from the ground as
the holes in the 6K carriage intended for the 10K forks.
(4)
Maneuver the ATLAS so the 10K forks go in the intended holes in the 6K carriage. The back of the 6K carriage
must be resting against the 10K forks.
(5)
Use the electronic joystick to move the right 10K fork to the left enough for the back of the right fork to rest tightly
against the weldment on the back of the 6K carriage. Move the left 10K fork to the right enough for the back of the
left fork to rest tightly against the other weldment.
(6)
Raise the boom and 10K carriage into travel position. The 6K carriage can now be roaded.
2-14. COUNTERWEIGHTS REMOVAL/INSTALLATION
a. Removal.
WARNING
• Use only the pendants and shackles provided in the ATLAS tool box for counterweight removal and
installation. Use of other lifting devices could result in injury or death to personnel.
• Do not use pendants if wires are frayed or broken. If one pendant is frayed or broken both pendants must
be replaced. Failure to comply could result in injury or death to personnel.
• Counterweight assembly weighs 5,800 lbs. Keep out from underneath counterweight assembly. Failure to
comply could result in injury or death to personnel.
2-48
(1)
Park vehicle on level ground, and boom lowered and retracted.
(2)
Remove two counterweight lifting pendants and shackles from the ATLAS toolbox.
(3)
Attach the shackle that is connected to one end of the lifting pendant to lifting hook 1.
(4)
Route the counterweight lifting pendant over boom sheave and frame sheave.
TM 10-3930-673-10
BOOM
SHEAVE
PENDANT
SHACKLE
LIFTING
HOOK 1
FRAME
SHEAVE
LIFTING
HOOK 2
COUNTERWEIGHT
SHACKLE
(5)
Attach the shackle that is connected to the other end of the lifting pendant to lifting hook 2.
(6)
Repeat Steps (3) through (5) above for the other counterweight.
CAUTION
Ensure pendants stay routed properly over boom and frame sheaves throughout this procedure, or
damage to equipment could result.
(7)
While assistant observes, operator slowly and carefully raises boom just enough to take out the slack in the
pendants.
(8)
Operator continues to raise the boom until the weight of the counterweights is supported by the pendants, not the
counterweight support pins.
2-49
TM 10-3930-673-10
2-14. COUNTERWEIGHTS REMOVAL/INSTALLATION (CONT)
WARNING
Counterweight assembly weighs
5,800 lbs. Keep out from
underneath counter-weight
assembly. Do not stick fingers or
hands in holes for counterweight
pins. Failure to comply could
result in injury or death to
personnel.
(9)
BOOM
RAISED
DO NOT
REMOVE
HITCH PIN
THREADS INTO
SUPPORT PIN
When the weight of the counterweights is
supported by the pendants, remove the
four counterweight-to-frame support pins
by removing each hitch pin, threading it
in the end of the counterweight support
pin, and then pulling the support pin out
of the bore.
SUPPORT PIN
TR00703
(10)
Carefully lower the ATLAS boom to lower the
counterweights to the ground.
(11)
Remove the counterweight lifting pendants and
shackles from the counterweights and vehicle
frame.
b. Installation.
WARNING
Counterweight assembly weighs 5,800 lbs. Keep out from underneath counterweight assembly. Do
not stick fingers or hands in holes for counterweight pins. Failure to comply could result in injury or
death to personnel.
2-50
(1)
Maneuver the ATLAS so rear of vehicle is centered on the counterweight assembly. Lower and retract boom.
(2)
Attach the shackle that is connected to one end of the lifting pendant to lifting hook 1.
(3)
Route the counterweight lifting pendant over boom sheave and frame sheave.
(4)
Attach the shackle that is connected to the other end of the lifting pendant to lifting hook 2.
(5)
Repeat Steps (2) through (4) above for the other counterweight.
TM 10-3930-673-10
BOOM
SHEAVE
PENDANT
SHACKLE
LIFTING
HOOK 1
FRAME
SHEAVE
LIFTING
HOOK 2
COUNTERWEIGHT
SHACKLE
WARNING
While counterweight is being raised, ensure the vertical frame mounting plates on the vehicle align
with the slots in the counterweights. Do not allow the top of either counterweight to catch or bind on
either hanger plate.
CAUTION
Ensure pendants stay routed properly over boom and frame sheaves throughout this procedure, or
damage to equipment could result.
(6)
While assistant observes, operator slowly and carefully raises boom until the counterweights are lifted into
position. While operator raises the counterweights, assistant ensures frame mounting plates align with the grooves
in the counterweights.
2-51
TM 10-3930-673-10
2-14. COUNTERWEIGHTS REMOVAL/INSTALLATION (CONT)
WARNING
Do not raise the boom beyond the point at which the pendants become taut with counterweights
pinned to the frame. Failure to comply could result in injury or death to personnel.
(7)
Operator continues to raise the boom until the four counterweight-to-frame support pins can be fully inserted in
bores.
(8)
Install the four counterweight-to-frame support pins in bores and secure with hitch pins.
BOOM RAISED
HITCH PIN
DO NOT
REMOVE
THREADS INTO
SUPPORT PIN
SUPPORT PIN
TR00703
(9)
(10)
2-52
While assistant observes, operator slowly and carefully lowers boom until there is slack in the pendants.
When the weight of the counterweight assembly is supported by the support pins, remove two counterweight
lifting pendants and shackles and store in the ATLAS toolbox.
TM 10-3930-673-10
2-15. HIGHWAY TRANSPORT
a. General.
(1) The ATLAS is highway transportable with a minimum of restrictions. However, because of its 100.2 inch width, the
ATLAS exceeds the maximum legal limit of 96 inches for most state’s noninterstate highways. Permit requirements will vary
depending upon local regulations and conditions, but in general the shipper must:
(a)
Submit DD Form 1266 to the installation transportation officer (ITO) 2 weeks before the planned
movement.
(b)
Be aware that travel may be restricted to daylight hours on normal workdays.
(c)
Be prepared to use “wide load” signs, amber lights, and escorts.
(d)
Determine if blanket permits are available for specific prime movers, such as a heavy equipment transporter.
(2) With maximum road speed of about 23 mph, the ATLAS can move over highways for short distances under its own
power. With the powertrain disconnected, it can be towed (see Para 2-31.)
(3) Refer to Appendix F for additional transportability information.
b.
Prime Mover Selection.
(1)
The physical size and weight of the ATLAS allow highway transport of the ATLAS by a variety of vehicles. In
selecting a transporter, the proposed route and local availability of wide load permits must be considered. Table
1-2 presents a comparison of military semitrailers.
Table 1-2. Evaluation of Prime Movers
Semitrailers
Load rating
(tons)
Comments
M747 HET
60
Much too large.
M870 Lowbed
40
Larger than needed, but usable.
M872 Flatbed
34
Not well-suited. Larger than needed, but usable. Deck height is
58 inches.
M172A1 Lowbed
25
Best. Deck is 115 inches wide and 40 inches high.
M871 Flatbed
22.5
Usable. Deck is 96 inches wide and 55 inches high. Slight overhang of approximately 2 inches per side.
M127A2C Stake
12
Not well-suited. Deck height is 57 inches. ATLAS counterweight
must be removed and shipped separately.
M345
10
Payload too small.
(2)
When properly loaded on an M172A or M871, the ATLAS will not overload the transporter or exceed axle limits
in most geographic areas.
2-53
TM 10-3930-673-10
2-15. HIGHWAY TRANSPORT (CONT)
c. Preparation. Preparation for highway transport includes:
(1)
Filling fuel tank (or defueling) to one-quarter of its capacity.
(2)
Removing all trash from the ATLAS.
(3)
Performing all PMCS and ensuring any defects are repaired.
(4)
Disconnecting the ether canister used for cold engine starting.
(5)
If required, removing the 5,800 lb. counterweight to reduce the total weight of the ATLAS
(see Para 2-14).
d. Loading Procedures.
(1)
Materials. Table 1-3 shows the bill of materials for blocking and tiedown on a flatbed trailer.
Table 1-3. Bill of Materials of Transport by Semitrailer
Item
Quantity
Description
Chain
12
1/2 inch chain, 13, 750 pound minimum working load.
Load binders
12
Heavy-duty, double grabhook, Type 4, 3/8 to 1/2 inch (26,000 pound
breaking strength) NSN 3990-01-213-1746
NOTE
• Chain assemblies and load binders are basic issue items (BII) for some trailers.
• Load binders are generally marked with an ultimate breaking strength rating. Depending on
manufacturer, the breaking strength is about three times the safe working load.
• Chain is generally rated by proof test load, or about two times the safe working load.
(2)
(3)
2-54
Loading.
(a)
To place the ATLAS in the tiedown position on the semitrailer, use a crane of adequate capacity or drive the
ATLAS onto a semitrailer if suitable ramp is available.
(b)
Position ATLAS so its weight is distributed relatively equal over the tractor and trailer axles.
(c)
Position the boom so that the carriage is 17 inches (432 mm) above the deck.
(d)
Set the parking brake.
(e)
Place the transmission in neutral.
(f)
Turn engine OFF.
Tiedown. See Appendix F for instructions on restraining the ATLAS against forces encountered at normal speeds
and operating conditions.
TM 10-3930-673-10
2-16. RAIL TRANSPORT
a. General. The ATLAS is rail-transportable in CONUS and NATO countries without restriction on most general
purpose, standard deck-height flatcars. The railcar may have a wood or steel deck and standard or cushioned-draft couplers. It
must have suitable tiedown points, such as stake pockets or chain-tiedown anchor channels. (Contact MTMCTEA for a
pamphlet on rail loading: MTMCTEA Pamphlet 55-19, Tiedown Handbook for Rail Movements.)
b. Rail Loading.
(1)
Railcar Selection. Because of its size and weight, the ATLAS is rail transportable by a variety of railcars. Table 1-4
presents features of commonly available military and commercial railcars.
Table 1-4. Evaluation of Rail Cars
Railcar
Features
Comments
DODX 140-ton
Steel deck, couplers are hydraulically cushioned, 1/2 inch chain-tiedown
Designed and intended for M1 Abrams and
other tracked vehicles.
DODX 50-ton
Wood-deck, 1/2 inch chain-tiedown
General-purpose Flatcar
Wood deck, couplers have stiff mechanical
snubbers only.
Suitable
Suitable, 5/8 inch cable and blocking
required.
Trailer Train: HTTX
Wood deck, couplers are hydraulically cush- Suitable
ioned, 1/2 inch chain-tiedown
OTTX
Wood deck, couplers are hydraulically cush- Suitable
ioned, 3/8 inch chain-tiedown
ITTX, TTDX
Steel deck, couplers are hydraulically cushioned, 1/2 inch chain-tiedown
Suitable
(2) Preparation. Preparation for rail movement includes:
(a)
Filling fuel tank (or defueling) to one-quarter of its capacity.
(b)
Removing all trash from the ATLAS.
(c)
Performing all PMCS and ensuring any defects are repaired.
(d)
Disconnecting the ether canister used for cold engine starting.
(e)
If required, removing the 5,800 lb. counterweight to reduce the total weight of the ATLAS (see Para
2-14).
2-55
TM 10-3930-673-10
2-16. RAIL TRANSPORT (CONT)
(3)
Loading Procedures.
(a)
Material. When chain-tiedown cars are unavailable, the shipper must supply materials for blocking and
tiedown on the railcar. Table 1-5 is a listing of such materials.
Table 1-5. Bill of Materials of Transport by Railcar
Item
Description
Chain
8
1/2 inch chain, 13,750 pound minimum working load.
Load binders
12
Heavy-duty, double grabhook, Type 4, 3/8 to 1/2 inch (26,000 pound
breaking strength) NSN 3990-01-213-1746
(b)
(c)
2-56
Quantity
Loading.
1
To place the ATLAS in the tiedown position on the railcar, use a crane of adequate capacity, or drive the
ATLAS onto the railcar if a suitable ramp is available.
2
Position the ATLAS so that sufficient railcar tiedown points are available.
3
Position the boom so that the carriage is 17 inches (432 mm) above the deck.
4
Set the parking brake.
5
Place the transmission in neutral.
6
Turn engine OFF.
7
Band the upper portion of the operator’s cab door shut.
Tiedown. See Appendix F for instructions on restraining the ATLAS against forces encountered at normal
speeds and operating conditions.
TM 10-3930-673-10
2-17. LOADING AND UNLOADING AMMUNITION AND OTHER PALLETS FROM A
CONTAINER OR TRAILER
WARNING
• Use care when handling and transporting ammunition pallets. Failure to do so could result in injury
or death to personnel.
• Never move any part of vehicle or load near a power line or overhead wires. Failure to follow this
precaution could result in immediate injury or death to personnel.
• Ensure that counterweights are in place. An unbalanced vehicle could tip over and could cause
injury or death to personnel.
• Always lift load from its resting spot before extending or retracting the boom. Always extend or
retract the boom before lowering load to its resting spot. Failure to do so could cause vehicle
instability and result in injury or death to personnel. Refer to Appendix E for Load Rating Chart.
a. Move vehicle to the pallet.
WARNING
Do not lift more than one pallet with forks. Pallets may topple and result in load or vehicle damage or
injury or death to personnel.
b. Use the hydraulic joystick to position forks at bottom of uppermost pallet. Either manually or using the automatic fork
level (auto fork level switch in ON position), level the forks and align the forks with the slots in the pallet.
c. Move vehicle or extend the boom to engage bottom of pallet with forks.
d. Use the hydraulic joystick to raise the boom and lift pallet slowly.
WARNING
Always retract the boom before lowering or transporting a load. Failure to do so could cause vehicle
instability and result in injury or death to personnel.
e. Use the hydraulic joystick to retract the boom and then lower pallet to a travel position (approximately two feet above
ground level).
2-57
TM 10-3930-673-10
2-17. LOADING AND UNLOADING AMMUNITION AND OTHER PALLETS FROM A
CONTAINER OR TRAILER (CONT)
TR00033
WARNING
Do not travel with the automatic fork level switch in the ON position. It is possible to drop a load
which could cause load damage, or injury or death to personnel.
f. Move the automatic fork level switch to the OFF position before traveling.
g. Use the electric joystick to raise the fork tips and enable load to be supported by the carriage. Use care when traveling
with a load.
h. Move vehicle to unloading area and in line with unloading area.
2-58
TM 10-3930-673-10
AUTOMATIC
FORK LEVEL
SWITCH
RIFLE
MOUNT
HYDRAULIC
JOYSTICK
ELECTRIC
JOYSTICK
RIFLE
MOUNT
TR00016
i. Move the automatic fork level switch to the ON position. Use the hydraulic and electric joysticks to set load down.
j. Move the automatic fork level switch to the OFF position and use the hydraulic and electric joysticks to remove the
weight from forks. Move vehicle slowly away from pallet.
k. Use the electric joystick to move forks to a carrying position.
l. Repeat Steps a. through k. above for continued operation.
2-18. RIFLE MOUNT
a. Stow rifle in stowage mount.
(1)
Position butt of M-16 rifle in rear mount with trigger guard toward top of vehicle.
(2)
Position barrel of M-16 rifle in front mount toward front of cab.
(3)
Check that M-16 rifle is held tightly.
2-59
TM 10-3930-673-10
2-18. RIFLE MOUNT (CONT)
b. Remove rifle from stowage mount.
(1)
Pull the handle of front mount up and toward top of cab.
(2)
Remove the barrel of M-16 rifle from front mount.
(3)
Remove the butt of M-16 rifle from rear mount.
2-19. DECONTAMINATION UNIT
DECONTAMINATION
UNIT
TR00080
Refer to TM 3-4230-214-12&P for decontamination unit operating instructions.
TR00034
2-60
TM 10-3930-673-10
2-20. DECALS AND WARNING PLATES
Refer to the next two figures for an illustration of the location of data plates, decals and warning plates.
Change 1
2-61
TM 10-3930-673-10
2-20. DECALS AND WARNING PLATES (CONT)
2-62
Change 1
TM 10-3930-673-10
Section IV. OPERATION UNDER UNUSUAL CONDITIONS
2-21. GENERAL
This section provides the operator with additional instructions for operating in various environments and emergency
situations.
2-22. OPERATION IN EXTREME MOIST HEAT
At Halt or Parking.
(1)
Park the ATLAS under shelter, if possible.
(2)
Dry the seat and wiring to prevent the formation of mildew.
(3)
Keep the fuel tank full at all times to avoid condensation forming in the tank.
(4)
Contact Unit Maintenance to check all points of lubrication according to the PMCS.
2-23. OPERATION IN EXTREME DRY HEAT (REFER TO FM 90-3,
DESERT OPERATIONS)
a. Preparation. Precautions must be taken to avoid overheating.
(1)
Contact Unit Maintenance to drain, flush and refill cooling system.
(2)
Contact Unit Maintenance to lubricate the ATLAS with correct grade of lubricants in accordance with the PMCS.
b. Operation.
WARNING
The cooling system operates under pressure which is controlled by the radiator cap. It is dangerous to
remove the cap while system is hot because hot steaming gases will escape and burn you. Always
allow system to cool, then turn the cap to the first stop and allow the pressure to escape before
removing the cap completely.
(1)
Check the water temperature gage at frequent intervals.
(2)
Check the air cleaner indicator frequently. Have filter serviced often.
c. At Halt or Parking. Park the ATLAS in a shaded area, if possible.
2-63
TM 10-3930-673-10
2-24. OPERATION IN EXTREME COLD (TO –25° F)
CAUTION
• In severe cold, engine coolant and fluid in windshield washer can freeze, batteries can freeze and
crack, oil and grease may get thick and stiff and rubber may crack or break easily.
• Watch instrument panel closely. If there are any unusual readings, stop vehicle and shut off engine.
Check vehicle immediately.
• All ice and snow should be removed from vehicle immediately. Snow and ice may slow or stop
movement of critical parts if allowed to pile up.
a. Preparations. Extensive preparation of mechanical equipment is required when extreme cold weather is anticipated.
The following steps will help protect vehicle against subfreezing temperatures.
(1)
Contact Unit Maintenance to prepare the cooling system by draining and then refilling with antifreeze appropriate
for anticipated temperatures (refer to Appendix D and FM 4-367).
(2)
Contact Unit Maintenance to change the engine lubricating oil to the grade called for in the PMCS for cold
weather operation.
b. Starting Engine.
(1)
Try starting engine using the procedure detailed in Para 2-7.
WARNING
Do not operate vehicle with the emergency steer switch in the OFF position. If engine power is lost,
there will also be a loss of emergency steering capabilities. Failure to follow this precaution could
result in injury or death to personnel.
CAUTION
Use the engine primer button only while cranking engine. Use only for starting a cold engine. Failure
to follow this precaution could cause engine damage.
NOTE
The engine primer will not function at temperatures above 34° F (± 8° F).
(2)
If engine does not start, turn the emergency steering pump switch off (switch up).
CAUTION
Do not press the engine primer button for more than 5 seconds. Failure to follow this precaution could
result in vehicle damage.
2-64
TM 10-3930-673-10
(3)
Crank engine and press the engine primer button for no longer than 5 seconds.
HYDRAULIC
JOYSTICK
PRIMER
BUTTON
TR00016
(4)
Release the engine primer button (this injects a measured amount of starting fluid into the engine).
(5)
If engine fails to start, repeat Steps (2) through (4) above. If engine fails to start after fourth repetition, notify Unit
Maintenance.
(6)
After starting the engine, run at half throttle until engine warms to normal temperature (180° – 190° F).
(7)
Use the hydraulic joystick to raise the boom until forks are 6 inches from ground, and then fully retract the boom.
(8)
Continue to hold the hydraulic joystick in the boom retract position for 10 to 15 minutes. This operation warms the
hydraulic oil by forcing it through the boom circuit relief valve. Operate all hydraulic functions until warm oil has
circulated through the cylinders.
2-65
TM 10-3930-673-10
2-24. OPERATION IN EXTREME COLD (TO –25° F) (CONT)
EMERGENCY STEER SWITCH
TR00021
TR00015
WARNING
Do not operate vehicle with the emergency steer switch in the OFF position. If engine power is lost,
there will also be a loss of emergency steering capabilities. Failure to follow this precaution could
result in injury or death to personnel.
NOTE
When moving the emergency steer switch to ON, the pump may operate for up to 10 seconds. If the
pump runs longer than 10 seconds, oil is not warm enough. Move the switch to OFF. Repeat Step (8)
above to allow hydraulic fluid to warm up before operating.
(9)
2-66
Move the emergency steer switch to the ON position (red cover down) after the oil is warm and before driving
vehicle.
TM 10-3930-673-10
2-25. OPERATION WITH ARCTIC KIT (TO –40° F)
CAUTION
• In severe cold, engine coolant, fluid in windshield washer can freeze, batteries can freeze and
crack, oil and grease may get thick and stiff and rubber may crack or break easily.
• Watch instrument panel closely. If there are any unusual readings, stop vehicle and shut off engine.
Check vehicle immediately.
• All ice and snow should be removed from vehicle immediately. Snow and ice may slow or stop
movement of critical parts if allowed to pile up.
a. Preparations. Extensive preparation of mechanical equipment is required when extreme cold weather is anticipated.
The following steps will help protect vehicle against subfreezing temperatures.
(1)
Contact Unit Maintenance to prepare the cooling system by draining and then refilling with antifreeze appropriate
for anticipated temperatures (refer to Appendix D and FM 4-367).
(2)
Contact Unit Maintenance to change the engine lubricating oil to the grade called for in the PMCS for cold
weather operation.
Change 1
2-67
TM 10-3930-673-10
2-25. OPERATION WITH ARCTIC KIT (TO –40° F) (CONT)
b. Operating Arctic Heater.
WARNING
CARBON MONOXIDE (EXHAUST GAS) CAN KILL YOU.
Carbon monoxide is a colorless, odorless, DEADLY POISONOUS gas and when breathed deprives
body of oxygen and causes SUFFOCATION. Breathing air with carbon monoxide produces
symptoms of headache, dizziness, loss of muscular control, a sleepy feeling, and coma. Permanent
BRAIN DAMAGE or DEATH can result from severe exposure.
The following precautions MUST be followed to ensure personnel are safe whenever arctic heater or
engine is operated for any purpose. Otherwise, injury to personnel may result.
• DO NOT operate arctic heater or vehicle engine in enclosed area without adequate ventilation.
• BE ALERT at all times during vehicle operation for exhaust symptoms. If symptoms are present,
IMMEDIATELY EVACUATE AND VENTILATE the area. Treat affected personnel as follows:
expose to fresh air; keep warm; DO NOT PERMIT PHYSICAL EXERCISE; if necessary, give
artificial respiration as described in FM 4-25.11 and get medical attention.
• BE AWARE; neither the gas particulate filter unit nor field protection mask for nuclear-biologicalchemical protection will protect you from carbon monoxide poisoning.
THE BEST DEFENSE AGAINST CARBON MONOXIDE POISONING IS GOOD
VENTILATION.
(1)
2-68
To operate arctic heater:
(a)
Ensure parking brake is applied.
(b)
Ensure that coolant shut-off valve on left-side of engine is fully OPEN.
(c)
Place emergency steer switch in OFF position.
(d)
Place ignition switch in RUN position.
(e)
Place switch on rear of arctic heater to ON (up) position.
(f)
Allow arctic heater to operate for approximately 15 minutes, then place switch in OFF (down) position to
shut off arctic heater.
(g)
Place emergency steer switch in ON position.
(h)
Start engine (see paragraph 2-25C).
Change 1
TM 10-3930-673-10
Data on This Page Deleted.
Change 1
2-69
TM 10-3930-673-10
Data on This Page Deleted.
2-70
Change 1
TM 10-3930-673-10
c. Starting Engine.
(1)
Try starting engine using the procedure detailed in Para 2-7.
WARNING
Do not operate vehicle with the emergency steer switch in the OFF position. If engine power is lost,
there will also be a loss of emergency steering capability. Failure to follow this precaution could result
in injury or death to personnel.
CAUTION
Use the engine primer button only while cranking engine. Use only for starting a cold engine. Failure
to follow this precaution could cause engine damage.
NOTE
The engine primer will not function at temperatures above 34° F (± 8° F).
(2)
If engine does not start, turn the emergency steering pump switch off (switch up).
CAUTION
Do not press the engine primer button for more than 5 seconds. Failure to follow this precaution could
result in vehicle damage.
(3)
Crank engine and press the engine primer button for no longer than 5 seconds.
2-71
TM 10-3930-673-10
2-25. OPERATION WITH ARCTIC KIT (TO –40° F) (CONT)
HYDRAULIC
JOYSTICK
PRIMER
BUTTON
TR00016
2-72
(4)
Release the engine primer button (this injects a measured amount of starting fluid into the engine).
(5)
If engine fails to start, repeat Steps (2) through (4) above. If engine fails to start after fourth repetition, notify Unit
Maintenance.
(6)
After starting the engine, run at half throttle until engine warms to normal temperature (180° – 190° F).
(7)
Use the hydraulic joystick to raise the boom until forks are 6 inches from ground, and then fully retract the boom.
(8)
Continue to hold the hydraulic joystick in the boom retract position for 10 to 15 minutes. This operation warms the
hydraulic oil by forcing it through the boom circuit relief valve. Operate all hydraulic functions until warm oil has
circulated through the cylinders.
TM 10-3930-673-10
EMERGENCY STEER SWITCH
TR00021
TR00015
WARNING
Do not operate vehicle with the emergency steer switch in the OFF position. If engine power is lost,
there will also be a loss of emergency steering capability. Failure to follow this precaution could result
in injury or death to personnel.
NOTE
When moving the emergency steer switch to ON, the pump may operate for up to 10 seconds. If the
pump runs longer than 10 seconds, oil is not warm enough. Move the switch to OFF. Repeat Step (8)
above to allow hydraulic fluid to warm up before operating.
(9)
Move the emergency steer switch to the ON position (red cover down) after the oil is warm and before driving
vehicle.
2-73
TM 10-3930-673-10
2-26. OPERATION IN SALT WATER AREAS
At Halt or Parking.
(1)
In salt water area, keep the ATLAS as clean as possible. Salt water causes corrosion of exposed parts. After
operation is completed, wash with fresh water, if available.
(2)
Keep all lubricating points wiped clean and contact Unit Maintenance to lubricate as instructed in the PMCS.
(3)
Keep all wiring and connections clean and free from corrosion.
2-27. OPERATION IN DUST OR SANDSTORMS
a. At Halt or Parking.
(1)
Contact Unit Maintenance to lubricate the ATLAS at more frequent intervals. Clean all fittings and lubrication
openings thoroughly before lubricating to prevent entrance of dust or sand with the lubricant.
(2)
When not in use, cover the operator's compartment, and utilize whatever means are available to protect the engine
compartment from the entry of windblown dust or sand.
b. Operation.
(1)
Check the radiator frequently and keep it clean of dust and sand.
(2)
Check the air cleaner indicator frequently. Service the filter as often as required.
2-28. FORDING
a. Check water depth, allowing for inconsistency of bottom. Do not attempt to ford even the narrowest stream that is more
than 36 inches deep.
b. Make certain all gages are indicating normal operating pressure and temperatures.
2-74
TM 10-3930-673-10
RANGE SELECT
LEVER
TR00016
c. Use the range select lever to shift the transmission in the low speed range (position 1), and speed the engine up to
minimize the danger of stalling. Enter the water slowly to minimize surges of backwash into the engine compartment.
Fording speed should not exceed 3 to 4 miles per hour.
d. In the event of complete submersion, contact Unit Maintenance for appropriate disposition.
e. Contact Unit Maintenance to lubricate the ATLAS completely as soon as possible after fording.
2-75
TM 10-3930-673-10
2-29. SLAVE STARTING
The ATLAS is equipped with a 24 volt, negative ground electric system. The slave receptacle is located on top of the battery
box. Ensure that both disabled and booster vehicles are equipped with a NATO slave receptacle.
SLAVE CABLE
RECEPTACLE
TR00008
a. Place emergency steering pump switch in OFF position.
a.1 Connect the slave cable to booster vehicle slave receptacle.
b. Connect other end of the slave cable to disabled vehicle slave receptacle.
c. Run booster vehicle at a speed just above idle.
d. After starting disabled vehicle, return booster vehicle to idle.
e. Remove the slave cable from disabled vehicle, then from booster vehicle.
f. Return emergency steering pump switch to ON position.
2-76
Change 1
TM 10-3930-673-10
2-30. TOWING OTHER VEHICLES
TOW
LUG
TOW
PINTLE
TOW
LUG
WARNING
• DO NOT TOW AT SPEEDS OVER 20 MPH.
• Carefully move vehicle into position. Always use a ground guide and any device necessary to lift
the tow bar into position without standing directly between vehicles. Failure to comply could result
in vehicle damage, or injury or death to personnel.
• The ATLAS is equipped with a towing pintle and lugs. Towing should be limited to vehicles
weighing 33,500 pounds or less. Whenever the ATLAS is used to tow another vehicle, use the tow
pintle to attach the tow bar.
2-77
TM 10-3930-673-10
2-31. TOWING THE ATLAS
Although unusual, a vehicle may experience an electrical, mechanical or hydraulic system failure. A vehicle may also be
damaged to an extent that the mission cannot be completed normally. Effort must be given to repair the vehicle either at the
current location or the vehicle driven to a repair facility. If vehicle cannot be safely driven, vehicle must be transported or
towed.
Contact Unit Maintenance to perform necessary preparation of the ATLAS for towing.
WARNING
• If the ATLAS must be towed, the tow lugs are used to connect the tow bar.
• Carefully move towing vehicle into position. Always use a ground guide and any device necessary
to lift the tow bar into position without standing directly between vehicles. Failure to comply could
result in vehicle damage, or injury or death to personnel.
• DO NOT TOW AT SPEEDS OVER 20 MPH (32 KPH).
NOTE
If vehicle engine is not operational, perform Emergency Boom Operations (see paragraph 2-32) to
retract and lower boom.
a. Fully retract boom.
b. Position forks approximately 24 in. (610 mm) above ground.
WARNING
When the propeller shafts are disconnected and the parking brake is released, vehicle may roll,
resulting in injury or death to personnel. Always chock wheels securely.
c. Chock all four wheels and place parking brake switch in OFF position.
d. Shift transmission into NEUTRAL and turn engine start switch to OFF position to stop engine.
2-78
Change 1
TM 10-3930-673-10
d.1. Remove dust cap (1) from diagnostic nipple (2) on tee (3) at left side of rear axle (4).
d.2. Connect either end of quick-connect hose (5) (BII) to diagnostic nipple (2).
d.3. Route quick-connect hose (5) up over axle pivot to right side of rear axle (4).
d.4. Remove dust cap (6) from diagnostic nipple (7) on tee (8) at right side of rear axle (4).
d.5. Connect other end of quick-connect hose (5) to diagnostic nipple (7).
4
6
7
5
8
1
2
3
NOTE
Contact Unit Maintenance to perform steps e through m.
Change 1
2-79
TM 10-3930-673-10
2-31. TOWING THE ATLAS (CONT)
e. Remove four bolts and lockwashers and disconnect rear propeller shaft (9) from rear differential yoke (10). Discard
lockwasher. Secure end of the propeller shaft in hanger hook provided underneath vehicle.
f. Remove four bolts and lockwasher and disconnect front propeller shaft (11) from front differential yoke (12). Discard
lockwasher. Secure end of the propeller shaft in hanger provided underneath vehicle.
11
9
12
10
TR00047
g. Attach the tow bar to the tow lugs of the ATLAS.
h. With the aid of a ground guide, move towing vehicle into position. Two personnel are required to lift the tow bar to
towing vehicle pintle.
i. Disengage parking brake by loosening locknut (13) and adjusting screw (14) on brake caliper. Retighten locknut.
14
13
TR00047
2-80
Change 1
TM 10-3930-673-10
j. Remove wheel chocks. Ensure that all personnel and equipment are clear. Proceed to tow with caution.
k. After towing of the ATLAS is completed, chock the wheels and reconnect propeller shafts, using new lockwashers, and
remove quick-connect hose (5).
l. With the wheels still chocked, adjust the parking brake as follows:
(1.0) Start engine and release parking brake.
(1)
Place a 0.012 in. (0.30 mm) shim between the brake disc and one of the linings.
(2)
Tighten the adjusting screw (14) clockwise until it is just possible to remove the shim.
(3)
Tighten the locknut (13) while holding the adjusting screw (14) with a wrench.
(4)
Remove the shim.
(5)
Apply parking brake, stop engine and remove wheel chocks.
m. Bleed any trapped air from steering system using the following procedure:
(1)
Synchronize steering as described in Para 2-9.
(2)
Turn the steering wheel two full turns right and left in all three steering modes.
2-32. EMERGENCY BOOM OPERATIONS
WARNING
If engine power is lost with the boom extended or raised, boom must be fully retracted before it is
lowered to prevent vehicle damage or injury or death to personnel.
NOTE
Contact Unit Maintenance to perform necessary preparation of the ATLAS for emergency boom
operations.
a. Emergency Boom Retracting.
the boom, proceed as follows:
(1)
Whenever an emergency situation prevents the use of engine power for retracting
Turn engine start switch to OFF position to stop engine.
WARNING
• Hydraulic oil in the system can be under pressures over 3000 psi with engine OFF. Always relieve
pressure in hydraulic lines before attempting to remove any component in the hydraulic system.
With engine OFF, starter-run control switch in RUN position, and attachment on the ground, move
all control levers through all operating positions several times to relieve line pressure. Relieve
pressure in hydraulic oil tank by loosening filler cap very slowly. Failure to comply could result in
injury or death to personnel.
• Hydraulic oil is flammable. Ensure engine is cool to prevent fire. Injury or death to personnel could
result.
• Oil is slippery and can cause falls. To avoid injury, wipe up spilled oil with wiping rags.
(2)
Remove the transmission cover, if necessary, to gain access to diagnostic nipple of main control valve.
Change 1
2-81
TM 10-3930-673-10
2-32. EMERGENCY BOOM OPERATIONS (CONT)
(3)
Remove dust cap (1) from diagnostic nipple (2) at side of main control valve (3).
(4)
Connect “L” shaped end of quick-connect hose (4) (BII) to diagnostic nipple (2).
TR00047
3
2
4
1
(5)
Route quick-connect hose (4) down through vehicle frame along side or in front of transmission.
NOTE
• Configuration of hydraulic bypass switch of priority valve may differ from switch shown.
• Hoses and fittings are shown out of true position for clarity.
(6)
2-82
Remove dust cap (5) from diagnostic nipple (6) in one of three tee fittings of priority valve (7)
Change 1
TM 10-3930-673-10
(7)
Connect other end of quick-connect hose (4) to diagnostic nipple (6).
7
TR00048
5
4
6
WARNING
Do not operate vehicle with the emergency steer switch in OFF position. If engine power is lost, there
will also be a loss of emergency steering capability. Failure to follow this precaution could result in
injury or death to personnel.
(8)
Turn the emergency steer pump switch to ON position.
(9)
Turn the engine start switch to ACCESSORY position. DO NOT start the engine.
NOTE
If required to retract and lower or retract and raise the boom, always retract the boom first.
(10) Using the hydraulic joystick, immediately place joystick in RETRACT position, or in RAISE or LOWER position
as necessary. Hold joystick in position.
Change 1
2-83
TM 10-3930-673-10
2-32. EMERGENCY BOOM OPERATIONS (CONT)
(11) While holding joystick, turn steering wheel to right and left so emergency steer pump turns wheels slightly. This
activates main control valve and boom will start moving. If movement is extremely slow, refer to step 22,
otherwise continue with step 12.
(12) When boom is fully retracted, immediately place joystick in RAISE or LOWER position as necessary to move
boom to desired position.
(13) Release joystick and turn emergency steer switch and engine start switch to OFF position.
(14) Disconnect quick-connect hose (4) from diagnostic nipple (6) in tee fitting (8) of priority valve (7).
(15) Install dust cap (5) to diagnostic nipple (6).
(16) Disconnect “L” shaped end of quick-connect hose (4) from diagnostic nipple (2) and remove quick-connect hose
from vehicle.
7
TR00048
5
4
6
2-84
Change 1
TM 10-3930-673-10
(17) Install dust cap (1) to diagnostic nipple (2) at side of main control valve (3).
(18) Install transmission cover.
NOTE
• Contact Unit Maintenance to perform steps 19 through 26.
• Perform the following steps if cap and plug were installed at priority valve.
(19) Remove plug (11) from female threads of tee (8).
(20) Remove cap (10) from male threads of tee (9).
(21) Connect tee (8) to tee (9).
TR00079
TR00016
NOTE
• Two to five minutes is normally required to restore boom from a fully raised and fully extended
position. When wear on main gear pump permits internal leakage, additional time will be required.
• If while performing step 11 it is evident that boom movement is excessively slow, the following
steps can be performed.
(22) Release joystick and turn emergency steer pump switch to OFF position.
(23) Disconnect tee (8) from tee (9).
Change 1
2-85
TM 10-3930-673-10
2-32. EMERGENCY BOOM OPERATIONS (CONT)
NOTE
Cap and plug are BII items.
(24) Install cap (10) to male threads of tee (9).
(25) Install plug (11) to female threads of tee (8).
(26) Turn emergency steer pump switch ON and perform steps 11 through 18.
TR00079
TR00016
2-86
Change 1
TM 10-3930-673-10
Data on This Page Deleted.
Change 1
2-87
TM 10-3930-673-10
2-33. REAR WINDOW EMERGENCY EXIT
REMOVABLE
CORD
TR00056
Rear window can be used as an emergency exit when exit through the cab doors cannot be made. To open the emergency exit,
proceed as follows:
0. Pull out the removable cord.
a. Push the window out.
b. Exit can be made by crawling out the opening.
2-88
TM 10-3930-673-10
3
CHAPTER 3
OPERATOR MAINTENANCE INSTRUCTIONS
Para
Contents
Page
3-1.
Section I. Lubrication Instructions
Lubrication. . . . . . . . . . . . . . . . . . . . . . . . . . . . . . . . . . . . . . . . . . . . . . . . . . . . . . . . . . . . . . . . . . . . . . . . 3-1
3-2.
3-3.
Section II. Troubleshooting Procedures
General. . . . . . . . . . . . . . . . . . . . . . . . . . . . . . . . . . . . . . . . . . . . . . . . . . . . . . . . . . . . . . . . . . . . . . . . . . . 3-1
Troubleshooting . . . . . . . . . . . . . . . . . . . . . . . . . . . . . . . . . . . . . . . . . . . . . . . . . . . . . . . . . . . . . . . . . . . . 3-1
3-4.
3-5.
3-6.
3-7.
3-8.
3-9.
3-10.
Section III. Operator Maintenance Procedures
Introduction . . . . . . . . . . . . . . . . . . . . . . . . . . . . . . . . . . . . . . . . . . . . . . . . . . . . . . . . . . . . . . . . . . . . . . .
Engine Oil Sampling Valve – Service . . . . . . . . . . . . . . . . . . . . . . . . . . . . . . . . . . . . . . . . . . . . . . . . . . .
Transmission Oil Sampling Valve – Service . . . . . . . . . . . . . . . . . . . . . . . . . . . . . . . . . . . . . . . . . . . . . .
Hydraulic Oil Sampling Valve – Service. . . . . . . . . . . . . . . . . . . . . . . . . . . . . . . . . . . . . . . . . . . . . . . . .
Air Cleaner – Service. . . . . . . . . . . . . . . . . . . . . . . . . . . . . . . . . . . . . . . . . . . . . . . . . . . . . . . . . . . . . . . .
Radiator – Service . . . . . . . . . . . . . . . . . . . . . . . . . . . . . . . . . . . . . . . . . . . . . . . . . . . . . . . . . . . . . . . . . .
Fuel/Water Separator – Service . . . . . . . . . . . . . . . . . . . . . . . . . . . . . . . . . . . . . . . . . . . . . . . . . . . . . . . .
3-7
3-7
3-8
3-9
3-10
3-14
3-15
Section I. LUBRICATION INSTRUCTIONS
3-1. LUBRICATION
Perform all lubrication in accordance with the PMCS.
Section II.
TROUBLESHOOTING PROCEDURES
3-2. GENERAL
a. Table 3-1 lists the common malfunctions which you may find during the operation or maintenance of the ATLAS or its
components. You should perform the tests/inspections and corrective actions in the order listed.
b. This manual cannot list all malfunctions that may occur, nor all tests or inspections and corrective actions. If a
malfunction is not listed or is not corrected by listed corrective actions, notify your supervisor.
3-3. TROUBLESHOOTING
The malfunction index is a quick reference for the troubleshooting tables. It lists the malfunctions in the same order as
they appear in the table with the corresponding page number. Refer to Table 3-1 for troubleshooting procedures.
3-1
TM 10-3930-673-10
3
Malfunction Index
Troubleshooting
Procedure
Page
ENGINE
1.
2.
3.
4.
5.
6.
7.
8.
9.
10.
11.
12.
13.
Engine will not crank. . . . . . . . . . . . . . . . . . . . . . . . . . . . . . . . . . . . . . . . . . . . . . . . . . . . . . . . . . . . . . .
Engine cranks but will not start . . . . . . . . . . . . . . . . . . . . . . . . . . . . . . . . . . . . . . . . . . . . . . . . . . . . . . .
Engine misfires or runs rough . . . . . . . . . . . . . . . . . . . . . . . . . . . . . . . . . . . . . . . . . . . . . . . . . . . . . . . .
Low engine power . . . . . . . . . . . . . . . . . . . . . . . . . . . . . . . . . . . . . . . . . . . . . . . . . . . . . . . . . . . . . . . . .
Engine overheats . . . . . . . . . . . . . . . . . . . . . . . . . . . . . . . . . . . . . . . . . . . . . . . . . . . . . . . . . . . . . . . . . .
Low engine oil pressure. . . . . . . . . . . . . . . . . . . . . . . . . . . . . . . . . . . . . . . . . . . . . . . . . . . . . . . . . . . . .
Vehicle starts but will not move. . . . . . . . . . . . . . . . . . . . . . . . . . . . . . . . . . . . . . . . . . . . . . . . . . . . . . .
Engine priming system does not work. . . . . . . . . . . . . . . . . . . . . . . . . . . . . . . . . . . . . . . . . . . . . . . . . .
All hydraulic functions operate slowly or erratically . . . . . . . . . . . . . . . . . . . . . . . . . . . . . . . . . . . . . .
Forks will not automatically level . . . . . . . . . . . . . . . . . . . . . . . . . . . . . . . . . . . . . . . . . . . . . . . . . . . . .
Only one heater/air conditioner fan operates. . . . . . . . . . . . . . . . . . . . . . . . . . . . . . . . . . . . . . . . . . . . .
Front and rear wheels are not aligned in the straight ahead position. . . . . . . . . . . . . . . . . . . . . . . . . . .
Poor or no brakes . . . . . . . . . . . . . . . . . . . . . . . . . . . . . . . . . . . . . . . . . . . . . . . . . . . . . . . . . . . . . . . . . .
3-2
3-2
3-3
3-3
3-3
3-4
3-4
3-4
3-5
3-5
3-5
3-5
3-5
Table 3-1. Troubleshooting
Malfunction
Test or Inspection
Corrective Action
1. ENGINE WILL NOT CRANK.
Check for loose or disconnected battery cables.
If cables are loose or disconnected, notify Unit Maintenance.
2. ENGINE CRANKS BUT WILL NOT START.
Step 1.
Check to see if the auxiliary fuel shut-off switch is in the OFF position.
If so, move the auxiliary fuel shut-off switch to the ON position.
Do not overfill fuel tank, damage to equipment may result.
Step 2.
Check to see if fuel tank is empty.
If tank is empty, fill fuel tank.
Step 3.
Check ambient temperature.
Use the engine primer button in extreme cold temperature to start engine (refer to Para 2-24).
Step 4.
Check the fuel/water separator for water.
If water is visible, drain fuel/water separator (refer to Para 3-10).
3-2
TM 10-3930-673-10
Table 3-1. Troubleshooting - CONT.
Malfunction
Test or Inspection
Corrective Action
Step 5.
Check to see if any fuel lines are damaged.
If lines are damaged, notify Unit Maintenance.
3. ENGINE MISFIRES OR RUNS ROUGH.
Do not overfill fuel tank, damage to equipment may result.
Step 1.
Check to see if fuel tank is low or empty.
If tank is low or empty, fill fuel tank.
Step 2.
Check to see if any moisture is present in fuel/water separator.
If moisture is visible, drain fuel/water separator (refer to Para 3-10).
Step 3.
Check for black or gray exhaust smoke. Indicates plugged or dirty intake system.
Clean or replace air filters (refer to Para 3-8).
Step 4.
Check for white or blue smoke. Indicates engine is cold.
Allow engine to warm up.
Step 5.
Check for leaks in fuel lines and injectors.
If lines or injectors are leaking, notify Unit Maintenance.
4. LOW ENGINE POWER.
Step 1.
Check air filter restriction indicator.
If necessary, clean or replace air filters (refer to Para 3-8).
Step 2.
Check exhaust pipe for obstructions.
If necessary, remove any obstruction.
Step 3.
Check for high engine oil level.
If oil level is high, notify Unit Maintenance.
5. ENGINE OVERHEATS.
Damage to the radiator can occur if pressure cap is removed with engine hot. Allow
system to cool before checking coolant level. Failure to follow this precaution could
result in vehicle damage or personal injury.
3-3
TM 10-3930-673-10
Table 3-1. Troubleshooting - CONT.
Malfunction
Test or Inspection
Corrective Action
Step 1.
Check for low coolant level.
If low, add appropriate amount of coolant to overflow bottle (refer to Para 3-9).
Step 2.
Check for leaks and/or worn hoses.
If hoses are leaking or worn, notify Unit Maintenance.
The engine and radiator can be extremely hot. Contacting exposed skin to these
areas could result in severe burns.
Step 3.
Check for obstructions and trash build-up on the radiator fins.
If obstructed, clean radiator surface.
Step 4.
Check for high engine oil level.
If oil level is high, notify Unit Maintenance.
6. LOW ENGINE OIL PRESSURE.
Step 1.
Check to see if engine oil level is low.
If oil level is low, add oil as necessary (refer to the PMCS).
Step 2.
Check for external oil leaks.
If external leaks are visible, notify Unit Maintenance.
7. VEHICLE STARTS BUT WILL NOT MOVE.
Step 1.
Check to be sure parking brake switch is in OFF position.
Step 2.
Check transmission oil level.
If oil level is low, add oil as necessary (refer to the PMCS).
Step 3.
Check if parking brake is dragging.
If brake is dragging, notify Unit Maintenance.
Step 4.
Check if service brakes are dragging.
If brakes are dragging, notify Unit Maintenance.
Step 5.
Check transmission disconnect pedal for free movement.
If no free movement, notify Unit Maintenance.
8. ENGINE PRIMING SYSTEM DOES NOT WORK.
Check ambient temperature.
The priming system will not work if ambient temperature is above 34° ±8°F.
3-4
TM 10-3930-673-10
Table 3-1. Troubleshooting - CONT.
Malfunction
Test or Inspection
Corrective Action
9. ALL HYDRAULIC FUNCTIONS OPERATE SLOWLY OR ERRATICALLY.
Step 1.
Check to see if hydraulic oil is cold.
Operate hydraulic system until oil is warm (refer to Para 2-24).
Step 2.
Check to see if hydraulic oil level is low.
If oil level is low, add oil as necessary (refer to the PMCS).
Step 3.
Check to see if hydraulic oil is contaminated with water.
If oil is contaminated, notify Unit Maintenance.
Step 4.
Engine speed too low.
Increase engine speed with accelerator.
Step 5.
Inspect hydraulic lines for signs of damage or leaks.
If lines are damaged or leaking, notify Unit Maintenance.
10. FORKS WILL NOT AUTOMATICALLY LEVEL.
Step 1.
Check to see if the automatic fork level switch is in the ON position.
If not, move the automatic fork level switch to the ON position.
Step 2.
Check for damaged or broken wire(s) from toggle switch to fork autoleveler switch.
If wires are damaged or broken, notify Unit Maintenance.
11. ONLY ONE HEATER/AIR CONDITIONER FAN OPERATES.
Check to see if the heater blower switch is in the LOW speed position.
Move the heater blower switch to the HIGH speed position. Only one fan operates on low
speed. At high speed, both fans operate. If malfunction is not corrected, notify Unit
Maintenance.
12. FRONT AND REAR WHEELS ARE NOT ALIGNED IN THE STRAIGHT AHEAD POSITION.
Check to see if the steer select control switch is in the CRAB or FOUR WHEEL position.
The front and rear wheels do not always align straight ahead after changing steering
modes. Proceed with steering system synchronization (refer to Para 2-9).
13. POOR OR NO BRAKES.
Step 1.
Check hydraulic oil level at reservoir sight glass.
If oil level is low, add oil as necessary (refer to the PMCS).
3-5
TM 10-3930-673-10
Table 3-1. Troubleshooting - CONT.
Malfunction
Test or Inspection
Corrective Action
Step 2.
Check for oil leakage at brake calipers or hose connections.
If calipers or hose connections are leaking, notify Unit Maintenance.
3-6
TM 10-3930-673-10
3
Section III. OPERATOR MAINTENANCE PROCEDURES
3-4. INTRODUCTION
This section contains maintenance procedures which are the responsibility of the operator. Refer to Para 2-3, the Preventive
Maintenance Checks and Services, for additional maintenance not covered in this section. The maintenance procedures in this
manual are authorized by the Maintenance Allocation Chart (refer to TM 10-3930-673-20).
3-5. ENGINE OIL SAMPLING VALVE – SERVICE
This Task Covers:
Obtaining an engine oil sample for the Army Oil Analysis Program (AOAP).
Service.
(1)
Clean the engine oil sampling valve (1).
(2)
Start engine (refer to Para 2-7). Bring engine to
normal operating temperature.
(3)
Obtain oil sample.
3
(a)
With engine at idle, remove the dust cap (2) on
the oil sampling valve (1).
(b)
Attach an appropriate size hose to the valve, if
desired.
(c)
Place a clean container under the valve (1)
opening (or hose, if used).
(d)
Push down or pull up on the lever (3) to drain
approximately one pint of oil prior to taking
sample.
(e)
Place a sample bottle under the valve opening (or hose, if used) and fill to within 1/2” from top. Cap bottle
immediately.
(f)
Install the dust cap (2) on the oil sampling valve (1).
(g)
Check oil level and add oil if necessary (refer to the PMCS).
1
2
OIL FILL
TUBE
Change 1
TR00057
3-7
TM 10-3930-673-10
3-6. TRANSMISSION OIL SAMPLING VALVE – SERVICE
This Task Covers:
Obtaining a transmission oil sample for the Army Oil Analysis Program (AOAP).
Service.
TRANSMISSION
1
3
2
TR00058
3-8
(1)
Clean the transmission oil sampling valve (1).
(2)
Start engine (refer to Para 2-7). Drive vehicle approximately one mile or allow to idle in gear for a while to
bring transmission to normal operating temperature.
(3)
With engine running, place the travel select control lever in neutral. Move the parking brake switch to
the ON position.
(4)
Obtain oil sample.
(a)
Remove the dust cap (2) on the transmission oil sampling valve (1).
(b)
Attach an appropriate size hose to the valve (if desired).
(c)
Place a clean container under the valve (1) opening (or hose, if used).
(d)
Push down or pull up on the lever (3) to drain approximately one pint of oil prior to taking sample. Release
the lever (3) to close the valve (1).
(e)
Place a sample bottle under the valve opening (or hose, if used) and fill to within 1/2” from top. Cap bottle
immediately.
(f)
Install the dust cap (2) on the transmission oil sampling valve (1).
(g)
Check transmission fluid level and add oil if necessary (refer to the PMCS).
Change 1
TM 10-3930-673-10
3-7. HYDRAULIC OIL SAMPLING VALVE – SERVICE
This Task Covers:
Obtaining a hydraulic oil sample for the Army Oil Analysis Program (AOAP).
Service.
(1)
Clean the hydraulic oil sampling valve (1).
(2)
Start engine (refer to Para 2-7). Operate
hydraulic system until oil is warm (refer to
Para 2-24).
3
(3)
Obtain oil sample.
(a)
Remove the dust cap (2) on the hydraulic
oil sampling valve (1).
(b)
Attach an appropriate size hose to the
valve (if desired).
(c)
Place a clean container under the valve
(1) opening (or hose, if used).
(d)
Push down or pull up on the lever (3) to
drain approximately one pint of oil prior
to taking sample. Release the lever (3) to
close the valve (1).
1
2
HYDRAULIC
OIL FILTER
TR00059
(e)
Place a sample bottle under the valve
opening (or hose, if used) and fill to within 1/2” from top. Cap bottle immediately.
(f)
Install the dust cap (2) on the hydraulic oil sampling valve (1). Return the oil drained into container during
Step (d) above to hydraulic reservoir.
(g)
Check hydraulic oil level and add oil if necessary (refer to the PMCS).
3-9
TM 10-3930-673-10
3-8. AIR CLEANER – SERVICE
This Task Covers:
Inspecting the primary and secondary air filter elements. Cleaning or replacing elements as necessary.
Service.
WARNING
If NBC exposure is suspected, all air filter media should be handled by personnel wearing
protective equipment. Consult your unit NBC Officer or NBC NCO for appropriate handling or
disposal instructions.
(1)
Remove primary air filter element.
(a)
Turn thumbscrew and loosen clamp.
Remove air cleaner outer cover.
OUTER
COVER
CLAMP
THUMBSCREW
TR00063
(b)
Remove wing nut and primary filter
element from inside of outer cover.
(c)
Use a damp cloth to remove dust and
foreign material from inside canister.
WING
NUT
PRIMARY
AIR
FILTER
TR00060
3-10
TM 10-3930-673-10
(2)
Inspect secondary air filter element.
WING NUT
CAUTION
The secondary element is not intended
to be cleaned. For maximum engine
protection and air cleaner service life,
replace the secondary element with a
new one every third primary element
change or cleaning.
(a)
Check secondary element for damage.
Replace element if it has the slightest
damage to gasket or pleated element.
(b)
Replace secondary element if element is
visibly dirty.
(c)
SECONDARY
AIR FILTER
TR00061
If secondary element is to be replaced, remove wing nut to remove element.
CAUTION
Air restriction indicator will not function properly if an element has a break in the filtering paper
or if the element is not properly seated in the canister.
(d)
(3)
Install new secondary element with gasket end in canister first. Be sure element is centered in canister
before tightening wing nut.
Clean primary air filter element.
CAUTION
Do not tap the element against a hard surface, as this damages element.
(a)
Remove loose dust by tapping element with palm of your hand. DO NOT use a hard surface.
3-11
TM 10-3930-673-10
3-8. AIR CLEANER – SERVICE (CONT)
WARNING
Always wear safety glasses whenever
compressed air is used. Do not exceed
30 psig nozzle pressure when using
compressed air.
(b)
To remove remaining dust, use
compressed air under 30 psig. Blow air
up and down the pleats from the inside
of the element. Be careful not to
damage or tear paper element.
TR00062
CAUTION
DO NOT wash element in fuel oil, oil, gasoline, or solvent. DO NOT use compressed air to
remove water from an element.
(c)
(4)
To clean oily or sooty element, wash thoroughly with warm water and nonfoaming detergent. Rinse
element with clean water and allow element to air dry. Clean outer cover and rubber evacuator valve
with soap and water.
Install primary air filter element.
(a)
DO NOT install element until it is dry.
(b)
Inspect element for damage. Place a
bright light inside the element and rotate
element slowly. If any rupture, holes or
damaged gaskets are discovered, replace
the element.
(c)
If a new element is to be installed,
inspect the element and gasket for
shipping and storage damage.
(d)
Install the primary filter element in air
cleaner outer cover and secure with
wing nut.
WING
NUT
PRIMARY
AIR
FILTER
TR00060
3-12
TM 10-3930-673-10
OUTER
COVER
CLAMP
TR00063
EVACUATOR VALVE
THUMBSCREW
(e)
Install the outer cover and clamp. Tighten thumbscrew.
(f)
Check the rubber evacuator valve to be sure it is not plugged or damaged.
(g)
Reset the air intake restriction indicator by pressing button on end of indicator.
3-13
TM 10-3930-673-10
3-9. RADIATOR – SERVICE
This Task Covers:
Checking radiator coolant level and adding coolant as necessary.
Service.
OVERFLOW
BOTTLE
TR00064
(1)
Check coolant level in overflow bottle. Bottle must be 1/3 to 2/3 full.
NOTE
Use a 50-50 mix of ethylene glycol (MIL-A-46153B) and clean water for coolant. Plain water is
not recommended. Make coolant mixture before adding ethylene glycol and water to the coolant
bottle.
(2)
Add coolant to overflow bottle.
(a)
If bottle is less than 1/3 full, add approximately one quart.
WARNING
The cooling system operates under pressure which is controlled by the radiator cap. It is dangerous
to remove the cap while system is hot because hot steaming gases will escape and burn you.
Always allow system to cool, then turn the cap to the first stop and allow the pressure to escape
before removing the cap completely.
(b)
3-14
If no coolant is visible in the bottle, add 2 quarts of coolant to bottle and fill radiator with coolant.
TM 10-3930-673-10
3-10. FUEL/WATER SEPARATOR – SERVICE
This Task Covers:
Draining water from engine fuel/water separator.
FUEL/WATER SEPARATOR
TR00057
RIGHT SIDE OF ENGINE COMPARTMENT
TR00087
Service.
(1)
Look through fuel/water separator glass for presence of water or sediment.
(2)
Drain water and sediment from fuel/water separator.
(a)
Loosen retaining nut at bottom of sediment bowl.
(b)
Pull retaining bracket forward.
(c)
Remove sediment bowl and discard contents.
(d)
Re-install sediment bowl.
(e)
Swing retaining bracket under sediment bowl.
(f)
Tighten retaining nut finger tight.
3-15/(3-16 blank)
TM 10-3930-673-10
3
Malfunction Index
Troubleshooting
Procedure
Page
ENGINE
1.
2.
3.
4.
5.
6.
7.
8.
9.
10.
11.
12.
13.
Engine will not crank. . . . . . . . . . . . . . . . . . . . . . . . . . . . . . . . . . . . . . . . . . . . . . . . . . . . . . . . . . . . . . .
Engine cranks but will not start . . . . . . . . . . . . . . . . . . . . . . . . . . . . . . . . . . . . . . . . . . . . . . . . . . . . . . .
Engine misfires or runs rough . . . . . . . . . . . . . . . . . . . . . . . . . . . . . . . . . . . . . . . . . . . . . . . . . . . . . . . .
Low engine power . . . . . . . . . . . . . . . . . . . . . . . . . . . . . . . . . . . . . . . . . . . . . . . . . . . . . . . . . . . . . . . . .
Engine overheats . . . . . . . . . . . . . . . . . . . . . . . . . . . . . . . . . . . . . . . . . . . . . . . . . . . . . . . . . . . . . . . . . .
Low engine oil pressure. . . . . . . . . . . . . . . . . . . . . . . . . . . . . . . . . . . . . . . . . . . . . . . . . . . . . . . . . . . . .
Vehicle starts but will not move. . . . . . . . . . . . . . . . . . . . . . . . . . . . . . . . . . . . . . . . . . . . . . . . . . . . . . .
Engine priming system does not work. . . . . . . . . . . . . . . . . . . . . . . . . . . . . . . . . . . . . . . . . . . . . . . . . .
All hydraulic functions operate slowly or erratically . . . . . . . . . . . . . . . . . . . . . . . . . . . . . . . . . . . . . .
Forks will not automatically level . . . . . . . . . . . . . . . . . . . . . . . . . . . . . . . . . . . . . . . . . . . . . . . . . . . . .
Only one heater/air conditioner fan operates. . . . . . . . . . . . . . . . . . . . . . . . . . . . . . . . . . . . . . . . . . . . .
Front and rear wheels are not aligned in the straight ahead position. . . . . . . . . . . . . . . . . . . . . . . . . . .
Poor or no brakes . . . . . . . . . . . . . . . . . . . . . . . . . . . . . . . . . . . . . . . . . . . . . . . . . . . . . . . . . . . . . . . . . .
3-2
3-2
3-3
3-3
3-3
3-4
3-4
3-4
3-5
3-5
3-5
3-5
3-5
Table 3-1. Troubleshooting
Malfunction
Test or Inspection
Corrective Action
1. ENGINE WILL NOT CRANK.
Check for loose or disconnected battery cables.
If cables are loose or disconnected, notify Unit Maintenance.
2. ENGINE CRANKS BUT WILL NOT START.
Step 1.
Check to see if the auxiliary fuel shut-off switch is in the OFF position.
If so, move the auxiliary fuel shut-off switch to the ON position.
Do not overfill fuel tank, damage to equipment may result.
Step 2.
Check to see if fuel tank is empty.
If tank is empty, fill fuel tank.
Step 3.
Check ambient temperature.
Use the engine primer button in extreme cold temperature to start engine (refer to Para 2-24).
Step 4.
Check the fuel/water separator for water.
If water is visible, drain fuel/water separator (refer to Para 3-10).
3-2
TM 10-3930-673-10
Table 3-1. Troubleshooting - CONT.
Malfunction
Test or Inspection
Corrective Action
Step 5.
Check to see if any fuel lines are damaged.
If lines are damaged, notify Unit Maintenance.
3. ENGINE MISFIRES OR RUNS ROUGH.
Do not overfill fuel tank, damage to equipment may result.
Step 1.
Check to see if fuel tank is low or empty.
If tank is low or empty, fill fuel tank.
Step 2.
Check to see if any moisture is present in fuel/water separator.
If moisture is visible, drain fuel/water separator (refer to Para 3-10).
Step 3.
Check for black or gray exhaust smoke. Indicates plugged or dirty intake system.
Clean or replace air filters (refer to Para 3-8).
Step 4.
Check for white or blue smoke. Indicates engine is cold.
Allow engine to warm up.
Step 5.
Check for leaks in fuel lines and injectors.
If lines or injectors are leaking, notify Unit Maintenance.
4. LOW ENGINE POWER.
Step 1.
Check air filter restriction indicator.
If necessary, clean or replace air filters (refer to Para 3-8).
Step 2.
Check exhaust pipe for obstructions.
If necessary, remove any obstruction.
Step 3.
Check for high engine oil level.
If oil level is high, notify Unit Maintenance.
5. ENGINE OVERHEATS.
Damage to the radiator can occur if pressure cap is removed with engine hot. Allow
system to cool before checking coolant level. Failure to follow this precaution could
result in vehicle damage or personal injury.
3-3
TM 10-3930-673-10
Table 3-1. Troubleshooting - CONT.
Malfunction
Test or Inspection
Corrective Action
Step 1.
Check for low coolant level.
If low, add appropriate amount of coolant to overflow bottle (refer to Para 3-9).
Step 2.
Check for leaks and/or worn hoses.
If hoses are leaking or worn, notify Unit Maintenance.
The engine and radiator can be extremely hot. Contacting exposed skin to these
areas could result in severe burns.
Step 3.
Check for obstructions and trash build-up on the radiator fins.
If obstructed, clean radiator surface.
Step 4.
Check for high engine oil level.
If oil level is high, notify Unit Maintenance.
6. LOW ENGINE OIL PRESSURE.
Step 1.
Check to see if engine oil level is low.
If oil level is low, add oil as necessary (refer to the PMCS).
Step 2.
Check for external oil leaks.
If external leaks are visible, notify Unit Maintenance.
7. VEHICLE STARTS BUT WILL NOT MOVE.
Step 1.
Check to be sure parking brake switch is in OFF position.
Step 2.
Check transmission oil level.
If oil level is low, add oil as necessary (refer to the PMCS).
Step 3.
Check if parking brake is dragging.
If brake is dragging, notify Unit Maintenance.
Step 4.
Check if service brakes are dragging.
If brakes are dragging, notify Unit Maintenance.
Step 5.
Check transmission disconnect pedal for free movement.
If no free movement, notify Unit Maintenance.
8. ENGINE PRIMING SYSTEM DOES NOT WORK.
Check ambient temperature.
The priming system will not work if ambient temperature is above 34° ±8°F.
3-4
TM 10-3930-673-10
Table 3-1. Troubleshooting - CONT.
Malfunction
Test or Inspection
Corrective Action
9. ALL HYDRAULIC FUNCTIONS OPERATE SLOWLY OR ERRATICALLY.
Step 1.
Check to see if hydraulic oil is cold.
Operate hydraulic system until oil is warm (refer to Para 2-24).
Step 2.
Check to see if hydraulic oil level is low.
If oil level is low, add oil as necessary (refer to the PMCS).
Step 3.
Check to see if hydraulic oil is contaminated with water.
If oil is contaminated, notify Unit Maintenance.
Step 4.
Engine speed too low.
Increase engine speed with accelerator.
Step 5.
Inspect hydraulic lines for signs of damage or leaks.
If lines are damaged or leaking, notify Unit Maintenance.
10. FORKS WILL NOT AUTOMATICALLY LEVEL.
Step 1.
Check to see if the automatic fork level switch is in the ON position.
If not, move the automatic fork level switch to the ON position.
Step 2.
Check for damaged or broken wire(s) from toggle switch to fork autoleveler switch.
If wires are damaged or broken, notify Unit Maintenance.
11. ONLY ONE HEATER/AIR CONDITIONER FAN OPERATES.
Check to see if the heater blower switch is in the LOW speed position.
Move the heater blower switch to the HIGH speed position. Only one fan operates on low
speed. At high speed, both fans operate. If malfunction is not corrected, notify Unit
Maintenance.
12. FRONT AND REAR WHEELS ARE NOT ALIGNED IN THE STRAIGHT AHEAD POSITION.
Check to see if the steer select control switch is in the CRAB or FOUR WHEEL position.
The front and rear wheels do not always align straight ahead after changing steering
modes. Proceed with steering system synchronization (refer to Para 2-9).
13. POOR OR NO BRAKES.
Step 1.
Check hydraulic oil level at reservoir sight glass.
If oil level is low, add oil as necessary (refer to the PMCS).
3-5
TM 10-3930-673-10
Table 3-1. Troubleshooting - CONT.
Malfunction
Test or Inspection
Corrective Action
Step 2.
Check for oil leakage at brake calipers or hose connections.
If calipers or hose connections are leaking, notify Unit Maintenance.
3-6
TM 10-3930-673-10
3
Section III. OPERATOR MAINTENANCE PROCEDURES
3-4. INTRODUCTION
This section contains maintenance procedures which are the responsibility of the operator. Refer to Para 2-3, the Preventive
Maintenance Checks and Services, for additional maintenance not covered in this section. The maintenance procedures in this
manual are authorized by the Maintenance Allocation Chart (refer to TM 10-3930-673-20).
3-5. ENGINE OIL SAMPLING VALVE – SERVICE
This Task Covers:
Obtaining an engine oil sample for the Army Oil Analysis Program (AOAP).
Service.
(1)
Clean the engine oil sampling valve (1).
(2)
Start engine (refer to Para 2-7). Bring engine to
normal operating temperature.
(3)
Obtain oil sample.
3
(a)
With engine at idle, remove the dust cap (2) on
the oil sampling valve (1).
(b)
Attach an appropriate size hose to the valve, if
desired.
(c)
Place a clean container under the valve (1)
opening (or hose, if used).
(d)
Push down or pull up on the lever (3) to drain
approximately one pint of oil prior to taking
sample.
(e)
Place a sample bottle under the valve opening (or hose, if used) and fill to within 1/2” from top. Cap bottle
immediately.
(f)
Install the dust cap (2) on the oil sampling valve (1).
(g)
Check oil level and add oil if necessary (refer to the PMCS).
1
2
OIL FILL
TUBE
Change 1
TR00057
3-7
TM 10-3930-673-10
3-6. TRANSMISSION OIL SAMPLING VALVE – SERVICE
This Task Covers:
Obtaining a transmission oil sample for the Army Oil Analysis Program (AOAP).
Service.
TRANSMISSION
1
3
2
TR00058
3-8
(1)
Clean the transmission oil sampling valve (1).
(2)
Start engine (refer to Para 2-7). Drive vehicle approximately one mile or allow to idle in gear for a while to
bring transmission to normal operating temperature.
(3)
With engine running, place the travel select control lever in neutral. Move the parking brake switch to
the ON position.
(4)
Obtain oil sample.
(a)
Remove the dust cap (2) on the transmission oil sampling valve (1).
(b)
Attach an appropriate size hose to the valve (if desired).
(c)
Place a clean container under the valve (1) opening (or hose, if used).
(d)
Push down or pull up on the lever (3) to drain approximately one pint of oil prior to taking sample. Release
the lever (3) to close the valve (1).
(e)
Place a sample bottle under the valve opening (or hose, if used) and fill to within 1/2” from top. Cap bottle
immediately.
(f)
Install the dust cap (2) on the transmission oil sampling valve (1).
(g)
Check transmission fluid level and add oil if necessary (refer to the PMCS).
Change 1
TM 10-3930-673-10
3-7. HYDRAULIC OIL SAMPLING VALVE – SERVICE
This Task Covers:
Obtaining a hydraulic oil sample for the Army Oil Analysis Program (AOAP).
Service.
(1)
Clean the hydraulic oil sampling valve (1).
(2)
Start engine (refer to Para 2-7). Operate
hydraulic system until oil is warm (refer to
Para 2-24).
3
(3)
Obtain oil sample.
(a)
Remove the dust cap (2) on the hydraulic
oil sampling valve (1).
(b)
Attach an appropriate size hose to the
valve (if desired).
(c)
Place a clean container under the valve
(1) opening (or hose, if used).
(d)
Push down or pull up on the lever (3) to
drain approximately one pint of oil prior
to taking sample. Release the lever (3) to
close the valve (1).
1
2
HYDRAULIC
OIL FILTER
TR00059
(e)
Place a sample bottle under the valve
opening (or hose, if used) and fill to within 1/2” from top. Cap bottle immediately.
(f)
Install the dust cap (2) on the hydraulic oil sampling valve (1). Return the oil drained into container during
Step (d) above to hydraulic reservoir.
(g)
Check hydraulic oil level and add oil if necessary (refer to the PMCS).
3-9
TM 10-3930-673-10
3-8. AIR CLEANER – SERVICE
This Task Covers:
Inspecting the primary and secondary air filter elements. Cleaning or replacing elements as necessary.
Service.
WARNING
If NBC exposure is suspected, all air filter media should be handled by personnel wearing
protective equipment. Consult your unit NBC Officer or NBC NCO for appropriate handling or
disposal instructions.
(1)
Remove primary air filter element.
(a)
Turn thumbscrew and loosen clamp.
Remove air cleaner outer cover.
OUTER
COVER
CLAMP
THUMBSCREW
TR00063
(b)
Remove wing nut and primary filter
element from inside of outer cover.
(c)
Use a damp cloth to remove dust and
foreign material from inside canister.
WING
NUT
PRIMARY
AIR
FILTER
TR00060
3-10
TM 10-3930-673-10
(2)
Inspect secondary air filter element.
WING NUT
CAUTION
The secondary element is not intended
to be cleaned. For maximum engine
protection and air cleaner service life,
replace the secondary element with a
new one every third primary element
change or cleaning.
(a)
Check secondary element for damage.
Replace element if it has the slightest
damage to gasket or pleated element.
(b)
Replace secondary element if element is
visibly dirty.
(c)
SECONDARY
AIR FILTER
TR00061
If secondary element is to be replaced, remove wing nut to remove element.
CAUTION
Air restriction indicator will not function properly if an element has a break in the filtering paper
or if the element is not properly seated in the canister.
(d)
(3)
Install new secondary element with gasket end in canister first. Be sure element is centered in canister
before tightening wing nut.
Clean primary air filter element.
CAUTION
Do not tap the element against a hard surface, as this damages element.
(a)
Remove loose dust by tapping element with palm of your hand. DO NOT use a hard surface.
3-11
TM 10-3930-673-10
3-8. AIR CLEANER – SERVICE (CONT)
WARNING
Always wear safety glasses whenever
compressed air is used. Do not exceed
30 psig nozzle pressure when using
compressed air.
(b)
To remove remaining dust, use
compressed air under 30 psig. Blow air
up and down the pleats from the inside
of the element. Be careful not to
damage or tear paper element.
TR00062
CAUTION
DO NOT wash element in fuel oil, oil, gasoline, or solvent. DO NOT use compressed air to
remove water from an element.
(c)
(4)
To clean oily or sooty element, wash thoroughly with warm water and nonfoaming detergent. Rinse
element with clean water and allow element to air dry. Clean outer cover and rubber evacuator valve
with soap and water.
Install primary air filter element.
(a)
DO NOT install element until it is dry.
(b)
Inspect element for damage. Place a
bright light inside the element and rotate
element slowly. If any rupture, holes or
damaged gaskets are discovered, replace
the element.
(c)
If a new element is to be installed,
inspect the element and gasket for
shipping and storage damage.
(d)
Install the primary filter element in air
cleaner outer cover and secure with
wing nut.
WING
NUT
PRIMARY
AIR
FILTER
TR00060
3-12
TM 10-3930-673-10
OUTER
COVER
CLAMP
TR00063
EVACUATOR VALVE
THUMBSCREW
(e)
Install the outer cover and clamp. Tighten thumbscrew.
(f)
Check the rubber evacuator valve to be sure it is not plugged or damaged.
(g)
Reset the air intake restriction indicator by pressing button on end of indicator.
3-13
TM 10-3930-673-10
3-9. RADIATOR – SERVICE
This Task Covers:
Checking radiator coolant level and adding coolant as necessary.
Service.
OVERFLOW
BOTTLE
TR00064
(1)
Check coolant level in overflow bottle. Bottle must be 1/3 to 2/3 full.
NOTE
Use a 50-50 mix of ethylene glycol (MIL-A-46153B) and clean water for coolant. Plain water is
not recommended. Make coolant mixture before adding ethylene glycol and water to the coolant
bottle.
(2)
Add coolant to overflow bottle.
(a)
If bottle is less than 1/3 full, add approximately one quart.
WARNING
The cooling system operates under pressure which is controlled by the radiator cap. It is dangerous
to remove the cap while system is hot because hot steaming gases will escape and burn you.
Always allow system to cool, then turn the cap to the first stop and allow the pressure to escape
before removing the cap completely.
(b)
3-14
If no coolant is visible in the bottle, add 2 quarts of coolant to bottle and fill radiator with coolant.
TM 10-3930-673-10
3-10. FUEL/WATER SEPARATOR – SERVICE
This Task Covers:
Draining water from engine fuel/water separator.
FUEL/WATER SEPARATOR
TR00057
RIGHT SIDE OF ENGINE COMPARTMENT
TR00087
Service.
(1)
Look through fuel/water separator glass for presence of water or sediment.
(2)
Drain water and sediment from fuel/water separator.
(a)
Loosen retaining nut at bottom of sediment bowl.
(b)
Pull retaining bracket forward.
(c)
Remove sediment bowl and discard contents.
(d)
Re-install sediment bowl.
(e)
Swing retaining bracket under sediment bowl.
(f)
Tighten retaining nut finger tight.
3-15/(3-16 blank)
TM 10-3930-673-10
A
APPENDIX A
REFERENCES
A-1. PUBLICATION INDEXES AND GENERAL REFERENCES
Indexes should be consulted frequently for the latest changes or revisions of references given in this appendix and for new
publications relating to material covered in this publication.
a. Military Publication Indexes.
Consolidated Army Publications and Forms Index. . . . . . . . . . . . . . . . . . . . . . . . . . . . . . . . . . . . . . . . . . . . . . . DA 25-30
Functional User’s Manual for the Army Maintenance Management System . . . . . . . . . . . . . . . . . . . . . DA Pam 738-750
b. General References.
Dictionary of United States Army Terms . . . . . . . . . . . . . . . . . . . . . . . . . . . . . . . . . . . . . . . . . . . . . . . . . . . . . AR 310-25
Authorized Abbreviations and Brevity Codes . . . . . . . . . . . . . . . . . . . . . . . . . . . . . . . . . . . . . . . . . . . . . . . . . AR 310-50
Military Training Management . . . . . . . . . . . . . . . . . . . . . . . . . . . . . . . . . . . . . . . . . . . . . . . . . . . . . . . . . . . . . . TC 21-5-7
Military Symbols. . . . . . . . . . . . . . . . . . . . . . . . . . . . . . . . . . . . . . . . . . . . . . . . . . . . . . . . . . . . . . . . . . . . . . . . . FM 21-30
A-2. OTHER PUBLICATIONS
The following publications contain information pertinent to the major item materiel and associated equipment.
a. Camouflage.
Camouflage . . . . . . . . . . . . . . . . . . . . . . . . . . . . . . . . . . . . . . . . . . . . . . . . . . . . . . . . . . . . . . . . . . . . . . . . . . . . . . FM 5-20
b. Decontamination.
Chemical, Biological, Radiological, and Nuclear Decontamination . . . . . . . . . . . . . . . . . . . . . . . . . . . . . . . . . TM 3-220
Chemical, Biological, Radiological, and Nuclear Defense. . . . . . . . . . . . . . . . . . . . . . . . . . . . . . . . . . . . . . . . . TM 21-40
c. General.
Accident Reporting and Records. . . . . . . . . . . . . . . . . . . . . . . . . . . . . . . . . . . . . . . . . . . . . . . . . . . . . . . . . . . . AR 385-40
Basic Cold Weather . . . . . . . . . . . . . . . . . . . . . . . . . . . . . . . . . . . . . . . . . . . . . . . . . . . . . . . . . . . . . . . . . . . . . . . FM 31-70
Manual for Wheeled Vehicle Driver . . . . . . . . . . . . . . . . . . . . . . . . . . . . . . . . . . . . . . . . . . . . . . . . . . . . . . . . . FM 21-305
Mountain Operations. . . . . . . . . . . . . . . . . . . . . . . . . . . . . . . . . . . . . . . . . . . . . . . . . . . . . . . . . . . . . . . . . . . . . . . FM 90-6
Northern Operations . . . . . . . . . . . . . . . . . . . . . . . . . . . . . . . . . . . . . . . . . . . . . . . . . . . . . . . . . . . . . . . . . . . . . . FM 31-71
Desert Operations . . . . . . . . . . . . . . . . . . . . . . . . . . . . . . . . . . . . . . . . . . . . . . . . . . . . . . . . . . . . . . . . . . . . . . . . . FM 90-3
Operation and Maintenance of Ordnance Material in Cold Weather (0° F to –65° F) . . . . . . . . . . . . . . . . . . . . FM 9-207
Prevention of Motor Vehicle Accidents . . . . . . . . . . . . . . . . . . . . . . . . . . . . . . . . . . . . . . . . . . . . . . . . . . . . . . AR 385 55
Procedures for Destruction of Tank Automotive Equipment to Prevent Enemy Use . . . . . . . . . . . . . . . . . TM 750-244-6
The Army Maintenance Management System . . . . . . . . . . . . . . . . . . . . . . . . . . . . . . . . . . . . . . . . . . . .DA PAM 738-750
Army Logistics Assistance Program . . . . . . . . . . . . . . . . . . . . . . . . . . . . . . . . . . . . . . . . . . . . . . . . . . . . . . . . . . AR 700-4
Army Logistics Readiness and Sustainability. . . . . . . . . . . . . . . . . . . . . . . . . . . . . . . . . . . . . . . . . . . . . . . . . AR 700-138
Unit Status Reporting . . . . . . . . . . . . . . . . . . . . . . . . . . . . . . . . . . . . . . . . . . . . . . . . . . . . . . . . . . . . . . . . . . . . . AR 220-1
Change 1
A-1
TM 10-3930-673-10
d. First Aid.
First Aid . . . . . . . . . . . . . . . . . . . . . . . . . . . . . . . . . . . . . . . . . . . . . . . . . . . . . . . . . . . . . . . . . . . . . . . . . . . . . . FM 4-25.11
e. Maintenance and Repair.
Organizational, Direct Support, and General Support Care, Maintenance and Repair:
Pneumatic Tires and Inner Tubes . . . . . . . . . . . . . . . . . . . . . . . . . . . . . . . . . . . . . . . . . . . . . . . . . . .TM 9-2610-200-24
Description, Use, Bonding Techniques and Properties of Adhesives . . . . . . . . . . . . . . . . . . . . . . . . . . . . . . TB ORD 103
Inspection, Care, and Maintenance of Antifriction Bearings . . . . . . . . . . . . . . . . . . . . . . . . . . . . . . . . . . . . . . . TM 9-214
Materials Used for Cleaning, Preserving, Abrading and Cementing Ordnance Materiel
and Related Materiels Including Chemicals . . . . . . . . . . . . . . . . . . . . . . . . . . . . . . . . . . . . . . . . . . . . . . . . . . TM 9-247
Metal Body Repair and Related Operations . . . . . . . . . . . . . . . . . . . . . . . . . . . . . . . . . . . . . . . . . . . . . . . . . . . . . FM 23-2
Operation and Organizational Maintenance Manual for Lead-Acid Storage
Batteries . . . . . . . . . . . . . . . . . . . . . . . . . . . . . . . . . . . . . . . . . . . . . . . . . . . . . . . . . . . . . . . . . . . . . .TM 9-6140-200-14
Organizational, Policies, and Responsibilities for Army Materiel Maintenance Concepts
and Policies . . . . . . . . . . . . . . . . . . . . . . . . . . . . . . . . . . . . . . . . . . . . . . . . . . . . . . . . . . . . . . . . . . . . . . . . . . . AR 750-1
Use of Antifreeze Solutions and Cleaning Compounds in Engine Cooling System . . . . . . . . . . . . . . . . . . . . TB 750-651
Welding Theory and Application. . . . . . . . . . . . . . . . . . . . . . . . . . . . . . . . . . . . . . . . . . . . . . . . . . . . . . . . . . . . . TM 9-237
Color, Marking, and Camouflage Painting of Military Vehicles, Construction Equipment,
and Materials Handling Equipment . . . . . . . . . . . . . . . . . . . . . . . . . . . . . . . . . . . . . . . . . . . . . . . . . . . . . . TB 43-0209
Standards of Criteria for Technical Inspection and Classification of Tires . . . . . . . . . . . . . . . . . . . . . .TM 9-2610-201-14
Safety Inspection and Testing of Lifting Devices . . . . . . . . . . . . . . . . . . . . . . . . . . . . . . . . . . . . . . . . . . . . . . TB 43-0142
f. Shipment and Limited Storage.
Color, Marking, and Preparation of Equipment for Shipment of Army Materiel . . . . . . . . . . . . . . . . . . . . . . TB 43-0209
Organizational, Direct Support, and General Support Preservation and Packing of
Military Supplies and Equipment . . . . . . . . . . . . . . . . . . . . . . . . . . . . . . . . . . . . . . . . . . . . . . . . . . . .TM 38-230-1 & 2
Preservation of USAMECOM Mechanical Equipment for Shipment and Storage. . . . . . . . . . . . . . . . . . . . .TB 740-97-2
Preservation and Packing of Military Supplies and Equipment . . . . . . . . . . . . . . . . . . . . . . . . . . . . . . .TM 38-230-1 & 2
Preservation, Packaging, Packing and Marking Materials, Supplies, and Equipment
Used by the Army . . . . . . . . . . . . . . . . . . . . . . . . . . . . . . . . . . . . . . . . . . . . . . . . . . . . . . . . . . . . . . . . . . . . . SB 38-100
Shipment and Limited Storage . . . . . . . . . . . . . . . . . . . . . . . . . . . . . . . . . . . . . . . . . . . . . . . . . . . . . . . . . . . MIL-V-62038
Storage and Serviceability Standard: Tracked Vehicles, Wheeled Vehicles, and
Component Parts. . . . . . . . . . . . . . . . . . . . . . . . . . . . . . . . . . . . . . . . . . . . . . . . . . . . . . . . . . . . . . . . . . . . . . SB 40-98-1
Storage and Supply Activities: Covered and Open Storage . . . . . . . . . . . . . . . . . . . . . . . . . . . . . . . . . . . . . . . . SB 740-1
The Army Maintenance Management Systems (TAMMS). . . . . . . . . . . . . . . . . . . . . . . . . . . . . . . . . . DA PAM 738-750
Certification of Military Equipment for Transport in MAC/CRAF Aircraft. . . . . . . . . . . . . . . . . . . . . . . . . . . . TB 55-45
Standards for Overseas Shipment or Domestic Issue of Special Purpose Vehicles . . . . . . . . . . . . . . . . .TB 2300-281-35
Transportability Guidance for Application of Blocking, Bracing and Tiedown
Materiels for Rail Transport . . . . . . . . . . . . . . . . . . . . . . . . . . . . . . . . . . . . . . . . . . . . . . . . . . . . . .TM 55-2200-001-12
Transportation Reference Data . . . . . . . . . . . . . . . . . . . . . . . . . . . . . . . . . . . . . . . . . . . . . . . . . . . . . . . . . . . . . . FM 55-15
A-2
Change 1
TM 10-3930-673-10
B
APPENDIX B
COMPONENTS OF END ITEM (COEI) AND BASIC ISSUE ITEMS (BII) LIST
Section I. INTRODUCTION
B-1. SCOPE
This appendix lists COEI and BII for the ATLAS to help you inventory items required for safe and efficient operation.
B-2. GENERAL
Components of End Item (COEI). This list is for information purposes only, and is not authority for requisition of
replacements. These items are part of the ATLAS. As part of the end item, these items must be with the end item whenever it
is issued or transferred between property accounts. Items of COEI are removed and separately packaged for transportation or
shipment only when necessary. Illustrations are furnished to help you find and identify the items.
Basic Issue Items (BII). These essential items are required to place the ATLAS vehicles in operation, to operate them, and to
do emergency repairs. Although shipped separately packaged, BII must be with the ATLAS during operation and whenever it
is transferred between property accounts. Listing these items is your authority to request/requisition them for replacement
based on authorization of the end item by the TOE/MTOE. Illustrations are furnished to help you find and identify the items.
B-3. EXPLANATION OF COLUMNS IN THE COEI LIST AND BII LISTS
a. Column (1), Illus Number. This column gives you the number of the item illustrated.
b. Column (2), National Stock Number. This column identifies the stock number of the item to be used for
requisitioning purposes.
c. Column (3), Description CAGEC and Part Number. This column identifies the Federal item name (in all capital
letters) followed by a minimum description when needed. The last line below the description is the Commercial and
Government Entity code (CAGEC) (in parentheses) and the part number.
d. Column (4) Usable On Code. When applicable, gives you a code if the item you need is not the same for different
models of equipment. These codes are identified below:
Code
LAS
Used On
All Terrain Lifter Army System (ATLAS)
e. Column (5), U/I (Unit of Measure). Unit of Issue (U/I) indicates the physical measurement or count of the
item as issued per the National Stock Number shown in column (2).
f. Column (6), Qty Rqd. This column indicates the quantity required.
Change 2
B-1
TM 10-3930-673-10
Section II. COMPONENTS OF END ITEM
(1)
(2)
(3)
(4)
(5)
(6)
Illus
Number
National Stock
Number
Description
CAGEC and Part Number
Usable
on Code
U/I
Qty
Rqd
B-2
1
3930-01-454-2131
Carriage, 6K 6615204/(1YHH8)
LAS
ea
1
2
3930-01-529-6382
Carriage, 10K 6615214/(1YHH8)
LAS
ea
1
Change 2
TM 10-3930-673-10
Section III.
BASIC ISSUE ITEMS
(1)
(2)
(3)
(4)
(5)
(6)
Illus
Number
National Stock
Number
Description
CAGEC and Part Number
Usable
on Code
U/I
Qty
Rqd
Emergency Boom Lift and Retract, Raise and
Lower Kit (1YHHB) 6622013 (Also used
when towing vehicle)
LAS
ea
1
2
Hose Assembly (1YHH8) 2716022
LAS
ea
1
3
Hose Assembly (1YHH8) 2716002
LAS
ea
1
1
4720-01-502-4980
4
4730-00-797-6567
Coupler, Tube (1YHH8) 8430045
LAS
ea
2
5
4730-00-786-2247
Connector (1YHH8) 8760015
LAS
ea
2
6
4730-00-585-6565
Cap, Tube (1YHH8) 8760489
LAS
ea
1
7
4730-00-762-1239
Plug (1YHH8) 8770035
LAS
ea
1
1
2
THRU
7
3
THRU
5
2
4
3
5
7
6
4
TR00067
5
Change 2
B-3
TM 10-3930-673-10
(1)
(2)
(3)
(4)
(5)
(6)
Illus
Number
National Stock
Number
Description
CAGEC and Part Number
Usable
on Code
U/I
Qty
Rqd
Counterweight Removal Assembly (3Y949)
6615484
LAS
ea
1
Pendant with Shackle, Kit (3Y949) 6621953
LAS
ea
1
1
2590-01-442-7346
2
3
4030-01-440-7985
Shackle, Anchor (12128) M656A
LAS
ea
2
4
5315-01-449-5031
Pin, Sheave (3Y949) 6618392
LAS
ea
4
5
3020-01-441-0818
Sheave (3Y949) 8962605
LAS
ea
4
6
5305-00-543-4372
Screw, Cap, Hex, Hd (80204)
B1821BH038C075N
LAS
ea
4
7
5310-00-637-9541
Washer, Lock (96906) MS35338-46
LAS
ea
4
8
4730-00-050-4208
Fitting, Lubrication (96906) MS15003-1
LAS
ea
4
1
2 THRU 8
5
4
8
2
7
6
3
B-4
Change 2
TM 10-3930-673-10
C
APPENDIX C
ADDITIONAL AUTHORIZATION LIST
Section I. INTRODUCTION
C-1. SCOPE
This appendix lists additional items you are authorized for support of the ATLAS.
C-2. GENERAL
This list identifies items that do not have to accompany the ATLAS and do not have to be turned in with it. These items are all
authorized to you by CTA, MTOE, TDA, or JTA.
C-3. EXPLANATION OF LISTING
National stock numbers, descriptions, and quantities are provided to help you identify and request the additional items you
required to support this equipment.
C-4. EXPLANATION OF COLUMNS
a. Column (1), National Stock Number. This column identifies the stock number of the item to be used for
requisitioning purposes.
b. Column (2), Description CAGEC and Part Number. This column identifies the Federal item name (in all capital
letters) followed by a minimum description when needed. The last line below the description is the Commercial and
Government Entity Code (CAGEC) (in parentheses) and the part number.
c. Column (3), Usable on Code. This column identifies the usable on code of the item.
d. Column (4), U/M (Unit of Measure). This column indicates how the item is issued for the National Stock Number
shown in column one.
e. Column (5), Qty Auth. This column indicates the quantity authorized for each forklift.
C-1
TM 10-3930-673-10
Section II. ADDITIONAL AUTHORIZATION LIST
(1)
(2)
(3)
(4)
(5)
National Stock
Number
Description
CAGEC and Part Number
Usable
on Code
U/M
Qty
Auth
4210-00-115-8956
Fire Extinguisher, Halon 1211, 5 lb
(98752) IRA 4210-031 5 lb
ea
1
7520-00-559-9618
Case, Maintenance (81349) MIL-C-11743
ea
1
6545-00-919-6650
First Aid Kit, General
ea
1
2835-01-078-2081
Sling, Nylon (91796) 4-8FTX2IN
ea
2
C-2
Change 1
TM 10-3930-673-10
D
APPENDIX D
EXPENDABLE/DURABLE SUPPLIES AND MATERIALS LIST
Section I. INTRODUCTION
D-1. SCOPE
This appendix lists the expendable consumable maintenance supplies you will need to operate and maintain the ATLAS. This
listing is for informational purposes only and is not authority to requisition the listed items. These items are authorized to you
by CTA 50-970, Expendable/Durable Items.
D-2. EXPLANATION OF COLUMNS
a. Column (1), Item Number. This number is assigned to the entry in the listing and is referenced in the narrative
instructions to identify the material (e.g., “Use cleaning compound, Item 5, Appendix C”).
b. Column (2), Level. This column identifies the lowest level of maintenance that requires the listed item.
C – Operator/Crew
O – Organizational Maintenance
F – Direct Support Maintenance
H – General Support Maintenance
c. Column (3), National Stock Number. This is the National Stock Number assigned to the item; use it to request or
requisition the item.
d. Column (4), Description. Indicates the Federal item name, and, if required, a description to identify the item. The
last line for each item indicates the part number followed by Commercial And Government Entity (CAGE) Code in
parentheses.
e. Column (5), Unit of Measure U/M. Indicates the measure used in performing the actual maintenance function. This
measure is expressed by two-character alphabetical abbreviations (e.g., ea, in, pr). If the unit of measure differs from the unit
of issue, requisition the lowest unit of issue that will satisfy your requirements.
D-1
TM 10-3930-673-10
Section II. EXPENDABLE/DURABLE SUPPLIES AND MATERIALS LIST (CON’T)
(1)
Item
Number
Level
2
C
2.1
2.2
2.3
2.4
(2)
(3)
National Stock
Number
6850-01-441-3248
Antifreeze, Permanent, Type: Arctic Grade
(58536) A-A-52624
55 Gallon Drum
gal
6850-01-474-2318
6850-01-474-2320
6850-01-474-2321
Cleaning Compound, Solvent
P-D-680 Type III (81348)
1 Gallon Container
5 Gallon Container
55 Gallon Drum
gal
gal
gal
9130-01-031-5816
Fuel, Turbine, Aviation
(81349) MIL T83133 GR JP8
gal
C
C
C
C
9150-01-197-7692
5
6
D-2
O
Grease: Automotive and Artillery, GAA
M-10924-A (81349)
1-1/4 Ounce Tube
M-10924-B (81349)
14 Ounce Cartridge
M-10924-C (81349)
1-3/4 Pound Can
M-10924-E (81349)
35 Pound Can
oz
oz
lb
lb
3930-01-512-2281
Lubricant, Teflon Dry,
8526415 (IYHH8)
1 Spray Can
oz
9140-00-286-5295
9140-00-286-5296
9140-00-286-5294
Oil, Fuel, Diesel, DF-2 Regular VVF800 (81349)
5 Gallon Can
55 Gallon Drum
Bulk
gal
gal
gal
9140-00-286-5287
9140-00-286-5288
9140-00-286-5286
Oil, Fuel, Diesel, DF-1 Winter VVF800 (81349)
5 Gallon Can
55 Gallon Drum
Bulk
gal
gal
gal
9140-00-286-5282
9140-00-286-5284
9140-00-286-5283
Oil, Fuel, Diesel, DF-A Arctic WF800 (81349)
5 Gallon Can
55 Gallon Drum
Bulk
gal
gal
gal
9150-00-402-4478
9150-00-402-2372
9150-00-491-7197
Oil, Lubricating, Engine Arctic OEA, MIL-L-46167
(81349)
1 Quart Can
5 Gallon Can
55 Gallon Drum
qt
gal
gal
C
C
C
C
Change 1
U/M
gal
gal
9150-01-197-7690
4
Description
6850-00-181-7933
6850-01-441-3223
9150-01-197-7693
3
(5)
Antifreeze, Permanent, Ethylene Glycol, Inhibited MIL-A46153 (81349)
5 Gallon Can
55 Gallon Drum
9150-01-197-7688
2.5
(4)
TM 10-3930-673-10
(2)
(1)
Item
Number
Level
7
C
8
9
(3)
National Stock
Number
(5)
Description
U/M
9150-01-152-4117
9150-01-152-4118
9150-01-152-4119
Oil, Lubricating, Engine OE/HDO-15/40,
MIL-L-2104 (81349)
1 Quart Can
5 Gallon Can
55 Gallon Drum
qt
gal
gal
9150-00-189-6727
9150-00-191-2772
Oil, Lubricating, Transmission/Hydraulic
OE/HDO-10 MIL-L-2104 (81349)
1 Quart Can
55 Gallon Drum
qt
gal
7920-00-205-3570
Rags, Wiping (64067)
lb
C
C
(4)
Change 1
D-3/(D-4 blank)
TM 10-3930-673-10
E
APPENDIX E
LOAD RATING CHART
30 (9.1)
19
17
25 (7.6)
Boom Extension
Markings
15
13
11
9
20 (6.1)
7
5
25°
45°
15 (4.6)
6000 LBS.
(2722 Kg)
4000 LBS.
(1814 Kg)
30°
10 (3.0)
15°
5 (1.5)
0°
0 FT (0 M)
-5 (-1.5)
25
(7.6)
20
(6.1)
15
(4.6)
10
(3.0)
5
(1.5)
0 FT
(0 M)
6000 LB
(2722 KG)
CARRIAGE
TR00068
E-1
TM 10-3930-673-10
LOAD RATING CHART (CONT)
30 (9.1)
19
17
25 (7.6)
Boom Extension
Markings
15
13
11
9
20 (6.1)
7
5
25°
45°
15 (4.6)
6000 LBS.
(2722 Kg)
2000 LBS.
(907 Kg)
4000 LBS.
(1814 Kg)
10 (3.0)
30°
8000 LBS.
(3629 Kg)
10000 LBS.
(4536 Kg)
Fully Retracted
15°
5 (1.5)
0°
0 FT (0 M)
-5 (-1.5)
25
(7.6)
20
(6.1)
15
(4.6)
10
(3.0)
5
(1.5)
0 FT
(0 M)
10,000 LB
(4536 Kg)
CARRIAGE
TR00069
E-2
TM 10-3930-673-10
F
APPENDIX F
TRANSPORTABILITY INSTRUCTIONS
SECTION I. INTRODUCTION
F-1. GENERAL
a. Purpose and Scope.
This appendix is for transportation officers and other personnel responsible for safe transportation of the ATLAS. It provides
data for planning and executing movement of the ATLAS worldwide. Included are physical characteristics of the ATLAS,
safety precautions, technical data on transport modes, and lifting and tiedown procedures.
The major dimensions and weights given in this manual are US customary and equivalent SI (metric) units. Approximate
values appear in parentheses following the customary-unit value.
Transport modes are presented in F-4. Modes of Transportation.
b. Related Publications.
Additional information on transport procedures can be found in:
FM 55-65, Strategic Deployment by Surface Transportation.
TB 9-2300-281-35, Standards for Overseas Shipment or Domestic Issue of Special Purpose Equipment.
TM 38-250/AFR 71-4, Preparation of Hazardous Materials for Military Air Shipment.
c. Definitions.
Technical terms that may be helpful while using this appendix are:
(1) Axle Limits. A load limit set by highway officials or designers of ship decks and aircraft as the maximum axle (or
group of axles) weight that can be supported.
(2) Center of Gravity (CG). The balance point of a suspended item. The ATLAS counterweight is used to shift CG to the
rear. CG location is indicated by a symbol stencilled on the vehicle.
(3) Curb Weight (CW). Total weight of operational ATLAS including fuel, all system fluids, and on-vehicle basic issue
items (BII). CW does not include crew weight, which in this case is less than 1 percent of the gross vehicle weight.
(4) Gross Vehicle Weight (GVW). CW plus payload. For transport purposes, a forklift has no payload. Therefore the
GVW equals the CW.
(5) Safe Working load (SWL). The SWL is the maximum recommended load that should be exerted on an item. SWL is
also referred to as “working load,” “working load limit,” or “resultant safe working load.” Such rated load values are for inline pull.
(6) Loading Restraint Factors (LRF). The LRF, given in this appendix for the surface and air modes, are considered to
be the “G” factors that can be expected in military transport.
F-1
TM 10-3930-673-10
F-2. SAFETY
a. General. Even though the ATLAS has no special hazardous or dangerous characteristics during exposure to normal
transportation environments, several general safety considerations and precautions are important.
(1) Check the entire vehicle to be sure loose items are properly secured.
(2) Have fire extinguishers readily available when operating the ATLAS.
(3) Make sure only qualified personnel operate the ATLAS.
(4) Never permit riders. This is a one-person machine.
(5) Do not leave the ATLAS unattended while the engine is running.
(6) Do not allow the ATLAS to exceed 3 miles per hour during loading and unloading operations.
(7) Do not drive the ATLAS on public highways without the appropriate safety equipment.
(8) Adhere to all local, state, federal, and host-nation safety laws and regulations applying to commercial carriers.
b. Hazardous Material Considerations. The basic ATLAS does not contain hazardous material. Regulations or
transportation procedures covered diesel-fuel-powered vehicles will apply.
F-3. EQUIPMENT DESCRIPTION
a. General.
(1) The ATLAS is designed for loading and unloading munitions and other palletized items from transport vehicles and
containers. The ATLAS is also designed for use as a standard rough terrain forklift. The ATLAS can handle boxes, palletized
ammunition loads, and other palletized items from transport vehicles and containers. The vehicle frame can be tilted 9 degrees
to left or right, which allows vehicle to be level when traversing a sideslope. The attachment can be raised to a nearly
horizontal position for loading and unloading munitions. The forks tilt, level, and sideshift to maneuver loads. With 6K
carriage, lifts loads of 6,000 lbs to a height of 28 ft. With 10K carriage, lifts loads of 4,000 lbs to a height of 27.5 ft, and 10,000
lbs to a height of 17 ft, and can tow other vehicles weighing 33,500 pounds or less. The operator can select one of three
steering modes: two wheel, four wheel, and crab wheel. The ATLAS is all-weather operational, and can ford in up to 36 inches
of water. The ATLAS has a maximum speed of 23 mph over level ground with evenly distributed load.
F-2
TM 10-3930-673-10
b. Technical Data. The following selected characteristics and data apply to the ATLAS. More characteristics and data
can be found in Table 1-1, Equipment Data in Chapter 1 of this TM and in Figures
F-1 through F-8.
Vehicle Operational Weights:
With 6K carriage . . . . . . . . . . . . . . . . . . . . . . . . . . . . . . . . . . . . . . . . . . . . . . . . . . . . . . . . . . . . . . . . . . . . . . . . . . . 31,300 lb
With 10K carriage . . . . . . . . . . . . . . . . . . . . . . . . . . . . . . . . . . . . . . . . . . . . . . . . . . . . . . . . . . . . . . . . . . . . . . . . . . 32,600 lb
Roading (both carriages) . . . . . . . . . . . . . . . . . . . . . . . . . . . . . . . . . . . . . . . . . . . . . . . . . . . . . . . . . . . . . . . . . . . . . 33,500 lb
Boom Assembly Weight . . . . . . . . . . . . . . . . . . . . . . . . . . . . . . . . . . . . . . . . . . . . . . . . . . . . . . . . . . . . . . . . . . . . . . . .5,165 lb
Max Length in Carry Position:
With 6K carriage . . . . . . . . . . . . . . . . . . . . . . . . . . . . . . . . . . . . . . . . . . . . . . . . . . . . . . . . . . . . . . . . . . . . . . . . . . . 324.2 in.
With 10K carriage . . . . . . . . . . . . . . . . . . . . . . . . . . . . . . . . . . . . . . . . . . . . . . . . . . . . . . . . . . . . . . . . . . . . . . . . . . 356.3 in.
Roading . . . . . . . . . . . . . . . . . . . . . . . . . . . . . . . . . . . . . . . . . . . . . . . . . . . . . . . . . . . . . . . . . . . . . . . . . . . . . . . . . . 356.3 in.
Width . . . . . . . . . . . . . . . . . . . . . . . . . . . . . . . . . . . . . . . . . . . . . . . . . . . . . . . . . . . . . . . . . . . . . . . . . . . . . . . . . . . . . . 100.2 in.
Max Height . . . . . . . . . . . . . . . . . . . . . . . . . . . . . . . . . . . . . . . . . . . . . . . . . . . . . . . . . . . . . . . . . . . . . . . . . . . . . . . . . . . 107 in.
Track Width (Tread) . . . . . . . . . . . . . . . . . . . . . . . . . . . . . . . . . . . . . . . . . . . . . . . . . . . . . . . . . . . . . . . . . . . . . . . . . . . . 80.3 in
Max lift height with 6K carriage:
6,000 lb (max height) . . . . . . . . . . . . . . . . . . . . . . . . . . . . . . . . . . . . . . . . . . . . . . . . . . . . . . . . . . . . . . . . . . . .27 ft, 11.5 in.
Max lift height with 10K carriage:
6,000 lb (max height) . . . . . . . . . . . . . . . . . . . . . . . . . . . . . . . . . . . . . . . . . . . . . . . . . . . . . . . . . . . . . . . . . . . . . . 27 ft, 8 in.
8,000 lb . . . . . . . . . . . . . . . . . . . . . . . . . . . . . . . . . . . . . . . . . . . . . . . . . . . . . . . . . . . . . . . . . . . . . . . . . . . . . . . 24 ft, 9.5 in.
10,000 lb . . . . . . . . . . . . . . . . . . . . . . . . . . . . . . . . . . . . . . . . . . . . . . . . . . . . . . . . . . . . . . . . . . . . . . . . . . . . . . . 16 ft, 11 in.
Boom Lift Angle (Maximum) . . . . . . . . . . . . . . . . . . . . . . . . . . . . . . . . . . . . . . . . . . . . . . . . . . . . . . . . . . . . . . . . . .45 degrees
Ground Clearance . . . . . . . . . . . . . . . . . . . . . . . . . . . . . . . . . . . . . . . . . . . . . . . . . . . . . . . . . . . . . . . . . . . . . . . . . .15.2 in. min
Curb to Curb Turning Circle (Diameter). . . . . . . . . . . . . . . . . . . . . . . . . . . . . . . . . . . . . . . . . . . . . . . . . . . . . . . . . 27 ft, 10 in.
Frame Oscillation . . . . . . . . . . . . . . . . . . . . . . . . . . . . . . . . . . . . . . . . . . . . . . . . . . . . . . . . . . . . . 9 degrees to the left or right
c. Reduced Configuration. The ATLAS is configured as a single unit (with the counterweight installed and 6K
carriage stowed on the 10K carriage) for highway transport, rail transport, and air transport on C-141 and C-5 aircraft. For
transport on C-130 aircraft, the following are required:
(1) Both the 6K and 10K carriages shall be removed from the ATLAS and placed on a 463L pallet. Refer to paragraph
2-12. 6K/10K Fork Carriage Removal/Installation.
(2) The counterweight shall be removed from the ATLAS and placed on the same 463L pallet. Refer to paragraph
2-14. Counterweights Removal/Installation.
F-3
TM 10-3930-673-10
F-4. MODES OF TRANSPORTATION
a. Highway.
(1) The ATLAS is self-propelled at speeds up to 23 mph.
(2) The ATLAS is furnished with a pintle hook in the rear of the vehicle conforming to MS51118 for towing speeds up
to 15 mph. Provision for attachment of safety chains are provided in accordance with SAE J697. The ATLAS is equipped with
two vehicular towing lugs at the rear of the vehicle conforming to MS500004 which provide clearance to connect a towbar
conforming to MS500048. The towing procedures are found in Paragraph 2-31.
(3) The ATLAS is capable of being transported over the highway on standard military and commercial trailers. Refer to
Figure F-9.
b. Rail. The ATLAS is rail-transportable in CONUS and NATO countries without restriction. When loaded on a 50 inch
high rail car, the ATLAS has a dimensional profile within the ARR and GIC outlines as prescribed in MIL-STD-1366. Refer to
Figure F-10. The ATLAS withstands the shock loads resulting from rail impact (when tested in accordance with MIL-STD810) without failure, damage, or permanent deformation. Refer to Figure F-10.
c. Oceans and Waterways. The ATLAS is transportable by breakbulk cargo ships, roll-on/roll-off (RORO) ships: C-8
and larger. Lighter aboard ship (LASH); barge carrying ships (SEABEE); Lighter, Amphibious, resupply, cargo (IARC)-LX,
and larger lighter vessels; landing craft utility (LCU); landing craft mechanized (LCM); and Army barges and lighters in
accordance with MIL-STD-1366. The ATLAS will withstand without damage, the shock, rolling (up to 15 degrees), and
pitching (up to 10 degrees) normally experienced in marine transportation on the deck or in the hold of a cargo vessel.
d. Air. The ATLAS meets the requirements of MIL-STD-1791 for transport on C-130, C-141, and C-5 aircraft. The
ATLAS can be directly driven onto C-141 and C-5 aircraft. Refer to Figure F-11. and Figure F-12. The ATLAS can be
reconfigured for transport on C-130 aircraft (maximum axle loading of 13,000 lbs.) by two personnel without the use of
special tools by removing the counterweight and carriages. Refer to Figure F-13.
F-4
TM 10-3930-673-10
F-5. LOADING AND UNLOADING THE ATLAS ON BOARD A C-130 AIRCRAFT
a. Loading the ATLAS.
(1)
Place six pieces of lumber measuring 2 x 12 x 66 inches (51 x 305 x 1676 mm) for shoring, stacked three high in
two rows on 463L pallet as shown. This shoring will be used to shore the counterweight and 10K carriage.
(2)
Place four pieces of lumber measuring 2 x 12 x 36 inches (51 x 305 x 914 mm) for shoring, stacked two high in
two rows on the end of the 463L pallet. This shoring will be used to shore the 6K carriage.
NOTE
Ensure that the fork tines of the 6K carriage are in the center and fully closed position.
(3)
Remove the ATLAS 6K carriage and install the 10K carriage (Para 2-12).
(4)
Using the ATLAS with 10K carriage installed, pick the 6K carriage up with 6K tines facing away from cab.
(5)
Drive the ATLAS to the 463L pallet, approaching from the 108 inch side of the pallet where the 6K shoring is
stacked.
Change 1
F-5
TM 10-3930-673-10
F-5. LOADING AND UNLOADING THE ATLAS ON BOARD A C-130 AIRCRAFT (CONT)
(6)
Position 6K carriage over the 463L pallet with the back end of carriage at outer edge of pallet.
NOTE
• Carriage should not protrude past the edge of the 463L pallet.
• Carriage should be centered between left and right sides of 463L pallet.
(7)
Lower the 6K carriage onto the shoring and 463L pallet and drive ATLAS away from pallet.
(8)
Remove the ATLAS counterweight assembly (Para 2-14).
WARNING
• Use extreme care when lifting counterweight with forklift. Counterweights weigh 5800 lbs (2633.2
kg) and its center of gravity (CG) is off center. Never allow forks to tip forward. Always tie
counterweight lifting eyes to the lifting forklift. Counterweight must be handled using another 10K
ATLAS/10K carriage and lifted through lifting eyes located at the top of the counterweight. Keep
hands or fingers out of holes for counterweight pins. Failure to comply could result in serious
injury or death to personnel.
• When the ATLAS is being operated without counterweight, care must be taken to avoid tipping the
vehicle over. Boom extension must be kept at a minimum. Failure to comply could result in serious
injury or death to personnel.
(9)
F-6
Using the ATLAS with 10K carriage installed, pick the counterweight up from the front side (side without pintle
hook) through the lifting eyes.
TM 10-3930-673-10
(10)
Drive the ATLAS to the 463L pallet, approaching from the 108 inch side of the pallet where the counterweight and
10K shoring is stacked.
(11)
Position counterweight over the 463L pallet with the counterweight centered fore and aft.
NOTE
• Counterweight should also be centered between left and right sides of 463L pallet.
• Space must be allowed to position 10K fork tines between outer edge of 6K fork tines and inner
edge of counterweight blocks.
(12)
Lower the counterweight onto the shoring and 463L pallet and drive ATLAS away from pallet to the aircraft.
(13)
Place support blocks under the heels of the 6K fork tines to prevent tipping during transport.
(14)
Using the ATLAS with 10K carriage installed, approach the 463L pallet (with counterweight and 6K carriage)
from the side opposite the shored 6K carriage.
(15)
Using the ATLAS with 10K carriage installed, pick up the 463L pallet (with counterweight and 6K carriage).
Change 1
F-7
TM 10-3930-673-10
F-5. LOADING AND UNLOADING THE ATLAS ON BOARD A C-130 AIRCRAFT (CONT)
NOTE
The 463L pallet is compatible with the roller system of the C-130 aircraft.
(16.0) Place a wheel chock or other shoring material at rear of rear ramp of aircraft to temporarily support 463L pallet to
allow 10K forks to be withdrawn from under pallet.
(16)
With the rear ramp of the C-130 in horizontal position, place 463L pallet on rear ramp with the lateral (108 inch)
side perpendicular to aircraft.
(16.1) Partially withdraw 10K forks from under pallet to tapered portion of forks. Raise forks sufficiently to allow
removal of chock or shoring material. Remove chock or shoring material. Completely lower pallet to ramp and
completely withdraw 10K forks.
(17)
Remove support blocks from under heels of 6K fork tines.
(18)
Align the 10K carriage for positioning on the 463L pallet with the fork tines extending through the counterweight
crossmember and outside the 6K carriage fork tines.
(19)
(20)
Disconnect hydraulic couplings of the 10K carriage (Para 2-12).
(21)
F-8
(22)
Position 10K fork tines to extend past the edge of the 463L pallet by 2 inches (50.8 mm) and lower the 10K
carriage onto the shoring and 463L pallet.
(23)
Remove the 10K carriage from the ATLAS (Para 2-12).
Change 1
TM 10-3930-673-10
NOTE
• The ATLAS boom extension may be used to roll 463L pallet forward off the ramp and onto the
aircraft where loading personnel can roll the pallet to the far end of the aircraft.
• If the C-130 aircraft is not level, the 463L pallet shall be attached to the winch and guided by the
winch to the front of the aircraft.
(24)
Roll 463L pallet (with counterweight and both carriages) toward front of the C-130.
NOTE
The rear of the 463L pallet should not cover the 9th row of tiedown rings on the floor of the C-130
aircraft.
(25)
Position the front end of the 463L pallet at fuselage station FS317 (approximate location of the 4th row of tiedown
rings on the floor.)
(26)
Lock the 463L pallet into position using the C-130 pallet rail locking system.
CAUTION
Do not allow chaining to scratch, nick, or dent carriage fork shaft or side shift cylinder rods. Failure to
follow this caution will result in equipment damage.
(27)
(28)
(29)
Restrain the 6K carriage, refer to Figure F-13.
(a)
Chain the 6K carriage around the hole in the left carriage restraint bracket to the floor tiedown ring at 3C,
and around the hole in the right carriage restraint bracket to the floor tiedown ring at 3E.
(b)
Chain the 6K carriage around the right side plate to the 6th ring on the right side restraining rail assembly
(6A), and around the left side plate to the 6th ring on the left side restraining rail assembly (6A).
Restrain the counterweight.
(a)
Attach a chain at the 3rd ring on the left side of the restraining rail assembly (3G), through the counterweight
lifting eye, and to the 9th ring on the left side of the restraining rail assembly (9G).
(b)
Attach a chain at the 3rd ring on the right side of the restraining rail assembly (3A), through the
counterweight lifting eye, and to the 9th ring on the right side of the restraining rail assembly (9A).
Restrain the 10K carriage.
(a)
Attach a chain to the left and right side backrests and to the 5th tiedown ring of the restraining rail assembly
(5G and 5A) on the left and right sides.
Change 1
F-9
TM 10-3930-673-10
F-5. LOADING AND UNLOADING THE ATLAS ON BOARD A C-130 AIRCRAFT (CONT)
(b)
Place a chain around the left side of the top backrest to ring (10C) on the floor of the aircraft. The chains
should cross each other.
(c)
Place a chain around the right side of the top backrest and secure chain to ring (10E) on the floor of the
aircraft.
CAUTION
Do not allow chaining to scratch, nick or dent carriage fork shaft or side shift cylinder rods. Failure to
follow this caution will result in equipment damage.
(d)
If damage of the 10K backrest is noted, chain the carriage around the side plate beneath the sideshift bar.
(30)
Extend or retract the boom to the location indicated on the boom for the C-130 transport.
(31)
Extend the attachment cylinder until the attachment is fully raised.
(32)
Open the top window portion of the operator’s cab door and restrain in the open position to allow the operator to
exit the ATLAS in the C-130 aircraft.
CAUTION
Adjust boom angle to horizontal before backing up aircraft ramp and carefully adjust boom angle, as
required, to assure that a) front of boom does not make contact with either ramp below or aircraft door
above, and b) to assure that rear top of boom does not make contact with aircraft door above.
NOTE
The ATLAS shall be backed up toward the right side of the aircraft to allow a safety aisle on the left
side of the aircraft.
(33)
Back the ATLAS onto the C-130 aircraft until the rear axle is at fuselage station FS530 of the cargo area and the
front axle is at fuselage station FS654.
(34)
Lower the boom until the lift cylinder bottoms out and the boom is at its lowest position.
(35)
Shut off the engine, move the parking brake switch to ON position, and place the transmission select lever in
neutral and switch auxiliary fuel shut-off switch to OFF position.
(36)
Refer to Figure F-13. and tie down the ATLAS.
(37)
Place sleeper shoring under both axles of the vehicle such that the shoring does not bear any of the weight initially,
but the shoring will absorb any bounce of the ATLAS during flight.
(38)
In the area where the underside of boom is closest to top of frame, place a 13-1/8 inch thick piece (or stack) of
sleeper shoring between top frame plate of the ATLAS and the boom to absorb any vibration of the boom that may
occur during flight. Secure sleeper shoring in place.
b. Unloading the ATLAS.
F-10
(1)
Untie the ATLAS and remove sleeper shoring.
(2)
Start the engine, release the parking brake, and place the transmission select lever in forward. Speed range ‘1’
should also be selected.
(3)
Drive the ATLAS out of the cargo hold.
Change 1
TM 10-3930-673-10
(4)
Remove chains from carriage and counterweight.
(5)
Unlock the 463L pallet from the C-130 pallet rail locking system.
(6)
Roll 463L pallet (with counterweight and carriages) toward ramp of the C-130.
(7)
With the rear ramp of the C-130 in horizontal position, place 463L pallet on rear ramp with lateral (108 inch) side
perpendicular to aircraft.
(8)
Drive the ATLAS to the 463L pallet, approaching from the side of the pallet where the 10K carriage is shored.
(9)
Install the 10K carriage on the ATLAS (Para 2-12) and back up the ATLAS.
WARNING
When the ATLAS is being operated without counterweight, care must be taken to avoid tipping the
vehicle over. Boom extension must be kept at a minimum. Failure to comply could result in serious
injury or death to personnel.
(10)
Using the ATLAS with 10K carriage installed, pick up the 463L pallet (with counterweight and 6K carriage).
(11)
Position 463L pallet on stable level ground in suitable area.
(12)
Drive the ATLAS to the 463L pallet, approaching from the 108 inch side of the pallet where the counterweight and
10K shoring is stacked.
WARNING
Counterweight assembly weighs 5,800 lbs. Keep out from underneath counterweight assembly. Do not
stick fingers or hands in holes for counterweight pins. Failure to comply could result in injury or
death to personnel.
(13)
Using the ATLAS with 10K carriage installed, pick the counterweight up through the lifting eyes, and place on
stable level ground in suitable area.
(14)
Install counterweight assembly on the ATLAS (Para 2-14).
(15)
Drive the ATLAS toward the 463L pallet, approaching from the side of the pallet where the 6K carriage and
shoring is stacked.
(16)
Using the ATLAS with10K carriage installed, pick the 6K carriage up and place on stable level ground in suitable
area.
(17)
Remove shoring from 463L pallet.
Change 1
F-11
TM 10-3930-673-10
F-6. REFERENCES
e. Army Regulations (AR).
55-80
DoD Transportation Engineering Program
55-162
Permits for Oversize, Overweight, or Other Special Military Movements on Public Highways in
the United States
55-355
Defense Traffic Management Regulation
70-44
DoD Engineering for Transportability
70-47
Engineering for Transportability
f. Field Manuals (FM).
5-34
Engineer Field Data
5-170
Engineer Reconnaissance
55-15
Transportation Reference Data
55-17
Cargo Specialist’s Handbook
g. Supply Bulletins (SB).
700-20
Army Adopted/Other Items Selected for Authorization/List of Reportable Items
h. Technical Bulletins (TB).
55-46-1
Standard Characteristics (Dimensions, Weight, and Cube) for Transportability of Military
Vehicles and Other Outside/Overweight Equipment
i. Technical Manuals (TM).
38-250
(AFR 71-4)
Preparing Hazardous Materials for Military Air Shipment
55-500
Watercraft Equipment Characteristics and Data
55-2200-001-12
Transportability Guidance: Application of Blocking, Bracing, and Tiedown Materials for Rail
Transport
j. Air Force Manuals.
F-12
TO IC-5A-9
Loading Instructions, USAF Series C-5 Aircraft
TO IC-130E-9
Loading Instructions, USAF Series C-130 Aircraft
TO IC-141B-9
Loading Instructions, USAF Series C-141 Aircraft
Change 1
TM 10-3930-673-10
k. Other Publications.
Code of Federal Regulation, Title 49-Transportation Parts, 107-179 and Title 46-Shipping, Part 146
Available from: Superintendent of Documents
US Government Printing Offices
Washington, DC 20402
Association of American Railroads, Rules of Governing the Loading of Commodities on Open-Top Cars and Trailers
Section No. 1-General rules
Section No. 2-Rules Governing the Loading of Department of Defense Materiel on Open-Top Cars
Available from: Association of American Railroads
50 F Street, NW
Washington, DC 20001-1564
4th Transportation Command Pamphlet 55-2, Tiedown Guide of Rail Movement
Available from: 1st Transportation Movement Control Agency
ATTN: AEUTR-MCA-TA
APO New York 09451-4000
.
F-7. LOADING RESTRAINT FACTORS
The loading restraint factors (LRF) used for surface and air modes are the “G” (acceleration of gravity) loading factors that can
be expected in military transport. The tiedown arrangements shown in the figures are based on the following:
-restraint factors are applied independently in each direction
-restraint load (GVW times the LRF) was resolved into resultant lashing loads, allowing for tiedown angle
-lashing loads are less safe than safe working load (SWL) of the restraint (that is, chain)
Highway:
The Transportation Engineering Agency highway LRFs are:
-0.7 in the forward direction (relative to the transporter)
-0.3 in the aft and vertical directions
-0.1 in the lateral direction
Rail:
The Association of American Railroads recommended rail LRFs are:
-3.0 in the longitudinal direction (relative to the railcar)
-2.0 in the lateral and vertical directions
F-13
TM 10-3930-673-10
F-7. LOADING RESTRAINT FACTORS (CONT)
Marine:
The Military Sealift Command (MSC) design LRFs are:
-1.2 in the lateral direction (relative to the ship)
-0.7 in the longitudinal direction
-0.2 in the vertical direction
MSC LRFs are for severe conditions
Actual marine LRFs vary. Marine tiedown restraint depends on the size of the ship (decreasing on larger vessels), the expected
sea state to be encountered, and the stow location of a given ship. Generally, the restraint required will increase for locations
high and forward (or aft) in the ship. The most severe conditions will occur on exposed “weather decks,” where strong wind
and wet conditions add to the problem. A ship’s crew may require additional lashing on exposed decks. Below-deck locations
that are closer to the vessel’s center of gravity and rotation will experience less severe motion.
Air:
The USAF aircraft LRFs are:
-3.0 in the forward direction (relative to the aircraft)
-2.0 in the vertical direction
-1.5 in the aft and lateral directions
F-8. ESTIMATING TIEDOWNS
The number of lashings required to safely tie down the ATLAS for highway transport on a typical truck/semitrailer can be
estimated in the following manner:
Step 1- Determine the amount of longitudinal restraint needed. (With this method, the required vertical and lateral restraint is
covered by the longitudinal factors.)
-The highway loading restraint factor (LRF) is 0.7 (from Para 6-6) in the forward direction:
33,500 (ATLAS GVW) x 0.7 = 23,450 pounds
-The highway LRF is 0.3 in the aft direction:
33,500 x 0.3 = 10,050 pounds
Step 2-Determine the amount of chains needed.
-The angle to semitrailer deck and the angle to the angle to the side are assumed to be 45 degrees.
(cos 45 x cos 45 = 0.5)
-The SWL of the requisite 1/2-in. chain is 13,750:
23,450
= 3.4 (rounded up to 4)
Number of forward loading chains =
13,750 x 0.5
Number of aft loading chains =
10,050
= 1.5 (rounded up to 2)
13,750 x 0.5
F-9. FIGURES
The following figures present transportability data for the ATLAS.
F-14
TM 10-3930-673-10
CENTER OF
GRAVITY
.09 IN.
22.9 mm
67.8 IN.
1722.1 mm
63.9 IN.
1623.1 mm
50.9 IN.
1292.9 mm
40.3 IN.
1023.6 mm
32.8 IN.
833.1 mm
44.9 IN.
1140.5 mm
39.3 IN.
998.2 mm
8.0 IN.
203.2 mm
15.7 IN.
398.8 mm
13.5 IN.
342.9 mm
49.6 IN.
1259.8 mm
16.6 IN.
421.6 mm
43.6 IN.
1107.4 mm
124.0 IN.
3149.6 mm
21.0 IN.
533.9 mm
56.5 IN.
1435.1 mm
TIEDOWN EYE CAP: 13,300 LBS (6033 KG) MIN.
LIFTEYE CAP: 99,500 LBS (45133 KG)
Figure F-1. ATLAS Shipping Data
F-15
TM 10-3930-673-10
VIEW OF TOP
FRONT VIEW SHOWN W/O
BOOM FOR CLARITY
VIEW OF LEFT SIDE
107 IN.
2717.8 mm
101.1 IN.
2567.9 mm
38.0 IN.
965.2 mm
15.3 IN.
388.6 mm
80.3 IN. TRACK
2039.6 mm
37.8 IN.
960.1 mm
WIDTH 100.2 IN.
2545.1 mm
229.6 IN.
5831.8 mm
WHEELBASE
124.0 IN.
3149.6 mm
324.2 IN.
8234.7 mm
VIEW OF RIGHT SIDE
AXLE & TIRE DATA
AXLE
AXLE LOAD
LOAD / TIRE
FOOTPRINT AREA @ 65 PSI
448 kPa
REAR
21,330 LBS
9675 KG
10,670 LBS
4840 KG
175 SQ IN.
1129 CM2
FRONT
9,350 LBS
4241 KG
4,675 LBS
2121 KG
75 SQ IN.
484 CM2
Figure F-2. Vehicle Configuration with 6,000 lb. Carriage
F-16
TM 10-3930-673-10
VIEW OF TOP
FRONT VIEW SHOWN W/O
BOOM FOR CLARITY
VIEW OF LEFT SIDE
107.0 IN.
2717.8 mm
101.1 IN.
2567.9 mm
38.0 IN.
965.2 mm
15.3 IN.
388.6 mm
80.3 IN. TRACK
2039.6 mm
43.6 IN.
1107.4 mm
WIDTH 100.2 IN.
2545.1 mm
229.6 IN.
5831.8 mm
WHEELBASE
124.0 IN.
3149.6 mm
356.3 IN.
9050.0 mm
VIEW OF RIGHT SIDE
AXLE & TIRE DATA
AXLE
AXLE LOAD
LOAD / TIRE
FOOTPRINT AREA @ 65 PSI
448 kPa
REAR
20,740 LBS
9408 KG
10,370 LBS
4704 KG
170 SQ IN.
1097 CM2
FRONT
11,260 LBS
5108 KG
5,630 LBS
2554 KG
92 SQ IN.
594 CM2
Figure F-3. Vehicle Configuration with 10,000 lb. Carriage
F-17
TM 10-3930-673-10
VIEW OF TOP
FRONT VIEW SHOWN W/O
BOOM FOR CLARITY
VIEW OF LEFT SIDE
106.9 IN.
2715.3 mm
101.3 IN.
2573.0 mm
38.3 IN.
972.8 mm
15.4 IN.
388.6 mm
80.3 IN. TRACK
2039.6 mm
49.6 IN.
1259.8 mm
WHEELBASE
124.0 IN.
3149.6 mm
229.6 IN.
5831.8 mm
356.3 IN.
9050.0 mm
WIDTH 100.2 IN.
2545.1 mm
VIEW OF RIGHT SIDE
AXLE & TIRE DATA
AXLE
AXLE LOAD
LOAD / TIRE
FOOTPRINT AREA @ 65 PSI
448 kPa
REAR
19,900 LBS
9027 KG
9,950 LBS
4513 KG
165 SQ IN.
1065 CM2
FRONT
13,280 LBS
6024 KG
6,640 LBS
3012 KG
110 SQ IN.
710 CM2
Figure F-4. Vehicle Configuration with Both Carriages
F-18
TM 10-3930-673-10
LL
31 F
T6
IN.
(9
TO 601.2 m
WA
LL T m) DIA
URN
R
ING EARW
RAD ARD
IUS
WA
LL
A
RD W
RWA
M FO FORKS
U
IM
AX
10K
CENTER OF TURNING RADIUS
DIA M IRCLE C
mm)
27.0 RANCE
8
2
1
.(
EA
L CL
ARD
T 1 IN
42 F TO WAL
IMUM FORW
m) DIA MAX LE - 6 K FORKS
m
.2
98
09
. (1
CIRC
E
NC
36 FT 1 IN
RA
WALL CLEA
WALL TO
IMUM
IA MAX
mm) D CE CIRCLE
.6
5
1
5
N
0
LEARA
26 FT 10 IN. (8178.8 mm) DIA ACTUAL CURB
6 IN. (1
34 FT BLE CURB C
A
TO CURB TURNING CIRCLE
ALLOW
33.000°
97.52
2477.0
64.12 IN.
1628.6 mm
KP TO KP
27.981°
10K FORK
IN WIDEST
POSITION
6K FORK
(CARRIAGE NOT SHOWN)
IN WIDEST POSITION
WHEELBASE
124.02 IN. (3150.1 mm)
Figure F-5. ATLAS Steering Geometry
F-19
TM 10-3930-673-10
5.3 IN. (134.6 mm)
CLEARANCE
65 PSI
448 kPa
65 PSI
448 kPa
10.665
LBS / TIRE
23.8" RAD.
4.675
LBS / TIRE
24.9" RAD.
25°
2.0 IN. (50.8 mm)
CLEARANCE
0
10,00
LBS
4536
KG
S
LB
000 G
10, 536 K
4
10,000 LBS
4536 KG
65 PSI
448 kPa
65 PSI
448 kPa
4.825
LBS / TIRE
24.9" RAD.
16.175
LBS / TIRE
22.7" RAD.
4.7 IN.(119.4 mm)
CLEARANCE
3.5 IN.(88.9 mm)
CLEARANCE
Figure F-6. Approach and Departure Ramp Clearance
F-20
TM 10-3930-673-10
16.85 IN.
427.9 mm
FRONT VIEW SHOWN W/O
BOOM FOR CLARITY
VEHICLE CENTER
OF GRAVITY
PROVISION a (LEFT SIDE)
b (RIGHT SIDE)
PROVISION c (LEFT SIDE)
d (RIGHT SIDE)
63.9 IN.
1623.1 mm
44.9 IN.
1140.5 mm
49.6 IN.
1259.8 mm
50.6 IN.
1285.2 mm
74.4 IN.
1889.8 mm
58.6 IN.
1488.4 mm
15.7 IN.
398.8 mm
Figure F-7. Slinging Provision Configuration
F-21
TM 10-3930-673-10
35.6 IN.
904.2 mm
(B, F)
17.8 IN.
452.1 mm
(B, F)
10.0 IN.
254.0 mm
(E)
20.0 IN.
508.0 mm
(E)
16.9 IN.
429.3 mm
(A, C, D)
33.7 IN.
856.0 mm
(A, C, D)
TIEDOWN F
TIEDOWN A TIEDOWN B
67.8 IN.
1722.1 mm
40.3 IN.
1023.6 mm
39.3 IN.
998.2 mm
32.8 IN.
833.1 mm
TIEDOWN C
TIEDOWN D
TIEDOWN E
21.0 IN.
533.4 mm
110.8 IN.
2814.3 mm
140.6 IN.
3571.2 mm
13.7 IN.
348.0 mm
167.6 IN.
4257.0 mm
Figure F-8. Tiedown Provision Location
F-22
8.0 IN.
203.2 mm
TM 10-3930-673-10
48.9 IN.
1242.1 mm
101.7 IN.
2583.2 mm
MAX HEIGHT
100.2 IN.
2545.1 mm
TRANSMISSION IN NEUTRAL
PARKING BRAKE SET
.38 IN.
9.7 mm
CHAIN MIN.
9,000 LBS
(4082.4 KG)
CAPACITY
APPROX. 45°
4.0
IN.
101.6
mm
54.0
IN.
1371.6
mm
REF
STANDARD 96" COMMERCIAL
TRAILER SHOWN
6K CARRIAGE STOWED ON
10 K CARRIAGE
(REF OPERATOR'S MANUAL)
Figure F-9. Truck Transportability
F-23
TM 10-3930-673-10
NORTH AMERICAN
RAIL TRANSPORT
GAUGE
NATO GIC EQUIPMENT GAUGE
48.9 IN.
1242.1 mm
48.9 IN.
1242.1 mm
2.5 IN.
63.5 mm
TO MEET NATO GABARIT
DE CHARGEMENT (GIC)
REQUIREMENS FOR
"ORDINARY" TRANSPORT,
THE VEHICLE IS TO BE
LOADED ON THE RAIL
CAR AS FAR TO
THE RIGHT AS POSSIBLE
(2.5 IN. [63.5 mm] OFF CENTER)
AND TIRE PRESSURE IS
TO BE REDUCED TO 40 PSI
(276 LPa)
TRANSMISSION IN NEUTRAL
APPROX. 45°
PARKING BRAKE SET
TIRE PROTECTIVE
MATERIAL
CHAIN
6 IN.
152.4 mm
4.0
IN.
101.6
mm
50.0 IN.
1270 mm
6K CARRIAGE STOWED ON
10 K CARRIAGE
(REF OPERATOR'S MANUAL)
AXLE & TIRE DATA
AXLE
AXLE LOAD
LOAD / TIRE
FOOTPRINT AREA @ 40 PSI
276 kPa
FOOTPRINT AREA @ 65 PSI
448 kPa
REAR
19,900 LBS
9027 KG
9,950 LBS
4513 KG
217 SQ IN.
1400 CM2
165 SQ IN.
1065 CM2
FRONT
13,280 LBS
6024 KG
6,640 LBS
3012 KG
146 SQ IN.
942 CM2
110 SQ IN.
710 CM2
Figure F-10. Rail Transportability and GIC Clearance
F-24
TM 10-3930-673-10
FUS. STA
704
FUS. STA 704
864
1024
1184
1344
1504
1136
16641706
1706
1884
1884
AXLE & TIRE DATA
AXLE
AXLE LOAD
LOAD / TIRE
FOOTPRINT AREA @ 65 PSI
448 kPa
REAR
19,900 LBS
9027 KG
9,950 LBS
4513 KG
165 SQ IN.
1065 CM2
FRONT
13,280 LBS
6024 KG
6,640 LBS
3012 KG
110 SQ IN.
710 CM2
Figure F-11. Air Transport, C-5A Configuration
F-25
TM 10-3930-673-10
1.5 IN.
38.1 mm
UNDER
MAXIMUM
APPROX.
45°
103 IN.
2626.2mm
6K CARRIAGE STOWED ON
10 K CARRIAGE
(REF OPERATOR'S MANUAL)
TRANSMISSION IN NEUTRAL
TRAK WIDTH
100.2 IN.
2545.1 mm
11.25 IN.
2825.8 mm
MAXIMUM
TYPICAL
SECTION
111 IN.
2819.4 mm
103 IN.
2626.2mm
103 IN.
2616.2mm
AFT OPENING
DESIGN LIMITS
FS 734, 958,
998 & 1058
FRONT OF VEHICLE
19
20
21
G
22
23
24
12
8
25
26
27
28
29
16
10
E
31
32
33
36
37
38
39
28
30
6
35
32
18
14
34
24
20
4
F
30
22
26
2
D
C
B
1
5
21 25
9
3
A
31
FS
434
7
29
13
11
15
17
27
23
19
FS
678
FUS. STA.
292 322
C
398
D
458
E
518
F
578
G
678
H
735
I
818
J
898
K
958 998
L
M
1058
N
1178
0
1258
P
1338
Q
1412
R
1478
S
1543
T
AXLE & TIRE DATA
REAR
19,900
LBS
AXLE LOAD
9027.0 KG
9,950 LBS
LOAD / TIRE
4513.0 KG
FOOTPRINT AREA @ 65 PSI 165 SQ IN.
448 kPa 1064.5 CM2
AXLE
Figure F-12. Air Transport, C141 Tiedowns
F-26
FRONT
13,280 LBS
6024.0 KG
6,640 LBS
3012 KG
110 SQ IN.
709.7 CM 2
TM 10-3930-673-10
CLEARANCE
ENVELOPE
SAFETY AISLE
102 IN.
2590.8 mm
100.2 IN.
2545.1 mm
TRACK WIDTH
105 IN.
2667.0 mm
MAXIMUM
VIEW LOOKING REARWARD
THROUGH AIRCRAFT
FRONT OF VEHICLE
1
G
2
3
4
5
6
7
8
9
10
11
9
4
F
12 13
12
14
15
16
18 19
20
21
22
20
23
24 25
24
28
10
5
18
14
32
30
2
E
17
16
22
26
21
25
D
C
31
1
B
3
A
FS245
C
281
D
337
E
401
5
9
7
11
F
457
13
17
15
G
517
CARGO COMPARTMENT
HEIGHT ENVELOPE
19
H
597
23
I
J
627
682
27
K
BOOM EXTENDED 8' - 1" (2463.8 mm)
AND FULLY LOWERED
737
ATTACHMENT
FULLY RAISED
PARKING BRAKE SET
APPROX.
45°
TRANSMISSION IN NEUTRAL
463L PALLET DATA
290 LBS
463L PALLET
131.5 KG
2,520 LBS
10,000 LB FORK CARRIAGE WEIGHT
1143.1 KG
1,180 LBS
6,000 LB FORK CARRIAGE WEIGHT
535.2 KG
5,800 LBS
COUNTERWEIGHT ASSEMBLY WEIGHT 2630.9 KG
9,800 LBS
TOTAL
4445.3 KG
124 IN.
3149.6 mm
AXLE & TIRE DATA
REAR
FRONT
12,980 LBS 11,420 LBS
5888 KG
5180 KG
6,490 LBS 5,710 LBS
LOAD / TIRE
2944 KG
2590 KG
FOOTPRINT AREA @ 25 PSI 204 SQ IN. 178 SQ IN.
172 kPa 1316 CM2 1148 CM 2
AXLE
AXLE LOAD
Figure F-13. Air Transport, C-130 Configuration
F-27/(F-28 blank)
TM 10-3930-673-10
F-28
TM 10-3930-673-10
Index
ALPHABETICAL INDEX
Subject, Page
Subject, Page
A
E (Cont)
Abbreviations, 1-3
Additional Authorization List,
Air Cleaner - Service, 3-10
Arctic Kit Operation, 2-67
C-1
D-1
Extreme Cold Operation, 2-64
Extreme Dry Heat Operation, 2-63
Extreme Moist Heat Operation, 2-63
B
Basic Issue Items (BII) List,
Equipment Improvement Report and Maintenance
Digest (EIR MD), 1-2
Expendable/Durable Supplies and Materials List,
B-1
F
C
Capabilities, 1-3
Characteristics, 1-3
Components of End Item (COEI) B-1
Components, Location and Description, 1-4
Controls and Indicators, 2-1
Corrosion Prevention and Control (CPC), 1-2
Counterweights Installation, 2-48
D
Decals, 2-61
Decontamination Unit, 2-60
Description of Major Components, 1-4
Destruction of Army Material to Prevent Enemy
Use, 1-2
Dust or Sandstorms Operation, 2-74
E
Electrical System, 1-13
Emergency Boom Operations, 2-81
Engine
Cranks but will not Start, 3-2
Low Oil Pressure, 3-4
Misfires, 3-3
Overheats, 3-4
Starting, 2-32
Stopping, 2-44
Will not Crank, 3-2
Engine Lubrication and Cooling Systems, 1-9
Engine Oil Sampling Valve - Service, 3-7
Equipment Characteristics, Capabilities, and
Features, 1-3
Equipment Data, 1-6
Equipment Improvement Recommendations
(EIR’S), Reporting, 1-2
Features, 1-3
Fording, 2-74
Forklift
Moving, 2-36
Steering, 2-42
Stopping, 2-44
Fuel System, 1-8
Fuel/Water Separator,
3-15
G
General Information
Abbreviations, 1-3
Corrosion Prevention and Control (CPC), 1-2
Destruction of Army Material to Prevent Enemy
Use, 1-2
Equipment Improvement Report and
Maintenance Digest (EIR MD), 1-2
Maintenance Forms and Records, 1-2
Reporting Equipment Improvement
Recommendations (EIR’S), 1-2
Scope, 1-1
H
Hydraulic Oil Sampling Valve - Service,
Hydraulic System, 1-14
3-9
L
Load Rating Chart, E-1
Loading and Unloading Ammunition and Other
Pallets from a Container or Trailer, 2-57
Location of Major Components, 1-4
Lubrication Instructions, 2-18, 3-1
Change 2
Index-1
TM 10-3930-673-10
ALPHABETICAL INDEX (CONT)
Subject, Page
Subject, Page
O (Cont)
M
Maintenance Forms and Records, 1-2
Major Components, Location and Description of, 1-4
N
New Vehicle Break-in,
2-31
O
Operation Procedures
Decals and Warning Plates, 2-61
Decontamination Unit, 2-60
General, 2-31
Highway Transport, 2-53
Installing Counterweights, 2-48
Loading and Unloading Ammunition and Other
Pallets from Container or Trailer, 2-57
Moving the Forklift, 2-36
New Vehicle Break-in, 2-31
Removing Counterweights, 2-48
Rifle Mount, 2-59
Roading the 6K Fork Carriage, 2-47
Starting the Engine, 2-32
Steering the Forklift, 2-42
Stopping the Engine, 2-44
Stopping the Forklift, 2-44
Operation Under Unusual Conditions
Emergency Boom Operations, 2-81
Fording, 2-74
General, 2-63
In Dust or Sandstorms, 2-74
In Extreme Cold, 2-64
In Extreme Dry Heat, 2-63
In Extreme Moist Heat, 2-63
In Salt Water Areas, 2-74
Rear Window Emergency Exit, 2-88
Slave Starting, 2-76
Towing other Vehicles, 2-77
Index-2
Operation Under Unusual Conditions (Cont)
Towing the ATLAS, 2-78
With Arctic Kit, 2-67
Operator Maintenance Procedures
Air Cleaner, 3-10
Engine Oil Sampling Valve, 3-7
Fuel/Water Separator, 3-15
Hydraulic Oil Sampling Valve, 3-9
Introduction, 3-7
Radiator, 3-14
Transmission Oil Sampling Valve, 3-8
P
Parking Brake, 1-12
PMCS Procedures, 2-16
Preventive Maintenance
General, 2-16
Lubrication Instructions, 2-18
PMCS Procedures, 2-16
Principles of Operation
Electrical System, 1-13
Engine Lubrication and Cooling Systems, 1-9
Fuel System, 1-8
General, 1-7
Hydraulic System, 1-14
Steering and Brake System, 1-12
Transmission Lubrication and Cooling Systems,
1-11
Publication Indexes and General References,
Publications, Other, A-1
R
Radiator - Service, 3-14
Rear Window Emergency Exit, 2-88
Reporting Equipment Improvement
Recommendations (EIR’S), 1-2
Rifle Mount, 2-59
A-1
TM 10-3930-673-10
ALPHABETICAL INDEX (CONT)
Subject, Page
Subject, Page
S
Salt Water Areas Operation, 2-74
Scope, 1-1
Slave Starting, 2-76
Steering and Brake System, 1-12
T (Cont)
Transmission Oil Sampling Valve - Service,
Transportability Instructions, F-1
Troubleshooting Procedures
General, 3-1
Troubleshooting, 3-1
3-8
T
W
Towing other Vehicles, 2-77
Towing the ATLAS, 2-78
Transmission Lubrication and Cooling Systems,
Warning Plates, 2-61
Water Separator-Service,
3-15
1-11
Index-3/(Index-4 blank)
RECOMMENDED CHANGES TO PUBLICATIONS AND
BLANK FORMS
Use Part II (reverse) for Repair Parts and
Special Tool Lists (RPSTL) and Supply
Catalogs/Supply Manuals (SC/SM).
DATE
For use of this form, see AR 25-30; the proponent agency is OAASA
TO: (Forward to proponent of publication or form) (Include ZIP Code)
FROM: (Activity and location) (Include ZIP Code)
PART I – ALL PUBLICATIONS (EXCEPT RPSTL AND SC/SM) AND BLANK FORMS
PUBLICATION/FORM NUMBER
ITEM
PAGE
PARA-
DATE
LINE
GRAPH
FIGURE
TABLE
TITLE
RECOMMENDED CHANGES AND REASON
NO.
*Reference to line numbers within the paragraph or subparagraph.
TYPED NAME, GRADE OR TITLE
DA FORM 2028, FEB 74
TELEPHONE EXCHANGE/AUTOVON,
PLUS EXTENSION
SIGNATURE
REPLACES DA FORM 2028, 1 DEC 68, WHICH WILL BE USED.
USAPA V3.01
TO: (Forward direct to addressee listed in publication)
FROM: (Activity and location) (Include ZIP Code)
DATE
PART II – REPAIR PARTS AND SPECIAL TOOL LISTS AND SUPPLY CATALOGS/SUPPLY MANUALS
PUBLICATION NUMBER
PAGE
NO.
COLM
NO.
LINE
NO.
DATE
NATIONAL STOCK
NUMBER
REFERENCE
NO.
TITLE
FIGURE
NO.
ITEM
NO.
TOTAL NO.
OF MAJOR
ITEMS
SUPPORTED
RECOMMENDED ACTION
PART III – REMARKS (Any general remarks or recommendations, or suggestions for improvement of publications and
blank forms. Additional blank sheets may be used if more space is needed.)
TYPED NAME, GRADE OR TITLE
DA FORM 2028, FEB 74
TELEPHONE EXCHANGE/AUTOVON,
PLUS EXTENSION
SIGNATURE
REPLACES DA FORM 2028, 1 DEC 68, WHICH WILL BE USED.
USAPA V3.01
TM 10-3930-673-20
3
THE METRIC SYSTEM AND EQUIVALENTS
LINEAR MEASURE
SQUARE MEASURE
1 Centimeter=10 Millimeters=0.01 Meters=0.3937 Inches
1 Meter=100 Centimeters=1000 Millimeters=39.37 Inches
1 Kilometer=1000 Meters=0.621 Miles
1 Sq Centimeter=100 Sq Millimeters=0.155 Sq Inches
1 Sq Meter=10,000 Sq Centimeters=10.76 Sq Feet
1 Sq Kilometer=1,000,000 Sq Meters=0.386 Sq Miles
WEIGHTS
CUBIC MEASURE
1 Gram=0.001 Kilograms=1000 Milligrams=0.035 Ounces
1 Kilogram=1000 Grams=2.2 Lb
1 Metric Ton=1000 Kilograms=1 Megagram=1.1 Short Tons
1 Cu Centimeter=1000 Cu Millimeters=0.06 Cu Inches
1 Cu Meter=1,000,000 Cu Centimeters=35.31 Cu Feet
LIQUID MEASURE
1 Milliliter=0.001 Liters=0.0338 Fluid Ounces
1 Liter=1000 Milliliters=33.82 Fluid Ounces
TEMPERATURE
5/9 (°F – 32) = °C
212° Fahrenheit is equivalent to 100° Celsius
90° Fahrenheit is equivalent to 32.2° Celsius
32° Fahrenheit is equivalent to 0° Celsius
9/5 (C° + 32) = F°
6
14
5
13
12
4
11
10
3
2
1
INCHES
0
0.394
3.280
1.094
0.621
0.155
10.764
1.196
0.386
2.471
35.315
1.308
0.034
2.113
1.057
0.264
0.035
2.205
1.102
0.738
0.145
2.354
0.621
9
Inches . . . . . . . . . . . . . . . . . . . . .
Feet . . . . . . . . . . . . . . . . . . . . . . .
Yards . . . . . . . . . . . . . . . . . . . . . .
Miles . . . . . . . . . . . . . . . . . . . . . .
Square Inches . . . . . . . . . . . . . . .
Square Feet. . . . . . . . . . . . . . . . .
Square Yards . . . . . . . . . . . . . . . .
Square Miles . . . . . . . . . . . . . . . .
Acres . . . . . . . . . . . . . . . . . . . . . .
Cubic Feet . . . . . . . . . . . . . . . . . .
Cubic Yards . . . . . . . . . . . . . . . . .
Fluid Ounces . . . . . . . . . . . . . . . .
Pints . . . . . . . . . . . . . . . . . . . . . .
Quarts . . . . . . . . . . . . . . . . . . . . .
Gallons . . . . . . . . . . . . . . . . . . . .
Ounces . . . . . . . . . . . . . . . . . . . .
Pounds . . . . . . . . . . . . . . . . . . . .
Short Tons . . . . . . . . . . . . . . . . . .
Pound-Feet . . . . . . . . . . . . . . . . .
Pounds per Sq Inch . . . . . . . . . . .
Miles per Gallon . . . . . . . . . . . . .
Miles per Hour . . . . . . . . . . . . . . .
8
Centimeters . . . . . . .
Meters . . . . . . . . . . .
Meters . . . . . . . . . . .
Kilometers . . . . . . . .
Sq Centimeters . . . .
Square Meters . . . . .
Square Meters . . . . .
Square Kilometers . .
Sq Hectometers . . . .
Cubic Meters . . . . . .
Cubic Meters . . . . . .
Milliliters . . . . . . . . . .
Liters . . . . . . . . . . . .
Liters . . . . . . . . . . . .
Liters . . . . . . . . . . . .
Grams . . . . . . . . . . .
Kilograms . . . . . . . . .
Metric Tons . . . . . . .
Newton-Meters. . . . .
Kilopascals. . . . . . . .
Km per Liter . . . . . . .
Km per Hour . . . . . .
MULTIPLY BY
7
TO
6
TO CHANGE
2.540
0.305
0.914
1.609
6.451
0.093
0.836
2.590
0.405
0.028
0.765
29.573
0.473
0.946
3.785
28.349
0.454
0.907
1.356
6.895
0.425
1.609
5
Centimeters . . . . . . . . . . . . . . . . .
Meters . . . . . . . . . . . . . . . . . . . . .
Meters . . . . . . . . . . . . . . . . . . . . .
Kilometers . . . . . . . . . . . . . . . . . .
Square Centimeters . . . . . . . . . .
Square Meters . . . . . . . . . . . . . . .
Square Meters . . . . . . . . . . . . . . .
Square Kilometers. . . . . . . . . . . .
Square Hectometers . . . . . . . . . .
Cubic Meters . . . . . . . . . . . . . . . .
Cubic Meters . . . . . . . . . . . . . . . .
Milliliters. . . . . . . . . . . . . . . . . . . .
Liters . . . . . . . . . . . . . . . . . . . . . .
Liters . . . . . . . . . . . . . . . . . . . . . .
Liters . . . . . . . . . . . . . . . . . . . . . .
Grams . . . . . . . . . . . . . . . . . . . . .
Kilograms. . . . . . . . . . . . . . . . . . .
Metric Tons . . . . . . . . . . . . . . . . .
Newton-Meters . . . . . . . . . . . . . .
Kilopascals . . . . . . . . . . . . . . . . .
Kilometers per Liter . . . . . . . . . . .
Kilometers per Hour . . . . . . . . . .
4
Inches . . . . . . . . . . .
Feet . . . . . . . . . . . . .
Yards . . . . . . . . . . . .
Miles . . . . . . . . . . . .
Squares Inches . . . .
Square Feet . . . . . . .
Square Yards . . . . . .
Square Miles . . . . . .
Acres . . . . . . . . . . . .
Cubic Feet . . . . . . . .
Cubic Yards . . . . . . .
Fluid Ounces . . . . . .
Pints. . . . . . . . . . . . .
Quarts . . . . . . . . . . .
Gallons. . . . . . . . . . .
Ounces . . . . . . . . . .
Pounds . . . . . . . . . . .
Short Tons . . . . . . . .
Pound-Feet . . . . . . .
Pounds/Sq Inch . . . .
Miles per Gallon . . . .
Miles per Hour . . . . .
3
MULTIPLY BY
1 CM. 2
TO
0
TO CHANGE
15
APPROXIMATE CONVERSION FACTORS
TM 10-3930-673-20
- - - - - - - - - - - - - - - - - - - - - - - - - - - - - - - - - - - - - -
PIN: 078862-000
This fine document...
Was brought to you by me:
Liberated Manuals -- free army and government manuals
Why do I do it? I am tired of sleazy CD-ROM sellers, who take publicly
available information, slap “watermarks” and other junk on it, and sell it.
Those masters of search engine manipulation make sure that their sites that
sell free information, come up first in search engines. They did not create it...
They did not even scan it... Why should they get your money? Why are not
letting you give those free manuals to your friends?
I am setting this document FREE. This document was made by the US
Government and is NOT protected by Copyright. Feel free to share,
republish, sell and so on.
I am not asking you for donations, fees or handouts. If you can, please
provide a link to liberatedmanuals.com, so that free manuals come up first in
search engines:
<A HREF=http://www.liberatedmanuals.com/>Free Military and Government Manuals</A>
– Sincerely
Igor Chudov
http://igor.chudov.com/