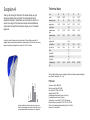
1
Technical data
Scorpion-4
Thank you for choosing SC Scorpion-4! This manual will help you to get
maximum information about your glider. This is information about the
design of the Scorpion-4, advice how to use it best and how to care for it to
ensure it has a long life. The manual also includes technical specifications
and line plans. We hope that the Scorpion-4 will give you a lot of wonderful
flying hours.
Scorpion-4 is suited for those pilots, who have at least 70 hours of flying expirience. The
paraglider has good aerodynamic characteristics, which enables it to be used for cross-country
flying, and even for flying competitions. Scorpion-4-27 is EN “C” certified.
size
23
25
27
29
31
scale
0,926
0,966
1
1,04
1,072
23
25
26,8
29
30,8
11,55
12,05
12,47
12,97
13,37
wing area, sq.m.
wing span, m.
aspect ratio
5,8
projected area,
sq.m.
19,7
21,43
22,97
24,84
26,4
projected span,
m.
9,12
9,52
9,85
10,24
10,56
projected a/r
4,22
root chord, m.
2, 51
2,62
2,71
2,82
2,91
tip chord, m.
0,46
0,48
0,5
0,51
0,53
95-115
110-130
cells
57
Vmin,km/h
24
Vmax,km/h
54
Vymin,m/s
1,0
in flight weight,
kg/
60-75
70-90
80-100
The total weight in flight is equal to the weight of the pilot and all the equipment including the
wing. Usually - pilot weight + 15...17 kg.
competitions
acro
paramotor
school
XC
Materials
Warning! Paragliding is a high risk activity. We strongly recommend to learn paragliding only in certified schools and to choose
only the equipment which is correspondent to Your flying skills.
Top surface: Skytex 9092 E85A
Bottom surface: Skytex 9017 E38A
Ribs: Skytex 9017 E29A, 9017 E38A
Diagonal ribs: 9017 E38A
Leading edge reinforcements: Flexon cord 2,4 mm
Lines reinforcements: Dacron 170 g/sqm
Top level lines: Liros Aramid LTC 80, LTC 65 uncovered
Bottom level lines: Liros Aramid TSL 190, TSL 220, TSL 280
Risers: Cousin technora/polyester webbing 12 mm, 1100 daN
Connectors: 3 mm stainless
Risers
Pre-flight check
Scorpion-4 has the risers
scheme A3B3C4. The risers
are equipped with speed system, that increases the speed
range of the glider.
- Lines are clear and leading edge is open
- Karabiners and maillons are tight
- All harness buckles are closed
- Helmet on
- Check reserve parachute
- Accelerator bar is attached
- Wind direction is perpendicular to the glider
- Airspace is clear
Warning!
You are not allowed to change the paraglider construction except adjusting the brake lines,
because it might lead to unpredictability in flying and make the paraglider dangerous in certain
flying situations.
Accelerator System Adjustment
Scorpion-4 construction enables you to use it with an accelerator. To set up the accelerator on
the ground:
1. Attach the risers to the harness.
2. Attach the accelerator.
3. Sit in your harness.
4. Ask a friend to pull your risers into their in-flight position.
5. While sitting in the harness, stretch your legs and push the loop of the accelerator as much
as possible. (The rope will be stretched when pulled).
6. With your legs stretched, choose the length of the lead in such a way that accelerator harness is fully stretched and the pulleys on the risers touch.
7. Fix with a tie this length of the accelerator rope.
The accelerator rope should not pull the accelerator in normal flight. Otherwise, the permanently-speeded-up paraglider will not provide the declared reliability for collapses. You must set up
the accelerator properly and make sure it is not entangled!
You must never use Scorpion-4 for:
- jumps;
- tandem-flying;
- any other purpose except flying.
Launching
Your Scorpion-4 can take-off with both forward and reverse techniques.
Use forward technique when the wind is light, or there is no wind.
Move forward and your glider will start to inflate. You must maintain a constant pressure on the
risers until the wing is overhead. Brake it a little and launch.
Use reverse technique in light to strong winds
Pull the glider by its A-risers. When it is overhead, pull the brakes to stop the glider, then turn
and launch.
Practise ground handling a lot! It will help you feel your glider better.
In Flight Characteristics
Descent Techniques
Scorpion-4 has long brake travel, light brake pressure and turns very well. When accelerated
Scorpion-4 remains solid and well-pressured. It also has high resistance to deflations in turbulence.
Big Ears
Speed control
You can change speed by simultaneously pulling or releasing the brakes. Flying at trim speed
(hands up) your glider will achieve its best glide ratio. When brakes are pulled approximately 25
cm – you get its minimum sink rate. In order to increase your speed you can use the accelerator.
Using accelerator
Scorpion-4 reaches its maximum speed when you pull the accelerator to its maximum and
release the brakes. Use this mode for long-distance flying and in strong winds. When using accelerator you will have a maximum speed of 54 km/h.
Remember, that when you use the accelerator, your glider is more likely to collapse. We do not
recommend to use accelerator, if your altitude is less, than 100m. If collapse occurs, release
accelerator immediately.
Turning
In order to make Scorpion-4 turn with a minimum sink and radius while pulling the internal brake
you should pull very slightly the external one too. Use weightshift to decrease the spiral radius.
If the thermal flow is narrow and strong, increase the tilt and the rotation speed by releasing the
external brake.
When you need to turn fast, you should swing Scorpion-4 in the opposite direction and then pull
as hard as needed the internal brake.
Scorpion-4 has a brake travel about 60 cm. When full stall is about to happen, the load at the
brakes increases, and ensures that you know about it.
Flying in turbulence
You can help your glider to avoid different collapses in turbulence – you must fly actively for it.
When the glider pitches forward – use the brakes to slow it, if it goes back – release brakes.
These movements can be symmetric or asymmetric.
Let us remind you once again that you should be very careful choosing the weather to fly.
While holding the brakes you should symmetrically pull the outer A-lines. For directional control
of the glider use the weight shift. When you do big ears, the horizontal speed increases slightly.
In order to return to normal flight, you should release the A-lines and pull the brakes a few times.
Spiraling is not permitted with big ears, because of the increased load on the remaining lines so
that they can be physically deformed.
B-stall
When you need to lose height quickly because of the sudden worsening of the weather, risk of
entering a cloud, etc, we recommend you B-stall.
Holding the brakes you take B-risers near the connectors. Forcefully but not suddenly, pull down
the risers 25-30 cm and hold them as long as necessary. The wing gets a fold along the entire
B-row and sinks at a rate of 8-10 m/sec. In order to return to normal flight simply release the
B-risers and your Scorpion-4 will get out of the B-stall with a small front dive. You can use the
brakes once the horizontal speed is gained. Scorpion-4 does not normally tend to go into deep
stall once the B-risers are released. If this does happen (possibly for bad adjustment or underloading), you should either pull the B-risers or swing the wing with the brakes.
Spiral dive
When you hold either brake down for a long time, the glider goes into a fast sharp turn and
loses a lot of height. The rotation axis can be somewhere between the pilot and the wing. The
sink rate could be more than 15 m/sec. To get out of the spiral dive you must release the inner
brake. If the glider stays in deep spiral, pull the outer brake slightly to exit the maneuver. Do not
pull the outer brake strong and fast – it may cause very dynamic exit.
While spiral diving, the pilot experiences considerable overload up to 3 – 4g, so you can lose
orientation. That is why we recommend spiral diving only when the sink rate of the B-stall is not
enough.
Landing
Deflations
In small winds, when you have 1-2 meters to the ground, you should pull the brakes gently to
your arms’ full length, so that you put your Scorpion-4 in stall at a height of about 0.5 m and the
horizontal speed is zero.
Frontal collapses
In strong winds you must land facing the wind. If necessary you can fold the ears. As you
approach the ground, you must take B-risers while holding the brakes. As soon as you hit the
ground, you must turn towards the glider and pull B-risers running towards the wing. If the wing
is flopping about a meter above the ground, release the B-risers and pull the brakes hard to
your arms length. We do not recommend you to use the brakes in the strong wind, as the wing
could catch the wind and pull the pilot.
Do not let the glider overtake you and hit the ground with its front edge - it leads to increased
pressure in the wing and may damage it.
Scorpion-4 comes out of symmetrical front collapse by itself. You can pull the brakes about a 20
cm to speed the re-inflation.
Asymmetric collapses can be controlled by weight-shifting away from the collapse and applying a small amount of brake to control the flight direction. At the same time you should use the
brake to re-inflate the canopy.
If your Scorpion-4 collapses in accelerated flight, you must immediately release the accelerator
to slow the glider down.
Remember that the deflated glider has higher stall speed and smaller brake travel. That is why
you should be careful not to pull the brake too hard to avoid stall.
Full stall
Full stall happens when you pull both brakes too hard. To return to the normal flight you must
release both brakes. After this usually comes a front dive with a possible front deflation.
Scorpion-4 warns the pilot about stalling by increasing the brake load.
Deep stall (parachuting)
To get out of this mode you must pull A – risers or swing the wing by pulling and releasing the
brakes (preferably the first one).
Asymmetrical stall
It can take place when you pull one of the brakes too hard, or while spiraling at a small speed in
turbulence you increase the angle of attack. Rotation in the asymmetrical stall is called negative
spiral. This is one of the most dangerous flying situations. In order to get out of asymmetrical
stall, just release the brakes. There may follow side thrust forward with a following wing collapse.
Deflations
Packing Your glider
Self-rotation
The paraglider must be folded cell to cell so that the plastic rods at the leading edge lie flat on
each other and don’t get bent. Try to pack your Scorpion-4 as loosely as the rucksack allows,
because every fold weakens the cloth.
Increasing rotation usually takes place when the pilot has not reacted properly to the asymmetric collapse of the accelerated paraglider. Try to slow down the rotation by counter-shifting
your weight in the harness and pulling the outer brake. If the self-rotation is increasing, drop the
rescue parachute quickly in the direction of the rotation. This mode can also take place when
you make extreme turns of the overloaded paraglider.
Cravat
If the collapsed part of the canopy is entangled in the lines, you must try to release it by pulling
the ear-line. If you cannot do it and the rotation is increasing, you must use the parachute.
In flight damage
Estimate the damage. If a brake has untied – no problem as Scorpion-4 can be steered well by
weight shift and pulling the back risers. Even if the damage allows for a sustainable controlled
flight, you should land as soon as possible. If normal flight is impossible, you must use the
parachute.
Avoid packing the glider if it is wet or contains the abrasive particles (sand, ice...). If the glider
was packed wet and/or contains abrasive staff - unpack it, let it dry and remove the trash from
the canopy as soon as possible.
General Glider Care
Take care while using Your glider. The inappropriate and/or inaccurate use may cause the damage of the canopy and lines, and the glider may become dangerous in flight.
Follow these rules and your Scorpion-4 will be in good condition:
- Do not expose your Scorpion-4 to the sun any longer than necessary
- Keep Scorpion-4 away from water and other liquids
- Do not let the front edge hit the ground
- If wet dry Scorpion-4 in shade. If soaked in salty water, rinse the glider thoroughly in non-salty
water
- Keep your Scorpion-4 away from fire
- Do not put anything heavy on your glider, do not pack it in a rucksack too tightly.
- Regularly inspect the canopy, lines, risers and harness. If you find any defects, contact your
dealer or the manufacturer. Do not attempt to self-repair the paraglider!
- If you detect a damaged line, inform the dealer or manufacturer about the line number according to the line plan
- Keep your Scorpion-4 in a rucksack in a dry well-ventilated place under neutral temperature
and humidity conditions
- Do not wash Scorpion-4. Do not use detergents or solvents. Clean dirty places with wet soft
cloth or sponge.
- Upper lines of the Scorpion-4 are uncovered and need greater attention and care.
Line plan
The producer guarantees the correctness of the declared characteristics and the paraglider’s
normal performance for one year after the purchase date, but no more than 200 flying hours.
The producer conducts special, and after-warranty repairs and maintenance at the owners’
request for an extra price.
If damaged, your Scorpion-4 must be repaired by manufacturer, or dealer.
Small holes in Gelvenor fabrics you can repair with silicon clue and a peace of Gelvenor cloth.
Small holes in Skytex may be repaired with sticky rip-stop tape.
Attention please!
The producer bears no responsibility for non-compliance with the stated characteristics if:
- the user manual is not followed;
- the paraglider structure is changed in any way;
- the paraglider is self-repaired.
You can use this scheme, if you want to order the new line instead of damaged.
We recommend to inspect your paraglider (including checking suspension line strength, line
geometry, riser geometry and permeability of the canopy material) one time at two years, or
every 100 hours of flying time (whichever comes first); Those inspection must be made by
manufacturer or dealer.
Пользуясь этой схемой, Вы можете заказать необходимую стропу у дилера или производителя.
Warrantee and Wing Repairs
Scorpion-4
Serial number
Production date
Test pilot
Dealer
Date
Wing check and repairs information