1
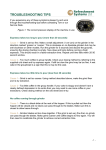
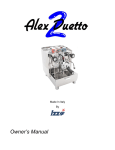
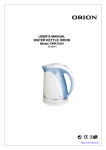
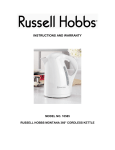
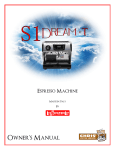
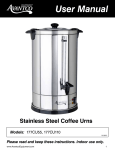
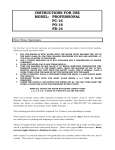
DESCALING a Vibiemme DOUBLE DOMO
Descaling should be performed by an authorized espresso machine technician.
However, should you feel technically competent to descale your espresso machine; these
instructions can be used in conjunction with your user’s manual and the descaler
manufacturer’s instructions to help you complete the process correctly. Please read this
thoroughly before attempting to complete the cleaning process. If you do not feel
comfortable with any step of the process, please hire a professional. Stefano’s Espresso
Care is not responsible for any damage to your equipment, your property, or your person
during or resulting from this cleaning process.
Descaling is preventative maintenance that will prolong the life of your espresso machine. As
boiling water turns to steam, mineral content leaves behind hard water deposits which can cause
multiple problems in your espresso machine, such as:
¾
¾
¾
¾
¾
¾
¾
¾
Water sensor malfunction and failure
Heating element failure
Clogged thermosyphon pipes
Low brewing volume
Poor pressurestat response
Low-temperature grouphead
Drips and leaks from the grouphead
Inability to form pressure in the boiler due to vacuum breaker failure
Depending on the mineral content of your water and frequency of use, your machine should be
descaled approximately four times a year.
Warning: Descaling involves pumping a chemical solution through the machine. These special
chemicals usually contain a food-grade acid that can be hazardous. Carefully follow the
manufacturer’s recommendations and use safety precautions. Even when working carefully,
some solution may splash in your work area. Eye protection and gloves are required when
handling and using these chemicals. Do not allow bystanders in the area unless they are
properly protected. You must also protect the work area both under and around your espresso
machine. Immediately wash off any splashes, particularly on painted surfaces. Do not touch your
skin or eyes during this process as descaler can cause serious irritation and burns to sensitive
tissue.
1
Warning: Descaling involves opening the case of the machine and exposing internal
components. Electrical components and their wiring can present a shock hazard. Many parts
inside the machine get hot enough to cause severe burns, so USE EXTREME CAUTION.
Warning: Only use products manufactured explicitly for scale removal in espresso machine
boilers. Other products, such as those made for cleaning coffee pots or removing hard water
scale from bathrooms must never be used. Never use vinegar or any other chemicals for this
purpose. Never add any other cleaning agent to your water tank. Always follow the
manufacturer’s recommendation and instructions when descaling an espresso machine. Use of
improper cleaners or improperly using the correct cleaner can void the warranty, damage your
espresso machine, and be harmful to your health.
WARNING: Do not leave the machine unattended during this process except when the
machine is OFF or unplugged.
For your convenience we now offer a Descaling Kit which can be purchase from our web page,
the kit includes:
4 packets of pulycaff baby descaler
2 packets of pulycaff espresso cleaner
1 pre-assembled jumper cable
Since your machine has 2 separate boilers, we will cover the procedure one boiler at a time,
starting with the brew boiler. The brew boiler works by displacement: water from the boiler
exits the grouphead as fresh water enters the boiler.
BREW BOILER DESCALING PROCESS
Before starting this process, thoroughly backflush the grouphead with a suitable espresso
machine cleaner.
1. Prepare the descaling solution in a container. Following the descaling agent
manufacturer’s instructions to make approximately 2.5 liters of solution. The powder
dissolves better in hot water, but the solution must cool to room temperature before you
add it to the reservoir. To expedite this process, start by dissolving the powder in
approximately one liter of hot water, and then add enough cold water to reach the proper
ratio. Once the solution is cool, use it to fill the water reservoir at least ½ full.
2. UNPLUG THE MACHINE. Remove drip tray, grate, and cup warming tray. Remove
the side/back casing (3 screws on each side). Remove the water reservoir; unscrew the 2
bottom screws that hold the reservoir plate/divider in place (located on the bottom back
part of the chassis). Unscrew the 2 screws below the cup warming tray. Locate the
reservoir microswitch, mark wire positions, and remove them from the microswitch. Set
the plate/divider aside. Use an insulated 12 gauge jumper wire to connect the 2 black
2
wires. Set the purple wire aside. (Ensure the jumper is insulated and no metal parts are
touched -- see picture below.)
3. If the machine is so equipped, remove the in-tank water softener (not the filter screen)
and install the original filter screen that fits the end of the hose. The descaling agent will
permanently damage the water softener if it is left in place during this process, so do not
reinstall it until this entire procedure is completed. The original filter screen will stop any
foreign matter from entering the boilers. Position the inlet hose (the one that goes to the
pump) inside the solution container, and place the bypass hose in a suitable container.
3
4. Plug machine in and turn on position I. While the PID brings the water up to operating
temperature, reposition the drip tray in its proper location under the grouphead.
5. Once the set temperature is reached, activate the lever and let the water flow out of the
group for NO MORE than one minute. Use the on/off switch to turn the pump on and
off. Caution: water will be boiling hot.
6. Let sit for one minute to allow the vibrating pump to cool and repeat process (the one
minute interval is recommended by the pump manufacturer). Continue until most of the
solution has been drawn into the boiler.
7. Insert the backflush basket and activate the lever. Allow 2-3 ounces of water to flow
from the bypass valve into the empty container and stop the lever.
8. Allow the machine to sit for at least one hour while the descaling solution works on
buildup inside the boiler. Refer to descaling agent instructions for indications of how
long this should take. The soaking time required is governed by the mineral content of
your water, how often you use your machine, and how long since it was last descaled.
9. After the necessary time has passed, rinse the solution container; fill it with 2.5 liters of
clean, fresh water. Insert the pump hose and flush clean water out of the grouphead
following the one minute on/one minute off procedure.
10. While descaling solution is coming out, the water will appear bluish and murky. Flush
about 2 liters of clean water through the boiler until it is crystal clear. Repeat the
backflush allowing also 2-3 ounces of water to flow from the bypass hose.
11. Your boiler is now descaled, flushed, and filled with clean water. Note that a slight taste
and smell of descaler may be present for a while longer.
12. Turn the PID off (push and hold the right
button until the LCD displays OFF).
STEAM BOILER DESCALING
1. Prepare another 2.5 liters of descaling solution and position the hoses as pictured on
page 3 (brew boiler instructions). Turn machine on to position II and wait for steam
pressure to reach the pre-set pressure.
2. Once the pressurestat clicks and the left light goes off, turn the switch to the OFF
position. UNPLUG THE MACHINE.
4
3. Place a container under the hot water spout and open the valve. Keep the valve open
until water stops flowing, and then close. Caution: the water is boiling hot.
4. Remove the steam wand tip, paying attention to the Teflon O-Ring (some versions have
a small Teflon disk inside the tip—take care not to lose it), as well as the hot water
spout tip and all its inside parts. Open the steam valve.
5. Locate the level probe sensor on top of the steam boiler (see picture below), and MARK
THE EXPOSED HEIGHT COMING OUT FROM THE NUT. Disconnect the
connector with a small flat blade screwdriver by loosening the screw on the sensor rod
end inside the plastic housing shown in the picture. Do not disconnect the screw on the
wire end. (Removing the connector indicates a low water level in the boiler and it needs
to be refilled.) Set it aside where it cannot accidentally touch any metal parts.
6. Locate the anti vacuum valve (see picture).
5
7. Lift the center plunger of the anti-vacuum valve with your finger and tie a wire tie
between the clip and the flat part of the valve so that the valve stays UP (closed). This
will prevent liquid from escaping from the valve as you complete this process.
6
8. Position a container under the steam wand and open the valve.
9. Plug the machine in and turn the power switch to position I (which keeps the steam
heating element safe from exposure). The autofill is defeated therefore the machine will
overfill (completely fill) the boiler. Once the steam valve level is reached, the liquid will
exit from the steam wand. At this point, close the steam valve and turn the machine
OFF. (Again, follow the one minute rule for the pump.)
10. UNPLUG THE MACHINE and reconnect the level probe.
11. Plug the machine in and turn to position II, wait for the machine to heat up and reach
the pre-set temperature. Keep monitoring the wire tie on the anti-vacuum valve. MAKE
SURE it remains secure or water will leak and splatter. Once the boiler is at pressure,
momentarily open and close the steam valve a couple of times to let out “false”
pressure.
12. Let the solution sit in the boiler for at least one hour.
13. Rinse the container and fill with 2.5 liters of clean fresh water. Turn off the machine.
Place a container under the hot water spout, and open the hot water valve until no more
water exits. Turn the knob off.
7
14. UNPLUG THE MACHINE. Disconnect the autofill probe.
15. Open the steam valve knob
16. Plug the machine in and turn switch to position I. The pump will engage, and clean
water will flow into the boiler. Following the one-minute pump procedure, pump clean
water into the boiler allowing solution to exit from the steam wand. Continue until the
2.5 liters are gone.
17. Turn the machine OFF. UNPLUG THE MACHINE. To remove any remaining scale
from the water level probe, loosen the small nut that holds the probe in place, pull the
probe out and wipe it clean. Reinstall the probe, making sure it is at the same level as
before, and reconnect the wire.
18. Refill your container with fresh clean water, plug the machine in, and turn to position II.
Wait for the pressure to build again (quickly open and close the steam valve to let the
“false” pressure out). Once the left light is off, turn switch to position I, place a
container under the hot water spout, and open the hot water knob. Allow water to flow
out until the pump starts.
19. As soon as the pump activates, turn the hot water knob off. When the pump stops, the
“normal” water level inside the boiler is reached.
20. Turn the machine off. UNPLUG THE MACHINE. Remove the wire tie from the anti
vacuum valve.
21. Plug in machine, turn on to position I. Turn the PID on. Turn switch on position II and
wait for both pressure and temperature to build.
22. Check for any anomalies, leaks, etc.
23. Turn the machine off. UNPLUG THE MACHINE. Remove the microswitch jumper,
reconnect the microswitch wires and reassemble the unit. After all the pieces are back in
place, it is recommended to pull and dump a few shots of espresso and “froth” a few
pitchers of water to clean the descaler’s aftertaste.
24. Your machine is now descaled.
WARNING: Most proper descalers are a form of food-grade citric acid and are safe to
consume when highly diluted.
CAUTION: Failure to reconnect the autofill wire or enable the vacuum breaker will cause
your machine to behave erratically and can cause damage not covered by the warranty.
Questions? Contact us at [email protected]
8