1
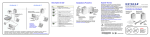
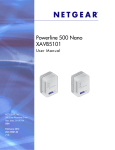
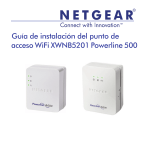
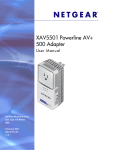
Powerline AV+ 200 Nano Dual-Port
XAV2602 Installation Guide
© 2011 NETGEAR, Inc. All rights reserved.
No part of this publication may be reproduced, transmitted, transcribed,
stored in a retrieval system, or translated into any language in any form or by
any means without the written permission of NETGEAR, Inc.
DO NOT stack equipment, or place equipment in tight spaces or in drawers.
Be sure your equipment is surrounded by at least 2 in. of air space.
Technical Support
Thank you for choosing NETGEAR. To register your product, get the latest
product updates, or get support online, visit us at http://support.netgear.com.
Phone (US & Canada only): 1-888-NETGEAR
Phone (Other Countries):
See http://support.netgear.com/app/answers/detail/a_id/984.
Trademarks
NETGEAR, the NETGEAR logo, and Connect with Innovation are trademarks and/or
registered trademarks of NETGEAR, Inc. and/or its subsidiaries in the United States and/or
other countries. Information is subject to change without notice. Other brand and product
names are registered trademarks or trademarks of their respective holders. © 2011
NETGEAR, Inc. All rights reserved.
Statement of Conditions
In the interest of improving internal design, operational function, and/or
reliability, NETGEAR reserves the right to make changes to the products
described in this document without notice. NETGEAR does not assume any
liability that may occur due to the use or application of the product(s) or circuit
layout(s) described herein.
Package Contents
Products sold in some locations include a Resource CD.
Ethernet cable
Powerline AV+ 200
(North America)
Your adapter might look like one of these:
UK
France
Germany/Europe Australia
3
Switzerland
Hardware Features
Filtered AC
socket
Factory Reset
button
Power LED
Powerline LED
Security
button
Ethernet LED
Ethernet Port 2 for
lower-priority data
traffic
Ethernet Port 1
for higherpriority traffic
4
LEDs
The LEDs indicate the status of your Powerline adapter.
•
•
•
•
When you plug in the adapter, the Power LED
lights up and
turns green.
The adapter is not active when no Ethernet link has occurred for
more than 10 minutes. The adapter enters power saving mode,
.
and the Power LED turns amber
The Ethernet LED
lights up when you connect a powered-on
Ethernet device to at least one Ethernet port.
The Powerline LED turns on when the adapter detects at least
one other compatible Powerline device.
The Pick A Plug feature lets you pick the electrical outlet with the
strongest link rate, indicated by the color displayed by the
Powerline LED:
-
Green: Link rate > 80 Mbps (Best)
Amber: Link rate > 50 and < 80 Mbps (Better)
Red: Link rate < 50 Mbps (Good)
5
Compatible NETGEAR Powerline Devices
To create a Powerline network you need at least two compatible
Powerline devices.
Your Powerline adapter can share a Powerline network with these
compatible NETGEAR devices: XAV101, XAV1004, XAV2001,
XAV2101, XAV1101, XAV1301, XAV1601, XAV2501, XAV5001,
XAV5501, XAV5601, XAV5004, and XAVN2001.
For a complete list of HomePlug AV certified devices, go to
www.homeplug.org/certified_products.
6
Install Your Powerline Adapter
The filtered AC
socket removes
some electrical
noise. Plugging
a nearby device
into the filtered
AC socket
improves
performance.
The ports use Quality
of Service (QoS) to
prioritize traffic. Port 1
on the left is the highpriority video port.
You can plug a
power strip into
the filtered outlet,
but do not plug
your Powerline
adapter into a
power strip.
7
You can set up a new Powerline network with your XAV2602 and a
compatible Powerline device, or you can add your XAV2602 to an
existing Powerline network.
Set up a new Powerline network:
1. Obtain at least one more Powerline device that is compatible
with the XAV2602.
2. Plug the Powerline AV+ 200-compatible adapter into an electrical
outlet, and plug the XAV2602 adapter into another electrical
outlet.
• The Power LED
on the XAV2602 lights up.
• If both of the devices you connected are powered on and
establish communication, the Powerline LED
on the
XAV2602 lights up.
3. If you have more than one compatible adapter, plug them into other
electrical outlets.
4. User Ethernet cables (one is included in the package) to connect
your equipment to the Ethernet ports on the adapter.
• Port 1 is for high priority traffic used by devices such as
gaming consoles.
• Port 2 is for devices with lower priority traffic.
You can use both ports or only one port.
8
The Powerline LED turns on for each Powerline adapter when they
detect each other. The devices automatically form a Powerline
network.
Add the adapter to a secure Powerline network:
Your Powerline network is already secured if you used the Security
button or the Powerline Utility to set up security.
1. Make sure that the Powerline devices you already use are
compatible to the XAV2602. Plug the XAV2602 into another
electrical outlet.
2. Press the Security button on one of your existing Powerline
adapters for 2 seconds and release the button. Then within 2
minutes, press the Security button on the XAV2602 for 2 seconds
and release the button. The Power LED on the XAV2602 starts to
blink as security is setting up.
The Powerline LED turns on for each Powerline adapter when
they detect each other. They automatically form a Powerline
network.
3. Use Ethernet cables (one is included in the package) to connect
your equipment to the Ethernet ports on the adapter.
• Port 1 is for high-priority traffic used by devices such as
gaming consoles.
• Port 2 is for devices with lower-priority traffic.
You can use both ports or only one port.
9
Add the adapter to a Powerline network that has not been
secured:
1. Check to make sure that the Powerline devices you already use
are compatible.
2. Plug the XAV2602 adapter into another electrical outlet. The
XAV2602 will start to communicate with other Powerline devices
(indicated by the linking Powerline LED).
3. Use Ethernet cables (one is included in the package) to connect
your equipment to the Ethernet ports on the adapter.
• Port 1 is for high-priority traffic used by devices such as
gaming consoles.
• Port 2 is for devices with lower-priority traffic.
You can use both ports or only one port.
4. NETGEAR recommends that you secure your Powerline network
to protect your personal information and media from unwanted
access. If you do not set up security on your network, anyone
nearby with a Powerline network can potentially use his or her
connection to gain access to your network and to information you
send over the Internet. This is especially relevant in settings such
as apartment buildings, office buildings, dorm rooms, and other
densely populated areas.
10
Secure Your Powerline Network
A Powerline network forms when at least two compatible Powerline
devices communicate. After the Powerline network is up and running,
you can use the Security buttons on the adapters to add encryption to
your Powerline network.
CAUTION:
Do not press the Security button until each adapter has
powered up and its Power LED is solid green. Pressing this
button too soon can temporarily disable Powerline
communication. If this occurs, use the Factory Reset button
to return the Powerline adapter to its factory default settings.
To secure your Powerline network:
1. Make sure the Power LED is solid green. If it is amber, connect
a device to one of the Ethernet ports so the adapter exits power
saving mode.
2. On the first Powerline adapter, press its Security button for 2
seconds and release the button. The Power LED blinks green
while the adapter is setting up security.
3. Within 2 minutes, go to the next Powerline adapter and press its
Security button for 2 seconds and release the button.
After security is set, the Power LED turns solid green. The
adapter can communicate over the network. The Powerline LED
is blinking or solid.
11
Technical Support
Thank you for selecting NETGEAR products.
After installing your device, locate the serial number on the label of
your product and use it to register your product at
https://my.netgear.com.
Registration is required before you can use the telephone support
service. Registration through the NETGEAR website is strongly
recommended.
Go to http://support.netgear.com for product updates and web
support.
For additional information about setting up, configuring, and using
your Powerline AV+ 200 Adapter, see the User Manual.
For complete DoC please visit the NETGEAR EU Declarations of
Conformity website at:
http://support.netgear.com/app/answers/detail/a_id/11621/
For GNU General Public License (GPL) related information, please
visit the NETGEAR support site at:
http://support.netgear.com/app/answers/detail/a_id/2649
12
Safety Information
•
•
•
•
•
•
AC input:100-125V~, 0.2A max in North America and 200-250V~,
0.2A max in other regions, for the XAV2602.
Operating temperature: 0C to 40C
The socket-outlet shall be installed near the equipment and be
easily accessible.
Powerline adapter ratings (maximum load):
EU: 16A 250V ~
FR: 16A 250V ~
UK: 13A 250V ~
AU: 10A 250V ~
NA: 15A 125V ~
Swiss: 10A 250V ~
Only power cords are allowed to be inserted into the filtered AC
outlet; no other equipment with a direct plug-in is allowed. The
power cord needs to be a maximum of 1 m long and a minimum
of 0.75 mm square of cross-sectional area.
Do not plug devices into the Powerline adapter filtered AC outlet
that exceed the product ratings. The output voltage of the filtered
AC outlet is the same as the power outlet that the Powerline
adapter is plugged into. To help avoid damaging your system, be
sure that the attached devices are electrically rated to operate
with the power available in your location.
13
•
•
•
If the input AC voltage is less than 125Vac, the device plugged
into the filtered AC socket of the Powerline adapter might not
perform as well as expected.
DO NOT PLUG MAJOR HOME APPLIANCES into the filtered AC
socket or into an attached power strip. The device is not intended
to be used with home appliances such as air conditioners, power
tools, space heaters, fans, hair dryers, ovens, or refrigerators.
Check the electrical current for any appliance used with the
device, and do not exceed home and product outlet ratings and
electrical requirements.
14
Compliance
This symbol was placed in accordance with the European Union Directive 2002/
96 on the Waste Electrical and Electronic Equipment (the WEEE Directive). If
disposed of within the European Union, this product should be treated and
recycled in accordance with the laws of your jurisdiction implementing the WEEE
Directive.
NETGEAR, Inc.
350 East Plumeria Drive
San Jose, CA 95134, USA
June 2011