1
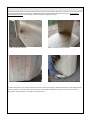
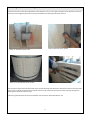
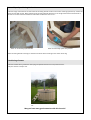
Wooden Hot Tub Assembly Guide
With right assembly you can enjoy your wooden hot tub for many years.
Assembling the hot tub is easier if you read this guide, follow it and use the right tools.
Make sure that you have all the packages (1-5)
Keep the details of the wooden hot tub in a dry place. Don't start assembling the hot tub
in rain or with high humidity. Wood expands in humid environment and assembling the hot tub becomes much harder.
Before assembling find a proper place for the tub. Good places are in garden, on the terrace or on the lake shore.
It is important that the tub is on a strong and level ground. We recommend positioning the tub on logs or blocks that can
carry several tonnes of weight for air circulation.
❶ 160cm diameter wooden hot tub parts:
•
•
•
•
•
2 bottom plates, 1 top plate, 1 bottom plug (1. package)
81 side slats (2. and 3. package)
14 sitting boards, 8 legs, 1 stair, 1 grate (3. package)
2 hoops, bolts, screws (4. package)
1 furnace, 1 funnel (5. package)
❶ Tools required for assembling the hot tub:
•
•
•
•
•
•
•
wooden or rubber hammer
tape measure
battery powered drill
drill (10mm)
screwdriver
wrench (17mm)
level
❶ Hot tub bottom plate assembly
Photo 1. Bottom plate assembly
Photo 2. Screwing screws into the bottom boards
Assemble the hot tube bottom boards up. Position the bottom plates to a level ground, bottom boards on top. Push the
bottom plates together so you will have a circle. Screw the bottom plate screws (6pc) in.
Turn the bottom upside down on a level ground so the bottom boards will be under the plate.
❶ Side slat assembly
Fasten the first side slat to the bottom plate (Picture 3). Start moving clockwise. Position the second slat next to the first so
that the tongued side of the second slat is tightly fastened to the grooved side of the first slat (Picture 4). Do not put
silicone between the slats. Use a wooden or rubber hammer to position the slats.
Photo 3. Side slat assembly
Photo 4. Position the slats clockwise
Photo 5. Positioning the last slat
Photo 6. Tap the slats over once more when finished
To position the last slat, turn the two slats that are next to the last one gently outside and position the slat between them
(Picture 5). Make sure that you have used all the slats. If all the slats are fastened, tap them over once more near the
bottom plate using a wooden or a rubber hammer (Picture 6).
❶ Positioning of the hoops
Start with positioning of the bottom hoop. Screw in the screws 12cm from the bottom (Picture 7) 10-15mm into the slats.
Position the hoop on the screws (Picture 8).
Photo 7. Position of the bottom hoop
Photo 8. Hoop resting on the screws
Photo 9. Fastening of the tightening bolt
Photo 10. Position of the top hoop
Fasten the tightening bolt and nut (Picture 9). The tightening bolts of the hoops should be vertically aligned and on the
right from the drain hole in the tub. Positioning of the top hoop. Screw in the screws 17cm from the top (Picture 10) 10
15mm into the slats. Fasten the tightening bolt and nut. Tighten the bolt so that the slats position is fixed. Remove the
screws.
❶ Positioning of the furnace and the grate
Position the furnace on two 20cm high blocks so that the drain hole is on the right from the furnace (Picture 11). Position
the furnace so that tightening bolts of the hoops are between the fastening bolts of the furnace.
Foto 12. Mark the center of hole
Photo 11. Positioning the furnace
Photo 13. Fastening bolts of the furnace
Photo 14. Positioning of the grate
Press the furnace against the wall. Mark the centre of each fastening hole (Picture 12). Remove the furnace and drill holes
where marks are. Position the bolts from outside in (Picture 13). Put the furnace back so that the bolts go through the
fastening holes and then fasten the nuts.
Position the grate parallel to the furnace and fasten it to the wall on both sides (Picture 14).
4
❶ Assembly and positioning the benches
Position the legs of the benches so that center of the sitting boards will be on the center of the legs (Picture 15). Fasten the
legs to the slats with screws. Begin positioning of the sitting boards (Picture 16). The longer sides of the boards will form
the outer circle of the benches and the shorter sides will form the inner circle.
Photo 15. Positioning of the benches
Photo 16. Fastening of the sitting boards
Fasten the sitting boards to the legs so that the end of the board is sitting on the center of the leg.
❶ Positioning of extras
Position the ladder firmly, fasten the drain plug and position the funnel on top of the furnace.
Now your hot tub is ready to use.
Photo 17. Assembled hot tub – ready to
use
May you have many good memories with this hot tub!
Wooden hot tub user manual
❶ Positioning
Find a place where you would like to position the hot tub, for example, garden, terrace or lake shore. It is important that
the hot tub is on a level and firm ground. For guaranteed air circulation we recommend placing the hot tube on top of logs
or blocks that can carry several tonnes of weight. Make sure that the hot tub is not on the grass for a long time or the wood
could rot because of constant humidity.
When choosing a place for the hot tube make sure that the funnel is far away from buildings.
❶ Usage
The hot tub can leak in some places. This is normal. Because the hot tub is made using dry wood, the wood
expands with humidity and the leaks stop.
Before using the hot tub check the condition of the side slats. Tap gently with wooden or rubber hammer to
push the slats in the right position. After that tighten the hoops using the bolts outside of the hot tub.
When you are not using the hot tub we recommend keeping 10cm of water in the bottom of the hot tub so that
the wood wouldn't dry before the next use.
To prevent litter and dirt getting into the hot tub cover the hot tub with the top plate.
When the barrel has been without water for a long time you should behave like the first time you used the hot tub.
You may heat the furnace only after the hot tub is at least half full and the furnace is under water
or the cold water that you pour in during heating can deform the furnace.
Dry wood is recommended to heat the furnace. Leave the furnace without the cover so that air gets in.
Using the cover you can regulate the airflow and keep the water getting into the furnace.
When the cover is closed for along time the fires goes out.
As long as there are hot coals in the furnace, draining of the hot tub is not allowed.
Recommended temperature for bathing is 37-40*C.
In the winter use a hat when bathing.
Don't leave the hot tub full with water in the winter!
❶ Maintenance
•
•
•
•
•
Clean the furnace when needed. To remove coal and dust you have two choices: you can clean the furnace with a
special dust vacuum or you can unmount the furnace and pour the dust out.
Don't leave the hot tub without water too long in the summer. This way the wood doesn't dry too much.
At least once a year treat the outside of the hot tub with wood preservative.
When using the hot tub longer and more frequent, change the water in the hot tube more frequent.
When cleaning the inside of the hot tub you can use pool cleaning equipment.
❶ Precautions
•
•
•
•
Be careful near the furnace. The furnace and the funnel can be hot!
Lift the cover of the furnace oil by the wooden handle!
Be careful in the winter, the stairs can be slippery!
Always watch the children when they are near the hot tub!