1
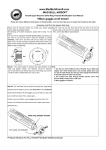
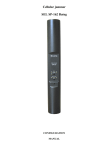
www.MadBullAirsoft.com
MAD BULL Gas Stun Grenade (GSG-01) User Manual
Please go to our
website for completed
video instruction and
more detail document:
MadBullAirsoft.com/
gsg-01/
NOTE: WEAR GOGGLE & EAR PLUG AT ALL TIMES!
Dangerous:
Wear the goggle &
ear plug
Dangerous:
Wear the goggle & ear plug
Step 04:Timing Adjustment: Use Allen wrench to adjust the screw on
the “gas valve.” Turn clockwise to the tightest status and use full
Step 01:Push the “gas valve” into head and pull the “deco hammer” back
pressure 800 PSI CO2 pressure. The delay time will be 5~10
and hold it.
second. You can turn it counter-clockwise or using the different
pressure CO2 to adjust the timing. The timing is all depends on the
screw and pressure of CO2. (The index lines on the “gas valve” are
for your adjustment reference.)
CO2 only
Dangerous:
Wear the goggle &
ear plug
Dangerous:
Wear the goggle &
ear plug
Step 05:Fill liquid CO2 into the GSG-01 to get full pressure and make
sure there is no leaking. Hold the spoon and pull out the pin. Once
you release the spoon, the GSG-01 should be detonated anytime.
Step 02:Inverse the spoon and use the hole on the spoon to adjust “gas Don’t insert anything into the GSG-01. GSG-01 can only make loud
valve”. Remember, you have to align the “gas valve” to the head and sound for training purpose. How to discharge? See next page Q&A!
then, the spoon can be installed correctly.
Details:
Dangerous:
Wear the goggle & ear plug
1.
GSG-01 Head
10. Refill valve
2.
Upper Shell
11.
3.
Gas Container
12. 2 O-ring
4.
Lower Shell
13. 3 O-ring
5.
Spoon
14. 4 O-ring
6.
Deco hammer
15. 5 O-ring
7.
Gas Valve
16. Gas valve body
8.
1 valve
9.
2 valve
Step 03:Hold the “deco hammer” and insert the spoon. (Make sure the
spoon align the “gas valve”. If not, the spoon can’t be completely
installed.) Insert the safety pin into the right hole on the “head.”
st
1 O-ring
nd
rd
th
th
st
17. Friction Ring
nd
18. Safety pin