1
ASSEMBLY AND MAINTENANCE MANUAL
CONTENT
Safe flying rules
Manual
4
5
Important notices
Amendments to the manual
Technical committee LAA CR (Light Aircraft Association of Czech republic)
5
5
6
Flight handbook data
User’s – owner’s record
Change of the owner
Technical data
Controls
Basic technical data of paraglider
Weights
Engine
Propeller
Rescue parachute system
7
7
7
9
10
10
10
11
11
12
Dimensions
Operating limitations
Speed
Driving unit limitations
Weight
Performance
Other limitations
Flight types
13
14
Emergency procedures
Engine failure
Fire
Vibrations
Using the rescue system
15
Normal procedures
Flight position adjustment
Pre-flight preparation (frame, prop, engine, battery, harness)
Pre-flight check
Engine test
Manual start
Refuelling
Takeoff
Landing
16
16
17
18
19
19
19
20
20
last update 1.05.2009
2
Engine tuning and maintenance
Running-in
Fuel and oils
Carburettor settings
Propeller orientation setting
Propeller maintenance
Periodical maintenance
20
20
21
21
22
22
22
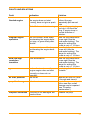
Faults and solutions
23
Transportation rules
24
Long time storage rules
24
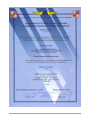
Certificate LAA ČR for manufacture, service and testing of MPG
25
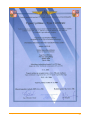
Type certificate – „Harness for MPG“
26
Paramotor Components
29
Records
Service log
Record of bulletin implementations or mandatory changes
Daily operation records
39
39
43
44
Notes
58
Equipment
64
Warranty
65
last update 1.05.2009
3
Safe flying rules
Observe UL aircraft regulations.
Do not overestimate your pilot skills and never show off. Use open areas
for emergency landing training.
Watch the weather forecast carefully. Do not plan long flights, when storms,
fogs or frost are forecasted.
Watch fuel level (flight time and real consumption).
When Choosing the direction and height of your flight always consider
possibility of emergency landing.
Always fly with reserve of speed, particularly during all start and landing
manoeuvres.
Do not make any kind of aerobatics (e.g. total wingovers), even if you think,
your skills and flight characteristics of your MPG can manage it.
Do not underestimate the navigation and flight planning. Do not fly in unknown
area without proper preparation and equipment (map, navigation).
Fly only in good physical and mental condition.
last update 1.05.2009
4
MANUAL
1)
This manual is written by the manufacturer of the MPG.
2)
All records must be readable, permanent and none of the pages must be pulled
out.
3)
This filled-in book is a part of technical documentation.
4)
Total flight time, number of starts and latest issued mandatory bulletins must be
transferred to the new book.
5)
Record only measured or certified data to the technical-operating records.
(After approval of commissioned inspector–technician)
6)
The owner guarantees the accuracy of the operation records.
IMPORTANT NOTES
AMENDMENTS TO THE MANUAL
If there is change of flight rules or a required change to the construction of MPG,
announcements of these changes will be published in bulletins (e.g. in Pilot
magazine). Each owner of MPG must take an appropriate action and implement this
change and make record of this in the relevant part of this handbook.
Every owner, user and pilot of this MPG must
thoroughly familiarize themselves with this manual.
THIS PRODUCT DOES NOT COME UNDER CERTIFICATION OF CIVIL AVIATION AUTHORITY CR
AND IT IS OPARATED ON USERS OWN RISK.
ALL INTENTIONAL SPIRALS, FALLS AND AEROBATICS ARE PROHIBITED.
All construction changes to the MPG altering the original certified setup must be
authorised by commissioned inspector-technician, who registered this MPG.
Any damage to the MPG must be notified to manufacturer of relevant
inspector-technician, who recommends service, supervises the repair and
makes technical check of the MPG afterwards. He will make a record of
this in the documentation of the MPG.
last update 1.05.2009
5
TECHNICAL COMMITTEE LAA CR (Light Aircraft Association of Czech Republic)
represented by Mr. ……………………………………. certifies, that ,according to
authorisation from Civil aviation authority CR given to test airworthiness of aircraft,
this MPG complies
in construction, used materials, performance and
characteristics with the UL-2 directive, and belongs to the group:
Powered ParaGlider
PPG
PPG
The name MPG – type
RODEO
This MPG was awarded airworthiness certificate – type:
Z
„Z“ – prototype, unique construction
„A“ – approved type of self-built construction
„P“ – approved type of professional made MPG
Type certificate is registered as ULL-01/2002 (see add.) by LAA CR
Registration mark
Number of crewmembers
1
Date of registration
Inspector-technician
last update 1.05.2009
stamp, signature ………………….
6
FLIGHT HANDBOOK RECORDS
USER´S - OWNER´S RECORD
MPG owner ………………………………………………………………………………….
Name …………………………………………………………………………………………
Address ………………………………………………………………………………………
ID number ….………………………………………………………………………...………
From – To (date) ..……………………………………………………………………..……
placed evidential mark
OK - .…………………………………………………..………
Change of owner ………………………………………………………………….………
Name ………………………………………………………………………………………
Address .……………………………………………………………………………………
ID number .………………………………………………………………………...………
From – To (date) …………………………………………………………………..………
placed evidential mark
OK - .…………………………………………………..………
Canopy (manufacturer, type, category, work number, date of manufacture,
min. – max. flight weight, canopy weight):
manufacturer / type …………………………………………………………………………
category
…………………………………………………………………………………
registration number …………………………………………………………………………
date of manuf. .………………………………………………………………………………
min. – max. flight weight ……………………………………………………………………
canopy weight ….……………………………………………………………………………
…………………………………………………………………………………………………
last update 1.05.2009
7
Change of owner ………………………………………………………………….………
Name ………………………………………………………………………………………
Address .……………………………………………………………………………………
ID number .………………………………………………………………………...………
From – To (date) …………………………………………………………………..………
placed evidential mark
OK - .…………………………………………………..………
Canopy (manufacturer, type, category, work number, date of manuf., min. – max.
flight weight, canopy weight):
manufacturer / type …………………………………………………………………………
category
…………………………………………………………………………………
registration number ....………………………………………………………………………
date of manufacture ...………………………………………………………………………
min. – max. flight weight ……………………………………………………………………
canopy weight ….……………………………………………………………………………
…………………………………………………………………………………………………
Change of owner ………………………………………………………………….………
Name ………………………………………………………………………………………
Address .……………………………………………………………………………………
ID number .………………………………………………………………………...………
From – To (date) …………………………………………………………………..………
registration mark OK - ..............…………………………………………………..………
Canopy (manufacturer, type, category, work number, date of manuf., min. – max.
flight weight, canopy weight):
manufacturer / type …………………………………………………………………………
category
…………………………………………………………………………………
registration number …………………………………………………………………………
date of manufacture ...………………………………………………………………………
min. – max. flight weight ……………………………………………………………………
canopy weight ….……………………………………………………………………………
last update 1.05.2009
8
last update 1.05.2009
paraglider 4
paraglider 3
paraglider 2
paraglider 1
Manuf. year
Name
Sky Engines,
Italy
NIRVANA
PARAMOTORS
Manufacturer
Manufacturer
SKY 100
EASY
Type, name
Manuf.number
Engine
Undercarriage
Manuf.number
-
Helix, Germany
125 / 3
Propeller
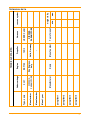
TECHNICAL DATA MPG
Year of manuf.
NIRVANA
PARAMOTORS
LEXX R Colibri
Harness
min.
max.
weight in fly
rescue system
TECHNICAL DATA
9
CONTROLS
Manual control
Pulling left brake MPG turns left and vice vera.
Pulling both breaks at the same time MPG brakes.
Throttle
In the left hand, pressing throttle lever increases thrust.
Ignition switch off
With left thumb, press and hold red button on the throttle.
Central ignition switch
With right hand, lower switch on the side of laminate part,. Ignition on – up, off –
down.
Starter button
not available
Central starter switch
Not available
Rescue system
With right hand, bottom part of the harness, side container or front container
(depends on the harness type).
WEIGHT
paramotor, harness, carbines
empty weight according to UL – 2
max. flight weight
last update 1.05.2009
24 kg
150 kg
10
ENGINE
If the is not certified as an aircraft engine, it can fail any time! The pilot is
responsible for any consequences of engine failure !
two-stroke single-cylinder engine, watercooled, membrane carburettor Walbro WB8.
cylinder capacity
102 ccm
power on take off
18 PS / 10200 RPM
weight incl. liquids
13 kg
fuel (type, oct.rating)
BA 95
consumption approx.
3 l/h
oil (type)
100% fully synthetic BARDAL KTS
the oil-petrol mixture
reduction (type, red.ratio)
1 : 40
mechanical 1:4 oil lubricated
fuel tank capacity
10 l
PROPELLER
diameter
1250 3blade
last update 1.05.2009
material
composite
weight
1200 g
in configuration
11
Rescue parachute system
Type, manufacturer, manuf.number ………………………………………………..
…………………………………………………………..
Activation way
…………………………………………………………..
Max. fall (m/s)
…………………………………………………………..
With max. flight weight
…………………………………………………………..
Position
…………………………………………………………..
Battery (type, parameters)
Not available
Ignition NIRVANA CI
Not available
Output 16,8 V
Not available
last update 1.05.2009
12
DIMENSIONS
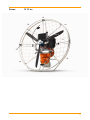
D
1250
last update 1.05.2009
D1
L
H
T
1450
450
750
450
13
OPERATING LIMITATIONS
Speed
Given by speed range of the canopy used.
Wind speed
According to canopy used. Do not take off and land with back wind.
Driving unit limitation
Mode
max. revolutions allowed
max. constant revolutions
10600 rpm
10200 rpm
Weight
min. pilot weight
max. pilot weight
max. weight in flight MPG
empty weight MPG
45 kg
100 kg
150 kg
24 kg
Performance
climb ratio approx.
service ceiling
flight range (depends on canopy used)
for max.. 5min at a time
unlimited
1,5 m/s
3 500 m
cca 100 km
Other limitations
This paramotor is not certified for tandem flying.
Canopy check period is set by the canopy manufacturer. We recommend first check
of the lines after 50-70 flying hours.
Flight types
Only daytime VFR flights are allowed
(visual reference flight). Other flight types are prohibited.
last update 1.05.2009
14
EMERGENCY PROCEDURES
Engine failure (in height up to 200 m)
-
lead the MPG into free flight
in low height, land in the line of flight – try to avoid any barriers
if you are high enough, land into an open area without any barriers, against the
wind if possible
Engine failure (in height over 200 m)
-
lead the MPG into free flight
check fuel condition
in case of breaking fuel supply, try to restore it and start the engine
if your paramotor has not got an electric starter, it do not start or your high is
under 200 m, choose suitable area for your landing and land as described
above.
Fire
-
switch off the ignition
do not try to start the engine
Vibrations
if abnormal vibrations appear it is necessary:
-
to set engine revolutions to the mode, where vibrations are as small as
possible
to do emergency landing
if vibrations increase, land in the terrain with engine switched off.
Using the rescue system
In case of emergency or definitive loss of control of your paraglider, switch the
ignition off, right hand grasps the rescue parachute handle, pull and release it, and
throw it sideways behind yourself. The position of the handle depends on the
rescue parachute positioning – at the bottom, on the side or in the front (standard in
the front in a front container).
last update 1.05.2009
15
NORMAL PROCEDURES
All engines are tested before handover for about 10 min. We gave special attention
to all joining components. All screws nuts and rivets were carefully tightened and
secured by Loctite. It is important to check and tighten all screws on the cylinder
head and exhaust system after approx. 2 operating hours, when heat energy
causes theirs final positioning. After this check you can be sure, that your paramotor
is save and ready to fly.
Flight position adjustment
Flight position adjustment of all paramotor set must be done before the first flight.
The upper hang points for the karabiners are used for PPG flying. You should set
seat position, side trims, shoulder trims, to find comfortable position slightly leaning
back. We recommend to hang the seat so that it simulates the flight position and to
try shift from sitting to stand-up position before landing. It is important for future
smooth starts and safe landings.
The propeller must be in an angle of 5 degrees with vertical axis in flight position.
Each pilot must adjust the flight position for his high and weight.
PRE-FLIGHT PREPARATION
Paramotor assembly
Frame
Take all components out of transport containers. Place the engine part horizontally
on the ground. Put the bottom quarter of the frame in the fixed pipe located in the
middle of the side of the laminate part, and turning fix it to the bottom hollow. Do the
same with the other bottom quarter. Then secure them together with velcro. Then
stand the engine up. Assemble the 2 upper quarters of the frame first, then slide
them partially into the pipes in the laminate part and finally to the bottom half of the
cage. Then assemble whole cage and secure it with all attached velcro belts.
Propeller
Put propeller on the reduction, put flange on it and secure it by four special screws
supplied. Tighten these by hand key in the order 1-4-2-5-3-6 with force of approx.
1 kg/m. Do not dent the propeller body by over tightening. We recommend turning
the propeller round once by hand to make sure, that it is attached correctly.
ATTNETION!
Never start the engine without a propeller!!!
last update 1.05.2009
16
Engine
Release the petrol tank cap to allow equalization of a pressure in the tank. Tighten
the cap again.
Battery
Insert charged battery (in the protective case) in the battery case in the laminate
part. Check the main starter switch. It should be OFF. Then connect leads and
close the battery case.
!! Never disconect battery from engine while in operation. There is a risk of damage
to the electronic ignition.
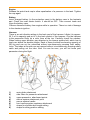
Harness
There is an anti-vibration airbag in the back part of the harness. Inflate it to approx.
30 % of its capacity and put it in the back pocket of the harness. Clip the harness
to the paramotor firstly on a side, then at the top. Carefully check the catches.
When locking upper buckles, pay attention to the rescue system belt, which has to
lead over above the buckles straps. Each of these buckles has bearing capacity of
300 kg and can not be unbuckled without simultaneously pressing both safetylocks. The tubes at the side can not opened without simultaneously pressing safety
catch and pulling out the tube. Now You can be sure, you will not loose your
paramotor during the flight.
1)
2)
3)
4)
5)
6)
7)
8)
main glider attachment
side tubes for paramotor attachment
upper paramotor attachment points
rescue system attachment point
rescue system handle
front rescue system container attachment
straps for shoulder belt length setting
straps for sitting position setting
last update 1.05.2009
17
PRE-FLIGHT CHECK
cage
strings
propeller
engine
reduction
equipment
fuel tank
harness
rescue system
oil
petrol
engine test
pilot
other
paraglider
last update 1.05.2009
intact, assembling, velcro
undamaged, tense
orientation, screws tightening, intact, no damage
silent-blocks, carburettor and exhaust attachment
screws
general condition, fuel supply, el. contacts, switches,
spark-plug cable
cup, tight
attach points – engine, pilot, paraglide
attached, safety catches
good oil-petrol mixture
sufficiency for flight planed
high revolutions, neutral, switch off
helmet, shoes, warm clothes, gloves
vario, tachometer, GPS, clock, radio
canopy, lines, loos ends
18
ENGINE TEST
When starting cold engine, repeatedly pres the petrol pump, until petrol comes out
through the air filter. Remove all small objects, which could be possibly drawn in by
the propeller, from immediate proximity of the paramotor. Loos parts of your (and
long hair) are equally dangerous.
Nobody must stand dangerously close to starting engine,
especially not in the propeller’s plane of rotation.
Switch on the main switch on the right hand side. Grasp the engine handle firmly by
left hand, lean your knee against the laminate. Never hold the protective frame.
The engine gives thrust immediately after it is started. It is necessary to keep this in
mind and make sure, the engine switch off button is accessible.
Manual start
Turn the propeller behind engine compression. As no.1. take the throttle with the left
hand* together with the engine handle. Pull the start rope strongly (but smoothly).
Do not release the start rope, but let it smoothly retract back.
Electric start
Not available
After starting, warm up the engine for about 1 min in low and middle rpm, till it starts
accelerating. Then try idle revs, transition from min to max revs and back. Switch
the engine off.
* Why is the throttle in left hand?
Most of the pilots are right handed. So they hold the throttle in the left hand,
similarly like the cluch in the car on the left leg. And the right hand is free to
manipulate with tools, radios or cameras, which is much more motorically
demanding activity.
REFUELLING
Always refuel with the engine and all its electricity switched OFF. Fill the tank
through the filter and check the fuel purity. Make sure there is no fire around the
MPG, especially nobody smoking there. Use only fuel containers specifically
intended for fuel. Do not wear clothes, which create static electricity, during
refuelling your MPG. Keep the fuel out of the reach of children.
It is possible to watch fuel level during the flight, by the mirror placed on the string
in the harness pocket (or a parabolic plastic mirror fixed on the glove).
last update 1.05.2009
19
TAKEOFF
The pilot is supposed to absolve paramotor lessons in an official paramotor
schools and receive pilot licence for microlight category. The pilot is
responsible for familiarizing yourself with flying rules and law in his country
or flying destination. This manual is not a substitution of professional
paramotor course.
Make front start in front wind. Start to inflate the paraglider with your hand poised to
the sides and engine in idle revs. Check the canopy filling and line condition. Apply
full gas and run as fast as possible with your hands now above your head without
breaking the paraglider. Keep heading against the wind. When you reach the
takeoff speed, break the paraglider slightly and take off. Run until you fly. Do not sit
prematurely down into the harness and do not bounce to lift the canopy.
Release the breaks after take off and climb with full speed. This minimises the
danger of speed loss.
LANDING
Carefully check the landing place, possible barriers and wind direction. Do always
land against the wind.
Press and hold the engine switch off button on the throttle till the engine stops in
high min 10 m above the ground. Get off the harness in approx. 5 m above the
ground. Land normally on your feet. Run if necessary. Put the canopy on the
ground to avoid the contact with hot engine parts.
ENGINE TUNING AND MAINTENANCE
RUNNING-IN
There are two reasons, why is engine running-in very important:
1)
2)
correct operation check in all rpm types
warming up the engine and final settling of all its parts
Don’t use full gas during first 5 flying hours, except for the take off (approx. 1 min at
a time). Vary the rpm levels during first flights. After this your engine will be ready to
fly without any limitations. The revolutions will increase by 300 rpm.
last update 1.05.2009
20
FUEL AND OILS
Solo and NIRVANA recommend using fully synthetic (ie: Mobil 1 – Racing 2T,
Eurol, Valvoline SYNTO, SHELL ADVANCE ULTRA, PANOLIN 2 STROKE
SYNTH., …) in correct oil-petrol mixture, which prevent combustion chamber and
exhaust carbonisation.
Do not store mixed petrol longer than few days, max 2 – 3 weeks! including
the petrol in the paramotor tank.
You can mix oil with leaded or unleaded petrol. However leaded petrol is preferred.
Always use quality petrol.
mode
time
Mixture
(oil/petrol)
running in
3 hod
1 : 33
---
1 : 40
normal operation
octane
EUROPE
UK
USA
97
Super PB
4-star PB
Premium
95
Super S/PB
Regular S/PB
Regular
Do not use oils intended for high revolutions.
Any mechanical problems causing seizure of the engine
will not be cowered by the warranty.
These are always caused by not observing the running-in rules,
use of wrong fuel, oil, oil-petrol mixture, old mixture or by combination of the
above..
CARBURETTOR SETTING
short screaw
long screaw
standard
setting the idle rpms
1+1/4 turn
Make setting from tightened position turning left.
last update 1.05.2009
21
PROPELLER ORIENTATION SETTING
Set propeller to vertical position. Find the distance between the blade end and the
o
frame with some tool (e.g. screwdriver). Then rotate the prop by 180 and check
whether the distance is the same on the other blade. If there is a difference, loose
firstly propeller screws on the less deflected side and than tighten both.
PROPELER MAINTENANCE
Always store the propeller in a dry place. Do not expose it to sudden temperature
changes. Store it in horizontal position. Do not expose the propeller unnecessarily
to sunshine.
Check the propeller after each flight. If it has small scratches, it is necessary to
repair them to prevent any dampness penetration. You can make Small repairs
yourself using special tools and solutions. It is necessary to balance the propeller
after every repair.
It is recommended to have the propeller generally treated and balanced after some
time.
Any unprofessional treatment of the propeller can have fatal consequences
(misbalance, high vibrations, loosing the prop in flight, frame destruction, reduction
damage,…)
REGULAR MAINTENANCE
part
radioator coolant check
exhaust cleaning
internal filter wash
spark-plug
engine silentblocks
exhaust silentblocks
reduction gear oil
check
10 h
50 h
100 h
10 h
before each flight
before each flight
10 h
replacement
100 h
100 h
50 h / 1 year
100 h / 2 years
100 h / 2 years
100 h
In case of evident damage of any part of the paramotor it is necessary to repair or replace it
before first next flight.
last update 1.05.2009
22
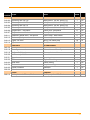
FAULTS AND SOLUTIONS
Fault
Indication
Solution
flooded engine
the engine does not start
running, does not give a spark
without the gas,
repeatedly pull manual
start
take out the spark-plug
and dry it. Without the
plug, 3 engine turns in
normal direction of
rotation.
tune the long carburettor
screw right (see the
carburettor setting). The
range for setting this
screw is only +/- 1/8 turn.
tune the long carburettor
screw left (see the
carburettor setting). The
range for setting this
screw is only +/- 1/8 turn.
tune the long carburettor
screw right (see the
carburettor setting). The
range for setting this
screw is only +/- 1/8 turn.
spark-plug – check the
contacts
If it still does not start running
Irregular engine
operation
too rich mixture, while sharp
accelerating the engine does
not stop, or goes slowly after
throttle
too poor mixture, while sharp
accelerating the engine does
stops
slow low-high
revolution
transition
slow acceleration
ignition fault
air filter pollution
carburettor is set correctly,
engine engine does not start
correctly or does not run
smoothly
low thrust
propeller damage
vibrations increase
Propeller vibrations
The prop is not damaged, but
causes vibes
last update 1.05.2009
take the air filter out, blow
it through and clean it
great damage – replace it
with a new one, small
damage can be repaired
(see “Propeller
maintenance”)
balance the prop.
23
TRANSPORTATION RULES
Completely assembled
-
disconnect the battery
the engine must be supported by the fuel tank and the frame all the time.
It must not be supported just by the frame.
if you need to secure it during transport only strap down the laminate part,
never try to secure (strap down )the MPG by the cage
check, that it can not tip over
Dismantled
-
disconnect the battery
detach the harness, propeller and take apart the frame
we recommend using the transportation bags (engine, frame, propeller)
LONG TIME STORAGE RULES
-
drain all the fuel
protect the combustion chamber wit special conservator
detach and store the propeller (see “Propeller maintenance”
disconnect the battery – store it separately
store the paramotor in dry, clean place in constant temperature
last update 1.05.2009
24
last update 1.05.2009
25
last update 1.05.2009
26
last update 1.05.2009
27
last update 1.05.2009
28
PARAMOTOR
NIRVANA EASY 125
COMPONENT SETS
last update 1.05.2009
29
Frame
01 01 xx
12
05
02
060116
13
12
03
060901
04
12
last update 1.05.2009
30
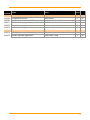
číslo/
popis
number
010101 RÁM
name
need
FRAME
1
010102 Ochranný rám 1/4 PH
safety frame, 1/4 incl. String, RT
1
set
pc
010103 Ochranný rám 1/4 PS
safety frame, 1/4 incl. String, RB
1
pc
010104 Ochranný rám 1/4 LS
safety frame, 1/4 incl. String, LB
1
pc
010105 Ochranný rám 1/4 LH
safety frame, 1/4 incl. String, LT
1
pc
010106 Spojka rámu - obvodová
Frame joint - peripheral
8
pc
010107 Spojka rámu - vnitřní
Frame joint - inner
4
pc
010111 Stahovací pásek rámu - se sponou
Velcro strap - with buckle
2
pc
010112 Stahovací pásky - sada
Velcro straps - set
1
set
010113 Výplet 1/4 rámu
String (1/4 frame part)
10
m
010114 Nýt rámu
Rivet
12
pc
DOPLŇKY
ACCESSORIES
Sedačka se zálož.kontejnerem LexxRColibri
Harness with rescue container LexxRColibrii
1
pc
010118 Powerfly
Main carbines - Powerfly
2
pc
010119 Majlon záložáková
Rescue chute carbines
2
pc
010120 Nafukovací polštářek
Air cushion
1
pc
010121 Speed
Speed system
1
pc
010122 Taška na motor
Engine wheel bag
1
pc
010123 Obal rámu
Frame casing
1
pc
010124 Obal vrtule
Propeller casing
1
pc
010125 Taška na návod
Briefcase
1
pc
020126 Návod
Manual
1
pc
1
pc
040128
Vrtule
060116 Vrtule plastová 125 cm, 3-listá
last update 1.05.2009
Propeller
Plastic propeller 125, 3blade
31
Engine
06 02 00
All information, directions of use, technical specification, maintenance, spare parts
you can find in enclosed Sky100 user’s manual issued by the engine unit producer.
This engine manual is indivisible part of Easy user manual.
last update 1.05.2009
32
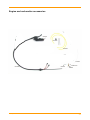
Engine and carburettor accessories
010375
010362
010363
010374
010365
last update 1.05.2009
010372
010373
020371
33
číslo/
popis
number
Příslušenství motoru a karburátoru
name
need
Engine and carburettor accessories
010362 Pumpička benzínová
Petrol pump
1
020363 Hadička čerpadla 1,1m (2x55cm)
Pump hose 1,1 m (2x55cm)
1
pc
020371 Držák bowdenu plynu
Throttle holder
1
pc
010372 Šroub bowdenu plynu
Screw
1
pc
010373 Matka bowdenu plynu
Nut
2
pc
010365 Plyn s aretací komplet
Throttle with tempomat complet
1
set
010374 Lanko plynu
Throttle wire
1
pc
010375 Tlačítko vypínání zapalování
Push button - stop
1
pc
last update 1.05.2009
pc
34
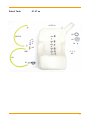
Petrol Tank
01 07 xx
01 07 01
02
020714
13
12
11
03
04
09
10
05
08
07
06
last update 1.05.2009
35
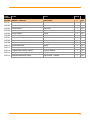
číslo/
popis
number
010700 NÁDRŽ - komplet
name
need
Petrol tank
1
set
010701 Nádrž
petrol tank
1
pc
010702 Těsnění víčka nádrže
Gasket
1
pc
010703 Víčko nádrže
Petrol top
1
pc
010704 Ventilek
Ventil
1
pc
010705 Šroub nádrže
Screw
3
pc
010706 Nořidlo s filtrem
Dip filter
1
pc
010707 Matice nořidla
Nut
1
pc
010708 Hadička benzínová vnitřní
Petrol hose - inside
1
pc
010709 Průchodka nádrže
Bushing
1
pc
010710 Spona stahovací
Clamp
3
pc
010711 Těsnění průchodky nádrže
Rubber gasket
1
pc
010712 Podložka průchodky nádrže
Tension washer
1
pc
010713 Matice průchodky nádrže
Nut
1
pc
010714 Hadička benzínová vnější
Petrol hose - outside
1
pc
last update 1.05.2009
36
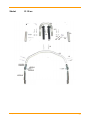
Skelet
01 09 xx
24
32
31
25
29
28
26
23
27
34 33
30
22
18
19
21 20
08
16
36
17
020209
020909
020911
020211
020912
020212
35
020910
020210
last update 1.05.2009
37
číslo/
popis
number
name
060900
ZÁDOVÝ DÍL - samostatně neprodejný
Skelet - unsaleable
060901
Skelet - samostatně neprodejný díl
Skelet - unsaleable
2
pc
010908
Zádový oblouk
Back bend pipe
1
pc
020909
Kloub sedačky
Hinge
2
pc
020910
Rozpěrka
Strut
2
pc
020911
Nýt
Rivet
2
pc
020912
Podložka
Washer
2
pc
010916
Nýt boční zadní
Rivet
2
pc
010917
Nýt boční přední
Rivet
2
pc
010918
Nýt zadní
Rivet
2
pc
010919
Kladka startovadla
Pulley
1
pc
010920
Podložka nýtu kladky startovadla
Rivet washer
2
pc
010921
Nýt kladky startovadla
Rivet
2
pc
010922
Držák startovadla
Holder
1
pc
010923
Nýt držáku startovadla
Rivet
2
pc
010924
Madlo
Handle
1
pc
010925
Nýt madla
Rivet
4
pc
010926
Podložka nýtu madla
Rivet washer
4
pc
010927
Pásek horní karabiny
Upper strap
2
pc
010928
Nýt pásku
Rivet
2
pc
010929
Trubka rámu
Frame pipe
2
pc
010930
Nýt trubky rámu
Rivet
2
pc
010933
Podložka silentbloku
Tension washer
4
pc
010934
Matice silentbloku
Nut
4
pc
010937
Velcro samolepící
Velcro self-adhesive
1
pc
010938
Nálepka "NIRVANA PARAMOTORS"
Sticker
1
pc
020940
Nálepka "Seřízení karburátoru"
Sticker
1
pc
010941
Nálepka "Mísící poměr"
Sticker
1
pc
010942
Nálepka "Předletová příprava"
Sticker
1
pc
010943
Nálepka "ON / OFF"
Sticker
1
pc
010945
Nálepka "Type"
Sticker
1
pc
010946
Nálepka "Evidenční štítek"
Sticker
1
pc
010947
Nálepka "NIRVANA PARAMOTORS"
stříbrná
Sticker
2
pc
last update 1.05.2009
need
1
set
38
OPERATING RECORDS
SERVICE LIST
List of mandatory checks performed,
repairs, important part replacements, …
Operation (reason)
last update 1.05.2009
date
flight hours
signature
– checked
by
39
List of mandatory checks performed,
repairs, important part replacements, …
Operation (reason)
last update 1.05.2009
date
flight hours
signature
– checked
by
40
List of mandatory checks performed,
repairs, important part replacements, …
Operation (reason)
last update 1.05.2009
date
flight hours
signature
– checked
by
41
List of mandatory checks performed,
repairs, important part replacements, …
Operation (reason)
last update 1.05.2009
date
flight hours
signature
– checked
by
42
RECORD OF BULLETIN IMPLEMENTATIONS OR MANDATORY CHANGES
serial
number
bulletin
number
last update 1.05.2009
date
note
performed –
signature
43
DAILY OPERATING RECORDS
date
take off and
landing place
last update 1.05.2009
daily
flights
number
in all
flight
time
flights
number
flight
time
notes, flight, faults,
repairs, consumption,…
44
date
take off and
landing place
last update 1.05.2009
daily
flights
number
in all
flight
time
flights
number
flight
time
notes, flight, faults,
repairs, consumption,…
45
date
take off and
landing place
last update 1.05.2009
daily
flights
number
in all
flight
time
flights
number
flight
time
notes, flight, faults,
repairs, consumption,…
46
date
take off and
landing place
last update 1.05.2009
daily
flights
number
in all
flight
time
flights
number
flight
time
notes, flight, faults,
repairs, consumption,…
47
date
take off and
landing place
last update 1.05.2009
daily
flights
number
in all
flight
time
flights
number
flight
time
notes, flight, faults,
repairs, consumption,…
48
date
take off and
landing place
last update 1.05.2009
daily
flights
number
in all
flight
time
flights
number
flight
time
notes, flight, faults,
repairs, consumption,…
49
date
take off and
landing place
last update 1.05.2009
daily
flights
number
in all
flight
time
flights
number
flight
time
notes, flight, faults,
repairs, consumption,…
50
date
take off and
landing place
last update 1.05.2009
daily
flights
number
in all
flight
time
flights
number
flight
time
notes, flight, faults,
repairs, consumption,…
51
date
take off and
landing place
last update 1.05.2009
daily
flights
number
in all
flight
time
flights
number
flight
time
notes, flight, faults,
repairs, consumption,…
52
date
take off and
landing place
last update 1.05.2009
daily
flights
number
in all
flight
time
flights
number
flight
time
notes, flight, faults,
repairs, consumption,…
53
date
take off and
landing place
last update 1.05.2009
daily
flights
number
in all
flight
time
flights
number
flight
time
notes, flight, faults,
repairs, consumption,…
54
date
take off and
landing place
last update 1.05.2009
daily
flights
number
in all
flight
time
flights
number
flight
time
notes, flight, faults,
repairs, consumption,…
55
date
take off and
landing place
last update 1.05.2009
daily
flights
number
in all
flight
time
flights
number
flight
time
notes, flight, faults,
repairs, consumption,…
56
NOTES:
last update 1.05.2009
57
NOTES:
last update 1.05.2009
58
NOTES:
last update 1.05.2009
59
NOTES:
last update 1.05.2009
60
NOTES:
last update 1.05.2009
61
NOTES:
last update 1.05.2009
62
NOTES:
last update 1.05.2009
63
EQUIPMENT
Engine configuration
Frame 4/4
1450
Propeller, frame, screws
1200
Bags
Harness
Engine
Frame
Prop
Complet
Air bag
Battery
Key – reduction
Key – propeller
Manual
last update 1.05.2009
64
WARRANTY
The warranty covers manufacture and material faults for all parts of paramotor
including the harness. This product is cowered by 1 year manufacturer’s
warranty
The warranty does not cover any damages caused by theft. It does not cover any
broken or destroyed parts due to incorrect use of the MPG, use in unsuitable
weather conditions, wrong assembly of mechanical parts and damages caused by
falls.
The warranty ceases if the MPG is sold to the third person, or in case of incorrect
use, unprofessional repair or use of unoriginal parts.
The guarantee is valid, when dated and signed by both sides.
Keep in mind, that this engine has not got an aircraft certification. It is your
responsibility as the user to assemble and check the MPG before each flight.
Date
…………………………………
Seller
…………………………………..
The buyer confirms, that he was informed about correct operation of the MPG, he
will be responsible for finding out about any changes or mandatory bulletins from
the manufacturer, related to this MPG.
Buyer
last update 1.05.2009
…………………………………..
65
NIRVANA SYSTEMS s.r.o., Jateční 523, 760 01 Zlín, Czech Republic
tel.: +420 577226616, fax: +420 577019117, sms: +420 775917001
e-mail: [email protected], http://www.nirvana.cz
last update 1.05.2009
66