1
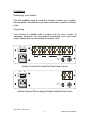
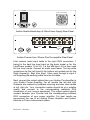
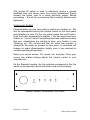
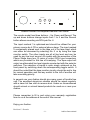
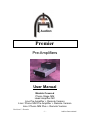
Premier
Pre-Amplifiers
User Manual
Models Covered
Phono Stage MM
Head Amplifier MC
Line Pre-Amplifier + Remote Version
Line / Phono MM Pre-Amplifier + Remote Version
Line / Phono MM Plus + Remote Version
Revision 1.3 Premier
-1-
Audion International
Introduction
Congratulations on your purchase of the World acclaimed
“Premier” pre-amplifier range from Audion.
Your Audion Amplifier is the result of nearly 20 years exhaustive
research and development culminating in our current world class
product. The chassis is made of anodised aluminium designed to
minimise magnetic interference and reduce internal noise to an
absolute minimum. All our amplifiers are hand built using only the
finest components available offering the highest quality.
Our new look for all of our Pre-Amp range represents our
guarantee to you of quality.
Warranty
All of our products carry a 2 (two) year worldwide parts and labour
warranty (less delivery charges). All valves/tubes are guaranteed
for a period of 6 (six) months. This does not affect your statutory
rights.
Revision 1.3 Premier
-2-
Audion International
Getting Started
Upon opening your box you will find:
1.
2.
3.
4.
5.
Audion Pre-Amplifier
Power cord
This User Manual
Product Registration and Warranty form
Valves/tubes
Please keep all packaging and store in a dry and safe place.
Carefully remove the Audion Amplifier from its packaging and store
both the box and the foam in a safe place, should, in the unlikely
event that you ever need to return your Audion to us for
maintenance, upgrading or servicing. The packaging has been
specifically designed to protect your amplifier.
Before attempting to connect your Audion please read carefully
and understand thoroughly the contents of this manual. Keep this
manual near you when installing your Audion so it is handy for
reference.
This manual is designed to assist both novice and experienced
persons in achieving satisfaction from your Audion. It describes the
features and operation
Please Note.
As with any electrical product extreme caution should be
exercised. Do not place your Audion in direct sunlight. There are
no user serviceable parts inside. The valves/tubes run HOT in
normal operation, under no circumstance during operation should
they be touched. If it becomes necessary to replace a valve/tube
please allow at least 20 minutes from switching off for the unit to
cool.
Revision 1.3 Premier
-3-
Audion International
Valves/Tubes
You will now need to place the valves/tubes into your Audion. The
Phono & MC Stage uses 2 x 6922/E88CC in the left and Right
hand side front. The Line level pre-amplifier uses 2 x 6922/E88CC
in all the sockets. The Line / Phono uses 4 x 6922 in all the
sockets, and finally the Line / Phono Plus (2 box) uses 4 x 6922 in
the pre-amplifier and none in the separate power supply.
If you have never handled a valve/tube before be careful – they
are similar in properties to a light bulb and just as easily breakable.
In use they can run as hot as a light bulb – SO BE CAREFUL.
The smaller E88CC or 6922 valve/tube will only fit one way around
into its respective socket. Before inserting check that the pins are
straight and that there is no physical damage to the glass
envelope. A small downward push is all that is needed to insert the
valve/tube make sure that the pins align and that the orientation is
correct. Do not use excessive force.
All Audion valve/tubes are dynamically selected and where
applicable are supplied as matched pairs. All are supplied with a
six (6) month return to base warranty.
Please Note
Inserting the valve/tubes the wrong way around will at the very
least damage the valve base pins and may result in a loose valve
causing a crackling sound.
WARNING – Do not attempt to remove or replace valves/tubes
whilst your Audion is in operation, as by so doing you could
destroy the amplifiers circuitry – risk electrical shock to yourself
and invalidate your Audion’s warranty.
Revision 1.3 Premier
-4-
Audion International
Installation
Positioning Your Audion
You will probably have in mind the location to place your Audion
but remember, valves/tubes get warm and need a good circulation
of air.
Connecting
Your Audion is supplied with a power cord for your country of
operation. However we recommend connecting your input and
output cables prior to connecting the power cord.
OFF
ON
L
R
2
1
Outputs
Tape
5
4
3
Inputs
Ground
Lift
2
1
OFF
ON
GND
Audion Premier Pre-Amplifier Rear Panel Layout
OFF
ON
L
R
Output
Ground
Lift
Input
OFF
ON
GND
Audion Premier Phono stage & Head Amplifier Rear Panel
Revision 1.3 Premier
-5-
Audion International
POWER
Power out connector
0
1
H.T.
Audion Quattro/Head Amp & 2 Box Power Supply Rear Panel
L
R
2
1
Outputs
Tape
5
4
3
Inputs
Ground
Lift
H.T.
2
1
OFF
ON
GND
Audion Premier Line / Phono Plus Pre-amplifier Rear Panel
First connect audio input leads to the input RCA connectors. 1
being for the best line level input on the basic model or for the
Line/Phono models 1.0 & 2.0, 1 is the MM input. 2-5 is then used
for line level inputs. Connect all audio input leads. The top white
sockets are for the Left input(s) the bottom red sockets are for the
Right channel(s). Start from Input 1 then work through to input 5
not forgetting the earthing cable from the turntable
Next, connect the output cables from your Audion Pre-Amplifier to
your Audion Power Amplifier. For all models the left and right
channels are marked by red/black colouring and also their names
ie left, right etc. Your connection cables should be of a suitable
quality and connect to the corresponding red/black RCA
connectors of your source equipment. The output cables should
connect between your Premier and the corresponding red/black
RCA connectors of your power amplifier. For best results we
recommend the use of an Audion Power Amplifier, and Audion
Electron or Proton Interconnect cables
Revision 1.3 Premier
-6-
Audion International
The ground lift switch is used to effectively reduce a ground
feedback loop and hence noise from some installations. Finally
connect the power cord to a mains electricity supply. Before
proceeding – Are all the connections fitted correctly and securely
tightened?
Using your Audion
Congratulations you are now ready to switch your Audion on. But
first we recommend turning the volume control on the front panel
anti-clockwise to zero. On the rear panel locate the on/off button.
Push the button downwards to position 1, this has now turned your
Audion on. You will notice if everything has been installed correctly
that your valves/tubes are starting to glow, your Audion is now
“Warming up”. We recommend that an initial few minutes is
allowed for the warm up process to take place. A valve/tube will
change its audio characteristics slightly once it has reached its
nominal operating temperature.
Select your sound source, CD, record, etc. and play. Once your
source has started playing adjust the volume control to your
required level.
On the Standard models, the five switches correspond to the five
inputs on the rear and can be switched in and out accordingly.
1
2
3
4
5
MUTE
Audion Premier Pre-Amplifier Front Panel
Revision 1.3 Premier
-7-
Audion International
SOURCE
1
2
DOWN
UP
REC
3
4
5
REC
Audion Premier Pre-Amplifier Remote Front Panel
The remote model has three buttons – Up, Down and Record. The
up and down buttons change inputs from 1 to 5 and the Record
button allows recording via RCA pair No. 6.
The input marked 1 is optimised and should be utilised for your
primary source be it CD or external phono stage. The input marked
5 conveniently placed next to the tape out is for tape input which
can either be accessed by selecting No. 5 or by using the tape
monitor switch. The other inputs are all at line level and can be
used for any line level source. All models with the exception of the
Phono Stage have two (2) pairs of output RCA type connectors
which are provided for the use of bi-amping. The tape output will
output un-attenuated line level signals as sele cted with the selector
switches. The selection of inputs is quite simply achieved on the
front panel by switching down the corresponding toggle switch. It
should be noted that the tape monitor circuitry should be set to line
for normal operation and that any switch to the left of another will
take overriding priority.
In general use your Audion should give many years of trouble free
use. The anodised aluminium chassis should be wiped regularly
with a clean lint free cloth to remove dust. Under no circumstances
should solvent or solvent based products be used on or near your
Audion.
Please remember to fill in and return your warranty registration
form to us at the address at the end of this manual.
Enjoy your Audion.
Revision 1.3 Premier
-8-
Audion International
Have you tried Audion cables.. We have power, loudspeaker and
interconnects. They are available in two ranges, The Electron, real
high end, totally transparent for the discerning listener and the
Proton range for the discerning listener on a budget. Visit our
website for up to the minute information. We also highly
recommend our MC head amplifier, designed for low output MC
cartridges. It is totally transformerless designed for speed ad
accuracy – this is a cut down version of our world class Quattro
pre-amplifier.
Technical Specifications
Phono Stage MM
Sensitivity Ref – 0dbV 2.0mV MM
Distortion @ 1V <0.015% No Feedback
Frequency Response: 11 – 185KHz ±1 db RIAA
Inputs:
2 x 1 Phono MM
Consumption: 12 Watts
Phase - Correct
Gain: 46db
Noise (CCIR)
<80 db
Signal to Noise:
>70 db
Outputs:
2 x 1 Main Out
Tubes: 2 x 6922 or E88CC
Head Amplifier MC
Sensitivity Ref – 0dbV 0.4mV
Distortion @ 1V <0.010% No Feedback
Frequency Response: 10 – 205KHz ±1 db RIAA
Inputs:
2 x 1 Phono
Consumption: 12 Watts
Phase - Correct
Gain 63db
Noise (CCIR)
<80 db
Signal to Noise:
>70 db
Outputs:
2 x 1 Main Out
Tubes: 2 x 6922 or E88CC
Line Pre-Amplifier
Sensitivity Variable >1,1V Line
Distortion @ 1V <0.010% No Feedback
Frequency Response: 11 – 165KHz ±1 db RIAA
Inputs:
4 Line Level, 1 x tape
Consumption: 12 Watts
Phase - Correct
Noise (CCIR)
<100 db
Signal to Noise:
>70 db
Outputs: 2 Main Out, 1 tape
Tubes: 2 x 6922
Line Pre-Amplifier Remote Control
Sensitivity Variable >1,1V Line
Distortion @ 1V <0.010% No Feedback
Frequency Response: 11 – 165KHz ±1 db RIAA
Inputs:
4 Line Level, 1 x tape
Consumption: 12 Watts
Phase - Correct
Noise (CCIR)
<100 db
Signal to Noise:
>70 db
Outputs: 2 Main Out, 1 tape
Tubes: 2 x 6922
Line / Phono Pre-Amplifier
Sensitivity Variable >1.1V Line, 2 mV Phono
Distortion @ 1V <0.010% No Feedback
Frequency Response: 11 – 165KHz ±1 db RIAA
Inputs: 3 Line Level, 1 x tape, 1 x Phono
Consumption: 12 Watts
Phase - Correct Gain: 46db
Noise (CCIR) <100db <80db Phono
Signal to Noise:
>70 db
Outputs: 2 Main Out, 1 tape
Tubes: 4 x 6922
Revision 1.3 Premier
-9-
Audion International
Line / Phono Pre-Amplifier Remote Control
Sensitivity Variable >1.1V Line, 2 mV Phono
Distortion @ 1V <0.010% No Feedback
Frequency Response: 11 – 185KHz ±1 db RIAA
Inputs: 3 Line Level, 1 x tape, 1 x Phono
Consumption: 12 Watts
Phase - Correct
Gain: 46db
Noise (CCIR) <100db <80db Phono
Signal to Noise:
>70 db
Outputs: 2 Main Out, 1 tape
Tubes: 4 x 6922
Line / Phono Plus Pre-Amplifier 2 - Box
Active Power Supply – on board regulation
Sensitivity Variable >1.1V Line, 2 mV Phono
Distortion @ 1V <0.010% No Feedback
Frequency Response: 11 – 185KHz ±1 db RIAA
Inputs: 3 Line Level, 1 x tape, 1 x Phono
Consumption: 12 Watts
Impedance: 47K / 254 Ohms
Phase - Correct
Noise (CCIR) <100db <80db Phono
Signal to Noise:
>70 db
Outputs: 2 Main Out, 1 tape
Tubes: 4 x 6922
Line / Phono Plus Pre-Amplifier Remote Control 2 - Box
Active Power Supply – on board regulation
Sensitivity Variable >1.1V Line, 2 mV Phono
Distortion @ 1V <0.010% No Feedback
Frequency Response: 11 – 185KHz ±1 db RIAA
Inputs: 3 Line Level, 1 x tape, 1 x Phono
Consumption: 12 Watts
Impedance: 47K / 254 Ohms
Phase - Correct
Noise (CCIR) <100db <80db Phono
Signal to Noise:
>70 db
Outputs: 2 Main Out, 1 tape
Tubes: 4 x 6922
Audion International
Chez Reynaud
Le Haut Mont
17360, La Genetouze
France
www.audion.co.uk
Revision 1.3 Premier
- 10 -
Audion International