1
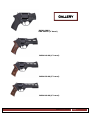
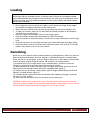
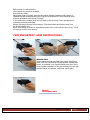
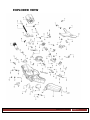
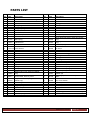
RHINO
USER’S MANUAL
ATTENTION: BEFORE REMOVING THIS FIREARM FROM ITS PACKAGE READ & UNDERSTAND WARNINGS, INSTRUCTIONS AND PRECAUTIONS IN THIS USER’S MANUAL Official Sponsor
NTION: BEg rounds.INDEX
Version Update June 2010 Warnings
3
Safety
3
Identifying Markings
6
Gallery
7
Revolver Revolution
8
Instructions for use
11
Loading
13
Decocking
13
Unloading
14
Shooting
15
Clearing misfires
16
Sight Adjustment
17
Cleaning
17
Lubrication
18
Ordinary and extraordinary maintenance
18
Exploded view
19
Parts list
20
ArmiSport / Chiappa Firearms Warranty
21
RHINO User’s Manual Page 2
WARNINGS
Armi Sport/ Chiappa Firearms is not responsible for damage to objects caused by misuse
of the gun or for injuries to persons or animals, or in case of death, caused voluntarily or
involuntarily by the gun user.
Armi Sport/ Chiappa Firearms is not responsible for injuries caused by poor
maintenance, misuse of the gun, unauthorized or improper modifications.
Armi Sport/ Chiappa Firearms declines responsibility for the indirect consequences of
any injuries and / or death of persons or animals, damage to objects caused by use of
the gun or by primer explosion, by bullet’s ricochet, or unsafe loading practices and / or
procedure.
Read the entire manual and learn the proper use of the gun without live ammunition. It is important
that you understand the proper use of this product. The life of the people close to you may depend
on your safety.
If the manual is not clear, please contact the dealer where you bought the gun or call the distributor
or the manufacturer by using the contact information provided within this manual.
ANY LEGAL DISPUTE WILL BE UNDER THE JURISDICTION OF A COURT IN THE STATE OF OHIO
SAFETY RULES
1.
Read the instructions carefully before use. Reading the manual and careful examination of
the gun are fundamental to avoid any kind of problem.
2. Be aware that you are handling a firearm; therefore your knowledge and behaviour may
affect your life and those of the people close to you.
3. Guns and ammunitions must be kept in separate places.
4. ALWAYS keep guns and ammunitions out of reach of children.
5. Store the gun in a clean dry and airy place after use to avoid rust in mechanical parts that
may cause serious problems in functioning after a period of inactivity.
6. The gun must ALWAYS be stored unloaded, ALWAYS check that all the cylinder chambers
are empty.
7. Keep away from open flame or heating sources.
8. Never leave a loaded gun unattended.
9. Never leave the weapon loaded, it could fall and cause injury and death. Always point the
gun in a safe direction, and handle it as though it were loaded. This is especially important
when loading and unloading the gun, and when handing it to someone else. Never take
someone’s word that it is unloaded. Always make sure the gun is unloaded before laying it
down or handing it to someone else.
10. After use, clean and lubricate the inside of the barrel with appropriate oil. Avoid grease or
oil build up that can cause excessive pressure and result in serious personal injuries. Before
using the gun again, inspect the barrel and chambers to make certain that there are no
obstructions in the bore. Remove any oil residue with rod and dry patch before shooting.
11. Accumulation of rust in the barrel can cause excessive pressures resulting in serious injury
RHINO User’s Manual Page 3
and may cause the explosion of the barrel.
12. Wash hands thoroughly after shooting and handling firearms to remove any unwanted
residues.
13. Pay great attention during transportation and use. Mechanical safety devices can fail.
Developing intelligent, good safety habits is the best way to prevent accidents.
14. ALWAYS keep the gun unloaded when transporting it from home to the shooting areas.
Carefully check that cartridge chamber is empty.
15. When you walk around with the gun in a shooting area, ALWAYS keep the muzzle pointed
in a safe direction.
16. Do not smoke while handling, loading or shooting any ammunition.
17. Never drink alcoholic beverages or take any drugs before or during shooting, as this not
only constitutes criminal disregard for your safety and that of others, but will seriously
impair your judgment and vision. Never use a gun while you are taking medication unless
you have checked with your doctor to ensure your fitness to handle the gun safely.
18. Never rest your finger on the trigger until the very moment you wish to shoot. Always
keep the safety on until you are ready to safely shoot at an intended target (see safety
features).
Note: Safety devices on guns are extras and are not a substitute for your proper and safe
handling practices.
19. Always wear and encourage others near you to wear proper ear protection when shooting,
especially on a range since the noise from your gun, and other guns close to you, could
result in permanent hearing loss.
20. Always wear protective shooting glasses to protect your eyes from injury by gun powder,
gas, lubricant, dirt or metallic particles, carbon residue, sparks or other debris.
21. Use exclusively factory loaded ammunition of the caliber specified on the firearm. Use of
different calibers may cause serious personal injuries to you and to people close to you.
22. Before shooting ALWAYS check to ensure that the barrel is free of obstructions.
23. When selecting a place to shoot, always be absolutely sure of your target and the area
behind it before you touch the trigger, making sure there is an adequate backstop which
will stop and contain bullets. A bullet can travel through or past your target with a range up
to 1 1/2 miles. If you have any doubt, do not shoot.
24. Keep all bystanders behind you, standing beside a shooter is not a safe position. Make sure
all other shooters and bystanders are well away from the ejection port.
25. Never shoot against a solid surface or in a pool of water, the projectiles could ricochet and
shoot toward any direction.
26. Do not attempt to re-use unexploded ammunitions.
27. NEVER modify any parts of your gun. Any alteration may cause serious personal injury and
voids the warranty.
28. Only a qualified gunsmith may service the gun for repair or serious maintenance.
RHINO User’s Manual Page 4
Armi Sport/ Chiappa Firearms declines any responsibility for misuse of the firearm.
In case of alteration of the firearm, Armi Sport/ Chiappa Firearms declines any civil and penal
responsibility and will not refund any damage.
The user is responsible for injuries or damages caused to him or to other persons.
COMPLETE KNOWLEDGE OF YOUR FIREARM CAN MAKE THE DIFFERENCE.
QUALITY INSPECTION: Every firearm is thoroughly inspected for
function and cosmetic blemish prior to shipment
IDENTIFYING MARKINGS:
Every gun we produce has a serial number that is marked on the receiver. Close to the serial
number you will also find the manufacturers information with the model name and caliber.
These markings must not be removed from the firearm for any reason.
RHINO User’s Manual Page 5
THE RHINO REVOLVER RANGE
MODEL
CF340.086
CF340.078
340.071
340.075
340.072
340.076
340.073
340.077
CODE
RHINO 200D
RHINO 200DS
RHINO 40 DS
RHINO 40 DS
RHINO 50 DS
RHINO 50 DS
RHINO 60 DS
RHINO 60 DS
FINISH
Black–rub grip
Black–rub grip
Black–wood grip
Black–wood grip
Black–wood grip
Black–wood grip
Black–wood grip
Black–wood grip
CALIBER
357 Mag
357 Mag
357 Mag
357 Mag
357 Mag
357 Mag
357 Mag
357 Mag
Barrel
length
IN
CM
2"
2"
4"
4"
5"
5"
6"
6"
Total length
IN
5
6"1/2
5
6"1/2
10
8"12
10
8"12
12,7 9"12
12,7 9"12
15,2 10"1/2
15,2 10"1/2
Grooves and
twist rate
CM
16,4
16,4
21,5
21,5
24
24
26,6
26,6
9
9
9
9
9
9
9
9
1x476
1x476
1x476
1x476
1x476
1x476
1x476
1x476
Available accessories:
791.011
791.012
791.013
270.051
780.106
780.107
Holster for mod. 20 DS-D, suede
Holster for mod. 20DS-D, brown leather
Holster for mod. 20DS-D, black leather
Rubber grip, small
Wooden grip, medium, checkered
Wooden grip, large checkered
RHINO User’s Manual Page 6
GALLERY
RHINO 200 D
AND 200 DS (2” barrel)
RHINO 40 DS (4” barrel)
RHINO 50 DS (5” barrel)
RHINO 60 DS (6” barrel)
RHINO User’s Manual Page 7
REVOLVER REVOLUTION
Rhino is the first revolver with truly modern mechanics, designed for a serial, industrial
production. Each component is machined from solid steel with the most modern machinery
available in the gun industry today. The result is an ultra smooth action, a perfect trigger pull,
greater fluidity, lightness and steadiness when shooting. The appearance is like no other
revolver you have ever seen.
Typically a revolver fires from the top most chamber which is aligned with the barrel. The new
Chiappa Rhino barrel is aligned with the bottom most chamber which is the key component to
Rhino’s tame characteristics. Due to the lower position of the barrel, the Rhino’s appearance is
abstract from any other revolver design. The position of the barrel lowers the center of gravity
and yields a centerline of the bore more in line with the shooters arm allowing for the most
natural “point ability” while engaging a target.
The natural “point-ability” is only the start of where the Rhino stands alone, this characteristic
drastically reduces both recoil and muzzle flip which insures subsequent shots to be on target
faster than ever before. The reduction of the recoil allows for the use of ultra light alloys to be
used in the construction of the Rhino minimizing any adverse effect. The flat sided cylinder
design of the Rhino reduces the typical revolver profile allowing greater concealment.
Reduction of Felt Recoil
As the wrist is almost straight, the recoil is discharged on the straight arm. To give an
explanation according to the laws of physics, the “arm of the lever” is very small, and this
nearly eliminates the “dynamic moment” which follows the shot in all handguns. Basically, the
dynamic moment becomes a static moment, nullifying the amplification of the reaction to recoil
which generates on the top of the hand.
Minimal Muzzle Flip
The strong pressure generated by a powerful caliber usually causes a muzzle flip effect after
shooting (dynamic moment), which is proportional to the lever angle created by the high
position of the barrel and consequent angle of the wrist. The muzzle flip effect has two negative
consequences: one is the physical strain, both when you bear the knock and when you
counterbalance it, pushing your hand with equal power into the opposite direction to regain the
initial position. The second is the time you lose while your arm and hand are travelling up and
down, which is obviously taking time on the sequence of shots. Rhino revolver requires a wrist
angle near to zero, thus minimizing muzzle flip and related consequences: subsequent shots on
a target are all in the center, and do not tend to slide upwards.
RHINO User’s Manual Page 8
SAFETY FEATURES
This firearm is equipped with several safety features which, if properly employed, can minimize
the danger of accidental discharge.
WARNING : All traditional revolvers which feature a single action mode have
an outer hammer and therefore the single action mode is directly visible. The
Rhino revolver has an inner hammer which is activated by a lever connected
to the outer “false” hammer. The single action mode IS NOT VISIBLE BY
RHINO THROUGH THE EXTERNAL HAMMER, as the latter always goes back to
rest position. You will be aware of the single action mode through the red
flag jutting our from the frame and the trigger completely pulled back.
NOTE: Never rely on mechanical safeties to overcome improper maintenance or
unsafe handling practices.
NEVER ASSUME THE REVOLVER IS UNLOADED. You can never be sure a revolver is
unloaded unless you check that the cylinder is open and no cartridges are in place.
Trigger guard
The trigger guard is a loop of metal that surrounds the trigger, protecting it from damage or
accidental discharge.
Inner hammer
The traditional hammer, when the gun is in single action mode, may be accidentally activated.
This danger is eliminated by the Rhino revolver, as the external hammer is operating the inner
hammer through a cocking lever which, not being exposed, is not sensitive to accidental
activation when the revolver falls or is hit inadvertently.
Automatic trigger safety
The automatic inner safety avoids that the hammer may approach the firing pin before the
trigger has been pulled. By uncocked position the hammer cannot approach the firing pin.
This safety is disengaged only when the trigger is pulled to firing position.
Cylinder safety
Rhino features two cylinder safeties: one is working in case the cylinder is not perfectly closed,
and will hamper the revolver from firing. The second is activated in case the cylinder chamber is
not perfectly aligned with the barrel bore. In this case, the trigger cannot be pulled to firing
point.
RHINO User’s Manual Page 9
Single Action Flag
By traditional firearms, the hammer is visible and therefore it is easy to detect whether the
firearms is in single or double action mode. By the Rhino revolver a red flag on the left of the
rear sight indicates, even by touch, the single action mode. Attention: when the flag is jutting
out, the revolver is ready to fire.
RHINO User’s Manual Page 10
INSTRUCTIONS FOR USE
Ammunition
NOTICE
WE SPECIFICALLY DISCLAIM RESPONSIBILITY FOR ANY DAMAGE OR INJURY WHATSOEVER
OCCURRING IN CONNECTION WITH, OR AS THE RESULT OF, THE USE OF FAULTY, OR
NONSTANDARD, OR “REMANUFACTURED” OR HANDLOADED (RELOADED) AMMUNITION, OR
OF CARTRIDGES OTHER THAN THOSE FOR WHICH THE FIREARM WAS ORIGINALLY
CHAMBERED.
•
•
•
•
•
•
•
•
•
•
A firearm and ammunition are a system and must work together. There are different
types of ammunition for different types of firearms. Your firearm has been designed for
ammunition of a specific type and a specific gauge or caliber. It is important to select
the proper ammunition for your firearm.
Different combinations of bullet velocity, bullet weight and firearm weight can have
major impact on felt recoil. To acclimate yourself to higher levels of felt recoil, use a firm
two-hand hold on the grip when firing. Always start your shooting experience with the
lowest bullet velocity and lowest bullet weight available for your firearm.
Death, serious injury, and damage can result from the use of wrong ammunition; bore
obstructions, powder overloads, or incorrect cartridge components.
Use only ammunition specifically recommended for your firearm (locate the cartridge
designation marked on the firearm. This information indicates the correct ammunition
that must be used in this firearm)
Always use cartridges of the same caliber as that indicated on the frame. You are
responsible for selecting ammunition that meets industry standards and is appropriate in
type and caliber in this firearm.
Use only high quality, original factory manufactured ammunition whose pressure cannot
be higher than the one stated by S.A.A.M.l. or C.I.P. Never use non-standard, reloaded
or hand loaded ammunition which has not been subjected to internal ballistic pressure
testing.
Your gun has been designed for ammunition of a specific caliber – do not alter the
barrel, chambers, caliber for which your gun was designed. In some cases, ammunition
not specified on your firearm may fit into the chamber. Firing ammunition not specified
on your firearm may cause rupture and serious injury or death to you or others.
Be sure you never mix ammunition.
Firearms may be severely damaged, and serious injury to the shooter or others may
result from any condition causing excessive pressure inside the chambers or barrel
during firing. Excessive pressure can be caused by obstruction in the barrel, propellant
powder overloads, or by the use of incorrect or defectively assembled cartridges. In
addition, the use of a dirty, corroded or damaged cartridge can lead to a burst cartridge
case and consequent damage to the firearm and personal injury from the sudden escape
of high-pressure propellant gas within the firearm's mechanism.
Some brands of ammunition may cause difficulty in extracting spent cartridge cases
from the cylinder or chamber. If this situation occurs, thoroughly clean the cylinder
charge holes or chamber with solvent. If this condition persists, we recommend
changing to another brand of ammunition.
RHINO User’s Manual Page 11
•
•
Don't oil cartridges, and be sure to wipe the chamber clean of any oil preservative
before commencing to shoot. Oil interferes with the friction between cartridge case and
chamber wall that is necessary for safe functioning, and subjects the firearm to stress
similar to that imposed by excessive pressure.
Use lubricants on the visible parts of your firearm. Avoid excessive spraying of any
aerosol gun care product, especially where it may get on ammunition. All lubricants, and
aerosol spray lubricants in particular, can penetrate cartridge primers and cause
misfires. Some highly penetrative lubricants can also migrate inside cartridge cases and
cause deterioration of the propellant powder; on firing, the powder may not ignite. If
only the primer ignites, there is a danger that the bullet may become lodged in the
barrel.
The use of improper ammunition voids the warranty.
Inspection of the revolver
When you inspect your revolver, you must first check for yourself to ensure that it is unloaded.
Do this with your finger off the trigger and out of the trigger guard and keep the barrel of the
firearm pointed in a safe direction. Press the cylinder opening lever downwards (Figure 1) and
push the cylinder to the left (Figure 2).
You must verify that all charge holes are free of live rounds and the barrel is free of any
obstructions. You must follow this procedure every time your revolver leaves your hand, is
cleaned, handed to you or another person, transported or stored.
FIGURE 1 (cylinder opening lever)
FIGURE 2 (cylinder pushed open)
RHINO User’s Manual Page 12
Loading
Keep muzzle pointed in safe direction and follow all safety procedures at all times. Practice
these steps with an unloaded revolver or dummy ammo until you are completely familiar
and comfortable with the procedures. Use live ammo only when you are prepared to shoot.
Always use clean, dry, high quality ammunition (of the proper caliber) that meets industry
performance standards.
•
•
•
•
•
•
•
•
Do not load the revolver until you are ready to use it. Keep your finger off the trigger
and outside the trigger guard until you are ready to fire.
Never load your revolver until you are at the shooting site and fully prepared to fire.
To load your revolver, hold it in one hand with the muzzle pointed in a safe direction
and away from you and others.
Keep your finger off the trigger and out of the trigger guard.
Press the cylinder opening lever downwards to unlock the cylinder.
Push the cylinder to the left and place a round of the correct ammunition in each charge
hole.
Grasp the revolver in the shooting hand with your finger still outside the trigger guard
Push the cylinder back into the frame until it locks into place. Your revolver is now fully
loaded. The hammer is in the “at rest” position.
Decocking
Rhino has an inner hammer and an external hammer (a false hammer). When you push the
External hammer downwards, the inner hammer is cocked and the gun is in single action.
When the gun is in single action, a red pin (flag) is jutting out on the frame (on the left side
of the rear sight), and the External hammer will go back to its original position.
If you decide not to fire in single action from a cocked position, continue to point the
firearm in a safe direction and then decock the revolver as follows:
(1) While keeping your fingers well away from the trigger guard, place the thumb of your
firing hand on the external hammer and pull it completely back (figure 1).
(2) Keeping the gun pointed to a safe position, pull the trigger while keeping the external
hammer in cocked position (figure 2).
(3) Carefully ease the external hammer downwards while releasing the trigger, until both
are in the “at rest” position
(4) Make sure that the flag is back into the frame and not jutting out.
WARNING: Practice this procedure with your unloaded revolver until you have mastered
decocking. Always be aware of the external hammer position. Never holster, carry or store a
cocked revolver. Always check that the trigger is in the “at rest” position.
RHINO User’s Manual Page 13
Figure 1 : Cocking the external hammer
Figure 2: Pulling the trigger
Figure 3: Releasing the external hammer
Unloading:
1. Point the muzzle in a safe direction. Make sure your finger is off the trigger and the
trigger is in the “at rest” or forward position.
2. To remove either live cartridges or spent casings from the cylinder, first point the barrel
in a safe direction. Press the cylinder opening lever downwards and swing and hold the
cylinder fully to the left.
3. With the barrel pointing upward in a safe direction, press the extractor rod through the
cylinder and remove all cartridges or casings from the cylinder.
4. Carefully count the cartridges or spent casings to be sure that you have recovered all of
them. Make a visual check to be sure all charge holes (chambers) are empty. When
unloading your revolver, always be sure to keep it pointed in a safe direction.
Remember, a safe direction means that you are not pointing the barrel of your handgun
at yourself or anyone or anything you do not intend to shoot.
Shooting / Firing
Always wear eye and hearing protection when shooting.
RHINO User’s Manual Page 14
Point muzzle in a safe direction.
Load revolver as previously directed.
Grip the frame firmly.
Place index finger on trigger, take aim and gently squeeze rearward until hammer is
released and falls forward striking the firing pin. Be prepared for loud noise and recoil.
Continue procedure until cylinder is empty.
If all rounds have not been fired and you wish to stop shooting, follow procedures for
unloading previously described.
Always use the proper two-hand hold grip. This keeps hands and fingers away from
the barrel/cylinder gap.
Never allow hands or fingers to extend beyond the front of the cylinder when firing. This is
an improper hold for any revolver.
VERY IMPORTANT: GRIP INSTRUCTIONS
WRONG GRIP
Always make sure that you keep your hands and fingers
away from the cylinder and the gap between cylinder and
frame. In particular, your fingers should never be in front
of the cylinder chambers as the gas escaping from the gap
between barrel and cylinder could hurt your fingers.
PROPER
TWO-HANDS GRIP
RHINO User’s Manual Page 15
There are two ways to fire the RHINO revolver. The first is in the double action mode,
wherein the shooter fully pulls and holds the trigger to the rear, causing the hammer to fully
cycle rearward and then release.
The second way to fire the revolver is in the single action mode, in which the hammer is
first cocked and the trigger is then pulled and held to the rear. A lesser amount of trigger
pressure and travel are necessary to fire the revolver when the hammer is in the cocked
position. It is your responsibility to exercise great care in handling a revolver
especially when it has been placed in the single action or cocked mode.
DOUBLE ACTION FIRING
• Never touch the trigger until you are ready to fire.
• To fire the handgun, pull the trigger fully to the rear. The inner hammer will move
rearward and then fall forward to fire the revolver. After firing, you must allow the
trigger to move forward fully before you can fire another shot. Failure to do so will
prevent the lockwork from fully cycling and will prevent you from being able to fire the
next shot.
• Keep your finger off the trigger and outside the trigger guard until you are ready to fire
again. Do not touch or otherwise interfere with the travel of the external hammer during
double action firing.
SINGLE ACTION FIRING
• Never touch the trigger until you are ready to fire.
• Pull the external hammer fully rearward until it is cocked. The action of pulling the
external hammer to the rear activates an inner lever which cocks the inner hammer and
will also cause the trigger to move rearward. By this position the external hammer will
go back to rest position, while the flag signaling that the inner hammer is cocked will be
jutting out. The revolver will now fire in the single action mode, requiring significantly
less trigger pressure and significantly less travel than in the double action mode.
• Pull the trigger and hold it rearward.
• After firing, you must allow the trigger to move fully forward before you can fire another
shot. Failure to do so will prevent the lock work from fully cycling and will prevent your
being able to fire the next shot.
• Keep your finger off the trigger and outside the trigger guard until you are ready to fire
again.
Clearing misfires
WARNING: IF YOUR HANDGUN GIVES ANY INDICATION THAT IT IS NOT PERFORMING
PROPERLY OR THE OPERATION OF YOUR HANDGUN HAS CHANGED “THE WAY IT FEELS
OR SOUNDS”, STOP FIRING. MAKE SURE THE FIREARM IS POINTED IN A SAFE
DIRECTION, UNLOAD THE FIREARM AND HAVE IT INSPECTED AND TEST- FIRED BY A
GUNSMITH QUALIFIED TO PERFORM SERVICE ON RHINO FIREARMS.
•
•
•
If a cartridge fails to fire, wait ten seconds while keeping the muzzle pointed in a
safe direction. Keep your finger off the trigger and out of the trigger guard.
Press and hold the cylinder opening lever downwards and swing the cylinder to the
left.
Remove the defective cartridge and dispose of it in a method specifically approved
for live round disposal.
Sight Adjustment (not available by models 20D and 20 DS)
RHINO User’s Manual Page 16
The rear sight is adjustable for windage & elevation. To adjust your point of impact to the
“RIGHT”, unscrew the windage sight screw and move the rear sight to the right; to adjust your
point of impact to the “LEFT”, tighten the windage sight screw to move the sight to the left.
To adjust your point of impact up, unscrew the elevation sight screw and move the rear sight
down; to adjust your point of impact to go down, tighten the elevation sight screw to go up.
Disassembly (field stripping) and Assembly
We recommend that you take your revolver to a professional gunsmith for disassembly and
assembly. The only part which can be safely removed by a shooter is the grip, which can be
disassembled and re-assembled through the relevant screw.
Cleaning
Attention: Careful and detailed cleaning of this firearm is essential to guarantee its
safety and proper function.
•
Every time you use your gun it is advised to clean it in order to remove all corroding
agents (humidity, powder or lead residues etc.) which can in time alter a few parts.
•
In order to perform a standard cleaning, it is sufficient to utilize a good solvent, cleaning
oil, and a little brush.
•
For a deeper cleaning, please contact your local gunsmith
•
Always clean the barrel running cleaning rods through it.
1. Run a wet patch through the cylinder. Let soak a few minutes. (Always read the
manufacturers' directions of the cleaner you are using)
2. Run a dry patch through to remove loose crud/deposits.
3. Run a wet brush through the barrel a few times.
4. Run a dry patch to remove the dirt.
5. Repeat steps 3 and 4 a few times until the patch comes out clean.
6. Lightly oil the barrel. NOTE: Run a dry patch through the barrel before firing to remove
oil.
7. Open the cylinder and follow the same clearing procedure described above to clean all
chamber
8. Clean the revolver surface with a cloth and clearing oil
9. Dry the chamber with the special brush, dry the surface of the revolver and store in a
safe place
RHINO User’s Manual Page 17
Lubrication
To lubricate moving mechanical parts (trigger assembly) you can use a standard firearms oil.
This operation should be performed only when necessary, and not as a standard maintenance.
In order to perform lubrication, unscrew the allen key fixing the grip, remove the grip and
lubricate the hole on the top of the frame.
An extraordinary clearing of inner components should be carried out by professional personnel
(gunsmith) and in this case we recommend to use a dry lubricant, MoS2 based (molybdenum
disulfide).
Ordinary and extraordinary maintenance
•
Before conducting any sort of maintenance, make sure the firearm is unloaded.
•
By “ordinary maintenance” we refer to measures the user should take to keep the gun in
good working conditions.
•
An “Extraordinary maintenance” implies the replacement of broken parts and therefore
disassembling the gun. In this case only authorized personnel or a qualified gunsmith
should handle the task.
•
Also a long period of heavy use or inactivity requires an extraordinary maintenance;
your gun should be taken to a qualified gunsmith to have the action disassembled for
professional cleaning and lubrication.
•
Your gunsmith will advise the best lubricant for the good maintenance of your revolver.
•
Do not leave oil residues when cleaning and lubricating your firearm.
•
Make sure that the mechanism of the weapon is easy; if it starts to stiffen, or if
corrosion is starting on some essential parts, you should bring your gun to competent,
professional personnel.
•
•
•
•
•
Do not use pure silicon or lanolin.
In the following pages you will find exploded views with a list of all parts
When ordering parts, it’s important to specify date of purchase, serial number, model,
caliber and item reference of the part/s needed.
If the gun has a problem that you cannot fix, DO NOT FIRE it but send it to an
authorized center for a check-up. If you try to fix it personally, you may put in serious
danger yourself and the people near you in serious danger.
Always pay great attention and handle the gun very carefully, in order to avoid terrible
accidents which may change your life and that of others.
RHINO User’s Manual Page 18
EXPLODED VIEW
RHINO User’s Manual Page 19
PARTS LIST
Pos.
1
2
3
4
5
6
7
8
9
10
11
Code
700129
710282
770483
130000
730876
730810
720021
130081
101003
130013
130035
Description
Frame Rhino 20/200
Barrel Rhino 20/200 cal. .357 Mag
Breech shield
Pin 3x6,8
Firing pin grub screw
Firing pin
Firing pin spring
Pin 1,5x5,8
Screw, M3x8, TORX
Pin 3x19,8 (Rhino 20DS and 200DS only)
Pin 4x19,8
Pos.
39
40
41
42
43
44
45
46
47
48
49
Code
730819
730816
770487
130087
730820
720110
770486
730821
730813
730842
760127
12
721132
Main spring
50
730872
13
14
770475
130089
Interlink lever
Pin 2,5x7,8
51
52
730807
770479
Description
Extractor rod
Cylinder insert
Cylinder
Spring pin 2x6
Extractor rod head
Ejector spring
Cylinder arm
Cylinder hook
Cylinder rotation axle
Swing axle pin
Cocking lever (Rhino 20DS and 200DS only)
Single action flag (Rhino 20DS and 200DS
only)
Cocking lever link sleeve 20DS and 200DS
only)
Hammer spring lever
15
16
17
18
19
20
21
22
23
24
25
26
27
770.477A
720108
770478
130029
730805
730951
770476
730806
730839
730815
760126
770484
770472
53
54
55
56
57
58
59
60
61
62
63
64
130005
770481
770493
730814
770485
130038
730906
720060
730812
130007
730808
730809
770482
Pin 2x9,8
External hammer for Rhino 20DS and 200DS
External hammer for Rhino 20D and 200D
Cylinder arm rotating pin
Front sight
Spring pin 2x8
Notched grub screw M5x4
Cylinder stop spring
Cylinder unhook pin
Pin 2x7,8
Cylinder release plunger
Cylinder release plunger pin
Cylinder opening lever
28
770480
Inner hammer
Hammer sear spring
Hammer sear
Pin 2x5,8
Hammer sleeve
Pin 2,5x6
Return lever
Roller
Pin 2x5,5
Cylinder arm screw
Lifting lever
Lock plate
Trigger
Single Action Lever 20DS and 200DS
only)
65
270051
29
104013
65
780106
Rubber grip
Wooden grip medium for except 20D and
20DS
30
31
32
33
34
35
36
37
38
720109
770474
130054
721131
770473
130012
730817
730818
720056
66
67
68
730822
100014
730839
730905
730873
730903
720005
130057
Grip screw washer
Allen key screw M5x15
Sleeve 0,2 Rhino 20DS and 200DS
Sleeve 0,2 Rhino 20D and 200D
Flag grub screw Rhino 20DS and 200DS
Flag grub screw Rhino 20D and 200D
Flag spring (Rhino 20DS and 200DS only)
Pin d. 3x6
Screw, M3x8, allen key head
Single Action Lever Spring 20DS and
200DS only)
Connecting rod
Pin 2x10
Trigger spring
Cylinder stop lever
Pin 3x15,8
Extractor
Extractor plunger
Extractor plunger spring
69
70
71
RHINO User’s Manual Page 20
WARRANTY CONDITIONS
Armi Sport guarantees that our products are scrupulously checked against defects in materials,
workmanship and aesthetical and functioning problems.
In case you find a defect in one of our products, you should immediately contact the
DEALER/SHOP/GUNSMITH where you have bought your gun. The seller will indicate the
conditions for the repair, which will be either made directly by them or through our assistance.
ATTENTION: in case you need to send us back a firearm for repair, either under guarantee or
against payment, please address to the shop dealer or importer where you bought the
firearm. This will allow us to follow the correct procedure; furthermore, transportation of
weapons is strictly regulated and in some countries the documents which are required can
solely be issued by companies with a specific authorization.
1. Armi Sport will warrant for structural or project defects without any time limit.
2. Armi Sport guarantees, for a year after the purchase date, the free substitution of parts for
defects which have been found out also during use: wear of parts which shouldn’t be subject to
wear, or excessive wear of parts subject to wear. The customer will have to give evidence of
the purchase date with a bill or other valid proof.
3. In case the defect under cover of guarantee is not repairable, Armi Sport will provide for a free
substitution of the weapon.
ARMI SPORT RESERVES THE RIGHT OF DEFINING THE TYPE OF DEFECT OF THE WEAPON,
AND THEREFORE TO STATE WHETHER THE DEFECT IS COVERED BY GUARANTEE
Armi Sport’s decision will be fair but final.
Armi Sport will be allowed a timing of 60 days for repair under guarantee, and 90 days for free
substitution.
We strongly recommend that you keep the receipt
or proof of purchase for any Armi Sport product
THE GUARANTEE IS VOID IN CASE:
•
•
•
•
•
•
•
•
•
Inadequate ammunition has been used (any ammunition but those commonly on
sale, reloaded ammunition, different from caliber and specification indicated on the
gun barrel)
The gun failed to be provided proper maintenance and cleaning
The gun has been modified without our prior consent
Unauthorized, inadequate or incorrect repairs have been carried out
Parts subject to wear and corrosion
Damage (improper use of the gun by the user)
Expired guarantee
In the above cases the repair, if carried out, will be charged to the customer
RHINO User’s Manual Page 21
The guarantee does not cover parts subject to wear and corrosion
In case non original spare parts are used, the guarantee or any service contract
with Armi Sport will be void.
ATTENTION: delivery expenses to and from the service center are not covered by
the guarantee and will be charged to the customer.
In case, for any valid reason, you do not have the possibility to obtain repair under guarantee
at the shop where you bought the gun, you may contact us directly; we will indicate a local
dealer to support you with the repair file:
USA - Phone: 937-835-5000
Italy- Phone: +39/030/9749065
e-mail: [email protected]
Should Chiappa Firearms / Armi Sport become aware of a
defect of a product during the guarantee period, the
defective part will be replaced free of charge.
This instruction manual must always follow the
firearm, including change of ownership Procedure for the usage of the guarantee
BEFORE shipping the weapon back for repair, the customer should contact the gunshop
where the product was bought. The customer should supply proper information on the defect,
and the relevant file will then be started.
The gun shop will be given an “NDR” (Repair Number). The weapon will have to be shipped
back to the gun shop in its original packing, with a copy of the purchase date, the Guarantee
Form (attached) duly filed with indication of the NDR number, according to the instructions of
the dealer.
ATTENTION: the returned gun must be protected with adequate packaging; any damages
occurred during transportation and handling will be the customer’s responsibility
RHINO User’s Manual Page 22
Request form
REPAIR UNDER GUARANTEE
NdR NDR : _____________________ Please write in the above box the Repair Number you were given
by the gun shop
1. Customer data:
•
•
•
•
•
•
Name: _________________________
Address : ________________________________
Town : ___________________________________
ZIP Code : ___________________________________
Phone : _______________Available from ____ to ____
Fax : _____________________
2. Product information:
• Model : ___________________________________
• Serial number : ___________________________
3. Gun Shop - dealer:
• Purchase date : ______________________________
• Dealer name : ____________________
• Dealer address : ____________________________
4. Description of defect:
Documents to attach: Proof of purchase date
RHINO User’s Manual Page 23
Chiappa Firearms, Ltd.
6785 W. Third Street
Dayton, OH 45427 USA
Tel. 937-835-5000
www.chiappafirearms.com
email: [email protected]
Armi Sport
di Chiappa Silvia & C Snc
Via Milano N°2 Azzano Mella (BS)
Tel. 030 9749065 Fax 030 9749232
www.armichiappa.com
email: [email protected]
Kimar Srl
Via Milano N°2 Azzano Mella (BS)
Tel. 030 9749065 Fax 030 9749232
www.armichiappa.com
email: [email protected]
RHINO User’s Manual Page 24