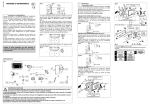
1
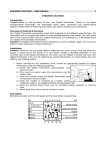
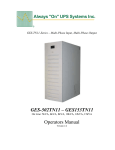
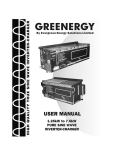
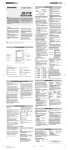
BOOSTER 12V
EN
Page 1 till 8
BOOSTER 12/24V
EN
Page 9 till 20
.
080620
INSTRUCTIONS FOR USE - BOOSTER 12V
EN
1. ATTENTION
2. INSTRUCTION MANUAL
2.1. TO START A VEHICLE.......................................................... 2
2.2. STARTING ATTEMPT............................................................ 3
2.3. PROTECTION.................................................................... 3
2.4. STORAGE........................................................................ 3
3. GENERAL INFORMATION
3.1. DESCRIPTION................................................................... 4
3.2. VOLTMETER..................................................................... 4
3.3. ALTERNATOR TESTING......................................................... 4
3.4. RECHARGE THE BOOSTER USING THE AC230V OR 110V/DC12V CHARGER
3.5. RECHARGE VIA CIGARETTE LIGHTER CABLE................................. 4
4. PREVENTING PREMATURE FAILURE OF YOUR BOOSTER BATTERY
4.1. RECHARGING.................................................................... 5
4.2. STARTING....................................................................... 5
4.3. REMARK......................................................................... 6
5. ELECTRONIC COMPONENTS OF VEHICLES
5.1. HISTORY......................................................................... 6
5.2. CAR MANUFACTURERS’ RECOMMENDATIONS................................. 6
5.3. HIGH VOLTAGE SURGE......................................................... 6
6. QUESTIONS – ANSWERS
6.1. MY BOOSTER................................................................... 7
6.2. GENERAL........................................................................ 8
7. WARRANTY
1. ATTENTION
The following instruction MUST be read prior to operating the Booster, failure in doing
so may result in damage to the unit or serious injury.
Always use the Booster in well ventilated areas, and wear eye protection.
Recharge your Booster after receipt 24 hours before using or storing the unit.
1
EN
2. INSTRUCTION MANUAL
2.1. TO START A VEHICLE
Turn OFF ignition before using the Booster.
1
1. Connection
2
2. Start the engine
3
3. Disconnection
Connect the red clamp (+) to the positive terminal (+)
of the battery, then connect the Blue clamp (-) to the
negative (-) terminal of the battery.
Turn the ignition key for a maximum of 8-10 seconds,
wait for a further 3 minutes before attempting to start
again.
Having started the engine, disconnect the blue (-)
clamp 1st, followed by the red (+) clamp.
4
4. Storing
5
5. Recharging
2
Return the cables and clamps to their support posts
on the Booster.
Recharge the Booster immediately after use and leave
it permanently connected !
2.2. STARTING ATTEMPT
EN
When using the Booster to start an engine, do not crank for more than 8-10 seconds,
and wait for a further 3 minutes before a second attempt.
If after the 3rd attempt the engine does not start, it may be necessary to identify a further cause for
the breakdown.
NOTE: If you’re Booster is fully charged but the starter turns slowly, the vehicle or Booster battery
may need checking for short circuit.
2.3. PROTECTION
Your Booster is provided with an internal fuse, in instances of too long a starting attempt or short
circuit, the fuse will blow. This can be determined by measuring the voltage between the clamps
-> zero voltage = blown fuse !
2.4. STORAGE
The Booster can be stored in any position.
Do not store below 0°C, as this will affect the performance of the battery. The ideal operating
temperature is between 10 to 25°C.
When not using the Booster for long periods of time, recharge the unit (using the original auto-
matic electric 230v AC charger) every three months for at least 48hrs.
Clamps must be stored on their support posts, ensuring they do not come to contact with
any metallic surface.
3
EN
3.1. DESCRIPTION
3. GENERAL INFORMATION
1
2
1. External fuse
2. Voltmeter
3. Push button voltmeter
4
3
4. Cigarette lighter plug to recharge & outlet
12V
3.2. VOLTMETER
Press the button to show the charge level of the battery.
Half an hour after disconnecting the charger from the Booster, the Voltmeter must indicate 13 volts
(fully charged).
3.3. ALTERNATOR TESTING
After starting the engine at 2000 Um, leave the Booster connected to the vehicle and press the ‘voltmeter’ button. The Voltmeter will indicate between 14 and 14.4 volts (at 2000rpm) if the alternator
is functioning correctly.
3.4. RECHARGE
THE
BOOSTER
USING THE
AC 230V
CHARGER
Never wait until the Booster is completely discharged before recharging.
OR
110V/DC 12V
The Booster can be left permanently connected to the automatic charger, to maintain correct charge
level.
3.5. RECHARGE VIA CIGARETTE LIGHTER CABLE
The Booster can be recharged whilst connected to the 12V cigarette lighter socket, (with the vehicle
engine running).
It is essential that the vehicle’s alternator is operating correctly. The tension at the cigarette lighter
socket must be 14 to 14,4 volt, engine running.
NB: The Booster can remain connected permanently on the cigarette lighter socket between uses.
However it is recommended to disconnect the Booster, if the vehicle is not in use for several days
(to prevent discharging of Booster).
4
4. PREVENTING PREMATURE FAILURE OF YOUR BOOSTER
BATTERY
EN
Correctly recharging the Booster battery, increases
its efficiency and its lifetime !
4.1. RECHARGING
1. The Booster must be put on continuous charge between uses
below 12,4V, the Booster battery will start to sulphate and irreversibly loses performance.
The lower the voltage, and the longer the time spent in a discharged state, the deeper the sulphation. When not in use, the Booster battery must never drop below 12,4V (well-charged =
13V).
2. Never recharge the Booster on a non-automatic garage charger or on an automatic
charger set on « fast charge » or « boost » position.
3. Never recharge the Booster using a 24V recharging (cigarette lighter) plug on board
of a vehicle.
4. Never completely discharge the Booster battery
the battery does not have a memory effect.
5. Check the vehicles cigarette lighter socket
to ensure it delivers 14 or 14,4V at 2000 rpm. If not check the earth and the connections to
the socket. A voltage of 13V at the cigarette lighter socket is not sufficient to recharge the
Booster battery.
4.2. STARTING
1. Important: on vehicles difficult to start, crank the engine for a maximum of 8-10
seconds and wait for 3 minutes between further attempts to restart the vehicle.
Three reasons for this method:
a. to allow the voltage of the Booster battery to build up again.
b. to allow the renewal of gasses inside the battery.
c. to allow the internal components of the battery to cool down.
2. Never place the Booster in short-circuit, for example by connecting the red clamp (+)
to the negative terminal of the battery and the blue clamp (-) to the vehicles earth.
the fuse of the battery blow in less than one second.
3. Never connect the Booster to a battery or starter which is in short-circuit.
4. Never disconnect the Booster while engine running when there is no battery in the
vehicle or when the vehicles battery is at 0 volt
this may cause failure to the diodes of the alternator.
5
EN
4.3. REMARK
If someone else uses the Booster, ensure they are well informed on how to use it safely, and have
read and understood the operating instructions. The longevity of the Booster depends on it.
To ensure long life and optimize the use of the Booster battery,
you must put the Booster on continuous charge after
each use using the automatic
charger provided
5.1. HISTORY
5. ELECTRONIC COMPONENTS OF VEHICLES
For more than twenty years, vehicles and engines of all kind are provided with electronics components more and more sophisticated.
Those are perfectly compatible with the use of a Booster in contrary to the old starting practices, still
too much used and extremely dangerous for vehicle electronics and for the health and safety of the
users.
5.2. CAR MANUFACTURERS’ RECOMMENDATIONS
Faced with the multiple requests from garage owners, some manufacturers have worked out a process of intervention to follow if the battery fails that excludes any other form of intervention under
pain of loss of warranty.
It is, therefore, important to read the vehicle user manual before doing anything on a vehicle’s battery.
Our boosters perfectly match manufacturers’ requirements. None prohibits or advises against the use
of a battery or a release booster.
5.3. HIGH VOLTAGE SURGE
How can one damage or destroy one or more electronic components?
Answer: by provoking high voltage surges.
A high voltage surge is a small spark or a very powerful stray flash provoked by voltage differences,
short circuits or reversals of polarity, or again, and quite often, making electrical welds on vehicles
without disconnecting the battery or using a special Anti-Zap filter.
The small surges damage or destroy electronic components of board computers or ordinary logic
controllers.
Stray flashes and electrical welding, contrariwise, do greater damage.
If the Booster is used according to instructions, it is impossible to provoke a voltage
surge.
A complete information about the electronic of vehicles is available on request.
6
6.1. MY BOOSTER…
6. QUESTIONS - ANSWERS
EN
A. Does not recharge anymore:
There is no current on the wall socket (230 Volt AC) on which you have connected the
charger
The wires of the cigarette lighter plug of the charger are « erased »
The charger does not function any more
The battery is sulphated, swollen or « cooked » and does not take anymore the charge
B. Has no power anymore:
-> check the voltage on the clamps with a multimeter
If 0 volt:
The fuse inside blown (see page 3)
If more than 0 volt:
The Booster is not charged (see point A (well-charged = 13V))
The battery lost its power because of:
The sulphatation of the battery: you did not recharged your Booster regularly
A recharge with a non automatic garage charger or an automatic charger in position
« fast charge » or « boost »
A connection to a vehicle 24V during a short time
An element inside the battery melded because of:
Starting attempts superseding the user instructions (see page 3)
The battery is « cooked » because of:
A connection to a vehicle 24V
A recharge of the Booster on board of a vehicle 24V
A use of the Booster on a vehicle 12V which has its alternator’s regulator broken or
when the alternator produce a too high tension
A recharge on a non automatic garage charger (more than 14,4V tension)
The battery is swollen because of:
A recharge with a non automatic garage charger or in position « fast charge » or
« boost », or a recharge of the Booster when the battery is deeply discharged
C. Indicate 0 volt on the voltmeter:
-> check the voltage on the clamps with a multimeter
O volt = the internal fuse is blown (see page 3)
The voltage is good = the voltmeter or push button is broken or defective
7
EN
6.2. GENERAL QUESTIONS
A. Can a Booster too powerful (example 12V/1600CA) damage a small engine (example
a motor bike) ?
No, the engine will only take the necessary power to start.
B. May I use my Booster as battery for my fridge, mobile phone,… ?
Yes this is possible but not at all recommended. Because under 12,4V the sulphatation process starts.
C. How many times do I need to recharge the Booster ?
The power of the provided charger is designed to recharge the Booster at 100% overnight (for a normal use).
If you have others questions or in case of a problem; please contact your seller.
7. WARRANTY
The Booster is guaranteed two years against all defects in material and workmanship. With the exception of any signs of abuse, misuse or modification.
Boosters must be returned complete (with charger) freight paid and suitably packaged preventing
damage whilst in transit. Repairs carried out under warranty will be returned free of return delivery
costs.
8
INSTRUCTIONS FOR USE
EN
1. ATTENTION
2. INSTRUCTION MANUAL
2.1. TO START A VEHICLE......................................................... 10
2.2. INVERSION OF POLARITY..................................................... 12
2.3. VEHICLE 24V - DETECTION OF THE 24V................................ 12
2.4. STARTING ATTEMPT........................................................... 13
2.5. PROTECTION................................................................... 14
2.6. STORAGE....................................................................... 14
3. GENERAL INFORMATION
3.1. DESCRIPTION.................................................................. 15
3.2. VOLTMETER.................................................................... 15
3.3. ALTERNATOR TESTING........................................................ 15
3.4. RECHARGE THE BOOSTER USING THE AC 230V OR 110V/DC 12V CHARGER
3.5. RECHARGING ON BOARD OF A VEHICLE 12V.............................. 15
4. PREVENTING PREMATURE FAILURE OF YOUR BOOSTER BATTERY
4.1. RECHARGING................................................................... 16
4.2. STARTING....................................................................... 16
4.3. REMARK......................................................................... 17
5. ELECTRONIC COMPONENTS OF VEHICLES
5.1. HISTORY........................................................................ 18
5.2. CAR MANUFACTURERS’ RECOMMENDATIONS................................ 18
5.3. HIGH VOLTAGE SURGE........................................................ 18
6. QUESTIONS – ANSWERS
6.1. MY BOOSTER.................................................................. 19
6.2. GENERAL........................................................................ 20
7. WARRANTY
1. ATTENTION
The following instruction MUST be read prior to operating the Booster; failure in doing
so may result in damage to the unit or serious injury.
Always use the Booster in well ventilated areas, and wear eye protection.
Recharge your Booster after receipt 24 hours before using or storing the unit.
9
EN
2. INSTRUCTION MANUAL
2.1. TO START A VEHICLE
IMPORTANT, the following instructions MUST be followed.
Turn OFF ignition before using the Booster.
1
1. The tension selector must be
disconnected !
2A
2. How to connect your Booster
2A. Starting in 12V:
Connect the red clamp (+) to the positive terminal (+)
of the battery, then connect the Blue clamp (-) to the
negative (-) terminal of the battery.
2B
2B. Starting in 24V:
-> Read page 12: detection of 24V
If the batteries are side by side:
Connect the red clamp (+) to the positive terminal (+)
of the battery, then connect the blue clamp (-) to the
negative (-) terminal of the other battery.
2B
If the batteries are on both sides of the
vehicle:
Connect the red clamp (+) to the positive terminal (+)
of the battery, then connect the blue clamp (-) to the
mass of the vehicle.
10
3
3. Selection of the tension
Select the tension of the vehicle to start
EN
-> from this moment there is current on the clamps.
4
4. Start the engine
Turn the ignition key for a maximum of 8-10 seconds,
wait for a further 3 minutes before attempting to start
again.
5
5. Disconnection of the tension
6
6. Disconnection
After starting, disconnect the tension selector.
Having started the engine, disconnect the blue (-)
clamp 1st, followed by the red (+) clamp.
7
7. Storing
8
8. Recharging
Return the cables and clamps to their support posts
on the Booster.
Recharge the Booster immediately after use and leave
it permanently connected !
11
EN
2.2. INVERSION OF POLARITY
If the polarity is not right, the buzzer will give a signal:
if the remaining voltage, in the batteries of the vehicle, is at least 4 volts
if the tension selector is not connected
Beeeeep
4V
2.3. VEHICLE 24V - DETECTION OF THE 24V
Detection of 24 volt on a vehicle where the cables are not visible or when the batteries are located
on both sides of the engine bay (Caterpillar, Volvo and others large type engines).
Use a voltmeter in position DC: connect the negative to the mass of the vehicle and the
positive to the positive of a battery.
If the voltmeter indicates 12V, you are not on the right battery.
12
If the voltmeter indicates 24V, you are on the right battery.
Test…
Batteries side by side
EN
Connect…
Batteries located on both sides of the vehicle
Test…
Connect…
2.4. STARTING ATTEMPT
When using the Booster to start an engine, do not crank for more than 8-10 seconds, and
wait for a further 3 minutes before a second attempt.
If after the 3rd attempt the engine does not start, it may be necessary to identify a further cause for
the breakdown.
NOTE: If you’re Booster is fully charged but the starter turns slowly, the vehicle or Booster battery
may need checking for short circuit.
13
EN
2.5. PROTECTION
Your Booster is provided with an internal fuse, in instances of too long a starting attempt or short
circuit, the fuse will blow. This can be determined by checking the example below.
Beeeeep
= OK
FUSE
INSIDE
2.6. STORAGE
The Booster can be stored in any position.
Do not store below 0°C (32° Fahrenheit), as this will affect the performance of the battery. The
ideal operating temperature is between 10 to 25°C (50 to 77° Fahrenheit).
When not using the Booster for long periods of time, recharge the unit (using the original
automatic electric AC 230V or 110V charger) every three months for at least 48hrs.
Clamps must be stored on their support posts, ensuring they do not come to contact with any
metallic surface. During charge there is current on the clamps and you will melt the contacts (poles)
in the charging plug.
14
3.1. DESCRIPTION
1
2
EN
3. GENERAL INFORMATION
1. Buzzer
2. 12V Outlet, protected by 16A fuse
3
3. Internal fuse
4. Voltmeter
FUSE
INSIDE
5. Push button voltmeter
6. Tension selector
5
7. Plug Neutrik® 4 pole to recharge
the Booster
7
4
6
3.2. VOLTMETER
Press the button to show the charge level of the batteries.
Half an hour after disconnecting the charger from the Booster, the Voltmeter must indicate 13 volts
(fully charged).
3.3. ALTERNATOR TESTING
After starting the engine at 2000 Um, leave the Booster connected to the vehicle and press the ‘voltmeter’ button. The Voltmeter will indicate between 14 and 14.4volts (at 2000rpm) if the alternator
is functioning correctly.
3.4. RECHARGE
THE
BOOSTER
USING THE
AC 230V
CHARGER
Never wait until the Booster is completely discharged before recharging.
OR
110V/DC 12V
An electronic full automatic charger AC 230V or 110V/DC 12V is provided with the Booster. Connect
the charger to the sector AC 230V or 110V, then connect the charger to the Booster via the recharge
plug Neutrik 4 poles.
The Booster can be left permanently connected to the automatic charger, to maintain correct charge
level.
If the light of the charger indicates:
orange: your Booster is charging
green: your Booster is charged but it is recommended to leave it continuous on the sector to maintain the batteries of the Boosters in perfect condition
red: there is a problem in the recharge circuit. Be careful, your Booster is not charging.
Contact immediately your seller
3.5. RECHARGE ON BOARD OF A VEHICLE 12V
A male to male cord (DC/DC) is available on request in order to recharge on board of a 12V vehicle
via the cigarette-lighter plug.
15
EN
4. PREVENTING PREMATURE FAILURE OF YOUR
BOOSTER BATTERIES
Correctly recharging the Booster batteries, increases
its efficiency and its lifetime!
4.1. RECHARGING
1. The Booster must be put on continuous charge between uses.
Below 12,4V, the Booster batteries will start to sulphate and irreversibly loses performance.
The lower the voltage, and the longer the time spent in a discharged state, the deeper the sulphation. When not in use, the Booster batteries must never drop below 12,4V (well-charged
= 13V).
2. Never recharge the Booster on a non-automatic garage charger or on an automatic
charger set on « fast charge » or « boost » position.
You risk overcharging the Booster and higher than 14,7V, hydrogen may form inside of the
batteries, resulting in explosion risk.
3. Never recharge the Booster via the cigarette lighter plug of the Booster, the
recharging plug (Neutrik®) is situated on the rear of the Booster.
The Neutrik® plug is a 4 pole plug, provided to recharge the 2 batteries at the same time.
The cigarette lighter plug (outlet 12V) is only connected to one battery and is just provided for
the connection of a portable lamp 12V (maximum 16A) or all others accessory 12V.
4. Never completely discharge the Booster batteries.
The batteries do not have a memory effect.
5. During the charge, the clamps MUST never touch a metallic surface.
You may melt one or several poles in the charging plug.
4.2. STARTING
1. Important: on vehicles difficult to start, crank the engine for a maximum 10 seconds
and wait for 3 minutes between further attempts to restart the vehicle.
Three reasons for this method:
a. to allow the voltage of the Booster batteries to build up again.
b. to allow the renewal of gasses inside the batteries.
c. to allow the internal components of the batteries to cool down.
If you do not wait and/or the starting attempt is too long, you risk losing power, you reduce
your starting possibilities by the second attempt and you risk melting the fuse inside.
2. Never connect the Booster to a battery or starter which is in short-circuit.
3. Never place the Booster in short-circuit, for example :
A. By connecting the red clamp (+) to the negative terminal of the battery and the blue clamp
(-) to the vehicles earth.
16
The inversion of polarity signal will not operate because you are connected 2 x to the
mass and you are not in inversion of polarity.
EN
B. By connecting the clamps on the positive and negative terminal of the 2 batteries which are
connected together in the vehicle 24V.
This will result in the Booster fuse of the batteries to blow in less than one second.
4. Never disconnect the Booster while engine running when there is no battery in the
vehicle or when the vehicles battery is at 0 volt.
This may cause failure to the diodes of the alternator.
5. Never connect the Booster on a vehicle 24V when it is in position 12V.
Forming of hydrogen and explosion risk.
4.3. REMARK
If someone else uses the Booster, ensure they are well informed on how to use it safely, and have
read and understood the operating instructions. The longevity of the Booster depends on it.
To ensure long life and optimize the use of the Booster batteries,
you must put the Booster on continuous charge after
each use using the automatic charger provided
17
EN
5. ELECTRONIC COMPONENTS OF VEHICLES
5.1. HISTORY
For more than twenty years, vehicles and engines of all kind are provided with electronics components more and more sophisticated.
Those are perfectly compatible with the use of a Booster in contrary to the old starting practices, still
too much used and extremely dangerous for vehicle electronics and for the health and safety of the
users.
5.2. CAR MANUFACTURERS’ RECOMMENDATIONS
Faced with the multiple requests from garage owners, some manufacturers have worked out a
process of intervention to follow if the battery fails that excludes any other form of intervention
under pain of loss of warranty.
It is, therefore, important to read the vehicle user manual before doing anything on a vehicle’s battery.
Our Boosters perfectly match manufacturers’ requirements. None prohibits or advises against the use
of a battery or a release Booster.
5.3. HIGH VOLTAGE SURGE
How can one damage or destroy one or more electronic components?
Answer: by provoking high voltage surges.
A high voltage surge is a small spark or a very powerful stray flash provoked by voltage differences,
short circuits or reversals of polarity, or again, and quite often, making electrical welds on vehicles
without disconnecting the battery or using a special Anti-Zap filter.
The small surges damage or destroy electronic components of board computers or ordinary logic controllers.
Stray flashes and electrical welding, contrariwise, do greater damage.
If the Booster is used according to instructions, it is impossible to provoke a voltage
surge.
A complete information about the electronic of vehicles is available on request.
18
6.1. MY BOOSTER…
6. QUESTIONS - ANSWERS
EN
A. Does not recharge anymore:
There is no current on the wall socket (230 Volt AC) on which you have connected the
charger
The recharge plug of the Booster is damaged (see page 16 – 4.1. (point 5))
The charger does not function any more
The batteries are sulphated, swollen or « cooked » and do not take anymore the charge
B. Does not work anymore in 12V, either in 24V:
The internal fuse is blow
C. Has no power anymore:
The Booster is not charged (see point A (well-charged = 13V))
The batteries lost its power because of:
The sulphatation of the batteries: you did not recharged your Booster regularly
A recharge with a non automatic garage charger or an automatic charger in position
« fast charge » or « boost »
A connection of the Booster in position 12V to a vehicle 24V during a short time
An element inside the batteries melded because of :
Starting attempts superseding the user instructions (see page 13 – 2.4.)
The battery is « cooked » because of:
A connection of the Booster in position 12V to a vehicle 24V
A recharge on a non automatic garage charger (more than 14,4V tension)
The batteries are swollen because of:
A recharge with a non automatic garage charger or in position « fast charge » or
« boost », or a recharge of the Booster when the batteries are deeply discharged
D. The voltmeter does not function:
The internal fuse is blow
The voltmeter or push button is broken or defective
The tension of the batteries is below 9V
19
EN
6.2. GENERAL QUESTIONS
A. Can a Booster too powerful (example 12/24V-2400/1200CA) damage a small engine
(example a motor bike) ?
No, the engine will only take the necessary power to start.
B. May I use my Booster as battery for my fridge, mobile phone,… ?
Yes this is possible but not at all recommended. Because under 12,4V the sulphatation process starts.
C. How many times do I need to recharge the Booster ?
The power of the provided charger is designed to recharge the Booster at 100% overnight (for a normal use).
If you have others questions or in case of a problem;
please contact your seller.
7. WARRANTY
The Booster is guaranteed two years against all defects in material and workmanship. With the exception of any signs of abuse, misuse or modification.
Boosters must be returned complete (with charger) freight paid and suitably packaged preventing
damage whilst in transit. Repairs carried out under warranty will be returned free of return delivery
costs.
20
FR
AVERTISSEMENTS POUR L’ELIMINATION CORRECTE DU PRODUIT AUX TERMES DE LA DIRECTIVE EUROPEENNE
2002/96/EC.
Au terme de son utilisation, le produit ne doit pas être éliminé avec les déchets urbains.
Le produit doit être remis à l’un des centres de collecte sélective prévus par l’administration communale ou auprès des revendeurs
assurant ce service.
Eliminer séparément un Booster permet d’éviter les retombées négatives pour l’environnement et la santé dérivant d’une élimination incorrecte, et permet de récupérer les matériaux qui le composent dans le but d’une économie importante en termes
d’énergie et de ressources. Pour rappeler l’obligation d’éliminer séparément les Boosters, le produit porte le symbole d’un caisson
à ordures barré.
NL
BELANGRIJKE INFORMATIE VOOR DE CORRECTE VERWERKING VAN HET PRODUCT IN OVEREENSTEMMING MET
DE EUROPESE RICHTLIJN 2002/96/EC.
Aan het einde van zijn nuttig leven mag het product niet samen met het gewone huishoudelijke afval worden verwerkt. Het moet
naar een speciaal centrum voor gescheiden afvalinzameling van de gemeente worden gebracht, of naar een verkooppunt dat deze
service verschaft. Het apart verwerken van een Booster voorkomt mogelijke negatieve gevolgen voor het milieu en de gezondheid
die door een ongeschikte verwerking ontstaan en zorgt ervoor dat de materialen waaruit de Booster bestaat teruggewonnen kunnen worden om een aanmerkelijke besparing van energie en grondstoffen te verkrijgen. Om op de verplichting tot gescheiden
verwerking van Boosters te wijzen, is op het product het symbool van een doorgekruiste vuilnisbak aangebracht.
DE
WICHTIGER HINWEIS FÜR DIE KORREKTE ENTSORGUNG DES PRODUKTS IN UBEREINSTIMMUNG MIT DER EGRICHTLINIE 2002/96/EG.
Am Ende seiner Nutzzeit darf das Produkt NICHT zusammen mit dem Siedlungsabfaff beseitigt werden.
Es kann zu den eigens von den städtischen Behörden eingerichteten Sammelstellen oder zu den Fachhändlern, die einen Rücknahmeservice anbieten, gebracht werden.
Die getrennte Entsorgung eines Haushaltsgerätes vermeidet mögliche negative Auswirkungen auf die Umwelt und die menschliche
Gesundheit, die durch eine nicht vorschriftsmäßige Entsorgung bedingt sind. Zudem ermöglicht wird die Wiederverwertung der
Materialien, aus denen sich das Gerät zusammensetzt, was wiederum eine bedeutende Einsparung an Energie und Ressourcen
mit sich bringt.
Zur Erinnerung an die Verpflichtung, die Elektrohauishaltsgeräte getrennt zu beseitigen, ist das Produkt mit einer Mülltonne, die
durchgestrichen ist, gekennzeichnet.
EN
IMPORTANT INFORMATION FOR CORRECT DISPOSAL OF THE PRODUCT IN ACCORDANCE WITH EC DIRECTIVE
2002/96/EC.
At the end of its working life, the product must not be disposed of as urban waste.
If must be taken to a special local authority differentiated waste collection centre or to a dealer providing this service.
Disposing of a household appliance separately avoids possible negative consequences for the environment and health deriving
from inappropriate disposal and enables the constituent materials to be recovered to obtain significant savings in energy and resources. As a reminder of the need to dispose of household appliances separately, the product is marked with a crossed-out
wheeled dustbin.
ES
ADVERTENCIAS PARA LA ELIMINACIÓN CORRECTA DEL PRODUCTO SEGUN ESTABLECE LA DIRECTIVA EUROPEA
2002/96/EC.
Al final de su vida útil, o producto no debe eliminarse junto a los desechos urbanos.
Puede entregarse a centros específicos de recogida diferenciada dispuestos por las administraciones municipales, o a distribuidores
que facilitan este servicio. Eliminar por separado un electrodoméstico significa evitar posibles consecuencias negativas para el
medio ambiente y la salud derivadas de una eliminación inadecuada y permite reciclar los materiales que le componen, obteniendo
así un ahorro importante de energía y recursos. Para subrayar la obligación de eliminar por separado los electrodomésticos, en
el producto aparece un contenedor de basura móvil tachado.
IT
AVVERTENZE PER IL CORRETTO SMALTIMENTO DEL PRODOTTO AI SENSI DELLA DIRETTIVA EUROPEA
2002/96/EC.
Alla fine della sua vita utile il prodotto non deve esser smaltito insieme ai rifiuti urbani.
Può essere consegnato presso gli appositi centri di raccolta differenziata predisposti dalle amministrazioni comunali, oppure
presso i rivenditorii che forniscono questo servizio.
Smaltire separatmente un elettrodomestico consente di evitare possibili conseguenze negative per l’ambiente e per la salute derivanti da un suo smaltimento inadeguato e permette di recuperare i materiali di cui è composto al fine di ottenere un importante
risparmio di energia e di risorse.
Per rimarcare l’obbligo di smaltire separatmente gli elettrodomestici, sul prodotto è riportato il marchio del contenitore di spazzatura mobile barrato.
The Easy Grip cables: To connect easily on all the
battery terminals which are smaller or difficult to reach.
Instruction Manual
For the connection of an Easy Grip cable
1) Connect the blue clamp on the earth of your vehicle.
2) Connect the red clamp of your booster with one of the clamps of the easy grip cable.
Be careful ! Make sure you connect the side of the clamp which supports the cable with the side of
the other clamp which supports also the cable. You will obtain by doing this the best conductivity.
GOOD connection
BAD connection
3) Connect then the red clamp on the positive terminal (+) of your battery.
4) Your clamps are correctly connected.
Booster 12/24V
060519ED
EN
Recharge the Booster on board of a 12 volts vehicle
By a male to male cord with a 4 pole plug (Neutrik) and a cigarette-lighter plug DC
To recharge your Booster, the tension selector should not be connected
LE
Boo st er MO
B
Boo st er P O
RT
AB
Male plug 4 pole
to connect into the
charging plug on the
back side of the
PORTABLE Booster
IL E
Male plug 4 pole
to connect into the
charging plug on
the front of the
MOBILE Booster
Male plug DC to
connect into the
cigarette-lighter plug
of the vehicle
This recharging method demands some precautions
If you want to connect the male to male cord on a ‘cigarette-lighter’ plug or a ‘Power
Supply’ plug of a vehicle, you have to measure imperatively the tension on recharging plug of
the vehicle while engine running at 2000 Um. Section of the cable (which gives the tension)
1,5mm and place a diode ‘anti-return’.
The tension on the plug must be higher than 14 Volt. 14,4 Volt is the ideal tension to best
recharge your Booster.
NB: under 14 Volt your Booster will never be completely recharged and you will reduce the
lifetime of the battery of the Booster.
According to the age of the vehicle, we notice very often a bad mass. We have already measured a tension of only 9 Volt. You think you recharge your Booster but you actually discharge
it.
ATTENTION
Do never recharge your Booster on a 24 Volts vehicle
Because with a higher tension than 14,7 Volt, hydrogen is produced in the battery and can
engenders an explosion risk.
A recharge of a Booster 12V on board of a vehicle 24 Volt, causes an irremediable quick
death of the battery of the Booster.
For all complementary information, contact us on +32 4 388 20 17