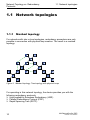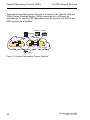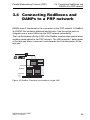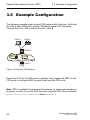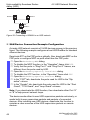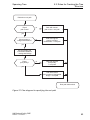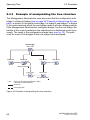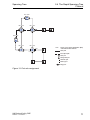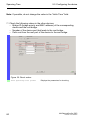
1
User Manual Redundancy Configuration Rail Switch Power (RSP) UM RedundConfig RSP Release 2.0 02/2013 Technical Support https://hirschmann-support.belden.eu.com The naming of copyrighted trademarks in this manual, even when not specially indicated, should not be taken to mean that these names may be considered as free in the sense of the trademark and tradename protection law and hence that they may be freely used by anyone. © 2013 Hirschmann Automation and Control GmbH Manuals and software are protected by copyright. All rights reserved. The copying, reproduction, translation, conversion into any electronic medium or machine scannable form is not permitted, either in whole or in part. An exception is the preparation of a backup copy of the software for your own use. For devices with embedded software, the end-user license agreement on the enclosed CD/DVD applies. The performance features described here are binding only if they have been expressly agreed when the contract was made. This document was produced by Hirschmann Automation and Control GmbH according to the best of the company's knowledge. Hirschmann reserves the right to change the contents of this document without prior notice. Hirschmann can give no guarantee in respect of the correctness or accuracy of the information in this document. Hirschmann can accept no responsibility for damages, resulting from the use of the network components or the associated operating software. In addition, we refer to the conditions of use specified in the license contract. You can get the latest version of this manual on the Internet at the Hirschmann product site (www.hirschmann.com). Printed in Germany Hirschmann Automation and Control GmbH Stuttgarter Str. 45-51 72654 Neckartenzlingen Germany Tel.: +49 1805 141538 Rel. 2.0 - 02/2013 – 11.02.2013 Contents Contents About this Manual 5 Key 7 1 Network Topology vs. Redundancy Protocols 9 1.1 Network topologies 1.1.1 Meshed topology 1.1.2 Ring topology 10 10 11 1.2 Redundancy Protocols 12 2 Media Redundancy Protocol (MRP) 13 2.1 Network Structure 14 2.2 Reconfiguration time 15 2.3 Advanced mode 16 2.4 Prerequisites for MRP 17 2.5 Example Configuration 18 3 Parallel Redundancy Protocol (PRP) 29 3.1 Implementation 30 3.2 LRE Functionality 31 3.3 PRP Network Structure 33 3.4 Connecting RedBoxes and DANPs to a PRP network 35 3.5 Example Configuration 36 3.6 PRP and Port Mirroring 39 4 High-availability Seamless Redundancy (HSR) 41 4.1 Implementation 42 4.2 HSR Network Structure 4.2.1 Connecting SANs to an HSR Network 4.2.2 HSR and PRP network connections 43 43 47 UM RedundConfig RSP Release 2.0 02/2013 3 Contents 5 Spanning Tree 53 5.1 Basics 5.1.1 The tasks of the STP 5.1.2 Bridge parameters 5.1.3 Bridge Identifier 5.1.4 Root Path Cost 5.1.5 Port Identifier 5.1.6 Max Age and Diameter 55 55 56 56 57 58 59 5.2 Rules for Creating the Tree Structure 5.2.1 Bridge information 5.2.2 Setting up the tree structure 61 61 61 5.3 Examples 5.3.1 Example of determining the root path 5.3.2 Example of manipulating the root path 5.3.3 Example of manipulating the tree structure 64 64 66 68 5.4 The Rapid Spanning Tree Protocol 5.4.1 Port roles 5.4.2 Port states 5.4.3 Spanning Tree Priority Vector 5.4.4 Fast reconfiguration 5.4.5 STP compatibility mode 69 69 72 73 73 74 5.5 Configuring the device 75 5.6 Guards 5.6.1 Activating the BPDU Guard 5.6.2 Activating Root Guard / TCN Guard / Loop Guard 81 84 87 A Readers’ Comments 89 B Index 91 C Further Support 93 4 UM RedundConfig RSP Release 2.0 02/2013 About this Manual About this Manual The “GUI” reference manual contains detailed information on using the graphical interface to operate the individual functions of the device. The “Command Line Interface” reference manual contains detailed information on using the Command Line Interface to operate the individual functions of the device. The “Installation” user manual contains a device description, safety instructions, a description of the display, and the other information that you need to install the device. The “Basic Configuration” user manual contains the information you need to start operating the device. It takes you step by step from the first startup operation through to the basic settings for operation in your environment. The “Redundancy Configuration” user manual document contains the information you require to select the suitable redundancy procedure and configure it. The “HiView” user manual contains information for using the HiView GUI application. This application allows you to use the graphical user interface of Hirschmann devices with management independently of other applications, such as a browser. UM RedundConfig RSP Release 2.0 02/2013 5 About this Manual The Industrial HiVision Network Management Software provides you with additional options for smooth configuration and monitoring: 6 Simultaneous configuration of multiple devices Graphical user interface with network layout Auto-topology discovery Event log Event handling Client/server structure Browser interface ActiveX control for SCADA integration SNMP/OPC gateway. UM RedundConfig RSP Release 2.0 02/2013 Key Key The designations used in this manual have the following meanings: List Work step Subheading Link Note: Cross-reference with link A note emphasizes an important fact or draws your attention to a dependency. Courier ASCII representation in user interface Execution in the Graphical User Interface Execution in the Command Line Interface Symbols used: WLAN access point Router with firewall Switch with firewall Router Switch UM RedundConfig RSP Release 2.0 02/2013 7 Key Bridge Hub A random computer Configuration Computer Server PLC Programmable logic controller I/O Robot 8 UM RedundConfig RSP Release 2.0 02/2013 Network Topology vs. Redundancy Protocols 1 Network Topology vs. Redundancy Protocols When using Ethernet, an important prerequisite is that data packets follow a single (unique) path from the sender to the receiver. The following network topologies support this prerequisite: Line topology Star topology Tree topology Figure 1: Network with line, star and tree topologies To ensure that the communication is maintained when a connection fails, you install additional physical connections between the network nodes. Redundancy protocols ensure that the additional connections remain switched off while the original connection is still working. If the connection fails, the redundancy protocol generates a new path from the sender to the receiver via the alternative connection. To introduce redundancy onto layer 2 of a network, you first define which network topology you require. Depending on the network topology selected, you then choose from the redundancy protocols that can be used with this network topology. UM RedundConfig RSP Release 2.0 02/2013 9 Network Topology vs. Redundancy Protocols 1.1 Network topologies 1.1 Network topologies 1.1.1 Meshed topology For networks with star or tree topologies, redundancy procedures are only possible in connection with physical loop creation. The result is a meshed topology. Figure 2: Meshed topology: Tree topology with physical loops For operating in this network topology, the device provides you with the following redundancy protocols: High-availability Seamless Redundancy (HSR) Parallel Redundancy Protocol (PRP) Rapid Spanning Tree (RSTP) 10 UM RedundConfig RSP Release 2.0 02/2013 Network Topology vs. Redundancy Protocols 1.1.2 1.1 Network topologies Ring topology In networks with a line topology, you can use redundancy procedures by connecting the ends of the line. This creates a ring topology. Figure 3: Ring topology: Line topology with connected ends For operating in this network topology, the device provides you with the following redundancy protocols: Media Redundancy Protocol (MRP) Parallel Redundancy Protocol (PRP) Rapid Spanning Tree (RSTP) UM RedundConfig RSP Release 2.0 02/2013 11 Network Topology vs. Redundancy Protocols 1.2 Redundancy Protocols 1.2 Redundancy Protocols For operating in different network topologies, the device provides you with the following redundancy protocols: Redundancy protocol HSR Network topology Comments Ring MRP Ring PRP Random structure RSTP Random structure Uninterrupted availability. On the path from the sender to the receiver, HSR transports the data packets in both directions via a ring. The switching time can be selected and is practically independent of the number of devices. An MRP-Ring consits of up to 50 devices that support the MRP protocol according to IEC 62439. If you only use Hirschmann devices, up to 100 devices are possible in the MRP-Ring. Uninterrupted availability. On the path from the sender to the receiver, PRP transports a data packet in parallel via 2 mutually independent LANs. The switching time depends on the network topology and the number of devices. typ. < 1 s with RSTP typ. < 30 s with STP Table 1: Overview of redundancy protocols Note: When you are using a redundancy function, you deactivate the flow control on the participating ports. Default setting: flow control deactivated globally and activated on every port. If the flow control and the redundancy function are active at the same time, the redundancy may not work as intended. 12 UM RedundConfig RSP Release 2.0 02/2013 Media Redundancy Protocol (MRP) 2 Media Redundancy Protocol (MRP) Since May 2008, the Media Redundancy Protocol (MRP) has been a standardized solution for ring redundancy in the industrial environment. MRP is compatible with redundant ring coupling, supports VLANs, and is distinguished by very short reconfiguration times. An MRP-Ring consists of up to 50 devices that support the MRP protocol according to IEC 62439. If you only use Hirschmann devices, up to 100 devices are possible in the MRP-Ring. UM RedundConfig RSP Release 2.0 02/2013 13 Media Redundancy Protocol (MRP) 2.1 Network Structure 2.1 Network Structure The concept of ring redundancy allows the construction of high-availability, ring-shaped network structures. With the help of the RM (Ring Manager) function, the two ends of a backbone in a line structure can be closed to a redundant ring. The ring manager keeps the redundant line open as long as the line structure is intact. If a segment becomes inoperable, the ring manager immediately closes the redundant line, and line structure is intact again. Figure 4: Line structure RM Figure 5: 14 Redundant ring structure RM = Ring Manager —— main line - - - redundant line UM RedundConfig RSP Release 2.0 02/2013 Media Redundancy Protocol (MRP) 2.2 Reconfiguration time 2.2 Reconfiguration time If a line section fails, the ring manager changes the MRP-Ring back into a line structure. You define the maximum time for the reconfiguration of the line in the ring manager. Possible values for the maximum delay time: • 500 ms • 200 ms • 30 ms • 10 ms The delay times 30ms and 10ms are only available to you for devices with hardware for enhanced redundancy functions. In order to use these delay times, load the FastMRP device software (HiOS2S-xxx-RSP-02000.bin where xxx=MRP). Configure the delay time to 10ms, when you use up to 50 devices in the ring, that support this delay time. When you use more than 50 of these devices in the ring, configure a delay time to at least 30ms. Note: You only configure the reconfiguration time with a value less than 500 ms if all the devices in the ring support the shorter delay time. Otherwise the devices that only support longer delay times might not be reachable due to overloading. Loops can occur as a result. UM RedundConfig RSP Release 2.0 02/2013 15 Media Redundancy Protocol (MRP) 2.3 Advanced mode 2.3 Advanced mode For times even shorter than the guaranteed reconfiguration times, the device provides the advanced mode. The advanced mode speeds up the link failure recognition when the ring participants inform the ring manager of interruptions in the ring via link-down notifications. Hirschmann devices support link-down notifications. Therefore, you generally activate the advanced mode in the ring manager. If you are using devices that do not support link-down notifications, the ring manager reconfigures the line in the selected maximum reconfiguration time. 16 UM RedundConfig RSP Release 2.0 02/2013 Media Redundancy Protocol (MRP) 2.4 Prerequisites for MRP 2.4 Prerequisites for MRP Before setting up an MRP-Ring, make sure that the following conditions are fulfilled: All ring participants support MRP. The ring participants are connected to each other via the ring ports. Apart from the device’s neighbors, no other ring participants are connected to the respective device. All ring participants support the configuration time defined in the ring manager. There is exactly 1 ring manager in the ring. If you are using VLANs, configure every ring port with the following settings: Deactivate ingress filtering - see the Switching:VLAN:Port dialog. Define the port VLAN ID (PVID) - see the Switching:VLAN:Port dialog. – PVID = 1 if the device transmits the MRP data packets untagged (VLAN ID = 0 in Redundancy:MRP dialog) – PVID = any if the device transmits the MRP data packets in a VLAN (VLAN ID ≥ 1 in Redundancy:MRP dialog) Define egress rules - see Switching:VLAN:Static dialog. – U (untagged) if the device transmits the MRP data packets untagged (VLAN ID = 0 in Redundancy:MRP dialog) – T (tagged) if the device transmits the MRP data packets in a VLAN (VLAN ID ≥ 1 in Redundancy:MRP dialog) UM RedundConfig RSP Release 2.0 02/2013 17 Media Redundancy Protocol (MRP) 2.5 Example Configuration 2.5 Example Configuration A backbone network contains 3 devices in a line structure. To increase the availability of the network, you convert the line structure to a redundant ring structure. Devices from different manufacturers are used.All devices support MRP. On every device you define ports 1.1 and 1.2 as ring ports. 1 1.1 2 1.2 1.1 3 1.2 1.1 1.2 RM Figure 6: Example of MRP-Ring RM = Ring Manager —— main line - - - redundant line The following example configuration describes the configuration of the ring manager device (1). You configure the 2 other devices (2 to 3) in the same way, but without activating the ring manager function. This example does not use a VLAN. You have entered 200 ms as the ring recovery time, and all the devices support the advanced mode of the ring manager. Set up the network to meet your demands. Configure all ports so that the transmission speed and the duplex settings of the lines correspond to the following table: 18 UM RedundConfig RSP Release 2.0 02/2013 Media Redundancy Protocol (MRP) Port type Bit rate TX TX Optical Optical Table 2: 100 Mbit/s 1 Gbit/s 100 Mbit/s 1 Gbit/s Autonegotiation (automatic configuration) off on off on 2.5 Example Configuration Port setting Duplex on on on on 100 Mbit/s full duplex (FDX) 100 Mbit/s full duplex (FDX) - Port settings for ring ports Note: You configure optical ports without support for autonegotiation (automatic configuration) with 100 Mbit/s full duplex (FDX) or 1000 Mbit/s full duplex (FDX). UM RedundConfig RSP Release 2.0 02/2013 19 Media Redundancy Protocol (MRP) 2.5 Example Configuration Note: Configure all the devices of the MRP-Ring individually. Before you connect the redundant line, you must have completed the configuration of all the devices of the MRP-Ring. You thus avoid loops during the configuration phase. You deactivate the flow control on the participating ports. If the flow control and the redundancy function are active at the same time, there is a risk that the redundancy function will not operate as intended. (Default setting: flow control deactivated globally and activated on all ports.) Switch Spanning Tree off on all devices in the network: Open the Redundancy:Spanning Tree:Global dialog. Switch off the function. In the state on delivery, Spanning Tree is switched on on the device. Figure 7: Switching the function off enable configure no spanning-tree operation show spanning-tree global 20 Switch to the privileged EXEC mode. Switch to the Configuration mode. Switches Spanning Tree off. Displays the parameters for checking. UM RedundConfig RSP Release 2.0 02/2013 Media Redundancy Protocol (MRP) 2.5 Example Configuration Switch MRP on on all devices in the network: Open the Redundancy:MRP dialog. Define the desired ring ports. Figure 8: Defining the ring ports In the Command Line Interface you first define an additional parameter, the MRP domain ID. Configure all the ring participants with the same MRP domain ID. The MRP domain ID is a sequence of 16 number blocks (8-bit values). When configuring with the graphical user interface, the device uses the default value 255 255 255 255 255 255 255 255 255 255 255 255 255 255 255 255. mrp domain add default-domain Creates a new MRP domain with the default domain ID. mrp domain modify port Defines port 1.1 as ring port 1 (primary). primary 1/1 mrp domain modify port Defines port 1.2 as ring port 2 (secondary). secondary 1/2 UM RedundConfig RSP Release 2.0 02/2013 21 Media Redundancy Protocol (MRP) 2.5 Example Configuration Activate the ring manager. For the other devices in the ring, leave the setting as Off. Figure 9: Activating the ring manager mrp domain modify mode manager 22 Defines the device as the ring manager. Do not activate the ring manager on any other device. UM RedundConfig RSP Release 2.0 02/2013 Media Redundancy Protocol (MRP) 2.5 Example Configuration Select the checkbox in the "Advanced Mode" field. Figure 10: Activating the advanced mode mrp domain modify advanced-mode enabled UM RedundConfig RSP Release 2.0 02/2013 Activates the advanced mode. 23 Media Redundancy Protocol (MRP) 2.5 Example Configuration In the "Ring Recovery" field, select the value 200ms. Figure 11: Defining the time for the ring recovery mrp domain modify recovery-delay 200ms Defines 200ms as the max. delay time for the reconfiguration of the ring. Note: If selecting 200 ms for the ring recovery does not provide the ring stability necessary to meet the requirements of your network, you select 500 ms. Leave the value in the "VLAN" field as 0. 24 UM RedundConfig RSP Release 2.0 02/2013 Media Redundancy Protocol (MRP) 2.5 Example Configuration Switch the operation of the MRP-Ring on. Figure 12: Switching on the MRP function Click on “Set” to save the changes. mrp domain modify operation enable Activates the MRP-Ring. When all the ring participants are configured, close the line to the ring. To do this, you connect the devices at the ends of the line via their ring ports. Check the messages from the device: show mrp UM RedundConfig RSP Release 2.0 02/2013 Displays the parameters for checking. 25 Media Redundancy Protocol (MRP) 2.5 Example Configuration The "Operation" field shows the operating state of the ring port. Possible values: forwarding Port is switched on, connection exists. blocked Port is blocked, connection exists. disabled Port is disabled. not connected No connection exists. Figure 13: Messages in the "Operation" field 26 UM RedundConfig RSP Release 2.0 02/2013 Media Redundancy Protocol (MRP) 2.5 Example Configuration The "Information" field shows messages for the redundancy configuration and the possible causes of errors. The following messages are possible if the device is operating as a ring client or a ring manager: Redundancy Available The redundancy is set up. When a component of the ring is down, the redundant line takes over its function. Configuration error: Ring port link error Error in the cabling of the ring ports. The following messages are possible if the device is operating as a ring manager: Configuration error: Packet of other ring manager received Another device exists in the ring that is operating as the ring manager. Activate the "Ring Manager" function if there is exactly one device in the ring. Configuration error: Connection in ring is connected to incorrect port A line in the ring is connected with a different port instead of with a ring port. The device only receives test data packets on 1 ring port. Figure 14: Messages in the "Information" field UM RedundConfig RSP Release 2.0 02/2013 27 Media Redundancy Protocol (MRP) 2.5 Example Configuration If applicable, integrate the MRP ring into a VLAN: Change the value in the "VLAN" field. Figure 15: Changing the VLAN ID If the MRP-Ring is not assigned to a VLAN (link in this example), leave the VLAN ID as 0. In the Switching:VLAN:Static dialog, define the VLAN membership as U (untagged) for the ring ports in VLAN 1. If the MRP-Ring is assigned to a VLAN, enter a VLAN ID >0. In the Switching:VLAN:Static dialog, define the VLAN membership as T (tagged) for the ring ports in the selected VLAN. mrp domain modify vlan <0..4042> 28 Assigns the VLAN ID ... UM RedundConfig RSP Release 2.0 02/2013 Parallel Redundancy Protocol (PRP) 3 Parallel Redundancy Protocol (PRP) Fast MRP rings (Media Redundancy Protocol rings) involve many requirements for a stable network. Furthermore, MRP has a short reconfiguration time when switching to the redundant path. Applications used for control and surveillance for example, require zero recovery time when switching to a redundant path. PRP uses 2 separate LANs for uninterrupted availability. On the path from the sender to the receiver, PRP sends 2 data packets in parallel via the 2 mutually independent LANs. The receiver processes the first data packet received and discards the second data packet of the pair. The international standard IEC 62439-3 defines the Parallel Redundancy Protocol (PRP). Note: PRP uses interfaces 1/1 and 1/2 when active. The PRP function replaces interfaces 1/1 and 1/2 with interface prp/1 as seen in the "VLAN", "Rate Limiter", and "Filter for MAC Addresses" dialogs. Configure interface prp/1 for VLAN membership, Rate Limitation, and MAC filtering. UM RedundConfig RSP Release 2.0 02/2013 29 Parallel Redundancy Protocol (PRP) 3.1 Implementation 3.1 Implementation When the upper protocol layers send a data packet, the PRP interface creates a “twin packet” from the original packet. The PRP interface then transmits 1 data packet of the pair to each participating LAN simultaneously. The packets traverse different LANs and therefore have different run times. The receiving PRP interface forwards the first packet of a pair towards the upper protocol layers and discards the second packet. When viewed from the application, a PRP interface functions like a standard Ethernet interface. The PRP interface or a Redundancy Box (RedBox) injects a Redundancy Control Trailer (RCT) into each packet. The RCT is a 48-bit identification field and is responsible for the identification of duplicates. This field contains, LAN identification (LAN A or B), information about the length of the payload, and a 16-bit sequence number. The PRP interface increments the sequence number for each packet sent. Using the unique attributes included in each packet, such as Physical MAC source address and sequence number, the receiving RedBox or Double Attached Node (DAN) interface identifies and discards duplicates. Depending on the packet size, with PRP it attains a reduced throughput of the available bandwidth, due to the addition of the RCT trailer. 30 UM RedundConfig RSP Release 2.0 02/2013 Parallel Redundancy Protocol (PRP) 3.2 LRE Functionality 3.2 LRE Functionality Each Double Attached Node implementing PRP (DANP) has 2 LAN ports that operate in parallel. The Link Redundancy Entity (LRE) connects the upper protocol layers with every individual port. DANP 1 Upper layers Same data link layer interface Network adapters Transceivers hard real-time stack UDP DANP 2 TCP network layer hard real-time stack LRE port A Tx Rx UDP TCP network layer LRE port B Tx Rx port A Tx Rx port B Tx Rx LAN A LAN B Figure 16: PRP LRE process The LRE has the following tasks: Handling of duplicates Management of redundancy When transmitting packets from the upper protocol layers, the LRE sends them from both ports at nearly the same time. The 2 data packets pass through the LANs with different delays. When the device receives the first data packet, the LRE forwards it to the upper protocol layers and discards the second data packet received. For the upper protocol layers, the LRE behaves like a normal port. To identify the twin packets, the LRE attaches an RCT with a sequential number to the packets. The LRE also periodically sends multicast PRP supervision packets and evaluates the multicast PRP supervision packets of the other RedBoxes and DANPs. UM RedundConfig RSP Release 2.0 02/2013 31 Parallel Redundancy Protocol (PRP) 3.2 LRE Functionality The device allows you to view the received supervision packet entries. The entries, in the Redundancy:PRP:DAN/VDAN Table, are helpful for detecting redundancy and connection problems. For example, in an index when the "Last Seen B" timestamp resets and the "Last Seen A" timestamp remains the same. The "Last Seen A" and "Last Seen B" timestamps steadily reseting indicate a normal condition. 32 UM RedundConfig RSP Release 2.0 02/2013 Parallel Redundancy Protocol (PRP) 3.3 PRP Network Structure 3.3 PRP Network Structure PRP uses 2 independent LANs. The topology of each of these LANs is arbitrary, and ring, star, bus and meshed topologies are possible. The main advantage of PRP is zero recovery time with an active (transit) LAN. When the terminal device receives no packets from one of the LANs, the second (transit) LAN maintains the connection. As long as 1 (transit) LAN is available, repairs and maintenance on the other (transit) LAN have no impact on the data packet transmission. The elementary devices of a PRP network are the RedBox (Redundancy Box) and the DANP (Double Attached Node implementing PRP). Both devices have 1 connection each to the (transit) LANs. The devices in the (transit) LAN are conventional switches. The devices transmit PRP data packets transparently, without evaluating the RCT information. Note: The RCT trailer increases packet size. Configure the MTU size equal to or greater than 1524 for LAN A and LAN B devices. UM RedundConfig RSP Release 2.0 02/2013 33 Parallel Redundancy Protocol (PRP) 3.3 PRP Network Structure Terminal devices that connect directly to a device in the (transit) LAN are SANs (Single Attached Nodes). SANs connected to a LAN have no redundancy. To use the PRP redundant network, connect the SAN to the PRP network via a RedBox. SAN B1 SAN B2 RedBox 1 LAN B LAN A PRP Network DANP 1 Figure 17: Parallel Redundancy Protocol Network 34 UM RedundConfig RSP Release 2.0 02/2013 Parallel Redundancy Protocol (PRP) 3.4 Connecting RedBoxes and DANPs to a PRP network 3.4 Connecting RedBoxes and DANPs to a PRP network DANPs have 2 interfaces for the connection to the PRP network. A RedBox is a DANP that contains additional switch ports. Use the switch ports to intagrate one or more SANs into the PRP network redundantly. The Link Redundancy Entity (LRE) in the RedBox creates a twin packet when sending a data packet to the PRP network. The LRE forwards 1 data packet of the twin pair when it receives it and discards the 2nd data packet of the twin pair. VDAN 1 VDAN 2 VDAN 3 Tx local application Rx TCP/IP SNMP port C Interlink LRE RedBox port A Tx Rx port B Tx Rx Transceiver LAN A LAN B Figure 18: RedBox Transition from double to single LAN UM RedundConfig RSP Release 2.0 02/2013 35 Parallel Redundancy Protocol (PRP) 3.5 Example Configuration 3.5 Example Configuration The following example uses a simple PRP network with 3 devices. Verify that the LAN A and LAN B ports contain 100 Mbit/s optical SFP interfaces. Connect Port A to LAN A and the Port B to LAN B. VDAN 1 VDAN 2 RedBox 1 LAN A LAN B PRP Network DANP 1 Figure 19: Example PRP Network Deactivate STP on the PRP ports or globally. Also, deactivate MRP on the PRP ports or configure MRP on ports other than the PRP ports. Note: PRP is available for devices with hardware for enhanced redundancy functions. In order to use the PRP functions, load the PRP device software (HiOS-2S-xxx-RSP-02000.bin where xxx=PRP). 36 UM RedundConfig RSP Release 2.0 02/2013 Parallel Redundancy Protocol (PRP) 3.5 Example Configuration Perform the following steps on both the RedBox 1 and DANP 1 devices. Open the Redundancy:MRP dialog. To disable the MRP function, in the "Operation" frame click Off. Verify that the ports in "Ring Port 1" and "Ring Port 2" frames, are different from the ports used by PRP. Open the Redundancy:Spanning Tree:Global dialog. To disable the STP function, in the "Operation" frame click Off. Open the Redundancy:Spanning Tree:Port dialog. In the "CIST" tab, deactivate the ports used for PRP in the "Stp active" column. In the "Guards" tab, deactivate the ports used for PRP in the "Root Guard", "TCN Guard", and "Loop Guard" columns. Open the Redundancy:PRP:Configuration dialog. Perform the following step in the "Supervision Packet Receiver" frame: To analyze received PRP supervision packets, activate the "Evaluate Supervision Packets" control box. Perform the following steps in the "Supervision Packet Transmitter" frame: To transmit PRP supervision packets from this device, activate "Send". The device sends either its own PRP supervision packets exclusively, or sends both its own supervision packets and packets of connected devices. To transmit packets for VDANs listed in the Redundancy:PRP:DAN/VDAN Table, activate "Send VDAN Packets". When deactivated the device sends its own supervision packets exclusively. After installing new PRP devices, deactivate this function to maintain a clear overview of the PRP supervision packets on remote devices. To enable the ports, in the "Port A" and "Port B" frames, click On. To enable the PRP function, in the "Operation" frame click On. To temporarily save the changes, click "Set". To load the configuration saved in the volatile memory, click "Reload". Open the "Proxy Node Table" dialog to view the terminating VDAN devices for which this device provides PRP conversion. To remove this list, click "Delete". To load the list of currently connected devices, click "Reload". UM RedundConfig RSP Release 2.0 02/2013 37 Parallel Redundancy Protocol (PRP) 3.5 Example Configuration Open the "Statistics" dialog to view the quality of the traffic that traverses the device. The device detects errors and displays them according to MIB Managed Objects and the respective link. To remove the entry in the statistics table, click "Delete". To load the current statistics, click "Reload". The device allows you to view the received supervision packet entries. The entries, in the Redundancy:PRP:DAN/VDAN Table, are helpful for detecting redundancy and connection problems. For example, in an index when the "Last Seen B" timestamp resets and the "Last Seen A" timestamp remains the same. The "Last Seen A" and "Last Seen B" timestamps steadily reseting indicate a normal condition. Note: If you deactivate the PRP function, then deactivate either Port “A“ or “B“ to help prevent network loops. enable configure no mrp operation no spanning-tree operation interface 1/1 no shutdown exit interface 1/2 no shutdown exit prp instance 1 supervision evaluate prp instance 1 supervision send prp instance 1 supervision redbox-exclusively prp operation show prp counters show prp node-table show prp proxy-node-table 38 Switch to the privileged EXEC mode. Switch to the Configuration mode. Disable the option. Disable the option. Switch to the Interface Configuration mode of interface 1/1. Enable the interface. Switch to the Configuration mode. Switch to the interface configuration mode for interface 1/2. Enable the interface. Switch to the Configuration mode. Enable evaluation of received supervision packets. Enable supervision packet transmission. Enable sending of supervision packets for this RedBox exclusively. Use the no form of the command to send supervision packets for each connected VDAN and this RedBox (if send is enabled). Enable the PRP function. Show prp counters Show node table. Show proxy node table. UM RedundConfig RSP Release 2.0 02/2013 Parallel Redundancy Protocol (PRP) 3.6 PRP and Port Mirroring 3.6 PRP and Port Mirroring The transceivers send traffic to the LRE, which separates the traffic. The LRE forwards the data frames to PRP Port A and the control frames to PRP Port B of the switch. When you configure the PRP Port A as a source port, the device sends the control frames to the destination port. When you configure the PRP Port B as a source port, the device sends the data frames to the destination port. Configure Port A and Port B in the Redundancy:PRP:Configuration dialog. The device also restricts the PRP interface and the PRP member ports from being destination ports. UM RedundConfig RSP Release 2.0 02/2013 39 Parallel Redundancy Protocol (PRP) 40 3.6 PRP and Port Mirroring UM RedundConfig RSP Release 2.0 02/2013 High-availability Seamless Redundancy (HSR) 4 High-availability Seamless Redundancy (HSR) As with PRP, an HSR ring also offers zero recovery time. HSR is suited for applications that demand high availability and short reaction times. For example, protection applications for electrical station automation and controllers for synchronized drives which require constant connection. WARNING RING LOOP HAZARD To avoid loops during the configuration phase, configure all the devices individually. Before you connect the redundant line, be sure to complete the configuration of all the devices. Failure to follow these instructions can result in death, serious injury, or equipment damage. Note: HSR uses interfaces 1/1 and 1/2 when active. The HSR function replaces interfaces 1/1 and 1/2 with interface hsr/1 as seen in the Switching:Rate Limiter and Switching:Filter for MAC Addresses dialogs. Configure interface hsr/1 for VLAN membership and Rate Limitation. UM RedundConfig RSP Release 2.0 02/2013 41 High-availability Seamless Redundancy (HSR) 4.1 Implementation 4.1 Implementation HSR Redundancy Boxes (RedBox) use 2 Ethernet ports operating in parallel to connect to a ring. An HSR RedBox operating in this configuration is a Doubly Attached Node implementing the HSR protocol (DANH). A standard ethernet device connected to the HSR ring through an HSR RedBox is a Virtual DANH (VDANH). As with PRP, the transmitting HSR Node or HSR RedBox sends twin frames, 1 in each direction, on the ring. For identification, the HSR Node injects the twins with an HSR tag. The HSR tag consists of a port identifier, the length of the payload and a sequence number. In a normal operating ring, the destination HSR Node or RedBox receives both frames within a certain time skew. An HSR node forwards the first frame to arrive and discards the second frame when it arrives. An HSR RedBox on the other hand forwards the first frame to the VDANHs and discards the second frame when it arrives. The HSR Nodes and HSR RedBoxs insert an HSR tag after the source MAC Address in the frame. The advantage to the HSR tag placement is that the device is able to forward the frame immediately after receiving the HSR header and performing duplicate recognition. Affectively decreasing the delay time within the device. In contrast to PRP where the RCT contains a PRP suffix near the end of the frame. Meaning that a PRP device receives the entire frame before forwarding the frame out of the correct port. HSR Nodes and HSR RedBoxes also use the LRE function as described in the PRP chapter. As with PRP, the LRE in the HSR RedBoxes are responsible for tagging and duplicate recognition. Note: HSR is available for devices with enhanced redundancy hardware. In order to use the HSR functions, load the HSR device software (HiOS-2Sxxx-RSP-02000.bin where xxx=HSR). 42 UM RedundConfig RSP Release 2.0 02/2013 High-availability Seamless Redundancy (HSR) 4.2 HSR Network Structure 4.2 HSR Network Structure An HSR Network consists of a ring, where each HSR device performs a specific role in the network. An HSR device for example, connects standard ethernet devices to an HSR ring, or PRP LANs to an HSR ring. 4.2.1 Connecting SANs to an HSR Network Standard ethernet devices, such as maintenance laptops or printers, have 1 network interface. Therefore, standard ethernet devices transmit traffic across an HSR ring through an HSR RedBox which acts as a proxy for the ethernet devices attached to it. The HSR RedBox interfaces transmit 1 twin in each direction around the network. The host HSR RedBox forwards the first unicast frame to the destination VDANH exclusively and discards the second unicast frame when it arrives. The HSR Nodes and RedBoxes forward multicast and broadcast traffic around the ring and also to the connected VDANH devices. To help prevent the traffic from endlessly looping around the ring, the node originally transmitting the traffic on the network discards the transmitted frames when received. UM RedundConfig RSP Release 2.0 02/2013 43 High-availability Seamless Redundancy (HSR) DANH 1 4.2 HSR Network Structure DANH 2 HSR RedBox 1 VDANH 1 VDANH 2 Figure 20: Connecting a VDANH to an HSR network SAN Device Connection Example Configuration A simple HSR network consists of 3 HSR devices as seen in the previous figure. The following example configures a host HSR RedBox for standard ethernet devices. Deactivate STP on the PRP ports or globally. Also, deactivate MRP on the PRP ports or configure MRP on ports other than the PRP ports. Open the Redundancy:MRP dialog. To disable the MRP function, in the "Operation" frame click Off. Verify that the ports in "Ring Port 1" and "Ring Port 2" frames, are different from the ports used by HSR. Open the Redundancy:Spanning Tree:Global dialog. To disable the STP function, in the "Operation" frame click Off. Open the Redundancy:Spanning Tree:Port dialog. In the "CIST" tab, deactivate the ports used for HSR in the "Stp active" column. In the "Guards" tab, deactivate the ports used for HSR in the "Root Guard", "TCN Guard", and "Loop Guard" columns. Note: If you deactivate the HSR function, then deactivate either Port “A“ or “B“ to help prevent network loops. The device sends either its own HSR supervision packets exclusively, or sends both its own supervision packets and packets of connected devices. After installing new HSR devices, deactivate this function to maintain a clear overview of the HSR supervision packets on remote devices. 44 UM RedundConfig RSP Release 2.0 02/2013 High-availability Seamless Redundancy (HSR) 4.2 HSR Network Structure Open the Redundancy:HSR:Configuration dialog. To analyze received HSR supervision packets, activate the "Evaluate Supervision Packets" control box in the "Supervision Packet Receiver" frame. To transmit HSR supervision packets from this device, activate "Send" in the "Supervision Packet Transmitter" frame. To transmit packets for VDANs listed in the Redundancy:HSR:DAN/VDAN Table, activate "Send VDAN Packets". Use the following steps to configure HSR RedBox 1: To configure the device to forward unicast traffic around the ring and to the destination device, set the "HSR Mode" to modeu. To configure the device as an HSR host, set the "Switching Node Type" to hsrredboxsan. Note: Setting the "Switching Node Type" to hsrredboxsan disables the "RedBox Identity" function. To enable the ports, in the "Port A" and "Port B" frames, click On. To enable the HSR function, in the "Operation" frame click On. To save your changes in the volatile memory, click "Set". To load the configuration stored in the volatile memory, click "Reload". Open the Redundancy:HSR:DAN/VDAN-Table dialog to view the traffic received from the LAN. This information helps you in detecting how the LANs are functioning. To remove this list, click "Delete". To update the table entries, click "Reload". Open the Redundancy:HSR:Proxy Node Table dialog to view the terminating VDAN devices for which this device provides HSR conversion. To remove the entries in the proxy table, click "Delete". To update the table entries, click "Reload". The device detects errors and displays them according to MIB Managed Objects and the respective link. Open the Redundancy:HSR:Statistics dialog to view the quality of the traffic that traverses the device. To remove the entry in the statistics table, click "Delete". To load the current statistics, click "Reload". UM RedundConfig RSP Release 2.0 02/2013 45 High-availability Seamless Redundancy (HSR) 4.2 HSR Network Structure Another possibility is to configure the host HSR RedBox 1 using the following CLI commands: enable configure no mrp operation no spanning-tree operation interface 1/1 no shutdown exit interface 1/2 no shutdown exit hsr instance 1 mode modeu hsr instance 1 port-a hsr instance 1 port-b hsr instance 1 switchingnode-type hsrredboxsan hsr instance 1 supervision evaluate hsr instance 1 supervision send hsr instance 1 supervision redbox-exclusively hsr operation Switch to the privileged EXEC mode. Switch to the Configuration mode. Disable the option. Disable the option. Switch to the Interface Configuration mode of interface 1/1. Enable the interface. Switch to the Configuration mode. Switch to the interface configuration mode for interface 1/2. Enable the interface. Switch to the Configuration mode. The HSR host forwards unicast traffic to the connected VDANs and around the ring. Activate the HSR Port A. Activate the HSR Port B. Enable the device to process traffic destine for LAN B of the PRP network. Enable evaluation of received supervision packets. Enable supervision packet transmission. Enable sending of supervision packets for this RedBox exclusively. Use the no form of the command to send supervision packets for each connected VDAN and this RedBox. Prerequisite is that you enable the supervision frame send function. Enable the HSR function. View traffic statistics on a device using the show commands. show hsr counters show hsr node-table show hsr proxy-node-table 46 Show the HSR counters. Show node table. Show proxy node table. UM RedundConfig RSP Release 2.0 02/2013 High-availability Seamless Redundancy (HSR) 4.2.2 4.2 HSR Network Structure HSR and PRP network connections When connecting PRP networks to an HSR network, the HSR device uses 2 interfaces to connect to the HSR ring. The HSR device uses a third interface to connect to either LAN A or LAN B of the PRP network as seen in the following figure. The HSR device transmitting the traffic across the HSR ring identifies traffic destine for PRP networks with the appropriate tag. The HSR devices then forward the PRP traffic through LAN A or LAN B. The PRP device receives the traffic and processes it as described in the PRP chapter. The HSR devices tag and identify traffic for up to 7 PRP networks connected to 1 HSR ring. SAN B2 SAN B1 PRP RedBox 1 LAN B LAN A PRP Network 1 DANH 1 DANH 2 HSR RedBox 1 VDANH 1 VDANH 2 Figure 21: Connecting a PRP network to an HSR network UM RedundConfig RSP Release 2.0 02/2013 47 High-availability Seamless Redundancy (HSR) 4.2 HSR Network Structure HSR Redboxes use 2 interfaces for the HSR ring and when configured to manage PRP traffic, a third interface connects to a LAN of the PRP network. The other interfaces provide HSR network access for VDANs. The HSR RedBox lists the connected VDANs in the Redundancy:HSR:Proxy Node Table. PRP Network Connection Example Configuration The following example configures a simple HSR network with 3 HSR devices as shown in the previous figure. Use the HSR RedBox configured in the previous example to connect the standard ethernet devices to the HSR ring. HSR RedBox 1 sends 1 twin toward DANH 1 and 1 twin toward DANH 2. When the first frame of a pair arrives, DANH 1 sends frame to PRP network 1 LAN A and DANH 2 sends the frame to PRP network 1 LAN B. Deactivate STP on the PRP ports or globally. Also, deactivate MRP on the PRP ports or configure MRP on ports other than the PRP ports. Use the HSR RedBox configured in the previous example for HSR RedBox 1. Perform the following steps on the DANH 1 and 2. Open the Redundancy:MRP dialog. To disable the MRP function, in the "Operation" frame click Off. Verify that the ports in "Ring Port 1" and "Ring Port 2" frames, are different from the ports used by HSR. Open the Redundancy:Spanning Tree:Global dialog. To disable the STP function, in the "Operation" frame click Off. Open the Redundancy:Spanning Tree:Port dialog. In the "CIST" tab, deactivate the ports used for HSR in the "Stp active" column. In the "Guards" tab, deactivate the ports used for HSR in the "Root Guard", "TCN Guard", and "Loop Guard" columns. Note: If you deactivate the HSR function, then deactivate either Port “A“ or “B“ to help prevent network loops. The device sends either its own HSR supervision packets exclusively, or sends both its own supervision packets and packets of connected devices. After installing new HSR devices, deactivate this function to maintain a clear overview of the HSR supervision packets on remote devices. 48 UM RedundConfig RSP Release 2.0 02/2013 High-availability Seamless Redundancy (HSR) 4.2 HSR Network Structure Open the Redundancy:HSR:Configuration dialog. To analyze received HSR supervision packets, activate the "Evaluate Supervision Packets" control box in the "Supervision Packet Receiver" frame. To transmit HSR supervision packets from this device, activate "Send" in the "Supervision Packet Transmitter" frame. To transmit packets for VDANs listed in the Redundancy:HSR:DAN/VDAN Table, activate "Send VDAN Packets". Use the following steps to configure DANH 1: Open the Redundancy:HSR:Configuration dialog. To configure the device to forward unicast traffic around the ring and to the destination device, set the "HSR Mode" to modeu. To configure the device to forward traffic to PRP LAN A, set the "Switching Node Type" to hsrredboxprpa. To configure the device to forward traffic to PRP network 1 LAN A, set "RedBox Identity" to id1a. To enable the ports, in the "Port A" and "Port B" frames, click On. To enable the HSR function, in the "Operation" frame click On. To temporarily save the changes, click "Set". To load the configuration stored in the volatile memory, click "Reload". Use the following configuration for DANH 2: Open the Redundancy:HSR:Configuration dialog. To configure the device to forward unicast traffic around the ring and to the destination device, set the "HSR Mode" to modeu. To configure the device to forward traffic to PRP LAN B, set the "Switching Node Type" to hsrredboxprpb. To configure the device to forward traffic to PRP network 1 LAN B, set "RedBox Identity" to id1b. To enable the ports, in the "Port A" and "Port B" frames, click On. To enable the HSR function, in the "Operation" frame click On. To temporarily save the changes, click "Set" or "Set and back". To load the configuration stored in the volatile memory, click "Reload". Another possibility is to use the following CLI commands to configure the HSR devices 1 and 2. UM RedundConfig RSP Release 2.0 02/2013 49 High-availability Seamless Redundancy (HSR) enable configure no mrp operation no spanning-tree operation interface 1/1 no shutdown exit interface 1/2 no shutdown exit 4.2 HSR Network Structure Switch to the privileged EXEC mode. Switch to the Configuration mode. Disable the option. Disable the option. Switch to the Interface Configuration mode of interface 1/1. Enable the interface. Switch to the Configuration mode. Switch to the interface configuration mode for interface 1/2. Enable the interface. Switch to the Configuration mode. Use the following CLI commands to configure DANH 1 to process traffic for PRP network 1 LAN A. The HSR host forwards unicast traffic to the connected VDANs and around the ring. hsr instance 1 port-a Activate the HSR Port A. hsr instance 1 port-b Activate the HSR Port B. hsr instance 1 switchingEnable the device to process traffic destine for node-type hsrredboxprpa LAN A of the PRP network. hsr instance 1 redbox-id id1a Enable the device to process traffic destine for LAN A of the PRP network 1. hsr instance 1 supervision Enable evaluation of received supervision evaluate packets. hsr instance 1 supervision Enable supervision packet transmission. send hsr instance 1 supervision Enable sending of supervision packets for this redbox-exclusively RedBox exclusively. Use the no form of the command to send supervision packets for each connected VDAN and this RedBox. Prerequisite is that you enable the supervision frame send function. hsr operation Enable the HSR function. hsr instance 1 mode modeu Use the following CLI commands to configure DANH 2 to process traffic for PRP network 1 LAN B. The HSR host forwards unicast traffic to the connected VDANs and around the ring. hsr instance 1 port-a Activate the HSR Port A. hsr instance 1 port-b Activate the HSR Port B. hsr instance 1 switchingEnable the device to process traffic destine for node-type hsrredboxprpb LAN B of the PRP network. hsr instance 1 redbox-id id1b Enable the device to process traffic destine for LAN B of the PRP network 1. hsr instance 1 mode modeu 50 UM RedundConfig RSP Release 2.0 02/2013 High-availability Seamless Redundancy (HSR) hsr instance 1 supervision evaluate hsr instance 1 supervision send hsr instance 1 supervision redbox-exclusively hsr operation 4.2 HSR Network Structure Enable evaluation of received supervision packets. Enable supervision packet transmission. Enable sending of supervision packets for this RedBox exclusively. Use the no form of the command to send supervision packets for each connected VDAN and this RedBox. Prerequisite is that you enable the supervision frame send function. Enable the HSR function. View traffic statistics on a device using the show commands. show hsr counters show hsr node-table show hsr proxy-node-table UM RedundConfig RSP Release 2.0 02/2013 Show the HSR counters. Show node table. Show proxy node table. 51 High-availability Seamless Redundancy (HSR) 52 4.2 HSR Network Structure UM RedundConfig RSP Release 2.0 02/2013 Spanning Tree 5 Spanning Tree Note: The Spanning Tree Protocol is a protocol for MAC bridges. For this reason, the following description uses the term bridge for Switch. Local networks are getting bigger and bigger. This applies to both the geographical expansion and the number of network participants. Therefore, it is advantageous to use multiple bridges, for example: to reduce the network load in sub-areas, to set up redundant connections and to overcome distance limitations. However, using multiple bridges with multiple redundant connections between the subnetworks can lead to loops and thus loss of communication across of the network. In order to help avoid this, you can use Spanning Tree. Spanning Tree enables loop-free switching through the systematic deactivation of redundant connections. Redundancy enables the systematic reactivation of individual connections as needed. RSTP is a further development of the Spanning Tree Protocol (STP) and is compatible with it. If a connection or a bridge becomes inoperable, the STP required a maximum of 30 seconds to reconfigure. This is no longer acceptable in time-sensitive applications. RSTP achieves average reconfiguration times of less than a second. When you use RSTP in a ring topology with 10 to 20 devices, you can even achieve reconfiguration times in the order of milliseconds. Note: RSTP reduces a layer 2 network topology with redundant paths into a tree structure (Spanning Tree) that does not contain any more redundant paths. One of the Switches takes over the role of the root bridge here. The maximum number of devices permitted in an active branch (from the root bridge to the tip of the branch) is specified by the variable Max Age for the current root bridge. The preset value for Max Age is 20, which can be increased up to 40. UM RedundConfig RSP Release 2.0 02/2013 53 Spanning Tree If the device working as the root is inoperable and another device takes over its function, the Max Age setting of the new root bridge determines the maximum number of devices allowed in a branch. Note: The RSTP standard dictates that all the devices within a network work with the (Rapid) Spanning Tree Algorithm. If STP and RSTP are used at the same time, the advantages of faster reconfiguration with RSTP are lost in the network segments that are operated in combination. A device that only supports RSTP works together with MSTP devices by not assigning an MST region to itself, but rather the CST (Common Spanning Tree). 54 UM RedundConfig RSP Release 2.0 02/2013 Spanning Tree 5.1 Basics 5.1 Basics Because RSTP is a further development of the STP, all the following descriptions of the STP also apply to the RSTP. 5.1.1 The tasks of the STP The Spanning Tree Algorithm reduces network topologies built with bridges and containing ring structures due to redundant links to a tree structure. In doing so, STP opens ring structures according to preset rules by deactivating redundant paths. If a path is interrupted because a network component becomes inoperable, STP reactivates the previously deactivated path again. This allows redundant links to increase the availabiliy of communication. STP determines a bridge that represents the STP tree structure‘s base. This bridge is called root bridge. Features of the STP algorithm: automatic reconfiguration of the tree structure in the case of a bridge becoming inoperable or the interruption of a data path the tree structure is stabilized up to the maximum network size, stabilization of the topology within a short time period topology can be specified and reproduced by the administrator transparency for the terminal devices low network load relative to the available transmission capacity due to the tree structure created UM RedundConfig RSP Release 2.0 02/2013 55 Spanning Tree 5.1.2 5.1 Basics Bridge parameters In the context of Spanning Treee, each bridge and its connections are uniquely described by the following parameters: Bridge Identifier Root Path Cost for the bridge ports, Port Identifier 5.1.3 Bridge Identifier The Bridge Identifier consists of 8 bytes. The 2 highest-value bytes are the priority. The default setting for the priority number is 32,768, but the Management Administrator can change this when configuring the network. The 6 lowest-value bytes of the bridge identifier are the bridge’s MAC address. The MAC address allows each bridge to have unique bridge identifiers. The bridge with the smallest number for the bridge identifier has the highest priority. MSB LSB 80 00 Priority 00 80 63 51 74 00 MAC Address Figure 22: Bridge Identifier, Example (values in hexadecimal notation) 56 UM RedundConfig RSP Release 2.0 02/2013 Spanning Tree 5.1.4 5.1 Basics Root Path Cost Each path that connects 2 bridges is assigned a cost for the transmission (path cost). The Switch determines this value based on the transmission speed (see table 3). It assigns a higher path cost to paths with lower transmission speeds. Alternatively, the Administrator can set the path cost. Like the Switch, the Administrator assigns a higher path cost to paths with lower transmission speeds. However, since the Administrator can choose this value freely, he has a tool with which he can give a certain path an advantage among redundant paths. The root path cost is the sum of all individual costs of those paths that a data packet has to traverse from a connected bridge‘s port to the root bridge. 1 PC = 200 000 PC = 200 000 000 PC Ethernet (100 Mbit/s) PC = 200 000 2 Path costs 3 Ethernet (10 Mbit/s) Figure 23: Path costs Data rate ≤100 Kbit/s 1 Mbit/s 10 Mbit/s 100 Mbit/s 1 Gbit/s 10 Gbit/s 100 Gbit/s 1 TBit/s 10 TBit/s Table 3: Recommended value 200,000,000a 20,000,000a 2,000,000a 200,000a 20,000 2,000 200 20 2 Recommended range 20,000,000-200,000,000 2,000,000-200,000,000 200,000-20,000,000 20,000-2,000,000 2,000-200,000 200-20,000 20-2,000 2-200 1-20 Possible range 1-200,000,000 1-200,000,000 1-200,000,000 1-200,000,000 1-200,000,000 1-200,000,000 1-200,000,000 1-200,000,000 1-200,000,000 Recommended path costs for RSTP based on the data rate. UM RedundConfig RSP Release 2.0 02/2013 57 Spanning Tree 5.1 Basics a. Bridges that conform with IEEE 802.1D 1998 and only support 16-bit values for the path costs should use the value 65,535 (FFFFH) for path costs when they are used in conjunction with bridges that support 32-bit values for the path costs. 5.1.5 Port Identifier The port identifier consists of 2 bytes. One part, the lower-value byte, contains the physical port number. This provides a unique identifier for the port of this bridge. The second, higher-value part is the port priority, which is specified by the Administrator (default value: 128). It also applies here that the port with the smallest number for the port identifier has the highest priority. MSB LSB Priority Port number Figure 24: Port Identifier 58 UM RedundConfig RSP Release 2.0 02/2013 Spanning Tree 5.1.6 5.1 Basics Max Age and Diameter The “Max Age” and “Diameter” values largely determine the maximum expansion of a Spanning Tree network. Diameter The number of connections between the devices in the network that are furthest removed from each other is known as the network diameter. Diameter = 7 1 2 3 4 5 6 7 Root-Bridge Figure 25: Definition of diameter The network diameter that can be achieved in the network is MaxAge-1. In the state on delivery, MaxAge=20 and the maximum diameter that can be achieved=19. If you set the maximum value of 40 for MaxAge, the maximum diameter that can be achieved=39. UM RedundConfig RSP Release 2.0 02/2013 59 Spanning Tree 5.1 Basics MaxAge Every STP-BPDU contains a “MessageAge” counter. When a bridge is passed through, the counter increases by 1. Before forwarding a STP-BPDU, the bridge compares the “MessageAge” counter with the “MaxAge” value defined in the device: If MessageAge < MaxAge, the bridge forwards the STP-BPDU to the next bridge. If MessageAge = MaxAge, the bridge discards the STP-BPDU. Root-Bridge MaxAge= 5 Message Age= 0 Message Age= 1 Message Age= 2 Message Age= 3 Message Age= 4 Message Age= 5 Message Age= 5 Figure 26: Transmission of an STP-BPDU depending on MaxAge 60 UM RedundConfig RSP Release 2.0 02/2013 Spanning Tree 5.2 Rules for Creating the Tree Structure 5.2 Rules for Creating the Tree Structure 5.2.1 Bridge information To determine the tree structure, the bridges need more detailed information about the other bridges located in the network. To obtain this information, each bridge sends a BPDU (Bridge Protocol Data Unit) to the other bridges. The contents of a BPDU include bridge identifier, root path costs and port identifier (see IEEE 802.1D). 5.2.2 Setting up the tree structure The bridge with the smallest number for the bridge identifier is called the root bridge. It is (or will become) the root of the tree structure. The structure of the tree depends on the root path costs. Spanning Tree selects the structure so that the path costs between each individual bridge and the root bridge become as small as possible. UM RedundConfig RSP Release 2.0 02/2013 61 Spanning Tree 5.2 Rules for Creating the Tree Structure If there are multiple paths with the same root path costs, the bridge further away from the root decides which port it blocks. For this purpose, it uses the bridge identifiers of the bridge closer to the root. The bridge blocks the port that leads to the bridge with the numerically higher ID (a numerically higher ID is the logically worse one). If 2 bridges have the same priority, the bridge with the numerically larger MAC address has the numerically higher ID, which is logically the worse one. If multiple paths with the same root path costs lead from one bridge to the same bridge, the bridge further removed from the root uses the port identifier of the other bridge as the last criterion (see fig. 24). In the process, the bridge blocks the port that leads to the port with the numerically higher ID (a numerically higher ID is the logically worse one). If 2 ports have the same priority, the port with the higher port number has the numerically higher ID, which is logically the worse one. 62 UM RedundConfig RSP Release 2.0 02/2013 Spanning Tree 5.2 Rules for Creating the Tree Structure Determine root path Equal path costs? no Path with lowest path costs = root path no Path with highest priority in bridge identification = root path no Path with highest port priority = root path yes Equal priority in bridge identification? yes Use the bridge with lowest MAC address = designated bridge Equal port priority? yes Path with lowest port number of designated bridge = root path Root path determined Figure 27: Flow diagram for specifying the root path UM RedundConfig RSP Release 2.0 02/2013 63 Spanning Tree 5.3 Examples 5.3 Examples 5.3.1 Example of determining the root path You can use the network plan (see fig. 28) to follow the flow chart (see fig. 27) for determining the root path. The administrator has specified a priority in the bridge identification for each bridge. The bridge with the smallest numerical value for the bridge identification takes on the role of the root bridge, in this case, bridge 1. In the example all the sub-paths have the same path costs. The protocol blocks the path between bridge 2 and bridge 3 as a connection from bridge 3 via bridge 2 to the root bridge would result in higher path costs. The path from bridge 6 to the root bridge is interesting: The path via bridge 5 and bridge 3 creates the same root path costs as the path via bridge 4 and bridge 2. STP selects the path using the bridge that has the lowest MAC address in the bridge identification (bridge 4 in the illustration). There are also 2 paths between bridge 6 and bridge 4. The port identifier is decisive here (Port 1 < Port 3). 64 UM RedundConfig RSP Release 2.0 02/2013 Spanning Tree 5.3 Examples Root Bridge P-BID = 16 384 1 P-BID = 32 768 P-BID = 32 768 2 3 P-BID = 32 768 7 P-BID = 32 768 Port 3 P-BID = 32 768 MAC 00:01:02:03:04:06 4 MAC 00:01:02:03:04:05 5 Port 1 P-BID P-BID = 32 768 Priority of the bridge identifikation (BID) = BID without MAC Address Root path 6 Interrupted path Figure 28: Example of determining the root path UM RedundConfig RSP Release 2.0 02/2013 65 Spanning Tree 5.3.2 5.3 Examples Example of manipulating the root path You can use the network plan (see fig. 29) to follow the flow chart (see fig. 27) for determining the root path. The Administrator has performed the following: – Left the default value of 32,768 (8000H) for every bridge apart from bridge 1 and bridge 5, and – assigned to bridge 1 the value 16,384 (4000H), thus making it the root bridge. – To bridge 5 he assigned the value 28,672 (7000H). In the example, all the sub-paths have the same path costs. The protocol blocks the path between bridge 2 and bridge 3 as a connection from bridge 3 via bridge 2 to the root bridge would mean higher path costs. The path from bridge 6 to the root bridge is interesting: The path via bridge 5 and bridge 3 creates the same root path costs as the path via bridge 4 and bridge 2. The bridges select the path via bridge 4 because the value 28,672 for the priority in the bridge identifier is smaller than value 32,768. Note: Because the Administrator does not change the default values for the priorities of the bridges in the bridge identifier, apart from the value for the root bridge, the MAC address in the bridge identifier alone determines which bridge becomes the new root bridge if the current root bridge goes down. 66 UM RedundConfig RSP Release 2.0 02/2013 Spanning Tree 5.3 Examples Root Bridge P-BID = 16 384 1 P-BID = 32 768 P-BID = 32 768 3 2 P-BID = 32 768 7 P-BID = 32 768 P-BID = 28 672 4 5 P-BID P-BID = 32 768 Priority of the bridge identifikation (BID) = BID without MAC Address Root path 6 Interrupted path Figure 29: Example of manipulating the root path UM RedundConfig RSP Release 2.0 02/2013 67 Spanning Tree 5.3.3 5.3 Examples Example of manipulating the tree structure The Management Administrator soon discovers that this configuration with bridge 1 as the root bridge (see on page 64 “Example of determining the root path”) is invalid. On the paths from bridge 1 to bridge 2 and bridge 1 to bridge 3, the control packets which the root bridge sends to all other bridges add up. If the Management Administrator configures bridge 2 as the root bridge, the burden of the control packets on the subnetworks is distributed much more evenly. The result is the configuration shown here (see fig. 30). The path costs for most of the bridges to the root bridge have decreased. Root-Bridge P-BID = 16 384 2 P-BID = 32 768 P-BID = 32 768 Port 2 P-BID = 32 768 4 7 3 P-BID = 32 768 1 Port 1 MAC 00:01:02:03:04:05 P-BID = 32 768 P-BID = 32 768 6 5 MAC 00:01:02:03:04:06 P-BID Priority of the bridge identifikation (BID) = BID without MAC Address Root path Interrupted path Figure 30: Example of manipulating the tree structure 68 UM RedundConfig RSP Release 2.0 02/2013 Spanning Tree 5.4 The Rapid Spanning Tree Protocol 5.4 The Rapid Spanning Tree Protocol The RSTP uses the same algorithm for determining the tree structure as STP. RSTP merely changes parameters, and adds new parameters and mechanisms that speed up the reconfiguration if a link or bridge becomes inoperable. The ports play a significant role in this context. 5.4.1 Port roles RSTP assigns each bridge port one of the following roles (see fig. 31): Root Port: This is the port at which a bridge receives data packets with the lowest path costs from the root bridge. If there are multiple ports with equally low path costs, the bridge ID of the bridge that leads to the root (designated bridge) decides which of its ports is given the role of the root port by the bridge further removed from the root. If a bridge has multiple ports with equally low path costs to the same bridge, the bridge uses the port ID of the bridge leading to the root (designated bridge) to decide which port it selects locally as the root port (see fig. 27). The root bridge itself does not have a root port. Designated port: The bridge in a network segment that has the lowest root path costs is the designated bridge. If more than 1 bridge has the same root path costs, the bridge with the smallest value bridge identifier becomes the designated bridge. The port on this bridge that connects it to a network segment leading to the root bridge, is the designated port. UM RedundConfig RSP Release 2.0 02/2013 69 Spanning Tree 5.4 The Rapid Spanning Tree Protocol Edge port Every network segment with no additional RSTP bridges is connected with exactly one designated port. In this case, this designated port is also an edge port. The distinction of an edge port is the fact that it does not receive any RST BPDUs (Rapid Spanning Tree Bridge Protocol Data Units). Alternate port This is a blocked port that takes over the task of the bridge port if the connection to the root bridge is lost. The alternate port provides a backup connection to the root bridge. Backup port This is a blocked port that serves as a backup in case the connection to the designated port of this network segment (without any RSTP bridges) is lost Disabled port This is a port that does not participate in the Spanning Tree Operation, i.e., the port is switched off or does not have any connection. 70 UM RedundConfig RSP Release 2.0 02/2013 Spanning Tree 5.4 The Rapid Spanning Tree Protocol BID = 16 384 1 BID = 20 480 BID = 24 576 2 3 BID = 28 672 BID = 32 768 BID = 40 960 7 Port 2 4 Port 1 5 P-BID Priority of the bridge identifikation (BID) = BID without MAC Address Root path Interrupted path Root port Designated port Alternate port Backup port Edge port Figure 31: Port role assignment UM RedundConfig RSP Release 2.0 02/2013 71 Spanning Tree 5.4.2 5.4 The Rapid Spanning Tree Protocol Port states Depending on the tree structure and the state of the selected connection paths, the RSTP assigns the ports their states. STP port state DISABLED DISABLED BLOCKING LISTENING LEARNING FORWARDING Table 4: Administrative bridge port state Disabled Enabled Enabled Enabled Enabled Enabled MAC RSTP operational Port state FALSE FALSE TRUE TRUE TRUE TRUE Discardinga Discardinga Discardingb Discardingb Learning Forwarding Active topology (port role) Excluded (disabled) Excluded (disabled) Excluded (alternate, backup) Included (root, designated) Included (root, designated) Included (root, designated) Relationship between port state values for STP and RSTP. a. The dot1d-MIB displays “Disabled” b. The dot1d-MIB displays “Blocked” Meaning of the RSTP port states: Disabled: Port does not belong to the active topology Discarding: No address learning in FDB, no data traffic except for STP BPDUs Learning: Address learning active (FDB) and no data traffic except for STP BPDUs Forwarding: Address learning is active (FDB), sending and receipt of all frame types (not only STP BPDUs) 72 UM RedundConfig RSP Release 2.0 02/2013 Spanning Tree 5.4.3 5.4 The Rapid Spanning Tree Protocol Spanning Tree Priority Vector To assign roles to the ports, the RSTP bridges exchange configuration information with each other. This information is known as the Spanning Tree Priority Vector. It is part of the RSTP BPDUs and contains the following information: Bridge identification of the root bridge Root path costs of the sending bridge Bridge identification of the sending bridge Port identifiers of the ports through which the message was sent Port identifiers of the ports through which the message was received Based on this information, the bridges participating in RSTP are able to determine port roles themselves and define the port states of their own ports. 5.4.4 Fast reconfiguration Why can RSTP react faster than STP to an interruption of the root path? Introduction of edge-ports: During a reconfiguration, RSTP switches an edge port into the transmission mode after three seconds (default setting) and then waits for the “Hello Time” to elapse, to be sure that no bridge sending BPDUs is connected. When the user ensures that a terminal device is connected at this port and will remain connected, there are no waiting times at this port in the case of a reconfiguration. Introduction of alternate ports: As the port roles are already distributed in normal operation, a bridge can immediately switch from the root port to the alternate port after the connection to the root bridge is lost. Communication with neighboring bridges (point-to-point connections): Decentralized, direct communication between neighboring bridges enables reaction without wait periods to status changes in the spanning tree topology. UM RedundConfig RSP Release 2.0 02/2013 73 Spanning Tree 5.4 The Rapid Spanning Tree Protocol Address table: With STP, the age of the entries in the FDB determines the updating of communication. RSTP immediately deletes the entries in those ports affected by a reconfiguration. Reaction to events: Without having to adhere to any time specifications, RSTP immediately reacts to events such as connection interruptions, connection reinstatements, etc. Note: The downside of this fast reconfiguration is the possibility that data packages could be duplicated and/or arrive at the recipient in the wrong order during the reconfiguration phase of the RSTP topology. If this is unacceptable for your application, use the slower Spanning Tree Protocol or select one of the other, faster redundancy procedures described in this manual. 5.4.5 STP compatibility mode The STP compatibility mode allows you to operate RSTP devices in networks with old installations. If an RSTP device detects an older STP device, it switches on the STP compatibility mode at the relevant port. 74 UM RedundConfig RSP Release 2.0 02/2013 Spanning Tree 5.5 Configuring the device 5.5 Configuring the device RSTP configures the network topology completely independently. The device with the lowest bridge priority automatically becomes the root bridge. However, to define a specific network structure regardless, you specify a device as the root bridge. In general, a device in the backbone takes on this role. Set up the network to meet your requirements, initially without redundant lines. You deactivate the flow control on the participating ports. If the flow control and the redundancy function are active at the same time, there is a risk that the redundancy function will not operate as intended. (Default setting: flow control deactivated globally and activated on all ports.) Switch MRP off on all devices. Switch Spanning Tree on on all devices in the network. In the state on delivery, Spanning Tree is switched on on the device. UM RedundConfig RSP Release 2.0 02/2013 75 Spanning Tree 5.5 Configuring the device Open the Redundancy:Spanning Tree:Global dialog. Activate the function. Figure 32: Switching the function on Click on "Set" to save the changes. enable configure spanning-tree operation show spanning-tree global 76 Switch to the privileged EXEC mode. Switch to the Configuration mode. Switches Spanning Tree on. Displays the parameters for checking. UM RedundConfig RSP Release 2.0 02/2013 Spanning Tree 5.5 Configuring the device Now connect the redundant lines. Define the settings for the device that takes over the role of the root bridge. In the "Priority" field you enter a numerically lower value. The root bridge receives the numerically lowest bridge priority of all the devices in the network. Figure 33: Defining the bridge priority Click on "Set" to save the changes. spanning-tree mst priority 0 <0..61440 in 4096er-Schritten> UM RedundConfig RSP Release 2.0 02/2013 Defines the bridge priority of the device. 77 Spanning Tree 5.5 Configuring the device After saving, the dialog shows the following information: – The "Bridge is Root" checkbox is selected. – The "Root Port" field shows the value 0.0. – The "Root Path Cost" field shows the value 0. Figure 34: Device is operating as root bridge show spanning-tree global 78 Displays the parameters for checking. UM RedundConfig RSP Release 2.0 02/2013 Spanning Tree 5.5 Configuring the device If applicable, change the values in the "Forward Delay" and "Max Age" fields. – The root bridge transmits the changed values to the other devices. Figure 35: Changing Forward Delay and Max Age Click on "Set" to save the changes. spanning-tree forward-time <4..30> spanning-tree max-age <6..40> show spanning-tree global Defines the delay time for the status change in seconds. Specifies the maximum permissible branch length, i.e. the number of devices to the root bridge. Displays the parameters for checking. Note: The parameters "Forward Delay" and "Max Age" have the following relationship: Forward Delay ≥ (Max Age/2) + 1 If you enter values in the fields that contradict this relationship, the device replaces these values with the last valid values or with the default value. UM RedundConfig RSP Release 2.0 02/2013 79 Spanning Tree 5.5 Configuring the device Note: If possible, do not change the value in the “Hello Time” field. Check the following values in the other devices: – Bridge ID (bridge priority and MAC address) of the corresponding device and the root bridge. – Number of the device port that leads to the root bridge. – Path cost from the root port of the device to the root bridge. Figure 36: Check values show spanning-tree global 80 Displays the parameters for checking. UM RedundConfig RSP Release 2.0 02/2013 Spanning Tree 5.6 Guards 5.6 Guards The device allows you to activate various protection functions (guards) on the device ports. The following protection functions help protect your network from incorrect configurations, loops and attacks with STP-BPDUs: BPDU Guard – for manually defined terminal device ports (edge ports) You activate this protection function globally in the device. Terminal device ports do not normally receive any STP-BPDUs. If an attacker still attempts to feed in STP-BPDUs at this port, the device deactivates the device port. Root Guard – for designated ports You activate this protection function separately for every device port. UM RedundConfig RSP Release 2.0 02/2013 81 Spanning Tree 5.6 Guards If a designated port receives an STP-BPDU with better path information to the root bridge, the device discards the STP-BPDU and sets the transmission state of the port to discarding instead of root. If there are no STP-BPDUs with better path information to the root bridge, after 2 x Hello Time the device resets the state of the port to a value according to the port role. TCN Guard – for ports that receive STP-BPDUs with a Topology Change flag You activate this protection function separately for every device port. Hacker 82 UM RedundConfig RSP Release 2.0 02/2013 Spanning Tree 5.6 Guards If the protection function is activated, the device ignores Topology Change flags in received STP-BPDUs. This does not change the content of the address table (FDB) of the device port. However, additional information in the BPDU that changes the topology is processed by the device. Loop Guard – for root, alternate and backup ports You activate this protection function separately for every device port. This protection function prevents the transmission status of a port from unintentionally being changed to forwarding if the port does not receive any more STP-BPDUs. If this situation occurs, the device designates the loop status of the port as inconsistent, but does not forward any data packets. UM RedundConfig RSP Release 2.0 02/2013 83 Spanning Tree 5.6.1 5.6 Guards Activating the BPDU Guard Open the Redundancy:Spanning Tree:Global dialog. Select the "BPDU Guard" checkbox. Figure 37: Activating the BPDU Guard Click on “Set” to save the changes. enable configure spanning-tree bpdu-guard show spanning-tree global 84 Switch to the privileged EXEC mode. Switch to the Configuration mode. Activates the BPDU Guard. Displays the parameters for checking. UM RedundConfig RSP Release 2.0 02/2013 Spanning Tree 5.6 Guards Open the Redundancy:Spanning Tree:Port dialog. Switch to the "CIST" tab. For terminal device ports, select the checkbox in the "Admin Edge Port" column. Figure 38: Port dialog, "CIST" tab Click on “Set” to save the changes. interface x/y spanning-tree edge-port show spanning-tree port x/y exit UM RedundConfig RSP Release 2.0 02/2013 Switches to the interface mode. Designates the port as a terminal device port (edge port). Displays the parameters for checking. Leaves the interface mode. 85 Spanning Tree 5.6 Guards If an edge port receives an STP-BPDU, the device behaves as follows: The device deactivates this port. In the Basic Configuration:Port Configuration dialog, the checkbox in the "Port on" column is not selected for this port. The device designates the port. In the Redundancy:Spanning Tree:Port dialog, "CIST" tab, the device shows the value enable in the "BPDU Guard Effect" column. Figure 39: Port dialog, "Guards" tab show spanning-tree port x/y Displays the parameters of the port for checking. The value of the "BPDU Guard Effect" parameter is enable. To reset the status of the device port to the value forwarding, you proceed as follows: If the device port is still receiving BPDUs: – Remove the manual definition as an edge port. or – Deactivate the BPDU Guard Activate the device port again. 86 UM RedundConfig RSP Release 2.0 02/2013 Spanning Tree 5.6.2 5.6 Guards Activating Root Guard / TCN Guard / Loop Guard Open the Redundancy:Spanning Tree:Port dialog. Switch to the "Guards" tab. For designated ports, select the checkbox in the "Root Guard" column. For ports that receive STP-BPDUs with a Topology Change flag, select the checkbox in the "TCN Guard" column. For root, alternate or backup ports, select the checkbox in the "Loop Guard" column. Figure 40: Activating Guards Note: The Root Guard and Loop Guard functions are mutually exclusive. If you switch on the Root Guard function while the Loop Guard function is switched on, the device switches off the Loop Guard function. Click on “Set” to save the changes. UM RedundConfig RSP Release 2.0 02/2013 87 Spanning Tree enable configure interface x/y spanning-tree guard-root spanning-tree guard-tcn spanning-tree guard-loop exit show spanning-tree port x/y 88 5.6 Guards Switch to the privileged EXEC mode. Switch to the Configuration mode. Switches to the interface mode. Switches the Root Guard on at the designated port. Switches on the TCN Guard on the port that receives STP-BPDUs with a Topology Change flag. Switches the Loop Guard on at a root, alternate or backup port. Leaves the interface mode. Displays the parameters of the port for checking. UM RedundConfig RSP Release 2.0 02/2013 Readers’ Comments A Readers’ Comments What is your opinion of this manual? We are always striving to provide as comprehensive a description of our product as possible, as well as important information that will ensure trouble-free operation. Your comments and suggestions help us to further improve the quality of our documentation. Your assessment of this manual: Precise description Readability Understandability Examples Structure Completeness Graphics Drawings Tables Very good O O O O O O O O O Good O O O O O O O O O Satisfactory O O O O O O O O O Mediocre O O O O O O O O O Poor O O O O O O O O O Did you discover any errors in this manual? If so, on what page? UM RedundConfig RSP Release 2.0 02/2013 89 Readers’ Comments Suggestions for improvement and additional information: General comments: Sender: Company / Department: Name / Telephone no.: Street: Zip code / City: e-mail: Date / Signature: Dear User, Please fill out and return this page as a fax to the number +49 (0)7127 14-1600 or by post to Hirschmann Automation and Control GmbH Department 01RD-NT Stuttgarter Str. 45-51 72654 Neckartenzlingen 90 UM RedundConfig RSP Release 2.0 02/2013 Index B Index A Advanced Mode Alternate port B Backup port BPDU BPDU guard Bridge Identifier Bridge Protocol Data Unit C Compatibility (STP) D DAN Delay time (MRP) Designated bridge Designated port Diameter (Spanning Tree) Disabled port E Edge port F FAQ 16, 18 70, 83 70, 83 61 81, 84 56 61 74 35 15 69 69, 81 59 70 70, 81 93 H HiView 5 HSR 10, 12, 41 HSR and PRP network connections 47 HSR Netzwerk Structure 43 I Industrial HiVision L Loop guard LRE functionality M MaxAge MRP N Network load Network structure (PRP) UM RedundConfig RSP Release 2.0 02/2013 6 83, 87 31 60 10, 11, 12, 13, 17 P Path costs Port Identifier Port mirroring and PRP Port number Port priority (Spanning Tree) Port roles (RSTP) Port-State PRP PRP example configuration PRP network structure PRP RedBox (Example HSR) Protection functions (guards) R Rapid Spanning Tree Reconfiguration Reconfiguration time (MRP) RedBox Redundancy Redundant connections Ring Ring manager RM function Root Bridge Root guard Root Path Cost Root path Root port RSTP RST BPDU S SAN RedBox (HSR Example) SAN (for HSR) STP compatibility STP-BPDU Symbol T TCN guard Technical Questions Topology Change flag Training Courses Tree structure (Spanning Tree) 57, 61 56, 58 39 58 58 69 72 11, 12, 29 36 33 48 81 10, 11, 12, 69 55 15 35 5 53 14 14 14 61 81, 87 56 64, 66 69, 83 75 70, 73 44 43 74 61 7 82, 87 93 82 93 61, 68 53, 55 33 91 Index 92 UM RedundConfig RSP Release 2.0 02/2013 Further Support C Further Support Technical Questions For technical questions, please contact any Hirschmann dealer in your area or Hirschmann directly. You will find the addresses of our partners on the Internet at http://www.hirschmann.com Contact our support at https://hirschmann-support.belden.eu.com You can contact us in the EMEA region at Tel.: +49 (0)1805 14-1538 E-mail: [email protected] in the America region at Tel.: +1 (717) 217-2270 E-mail: [email protected] in the Asia-Pacific region at Tel.: +65 6854 9860 E-mail: [email protected] Hirschmann Competence Center The Hirschmann Competence Center is ahead of its competitors: Consulting incorporates comprehensive technical advice, from system evaluation through network planning to project planning. Training offers you an introduction to the basics, product briefing and user training with certification. The current technology and product training courses can be found at http://www.hicomcenter.com Support ranges from the first installation through the standby service to maintenance concepts. UM RedundConfig RSP Release 2.0 02/2013 93 Further Support With the Hirschmann Competence Center, you have decided against making any compromises. Our client-customized package leaves you free to choose the service components you want to use. Internet: http://www.hicomcenter.com 94 UM RedundConfig RSP Release 2.0 02/2013 Further Support UM RedundConfig RSP Release 2.0 02/2013 95